0 写在前面
本文主要参考:webrtc 4577版本vs编译_tusong86的博客-CSDN博客
4577也就是m93,由于源码版本的不同,可能存在一定的出入,可根据实际情况进行修改;
感谢作者的付出;
1 编译参数
powershell运行:
// debug 需要编译参数 enable_iterator_debugging=true
gn gen h264-debug-m79 --args='is_debug=true use_lld=false is_clang=false treat_warnings_as_errors=false use_custom_libcxx=false is_component_build=false use_rtti=true rtc_enable_protobuf=false rtc_build_examples=true enable_iterator_debugging=true rtc_use_h264=true use_openh264=true ffmpeg_branding=\"Chrome\" proprietary_codecs=true' --ide=vs2019
查看参数是否生效:
gn args h264-debug-m79 --list=rtc_use_h264
gn args h264-debug-m79 --list=use_openh264
//release 不需要编译参数 enable_iterator_debugging=true
gn gen h264-release-m79 --args='is_debug=false use_lld=false is_clang=false treat_warnings_as_errors=false use_custom_libcxx=false is_component_build=false use_rtti=true rtc_enable_protobuf=false rtc_build_examples=true rtc_use_h264=true use_openh264=true ffmpeg_branding=\"Chrome\" proprietary_codecs=true' --ide=vs2019
查看参数是否生效:
gn args h264-release-m79 --list=rtc_use_h264
gn args h264-release-m79 --list=use_openh264
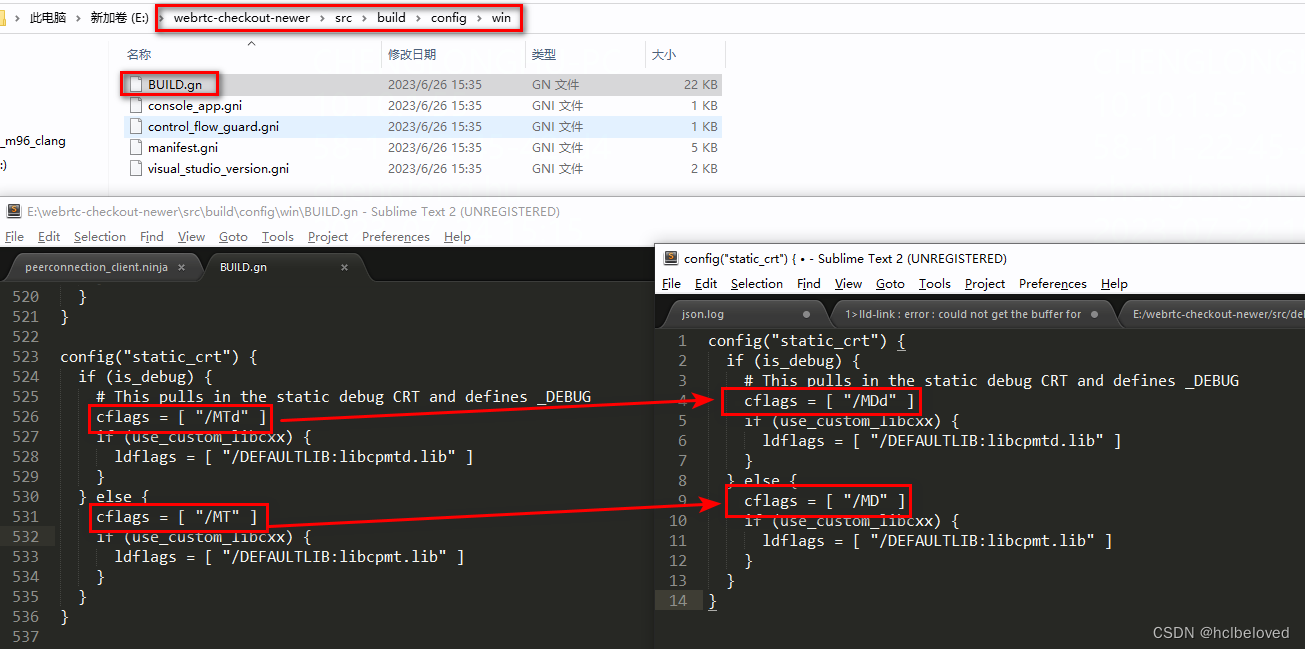
为了避免下面2.3小节的问题,需要将webrtc的编译参数修改为MD(d),具体修改如下所示:
2 编译错误以及修复
2.1 错误一

解决方案:
注释掉代码:
See: bugs.webrtc.org/9213#c13
具体修改如下图:

2.2 错误二

解决方案:
注释掉\third_party\ffmpeg\libavcodec\pcm.c的最后一行,具体如下图:

2.3 错误三
2.3.1 问题描述

解决此问题需要使用自己MSVC编译的x64 ffmpeg动态库,如何编译ffmpeg的动态库可以采用参考链接[2],自己在尝试的过程中遇到了一些问题:
(1)在编译ffmpeg时采用MT(d)进行编译时出现了很多问题,所以编译ffmpeg还是使用MD(d)方式,但是呢webrtc默认编译的是MT(d),所以需要将webrtc修改为MD(d),修改方式具体见前面;
(2)在使用ffmpeg_deps.sln生成库时,务必选择编译动态库,在使用ffmpeg静态库时则会出现符号重定义的问题,具体如下:

原因就是webrtc所依赖的第三方库中也使用了libvp8(highbd_variance_sse2.obj),而ffmpeg的静态库libavcodec.lib中也包含了highbd_variance_sse2.obj的定义,因此出现了冲突,论据如下:

webrtc中的证据:

2.3.2 解决步骤
假设已经准备好了ffmpeg的动态库,后续的步骤主要如下:
2.3.2.1 拷贝文件
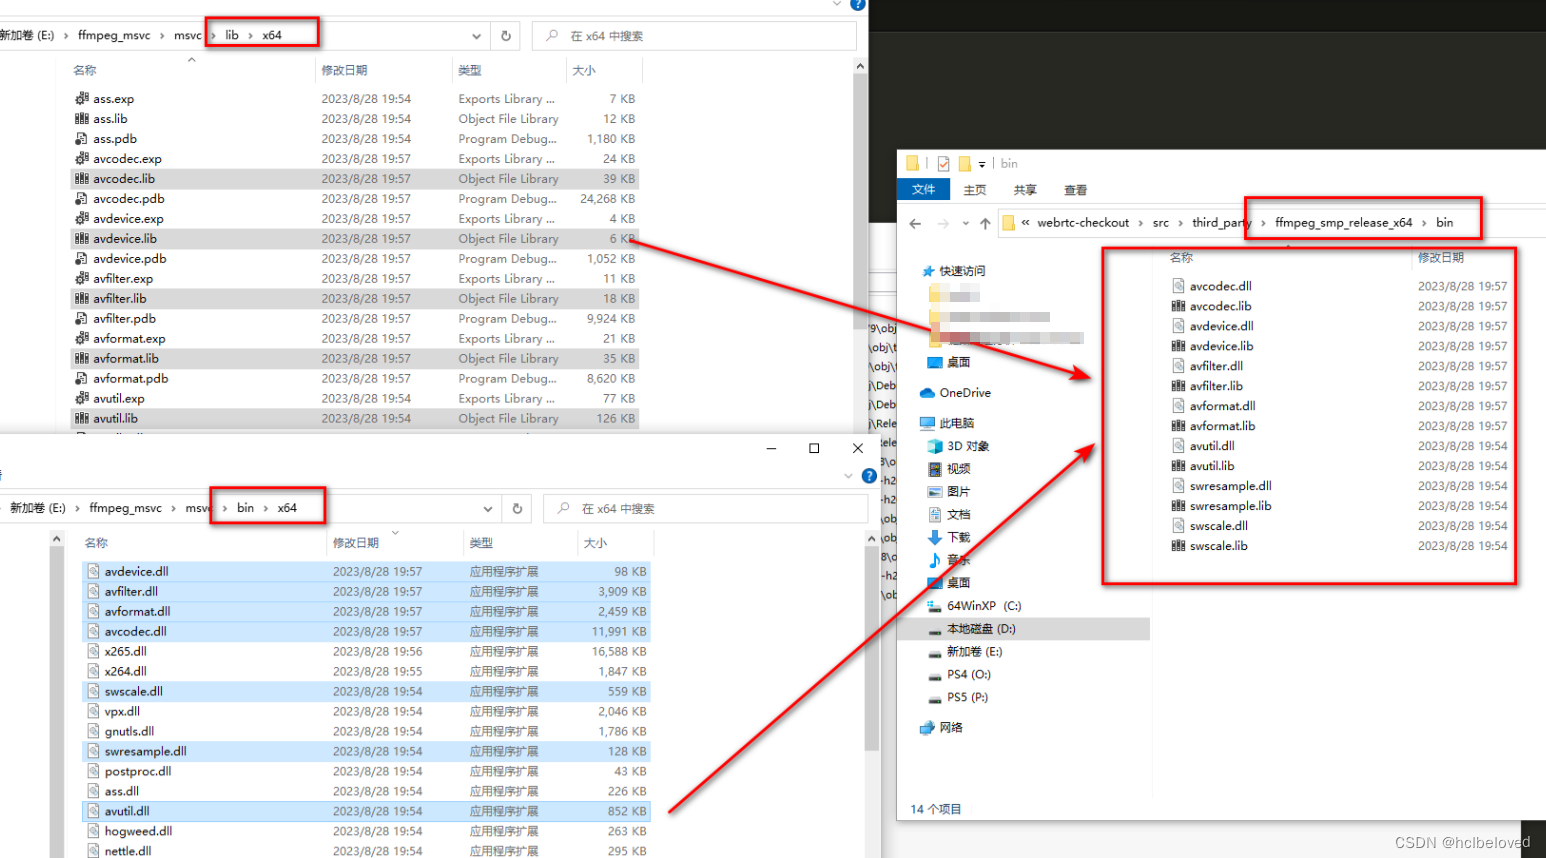
将ffmpeg_deps.sln生成的如下图中的文件拷贝到webrtc的指定目录,具体如下:
D:\webrtc-checkout\src\third_party\ffmpeg_smp_release_x64目录是新创建的,为的就是与之前的ffmpeg区别开来;
拷贝动态库文件:
拷贝头文件:

2.3.2.2 修改gn文件
修改D:\webrtc-checkout\src\modules\video_coding\BUILD.gn文件

修改内容罗列如下:
rtc_static_library("webrtc_h264") {
visibility = [ "*" ]
sources = [
"codecs/h264/h264.cc",
"codecs/h264/h264_color_space.cc",
"codecs/h264/h264_color_space.h",
"codecs/h264/h264_decoder_impl.cc",
"codecs/h264/h264_decoder_impl.h",
"codecs/h264/h264_encoder_impl.cc",
"codecs/h264/h264_encoder_impl.h",
"codecs/h264/include/h264.h",
]if (!is_clang) {
#设置头文件路径
include_dirs = [ "//third_party/ffmpeg_smp_release_x64/include" ]
libs = [
# 设置引用库
"//third_party/ffmpeg_smp_release_x64/bin/avcodec.lib",
"//third_party/ffmpeg_smp_release_x64/bin/avdevice.lib",
"//third_party/ffmpeg_smp_release_x64/bin/avfilter.lib",
"//third_party/ffmpeg_smp_release_x64/bin/avformat.lib",
"//third_party/ffmpeg_smp_release_x64/bin/avutil.lib",
"//third_party/ffmpeg_smp_release_x64/bin/swresample.lib",
"//third_party/ffmpeg_smp_release_x64/bin/swscale.lib",
]
}defines = []
deps = [
":video_codec_interface",
":video_coding_utility",
"../../api/video:video_frame",
"../../api/video:video_frame_i010",
"../../api/video:video_frame_i420",
"../../api/video:video_rtp_headers",
"../../api/video_codecs:video_codecs_api",
"../../common_video",
"../../media:rtc_h264_profile_id",
"../../media:rtc_media_base",
"../../rtc_base",
"../../rtc_base:checks",
"../../rtc_base/system:rtc_export",
"../../system_wrappers:field_trial",
"../../system_wrappers:metrics",
"//third_party/abseil-cpp/absl/strings",
"//third_party/abseil-cpp/absl/types:optional",
"//third_party/libyuv",
]if (rtc_use_h264) {
deps += [
#"//third_party/ffmpeg",
"//third_party/openh264:encoder",
]
if (!build_with_mozilla) {
deps += [ "../../media:rtc_media_base" ]
}
}
}
截止到这里虽然可以编译成功了,但是还有其他的问题,虽然这里替换成了自己编译的ffmpeg的x64动态库,但是webrtc的代码中所引用的头文件还是之前的ffmpeg的路径,如果不修改在运行的时候就会出现崩溃,所以还需要修改源码,具体见2.3.2.3小节;
2.3.2.3 修改webrtc源码中对ffmpeg头文件的引用
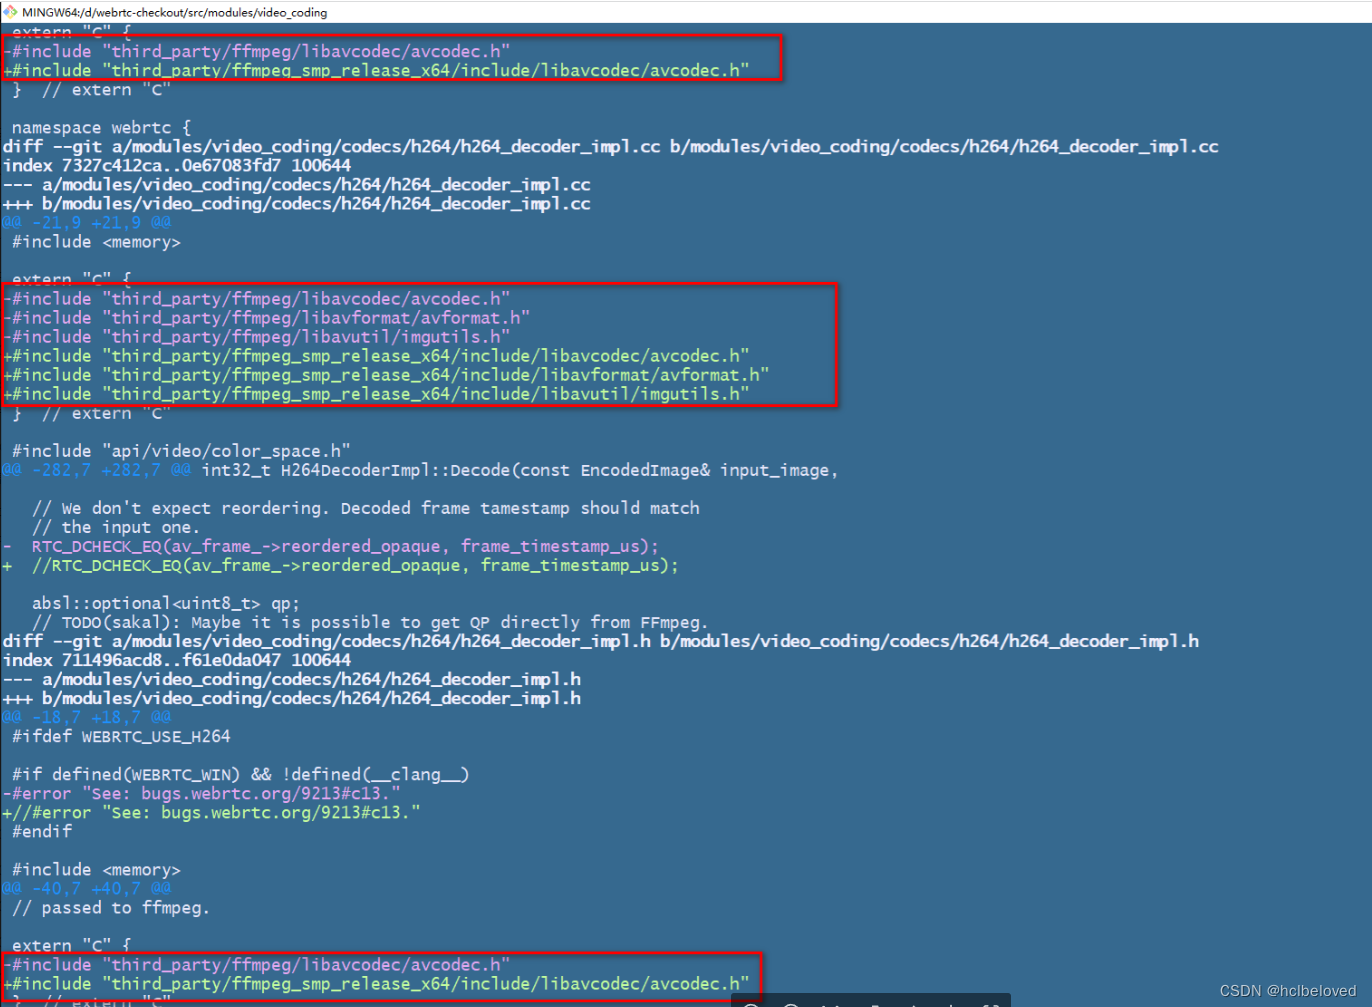
至此就可以编译通过所有的exe,但是还不可以使用peerconnection_client.exe验证H264的功能,需要修改SDP来提高H264的优先级;
注意:
由于自己所使用的ffmpeg版本问题(相较于webrtc-m79的代码来说ffmpeg的版本太新了),还出现了avcodec_find_decoder的问题,由于avcodec_find_decoder现在返回的是const AVCodec*,而webrtc-m79中没有进行强制类型转换导致编译错误,需要进行一个简单的修改即可:
将
AVCodec* codec = avcodec_find_decoder(av_context_->codec_id);
修改为:
AVCodec* codec = const_cast<AVCodec*>(avcodec_find_decoder(av_context_->codec_id));
3 提高H264优先级
修改后的代码如下:
std::vector<SdpVideoFormat> InternalEncoderFactory::GetSupportedFormats()const {std::vector<SdpVideoFormat> supported_codecs;for (const webrtc::SdpVideoFormat& format : webrtc::SupportedH264Codecs())supported_codecs.push_back(format);supported_codecs.push_back(SdpVideoFormat(cricket::kVp8CodecName));for (const webrtc::SdpVideoFormat& format : webrtc::SupportedVP9Codecs())supported_codecs.push_back(format);return supported_codecs;
}
4 两个peerconnection_client进行验证
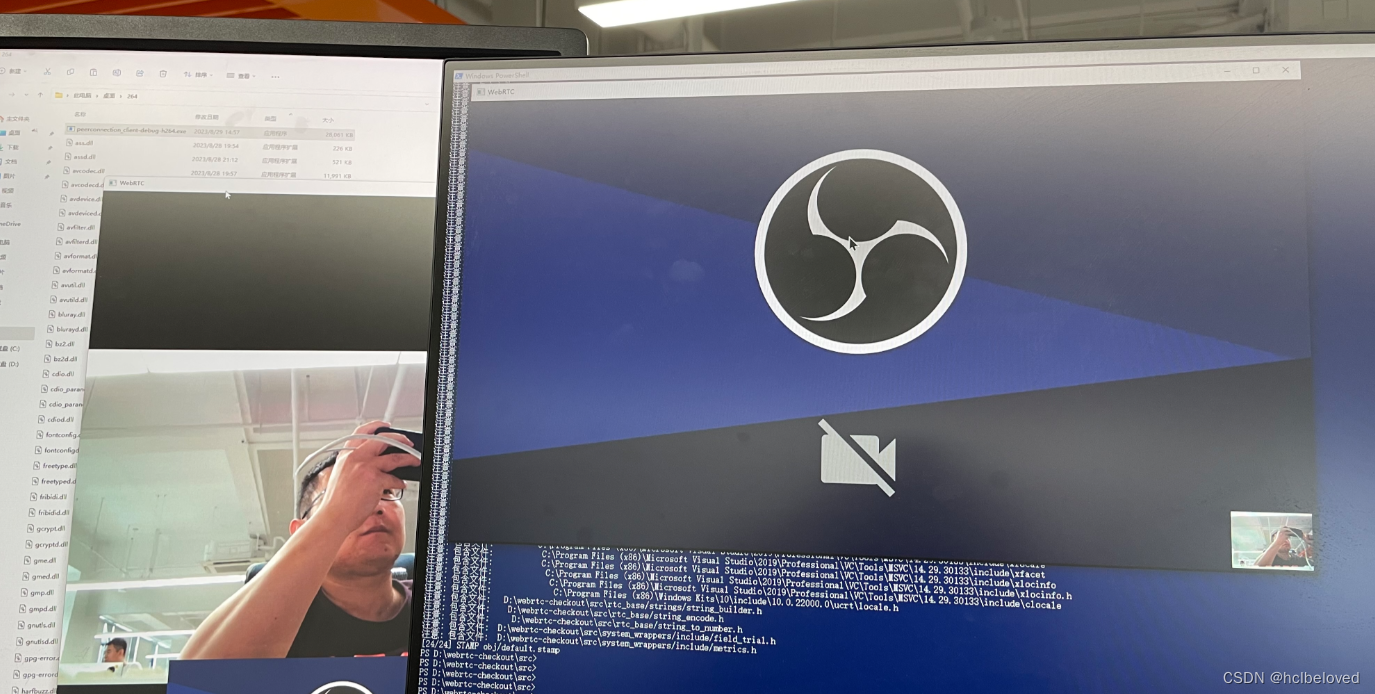
运行peerconnection_client.exe,别忘了拷贝其所依赖的动态库:

测试效果如下:
5 web端与peerconnection_client测试
若使用web与peerconnection_client进行测试,则需要注意,若web端发送offer来启动媒体协商过程,此时传输的仍然是VP8编码,原因是:
web端offer中描述自己最高优先接收的是VP8,接收offer的peerconnection_client端会在WebRtcVideoChannel::GetChangedSendParameters中通过调用SelectSendVideoCodecs来对比自己能提供的编码和offer期望的编码,会优先匹配offer中具有较高优先级的VP8编码,在自己修改的代码中InternalEncoderFactory::GetSupportedFormats中只是将H264的优先级提高了而已(((这个H264优先级的提高在本端作为offer端的时候可以让对端优先匹配该编码))),后面又加上了对VP8和VP9的支持,所以当offer端最高优先级的VP8能在对端被支持的时候,就会优先选择VP8格式来匹配offer端;也正是这个原因在使用两个peerconnection_client进行测试的时候不会出现这个问题,因为二者都是将接收H264设置为最高优先级;
当然若peerconnection_client.exe发送offer来启动媒体协商过程就不存在这个问题了,因为H264就是它的最高优先级接收的视频编码格式。
参考链接
[1] webrtc 4577版本vs编译_tusong86的博客-CSDN博客
[2] 创建ffmpeg vs2019工程_hclbeloved的博客-CSDN博客

