一、说明
这篇文章的目的是评估和比较 2 种深度学习算法(BERT 和 LSTM)在情感分析中进行二元分类的性能。评估将侧重于两个关键指标:准确性(衡量整体分类性能)和训练时间(评估每种算法的效率)。
二、数据
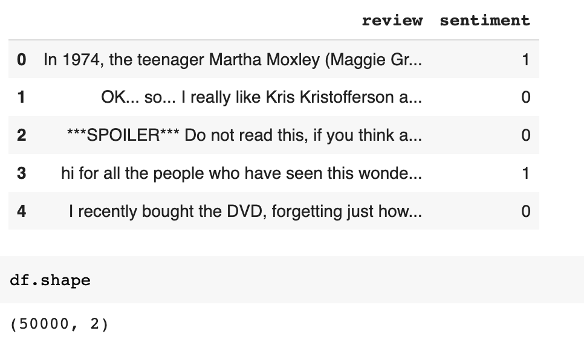
为了实现这一目标,我使用了IMDB数据集,其中包括50,000条电影评论。数据集平均分为 25,000 条正面评论和 25,000 条负面评论,使其适用于训练和测试二进制情绪分析模型。若要获取数据集,请转到以下链接:
50K电影评论的IMDB数据集
大型影评数据集
www.kaggle.com
下图显示了数据集的五行。我给积极情绪分配了 1,给消极情绪分配了 0。
三、算法
1. 长短期记忆(LSTM):它是一种循环神经网络(RNN),旨在处理顺序数据。它可以通过使用存储单元和门来捕获长期依赖关系。
2. BERT(来自变压器的双向编码器表示):它是一种预先训练的基于变压器的模型,使用自监督学习方法。利用双向上下文来理解句子中单词的含义。
-配置
对于 LSTM,模型采用文本序列以及每个序列的相应长度作为输入。它嵌入文本(嵌入维度 = 20),通过 LSTM 层(大小 = 64)处理文本,通过 ReLU 激活的全连接层传递最后一个隐藏状态,最后应用 S 形激活以生成 0 到 1 之间的单个输出值。(周期数:10,学习率:0.001,优化器:亚当)
对于BERT,我使用了DistilBertForSequenceClassification,它基于DistilBERT架构。DistilBERT是原始BERT模型的较小,蒸馏版本。它旨在具有较少数量的参数并降低计算复杂性,同时保持相似的性能水平。(周期数:3,学习率:5e-5,优化器:亚当)
四、LSTM 代码
!pip install torchtext!pip install portalocker>=2.0.0import torch
import torch.nn as nnfrom torchtext.datasets import IMDB
from torch.utils.data.dataset import random_split# Step 1: load and create the datasetstrain_dataset = IMDB(split='train')
test_dataset = IMDB(split='test')# Set random number to 123 to compare with BERT model
torch.manual_seed(123)
train_dataset, valid_dataset = random_split(list(train_dataset), [20000, 5000])## Step 2: find unique tokens (words)
import re
from collections import Counter, OrderedDicttoken_counts = Counter()def tokenizer(text):text = re.sub('<[^>]*>', '', text)emoticons = re.findall('(?::|;|=)(?:-)?(?:\)|\(|D|P)', text.lower())text = re.sub('[\W]+', ' ', text.lower()) +\' '.join(emoticons).replace('-', '')tokenized = text.split()return tokenizedfor label, line in train_dataset:tokens = tokenizer(line)token_counts.update(tokens)print('Vocab-size:', len(token_counts))## Step 3: encoding each unique token into integers
from torchtext.vocab import vocabsorted_by_freq_tuples = sorted(token_counts.items(), key=lambda x: x[1], reverse=True)
ordered_dict = OrderedDict(sorted_by_freq_tuples)vocab = vocab(ordered_dict)'''
The special tokens "<pad>" and "<unk>" are inserted into the vocabulary using vocab.insert_token("<pad>", 0) and vocab.insert_token("<unk>", 1) respectively.
The index 0 is assigned to "<pad>" token, which is typically used for padding sequences.
The index 1 is assigned to "<unk>" token, which represents unknown or out-of-vocabulary tokens.vocab.set_default_index(1) sets the default index of the vocabulary to 1, which corresponds to the "<unk>" token.
This means that if a token is not found in the vocabulary, it will be mapped to the index 1 by default.
'''vocab.insert_token("<pad>", 0)
vocab.insert_token("<unk>", 1)
vocab.set_default_index(1)print([vocab[token] for token in ['this', 'is', 'an', 'example']])'''
The IMDB class in datatext contains 1 = negative and 2 = positive
''''''
The label_pipeline lambda function takes a label value x as input.
It checks if the label value x is equal to 2 using the comparison x == 2.
If the condition is true, it returns a float value of 1.0. This implies that the label is positive.
If the condition is false (i.e., the label value is not equal to 2), it returns a float value of 0.0. This implies that the label is negative.
'''text_pipeline = lambda x: [vocab[token] for token in tokenizer(x)]
label_pipeline = lambda x: 1. if x == 2 else 0'''
This line suggests that the subsequent computations and tensors will be moved to the specified CUDA device for processing,
taking advantage of GPU acceleration if available.
'''device = torch.device("cuda:0")## Step 3-B: wrap the encode and transformation function'''
Instead of loading the whole reviews into memory which is way too expensive for the computer,
you can load a batch for manuy times which requires way less memory as compared to loading the complete data set.
Another reason that we use batch is that if we load the whole dataset at once, the deep learning algorithm(may be a neural network)
has to store errors values for all data points in the memory and this will cause a great decrease in speed of training.
With batches, the model updates the parameters(weights and bias) only after passing through the whole data set.
'''def collate_batch(batch):label_list, text_list, lengths = [], [], []for _label, _text in batch:label_list.append(label_pipeline(_label))processed_text = torch.tensor(text_pipeline(_text),dtype=torch.int64)text_list.append(processed_text)lengths.append(processed_text.size(0))## Convert lists to tensorslabel_list = torch.tensor(label_list)lengths = torch.tensor(lengths)## pads the text sequences in text_list to have the same length by adding padding tokens.padded_text_list = nn.utils.rnn.pad_sequence(text_list, batch_first=True)return padded_text_list.to(device), label_list.to(device), lengths.to(device)## Take a small batch to check if the wrapping worksfrom torch.utils.data import DataLoader
dataloader = DataLoader(train_dataset, batch_size=4, shuffle=False, collate_fn=collate_batch)
text_batch, label_batch, length_batch = next(iter(dataloader))
print(text_batch)
print(label_batch)
print(length_batch)
print(text_batch.shape)## Step 4: batching the datasetsbatch_size = 32train_dl = DataLoader(train_dataset, batch_size=batch_size,shuffle=True, collate_fn=collate_batch)
valid_dl = DataLoader(valid_dataset, batch_size=batch_size,shuffle=False, collate_fn=collate_batch)
test_dl = DataLoader(test_dataset, batch_size=batch_size,shuffle=False, collate_fn=collate_batch)print(len(list(train_dl.dataset)))
print(len(list(valid_dl.dataset)))
print(len(list(test_dl.dataset)))'''
the code defines an RNN model that takes encoded text inputs,
processes them through an embedding layer and an LSTM layer,
and produces a binary output using fully connected layers and a sigmoid activation function.
The model is initialized with specific parameters and moved to the specified device for computation.
'''class RNN(nn.Module):def __init__(self, vocab_size, embed_dim, rnn_hidden_size, fc_hidden_size):super().__init__()self.embedding = nn.Embedding(vocab_size,embed_dim,padding_idx=0)self.rnn = nn.LSTM(embed_dim, rnn_hidden_size,batch_first=True)self.fc1 = nn.Linear(rnn_hidden_size, fc_hidden_size)self.relu = nn.ReLU()self.fc2 = nn.Linear(fc_hidden_size, 1)self.sigmoid = nn.Sigmoid()def forward(self, text, lengths):out = self.embedding(text)out = nn.utils.rnn.pack_padded_sequence(out, lengths.cpu().numpy(), enforce_sorted=False, batch_first=True)out, (hidden, cell) = self.rnn(out)out = hidden[-1, :, :]out = self.fc1(out)out = self.relu(out)out = self.fc2(out)out = self.sigmoid(out)return outvocab_size = len(vocab)
embed_dim = 20
rnn_hidden_size = 64
fc_hidden_size = 64torch.manual_seed(123)
model = RNN(vocab_size, embed_dim, rnn_hidden_size, fc_hidden_size)
model = model.to(device)def train(dataloader):model.train()total_acc, total_loss = 0, 0for text_batch, label_batch, lengths in dataloader:optimizer.zero_grad()pred = model(text_batch, lengths)[:, 0]loss = loss_fn(pred, label_batch)loss.backward()optimizer.step()total_acc += ((pred>=0.5).float() == label_batch).float().sum().item()total_loss += loss.item()*label_batch.size(0)return total_acc/len(dataloader.dataset), total_loss/len(dataloader.dataset)def evaluate(dataloader):model.eval()total_acc, total_loss = 0, 0with torch.no_grad():for text_batch, label_batch, lengths in dataloader:pred = model(text_batch, lengths)[:, 0]loss = loss_fn(pred, label_batch.float())  # Convert label_batch to Floattotal_acc += ((pred >= 0.5).float() == label_batch).float().sum().item()total_loss += loss.item() * label_batch.size(0)return total_acc/len(list(dataloader.dataset)),\total_loss/len(list(dataloader.dataset))import time
start_time = time.time()loss_fn = nn.BCELoss()
optimizer = torch.optim.Adam(model.parameters(), lr=0.001)num_epochs = 10torch.manual_seed(123)for epoch in range(num_epochs):acc_train, loss_train = train(train_dl)acc_valid, loss_valid = evaluate(valid_dl)print(f'Epoch {epoch} accuracy: {acc_train:.4f} val_accuracy: {acc_valid:.4f}')print(f'Time elapsed: {(time.time() - start_time)/60:.2f} min')
print(f'Total Training Time: {(time.time() - start_time)/60:.2f} min')acc_test, _ = evaluate(test_dl)
print(f'test_accuracy: {acc_test:.4f}')"""### Test with new movie reviews of Spider-Man: Across the Spider-Verse (2023)"""def collate_single_text(text):processed_text = torch.tensor(text_pipeline(text), dtype=torch.int64)length = processed_text.size(0)padded_text = nn.utils.rnn.pad_sequence([processed_text], batch_first=True)return padded_text.to(device), lengthtext = "It is the first marvel movie to make me shed a tear. It has heart, it feels so alive with it's conveyance of emotions and feelings, it uses our nostalgia for the first movie AGAINST US it is on a completely new level of animation, there is a twist on every turn you make while watching this movie. "
padded_text, length = collate_single_text(text)
padded_text = padded_text.to(device)model.eval()  # Set the model to evaluation mode
with torch.no_grad():encoded_text = padded_text.to(device)  # Move the encoded_text tensor to the CUDA devicelengths = torch.tensor([len(encoded_text)])  # Compute the length of the text sequenceoutput = model(encoded_text, lengths)  # Pass the lengths argumentprobability = output.item()  # Obtain the predicted probabilityif probability >= 0.5:prediction = "Positive"else:prediction = "Negative"print(f"Text: {text}")
print(f"Prediction: {prediction} (Probability: {probability})")text = "This movie was very boring and garbage this is why Hollywood has zero imagination. They rewrote Spiderman as Miles Morales so that they can fit the DEI agenda which was more important than time. "
padded_text, length = collate_single_text(text)
padded_text = padded_text.to(device)model.eval()  # Set the model to evaluation mode
with torch.no_grad():encoded_text = padded_text.to(device)  # Move the encoded_text tensor to the CUDA devicelengths = torch.tensor([len(encoded_text)])  # Compute the length of the text sequenceoutput = model(encoded_text, lengths)  # Pass the lengths argumentprobability = output.item()  # Obtain the predicted probabilityif probability >= 0.5:prediction = "Positive"else:prediction = "Negative"print(f"Text: {text}")
print(f"Prediction: {prediction} (Probability: {probability})")
五、BERT代码
!pip install transformersimport gzip
import shutil
import timeimport pandas as pd
import requests
import torch
import torch.nn.functional as F
import torchtextimport transformers
from transformers import DistilBertTokenizerFast
from transformers import DistilBertForSequenceClassificationtorch.backends.cudnn.deterministic = True
RANDOM_SEED = 123
torch.manual_seed(RANDOM_SEED)
DEVICE = torch.device('cuda' if torch.cuda.is_available() else 'cpu')NUM_EPOCHS = 3path = '/content/drive/MyDrive/data/movie_data.csv'df = pd.read_csv(path)df.head()df.shapetrain_texts = df.iloc[:35000]['review'].values
train_labels = df.iloc[:35000]['sentiment'].valuesvalid_texts = df.iloc[35000:40000]['review'].values
valid_labels = df.iloc[35000:40000]['sentiment'].valuestest_texts = df.iloc[40000:]['review'].values
test_labels = df.iloc[40000:]['sentiment'].valuestokenizer = DistilBertTokenizerFast.from_pretrained('distilbert-base-uncased')train_encodings = tokenizer(list(train_texts), truncation=True, padding=True)
valid_encodings = tokenizer(list(valid_texts), truncation=True, padding=True)
test_encodings = tokenizer(list(test_texts), truncation=True, padding=True)train_encodings[0]class IMDbDataset(torch.utils.data.Dataset):def __init__(self, encodings, labels):self.encodings = encodingsself.labels = labelsdef __getitem__(self, idx):item = {key: torch.tensor(val[idx]) for key, val in self.encodings.items()}item['labels'] = torch.tensor(self.labels[idx])return itemdef __len__(self):return len(self.labels)train_dataset = IMDbDataset(train_encodings, train_labels)
valid_dataset = IMDbDataset(valid_encodings, valid_labels)
test_dataset = IMDbDataset(test_encodings, test_labels)train_loader = torch.utils.data.DataLoader(train_dataset, batch_size=16, shuffle=True)
valid_loader = torch.utils.data.DataLoader(valid_dataset, batch_size=16, shuffle=False)
test_loader = torch.utils.data.DataLoader(test_dataset, batch_size=16, shuffle=False)model = DistilBertForSequenceClassification.from_pretrained('distilbert-base-uncased')
model.to(DEVICE)
model.train()optim = torch.optim.Adam(model.parameters(), lr=5e-5)def compute_accuracy(model, data_loader, device):with torch.no_grad():correct_pred, num_examples = 0, 0for batch_idx, batch in enumerate(data_loader):### Prepare datainput_ids = batch['input_ids'].to(device)attention_mask = batch['attention_mask'].to(device)labels = batch['labels'].to(device)outputs = model(input_ids, attention_mask=attention_mask)logits = outputs['logits']predicted_labels = torch.argmax(logits, 1)num_examples += labels.size(0)correct_pred += (predicted_labels == labels).sum()return correct_pred.float()/num_examples * 100start_time = time.time()for epoch in range(NUM_EPOCHS):model.train()for batch_idx, batch in enumerate(train_loader):### Prepare datainput_ids = batch['input_ids'].to(DEVICE)attention_mask = batch['attention_mask'].to(DEVICE)labels = batch['labels'].to(DEVICE)### Forwardoutputs = model(input_ids, attention_mask=attention_mask, labels=labels)loss, logits = outputs['loss'], outputs['logits']### Backwardoptim.zero_grad()loss.backward()optim.step()### Loggingif not batch_idx % 250:print (f'Epoch: {epoch+1:04d}/{NUM_EPOCHS:04d} | 'f'Batch {batch_idx:04d}/{len(train_loader):04d} | 'f'Loss: {loss:.4f}')model.eval()with torch.set_grad_enabled(False):print(f'Training accuracy: 'f'{compute_accuracy(model, train_loader, DEVICE):.2f}%'f'\nValid accuracy: 'f'{compute_accuracy(model, valid_loader, DEVICE):.2f}%')print(f'Time elapsed: {(time.time() - start_time)/60:.2f} min')print(f'Total Training Time: {(time.time() - start_time)/60:.2f} min')
print(f'Test accuracy: {compute_accuracy(model, test_loader, DEVICE):.2f}%')
六、结果

七、为什么BERT的性能优于LSTM?
BERT之所以获得高准确率,有几个原因:
1)BERT通过考虑给定单词两侧的周围单词来捕获单词的上下文含义。这种双向方法使模型能够理解语言的细微差别并有效地捕获单词之间的依赖关系。
2)BERT采用变压器架构,可有效捕获顺序数据中的长期依赖关系。转换器采用自我注意机制,使模型能够权衡句子中不同单词的重要性。这种注意力机制有助于BERT专注于相关信息,从而获得更好的表示和更高的准确性。
3)BERT在大量未标记的数据上进行预训练。这种预训练允许模型学习一般语言表示,并获得对语法、语义和世界知识的广泛理解。通过利用这些预训练的知识,BERT可以更好地适应下游任务并实现更高的准确性。
八、结论
与 LSTM 相比,BERT 确实需要更长的时间来微调,因为它的架构更复杂,参数空间更大。但同样重要的是要考虑到BERT在许多任务中的性能优于LSTM。 达门·