HuggingFace 简介
- 0. HuggingFace 简介
- 1. HuggingFace 官网地址
- 2. HuggingFace 标准研发流程
- 3. HuggingFace 工具集
- 4. 编码工具
- 4.1 编码工具介绍
- 4.2 使用编码工具
- 5. 数据集工具
- 5.1 数据集工具介绍
- 5.2 使用数据集工具
- 6. 评价指标工具
- 6.1 评价指标工具介绍
- 6.2 使用评价指标工具
- 7. 管道工具
- 7.1 管道工具介绍
- 7.2 使用管道工具
- 8. 训练工具
- 8.1 训练工具介绍
- 8.2 使用训练工具
0. HuggingFace 简介
HuggingFace 是一个开源社区,提供了开源的 AI 研发框架、工具集、可在线加载的数据集仓库和预训练模型仓库。
1. HuggingFace 官网地址
https://huggingface.co/
2. HuggingFace 标准研发流程
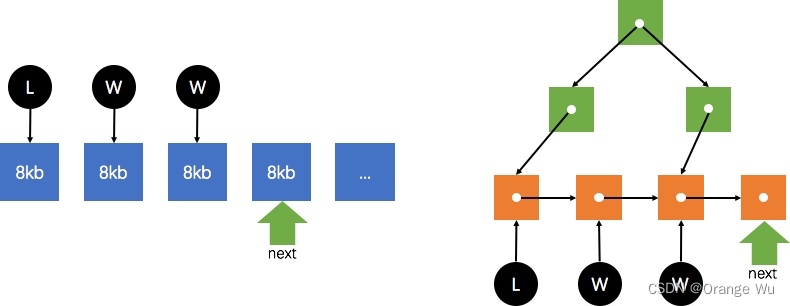
HuggingFace 提出了一套可以依照的标准研发流程,HaggingFace 把 AI 项目的研发大致分为以下几个部分:
3. HuggingFace 工具集
针对标准流程的各个节点,HuggingFace 都提供了许多工具,能够帮助研发人员快速实施。
比如,
4. 编码工具
4.1 编码工具介绍
HuggingFace 提供了一套统一的编码 API,由每个模型各自提交实现。由于统一了 API,所以调用者能快速地使用不同模型的编码工具。
4.2 使用编码工具
现在就来看一看如何使用 HuggingFace 提供的编码工具。
1. 加载编码工具
首先需要加载一个编码工具,这里使用 bert-base-chinese 的实现,示例代码如下:
from transformers import BertTokenizertokenizer = BertTokenizer.from_pretrained(pretrained_model_name_or_path='bert-base-chinese',cache_dir=None,force_download=False,
)tokenizer
参数 pretrained_model_name_or_path='bert-base-chinese' 指定要加载的编码工具, 大多数模型会把自己提交的编码工具命名为和模型一样的名字。
输出结果如下,
BertTokenizer(name_or_path='bert-base-chinese', vocab_size=21128, model_max_length=512, is_fast=False, padding_side='right', truncation_side='right', special_tokens={'unk_token': '[UNK]', 'sep_token': '[SEP]', 'pad_token': '[PAD]', 'cls_token': '[CLS]', 'mask_token': '[MASK]'}, clean_up_tokenization_spaces=True)
2. 准备实验数据
现在有了一个编码工具,让我们来准备一些句子,以测试编码工具,示例代码如下,
sents = ['你站在桥上看风景','看风景的人在楼上看你','明月装饰了你的窗子','你装饰了别人的梦',
]
3. 基本的编码函数
使用基本的编码函数,示例代码如下,
out = tokenizer.encode(text=sents[0],text_pair=sents[1],#当句子长度大于max_length时截断truncation=True,#一律补pad到max_length长度padding='max_length',add_special_tokens=True,max_length=25,return_tensors=None,
)print(out)
print(tokenizer.decode(out))
参数 return_tensors=None 表明返回的数据类型为 list 格式,也可以赋值为 tf、pt、np,分别表里 TensorFlow、PyTorch、NumPy 数据格式。
输出结果如下,
[101, 872, 4991, 1762, 3441, 677, 4692, 7599, 3250, 102, 4692, 7599, 3250, 4638, 782, 1762, 3517, 677, 4692, 872, 102, 0, 0, 0, 0]
[CLS] 你 站 在 桥 上 看 风 景 [SEP] 看 风 景 的 人 在 楼 上 看 你 [SEP] [PAD] [PAD] [PAD] [PAD]
4. 对字典的操作
到这里,已经掌握了编码工具的基本使用,接下来看一看如何操作编码工具中的字典。
首先查看字典,示例代码如下:
vocab = tokenizer.get_vocab()type(vocab), len(vocab), '明月' in vocab
输出结果如下,
(dict, 21128, False)
可以看到,字典本身是个 dict 类型的数据。在 BERT 的字典中,共有 21,128 个词,并且"明月"这个词并不存在于字典中。
既然"明月"这个词并不存在于字典中,可以把这个新词添加到字典中,示例代码如下:
tokenizer.add_tokens(new_tokens=['明月', '装饰', '窗子'])
可以添加新的符号,示例代码如下,
tokenizer.add_special_tokens({'eos_token': '[EOS]'})
再次查看字典,示例代码如下:
vocab = tokenizer.get_vocab()type(vocab), len(vocab), vocab['明月'], vocab['[EOS]']
输出结果如下,
(dict, 21132, 21128, 21131)
接下来试试用添加了新词的字典编码句子,示例代码如下,
out = tokenizer.encode(text='明月装饰了你的窗子[EOS]',text_pair=None,#当句子长度大于max_length时,截断truncation=True,#一律补pad到max_length长度padding='max_length',add_special_tokens=True,max_length=10,return_tensors=None,
)print(out)tokenizer.decode(out)
输出结果如下,
[101, 21128, 21129, 749, 872, 4638, 21130, 21131, 102, 0]
'[CLS] 明月 装饰 了 你 的 窗子 [EOS] [SEP] [PAD]'
可以看到,"明月"已经被识别为一个词,而不是两个词,新的特殊符号 [EOS] 也被正确识别。
5. 数据集工具
5.1 数据集工具介绍
HuggingFace 提供了统一的数据集处理工具,让开发者在处理各种不同的数据集时可以通过统一的 API 处理,大大降低了数据处理的工作量。
登录 HuggingFace官网,单击顶部的 Datasets,即可看到 HuggingFace 提供的数据集。
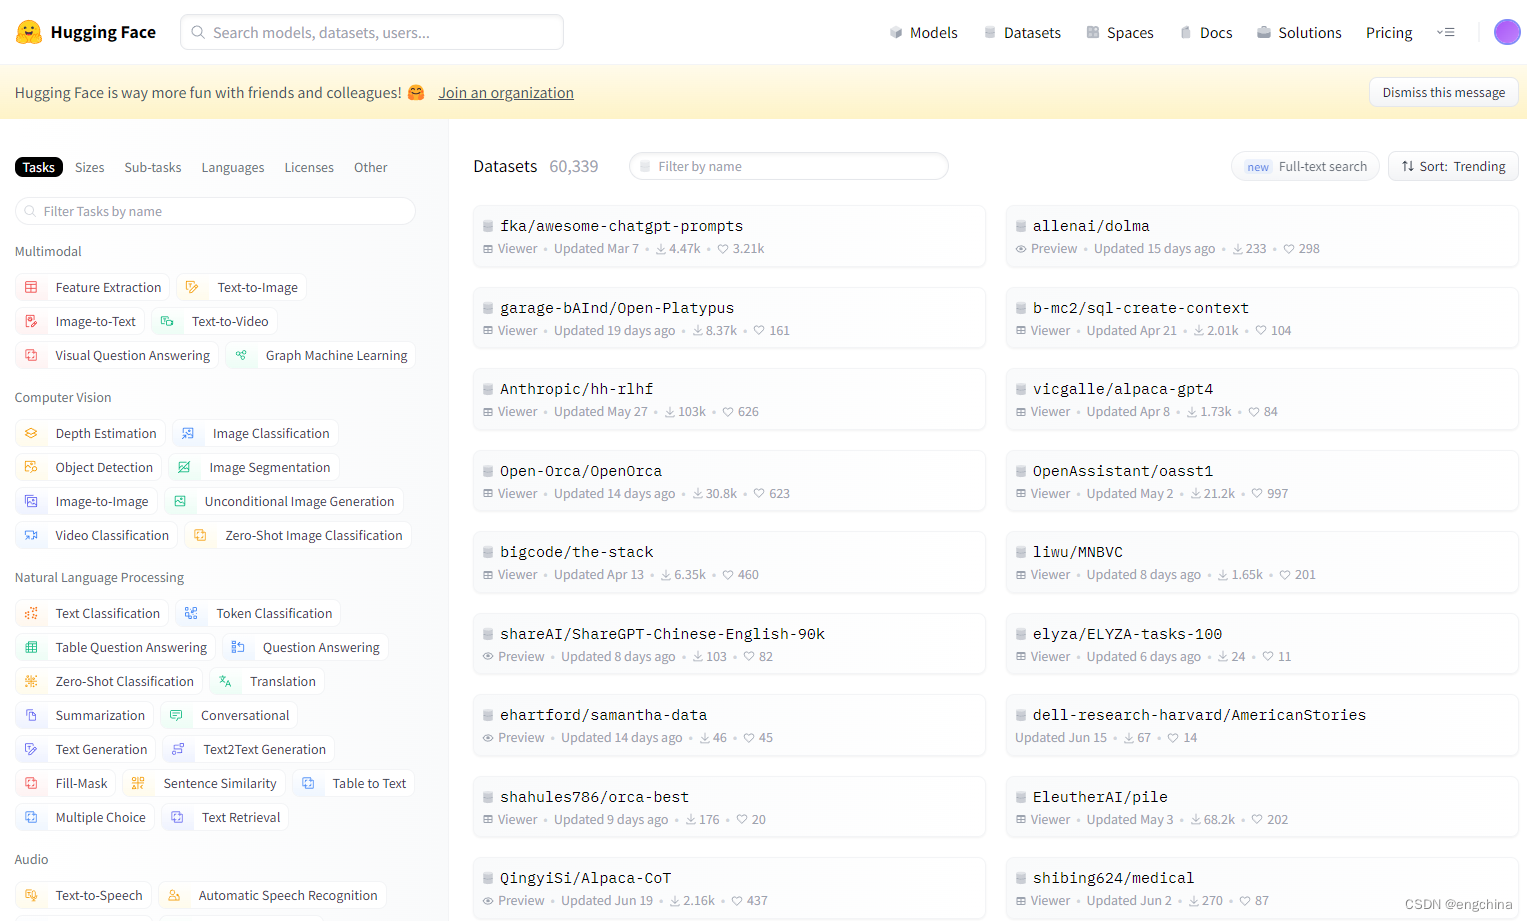
在该界面左侧可以根据不同的任务类型、语言、体积、使用许可来筛选数据集,右侧为具体的数据集列表,其中有经典的 glue、super_glue 数据集,问答数据集 squad,情感分类数据集 imdb,纯文本数据集 wikitext。
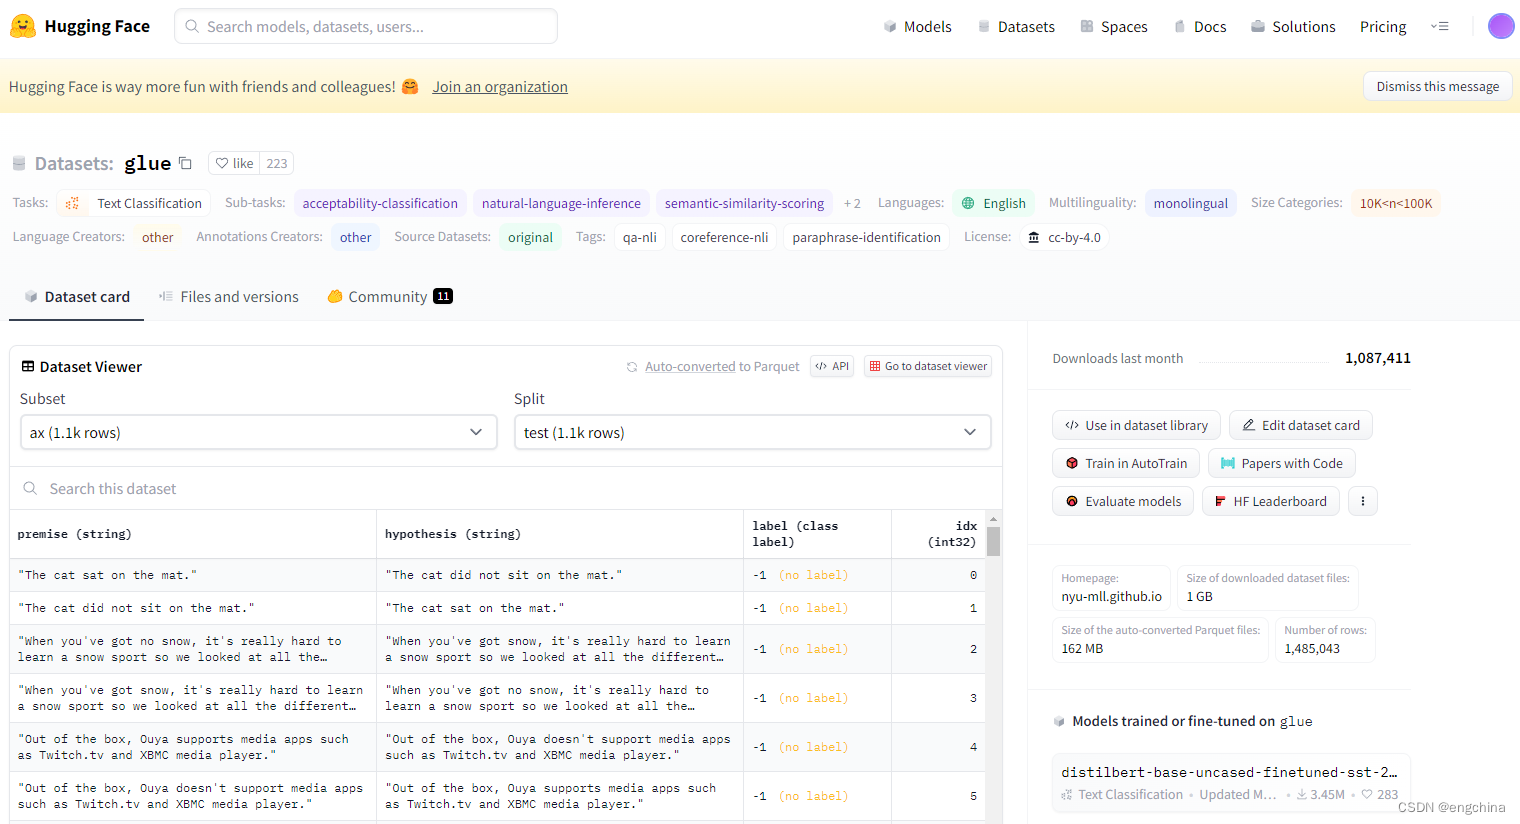
单击具体的某个数据集,进入数据集的详情页面,可以看到数据集的概要信息。
以 glue 数据集为例,在详情页可以看到 glue 的各个数据子集的概要内容,每个数据子集的下方可能会有详细信息。
5.2 使用数据集工具
1. 在线加载数据集
使用 HuggingFace 数据集工具加载数据往往只需一行代码,以加载名为 seamew/ChnSentiCorp 数据集为例,
from datasets import load_datasetdataset = load_dataset(path='seamew/ChnSentiCorp')dataset
输出结果如下,
DatasetDict({train: Dataset({features: ['text', 'label'],num_rows: 9600})validation: Dataset({features: ['text', 'label'],num_rows: 1200})test: Dataset({features: ['text', 'label'],num_rows: 1200})
})
可以看到,要加载一个数据集时很简单的,使用 load_dataset() 函数,把数据集的名字作为参数传入即可。
可以看到 seamew/ChnSentiCorp 共分为 3 部分,分别为 train、validation 和 test,分别代表训练集、验证集和测试集,并且每条数据有两个字段,即 text 和 label,分别代表文本和标签。
2. 将数据集保存到本地磁盘
加载了数据集后,可以使用 save_to_disk() 函数将数据集保存到本地磁盘,
dataset.save_to_disk(dataset_dict_path='./data/ChnSentiCorp')
3. 从本地磁盘加载数据集
保存到磁盘以后可以使用 load_from_disk() 函数加载数据集,
from datasets import load_from_diskdataset = load_from_disk('./data/ChnSentiCorp')dataset
4. 取出数据部分
为了便于做后续的练习,这里取出数据集的 train 部分,
dataset = dataset['train']dataset
输出结果如下,
Dataset({features: ['text', 'label'],num_rows: 9600
})
5. 查看数据内容
可以查看部分数据样例,
for i in [12, 17, 20, 26, 56]:print(dataset[i])
输出结果如下,
{'text': '轻便,方便携带,性能也不错,能满足平时的工作需要,对出差人员来说非常不错', 'label': 1}
{'text': '很好的地理位置,一蹋糊涂的服务,萧条的酒店。', 'label': 0}
{'text': '非常不错,服务很好,位于市中心区,交通方便,不过价格也高!', 'label': 1}
{'text': '跟住招待所没什么太大区别。 绝对不会再住第2次的酒店!', 'label': 0}
{'text': '价格太高,性价比不够好。我觉得今后还是去其他酒店比较好。', 'label': 0}
这是一份购物和消费评论数据,字段 text 表示消费者的评论,字段 label 表明这是一段好评还是差评。
6. 数据排序
可以使用 sort() 函数让数据按照某个字段排序,
#数据中的label是无序的
print(dataset['label'][:10])#让数据按照label排序
sorted_dataset = dataset.sort('label')
print(sorted_dataset['label'][:10])
print(sorted_dataset['label'][-10:])
输出结果如下,
[1, 1, 0, 0, 1, 0, 0, 0, 1, 1]
[0, 0, 0, 0, 0, 0, 0, 0, 0, 0]
[1, 1, 1, 1, 1, 1, 1, 1, 1, 1]
7. 打乱数据
和 sort() 函数相对应,可以使用 shuffle() 函数再次打乱数据,
shuffled_dataset = sorted_dataset.shuffle(seed=42)shuffled_dataset['label'][:10]
输出结果如下,
[0, 1, 0, 0, 1, 0, 1, 0, 1, 0]
8. 数据抽样
可以使用 select() 函数从数据集中选择某些数据,
dataset.select([0, 10, 20, 30, 40, 50])
输出结果如下,
Dataset({features: ['text', 'label'],num_rows: 6
})
9. 数据过滤
可以使用 filter() 函数按照自定义的规则过滤数据,
def f(data):return data['text'].startswith('非常不错')dataset.filter(f)
输出结果如下,
Dataset({features: ['text', 'label'],num_rows: 13
})
10. 训练测试集拆分
可以使用 train_test_split() 函数将数据集切分为训练集和测试集,
dataset.train_test_split(test_size=0.1)
输出结果如下,
DatasetDict({train: Dataset({features: ['text', 'label'],num_rows: 8640})test: Dataset({features: ['text', 'label'],num_rows: 960})
})
可以看到,数据集被切分为 train 和 text 两部分,并且两部分数据量的比例满足 9:1。
11. 数据分桶
可以使用 shared() 函数将数据均匀地分为 n 部分,
dataset.shard(num_shards=4, index=0)
参数 num_shards 表明要把数据均匀地分为几部分,例子中分为 4 部分。
运行结果如下,
Dataset({features: ['text', 'label'],num_rows: 2400
})
12. 重命名字段
使用 rename_column() 函数可以重命名字段,
dataset.rename_column('text', 'text_rename')
运行结果如下,
Dataset({features: ['text_rename', 'label'],num_rows: 9600
})
13. 删除字段
使用 remove_columns 函数可以删除字段,
dataset.remove_columns(['text'])
输出结果如下,
Dataset({features: ['label'],num_rows: 9600
})
14. 映射函数
有时希望对数据集总体做一些修改,可以使用 map() 函数遍历数据,并且对每条数据都进行修改,
def f(data):data['text'] = 'My sentence: ' + data['text']return datamaped_datatset = dataset.map(f)print(dataset['text'][20])
print(maped_datatset['text'][20])
输出结果如下,
非常不错,服务很好,位于市中心区,交通方便,不过价格也高!
My sentence: 非常不错,服务很好,位于市中心区,交通方便,不过价格也高!
15. 使用批处理加速
在使用过滤和映射这类需要使用一个函数遍历数据集的方法时,可以使用批处理减少函数调用的次数,从而达到加速处理的目的。
def f(data):text = data['text']text = ['My sentence: ' + i for i in text]data['text'] = textreturn datamaped_datatset = dataset.map(function=f,batched=True,batch_size=1000,num_proc=4)print(dataset['text'][20])
print(maped_datatset['text'][20])
输出结果如下,
非常不错,服务很好,位于市中心区,交通方便,不过价格也高!
My sentence: 非常不错,服务很好,位于市中心区,交通方便,不过价格也高!
16. 设置数据格式
使用 set_format() 函数修改数据格式,
dataset.set_format(type='torch', columns=['label'], output_all_columns=True)dataset[20]
输出结果如下,
{'label': tensor(1), 'text': '非常不错,服务很好,位于市中心区,交通方便,不过价格也高!'}
17. 将数据集保存为 csv 格式
可以将数据集保存为 csv 格式,
#导出为csv格式
dataset = load_dataset(path='seamew/ChnSentiCorp', split='train')
dataset.to_csv(path_or_buf='./data/ChnSentiCorp.csv')#加载csv格式数据
csv_dataset = load_dataset(path='csv',data_files='./data/ChnSentiCorp.csv',split='train')
csv_dataset[20]
输出结果如下,
{'text': '非常不错,服务很好,位于市中心区,交通方便,不过价格也高!', 'label': 1}
18. 将数据集保存为 json 格式
可以将数据集保存为 json 格式,
#导出为json格式
dataset = load_dataset(path='seamew/ChnSentiCorp', split='train')
dataset.to_json(path_or_buf='./data/ChnSentiCorp.json')#加载json格式数据
json_dataset = load_dataset(path='json',data_files='./data/ChnSentiCorp.json',split='train')
json_dataset[20]
输出结果如下,
{'text': '非常不错,服务很好,位于市中心区,交通方便,不过价格也高!', 'label': 1}
6. 评价指标工具
6.1 评价指标工具介绍
在训练和测试一个模型时往往需要计算不同的评价指标,如正确率、查准率、F1 值等,具体需要的指标往往和处理的数据集、任务类型有关。HuggingFace 提供了统一的评价指标工具,能够将具体的计算过程隐藏,调用者只需提供计算结果,由评价指标工具给出评价指标。
6.2 使用评价指标工具
1. 列出可用的评价指标
使用 list_evaluation_modules() 函数可获取可用的评价指标列表,
#!pip install evaluate
#列出可用的评价指标
from evaluate import list_evaluation_modulesmetrics_list = list_evaluation_modules()len(metrics_list), metrics_list[:5]
输出结果如下,
(136, ['precision', 'code_eval', 'roc_auc', 'cuad', 'xnli'])
2. 加载一个评价指标
使用 load() 函数加载一个评价指标。评价指标往往和对应的数据集配套使用,此次以 glue 数据集的 mrpc 子集为例,
#加载一个评价指标
from evaluate import loadmetric = load(path='glue', config_name='mrpc')
3. 获取评价指标的使用说明
评价指标的 inputs_description 属性为一段文本,描述了评价指标的使用方法,不同的评价指标需要的输入往往是不同的,
print(metric.inputs_description)
输出结果如下,
Compute GLUE evaluation metric associated to each GLUE dataset.
Args:predictions: list of predictions to score.Each translation should be tokenized into a list of tokens.references: list of lists of references for each translation.Each reference should be tokenized into a list of tokens.
Returns: depending on the GLUE subset, one or several of:"accuracy": Accuracy"f1": F1 score"pearson": Pearson Correlation"spearmanr": Spearman Correlation"matthews_correlation": Matthew Correlation
Examples:>>> glue_metric = evaluate.load('glue', 'sst2')  # 'sst2' or any of ["mnli", "mnli_mismatched", "mnli_matched", "qnli", "rte", "wnli", "hans"]>>> references = [0, 1]>>> predictions = [0, 1]>>> results = glue_metric.compute(predictions=predictions, references=references)>>> print(results){'accuracy': 1.0}>>> glue_metric = evaluate.load('glue', 'mrpc')  # 'mrpc' or 'qqp'>>> references = [0, 1]>>> predictions = [0, 1]>>> results = glue_metric.compute(predictions=predictions, references=references)>>> print(results){'accuracy': 1.0, 'f1': 1.0}>>> glue_metric = evaluate.load('glue', 'stsb')>>> references = [0., 1., 2., 3., 4., 5.]>>> predictions = [0., 1., 2., 3., 4., 5.]>>> results = glue_metric.compute(predictions=predictions, references=references)>>> print({"pearson": round(results["pearson"], 2), "spearmanr": round(results["spearmanr"], 2)}){'pearson': 1.0, 'spearmanr': 1.0}>>> glue_metric = evaluate.load('glue', 'cola')>>> references = [0, 1]>>> predictions = [0, 1]>>> results = glue_metric.compute(predictions=predictions, references=references)>>> print(results){'matthews_correlation': 1.0}
4. 计算评价指标
按照上面的示例代码,可以实际的计算此评价指标,
#计算一个评价指标
predictions = [0, 1, 0]
references = [0, 1, 1]metric.compute(predictions=predictions, references=references)
输出结果如下,
{'accuracy': 0.6666666666666666, 'f1': 0.6666666666666666}
7. 管道工具
7.1 管道工具介绍
使用管道工具时,调用者需要做的只是告诉管道工具要进行的任务类型,管道工具会自动分配合适的模型,直接给出预测结果。
7.2 使用管道工具
1. 文本分类
使用管道工具处理文本分类任务,
#文本分类
from transformers import pipelineclassifier = pipeline("sentiment-analysis")result = classifier("I hate you")[0]
print(result)result = classifier("I love you")[0]
print(result)
输出结果如下,
{'label': 'NEGATIVE', 'score': 0.9991129040718079}
{'label': 'POSITIVE', 'score': 0.9998656511306763}
2. 阅读理解
使用管道工具处理阅读理解任务,
#阅读理解
from transformers import pipelinequestion_answerer = pipeline("question-answering")context = r"""
Extractive Question Answering is the task of extracting an answer from a text given a question. An example of a
question answering dataset is the SQuAD dataset, which is entirely based on that task. If you would like to fine-tune
a model on a SQuAD task, you may leverage the examples/pytorch/question-answering/run_squad.py script.
"""result = question_answerer(question="What is extractive question answering?",context=context,
)
print(result)result = question_answerer(question="What is a good example of a question answering dataset?",context=context,
)print(result)
输出结果,
{'score': 0.6177279949188232, 'start': 34, 'end': 95, 'answer': 'the task of extracting an answer from a text given a question'}
{'score': 0.5152303576469421, 'start': 148, 'end': 161, 'answer': 'SQuAD dataset'}
- 完形填空
使用管道工具处理完形填空任务,
#完形填空
from transformers import pipelineunmasker = pipeline("fill-mask")from pprint import pprintsentence = 'HuggingFace is creating a <mask> that the community uses to solve NLP tasks.'unmasker(sentence)
输出结果如下,
[{'score': 0.17927466332912445,'token': 3944,'token_str': ' tool','sequence': 'HuggingFace is creating a tool that the community uses to solve NLP tasks.'},{'score': 0.11349395662546158,'token': 7208,'token_str': ' framework','sequence': 'HuggingFace is creating a framework that the community uses to solve NLP tasks.'},{'score': 0.05243551731109619,'token': 5560,'token_str': ' library','sequence': 'HuggingFace is creating a library that the community uses to solve NLP tasks.'},{'score': 0.034935347735881805,'token': 8503,'token_str': ' database','sequence': 'HuggingFace is creating a database that the community uses to solve NLP tasks.'},{'score': 0.02860259637236595,'token': 17715,'token_str': ' prototype','sequence': 'HuggingFace is creating a prototype that the community uses to solve NLP tasks.'}]
4. 文本生成
使用管道工具处理文本生成任务,
#文本生成
from transformers import pipelinetext_generator = pipeline("text-generation")text_generator("As far as I am concerned, I will",max_length=50,do_sample=False)
输出结果如下,
[{'generated_text': 'As far as I am concerned, I will be the first to admit that I am not a fan of the idea of a "free market." I think that the idea of a free market is a bit of a stretch. I think that the idea'}]
5. 命名实体识别
命名实体识别任务为找出一段文本中的人名、地名、组织机构名等。
#命名实体识别
from transformers import pipelinener_pipe = pipeline("ner")sequence = """Hugging Face Inc. is a company based in New York City. Its headquarters are in DUMBO,
therefore very close to the Manhattan Bridge which is visible from the window."""for entity in ner_pipe(sequence):print(entity)
输出结果如下,
{'entity': 'I-ORG', 'score': 0.99957865, 'index': 1, 'word': 'Hu', 'start': 0, 'end': 2}
{'entity': 'I-ORG', 'score': 0.9909764, 'index': 2, 'word': '##gging', 'start': 2, 'end': 7}
{'entity': 'I-ORG', 'score': 0.9982224, 'index': 3, 'word': 'Face', 'start': 8, 'end': 12}
{'entity': 'I-ORG', 'score': 0.9994879, 'index': 4, 'word': 'Inc', 'start': 13, 'end': 16}
{'entity': 'I-LOC', 'score': 0.9994344, 'index': 11, 'word': 'New', 'start': 40, 'end': 43}
{'entity': 'I-LOC', 'score': 0.99931955, 'index': 12, 'word': 'York', 'start': 44, 'end': 48}
{'entity': 'I-LOC', 'score': 0.9993794, 'index': 13, 'word': 'City', 'start': 49, 'end': 53}
{'entity': 'I-LOC', 'score': 0.98625815, 'index': 19, 'word': 'D', 'start': 79, 'end': 80}
{'entity': 'I-LOC', 'score': 0.95142674, 'index': 20, 'word': '##UM', 'start': 80, 'end': 82}
{'entity': 'I-LOC', 'score': 0.93365884, 'index': 21, 'word': '##BO', 'start': 82, 'end': 84}
{'entity': 'I-LOC', 'score': 0.9761654, 'index': 28, 'word': 'Manhattan', 'start': 114, 'end': 123}
{'entity': 'I-LOC', 'score': 0.9914629, 'index': 29, 'word': 'Bridge', 'start': 124, 'end': 130}
6. 文本摘要
使用管道工具处理文本摘要任务,
#文本摘要
from transformers import pipelinesummarizer = pipeline("summarization")ARTICLE = """ New York (CNN)When Liana Barrientos was 23 years old, she got married in Westchester County, New York.
A year later, she got married again in Westchester County, but to a different man and without divorcing her first husband.
Only 18 days after that marriage, she got hitched yet again. Then, Barrientos declared "I do" five more times, sometimes only within two weeks of each other.
In 2010, she married once more, this time in the Bronx. In an application for a marriage license, she stated it was her "first and only" marriage.
Barrientos, now 39, is facing two criminal counts of "offering a false instrument for filing in the first degree," referring to her false statements on the
2010 marriage license application, according to court documents.
Prosecutors said the marriages were part of an immigration scam.
On Friday, she pleaded not guilty at State Supreme Court in the Bronx, according to her attorney, Christopher Wright, who declined to comment further.
After leaving court, Barrientos was arrested and charged with theft of service and criminal trespass for allegedly sneaking into the New York subway through an emergency exit, said Detective
Annette Markowski, a police spokeswoman. In total, Barrientos has been married 10 times, with nine of her marriages occurring between 1999 and 2002.
All occurred either in Westchester County, Long Island, New Jersey or the Bronx. She is believed to still be married to four men, and at one time, she was married to eight men at once, prosecutors say.
Prosecutors said the immigration scam involved some of her husbands, who filed for permanent residence status shortly after the marriages.
Any divorces happened only after such filings were approved. It was unclear whether any of the men will be prosecuted.
The case was referred to the Bronx District Attorney\'s Office by Immigration and Customs Enforcement and the Department of Homeland Security\'s
Investigation Division. Seven of the men are from so-called "red-flagged" countries, including Egypt, Turkey, Georgia, Pakistan and Mali.
Her eighth husband, Rashid Rajput, was deported in 2006 to his native Pakistan after an investigation by the Joint Terrorism Task Force.
If convicted, Barrientos faces up to four years in prison.  Her next court appearance is scheduled for May 18.
"""summarizer(ARTICLE, max_length=130, min_length=30, do_sample=False)
输出结果如下,
[{'summary_text': ' Liana Barrientos, 39, is charged with two counts of "offering a false instrument for filing in the first degree" In total, she has been married 10 times, with nine of her marriages occurring between 1999 and 2002 . At one time, she was married to eight men at once, prosecutors say .'}]
7. 翻译
管道工具会根据不同的任务自动分配一个模型,如果该模型不是调用者想使用的,则可以指定管道工具使用的模型。
使用管道工具处理翻译任务,
示例代码1,
#!pip install sentencepiece
#替换模型执行中译英任务
from transformers import pipeline, AutoTokenizer, AutoModelForSeq2SeqLM#要使用该模型,需要安装sentencepiecetokenizer = AutoTokenizer.from_pretrained("Helsinki-NLP/opus-mt-zh-en")
model = AutoModelForSeq2SeqLM.from_pretrained("Helsinki-NLP/opus-mt-zh-en")translator = pipeline(task="translation_zh_to_en",model=model,tokenizer=tokenizer)sentence = "我叫萨拉,我住在伦敦。"translator(sentence, max_length=20)
输出结果如下,
[{'translation_text': 'My name is Sarah, and I live in London.'}]
示例代码2,
替换模型执行英译中任务
from transformers import pipeline, AutoTokenizer, AutoModelForSeq2SeqLM#要使用该模型,需要安装sentencepiece
!pip install sentencepiece
tokenizer = AutoTokenizer.from_pretrained("Helsinki-NLP/opus-mt-en-zh")
model = AutoModelForSeq2SeqLM.from_pretrained("Helsinki-NLP/opus-mt-en-zh")translator = pipeline(task="translation_en_to_zh",model=model,tokenizer=tokenizer)sentence = "My name is Sarah and I live in London"translator(sentence, max_length=20)
输出结果如下,
[{'translation_text': '我叫莎拉,我住伦敦'}]
8. 训练工具
8.1 训练工具介绍
HuggingFace 提供了巨大的模型库,虽然其中的很多模型性能表现出色,但这些模型往往是在广义的数据集上训练的,缺乏针对特定数据集的优化,所以在获得一个合适的模型之后,往往还要针对具体任务的数据集进行二次训练,这就是所谓的迁移学习。
HuggingFace 提供了训练工具,统一了模型的再训练过程,是调用者无须了解具体模型的计算过程,只需针对具体的任务准备好数据集,便可以再训练模型。
在这里将使用一个情感分类任务的例子来再训练一个模型,以此来讲解 HuggingFace 训练工具的使用方法。
8.2 使用训练工具
1. 加载编码工具
首先加载一个编码工具,由于编码工具和模型往往是成对使用的,所以此处使用 hfl/rb3 编码工具,因为再训练的模型是 hfl/rb3 模型,hfl/rb3 模型是由哈尔滨工业大学讯飞联合实验室(HFL)分享到 HuggingFace 模型库的,一个基于中文文本数据训练的 BERT 模型。
加载tokenizer
from transformers import AutoTokenizertokenizer = AutoTokenizer.from_pretrained('hfl/rbt3')tokenizer
输出结果如下,
BertTokenizerFast(name_or_path='hfl/rbt3', vocab_size=21128, model_max_length=1000000000000000019884624838656, is_fast=True, padding_side='right', truncation_side='right', special_tokens={'unk_token': '[UNK]', 'sep_token': '[SEP]', 'pad_token': '[PAD]', 'cls_token': '[CLS]', 'mask_token': '[MASK]'}, clean_up_tokenization_spaces=True)
2. 准备数据集
加载数据集,使用该数据集来再训练模型,
从磁盘加载数据集
from datasets import load_from_diskdataset = load_from_disk('./data/ChnSentiCorp')#缩小数据规模,便于测试
dataset['train'] = dataset['train'].shuffle().select(range(2000))
dataset['test'] = dataset['test'].shuffle().select(range(100))dataset
输出结果如下,
DatasetDict({train: Dataset({features: ['text', 'label'],num_rows: 2000})validation: Dataset({features: ['text', 'label'],num_rows: 0})test: Dataset({features: ['text', 'label'],num_rows: 100})
})
对数据集进行了采样,目的有以下两方面:一是便于测试;二是模型在训练集的体量较小的情况,以验证即使是小的数据集,也能通过迁移学习得到一个较好的训练结果。
3. 编码
现在数据集还是文本数据,使用编码工具把这些抽象的文字编码成计算机善于处理的数字,
#编码
def f(data):return tokenizer.batch_encode_plus(data['text'], truncation=True)dataset = dataset.map(f,batched=True,batch_size=1000,num_proc=1,remove_columns=['text'])dataset
输出结果如下,
DatasetDict({train: Dataset({features: ['label', 'input_ids', 'token_type_ids', 'attention_mask'],num_rows: 2000})validation: Dataset({features: ['label'],num_rows: 0})test: Dataset({features: ['label', 'input_ids', 'token_type_ids', 'attention_mask'],num_rows: 100})
})
remove_columns=['text'] 表明映射结束后删除数据集中的 text 字段。
4. 过滤
由于模型对句子的长度有限制,不能处理长度超过 512 个词的句子,所以需要把数据集中长度超过 512 个词的句子过滤掉,
#移除太长的句子
def f(data):return [len(i) <= 512 for i in data['input_ids']]dataset = dataset.filter(f, batched=True, batch_size=1000, num_proc=4)dataset
输出结果如下,
DatasetDict({train: Dataset({features: ['label', 'input_ids', 'token_type_ids', 'attention_mask'],num_rows: 1976})validation: Dataset({features: ['label'],num_rows: 0})test: Dataset({features: ['label', 'input_ids', 'token_type_ids', 'attention_mask'],num_rows: 99})
})
5. 加载预训练模型
数据集准备好了,现在就可以加载要再训练的模型了,
#加载模型
from transformers import AutoModelForSequenceClassificationmodel = AutoModelForSequenceClassification.from_pretrained('hfl/rbt3',num_labels=2)#统计模型参数量
sum([i.nelement() for i in model.parameters()]) / 10000
输出结果如下,
3847.8338
在代码的最后一行统计了该模型的参数量,以大致衡量一个模型的体量大小。
该模型的参数量约为 3800 万个,这是一个较小的模型。
6. 定义评价函数
为了便于在训练过程中观察模型的性能变化,需要定义一个评价指标函数。对于情感分类任务往往关注正确率指标,
#定义评价函数
import numpy as np
from transformers.trainer_utils import EvalPredictiondef compute_metrics(eval_pred):logits, labels = eval_predlogits = logits.argmax(axis=1)return {'accuracy': (logits == labels).sum() / len(labels)}#return metric.compute(predictions=logits, references=labels)#模拟输出
eval_pred = EvalPrediction(predictions=np.array([[0, 1], [2, 3], [4, 5], [6, 7]]),label_ids=np.array([1, 1, 0, 1]),
)compute_metrics(eval_pred)
输出结果如下,
{'accuracy': 0.75}
在这段代码中,不仅定义了评价函数,还对该函数进行了试算。
7. 定义训练超参数
在开始训练之前,需要定义好超参数,HuggingFace 使用 TrainingArguments 对象来封装超参数,
#定义训练参数
from transformers import TrainingArguments#定义训练参数
args = TrainingArguments(#定义临时数据保存路径output_dir='./output_dir',#定义测试执行的策略,可取值no、epoch、stepsevaluation_strategy='steps',#定义每隔多少个step执行一次测试eval_steps=30,#定义模型保存策略,可取值no、epoch、stepssave_strategy='steps',#定义每隔多少个step保存一次save_steps=30,#定义共训练几个轮次num_train_epochs=1,#定义学习率learning_rate=1e-4,#加入参数权重衰减,防止过拟合weight_decay=1e-2,#定义测试和训练时的批次大小per_device_eval_batch_size=16,per_device_train_batch_size=16,#定义是否要使用gpu训练no_cuda=False,
)
8. 定义训练器
完成了上面准备工作,现在可以定义训练器,
#定义训练器
from transformers import Trainer
from transformers.data.data_collator import DataCollatorWithPadding#定义训练器
trainer = Trainer(model=model,args=args,train_dataset=dataset['train'],eval_dataset=dataset['test'],compute_metrics=compute_metrics,data_collator=DataCollatorWithPadding(tokenizer),
)
定义训练器时需要传递要训练的模型、超参数对象、训练和验证数据集、评价函数,以及数据整理函数。
数据整理函数使用了由 HuggingFace 提供的 DataCollatorWithPadding 对象,它能把一个批次中长短不一的句子补充成统一的长度,长度取决于这个批次中最长的句子有多长,所有数据的长度一致后即可转换成矩阵,模型期待的数据类型也是矩阵,所以经过数据整理函数的处理之后,数据即被整理成模型可以直接计算的矩阵格式。
9. 评价模型
在开始训练之前,不妨直接对模型进行一次测试,先定下训练前的基准,在训练结束后再对比这里得到的基准,以验证训练的有效性,
#评价模型
trainer.evaluate()
输出结果如下,
{'eval_loss': 0.7029854655265808,'eval_accuracy': 0.5151515151515151,'eval_runtime': 10.2897,'eval_samples_per_second': 9.621,'eval_steps_per_second': 0.68}
可见模型在训练之前,有 51% 正确率。由于使用的训练集为二分类数据集,所以 51% 的正确率近乎于瞎猜。
10. 训练模型
对模型进行训练,
#训练
trainer.train()
输出结果如下,
***** Running training *****Num examples = 1980Num Epochs = 1Instantaneous batch size per device = 16Total train batch size (w. parallel, distributed & accumulation) = 16Gradient Accumulation steps = 1Total optimization steps = 124
从该日志中的 Total optimization steps = 124 可知,本次训练共有 124 个 steps,由于定义超参数时指定了每 30 个 steps 执行一次测试,并保存模型参数,所以当训练结束时,期待有 4 次测试的结果,并且有 4 个保存的模型参数。
在训练过程中,会逐步输出一张表格以便于观察各指标。
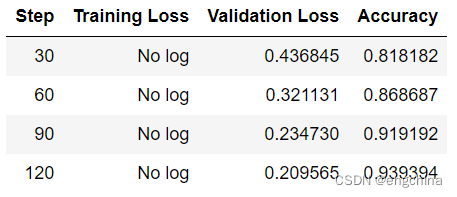
观察该表,由于在超参数中设定了每 30 steps 执行一次测试,而每次测试产生一次测试结果。
11. 评价模型
在训练结束后,再执行一次测试,以测试模型的性能,
#评价模型
trainer.evaluate()
输出结果如下,
{'eval_loss': 0.20948095619678497,'eval_accuracy': 0.9393939393939394,'eval_runtime': 0.3676,'eval_samples_per_second': 269.316,'eval_steps_per_second': 19.043,'epoch': 1.0}
12. 模型的保存
训练得到满意的模型之后,可以手动将该模型的参数保存到磁盘上,
#手动保存模型参数
trainer.save_model(output_dir='./output_dir/save_model')
13. 模型的加载
加载模型参数的方法如下,
#手动加载模型参数
import torchmodel.load_state_dict(torch.load('./output_dir/save_model/pytorch_model.bin'))
14. 使用模型预测
最后使用模型进行预测,
#测试
#这行代码将模型设置为评估模式。在评估模式下,模型的参数不会被更新,只会进行前向传播计算。
model.eval()#这个循环用于获取评估数据集的一个批次。
#trainer.get_eval_dataloader() 返回一个数据加载器,用于加载评估数据集。
#enumerate() 函数用于给每个批次生成一个索引 i 和对应的数据 data。
#break 关键字用于提前退出循环,这里只获取了第一个批次的数据。
for i, data in enumerate(trainer.get_eval_dataloader()):break#这个循环遍历 data 字典中的每个键值对,将对应的值 v 移动到 CUDA 设备上,以便在 GPU 上进行计算。
for k, v in data.items():data[k] = v.to('cuda')#这行代码将数据 data 传递给模型 model 进行前向传播计算,并将输出结果保存在变量 out 中。
out = model(**data)
#这行代码将模型输出 out 中的 logits 沿着第一个维度取最大值的索引,得到预测的类别标签。
out = out['logits'].argmax(dim=1)#这个循环用于打印出前 16 个样本的输入文本、真实标签和预测结果。
#tokenizer.decode() 函数用于将输入文本的编码解码为可读的文本。
#data['input_ids'] 是输入样本的编码表示,data['labels'] 是真实标签,out 是预测结果。
for i in range(16):print(tokenizer.decode(data['input_ids'][i], skip_special_tokens=True))print('label=', data['labels'][i].item())print('predict=', out[i].item())
输出结果如下,
外 包 装 写 是 内 存 2g , 可 是 内 清 单 标 的 是 1g , 不 知 道 是 怎 么 回 事 , 希 望 有 了 解 的 朋 友 帮 忙 解 决 一 下 , 谢 谢 。
label= 0
predict= 0
价 格 有 点 高 , 电 池 电 量 消 耗 过 快 , 机 身 容 易 留 下 指 纹 , 其 它 的 还 没 有 发 现 ! 一 点 人 情 都 没 有 , 赠 品 一 样 都 没 有 ! 可 恶 !
label= 0
predict= 0
每 个 小 鸡 的 动 作 和 神 态 都 不 一 样 , 很 可 爱 , 喜 欢 画 画 的 儿 子 非 常 喜 欢 书 的 插 图 。 文 字 很 幽 默 , 我 们 一 家 三 口 同 看 , 笑 得 合 不 拢 嘴
label= 0
predict= 0
确 实 不 错 ! 地 点 较 佳 , 海 景 房 正 对 栈 桥 和 小 青 岛 , 不 出 房 门 , 不 用 挤 在 旅 游 人 群 中 , 就 能 欣 赏 怡 人 海 景 ; 早 餐 较 丰 富 且 环 境 好 , 相 对 其 价 格 , 性 价 比 高 ; 一 楼 咖 啡 吧 的 简 餐 价 格 不 高 , 味 道 较 好 , 份 量 足 ( 特 别 是 三 明 治 、 热 狗 ) , 是 住 客 和 非 住 店 游 客 解 决 简 单 一 餐 或 作 为 点 心 的 好 选 择 ; 宾 馆 楼 道 里 的 点 心 较 受 欢 迎 , 品 种 多 , 质 量 高 , 而 且 添 加 及 时 , 深 受 孩 子 喜 爱 ; 就 是 床 略 小 ( 指 带 一 个 孩 子 睡 的 话 ) 。 总 之 , 总 体 感 觉 好 , 推 荐 入 住 。
label= 1
predict= 1
房 间 很 舒 适 也 很 干 净 , 周 围 虽 然 不 热 闹 但 很 安 静 , 离 虹 桥 机 场 很 静 , 平 时 价 格 很 贵 但 因 为 入 住 时 正 逢 春 节 假 期 所 以 价 格 超 值 ! ! !
label= 1
predict= 1
不 知 道 为 什 么 。 我 家 女 儿 就 是 不 喜 欢 这 套 书 。 我 们 一 起 看 的 时 候 她 总 是 跑 溜 了 。 似 乎 这 样 的 插 图 和 乱 七 八 糟 的 风 格 她 不 喜 欢 。 我 也 不 喜 欢 这 样 的 书 。 图 画 不 是 很 逼 真 。 好 多 英 文 单 词 我 看 着 都 不 认 识 怎 么 教 她 啊 。 可 能 是 比 较 适 合 国 外 的 小 朋 友 吧 。
label= 0
predict= 0
原 先 一 直 想 买 非 漫 画 版 的 , 总 觉 得 漫 画 版 适 合 学 生 看 , 但 是 又 找 不 到 纯 文 字 的 那 种 , 所 以 将 就 买 了 二 十 几 本 先 看 看 , 虽 然 一 开 始 有 点 不 习 惯 漫 画 版 的 阅 读 方 式 , 但 看 了 几 页 后 就 习 惯 了 , 并 且 越 来 越 觉 得 这 种 版 本 比 纯 文 字 的 更 好 , 有 视 觉 效 果 , 这 不 , 马 上 又 订 购 了 余 下 的 四 十 多 本 , 不 过 还 缺 第 一 本 的 , 不 知 什 么 时 候 会 有 货 , 想 买 齐 , 收 藏 , 等 女 儿 大 一 点 , 再 给 她 看 。 总 之 , 值 得 推 荐 !
label= 1
predict= 1
用 起 来 还 不 错 , 本 人 还 有 几 张 2000 - 100 1000 - 50 东 券 要 的 加 qq 673946022
label= 0
predict= 1
我 的 书 缺 少 了 十 页 , 严 重 影 响 阅 读 ! 当 当 这 么 大 的 书 店 , 怎 么 会 出 现 这 样 的 问 题 呢 。 我 都 怀 疑 我 的 书 是 盗 版 的 。
label= 0
predict= 0
海 景 不 错 , 属 于 在 威 海 最 好 的 吧 。 服 务 也 还 可 以 , 但 也 没 留 下 特 深 刻 的 印 象 。 房 间 内 的 设 施 还 不 错 , 只 是 七 成 新 吧 , 跟 蓝 天 酒 店 比 还 差 些 。 早 餐 我 觉 得 不 比 三 十 八 的 好 多 少 , 可 是 却 要 六 十 八 元 。 房 间 的 隔 音 很 差 , 我 隔 壁 入 住 了 几 个 人 , 开 始 唱 歌 , 后 来 打 牌 , 我 听 得 很 清 楚 。
label= 1
predict= 1
1 、 京 东 服 务 不 错 哦 , 呵 呵 自 提 点 的 客 服 提 醒 俺 们 核 对 商 品 啥 的 态 度 蛮 好 2 、 价 格 ok , 比 广 州 卖 场 里 头 的 要 好 , 而 且 带 票 3 、 2g 够 用 咯 4 、 装 oem hp xp 系 统 成 功 ! 咔 咔 方 便 是 自 己 弄 的
label= 1
predict= 1
非 常 好 的 宾 馆 , 我 住 的 是 19 楼 290 元 的 房 间 。 可 以 鸟 瞰 整 个 西 宁 市 和 远 处 的 群 山 , 美 丽 极 了 。 酒 店 很 干 净 , 服 务 也 很 好 , 设 施 齐 备 , 餐 厅 营 业 时 间 很 长 , 取 款 机 就 有 两 台 , 可 以 代 买 火 车 票 机 票 , 商 务 中 心 也 态 度 很 友 好 , 酒 店 很 大 , 地 理 位 置 很 好 , 处 于 西 宁 的 中 心 , 步 行 到 中 心 广 场 很 近 ( 相 当 于 上 海 的 人 民 广 场 ) , 酒 店 边 上 就 有 拼 车 到 塔 尔 寺 的 集 散 点 ( 夏 利 车 8 元 / 人 ) , 很 方 便 。 酒 店 与 国 家 领 导 人 下 榻 的 国 宾 馆 相 邻 , 闹 中 取 静 , 很 安 静 , 很 安 全 ( 经 常 看 到 警 察 在 把 守 ) 。 总 的 来 说 比 较 符 合 我 的 要 求 , 性 价 比 很 高 的 酒 店 。 下 次 来 西 宁 还 住 这 里 , 呵 呵 。
label= 1
predict= 1
我 再 次 重 申 : 不 能 相 信 携 程 接 线 员 的 推 介, 要 大 家 看 点 评! 接 线 员 说 这 是 准 四 星, 但 只 是 准 三 星 而 已. 在 张 家 界 这 个 旅 游 热 点 城 市 但 管 理 横 乱 的 地 方, 凑 合 住 了 一 夜 - - - 因 为 咱 队 其 他 地 方 也 是 不 熟.
label= 0
predict= 0
vista 用 起 来 不 习 惯 , 速 度 慢 , 分 区 麻 烦 , 带 了 很 多 垃 圾 软 件 , 卸 载 都 麻 烦
label= 0
predict= 0
容 易 产 生 指 纹 。 不 习 惯 分 区 。 由 于 出 货 量 大 了 , 我 觉 得 在 配 货 的 时 候 更 快 一 点 就 好 了 , 我 昨 天 到 中 通 迅 递 , 看 到 的 好 多 都 是 京 东 的 物 品 啊 。
label= 0
predict= 0
习 武 是 为 了 什 么 ? 文 武 合 一 为 道 , 传 统 并 非 只 是 文 。 我 非 常 喜 欢 这 句 话 : 通 神 达 化 , 备 万 贯 一 ; 理 象 会 通 , 体 用 俱 备 。 这 也 许 是 对 武 最 好 的 诠 释 。 书 中 有 几 个 观 点 我 非 常 认 同 : 一 : 武 非 神 鬼 之 说 , 而 是 实 实 在 在 的 文 化 与 艺 术 ; 二 : 武 一 直 以 它 独 有 的 脚 步 在 发 展 , 在 前 进 ; 三 : 各 民 族 都 对 武 的 发 展 做 了 贡 献 。 看 罢 书 后 , 我 真 想 学 习 《 磨 旗 棍 》 这 门 学 有 学 有 渊 源 的 武 术 。 可 惜 , 我 没 有 马 先 生 的 联 系 方 式 , 留 待 有 缘 吧 。
label= 1
predict= 1
从测试结果可以看到一些错误,但大部分的预测是正确的。
完结!







![2、[春秋云镜]CVE-2022-30887](https://img-blog.csdnimg.cn/a281e80d062547c98c80eb394c90919e.png#pic_center)
