一,使用对极几何约束求R,T
第一步:特征匹配。提取出有效的匹配点
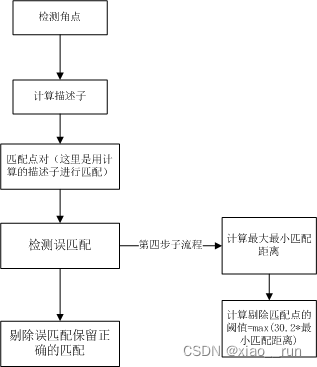
void find_feature_matches(const Mat &img_1, const Mat &img_2,std::vector<KeyPoint> &keypoints_1,std::vector<KeyPoint> &keypoints_2,std::vector<DMatch> &matches) {//-- 初始化Mat descriptors_1, descriptors_2;// used in OpenCV3Ptr<FeatureDetector> detector = ORB::create();Ptr<DescriptorExtractor> descriptor = ORB::create();// use this if you are in OpenCV2// Ptr<FeatureDetector> detector = FeatureDetector::create ( "ORB" );// Ptr<DescriptorExtractor> descriptor = DescriptorExtractor::create ( "ORB" );Ptr<DescriptorMatcher> matcher = DescriptorMatcher::create("BruteForce-Hamming");//-- 第一步:检测 Oriented FAST 角点位置detector->detect(img_1, keypoints_1);detector->detect(img_2, keypoints_2);//-- 第二步:根据角点位置计算 BRIEF 描述子descriptor->compute(img_1, keypoints_1, descriptors_1);descriptor->compute(img_2, keypoints_2, descriptors_2);//-- 第三步:对两幅图像中的BRIEF描述子进行匹配,使用 Hamming 距离vector<DMatch> match;// BFMatcher matcher ( NORM_HAMMING );matcher->match(descriptors_1, descriptors_2, match);//-- 第四步:匹配点对筛选double min_dist = 10000, max_dist = 0;//找出所有匹配之间的最小距离和最大距离, 即是最相似的和最不相似的两组点之间的距离for (int i = 0; i < descriptors_1.rows; i++) {double dist = match[i].distance;if (dist < min_dist) min_dist = dist;if (dist > max_dist) max_dist = dist;}printf("-- Max dist : %f \n", max_dist);printf("-- Min dist : %f \n", min_dist);//当描述子之间的距离大于两倍的最小距离时,即认为匹配有误.但有时候最小距离会非常小,设置一个经验值30作为下限.for (int i = 0; i < descriptors_1.rows; i++) {if (match[i].distance <= max(2 * min_dist, 30.0)) {matches.push_back(match[i]);}}
}
二、使用本质矩阵求解R,T
第二步:根据匹配点对,依据对极几何约束原理,求相机运动的R,t
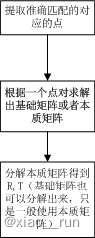
void pose_estimation_2d2d(const std::vector<KeyPoint> &keypoints_1,const std::vector<KeyPoint> &keypoints_2,const std::vector<DMatch> &matches,Mat &R, Mat &t) {// 相机内参,TUM Freiburg2Mat K = (Mat_<double>(3, 3) << 520.9, 0, 325.1, 0, 521.0, 249.7, 0, 0, 1);//-- 把匹配点转换为vector<Point2f>的形式vector<Point2f> points1;vector<Point2f> points2;for (int i = 0; i < (int) matches.size(); i++) {points1.push_back(keypoints_1[matches[i].queryIdx].pt);points2.push_back(keypoints_2[matches[i].trainIdx].pt);}//-- 计算本质矩阵Point2d principal_point(325.1, 249.7);        //相机主点, TUM dataset标定值int focal_length = 521;            //相机焦距, TUM dataset标定值Mat essential_matrix;essential_matrix = findEssentialMat(points1, points2, focal_length, principal_point);//-- 从本质矩阵中恢复旋转和平移信息.recoverPose(essential_matrix, points1, points2, R, t, focal_length, principal_point);
}
三、由R,T三角化空间坐标
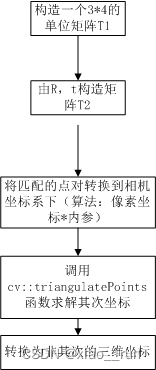
第三步:根据针孔相机模型的公式,由 R,t估计特征点的空间坐标
//三角化,根据匹配点和求解到的三维点。存储在points中
void triangulation(const vector<KeyPoint> &keypoint_1,const vector<KeyPoint> &keypoint_2,const std::vector<DMatch> &matches,const Mat &R, const Mat &t,vector<Point3d> &points) {Mat T1 = (Mat_<float>(3, 4) <<1, 0, 0, 0,0, 1, 0, 0,0, 0, 1, 0);//根据求解到的RT构造T2矩阵Mat T2 = (Mat_<float>(3, 4) <<R.at<double>(0, 0), R.at<double>(0, 1), R.at<double>(0, 2), t.at<double>(0, 0),R.at<double>(1, 0), R.at<double>(1, 1), R.at<double>(1, 2), t.at<double>(1, 0),R.at<double>(2, 0), R.at<double>(2, 1), R.at<double>(2, 2), t.at<double>(2, 0));//相机内参Mat K = (Mat_<double>(3, 3) << 520.9, 0, 325.1, 0, 521.0, 249.7, 0, 0, 1);vector<Point2f> pts_1, pts_2;for (DMatch m:matches) {// 将像素坐标转换至相机坐标pts_1.push_back(pixel2cam(keypoint_1[m.queryIdx].pt, K));pts_2.push_back(pixel2cam(keypoint_2[m.trainIdx].pt, K));}Mat pts_4d;cv::triangulatePoints(T1, T2, pts_1, pts_2, pts_4d);// 转换成非齐次坐标for (int i = 0; i < pts_4d.cols; i++) {Mat x = pts_4d.col(i);x /= x.at<float>(3, 0); // 归一化Point3d p(x.at<float>(0, 0),x.at<float>(1, 0),x.at<float>(2, 0));points.push_back(p);}
}
其中 triangulatePoints()的具体用法为
triangulatePoints(T1, T2, left, right, points_final) ;Mat T1 = (Mat_<float>(3, 4) <<1, 0, 0, 0,0, 1, 0, 0,0, 0, 1, 0);
Mat T2 = (Mat_<float>(3, 4) <<R.at<double>(0, 0), R.at<double>(0, 1), R.at<double>(0, 2), T.at<double>(0, 0),R.at<double>(1, 0), R.at<double>(1, 1), R.at<double>(1, 2), T.at<double>(1, 0),R.at<double>(2, 0), R.at<double>(2, 1), R.at<double>(2, 2), T.at<double>(2, 0));`
triangulatePoints(T1, T2, left, right, points_final) ;其中T2为3x4的[R|T]矩阵,left、right为相机坐标系下的归一化坐标,
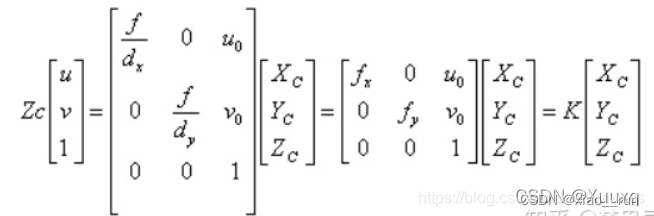
因此不能直接使用提取到的像素坐标。应首先将像素坐标通过相机内参转化到相机坐标系下。
所以通过函数pixel2cam可将像素坐标转换到归一化相机坐标系下
归一化坐标:X=(u-u0)/fx
//像素坐标到归一化平面相机坐标的转换
Point2f pixel2cam(const Point2f& p, const Mat& K)
{return Point2f((p.x - K.at<double>(0, 2)) / K.at<double>(0, 0),(p.y - K.at<double>(1, 2)) / K.at<double>(1, 1));
}
四、代码demo
总的代码为:
#include <iostream>
#include <opencv2/opencv.hpp>
// #include "extra.h" // used in opencv2
using namespace std;
using namespace cv;void find_feature_matches(const Mat &img_1, const Mat &img_2,std::vector<KeyPoint> &keypoints_1,std::vector<KeyPoint> &keypoints_2,std::vector<DMatch> &matches);void pose_estimation_2d2d(const std::vector<KeyPoint> &keypoints_1,const std::vector<KeyPoint> &keypoints_2,const std::vector<DMatch> &matches,Mat &R, Mat &t);void triangulation(const vector<KeyPoint> &keypoint_1,const vector<KeyPoint> &keypoint_2,const std::vector<DMatch> &matches,const Mat &R, const Mat &t,vector<Point3d> &points
);/// 作图用
inline cv::Scalar get_color(float depth) {float up_th = 50, low_th = 10, th_range = up_th - low_th;if (depth > up_th) depth = up_th;if (depth < low_th) depth = low_th;return cv::Scalar(255 * depth / th_range, 0, 255 * (1 - depth / th_range));
}// 像素坐标转相机归一化坐标
Point2f pixel2cam(const Point2d &p, const Mat &K);int main(int argc, char **argv) {if (argc != 3) {cout << "usage: triangulation img1 img2" << endl;return 1;}//-- 读取图像Mat img_1 = imread(argv[1], CV_LOAD_IMAGE_COLOR);Mat img_2 = imread(argv[2], CV_LOAD_IMAGE_COLOR);vector<KeyPoint> keypoints_1, keypoints_2;vector<DMatch> matches;find_feature_matches(img_1, img_2, keypoints_1, keypoints_2, matches);cout << "一共找到了" << matches.size() << "组匹配点" << endl;//-- 估计两张图像间运动Mat R, t;pose_estimation_2d2d(keypoints_1, keypoints_2, matches, R, t);//-- 三角化vector<Point3d> points;//tr是三维点triangulation(keypoints_1, keypoints_2, matches, R, t, tr);//-- 验证三角化点与特征点的重投影关系Mat K = (Mat_<double>(3, 3) << 520.9, 0, 325.1, 0, 521.0, 249.7, 0, 0, 1);Mat img1_plot = img_1.clone();Mat img2_plot = img_2.clone();for (int i = 0; i < matches.size(); i++) {// 第一个图float depth1 = points[i].z;cout << "depth: " << depth1 << endl;Point2d pt1_cam = pixel2cam(keypoints_1[matches[i].queryIdx].pt, K);cv::circle(img1_plot, keypoints_1[matches[i].queryIdx].pt, 2, get_color(depth1), 2);// 第二个图Mat pt2_trans = R * (Mat_<double>(3, 1) << points[i].x, points[i].y, points[i].z) + t;float depth2 = pt2_trans.at<double>(2, 0);cv::circle(img2_plot, keypoints_2[matches[i].trainIdx].pt, 2, get_color(depth2), 2);}cv::imshow("img 1", img1_plot);cv::imshow("img 2", img2_plot);cv::waitKey();return 0;
}void find_feature_matches(const Mat &img_1, const Mat &img_2,std::vector<KeyPoint> &keypoints_1,std::vector<KeyPoint> &keypoints_2,std::vector<DMatch> &matches) {//-- 初始化Mat descriptors_1, descriptors_2;// used in OpenCV3Ptr<FeatureDetector> detector = ORB::create();Ptr<DescriptorExtractor> descriptor = ORB::create();// use this if you are in OpenCV2// Ptr<FeatureDetector> detector = FeatureDetector::create ( "ORB" );// Ptr<DescriptorExtractor> descriptor = DescriptorExtractor::create ( "ORB" );Ptr<DescriptorMatcher> matcher = DescriptorMatcher::create("BruteForce-Hamming");//-- 第一步:检测 Oriented FAST 角点位置detector->detect(img_1, keypoints_1);detector->detect(img_2, keypoints_2);//-- 第二步:根据角点位置计算 BRIEF 描述子descriptor->compute(img_1, keypoints_1, descriptors_1);descriptor->compute(img_2, keypoints_2, descriptors_2);//-- 第三步:对两幅图像中的BRIEF描述子进行匹配,使用 Hamming 距离vector<DMatch> match;// BFMatcher matcher ( NORM_HAMMING );matcher->match(descriptors_1, descriptors_2, match);//-- 第四步:匹配点对筛选double min_dist = 10000, max_dist = 0;//找出所有匹配之间的最小距离和最大距离, 即是最相似的和最不相似的两组点之间的距离for (int i = 0; i < descriptors_1.rows; i++) {double dist = match[i].distance;if (dist < min_dist) min_dist = dist;if (dist > max_dist) max_dist = dist;}printf("-- Max dist : %f \n", max_dist);printf("-- Min dist : %f \n", min_dist);//当描述子之间的距离大于两倍的最小距离时,即认为匹配有误.但有时候最小距离会非常小,设置一个经验值30作为下限.for (int i = 0; i < descriptors_1.rows; i++) {if (match[i].distance <= max(2 * min_dist, 30.0)) {matches.push_back(match[i]);}}
}void pose_estimation_2d2d(const std::vector<KeyPoint> &keypoints_1,const std::vector<KeyPoint> &keypoints_2,const std::vector<DMatch> &matches,Mat &R, Mat &t) {// 相机内参,TUM Freiburg2Mat K = (Mat_<double>(3, 3) << 520.9, 0, 325.1, 0, 521.0, 249.7, 0, 0, 1);//-- 把匹配点转换为vector<Point2f>的形式vector<Point2f> points1;vector<Point2f> points2;for (int i = 0; i < (int) matches.size(); i++) {points1.push_back(keypoints_1[matches[i].queryIdx].pt);points2.push_back(keypoints_2[matches[i].trainIdx].pt);}//-- 计算本质矩阵Point2d principal_point(325.1, 249.7);        //相机主点, TUM dataset标定值int focal_length = 521;            //相机焦距, TUM dataset标定值Mat essential_matrix;essential_matrix = findEssentialMat(points1, points2, focal_length, principal_point);//-- 从本质矩阵中恢复旋转和平移信息.recoverPose(essential_matrix, points1, points2, R, t, focal_length, principal_point);
}//三角化,根据匹配点和求解到的三维点。存储在points中
void triangulation(const vector<KeyPoint> &keypoint_1,const vector<KeyPoint> &keypoint_2,const std::vector<DMatch> &matches,const Mat &R, const Mat &t,vector<Point3d> &points) {Mat T1 = (Mat_<float>(3, 4) <<1, 0, 0, 0,0, 1, 0, 0,0, 0, 1, 0);//根据求解到的RT构造T2矩阵Mat T2 = (Mat_<float>(3, 4) <<R.at<double>(0, 0), R.at<double>(0, 1), R.at<double>(0, 2), t.at<double>(0, 0),R.at<double>(1, 0), R.at<double>(1, 1), R.at<double>(1, 2), t.at<double>(1, 0),R.at<double>(2, 0), R.at<double>(2, 1), R.at<double>(2, 2), t.at<double>(2, 0));//相机内参Mat K = (Mat_<double>(3, 3) << 520.9, 0, 325.1, 0, 521.0, 249.7, 0, 0, 1);vector<Point2f> pts_1, pts_2;for (DMatch m:matches) {// 将像素坐标转换至相机坐标pts_1.push_back(pixel2cam(keypoint_1[m.queryIdx].pt, K));pts_2.push_back(pixel2cam(keypoint_2[m.trainIdx].pt, K));}Mat pts_4d;cv::triangulatePoints(T1, T2, pts_1, pts_2, pts_4d);// 转换成非齐次坐标for (int i = 0; i < pts_4d.cols; i++) {Mat x = pts_4d.col(i);x /= x.at<float>(3, 0); // 归一化Point3d p(x.at<float>(0, 0),x.at<float>(1, 0),x.at<float>(2, 0));points.push_back(p);}
}Point2f pixel2cam(const Point2d &p, const Mat &K) {return Point2f((p.x - K.at<double>(0, 2)) / K.at<double>(0, 0),(p.y - K.at<double>(1, 2)) / K.at<double>(1, 1));
}