DAMO-YOLO训练自己的数据集,使用onnxruntime推理部署
DAMO-YOLO 是阿里达摩院智能计算实验室开发的一种兼顾速度与精度的目标检测算法,在高精度的同时,保持了很高的推理速度。
DAMO-YOLO 是在 YOLO 框架基础上引入了一系列新技术,对整个检测框架进行了大幅的修改。具体包括:
- 基于 NAS 搜索的新检测 backbone 结构,利用 MAE-NAS 方法快速搜索出适合检测任务的网络结构,比如MAE-NAS-L35 和 MAE-NAS-L45。
- 更深的 neck 结构,采用 RepGFPN技术,实现了高效的多尺度特征融合,提升了特征表达能力和模型性能。 精简的 head 结构,采用 ZeroHead技术,减少了冗余的参数和计算量,提高了模型速度和精度。
- 引入蒸馏技术实现效果的进一步提升,利用大模型作为教师模型,小模型作为学生模型,通过知识蒸馏方法提高小模型的泛化能力。
- DAMO-YOLO还提供高效的训练策略和便捷易用的部署工具,能够快速解决工业落地中的实际问题。可以通过以下链接访问 DAMO-YOLO的代码和文档,或者通过以下链接访问 DAMO-YOLO 在 ModelScope 平台上的在线体验。
1.modelscope平台:https://modelscope.cn/models/damo/cv_tinynas_objectdetection_damoyolo/summary
2.github链接:https://github.com/tinyvision/DAMO-YOLO

1.数据准备
DAMO-YOLO目前支持coco数据集和voc数据集格式,本文推荐使用coco数据集格式,如果您是用labelimg标注的xml文件,可以使用下述voc2coco.py脚本进行一键转换(需要按我的格式摆放数据,否则的话需要改脚本中的路径):
.
├── ./voc2coco.py
├── ./data
│   ├── ./data/Annotations
│   │   ├── ./data/Annotations/0.xml
│   │   ├── ./data/Annotations/1000.xml
│   │   ├── ...
│   ├── ./data/images
│   │   ├── ./data/images/0.jpg
│   │   ├── ./data/images/1000.jpg
│   │   ├── ...
voc2coco.py脚本,注意需要改下category_set类别(换成自己数据集的):
import xml.etree.ElementTree as ET
import os
import json
import collections
import random
import shutilcategory_set = ['ship']# 设置随机数种子,可以是任意整数
random_seed = 42# 设置随机数种子
random.seed(random_seed)coco_train = dict()
coco_train['images'] = []
coco_train['type'] = 'instances'
coco_train['annotations'] = []
coco_train['categories'] = []coco_val = dict()
coco_val['images'] = []
coco_val['type'] = 'instances'
coco_val['annotations'] = []
coco_val['categories'] = []# category_set = dict()
image_set = set()
train_image_id = 1
val_image_id = 200000  # Assuming you have less than 200000 images
category_item_id = 1
annotation_id = 1def split_list_by_ratio(input_list, ratio=0.8):# 计算切分的索引位置split_index = int(len(input_list) * ratio)# 随机打乱列表random.shuffle(input_list)# 划分为两个列表并返回return input_list[:split_index], input_list[split_index:]def addCatItem(name):'''增加json格式中的categories部分'''global category_item_idcategory_item = collections.OrderedDict()category_item['supercategory'] = 'none'category_item['id'] = category_item_idcategory_item['name'] = namecoco_train['categories'].append(category_item)coco_val['categories'].append(category_item)category_item_id += 1def addImgItem(file_name, size, img_suffixes, is_train):global train_image_id # 声明变量为全局变量global val_image_id # 声明变量为全局变量# global image_idif file_name is None:raise Exception('Could not find filename tag in xml file.')if size['width'] is None:raise Exception('Could not find width tag in xml file.')if size['height'] is None:raise Exception('Could not find height tag in xml file.')# image_item = dict() #按照一定的顺序,这里采用collections.OrderedDict()image_item = collections.OrderedDict()jpg_name = os.path.splitext(file_name)[0] + img_suffixesimage_item['file_name'] = jpg_nameimage_item['width'] = size['width']image_item['height'] = size['height']# image_item['id'] = image_id# coco['images'].append(image_item)if is_train:image_item['id'] = train_image_idcoco_train['images'].append(image_item)image_id = train_image_idtrain_image_id += 1else:image_item['id'] = val_image_idcoco_val['images'].append(image_item)image_id = val_image_idval_image_id += 1image_set.add(jpg_name)image_id = image_id + 1return image_iddef addAnnoItem(object_name, image_id, category_id, bbox, is_train):global annotation_id# annotation_item = dict()annotation_item = collections.OrderedDict()annotation_item['segmentation'] = []seg = []# bbox[] is x,y,w,h# left_topseg.append(bbox[0])seg.append(bbox[1])# left_bottomseg.append(bbox[0])seg.append(bbox[1] + bbox[3])# right_bottomseg.append(bbox[0] + bbox[2])seg.append(bbox[1] + bbox[3])# right_topseg.append(bbox[0] + bbox[2])seg.append(bbox[1])annotation_item['segmentation'].append(seg)annotation_item['area'] = bbox[2] * bbox[3]annotation_item['iscrowd'] = 0annotation_item['image_id'] = image_idannotation_item['bbox'] = bboxannotation_item['category_id'] = category_idannotation_item['id'] = annotation_idannotation_item['ignore'] = 0annotation_id += 1# coco['annotations'].append(annotation_item)if is_train:coco_train['annotations'].append(annotation_item)else:coco_val['annotations'].append(annotation_item)def parseXmlFiles(xml_path, xmllist, img_suffixes, is_train):for f in xmllist:if not f.endswith('.xml'):continuebndbox = dict()size = dict()current_image_id = Nonecurrent_category_id = Nonefile_name = Nonesize['width'] = Nonesize['height'] = Nonesize['depth'] = Nonexml_file = os.path.join(xml_path, f)print(xml_file)tree = ET.parse(xml_file)root = tree.getroot() # 抓根结点元素if root.tag != 'annotation': # 根节点标签raise Exception('pascal voc xml root element should be annotation, rather than {}'.format(root.tag))# elem is <folder>, <filename>, <size>, <object>for elem in root:current_parent = elem.tagcurrent_sub = Noneobject_name = None# elem.tag, elem.attrib,elem.textif elem.tag == 'folder':continueif elem.tag == 'filename':file_name = elem.textif file_name in category_set:raise Exception('file_name duplicated')# add img item only after parse <size> tagelif current_image_id is None and file_name is not None and size['width'] is not None:if file_name not in image_set:current_image_id = addImgItem(file_name, size, img_suffixes, is_train) # 图片信息print('add image with {} and {}'.format(file_name, size))else:raise Exception('duplicated image: {}'.format(file_name))# subelem is <width>, <height>, <depth>, <name>, <bndbox>for subelem in elem:bndbox['xmin'] = Nonebndbox['xmax'] = Nonebndbox['ymin'] = Nonebndbox['ymax'] = Nonecurrent_sub = subelem.tagif current_parent == 'object' and subelem.tag == 'name':object_name = subelem.text# if object_name not in category_set:# current_category_id = addCatItem(object_name)# else:# current_category_id = category_set[object_name]current_category_id = category_set.index(object_name) + 1 # index默认从0开始,但是json文件是从1开始,所以+1elif current_parent == 'size':if size[subelem.tag] is not None:raise Exception('xml structure broken at size tag.')size[subelem.tag] = int(subelem.text)# option is <xmin>, <ymin>, <xmax>, <ymax>, when subelem is <bndbox>for option in subelem:if current_sub == 'bndbox':if bndbox[option.tag] is not None:raise Exception('xml structure corrupted at bndbox tag.')bndbox[option.tag] = int(option.text)# only after parse the <object> tagif bndbox['xmin'] is not None:if object_name is None:raise Exception('xml structure broken at bndbox tag')if current_image_id is None:raise Exception('xml structure broken at bndbox tag')if current_category_id is None:raise Exception('xml structure broken at bndbox tag')bbox = []# xbbox.append(bndbox['xmin'])# ybbox.append(bndbox['ymin'])# wbbox.append(bndbox['xmax'] - bndbox['xmin'])# hbbox.append(bndbox['ymax'] - bndbox['ymin'])print('add annotation with {},{},{},{}'.format(object_name, current_image_id - 1, current_category_id,bbox))addAnnoItem(object_name, current_image_id - 1, current_category_id, bbox, is_train)def copy_img(img_path, file_list, img_suffixes, new_folder):# global train_image_id # 将train_image_id声明为全局变量# global val_image_id # 将val_image_id声明为全局变量parent_directory = os.path.dirname(img_path)dest_folder = os.path.join(parent_directory, new_folder)# 创建目标文件夹if not os.path.exists(dest_folder):os.makedirs(dest_folder)for each_file in file_list:file_prefix = os.path.splitext(each_file)[0]old_img_path = os.path.join(img_path, file_prefix + img_suffixes)new_img_path = os.path.join(dest_folder, file_prefix + img_suffixes)shutil.copy(old_img_path, new_img_path)# print(f'已拷贝图片到{new_img_path}')# 更新image_id# if new_folder == 'train':# train_image_id += 1# else:# val_image_id += 1def check_image_folder_suffix(folder_path):# 获取文件夹中所有文件的后缀名,并将它们放入一个集合(set)中file_suffixes = set()for file_name in os.listdir(folder_path):if os.path.isfile(os.path.join(folder_path, file_name)):_, file_suffix = os.path.splitext(file_name)file_suffixes.add(file_suffix)# 检查集合中后缀名的数量,如果数量为1,则所有图片都是同一个后缀,返回后缀名,否则报错assert len(file_suffixes) == 1, "图片文件夹中的后缀名不统一"return file_suffixes.pop()if __name__ == '__main__':# 存放img和xml的文件夹img_path = 'data/images'xml_path = 'data/Annotations'# 确保img文件夹中只有一种格式img_suffixes = check_image_folder_suffix(img_path)annotation_folder = os.path.join('data', 'annotations')os.makedirs(annotation_folder, exist_ok=True)# 保存生成的coco格式的json路径train_json_file = os.path.join(annotation_folder, 'instances_train2017.json')val_json_file = os.path.join(annotation_folder, 'instances_val2017.json')# 添加categories部分for categoryname in category_set:addCatItem(categoryname)# 获取所有的XML文件列表xmllist = os.listdir(xml_path)# 按8:2的随机比例划分为两个列表train_list, val_list = split_list_by_ratio(xmllist, ratio=0.8)print(train_list)print('--------------------')print(val_list)# 拷贝图片到新的文件夹copy_img(img_path, train_list, img_suffixes, 'train2017')copy_img(img_path, val_list, img_suffixes, 'val2017')parseXmlFiles(xml_path, train_list, img_suffixes, True)parseXmlFiles(xml_path, val_list, img_suffixes, False)json.dump(coco_train, open(train_json_file, 'w'))json.dump(coco_val, open(val_json_file, 'w'))运行完成后,则会在data下生成train2017/val2017/annotations文件夹,注意自己准备的coco数据集名字也需要和下面一样,否则的话需要去改下demo-yolo源码:
.
├── ./voc2coco.py
├── ./data
│   ├── ./data/train2017
│   │   ├── ./data/train2017/0.jpg
│   │   ├── ./data/train2017/3.jpg
│   │   ├── ...
│   ├── ./data/val2017
│   │   ├── ./data/val2017/5.jpg
│   │   ├── ./data/val2017/16.jpg
│   │   ├── ...
│   ├── ./data/annotations
│   │   ├── ./data/annotations/instances_train2017.json
│   │   ├── ./data/annotations/instances_val2017.json
最后,将上述的data文件夹,整个移动到datasets文件夹下。
2.安装依赖
按照官方提供的安装方式即可,python和torch版本使用更高版本,尤其需要注意export PYTHONPATH=$PWD:$PYTHONPATH这一行命令,它是一个Shell命令,用于将当前工作目录(通过 $PWD 获取)添加到python的模块搜索路径中,以便python可以找到并导入在当前工作目录下的自定义模块或库。如果重开终端,则需要重新export一下,如果不想这么麻烦,也可以把他写入到~/.bashrc文件中,记得改下自己的路径;另外,别使用python setup.py install,我之前一直以为是这么安装的,结果一直报包不存在,官方仓库中也有对这一点的讨论https://github.com/tinyvision/DAMO-YOLO/issues/13
(1)安装DAMO-YOLO
git clone https://github.com/tinyvision/DAMO-YOLO.git
cd DAMO-YOLO/
conda create -n DAMO-YOLO python=3.7 -y
conda activate DAMO-YOLO
conda install pytorch==1.7.0 torchvision==0.8.0 torchaudio==0.7.0 cudatoolkit=10.2 -c pytorch
pip install -r requirements.txt
export PYTHONPATH=$PWD:$PYTHONPATH
(2)安装pycocotools
pip install cython;
pip install git+https://github.com/cocodataset/cocoapi.git#subdirectory=PythonAPI # for Linux
pip install git+https://github.com/philferriere/cocoapi.git#subdirectory=PythonAPI # for Windows
3.修改配置文件
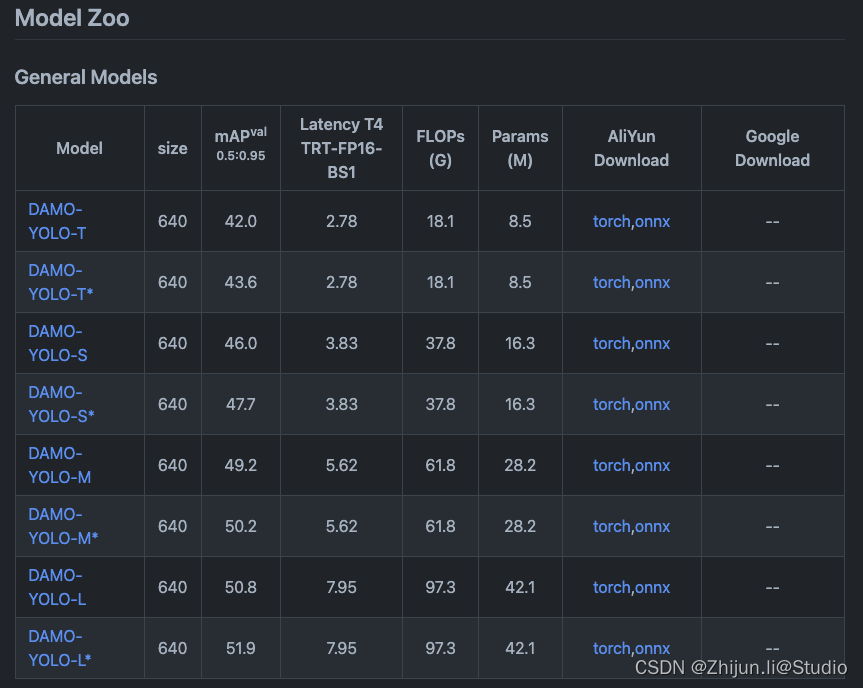
DAMO-YOLO基础网络共有T/S/M/L等模型,并且还有一些轻量化的网络,根据需要的模型大小,下载对应的torch预训练模型,这里我们以s为例:
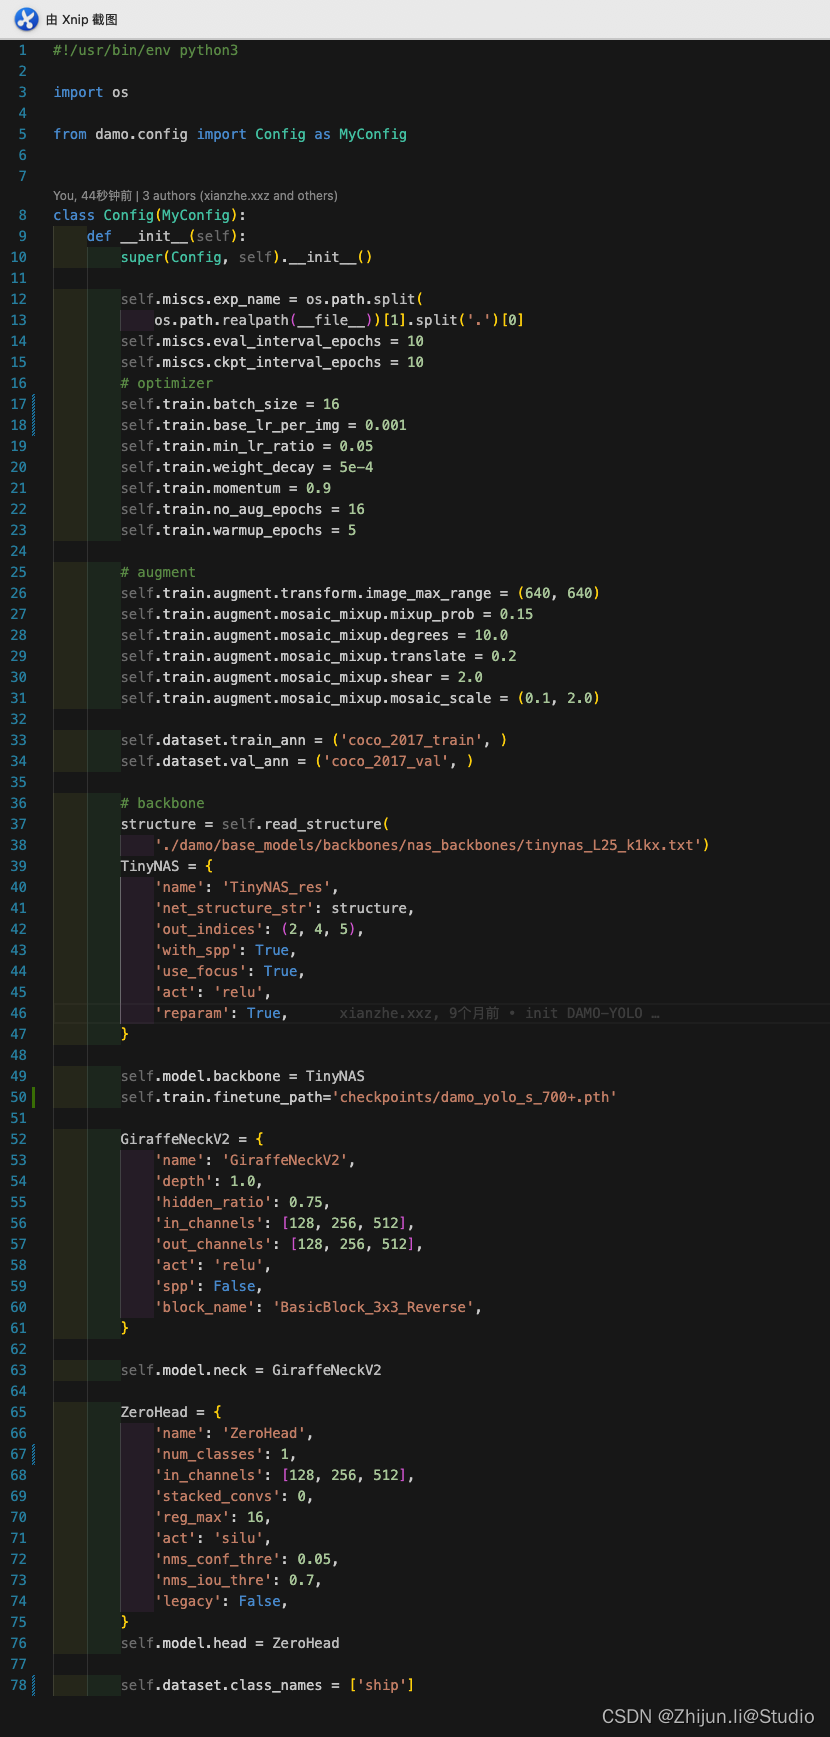
在configs/damoyolo_tinynasL25_S.py下找到对应的配置文件,可以按自己的数据集修改下batch_size/base_lr_per_img/image_max_range,ZeroHead下的num_classes以及class_names需要修改为自己的数据集对应数量及名称
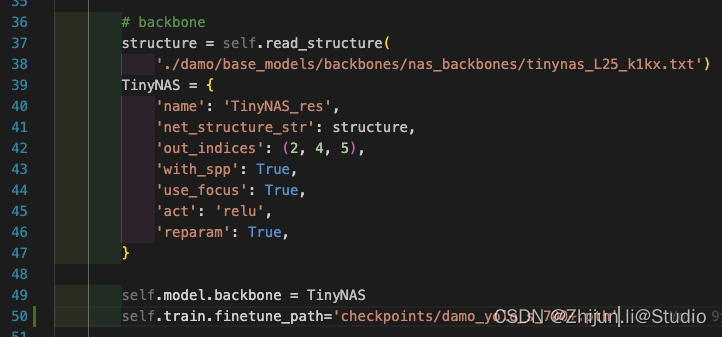
特别注意一点,如果需要使用预训练模型,则需要在文件下加入self.train.finetune_path,后面跟下载好的权重路径:
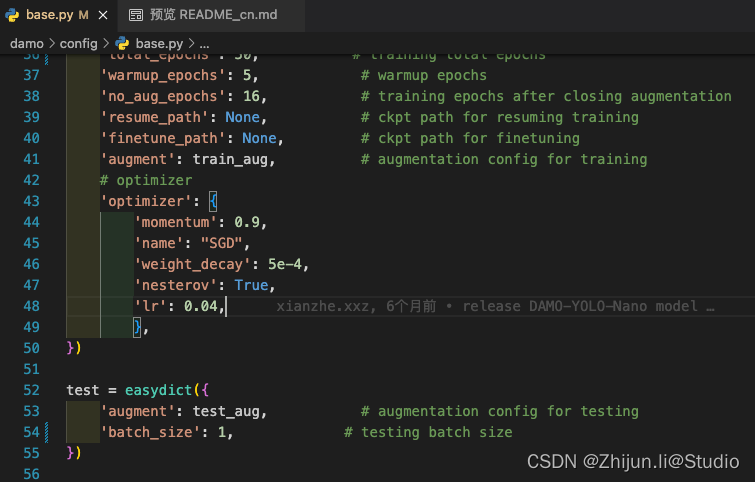
如果验证阶段报显存满了的错误,则需要修改下damo/config/base.py下的test的batch_size
4.训练->验证->推理->导出
单卡训练:
python -m torch.distributed.launch --nproc_per_node=1 tools/train.py -f configs/damoyolo_tinynasL25_S.py
多卡训练:
python -m torch.distributed.launch --nproc_per_node=4 tools/train.py -f configs/damoyolo_tinynasL25_S.py
模型验证:
python -m torch.distributed.launch --nproc_per_node=1 tools/eval.py -f configs/damoyolo_tinynasL25_S.py -c workdirs/damoyolo_tinynasL25_S/latest_ckpt.pth --fuse --conf 0.25 --nms 0.45
模型推理:
python -m torch.distributed.launch --nproc_per_node=1 tools/demo.py -p datasets/JPEGImages/11.jpg -f configs/damoyolo_tinynasL25_S.py --engine workdirs/damoyolo_tinynasL25_S/latest_ckpt.pth --infer_size 640 640
模型导出:
# onnx export
python tools/converter.py -f configs/damoyolo_tinynasL25_S.py -c workdirs/damoyolo_tinynasL25_S/latest_ckpt.pth --batch_size 1 --img_size 640# trt export
python tools/converter.py -f configs/damoyolo_tinynasL25_S.py -c workdirs/damoyolo_tinynasL25_S/latest_ckpt.pth --batch_size 1 --img_size 640 --trt --end2end --trt_eval
5.onnxruntime推理
进入damo-onnx文件夹,修改infer.py的相关参数,主要是模型路径、图片路径等,代码如下,该代码会遍历文件夹中的所有图片,对其进行推理后保存在指定文件夹中(注意需要修改下damo-onnx/coco_classes.txt下的类别名):
import cv2
import os
import copy
from damoyolo.damoyolo_onnx import DAMOYOLO
import torchdef main():# 指定参数model_path = 'damoyolo/model/damoyolo_tinynasL35_M.onnx'score_th = 0.4nms_th = 0.85coco_classes = get_coco_classes()# 指定输入图片文件夹和输出图片文件夹input_folder = '/home/lzj/ssd2t/01.my_algo/damo-yolo/datasets/data/val2017'output_folder = 'output_images_folder'# 创建输出文件夹if not os.path.exists(output_folder):os.makedirs(output_folder)# 初始化模型model = DAMOYOLO(model_path)print(f"Model loaded: {model_path}")# 遍历输入文件夹中的图片for filename in os.listdir(input_folder):if filename.endswith(('.jpg', '.png', '.jpeg')):image_path = os.path.join(input_folder, filename)image = cv2.imread(image_path)# 进行推理bboxes, scores, class_ids = model(image, nms_th=nms_th)# 绘制结果并保存图片result_image = draw_debug(image, score_th, bboxes, scores, class_ids, coco_classes)output_path = os.path.join(output_folder, filename)cv2.imwrite(output_path, result_image)print(f"Output saved: {output_path}")def draw_debug(image, score_th, bboxes, scores, class_ids, coco_classes):debug_image = copy.deepcopy(image)for bbox, score, class_id in zip(bboxes, scores, class_ids):x1, y1, x2, y2 = int(bbox[0]), int(bbox[1]), int(bbox[2]), int(bbox[3])if score_th > score:continue# 绘制边界框debug_image = cv2.rectangle(debug_image, (x1, y1), (x2, y2), (0, 255, 0), thickness=2)# 显示类别和分数score = '%.2f' % scoretext = '%s:%s' % (str(coco_classes[int(class_id)]), score)debug_image = cv2.putText(debug_image, text, (x1, y1 - 10), cv2.FONT_HERSHEY_SIMPLEX, 0.7, (0, 255, 0), thickness=2)return debug_imagedef get_coco_classes():with open('coco_classes.txt', 'rt') as f:coco_classes = f.read().rstrip('\n').split('\n')return coco_classesif __name__ == '__main__':main()
至此,已经完成自己的数据集训练damo-yolo模型,并且使用onnx推理;完整代码已经放在github中:https://github.com/ZhijunLStudio/DAMO-YOLO-ONNX
如果还有tensorrt的推理需求,可以参考这个仓库:https://github.com/hpc203/DAMO-YOLO-detect-onnxrun-cpp-py
参考:
1.https://github.com/tinyvision/DAMO-YOLO
2.https://github.com/Kazuhito00/DAMO-YOLO-ONNX-Sample

