前言
紧接上回在windows上安装了最新版的RabbitMQ:
RabbitMQ:windows最新版本4.0.5安装方案-CSDN博客
这是官方给出的使用文档:How to Use RabbitMQ | RabbitMQ
这里我给出通过AI学习到的python使用方法
理论截图
python直接使用pip安装pika模块即可开始使用RabbitMQ:
pip install pika
常用需要实现的队列模式


代码实现
话不多说,直接上代码
1、连接和关闭RabbitMQ服务
import pika# 创建连接
# 使用自定义的用户名和密码连接到 RabbitMQ
credentials = pika.PlainCredentials('manfish', '52manfish')
connection_params = pika.ConnectionParameters(host='localhost',  # RabbitMQ 服务器的主机名port=5672,         # RabbitMQ 的默认端口virtual_host='manfish',  # 虚拟主机名称credentials=credentials  # 认证凭证
)connection = pika.BlockingConnection(connection_params)
channel = connection.channel()# 声明队列json_queue
queue_name = 'json_queue'
channel.queue_declare(queue=queue_name)# 关闭连接
connection.close()
注意:当不填写账号密码时,模块将自动以guest管理员默认账密(guest/guest)连接,不建议养成这种习惯
另:用户需要使用相同虚拟主机传递队列消息
这里是webui上设置账密及分配虚拟主机的截图:


2、直接队列
消费者
import pika
import json# 创建连接
# 使用自定义的用户名和密码连接到 RabbitMQ
credentials = pika.PlainCredentials('manfish1', '123456')
connection_params = pika.ConnectionParameters(host='localhost',  # RabbitMQ 服务器的主机名port=5672,         # RabbitMQ 的默认端口virtual_host='manfish1',  # 虚拟主机名称credentials=credentials  # 认证凭证
)connection = pika.BlockingConnection(connection_params)
channel = connection.channel()# 声明队列
queue_name = 'json_queue'
channel.queue_declare(queue=queue_name)# 定义回调函数
def callback(ch, method, properties, body):print('------- get a msg -------')# 将 JSON 字符串反序列化为 Python 对象message_data = json.loads(body)print(f" [x] Received JSON message: {message_data}")# 打印 method 参数的详细信息print(f" [x] Delivery tag: {method.delivery_tag}")print(f" [x] Exchange: {method.exchange}")print(f" [x] Routing key: {method.routing_key}")print(f" [x] Redelivered: {method.redelivered}")# 打印 properties 参数的详细信息print(f" [x] Correlation ID: {properties.correlation_id}")print(f" [x] Content type: {properties.content_type}")print(f" [x] Headers: {properties.headers}")print(f" [x] Message ID: {properties.message_id}")print(f" [x] Timestamp: {properties.timestamp}")print(f" [x] User ID: {properties.user_id}")print(f" [x] App ID: {properties.app_id}")# 开始消费
channel.basic_consume(queue=queue_name, on_message_callback=callback, auto_ack=True)print(' [*] Waiting for messages. To exit press CTRL+C')
channel.start_consuming()
生产者
import pika
import json# 创建连接
credentials = pika.PlainCredentials('manfish', '123456')
connection_params = pika.ConnectionParameters(host='localhost', # RabbitMQ 服务器的主机名port=5672, # RabbitMQ 的默认端口virtual_host='manfish1', # 虚拟主机名称credentials=credentials # 认证凭证
)connection = pika.BlockingConnection(connection_params)
channel = connection.channel()# 声明队列
queue_name = 'json_queue'
channel.queue_declare(queue=queue_name)# 创建一个 Python 字典
message_data = {'name': 'Alice','age': 30,'city': 'New York'
}# 将字典转换为 JSON 字符串
message = json.dumps(message_data)# 发送 JSON 数据
channel.basic_publish(exchange='',routing_key=queue_name,body=message
)
print(f" [x] Sent JSON message: {message}")# 关闭连接
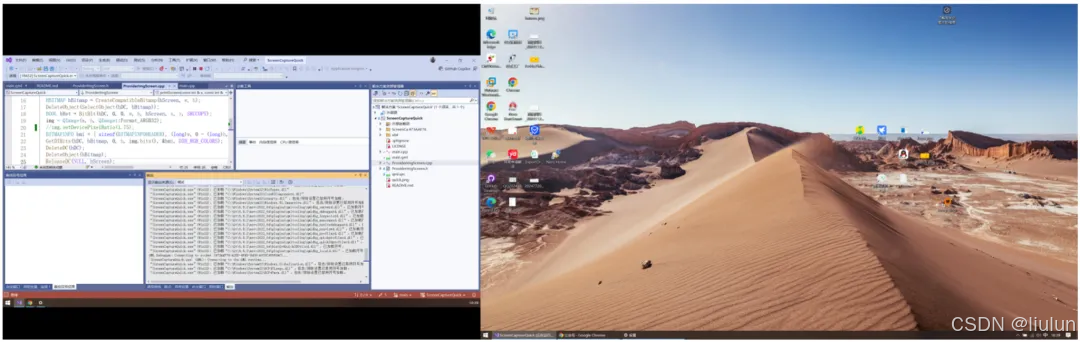
connection.close()截图

3、主题队列
消费者
import pika
import json# 创建连接
# 使用自定义的用户名和密码连接到 RabbitMQ
credentials = pika.PlainCredentials('manfish1', '123456')
connection_params = pika.ConnectionParameters(host='localhost',  # RabbitMQ 服务器的主机名port=5672,         # RabbitMQ 的默认端口virtual_host='manfish1',  # 虚拟主机名称credentials=credentials  # 认证凭证
)connection = pika.BlockingConnection(connection_params)
channel = connection.channel()# 声明交换机
exchange_name = 'topic_exchange'
channel.exchange_declare(exchange=exchange_name, exchange_type='topic')# 声明队列
result = channel.queue_declare('', exclusive=True)
queue_name = result.method.queue# 绑定队列到交换机
binding_key = 'user.*'
channel.queue_bind(exchange=exchange_name,queue=queue_name,routing_key=binding_key
)# 定义回调函数
def callback(ch, method, properties, body):print('------- get a msg -------')print(f" [x] Received message: {body}")# 打印 method 参数的详细信息print(f" [x] Delivery tag: {method.delivery_tag}")print(f" [x] Exchange: {method.exchange}")print(f" [x] Routing key: {method.routing_key}")print(f" [x] Redelivered: {method.redelivered}")# 打印 properties 参数的详细信息print(f" [x] Correlation ID: {properties.correlation_id}")print(f" [x] Content type: {properties.content_type}")print(f" [x] Headers: {properties.headers}")print(f" [x] Message ID: {properties.message_id}")print(f" [x] Timestamp: {properties.timestamp}")print(f" [x] User ID: {properties.user_id}")print(f" [x] App ID: {properties.app_id}")# 确认消息ch.basic_ack(delivery_tag=method.delivery_tag)# 开始消费
# auto_ack为True时自动确认消息,但既为True又在回调中使用了ch.basic_ack(),则会导致报错——重复确认
channel.basic_consume(queue=queue_name, on_message_callback=callback, auto_ack=False)
print(' [*] Waiting for messages. To exit press CTRL+C')
channel.start_consuming()
生产者
import timeimport pika
import json# 创建连接
credentials = pika.PlainCredentials('manfish', '123456')
connection_params = pika.ConnectionParameters(host='localhost',  # RabbitMQ 服务器的主机名port=5672,         # RabbitMQ 的默认端口virtual_host='manfish1',  # 虚拟主机名称credentials=credentials  # 认证凭证
)connection = pika.BlockingConnection(connection_params)
channel = connection.channel()# 声明交换机
exchange_name = 'topic_exchange'
channel.exchange_declare(exchange=exchange_name, exchange_type='topic')# 发送消息
routing_key = 'user.login'
message = 'User logged in.'
channel.basic_publish(exchange=exchange_name,routing_key=routing_key,body=message,)
print(f" [x] Sent message: {message}")# 关闭连接
connection.close()
截图