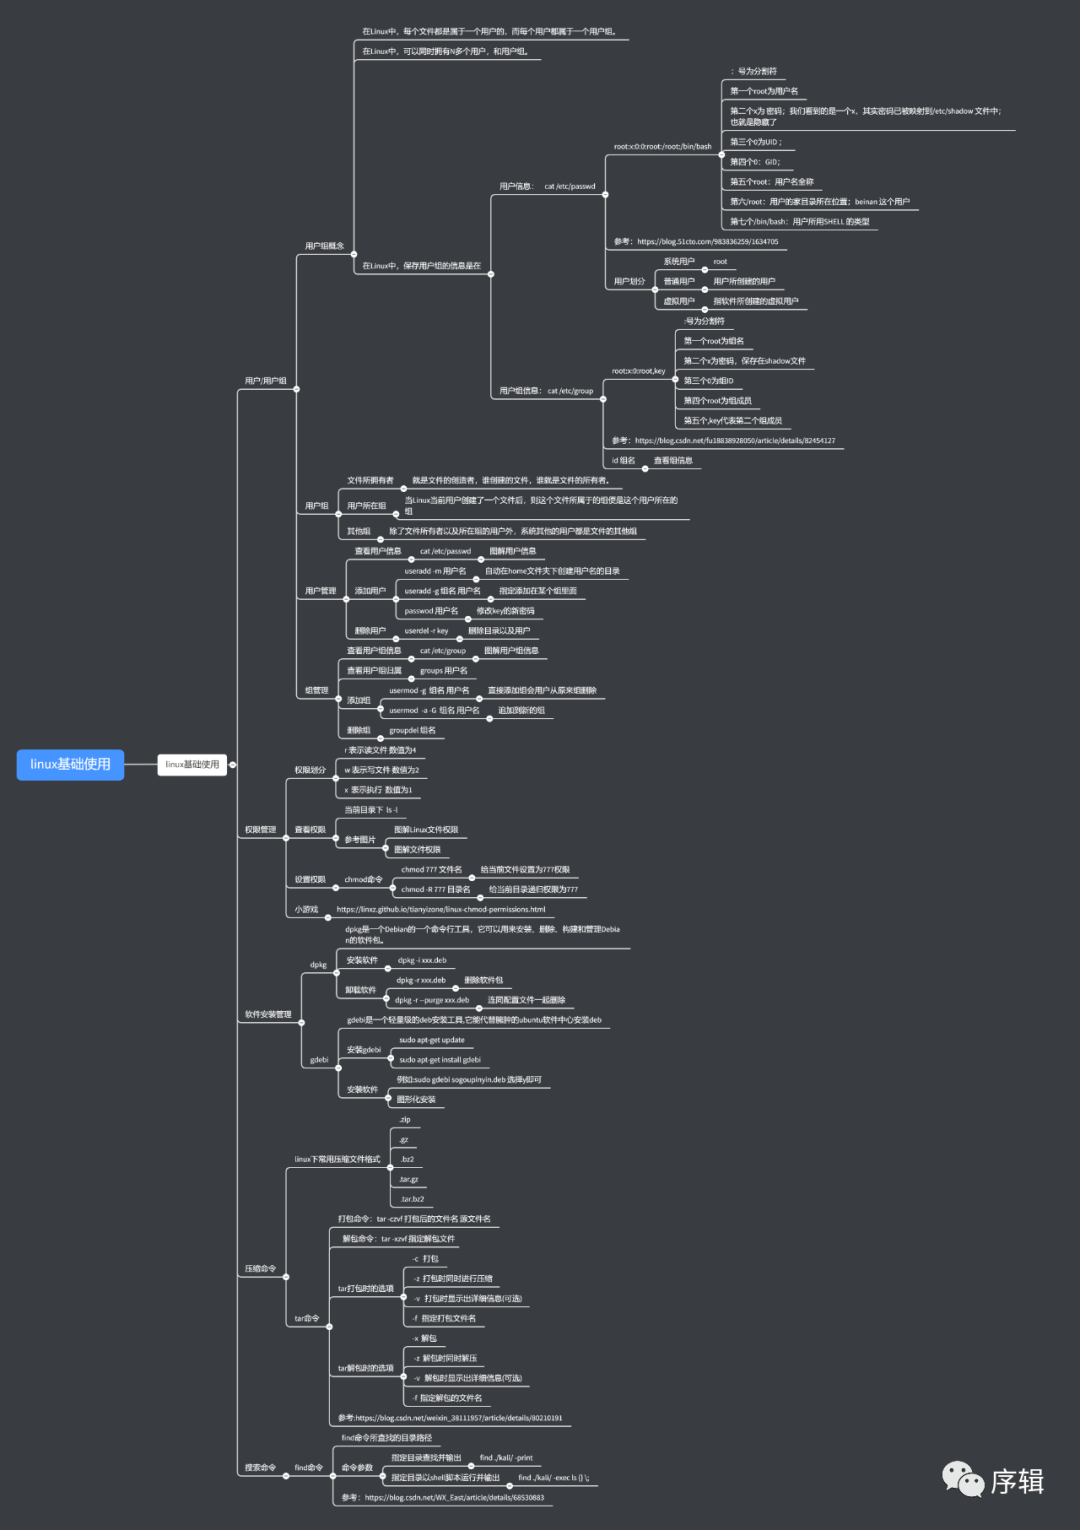
主要操作步骤:
1、初始化 OS
2、对OS进行集群配置初始化
3、确定 部署机器与待安装机器
4、安装并配置 Containerd
5、安装 Kubernetes工具集
6、初始化全部的 master节点
7、安装 Kubernetes网络插件
8、将slave节点加入到集群中
*************************************************************************************************************
主机规格:

集群内的角色成员

Step 1 为集群内的主机配置 SSH 授权认证登录
参考命令
ssh-keygen -t rsa -P ""
cp $HOME/.ssh/id_rsa.pub $HOME/.ssh/authorized_keys
for i in {192.168.136.145,192.168.136.152};do scp -r /root/.ssh root@$i:/root/;done
Step 2 配置 集群内 resolve 地址解析
参考命令:
> /etc/hosts
tee -a /etc/hosts <<-'EOF'
> 192.168.136.153 master0
> 192.168.136.145 slave0
> 192.168.136.152 slave1
> EOF
for i in {192.168.136.145,192.168.136.152};do scp /etc/hosts root@$i:/etc/;done

Step 3 配置集群内各主机的静态主机名
参考命令:
cat /etc/hosts | while read hang;do server=`echo ${hang} | awk -F " "
'{print $1}'` && name=`echo ${hang} | awk -F " " '{print $2}'` && ssh
-n root@${server} "hostnamectl set-hostname ${name}";done
Step 4 酌情关闭集群内主机的 SElinux、 swap、 OS 防火墙,并检查其状态
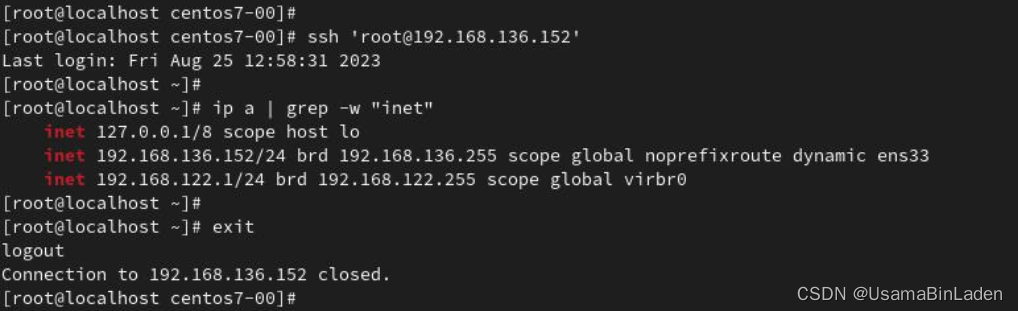
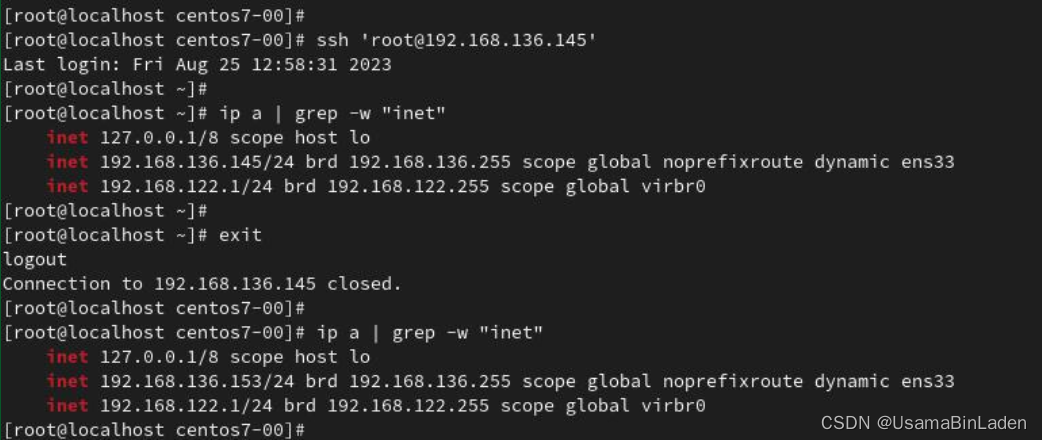
for i in {192.168.136.153,192.168.136.145,192.168.136.152}; do ssh
root@$i "echo -e ' ';echo -e ' 主 机 IP 信 息 ';ip a | grep -E -w
'inet.*ens33';echo -e ' ';echo -e 'SELinux 状态';sestatus;echo -e '
';echo -e 'OS 防 火墙状态'systemctl status firewalld;echo -e ' ';echo -e
'OS 的 SWAP 状态';swapon --show;echo -e ' '" ; done

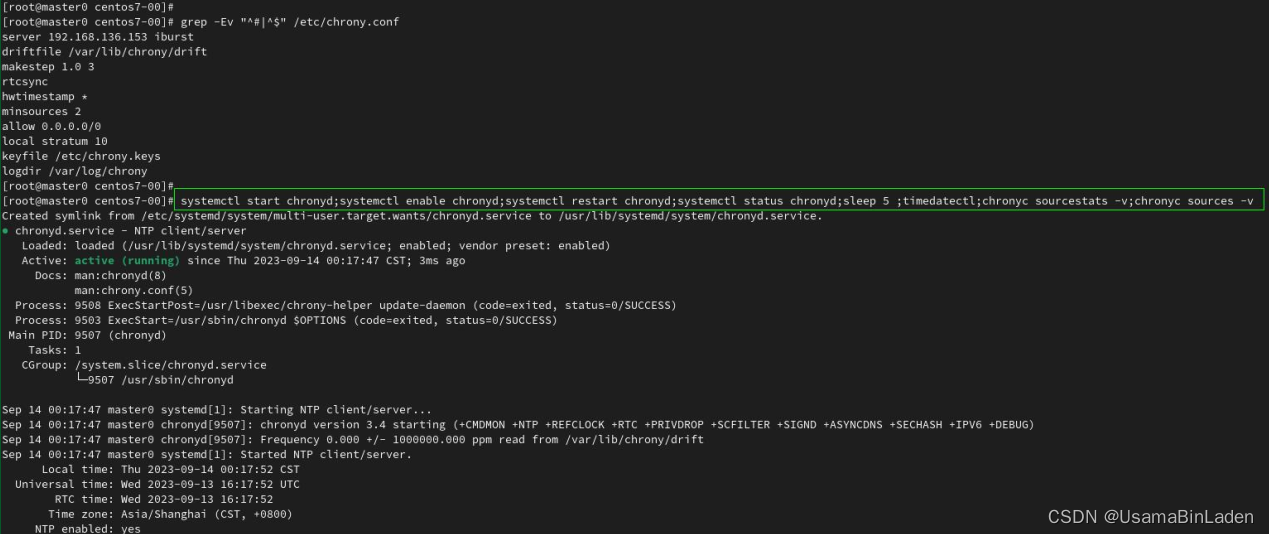
Step 5 配置集群内的授时服务(192.168.136.153 为本集群内的时钟服务器)
参考命令:
systemctl start chronyd;systemctl enable chronyd;systemctl restart
chronyd;systemctl status chronyd;sleep 5 ;timedatectl;chronyc
sourcestats -v;chronyc sources -v
Step 6 配置 集群内的 时钟接收者
参考命令:
ssh root@192.168.136.145
scp /etc/chrony.conf root@192.168.136.152:/etc/
for i in {192.168.136.145,192.168.136.152};do ssh root@$i "systemctl
start chronyd;systemctl status chronyd;systemctl enable
chronyd;systemctl restart chronyd;chronyc -a makestep;sleep
5 ;timedatectl;chronyc sourcestats -v;chronyc sources -v";done

Step 7 安装并配置 Containerd
参考命令:
for i in {192.168.136.153,192.168.136.145,192.168.136.152}; do ssh
root@$i "wget -O /etc/yum.repos.d/docker-ce.repo
https://mirrors.aliyun.com/docker-ce/linux/centos/docker-ce.repo" ;
done
for i in {192.168.136.153,192.168.136.145,192.168.136.152}; do ssh
root@$i "yum clean all && yum makecache && yum update -y" ; done
for i in {192.168.136.153,192.168.136.145,192.168.136.152}; do ssh
root@$i "yum install -y containerd" ; done
containerd config default > /etc/containerd/config.toml
for i in {192.168.136.145,192.168.136.152}; do scp
/etc/containerd/config.toml root@$i:/etc/containerd/ ; done
for i in {192.168.136.153,192.168.136.145,192.168.136.152}; do ssh
root@$i "systemctl daemon-reload && systemctl restart containerd && systemctl status
containerd" ; done
[root@master0 centos7-00]# cat /etc/containerd/config.toml
disabled_plugins = []
imports = []
oom_score = 0
plugin_dir = ""
required_plugins = []
root = "/var/lib/containerd"
state = "/run/containerd"
temp = ""
version = 2
[cgroup]
path = ""
[debug]
address = ""
format = ""
gid = 0
level = ""
uid = 0
[grpc]
address = "/run/containerd/containerd.sock"
gid = 0
max_recv_message_size = 16777216
max_send_message_size = 16777216
tcp_address = ""
tcp_tls_ca = ""
tcp_tls_cert = ""
tcp_tls_key = ""
uid = 0
[metrics]
address = ""
grpc_histogram = false
[plugins]
[plugins."io.containerd.gc.v1.scheduler"]
deletion_threshold = 0
mutation_threshold = 100
pause_threshold = 0.02
schedule_delay = "0s"
startup_delay = "100ms"
[plugins."io.containerd.grpc.v1.cri"]
device_ownership_from_security_context = false
disable_apparmor = false
disable_cgroup = false
disable_hugetlb_controller = true
disable_proc_mount = false
disable_tcp_service = true
enable_selinux = false
enable_tls_streaming = false
enable_unprivileged_icmp = false
enable_unprivileged_ports = false
ignore_image_defined_volumes = false
max_concurrent_downloads = 3
max_container_log_line_size = 16384
netns_mounts_under_state_dir = false
restrict_oom_score_adj = false
# sandbox_image = "registry.k8s.io/pause:3.6"
sandbox_image = "registry.cn-hangzhou.aliyuncs.com/google_containers/pause:3.6"
selinux_category_range = 1024
stats_collect_period = 10
stream_idle_timeout = "4h0m0s"
stream_server_address = "127.0.0.1"
stream_server_port = "0"
systemd_cgroup = false
tolerate_missing_hugetlb_controller = true
unset_seccomp_profile = ""
[plugins."io.containerd.grpc.v1.cri".cni]
bin_dir = "/opt/cni/bin"
conf_dir = "/etc/cni/net.d"
conf_template = ""
ip_pref = ""
max_conf_num = 1
[plugins."io.containerd.grpc.v1.cri".containerd]
default_runtime_name = "runc"
disable_snapshot_annotations = true
discard_unpacked_layers = false
ignore_rdt_not_enabled_errors = false
no_pivot = false
snapshotter = "overlayfs"
[plugins."io.containerd.grpc.v1.cri".containerd.default_runtime]
base_runtime_spec = ""
cni_conf_dir = ""
cni_max_conf_num = 0
container_annotations = []
pod_annotations = []
privileged_without_host_devices = false
runtime_engine = ""
runtime_path = ""
runtime_root = ""
runtime_type = ""
[plugins."io.containerd.grpc.v1.cri".containerd.default_runtime.options]
[plugins."io.containerd.grpc.v1.cri".containerd.runtimes]
[plugins."io.containerd.grpc.v1.cri".containerd.runtimes.runc]
base_runtime_spec = ""
cni_conf_dir = ""
cni_max_conf_num = 0
container_annotations = []
pod_annotations = []
privileged_without_host_devices = false
runtime_engine = ""
runtime_path = ""
runtime_root = ""
runtime_type = "io.containerd.runc.v2"
[plugins."io.containerd.grpc.v1.cri".containerd.runtimes.runc.options]
BinaryName = ""
CriuImagePath = ""
CriuPath = ""
CriuWorkPath = ""
IoGid = 0
IoUid = 0
NoNewKeyring = false
NoPivotRoot = false
Root = ""
ShimCgroup = ""
#SystemdCgroup = false
SystemdCgroup = true
[plugins."io.containerd.grpc.v1.cri".containerd.untrusted_workload_runtime]
base_runtime_spec = ""
cni_conf_dir = ""
cni_max_conf_num = 0
container_annotations = []
pod_annotations = []
privileged_without_host_devices = false
runtime_engine = ""
runtime_path = ""
runtime_root = ""
runtime_type = ""
[plugins."io.containerd.grpc.v1.cri".containerd.untrusted_workload_runtime.options]
[plugins."io.containerd.grpc.v1.cri".image_decryption]
key_model = "node"
[plugins."io.containerd.grpc.v1.cri".registry]
#config_path = ""
[plugins."io.containerd.grpc.v1.cri".registry.mirrors]
[plugins."io.containerd.grpc.v1.cri".registry.mirrors."docker.io"]
endpoint = ["https://9oe2llyt.mirror.aliyuncs.com"]
[plugins."io.containerd.grpc.v1.cri".registry.auths]
[plugins."io.containerd.grpc.v1.cri".registry.configs]
[plugins."io.containerd.grpc.v1.cri".registry.headers]
#[plugins."io.containerd.grpc.v1.cri".registry.mirrors]
[plugins."io.containerd.grpc.v1.cri".x509_key_pair_streaming]
tls_cert_file = ""
tls_key_file = ""
[plugins."io.containerd.internal.v1.opt"]
path = "/opt/containerd"
[plugins."io.containerd.internal.v1.restart"]
interval = "10s"
[plugins."io.containerd.internal.v1.tracing"]
sampling_ratio = 1.0
service_name = "containerd"
[plugins."io.containerd.metadata.v1.bolt"]
content_sharing_policy = "shared"
[plugins."io.containerd.monitor.v1.cgroups"]
no_prometheus = false
[plugins."io.containerd.runtime.v1.linux"]
no_shim = false
runtime = "runc"
runtime_root = ""
shim = "containerd-shim"
shim_debug = false
[plugins."io.containerd.runtime.v2.task"]
platforms = ["linux/amd64"]
sched_core = false
[plugins."io.containerd.service.v1.diff-service"]
default = ["walking"]
[plugins."io.containerd.service.v1.tasks-service"]
rdt_config_file = ""
[plugins."io.containerd.snapshotter.v1.aufs"]
root_path = ""
[plugins."io.containerd.snapshotter.v1.btrfs"]
root_path = ""
[plugins."io.containerd.snapshotter.v1.devmapper"]
async_remove = false
base_image_size = ""
discard_blocks = false
fs_options = ""
fs_type = ""
pool_name = ""
root_path = ""
[plugins."io.containerd.snapshotter.v1.native"]
root_path = ""
[plugins."io.containerd.snapshotter.v1.overlayfs"]
root_path = ""
upperdir_label = false
[plugins."io.containerd.snapshotter.v1.zfs"]
root_path = ""
[plugins."io.containerd.tracing.processor.v1.otlp"]
endpoint = ""
insecure = false
protocol = ""
[proxy_plugins]
[stream_processors]
[stream_processors."io.containerd.ocicrypt.decoder.v1.tar"]
accepts = ["application/vnd.oci.image.layer.v1.tar+encrypted"]
args = ["--decryption-keys-path", "/etc/containerd/ocicrypt/keys"]
env = ["OCICRYPT_KEYPROVIDER_CONFIG=/etc/containerd/ocicrypt/ocicrypt_keyprovider.conf"]
path = "ctd-decoder"
returns = "application/vnd.oci.image.layer.v1.tar"
[stream_processors."io.containerd.ocicrypt.decoder.v1.tar.gzip"]
accepts = ["application/vnd.oci.image.layer.v1.tar+gzip+encrypted"]
args = ["--decryption-keys-path", "/etc/containerd/ocicrypt/keys"]
env = ["OCICRYPT_KEYPROVIDER_CONFIG=/etc/containerd/ocicrypt/ocicrypt_keyprovider.conf"]
path = "ctd-decoder"
returns = "application/vnd.oci.image.layer.v1.tar+gzip"
[timeouts]
"io.containerd.timeout.bolt.open" = "0s"
"io.containerd.timeout.shim.cleanup" = "5s"
"io.containerd.timeout.shim.load" = "5s"
"io.containerd.timeout.shim.shutdown" = "3s"
"io.containerd.timeout.task.state" = "2s"
[ttrpc]
address = ""
gid = 0
uid = 0
[root@master0 centos7-00]#
Step 8 安装 kubernetes 社区提供的 containerd 客户端工具 crictl
根 据 https://www.downloadkubernetes.com/ 确 定 即 将 安 装 的
Kubernetes 版本, 本次即将安装 Kubernetes v1.28.0。 客户端工具 crictl 的
版本号需和即将安装的 Kubernetes 版本号一致。
参考命令:
for i in {192.168.136.153,192.168.136.145,192.168.136.152}; do
scp ./crictl-v1.28.0-linux-amd64.tar.gz root@$i:/opt/;sleep 3;ssh
root@$i "cd /opt/ && tar -xzf crictl-v1.28.0-linux-amd64.tar.gz -C /usr/bin/" ; done
[root@master0 centos7-00]# cat > crictl.yaml <<-'EOF'
> runtime-endpoint: unix:///run/containerd/containerd.sock
> image-endpoint: unix:///run/containerd/containerd.sock
> timeout: 10
> EOF
[root@master0 centos7-00]#
for i in {192.168.136.153,192.168.136.145,192.168.136.152}; do
scp ./crictl.yaml root@$i:/etc/" ; done
Step 9 安装 Kubernetes v1.28.0
参考命令:
[root@master0 centos7-00]# cat <<EOF > kubernetes.repo
> [kubernetes]
> name=Kubernetes
> b
aseurl=https://mirrors.aliyun.com/kubernetes/yum/repos/kubernetes-e
l7-x86_64/
> enabled=1
> gpgcheck=1
> repo_gpgcheck=1
> gpgkey=https://mirrors.aliyun.com/kubernetes/yum/doc/yum-key.gpg
https://mirrors.aliyun.com/kubernetes/yum/doc/rpm-package-key.gpg
> EOF
[root@master0 centos7-00]#
for i in {192.168.136.153,192.168.136.145,192.168.136.152}; do
scp ./kubernetes.repo root@$i:/etc/yum.repos.d/ ; done
for i in {192.168.136.153,192.168.136.145,192.168.136.152}; do ssh
root@$i "yum install -y {kubeadm,kubelet,kubectl}-1.28.0-0" ; done
[root@master0 centos7-00]# cat > kubelet <<EOF
> KUBELET_EXTRA_ARGS=--cgroup-driver=systemd
> EOF
[root@master0 centos7-00]#
for i in {192.168.136.153,192.168.136.145,192.168.136.152}; do ssh
root@$i "systemctl start kubelet && systemctl enable kubelet && systemctl
is-active kubelet" ; done
kubeadm config print init-defaults | tee kubernetes-init.yaml
kubeadm init --config ./kubernetes-init.yaml --v=5 | tee
kubernetes-init.log
export KUBECONFIG=/etc/kubernetes/admin.conf

[root@master0 centos7-00]# cat kubernetes-init.yaml
apiVersion: kubeadm.k8s.io/v1beta3
bootstrapTokens:
- groups:
- system:bootstrappers:kubeadm:default-node-token
token: abcdef.0123456789abcdef
ttl: 24h0m0s
usages:
- signing
- authentication
kind: InitConfiguration
localAPIEndpoint:
#advertiseAddress: 1.2.3.4
advertiseAddress: 192.168.136.153
bindPort: 6443
nodeRegistration:
criSocket: unix:///var/run/containerd/containerd.sock
imagePullPolicy: IfNotPresent
#name: node
name: master0
taints: null
---
apiServer:
timeoutForControlPlane: 4m0s
apiVersion: kubeadm.k8s.io/v1beta3
certificatesDir: /etc/kubernetes/pki
#clusterName: kubernetes
clusterName: kubernetes_Containerd
controllerManager: {}
dns: {}
etcd:
local:
dataDir: /var/lib/etcd
#imageRepository: registry.k8s.io
imageRepository: registry.aliyuncs.com/google_containers
kind: ClusterConfiguration
kubernetesVersion: 1.28.0
networking:
dnsDomain: cluster.local
serviceSubnet: 10.96.0.0/12
podSubnet: 10.244.0.0/16
scheduler: {}
---
apiVersion: kubelet.config.k8s.io/v1beta1
kind: KubeletConfiguration
cgroupDriver: systemd
[root@master0 centos7-00]#
Step 10 给 Kubernetes 集群安装 CNI 网络插件
参考命令:
wget https://github.com/flannel-io/flannel/releases/latest/download/kubeflannel.yml
kubectl apply -f /home/centos7-00/kube-flannel.yml
Step 11 把 slave 节点加入初始化好后的 Kubernetes 集群
参考命令:
for i in {192.168.136.145,192.168.136.152}; do ssh root@$i "kubeadm join
192.168.136.153:6443 --token abcdef.0123456789abcdef
--discovery-token-ca-cert-hash
sha256:24421351ee9325ac028036b089aa62f01c7e39ec385135c22e113f657b0d7
8ba --cri-socket=unix:///var/run/containerd/containerd.sock" ; done

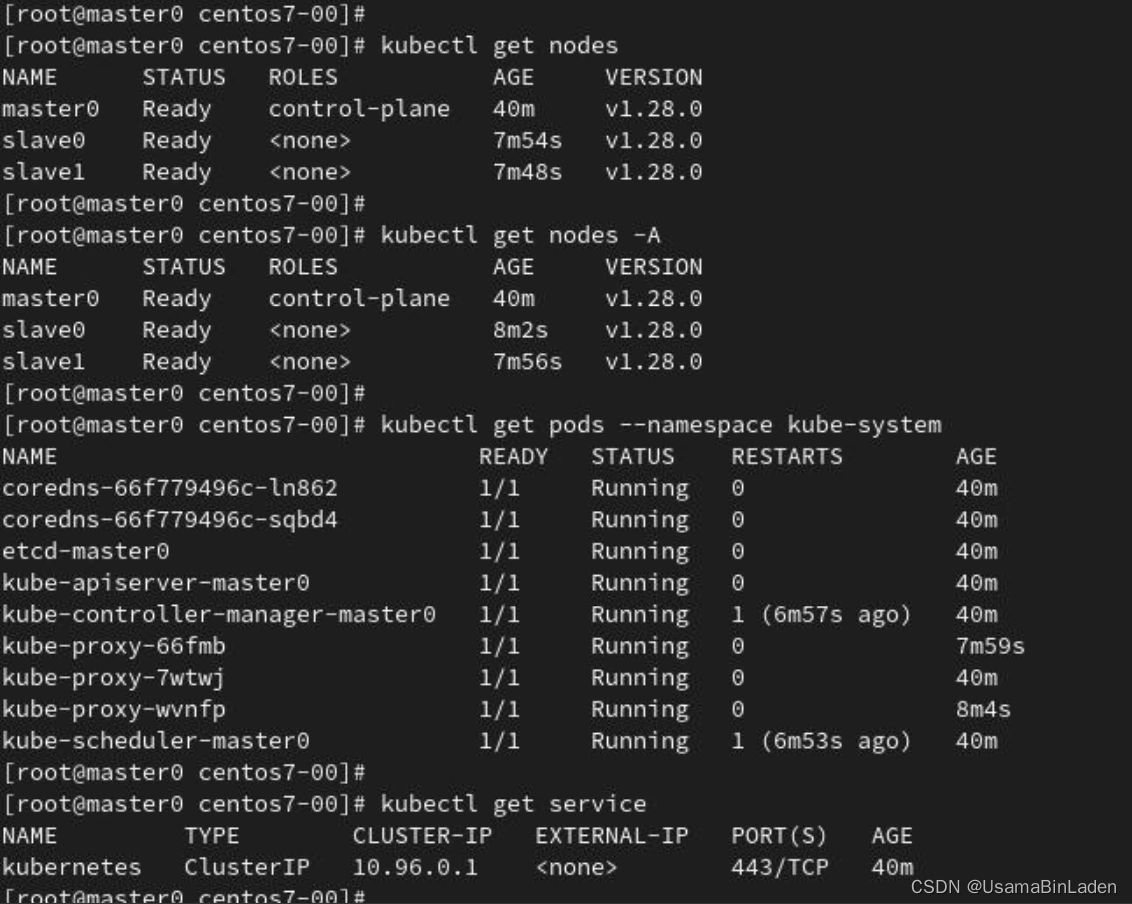
Step 11 查看 Kubernetes 集群状态