SpringBoot启动方式
springboot的启动经过了一些一系列的处理,我们先看看整体过程的流程图

SpringBoot的启动方式
<parent><groupId>org.springframework.boot</groupId><artifactId>spring-boot-starter-parent</artifactId><version>2.0.6.RELEASE</version><relativePath/> <!-- lookup parent from repository --></parent><groupId>com.spring</groupId><artifactId>springBoot-demo1</artifactId><version>1.0-SNAPSHOT</version><dependencies><dependency><groupId>org.springframework.boot</groupId><artifactId>spring-boot-starter-web</artifactId></dependency></dependencies>第一种启动方式 @EnableAutoConfiguration
@EnableAutoConfiguration 作用
开启自动装配,帮助SpringBoot应用将所有符合条件的@Configuration配置都加载到当前SpringBoot,并创建对应配置类的Bean,并把该Bean实体交给IoC容器进行管理。
新建文件 IndexController.java
package com.spring;
import org.springframework.boot.SpringApplication;
import org.springframework.boot.autoconfigure.EnableAutoConfiguration;
import org.springframework.web.bind.annotation.RequestMapping;
import org.springframework.web.bind.annotation.RestController;@EnableAutoConfiguration
@RestController
public class IndexController {// 访问路径   http://localhost:8080/index@RequestMapping("/index")public String index(){System.out.println("我进来了");return "index controller";}public static void main(String[] args) {// 启动springbootSpringApplication.run(IndexController.class,args);}
}
第二种启动方式 @ComponentScan
@ComponentScan() 注解作用
根据定义的扫描路径,将符合规则的类加载到spring容器中,比如在类中加入了以下注解 @Controller、@Service、@Mapper 、@Component、@Configuration 等等;
package com.spring.controller;import org.springframework.boot.SpringApplication;
import org.springframework.boot.autoconfigure.EnableAutoConfiguration;
import org.springframework.context.annotation.ComponentScan;@EnableAutoConfiguration  // 开启自动装配
@ComponentScan("com.spring.controller")
public class App {public static void main(String[] args) {// 启动springbootSpringApplication.run(App.class,args);}
}
控制层 OrderController.java
package com.spring.controller;
import org.springframework.web.bind.annotation.RequestMapping;
import org.springframework.web.bind.annotation.RestController;
@RestController
public class OrderController {@RequestMapping("/order")public String order(){System.out.println("我进来了 order controller 的 index 方法");return "order controller";}
}
第三种方式 @SpringBootApplication
@SpringBootApplication 注解作用
标注这是一个springboot的应用,被标注的类是一个主程序, SpringApplication.run(App.class, args);传入的类App.class必须是被@SpringBootApplication标注的类。
@SpringBootApplication是一个组合注解,组合了其他相关的注解,点进去注解后我们可以看到,这个注解集成了以上2种启动方式的注解;在这里的 @ComponentScan() 注解有一堆东西,它的作用是 将主配置类所在包及其下面所有后代包的所有注解扫描;
SpringBootApplication 使用起来更加简单,只需要一个注解即可完成,
package com.spring.controller;import org.springframework.boot.SpringApplication;
import org.springframework.boot.autoconfigure.SpringBootApplication;@SpringBootApplication
public class App {public static void main(String[] args) {// 启动springbootSpringApplication.run(App.class,args);}
}
SpringBoot启动流程
运行main函数,调用run方法
//分为两步// 1、new SpringApplication(primarySources)// 2、run(args)
创建SpringApplication对象
1、启动SpringBoot启动类SpringbootdemoApplication中的main方法。
@SpringBootApplication
public class SpringbootdemoApplication {public static void main(String[] args) {SpringApplication.run(SpringbootdemoApplication.class, args);}
}
2、调用SpringApplication.run(SpringbootdemoApplication.class, args),该方法是一个静态方法。
public static ConfigurableApplicationContext run(Class<?> primarySource, String... args) {return run(new Class<?>[] { primarySource }, args);
}
3、继续调用SpringApplication内部的run方法
public static ConfigurableApplicationContext run(Class<?>[] primarySources, String[] args) {return new SpringApplication(primarySources).run(args);
}
且构建了一个SpringApplication对象,应用程序将从指定的主要来源加载Bean
public SpringApplication(Class<?>... primarySources) {this(null, primarySources);
}
public SpringApplication(ResourceLoader resourceLoader, Class<?>... primarySources) {//resourceLoader赋值为Null// 初始化类加载器 this.resourceLoader = resourceLoader;//primarySources不为空,继续向下执行。为空抛异常// Assert 断言非空,若传入的class参数为null则打印异常并退出初始化Assert.notNull(primarySources, "PrimarySources must not be null");//将SpringbootdemoApplication(启动类)赋值给primarySources ,去重转换成primarySources对象// 传进来的class对象变成一个集合对象,只是做了一个格式转换,基本信息没有变化this.primarySources = new LinkedHashSet<>(Arrays.asList(primarySources));//Web容器类型推断//从classpath类路径推断Web应用类型,有三种Web应用类型,分别是//NONE: 该应用程序不应作为 Web 应用程序运行,也不应启动嵌入式 Web 服务器//SERVLET: 该应用程序应作为基于 servlet 的 Web 应用程序运行,并应启动嵌入式 servlet Web 服务器。//REACTIVE: 该应用程序应作为响应式 Web 应用程序运行,并应启动嵌入式响应式 Web 服务器// 返回NONE//<dependency>// <groupId>org.springframework.boot</groupId>// <artifactId>spring-boot-starter</artifactId>// </dependency>// 返回SERVLET//<dependency>// <groupId>org.springframework.boot</groupId>// <artifactId>spring-boot-starter-web</artifactId>// </dependency>//<dependency>// <groupId>org.springframework.boot</groupId>// <artifactId>spring-boot-starter-webflux</artifactId>// </dependency>// 简单点说是:要不要加载web容器,或者说加载什么类型的容器this.webApplicationType = WebApplicationType.deduceFromClasspath();//初始化ApplicationContextInitializer集合// 获取 Spring 工厂实例 -> 容器上下文相关的初始化setInitializers((Collection) getSpringFactoriesInstances(ApplicationContextInitializer.class));//初始化ApplicationListener// 获取 Spring 工厂实例 -> 设置应用程序监听器setListeners((Collection) getSpringFactoriesInstances(ApplicationListener.class));//获取StackTraceElement数组遍历,通过反射获取堆栈中有main方法的类。// 推导出主应用程序类,即从当前的栈信息中寻找main所在主类:包名.类名this.mainApplicationClass = deduceMainApplicationClass();
}在SpringApplication的构造方法内,首先会通过 WebApplicationType.deduceFromClasspath(); 方法判断当前应用程序的容器,默认使用的是Servlet 容器,除了servlet之外,还有NONE 和 REACTIVE (响应式编程);
this.webApplicationType = WebApplicationType.deduceFromClasspath();
Spring boot依据Class path来推断web应用类型
- reactive
路径包含org.springframework.web.reactive.DispatcherHandler,并且不包含org.springframework.web.servlet.DispatcherServlet和org.glassfish.jersey.servlet.ServletContainer
- none
不是reactive,并且路径中没有javax.servlet.Servlet和org.springframework.web.context.ConfigurableWebApplicationContext
- servlet
剩余的部分都是servlet
NONE:不是一个 web 应用,不需要启动内置的 web 服务器,所以应用启动运行后就自动关闭了,并没有启动内置的 web 服务器,也没有监听任何端口。
SERVLET:基于 servlet 的 web 应用,需要启动一个内置的 servlet 服务器;通过启动日志我们可以看到这里启动了内置的 Tomcat Servlet 服务器,监听了 8080 端口,应用程序并不会像 None 类型一样,启动后就自动关闭。
REACTIVE:一个 reactive 的 web 应用,需要启动一个内置的 reactive 服务器;通过启动日志我们可以看到,这里启动了内置的 Netty 服务器,并监听在 8080 端口上
/** Copyright 2012-2019 the original author or authors.** Licensed under the Apache License, Version 2.0 (the "License");* you may not use this file except in compliance with the License.* You may obtain a copy of the License at**      https://www.apache.org/licenses/LICENSE-2.0** Unless required by applicable law or agreed to in writing, software* distributed under the License is distributed on an "AS IS" BASIS,* WITHOUT WARRANTIES OR CONDITIONS OF ANY KIND, either express or implied.* See the License for the specific language governing permissions and* limitations under the License.*/package org.springframework.boot;import org.springframework.util.ClassUtils;/*** An enumeration of possible types of web application.** @author Andy Wilkinson* @author Brian Clozel* @since 2.0.0*/
public enum WebApplicationType {/*** The application should not run as a web application and should not start an* embedded web server.*/NONE,/*** The application should run as a servlet-based web application and should start an* embedded servlet web server.*/SERVLET,/*** The application should run as a reactive web application and should start an* embedded reactive web server.*/REACTIVE;private static final String[] SERVLET_INDICATOR_CLASSES = {"javax.servlet.Servlet","org.springframework.web.context.ConfigurableWebApplicationContext"};private static final String WEBMVC_INDICATOR_CLASS = "org.springframework.web.servlet.DispatcherServlet";private static final String WEBFLUX_INDICATOR_CLASS = "org.springframework.web.reactive.DispatcherHandler";private static final String JERSEY_INDICATOR_CLASS = "org.glassfish.jersey.servlet.ServletContainer";private static final String SERVLET_APPLICATION_CONTEXT_CLASS = "org.springframework.web.context.WebApplicationContext";private static final String REACTIVE_APPLICATION_CONTEXT_CLASS = "org.springframework.boot.web.reactive.context.ReactiveWebApplicationContext";/*** deduceFromClasspath* 依次循环遍历当前应用中是否存在相关的类来判断最终应用的启动类型** @return*/static WebApplicationType deduceFromClasspath() {/*** REACTIVE:响应式WEB项目* 若启动类型为REACTIVE,* 则类路径下存在 org.springframework.web.reactive.DispatcherHandler 类* 并且不存在 org.springframework.web.servlet.DispatcherServlet 和 org.glassfish.jersey.servlet.ServletContainer* 两者指的是SpringMVC/Tomcat和jersey容器*/if (ClassUtils.isPresent(WEBFLUX_INDICATOR_CLASS, null) && !ClassUtils.isPresent(WEBMVC_INDICATOR_CLASS, null)&& !ClassUtils.isPresent(JERSEY_INDICATOR_CLASS, null)) {return WebApplicationType.REACTIVE;}/*** NONE:非WEB项目,就是一个最简单的Springboot应用* 若启动类型为NONE* 则类路径下 javax.servlet.Servlet 和org.springframework.web.context.ConfigurableWebApplicationContext都不存在*/for (String className : SERVLET_INDICATOR_CLASSES) {if (!ClassUtils.isPresent(className, null)) {return WebApplicationType.NONE;}}/*** SERVLET:SERVLET WEB 项目* 若启动类型为Servlet,则必须有SERVLET_INDICATOR_CLASSES中的javax.servlet.Servlet* 和org.springframework.web.context.ConfigurableWebApplicationContext*/return WebApplicationType.SERVLET;}static WebApplicationType deduceFromApplicationContext(Class<?> applicationContextClass) {if (isAssignable(SERVLET_APPLICATION_CONTEXT_CLASS, applicationContextClass)) {return WebApplicationType.SERVLET;}if (isAssignable(REACTIVE_APPLICATION_CONTEXT_CLASS, applicationContextClass)) {return WebApplicationType.REACTIVE;}return WebApplicationType.NONE;}private static boolean isAssignable(String target, Class<?> type) {try {return ClassUtils.resolveClassName(target, null).isAssignableFrom(type);} catch (Throwable ex) {return false;}}}
getSpringFactoriesInstances(Class type, Class<?>[] parameterTypes, Object… args)中首先获取ClassLoader ,通过SpringFactoriesLoader机制,根据ClassLoader从类路径jar包中加载META-INF/spring.factories下的所有工厂类及其实现类 。
setInitializers((Collection) getSpringFactoriesInstances(ApplicationContextInitializer.class));
private <T> Collection<T> getSpringFactoriesInstances(Class<T> type) {return getSpringFactoriesInstances(type, new Class<?>[] {});}private <T> Collection<T> getSpringFactoriesInstances(Class<T> type, Class<?>[] parameterTypes, Object... args) {//获取ClassLoader ClassLoader classLoader = Thread.currentThread().getContextClassLoader();// 使用SpringFactoriesLoader机制加载出工厂名,并放入Set集合中确保其唯一性。但是在META-INF/spring.factories中并无BootstrapRegistryInitializer所以此处的names的size为0。Set<String> names = new LinkedHashSet<>(SpringFactoriesLoader.loadFactoryNames(type, classLoader));//创建Spring工厂实例(但因为上述names的size为0,所以对于BootstrapRegistryInitializer来说它并不会创建SpringFactory实例)List<T> instances = createSpringFactoriesInstances(type, parameterTypes, classLoader, args, names);//通过AnnotationAwareOrderComparator对Spring工厂实例排序AnnotationAwareOrderComparator.sort(instances);return instances;
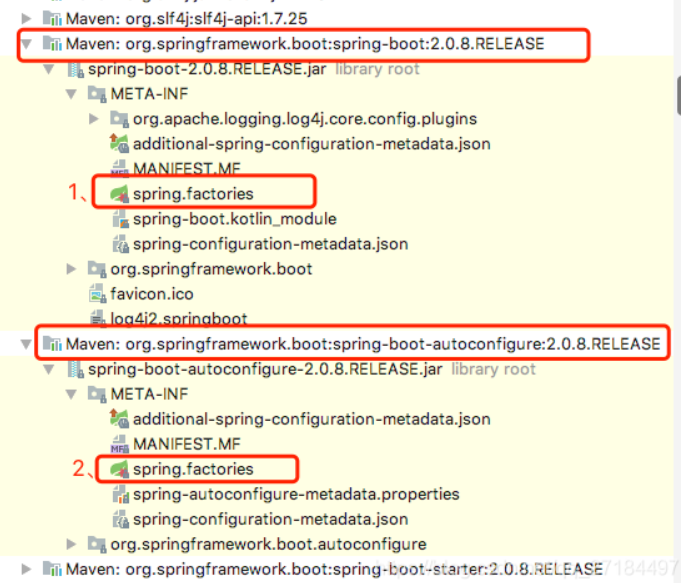
}这里加载的初始化器是springboot自带初始化器,从从 META-INF/spring.factories 配置文件中加载的,那么这个文件在哪呢?自带有2个,分别在源码的jar包的 spring-boot-autoconfigure 项目 和 spring-boot 项目里面各有一个
spring.factories文件里面,看到开头是 org.springframework.context.ApplicationContextInitializer 接口就是初始化器了 ,
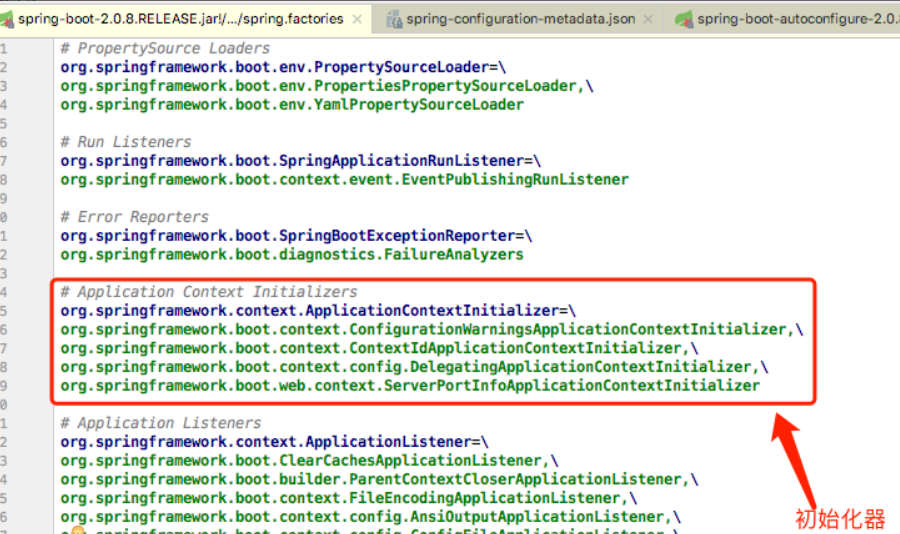
当然,我们也可以自己实现一个自定义的初始化器:实现 ApplicationContextInitializer接口既可
MyApplicationContextInitializer.java
package com.spring.application;
import org.springframework.context.ApplicationContextInitializer;
import org.springframework.context.ConfigurableApplicationContext;
/** * 自定义的初始化器 */
public class MyApplicationContextInitializer implements ApplicationContextInitializer<ConfigurableApplicationContext> { @Override
public void initialize(ConfigurableApplicationContext configurableApplicationContext) { System.out.println("我是初始化的 MyApplicationContextInitializer...");}
}
在resources目录下添加 META-INF/spring.factories 配置文件,内容如下,将自定义的初始化器注册进去;
org.springframework.context.ApplicationContextInitializer=\
com.spring.application.MyApplicationContextInitializer

启动springboot后,就可以看到控制台打印的内容了,在这里我们可以很直观的看到它的执行顺序,是在打印banner的后面执行的;

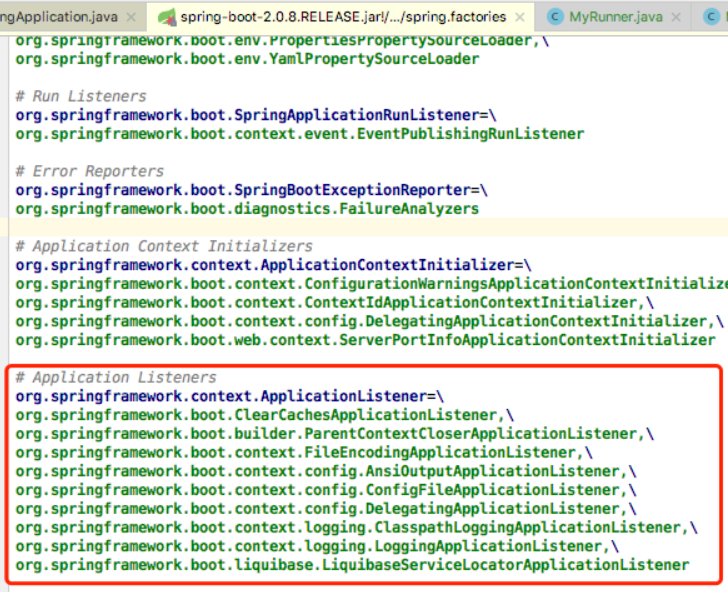
加载监听器也是从 META-INF/spring.factories 配置文件中加载的,与初始化不同的是,监听器加载的是实现了 ApplicationListener 接口的类
setListeners((Collection) getSpringFactoriesInstances(ApplicationListener.class));
自定义监听器也跟初始化器一样
org.springframework.context.ApplicationListener=\
com.maweiqi.MyListener
import org.springframework.boot.context.event.ApplicationStartingEvent;
import org.springframework.context.ApplicationEvent;
import org.springframework.context.ApplicationListener;//public class MyListener implements ApplicationListener {
//    @Override
//    public void onApplicationEvent(ApplicationEvent event) {
//        System.out.println("-----------");
//        System.out.println(event.getTimestamp());
//        System.out.println(event.getSource());
//        System.out.println(event.getClass());
//    }
//}public class MyListener implements ApplicationListener<ApplicationStartingEvent> {@Overridepublic void onApplicationEvent(ApplicationStartingEvent event) {System.out.println("-----可以干预不同的监听器------");System.out.println(event.getTimestamp());System.out.println(event.getSource());System.out.println(event.getClass());}
}
deduceMainApplicationClass(); 这个方法仅仅是找到main方法所在的类,为后面的扫包作准备,deduce是推断的意思,所以准确地说,这个方法作用是推断出主方法所在的类;
this.mainApplicationClass = deduceMainApplicationClass();
执行Run方法
我们看启动springboot最核心的逻辑run方法
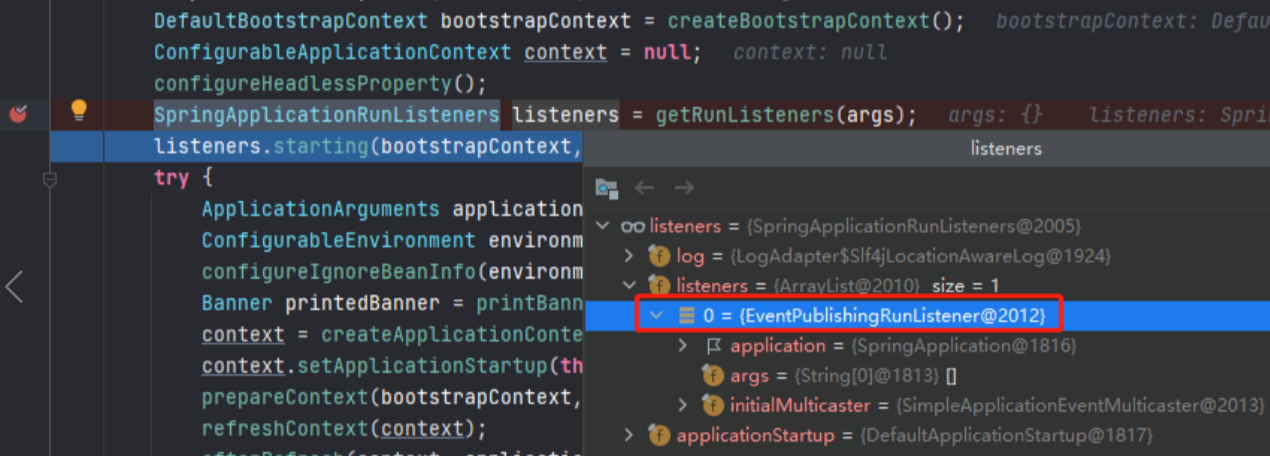
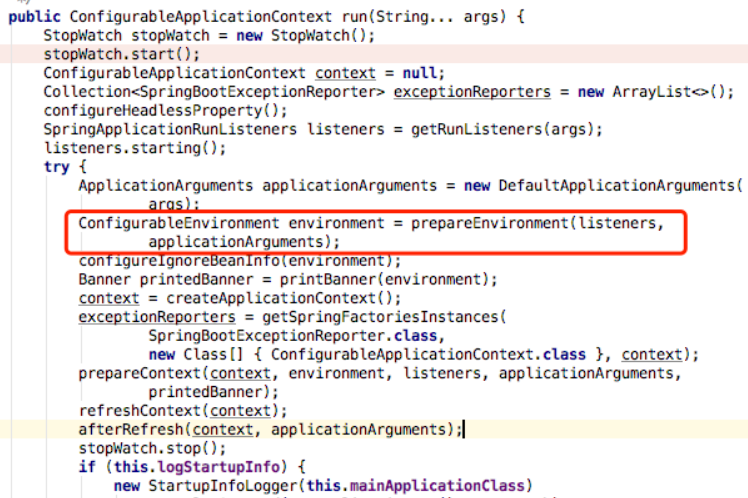
public ConfigurableApplicationContext run(String... args) {// new 一个StopWatch用于统计run启动过程花了多少时间StopWatch stopWatch = new StopWatch();// 开始计时stopWatch.start();//关键类,它是任何spring上下文的接口, 所以可以接收任何ApplicationContext实现ConfigurableApplicationContext context = null;// exceptionReporters集合用来存储异常报告器,用来报告SpringBoot启动过程的异常Collection<SpringBootExceptionReporter> exceptionReporters = new ArrayList<>();/*** 设置jdk系统属性* headless直译就是无头模式,* headless模式的意思就是明确Springboot要在无鼠键支持的环境中运行,一般程序也都跑在Linux之类的服务器上,无鼠键支持,这里默认值是     true;*/configureHeadlessProperty();// 【1】从spring.factories配置文件中加载到EventPublishingRunListener对象并赋值给SpringApplicationRunListeners// EventPublishingRunListener对象主要用来发射SpringBoot启动过程中内置的一些生命周期事件,标志每个不同启动阶段SpringApplicationRunListeners listeners = getRunListeners(args);// 启动SpringApplicationRunListener的监听,表示SpringApplication开始启动。// 》》》》》发射【ApplicationStartingEvent】事件listeners.starting();try {// 根据命令行参数 实例化一个ApplicationArguments// 封装命令行参数,也就是在命令行下启动应用带的参数,如--server.port=9000 ApplicationArguments applicationArguments = new DefaultApplicationArguments(args);// 【2】准备环境变量,包括系统变量,环境变量,命令行参数,默认变量,servlet相关配置变量,随机值,// JNDI属性值,以及配置文件(比如application.properties)等,注意这些环境变量是有优先级的// 》》》》》发射【ApplicationEnvironmentPreparedEvent】事件ConfigurableEnvironment environment = prepareEnvironment(listeners,applicationArguments);//忽略beaninfo的bean      configureIgnoreBeanInfo(environment);// 【3】控制台打印SpringBoot的bannner标志Banner printedBanner = printBanner(environment);//根据webApplicationType创建Spring上下文// 【4】根据不同类型创建不同类型的spring applicationcontext容器// 因为这里是servlet环境,所以创建的是AnnotationConfigServletWebServerApplicationContext容器对象context = createApplicationContext();// 【5】从spring.factories配置文件中加载异常报告期实例,这里加载的是FailureAnalyzers// 注意FailureAnalyzers的构造器要传入ConfigurableApplicationContext,因为要从context中获取beanFactory和environmentexceptionReporters = getSpringFactoriesInstances(SpringBootExceptionReporter.class,new Class[] { ConfigurableApplicationContext.class }, context);// 【6】为刚创建的AnnotationConfigServletWebServerApplicationContext容器对象做一些初始化工作,准备一些容器属性值等// 1)为AnnotationConfigServletWebServerApplicationContext的属性AnnotatedBeanDefinitionReader和ClassPathBeanDefinitionScanner设置environgment属性// 2)根据情况对ApplicationContext应用一些相关的后置处理,比如设置resourceLoader属性等// 3)在容器刷新前调用各个ApplicationContextInitializer的初始化方法,ApplicationContextInitializer是在构建SpringApplication对象时从spring.factories中加载的// 4)》》》》》发射【ApplicationContextInitializedEvent】事件,标志context容器被创建且已准备好// 5)从context容器中获取beanFactory,并向beanFactory中注册一些单例bean,比如applicationArguments,printedBanner// 6)TODO 加载bean到application context,注意这里只是加载了部分bean比如mainApplication这个bean,大部分bean应该是在AbstractApplicationContext.refresh方法中被加载?这里留个疑问先// 7)》》》》》发射【ApplicationPreparedEvent】事件,标志Context容器已经准备完成 prepareContext(context, environment, listeners, applicationArguments,printedBanner);// 【7】刷新容器,这一步至关重要,以后会在分析Spring源码时详细分析,主要做了以下工作:// 1)在context刷新前做一些准备工作,比如初始化一些属性设置,属性合法性校验和保存容器中的一些早期事件等;// 2)让子类刷新其内部bean factory,注意SpringBoot和Spring启动的情况执行逻辑不一样// 3)对bean factory进行配置,比如配置bean factory的类加载器,后置处理器等// 4)完成bean factory的准备工作后,此时执行一些后置处理逻辑,子类通过重写这个方法来在BeanFactory创建并预准备完成以后做进一步的设置// 在这一步,所有的bean definitions将会被加载,但此时bean还不会被实例化// 5)执行BeanFactoryPostProcessor的方法即调用bean factory的后置处理器:// BeanDefinitionRegistryPostProcessor(触发时机:bean定义注册之前)和BeanFactoryPostProcessor(触发时机:bean定义注册之后bean实例化之前)// 6)注册bean的后置处理器BeanPostProcessor,注意不同接口类型的BeanPostProcessor;在Bean创建前后的执行时机是不一样的// 7)初始化国际化MessageSource相关的组件,比如消息绑定,消息解析等// 8)初始化事件广播器,如果bean factory没有包含事件广播器,那么new一个SimpleApplicationEventMulticaster广播器对象并注册到bean factory中// 9)AbstractApplicationContext定义了一个模板方法onRefresh,留给子类覆写,比如ServletWebServerApplicationContext覆写了该方法来创建内嵌的tomcat容器// 10)注册实现了ApplicationListener接口的监听器,之前已经有了事件广播器,此时就可以派发一些early application events// 11)完成容器bean factory的初始化,并初始化所有剩余的单例bean。这一步非常重要,一些bean postprocessor会在这里调用。// 12)完成容器的刷新工作,并且调用生命周期处理器的onRefresh()方法,并且发布ContextRefreshedEvent事件refreshContext(context);// 【8】执行刷新容器后的后置处理逻辑,注意这里为空方法afterRefresh(context, applicationArguments);stopWatch.stop();if (this.logStartupInfo) {new StartupInfoLogger(this.mainApplicationClass).logStarted(getApplicationLog(), stopWatch);}listeners.started(context);// 【9】调用ApplicationRunner和CommandLineRunner的run方法,实现spring容器启动后需要做的一些东西比如加载一些业务数据等callRunners(context, applicationArguments);}//部分代码省略return context;
}
上面的每行代码,每行解释,都要细细品一下,接下来我们把上面几个重要的点再深入下。
1、StopWatch stopWatch = new StopWatch();
StopWatch 是一个spring util 包下的工具类,是一个计时器,能计算代码段耗时时间。
run方法中在最开始创建StopWatch并start开始计算。在所有的操作完成后调用stop方法结束计时,然后通过log info输出格式化后的时间。
public ConfigurableApplicationContext run(String... args) {StopWatch stopWatch = new StopWatch();stopWatch.start();// do somethingstopWatch.stop();if (this.logStartupInfo) {new StartupInfoLogger(this.mainApplicationClass).logStarted(getApplicationLog(), stopWatch); //输出计时时间}}
run方法中在最开始创建StopWatch并start开始计算。在所有的操作完成后调用stop方法结束计时,然后通过log info输出格式化后的时间。
2、configureHeadlessProperty()
//配置java.awt.headless属性configureHeadlessProperty();
这里将java.awt.headless设置为true,表示运行在服务器端,在没有显示器器和鼠标键盘的模式下照样可以工作,模拟输入输出设备功能。
做了这样的操作后,SpringBoot想干什么呢?其实是想设置该应用程序,即使没有检测到显示器,也允许其启动.对于服务器来说,是不需要显示器的,所以要这样设置.
private static final String SYSTEM_PROPERTY_JAVA_AWT_HEADLESS = "java.awt.headless";
方法主体如下:
private void configureHeadlessProperty() {System.setProperty(SYSTEM_PROPERTY_JAVA_AWT_HEADLESS, System.getProperty(SYSTEM_PROPERTY_JAVA_AWT_HEADLESS, Boolean.toString(this.headless)));
}
通过方法可以看到,setProperty()方法里面又有个getProperty();这不多此一举吗?其实getProperty()方法里面有2个参数, 第一个key值,第二个是默认值,意思是通过key值查找属性值,如果属性值为空,则返回默认值 true;保证了一定有值的情况;
@SpringBootApplication
public class App {public static void main(String[] args) {ConfigurableApplicationContext run = SpringApplication.run(App.class, args);Properties properties = System.getProperties();properties.list(System.out);}
}
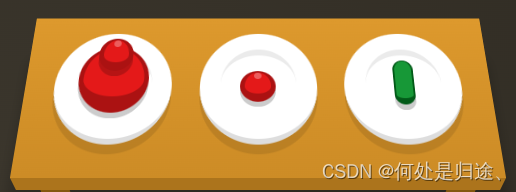
获取并启用监听器
这一步 通过监听器来实现初始化的的基本操作,这一步做了2件事情
- 创建所有 Spring 运行监听器并发布应用启动事件
- 启用监听器
SpringApplicationRunListeners listeners = getRunListeners(args);
listeners.starting();
private SpringApplicationRunListeners getRunListeners(String[] args) {Class<?>[] types = new Class<?>[] { SpringApplication.class, String[].class };return new SpringApplicationRunListeners(logger,getSpringFactoriesInstances(SpringApplicationRunListener.class, types, this, args),this.applicationStartup);
}
先看看new SpringApplicationRunListeners中的getSpringFactoriesInstances这个方法做了什么事情
getSpringFactoriesInstances(SpringApplicationRunListener.class, types, this, args)这个主要是看传入了什么接口,然后会从工map中获取对应有哪些实现,然后将这些实现一一启动
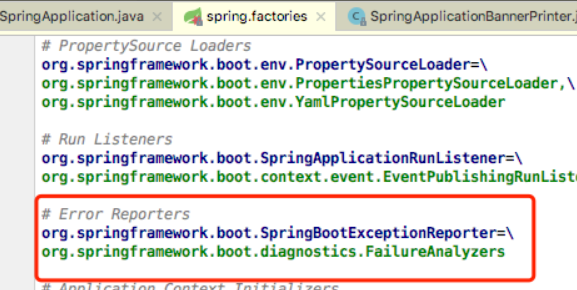
我从META-INF/spring.factories看到
# Run Listeners
org.springframework.boot.SpringApplicationRunListener=\
org.springframework.boot.context.event.EventPublishingRunListener
很明显,Listener主要就是初始化这个监听器
9、设置应用程序参数
将执行run方法时传入的参数封装成一个对象
ApplicationArguments applicationArguments = new DefaultApplicationArguments(args);
创建ApplicationArguments对象,封装了args参数
@SpringBootApplication
public class App {public static void main(String[] args) {args = new String[]{"aaa","bbb","ccc"};ConfigurableApplicationContext run = SpringApplication.run(App.class, args);}
}
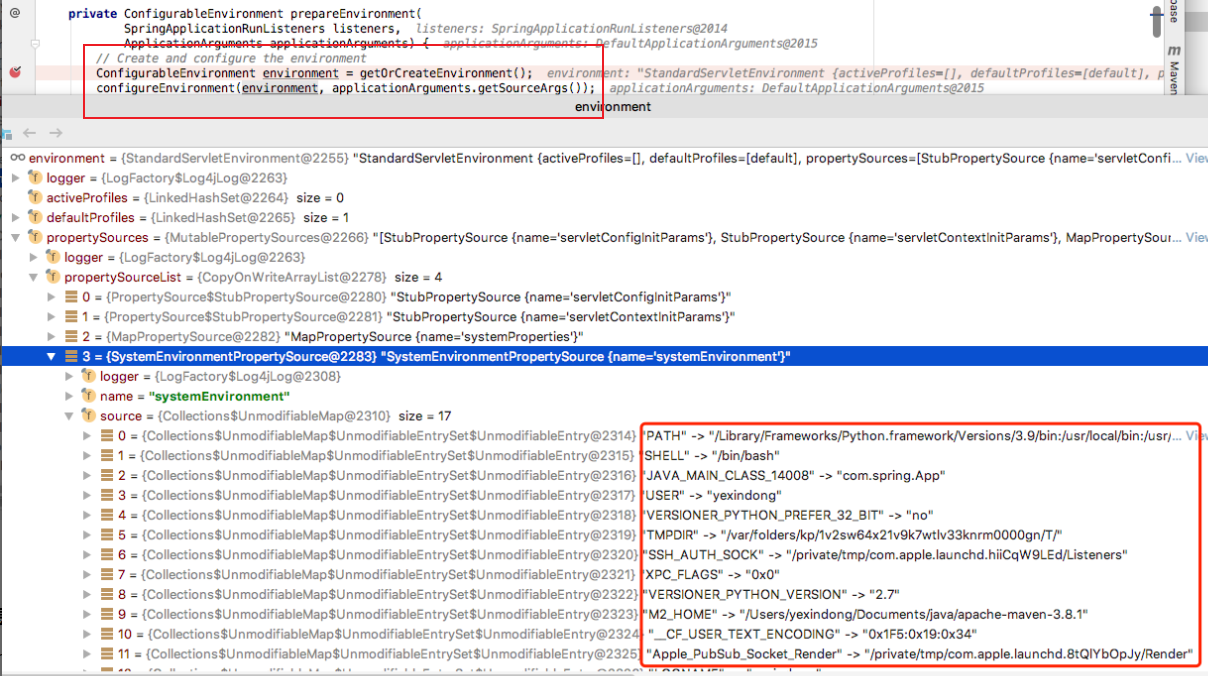
10、准备环境变量
准备环境变量,包含系统属性和用户配置的属性,执行的代码块在 prepareEnvironment 方法内
ConfigurableEnvironment environment = prepareEnvironment(listeners,applicationArguments);
打了断点之后可以看到,它将maven和系统的环境变量都加载进来了
12、打印 banner 信息
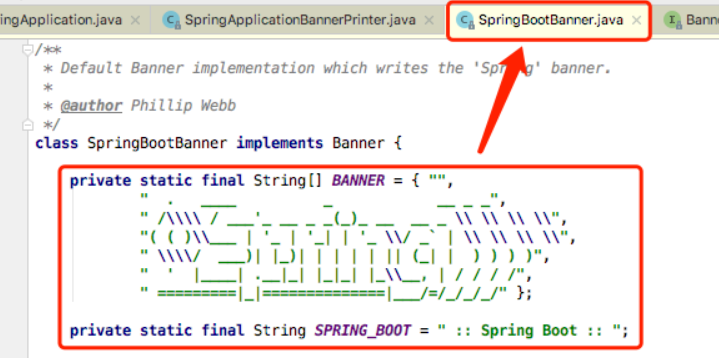
显而易见,这个流程就是用来打印控制台那个很大的spring的banner的,就是下面这个东东
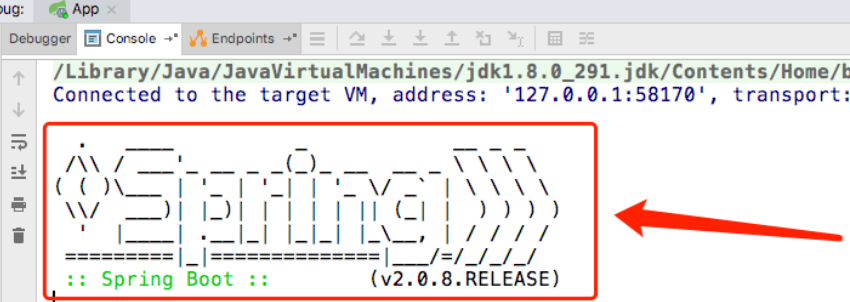
那他在哪里打印的呢?他在 SpringBootBanner.java 里面打印的,这个类实现了Banner 接口,
而且banner信息是直接在代码里面写死的;
有些公司喜欢自定义banner信息,如果想要改成自己喜欢的图标该怎么办呢,其实很简单,只需要在resources目录下添加一个 banner.txt 的文件即可,txt文件内容如下
                 _           _
(_)         | |
_   _  _____  ___ _ __   __| | ___  _ __   __ _
| | | |/ _ \ \/ / | '_ \ / _` |/ _ \| '_ \ / _` |
| |_| |  __/>  <| | | | | (_| | (_) | | | | (_| |
\__, |\___/_/\_\_|_| |_|\__,_|\___/|_| |_|\__, |
__/ |                                     __/ |
|___/                                     |___/
:: yexindong::
一定要添加到resources目录下,别加错了

只需要加一个文件即可,其他什么都不用做,然后直接启动springboot,就可以看到效果了

13、创建应用程序的上下文
实例化应用程序的上下文, 调用 createApplicationContext() 方法,这里就是用反射创建对象,没什么好说的;
context = createApplicationContext();
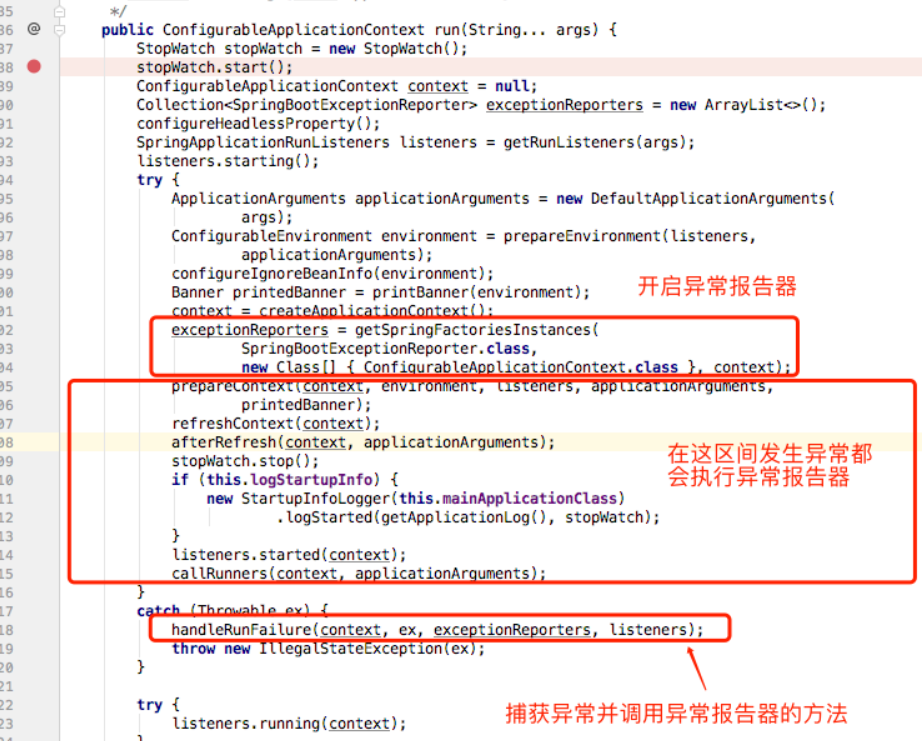
14、实例化异常报告器
异常报告器是用来捕捉全局异常使用的,当springboot应用程序在发生异常时,异常报告器会将其捕捉并做相应处理,在spring.factories 文件里配置了默认的异常报告器,
需要注意的是,这个异常报告器只会捕获启动过程抛出的异常,如果是在启动完成后,在用户请求时报错,异常报告器不会捕获请求中出现的异常,
了解原理了,接下来我们自己配置一个异常报告器来玩玩;
MyExceptionReporter.java 继承 SpringBootExceptionReporter 接口
package com.spring.application;
import org.springframework.boot.SpringBootExceptionReporter;
import org.springframework.context.ConfigurableApplicationContext;
public class MyExceptionReporter implements SpringBootExceptionReporter { private ConfigurableApplicationContext context;
// 必须要有一个有参的构造函数,否则启动会报错
MyExceptionReporter(ConfigurableApplicationContext context) { this.context = context;
}
@Override
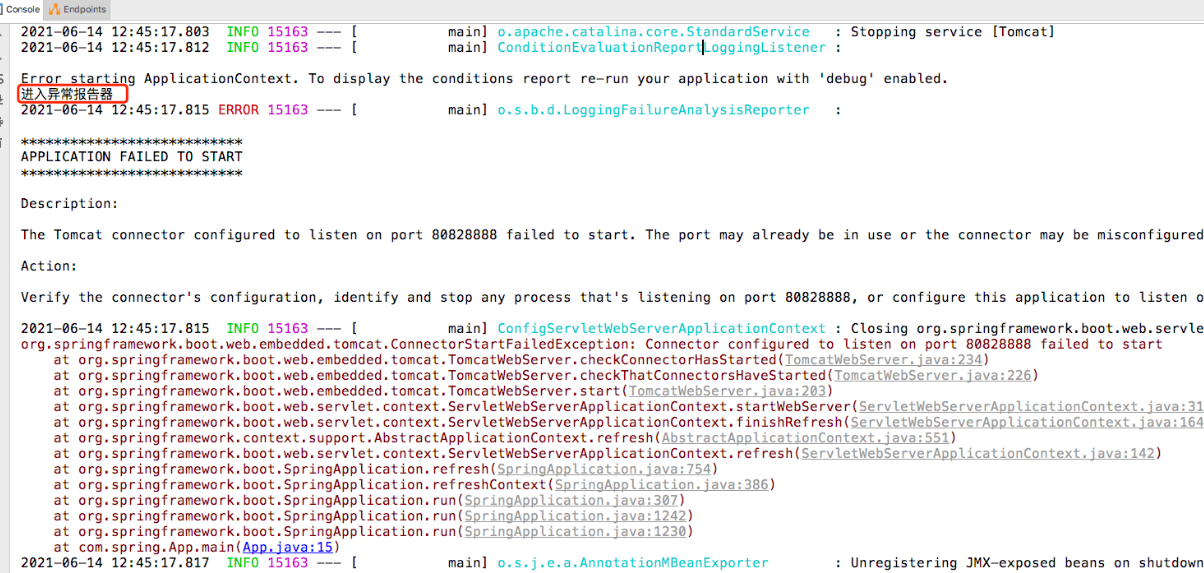
public boolean reportException(Throwable failure) { System.out.println("进入异常报告器");
failure.printStackTrace();
// 返回false会打印详细springboot错误信息,返回true则只打印异常信息
return false;
}
}
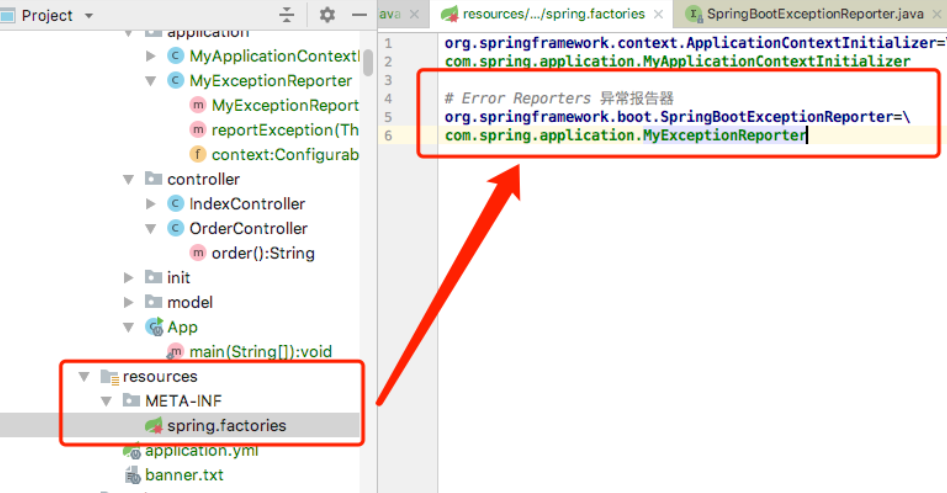
在 spring.factories 文件中注册异常报告器
# Error Reporters 异常报告器
org.springframework.boot.SpringBootExceptionReporter=\
com.spring.application.MyExceptionReporter
接着我们在application.yml 中 把端口号设置为一个很大的值,这样肯定会报错,
server:
port: 80828888
启动后,控制台打印如下图
15、准备上下文环境
这里准备的上下文环境是为了下一步刷新做准备的,里面还做了一些额外的事情;
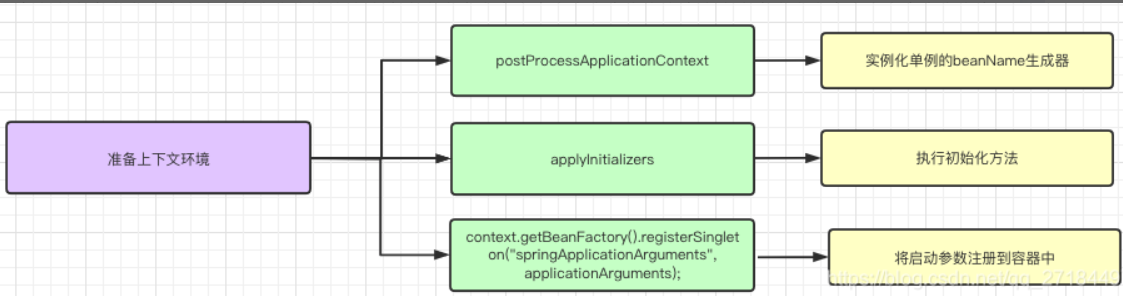
15.1、实例化单例的beanName生成器
在 postProcessApplicationContext(context); 方法里面。使用单例模式创建 了BeanNameGenerator 对象,其实就是beanName生成器,用来生成bean对象的名称
15.2、执行初始化方法
初始化方法有哪些呢?还记得第3步里面加载的初始化器嘛?其实是执行第3步加载出来的所有初始化器,实现了ApplicationContextInitializer 接口的类
15.3、将启动参数注册到容器中
这里将启动参数以单例的模式注册到容器中,是为了以后方便拿来使用,参数的beanName 为 :springApplicationArguments
16、刷新上下文
刷新上下文已经是spring的范畴了,自动装配和启动 tomcat就是在这个方法里面完成的,还有其他的spring自带的机制在这里就不一一细说了,

17、刷新上下文后置处理
afterRefresh 方法是启动后的一些处理,留给用户扩展使用,目前这个方法里面是空的,
/** * Called after the context has been refreshed. * @param context the application context * @param args the application arguments */
protected void afterRefresh(ConfigurableApplicationContext context,
ApplicationArguments args) { }
18、结束计时器
到这一步,springboot其实就已经完成了,计时器会打印启动springboot的时长
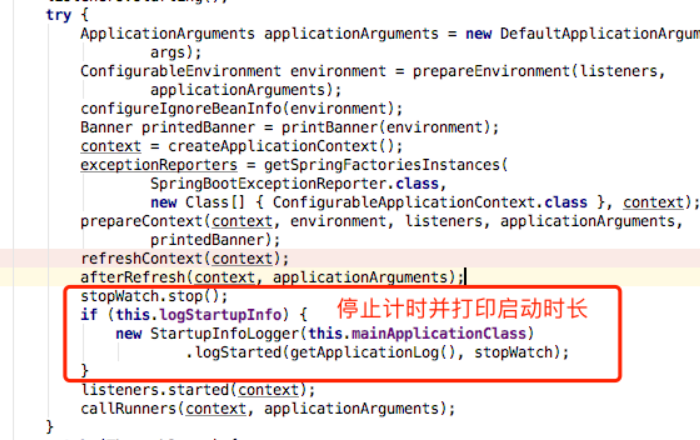
在控制台看到启动还是挺快的,不到2秒就启动完成了;
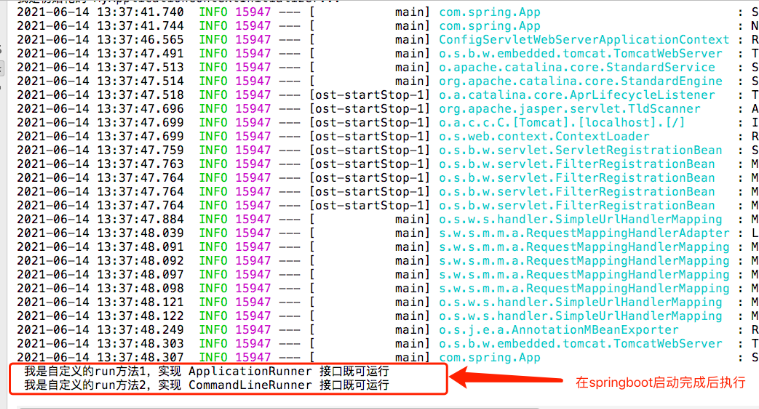
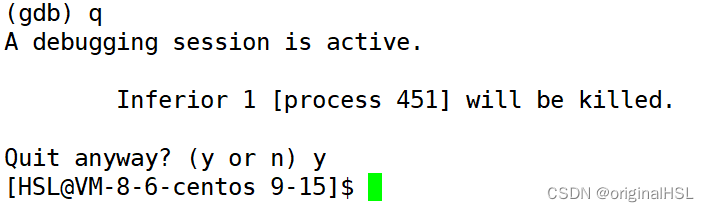
20、执行自定义的run方法
这是一个扩展功能,callRunners(context, applicationArguments) 可以在启动完成后执行自定义的run方法;有2中方式可以实现:
实现 ApplicationRunner 接口
实现 CommandLineRunner 接口
接下来我们验证一把,为了方便代码可读性,我把这2种方式都放在同一个类里面
package com.spring.init;
import org.springframework.boot.ApplicationArguments;
import org.springframework.boot.ApplicationRunner;
import org.springframework.boot.CommandLineRunner;
import org.springframework.stereotype.Component;
/** * 自定义run方法的2种方式 */
@Component
public class MyRunner implements ApplicationRunner, CommandLineRunner { @Override
public void run(ApplicationArguments args) throws Exception { System.out.println(" 我是自定义的run方法1,实现 ApplicationRunner 接口既可运行"        );
}
@Override
public void run(String... args) throws Exception { System.out.println(" 我是自定义的run方法2,实现 CommandLineRunner 接口既可运行"        );
}
}
启动springboot后就可以看到控制台打印的信息了