2D&3D融合
概述
截止目前为止,我们学习了机器人学,学习了2D和3D视觉算法。我们也学习了2D相机(图像数据的来源)和3D相机(点云数据的来源)工作原理。
实际上,我们最终要做的,是一个手眼机器人系统。在这个系统里,相机与机器人构成了两个非常关键的部分,它们之间需要密切配合,因此,它们之间的关系,也就非常重要。确定相机与机器人之间的关系,这是手眼标定要解决的问题。
另一方面,在很多场合,为了增强算法的鲁棒性,我们通常同时使用图像数据与点云数据,这又涉及到2D与3D配准的问题。
相机配准
- 方式一:
通过双重循环遍历
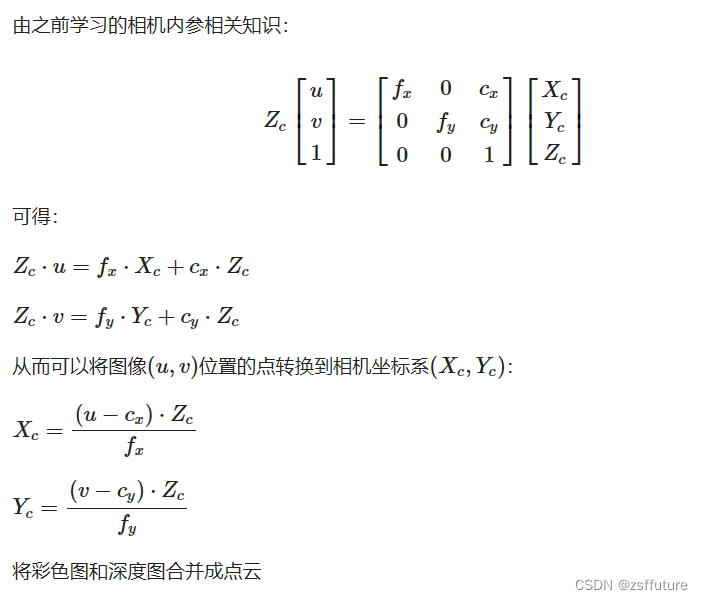
/*** 将彩色图和深度图合并成点云* @param matrix 相机内参矩阵3x3* @param rgb    彩色图* @param depth  深度图* @param cloud  输出点云*/
static void convert(Mat &matrix, Mat &rgb, Mat &depth, PointCloud::Ptr &cloud) {double camera_fx = matrix.at<double>(0, 0);double camera_fy = matrix.at<double>(1, 1);double camera_cx = matrix.at<double>(0, 2);double camera_cy = matrix.at<double>(1, 2);cout << "fx: " << camera_fx << endl;cout << "fy: " << camera_fy << endl;cout << "cx: " << camera_cx << endl;cout << "cy: " << camera_cy << endl;// 遍历深度图for (int v = 0; v < depth.rows; v++)for (int u = 0; u < depth.cols; u++) {// 获取深度图中(m,n)处的值ushort d = depth.ptr<ushort>(v)[u];// d 可能没有值,若如此,跳过此点if (isnan(d) && abs(d) < 0.0001)continue;// d 存在值,则向点云增加一个点PointT p;// 计算这个点的空间坐标p.z = double(d) / 1000; //单位是米p.x = (u - camera_cx) * p.z / camera_fx;p.y = (v - camera_cy) * p.z / camera_fy;// 从rgb图像中获取它的颜色// rgb是三通道的BGR格式图,所以按下面的顺序获取颜色Vec3b bgr = rgb.at<Vec3b>(v, u);p.b = bgr[0];p.g = bgr[1];p.r = bgr[2];// 把p加入到点云中cloud->points.push_back(p);//cout << cloud->points.size() << endl;}// 设置并保存点云cloud->height = 1;cloud->width = cloud->points.size();cout << "point cloud size = " << cloud->points.size() << endl;cloud->is_dense = false;
}
int main(){cv::Mat cameraMatrix; // 从文件加载相机内参cv::Mat rgb;         // 从相机得到RGB彩色图cv::Mat depth;       // 从相机得到depth深度图PointCloud::Ptr pCloud = PointCloud::Ptr(new PointCloud);convert(cameraMatrix, rgb, depth, pCloud);
}
- 方式二:
通过指针遍历,并提前准备好计算矩阵
#include <iostream>
#include <opencv2/opencv.hpp>
#include <sstream>
#include <cstdlib>
#include <pcl/io/io.h>using namespace std;
using namespace cv;float qnan_ = std::numeric_limits<float>::quiet_NaN();
const char *cameraInCailFile = "./assets/3DCameraInCailResult.xml";Eigen::Matrix<float, 1920, 1> colmap;
Eigen::Matrix<float, 1080, 1> rowmap;
//const short w = 512, h = 424;
const short w = 1920, h = 1080;void prepareMake3D(const double cx, const double cy,const double fx, const double fy) {float *pm1 = colmap.data();float *pm2 = rowmap.data();for (int i = 0; i < w; i++) {*pm1++ = (i - cx + 0.5) / fx;}for (int i = 0; i < h; i++) {*pm2++ = (i - cy + 0.5) / fy;}
}
/*** 根据内参,合并RGB彩色图和深度图到点云* @param cloud* @param depthMat* @param rgbMat*/
void getCloud(pcl::PointCloud<pcl::PointXYZRGB>::Ptr &cloud, Mat &depthMat, Mat &rgbMat) {const float *itD0 = (float *) depthMat.ptr();const char *itRGB0 = (char *) rgbMat.ptr();if (cloud->size() != w * h)cloud->resize(w * h);pcl::PointXYZRGB *itP = &cloud->points[0];bool is_dense = true;for (size_t y = 0; y < h; ++y) {const unsigned int offset = y * w;const float *itD = itD0 + offset;const char *itRGB = itRGB0 + offset * 4;const float dy = rowmap(y);for (size_t x = 0; x < w; ++x, ++itP, ++itD, itRGB += 4) {const float depth_value = *itD / 1000.0f;if (!isnan(depth_value) && abs(depth_value) >= 0.0001) {const float rx = colmap(x) * depth_value;const float ry = dy * depth_value;itP->z = depth_value;itP->x = rx;itP->y = ry;itP->b = itRGB[0];itP->g = itRGB[1];itP->r = itRGB[2];} else {itP->z = qnan_;itP->x = qnan_;itP->y = qnan_;itP->b = qnan_;itP->g = qnan_;itP->r = qnan_;is_dense = false;}}}cloud->is_dense = is_dense;
}int main(){Mat cameraMatrix = cv::Mat_<double>(3, 3);FileStorage paramFs(cameraInCailFile, FileStorage::READ);paramFs["cameraMatrix"] >> cameraMatrix;// 内参数据double fx = cameraMatrix.at<double>(0, 0);double fy = cameraMatrix.at<double>(1, 1);double cx = cameraMatrix.at<double>(0, 2);double cy = cameraMatrix.at<double>(1, 2);// 提前准备计算所需参数prepareMake3D(cx, cy, fx, fy);cv::Mat rgbMat;      // 从相机得到RGB彩色图cv::Mat depthMat;        // 从相机得到depth深度图pcl::PointCloud<pcl::PointXYZRGB>::Ptr cloud(new pcl::PointCloud<pcl::PointXYZRGB>());getCloud(cloud, depthMat, rgbMat)
}
手眼标定(外参标定)
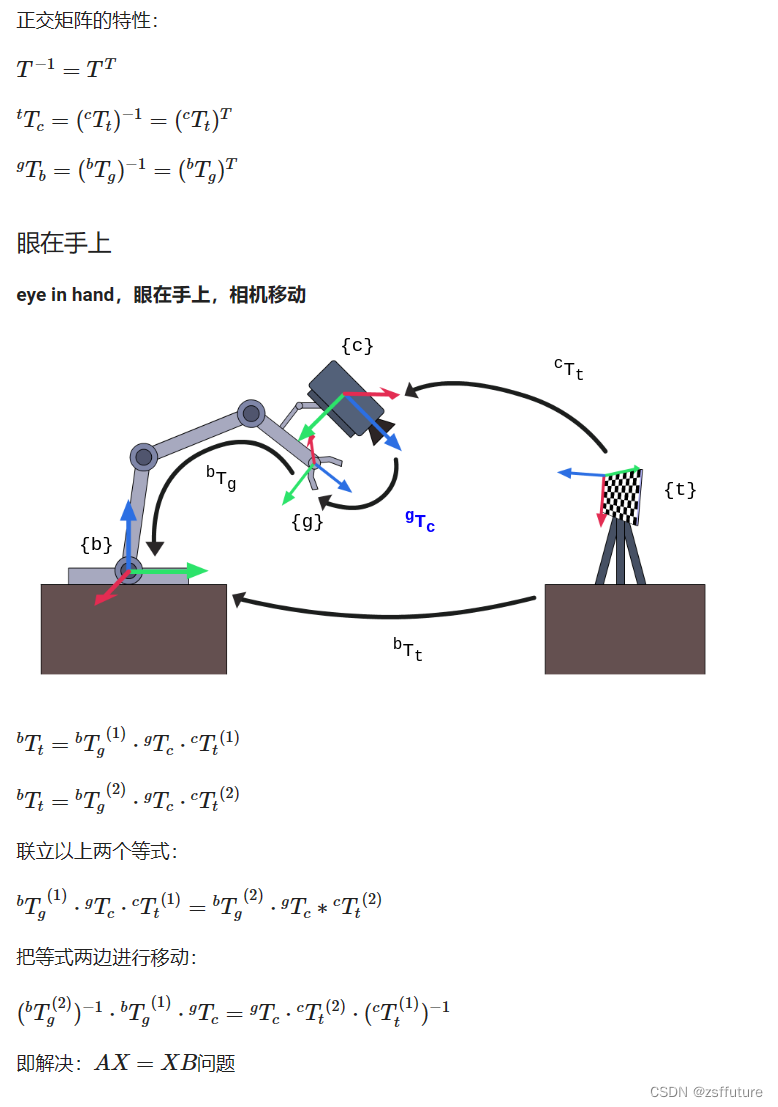
一、手眼标定的原理
图例说明:
- {b}:base基座标系
- {g}:gripper抓手坐标系
- {t}:target标定板坐标系
- {c}:camera相机坐标系


二、手眼标定的操作
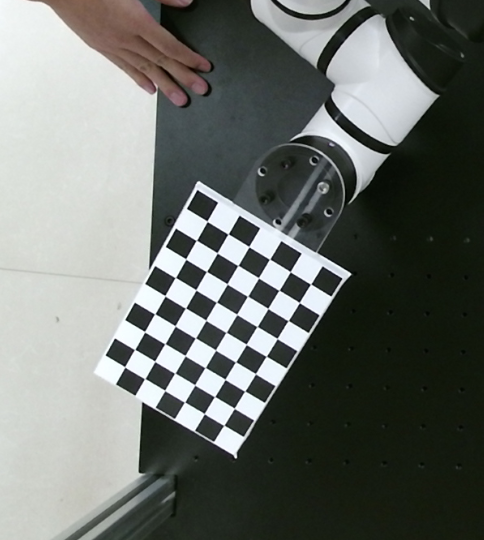
- 将标定板固定在机械臂末端
- 开启机械臂,开启摄像头
- 在距离摄像头40、60、80cm的距离上,在摄像头可见范围内,使用各种角度各拍照15-20张照片,一共45-60张。
- 同时保存照片以及对应拍照时机械臂位姿
- 准备好之前标定的相机内参
- 执行手眼标定API,得到相机在基坐标系的表达(旋转矩阵R+平移向量t)
三、自己动手实现手眼标定及验证
- 从文件及图片读取照片
// Created by poplar on 19-7-25.
#include <iostream>
#include <opencv2/core.hpp>
#include <opencv2/calib3d.hpp>#include "boost/filesystem.hpp"   // includes all needed Boost.Filesystem declarations
#include <boost/algorithm/string/predicate.hpp>
#include <opencv2/imgcodecs.hpp>#include "tinyxml/tinyxml2.h"
#include <map>// Eigen 部分
#include <Eigen/Core>
// 稠密矩阵的代数运算(逆,特征值等)
#include <Eigen/Dense>
// Eigen 几何模块
#include <Eigen/Geometry>#include <rw/math/Rotation3D.hpp>
#include <rw/math/Vector3D.hpp>
#include <rw/math/RPY.hpp>#include <opencv/cxeigen.hpp>
#include <opencv/cv.hpp>
#include "utils/Rotation3DUtils.h"using namespace boost::filesystem;          // for ease of tutorial presentation;
//  a namespace alias is preferred practice in real codeusing namespace tinyxml2;
using namespace Eigen;
using namespace cv;
using namespace std;using namespace rw::math;// Eigen
// OpenCV
// RobWorkconst string prefix_path = "/home/ty/Workspace/Robot/calibration-single";
const string intrinsicsPath = prefix_path + "/CaliResult/3DCameraInCailResult.xml";const string pic_dir_path = prefix_path + "/ImageFromCamera";
const string exten = "bmp";
const string extrinsic_params = prefix_path + "/extrinsic_input_param.xml";
// const string extrinsic_params = "/home/poplar/Lesson/Cobot/Aubo/calibration-single/extrinsic_input_param_t.xml";const string exCailFilePath = prefix_path + "/CaliResult/3DCameraExCailResult.xml";enum Pattern {CHESSBOARD, CIRCLES_GRID, ASYMMETRIC_CIRCLES_GRID
};void printPose(const vector<double> &pose);void calcChessboardCorners(const Size &boardSize, float squareSize, vector<Point3f> &corners,Pattern patternType = CHESSBOARD) {corners.resize(0);switch (patternType) {case CHESSBOARD:case CIRCLES_GRID:for (int i = 0; i < boardSize.height; i++)      // 9for (int j = 0; j < boardSize.width; j++)   // 6corners.emplace_back(float(j * squareSize),float(i * squareSize), 0);break;case ASYMMETRIC_CIRCLES_GRID:for (int i = 0; i < boardSize.height; i++)for (int j = 0; j < boardSize.width; j++)corners.emplace_back(float((2 * j + i % 2) * squareSize),float(i * squareSize), 0);break;default:CV_Error(Error::StsBadArg, "Unknown pattern type\n");}
}/*** 通过图片集合 填充 旋转矩阵&平移矩阵* @param R_target2cam* @param t_target2cam* @param imgPaths*/
bool fillFromImages(vector<Mat> &R_target2cam, std::vector<Mat> &t_target2cam, std::vector<path> &imgPaths) {const Size patternSize(6, 9);const float squareSize = 20;//! [compute-poses]std::vector<Point3f> objectPoints;
//  [
//       [0, 0 , 0]
//       [0, 20, 0]
//       [0, 40, 0]
//       ...
//       [20, 0, 0]
//       ...
//  ]calcChessboardCorners(patternSize, squareSize, objectPoints);// 通过内参进行矫正// 检测角点// 计算变换矩阵(旋转矩阵+平移矩阵)cv::FileStorage fs(intrinsicsPath, FileStorage::READ);Mat cameraMatrix, distCoeffs;fs["cameraMatrix"] >> cameraMatrix;fs["distCoeffs"] >> distCoeffs;// 遍历图片for (const auto &path: imgPaths) {const string &s_path = path.string();
//        std::cout << s_path << std::endl;const Mat &img_mat = imread(s_path, IMREAD_UNCHANGED);// 查找图片所有角点std::vector<Point2f> corners;bool isFound = cv::findChessboardCorners(img_mat, patternSize, corners);if (!isFound) {std::cerr << "Image not found corners: " << s_path << std::endl;return false;}
//        std::cout << corners.size() << std::endl;cv::Mat rvec = cv::Mat::zeros(3, 1, CV_64FC1);cv::Mat tvec = cv::Mat::zeros(3, 1, CV_64FC1);// solveP3P// 根据://      objectPoints(角点行列信息&大小信息)//      corners所有角点信息//      内参// 得到://      旋转向量,平移向量solvePnP(objectPoints, corners, cameraMatrix, distCoeffs, rvec, tvec);//        raux.convertTo(Rvec, CV_32F);    //旋转向量
//        taux.convertTo(Tvec, CV_32F);   //平移向量Mat R; // 旋转矩阵 <-> 旋转向量// Transforms Rotation Vector to MatrixRodrigues(rvec, R); //  solvePnP返回的是旋转向量,故用罗德里格斯变换变成旋转矩阵cout << "rotation vector rvec =\n" << rvec << endl;cout << "rotation R =\n" << R << endl;cout << "translation vector tvec =\n" << tvec << std::endl;const Vec3f &oulerAngles = rotationMatrixToEulerAngles(R);std::cout << "oulerAngles = \n" << oulerAngles * RA2DE << std::endl; // zyx (RPY)
//        Rotation3D<double> rot(R);std::cout << "Image path: " << s_path << std::endl;R_target2cam.push_back(R);
//        t_target2cam.push_back(tvec);t_target2cam.push_back(tvec / 1000);//        const Mat &img_mat = imread(s_path, IMREAD_UNCHANGED);
//        Mat smallImg;
//        resize( img_mat, smallImg, Size(), 0.5, 0.5, INTER_LINEAR_EXACT);
//        cv::imshow("img_chess", smallImg);
//        std::cout << s_path << std::endl;
//        waitKey(0);}return true;}/*** 求齐次矩阵的逆矩阵* @param T* @return*/
static Mat homogeneousInverse(const Mat &T) {CV_Assert(T.rows == 4 && T.cols == 4);Mat R = T(Rect(0, 0, 3, 3));Mat t = T(Rect(3, 0, 1, 3));Mat Rt = R.t();Mat tinv = -Rt * t;Mat Tinv = Mat::eye(4, 4, T.type());Rt.copyTo(Tinv(Rect(0, 0, 3, 3)));tinv.copyTo(Tinv(Rect(3, 0, 1, 3)));return Tinv;
}/*** 外参标定** 输入:*      60组:t2c*          标定板在相机坐标系的表达(标定板到相机的转换矩阵->旋转矩阵R+平移向量t)*          内参(用于求相机在标定板坐标系的表达)**      60组:b2g  (g2b求逆)*          末端gripper的x,y,z,r,p,y-> 旋转矩阵R+平移向量t, 笛卡尔(RPY转旋转矩阵)*          求逆(转置),正交矩阵两个计算结果一致** 输出:*      外参 :*          相机在Base坐标系的表达 (轴角对+平移向量t) (旋转矩阵R+平移向量t)** 验证:*      通过现有图片及标定结果进行验证* @return*/
int main() {// 相机坐标系下标定板(目标)的表达 (通过 彩图&深度图&内参 获得) ---------------1std::vector<Mat> R_target2cam, t_target2cam;// 读取照片&深度图if (!exists(pic_dir_path)) {std::cout << pic_dir_path << " not exist" << std::endl;return 0;}int counter{0};// 将所有外参标定的照片路径存到imgPathsvector<path> imgPaths;directory_iterator end_itr;for (directory_iterator itr(pic_dir_path); itr != end_itr; ++itr) {if (!is_directory(itr->status())) {path file_path = itr->path();const path &filename = file_path.filename();if (boost::starts_with(filename.string(), "raw_color_extrinsic_pose")) {
//                std::cout << filename.string() << std::endl;imgPaths.push_back(file_path);//                counter++;
//                if (counter >= 5){
//                    break;
//                }}}}// 通过识别图像及角点,得到相机到标定板的变换矩阵 (内参)bool rst = fillFromImages(R_target2cam, t_target2cam, imgPaths);if (!rst) {return -1;}std::cout << "R_target2cam: " << R_target2cam.size() << std::endl;std::cout << "t_target2cam: " << t_target2cam.size() << std::endl;std::cout << " --------------------------------------------- 相机坐标系下标定板(目标)的表达 OK -------------------------------------------- ↑" << std::endl;// 基坐标Base下末端TCP(gripper)的表达 (通过设备获得) ---------------2std::vector<Mat> R_gripper2base, t_gripper2base;// 轴角对&平移 -> 旋转矩阵&平移矩阵XMLDocument doc;doc.LoadFile(extrinsic_params.c_str());XMLElement *root = doc.RootElement();XMLElement *extrinsics = root->FirstChildElement("extrinsic");map<std::string, vector<double>> map;while (extrinsics) {const char *image_path = extrinsics->FirstChildElement("Limage_color_path")->GetText();string img_path = std::string(image_path);string img_name = img_path.substr(img_path.find_last_of('/') + 1, -1);// std::cout << image_path << " name: " << img_name << std::endl;double pose1 = atof(extrinsics->FirstChildElement("pose1")->GetText());double pose2 = atof(extrinsics->FirstChildElement("pose2")->GetText());double pose3 = atof(extrinsics->FirstChildElement("pose3")->GetText());double pose4 = atof(extrinsics->FirstChildElement("pose4")->GetText());double pose5 = atof(extrinsics->FirstChildElement("pose5")->GetText());double pose6 = atof(extrinsics->FirstChildElement("pose6")->GetText());vector<double> pose{pose1, pose2, pose3, pose4, pose5, pose6};// 字典map保存的图片文件名及对应的=位姿map[img_name] = pose;extrinsics = extrinsics->NextSiblingElement();}// 将对应图片的机械臂笛卡尔空间坐标pose转成 旋转矩阵+平移矩阵for (const path &p: imgPaths) {std::string f_name = p.filename().string();try {// 取出每个图片对应的位姿vector<double> &pose = map.at(f_name);if (pose.empty()) {std::cerr << "pose empty" << std::endl;return -1;}
//            std::cout << f_name << " -> ";printPose(pose);cv::Vec3f eulerAngles(pose[3],pose[4],pose[5]);const Mat &R = eulerAnglesToRotationMatrix(eulerAngles);cout << "rotation matrix3 eulerAngles =\n" << eulerAngles << endl;cout << "rotation matrix3 R =\n" << R << endl;cv::Mat t = (cv::Mat_<double>(3,1) << pose[0], pose[1], pose[2]);cout << "translation matrix3 t =\n" << t << endl;R_gripper2base.push_back(R);
//            t_gripper2base.push_back(t);t_gripper2base.push_back(t / 1000);//            const string &s_path = p.string();
//            const Mat &img_mat = imread(s_path, IMREAD_UNCHANGED);
//            Mat smallImg;
//            resize( img_mat, smallImg, Size(), 0.5, 0.5, INTER_LINEAR_EXACT);
//            cv::imshow("img_chess", smallImg);
//            std::cout << s_path << std::endl;
//            waitKey(0);} catch (const std::out_of_range &e) {std::cerr << f_name << " was not found." << std::endl;}}std::cout << " --------------------------------------------- 基坐标Base下末端TCP(gripper)的表达 -------------------------------------------- ↑" << std::endl;//    return 0;//    std::cout << map["raw_color_extrinsic_pose_07_26_17_01_59_965.bmp"].size()<< std::endl;// TCP坐标系下基坐标的表达std::vector<Mat> R_base2gripper, t_base2gripper;// 转换成逆矩阵unsigned long size = R_gripper2base.size();R_base2gripper.reserve(size);t_base2gripper.reserve(size);for (size_t i = 0; i < size; i++) {// 获取每个抓手的姿态(旋转矩阵)Mat R = R_gripper2base[i];Mat Rt = R.t(); // 转置R_base2gripper.push_back(Rt);// 获取每个抓手的位置Mat t = t_gripper2base[i];Mat tinv = -Rt * t;t_base2gripper.push_back(tinv);cout << "base2gripper Rt=\n" << Rt << endl;cout << "base2gripper tinv =\n" << tinv << endl;}std::cout << " --------------------------------------------- 末端TCP坐标下Base的表达 -------------------------------------------- ↑" << std::endl;std::cout << R_target2cam.size()   << ":" << t_target2cam.size()   << '\n' <<R_base2gripper.size() << ":" << t_base2gripper.size() << std::endl;std::cout << "---------------------calibrateHandEye start !---------------------" << std::endl;// 求Base基坐标下相机Cam的表达Mat R_cam2base_est, t_cam2base_est;// 进行手眼标定(外参)cv::calibrateHandEye(R_base2gripper,  t_base2gripper,R_target2cam,    t_target2cam,R_cam2base_est,  t_cam2base_est,HandEyeCalibrationMethod::CALIB_HAND_EYE_DANIILIDIS);cout << "旋转矩阵 est: \n" << R_cam2base_est << endl;cout << "平移矩阵 est: \n" << t_cam2base_est * 1000 << endl;double angle = 0;double axisX = 0;double axisY = 0;double axisZ = 0;double translationX = 0;double translationY = 0;double translationZ = 0;// 使用opencv读取文件cv::FileStorage fs(exCailFilePath, cv::FileStorage::READ);fs["Angle"] >> angle;fs["AxisX"] >> axisX;fs["AxisY"] >> axisY;fs["AxisZ"] >> axisZ;fs["TranslationX"] >> translationX;fs["TranslationY"] >> translationY;fs["TranslationZ"] >> translationZ;// 轴角对Vector3d axisMatrix(axisX, axisY, axisZ);AngleAxisd angleAxisd(angle, axisMatrix);// 获取旋转矩阵const Eigen::AngleAxis<double>::Matrix3 &rotationMatrix = angleAxisd.toRotationMatrix();
//    cout << "旋转矩阵e:" << rotationMatrix << endl;// 获取平移矩阵Vector3d t_cam2base_eigen(translationX, translationY, translationZ);// 获取输出结果
//    cout << "平移向量e:" << t_cam2base_eigen << endl;// 真实值,eigen转成cvcv::Mat_<double> R_cam2base_true(3, 3);cv::eigen2cv(rotationMatrix,R_cam2base_true);cv::Mat_<double> t_cam2base_true(3, 1);cv::eigen2cv(t_cam2base_eigen,t_cam2base_true);cout << "旋转矩阵 true: \n" << R_cam2base_true << endl;cout << "平移矩阵 true: \n" << t_cam2base_true << endl;// 估算的 旋转矩阵->旋转向量
//    Mat rvec_cam2base_est;
//    cv::Rodrigues(R_cam2base_est, rvec_cam2base_est);// 真实的 旋转矩阵->旋转向量
//    Mat rvec_cam2base_true;
//    cv::Rodrigues(R_cam2base_true, rvec_cam2base_true);
//    cout << "旋转矩阵 est: \n" << rvec_cam2base_est << endl;
//    cout << "平移向量 est: \n" << t_cam2base_true << endl;//    double rvecDiff = norm(rvec_cam2base_true, rvec_cam2base_est, NormTypes::NORM_L2);
//    double tvecDiff = norm(t_cam2base_true, t_cam2base_est, NormTypes::NORM_L2);
//    std::cout << "rvecDiff:" << rvecDiff << " tvecDiff:" << tvecDiff << std::endl;return 0;
}void printPose(const vector<double> &pose) {cout << "[" <<pose[0] << " " << pose[1] << " " << pose[2] << " " <<pose[3] << " " << pose[4] << " " << pose[5] << " " <<"]" << endl;
}2D与3D融合实践
根据模板抓取指定物体:
制作模板,并计算取得相机到模板的变换矩阵T1,根据实时相机中拍到的物体进行模板匹配,得到变换矩阵T0,最后和相机的外参矩阵Tc进行矩阵相乘,得到目标在世界坐标系的表示,从而进行抓取操作。
一、制作模板:求T1
-
Kinect相机拍照(得到RGB图和深度图)
01_PhotoCapture.cpp -
检测抓取位置(u,v),根据内参及深度信息得到三个空间中的点坐标
02_PointLocator.cpp03_TemplateMaker.cpp -
构建坐标系得到旋转矩阵T1,转成RPY进行抓取测试
04_TestGrabTemplate.cpp -
生成点云图用于模板匹配(进行直通滤波及降采样)
05_CreatePclCloud.cpp验证变换矩阵06_TemplateCloudFilter.cpp生成剪切后的模板- 实时的拍照得到RGB和深度图
- 合成目标点云图
- 通过直通滤波框定范围(得到感兴趣区域)
- 将感兴趣区域进行降采样(提高模板匹配效率)
二、使用模板:求T0
准备好切割后的点云template.pcd以及对应的变换矩阵T1(可以有多个)
-
Kinect相机拍照(得到RGB图和深度图)
01_PhotoCapture.cpp -
生成目标点云图
07_TargetCloudFilter.cpp -
进行模板与目标点云图匹配(统一进行直通滤波及降采样),得到变换矩阵T0
08_TemplateAlignment.cpp
三、进行抓取测试
![]()
09_TestGrabTarget.cpp√
T0 为目标在模板坐标系的表达 T1 为模板在相机坐标系的表达 Tc 为相机在基坐标系的表达
待优化事宜
- 安全位置判定
- 将盒子抓取到指定位置放置
- 不间断抓取多个盒子
- 准备多个模板,提高模板匹配姿态识别度
- 设置间隔,实时进行模板匹配
- 设置目标位置抓取动态延时
- 自动避障
- 其他
自己封装内外参标定工具
- 命令行版
- Qt版