作为向量数据库的佼佼者,Milvus 适用于各种需要借助高效和可扩展向量搜索功能的 AI 应用。
举个例子,如果想要搭建一个负责聊天机器人数据管理流程,Milvus 必然是首选向量数据库。那么如何让这个应用程序开发变得易于管理及更好理解,那就需要借助 Towhee(https://towhee.io/)了。Towhee 是一个新兴的机器学习(ML)框架,可以简化了实现和编排复杂 ML 模型的过程。
接下来我将介绍如何通过 Python 使用 Milvus + Towhee 搭建一个基础的 AI 聊天机器人。本文会重点讲解如何处理、分析非结构化数据及存储和查询向量数据。
01.设置环境
首先,创建一个 Python 虚拟环境来运行聊天机器人。
以下是 Linux shell session(会话)。借助 Shell session 创建并激活环境,将 pip 升级到最新版本。
[egoebelbecker@ares milvus_chatbot]$ python -m venv ./chatbot_venv
[egoebelbecker@ares milvus_chatbot]$ source chatbot_venv/bin/activate
(chatbot_venv) [egoebelbecker@ares milvus_chatbot]$ pip install --upgrade pip
Requirement already satisfied: pip in ./chatbot_venv/lib64/python3.11/site-packages (22.2.2)
Collecting pipUsing cached pip-23.1.2-py3-none-any.whl (2.1 MB)
Installing collected packages: pipAttempting uninstall: pipFound existing installation: pip 22.2.2Uninstalling pip-22.2.2:Successfully uninstalled pip-22.2.2
Successfully installed pip-23.1.2
接下来,安装运行代码所需的软件包:Pandas、Jupyter、Langchain、Towhee、Unstructured、Milvus、PymMilvus、sentence_transformers 和 Gradio。
(chatbot_venv) [egoebelbecker@ares milvus_chatbot]$ pip install pandas jupyter langchain towhee unstructured milvus pymilvus sentence_transformers gradio
Collecting pandasObtaining dependency information for pandas from https://files.pythonhosted.org/packages/d0/28/88b81881c056376254618fad622a5e94b5126db8c61157ea1910cd1c040a/pandas-2.0.3-cp311-cp311-manylinux_2_17_x86_64.manylinux2014_x86_64.whl.metadataUsing cached pandas-2.0.3-cp311-cp311-manylinux_2_17_x86_64.manylinux2014_x86_64.whl.metadata (18 kB)
Collecting jupyterUsing cached jupyter-1.0.0-py2.py3-none-any.whl (2.7 kB)
(snip)
Installing collected packages: webencodings, wcwidth, pytz, pure-eval, ptyprocess, pickleshare, json5, ipython-genutils, filetype, fastjsonschema, executing, backcall, zipp, XlsxWriter, xlrd, widgetsnbextension, websocket-client, webcolors, urllib3, uri-template, tzdata, typing-extensions, traitlets, tqdm, tornado, tinycss2, tenacity, tabulate, soupsieve, sniffio, six, send2trash, rpds-py, rfc3986-validator, rfc3986, regex, pyzmq, PyYAML, python-magic, python-json-logger, pypandoc, pygments, pycparser, psutil, prompt-toolkit, prometheus-client, platformdirs, pkginfo, pillow, pexpect, parso, pandocfilters, packaging, overrides, olefile, numpy, nest-asyncio, mypy-extensions, multidict, more-itertools, mistune, mdurl, markupsafe, markdown, lxml, jupyterlab-widgets, jupyterlab-pygments, jsonpointer, joblib, jeepney, idna, greenlet, frozenlist, fqdn, et-xmlfile, docutils, defusedxml, decorator, debugpy, click, charset-normalizer, chardet, certifi, babel, attrs, async-timeout, async-lru, yarl, typing-inspect, terminado, SQLAlchemy, rfc3339-validator, requests, referencing, qtpy, python-pptx, python-docx, python-dateutil, pydantic, pdf2image, openpyxl, numexpr, nltk, msg-parser, matplotlib-inline, marshmallow, markdown-it-py, jupyter-core, jinja2, jedi, jaraco.classes, importlib-metadata, comm, cffi, bleach, beautifulsoup4, asttokens, anyio, aiosignal, stack-data, rich, requests-toolbelt, readme-renderer, pandas, openapi-schema-pydantic, langsmith, jupyter-server-terminals, jupyter-client, jsonschema-specifications, dataclasses-json, cryptography, arrow, argon2-cffi-bindings, aiohttp, SecretStorage, pdfminer.six, langchain, jsonschema, isoduration, ipython, argon2-cffi, unstructured, nbformat, keyring, ipykernel, twine, qtconsole, nbclient, jupyter-events, jupyter-console, ipywidgets, towhee, nbconvert, jupyter-server, notebook-shim, jupyterlab-server, jupyter-lsp, jupyterlab, notebook, jupyter
Successfully installed PyYAML-6.0.1 SQLAlchemy-2.0.19 SecretStorage-3.3.3 XlsxWriter-3.1.2 aiohttp-3.8.5 aiosignal-1.3.1 anyio-3.7.1 argon2-cffi-21.3.0 argon2-cffi-bindings-21.2.0 arrow-1.2.3 asttokens-2.2.1 async-lru-2.0.4 async-timeout-4.0.2 attrs-23.1.0 babel-2.12.1 backcall-0.2.0 beautifulsoup4-4.12.2 bleach-6.0.0 certifi-2023.7.22 cffi-1.15.1 chardet-5.1.0 charset-normalizer-3.2.0 click-8.1.6 comm-0.1.3 cryptography-41.0.2 dataclasses-json-0.5.14 debugpy-1.6.7 decorator-5.1.1 defusedxml-0.7.1 docutils-0.20.1 et-xmlfile-1.1.0 executing-1.2.0 fastjsonschema-2.18.0 filetype-1.2.0 fqdn-1.5.1 frozenlist-1.4.0 greenlet-2.0.2 idna-3.4 importlib-metadata-6.8.0 ipykernel-6.25.0 ipython-8.14.0 ipython-genutils-0.2.0 ipywidgets-8.0.7 isoduration-20.11.0 jaraco.classes-3.3.0 jedi-0.19.0 jeepney-0.8.0 jinja2-3.1.2 joblib-1.3.1 json5-0.9.14 jsonpointer-2.4 jsonschema-4.18.4 jsonschema-specifications-2023.7.1 jupyter-1.0.0 jupyter-client-8.3.0 jupyter-console-6.6.3 jupyter-core-5.3.1 jupyter-events-0.7.0 jupyter-lsp-2.2.0 jupyter-server-2.7.0 jupyter-server-terminals-0.4.4 jupyterlab-4.0.3 jupyterlab-pygments-0.2.2 jupyterlab-server-2.24.0 jupyterlab-widgets-3.0.8 keyring-24.2.0 langchain-0.0.248 langsmith-0.0.15 lxml-4.9.3 markdown-3.4.4 markdown-it-py-3.0.0 markupsafe-2.1.3 marshmallow-3.20.1 matplotlib-inline-0.1.6 mdurl-0.1.2 mistune-3.0.1 more-itertools-10.0.0 msg-parser-1.2.0 multidict-6.0.4 mypy-extensions-1.0.0 nbclient-0.8.0 nbconvert-7.7.3 nbformat-5.9.2 nest-asyncio-1.5.7 nltk-3.8.1 notebook-7.0.1 notebook-shim-0.2.3 numexpr-2.8.4 numpy-1.25.2 olefile-0.46 openapi-schema-pydantic-1.2.4 openpyxl-3.1.2 overrides-7.3.1 packaging-23.1 pandas-2.0.3 pandocfilters-1.5.0 parso-0.8.3 pdf2image-1.16.3 pdfminer.six-20221105 pexpect-4.8.0 pickleshare-0.7.5 pillow-10.0.0 pkginfo-1.9.6 platformdirs-3.10.0 prometheus-client-0.17.1 prompt-toolkit-3.0.39 psutil-5.9.5 ptyprocess-0.7.0 pure-eval-0.2.2 pycparser-2.21 pydantic-1.10.12 pygments-2.15.1 pypandoc-1.11 python-dateutil-2.8.2 python-docx-0.8.11 python-json-logger-2.0.7 python-magic-0.4.27 python-pptx-0.6.21 pytz-2023.3 pyzmq-25.1.0 qtconsole-5.4.3 qtpy-2.3.1 readme-renderer-40.0 referencing-0.30.0 regex-2023.6.3 requests-2.31.0 requests-toolbelt-1.0.0 rfc3339-validator-0.1.4 rfc3986-2.0.0 rfc3986-validator-0.1.1 rich-13.5.1 rpds-py-0.9.2 send2trash-1.8.2 six-1.16.0 sniffio-1.3.0 soupsieve-2.4.1 stack-data-0.6.2 tabulate-0.9.0 tenacity-8.2.2 terminado-0.17.1 tinycss2-1.2.1 tornado-6.3.2 towhee-1.1.1 tqdm-4.65.0 traitlets-5.9.0 twine-4.0.2 typing-extensions-4.7.1 typing-inspect-0.9.0 tzdata-2023.3 unstructured-0.8.7 uri-template-1.3.0 urllib3-2.0.4 wcwidth-0.2.6 webcolors-1.13 webencodings-0.5.1 websocket-client-1.6.1 widgetsnbextension-4.0.8 xlrd-2.0.1 yarl-1.9.2 zipp-3.16.2
(chatbot_venv) [egoebelbecker@ares milvus_chatbot]$
访问链接 https://gist.github.com/egoebelbecker/07059b88a1c4daa96ec07937f8ca77b3 获取涵盖本教程所有代码的 Jupyter Notebook。下载 Notebook,启动 Jupyter 并加载 Notebook。
chatbot_venv) [egoebelbecker@ares milvus_chatbot]$ jupyter notebook milvus_chatbot.ipynb
[I 2023-07-31 11:29:01.748 ServerApp] Package notebook took 0.0000s to import
[I 2023-07-31 11:29:01.759 ServerApp] Package jupyter_lsp took 0.0108s to import
[W 2023-07-31 11:29:01.759 ServerApp] A `_jupyter_server_extension_points` function was not found in jupyter_lsp. Instead, a `_jupyter_server_extension_paths` function was found and will be used for now. This function name will be deprecated in future releases of Jupyter Server.
[I 2023-07-31 11:29:01.764 ServerApp] Package jupyter_server_terminals took 0.0045s to import
[I 2023-07-31 11:29:01.765 ServerApp] Package jupyterlab took 0.0000s to import
[I 2023-07-31 11:29:02.124 ServerApp] Package notebook_shim took 0.0000s to import
02.搭建聊天机器人
一切准备就绪后,就可以搭建聊天机器人了。
文档存储
机器人需要存储文档块以及使用 Towhee 提取出的文档块向量。在这个步骤中,我们需要用到 Milvus。
安装轻量版 Milvus Lite,使用以下命令运行 Milvus 服务器:
(chatbot_venv) [egoebelbecker@ares milvus_chatbot]$ milvus-server__ _________ _ ____ ______/ |/ / _/ /| | / / / / / __// /|_/ // // /_| |/ / /_/ /\ \/_/ /_/___/____/___/\____/___/ {Lite}Welcome to use Milvus!Version: v2.2.12-liteProcess: 139309Started: 2023-07-31 12:43:43Config: /home/egoebelbecker/.milvus.io/milvus-server/2.2.12/configs/milvus.yamlLogs: /home/egoebelbecker/.milvus.io/milvus-server/2.2.12/logsCtrl+C to exit …
或者,运行 Notebook 中的代码:
from milvus import default_server# 启动 Milvus 服务
default_server.start()# 停止 Milvus 服务
default_server.stop()
设置应用变量并获取 OpenAI API 密钥
接下来,设置变量并清理旧的 SQLite 文件,我们将用 SQLite 存储聊天历史记录。
-
MILVUS_URI - Milvus 服务器连接信息,解析为主机和端口。
-
MILVUS_HOST - Milvus 运行的主机。
-
MILVUS_PORT - 服务器监听的端口。
-
DROP_EXIST - 在启动时删除现有的 Milvus 集合。
-
EMBED_MODEL - 用于生成 embedding 向量的 sentence_transformers模型
-
COLLECTION_NAME - 用于存储向量数据的 Milvus collection 名称
-
DIM - 模型生成的文本向量维度
-
OPENAI_API_KEY - 大语言模型(LLM) API 的密钥
import getpass
import osMILVUS_URI = 'http://localhost:19530'
[MILVUS_HOST, MILVUS_PORT] = MILVUS_URI.split('://')[1].split(':')
DROP_EXIST = True
EMBED_MODEL = 'all-mpnet-base-v2'
COLLECTION_NAME = 'chatbot_demo'
DIM = 768OPENAI_API_KEY = getpass.getpass('Enter your OpenAI API key: ')if os.path.exists('./sqlite.db'):os.remove('./sqlite.db')
运行上述代码定义变量并输入 OpenAI API 密钥。
示例流水线(pipeline)
接下来,需要下载数据并存储在 Milvus 中。不过在此之前,先学习一下如何使用 pipeline 处理非结构化数据。
我会用 Towhee 官网主页作为文档来源的示例来进行演示,大家也可以尝试其他不同文档网站,了解 pipeline 如何处理不同的数据集。
以下代码使用 Towhee pipeline:
-
input - 创建新 pipeline,传入源数据。
-
map - 使用 ops.text_loader() 解析 URL 并将其映射为 'doc'。
-
flat_map - 使用 ops.text_splitter() 将文档拆分成多个片段,以便后续存储。
-
output - 选择数据输出,准备就绪可以使用。
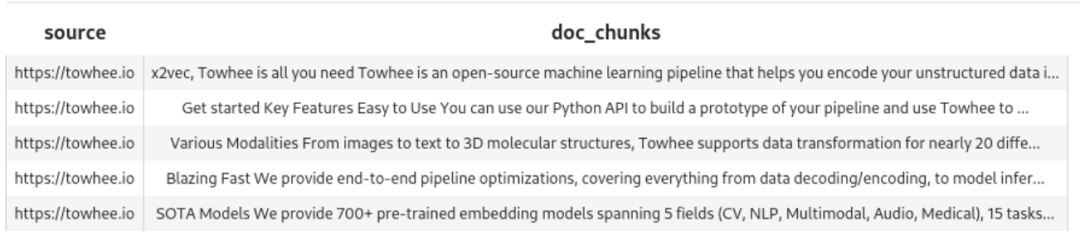
将此 pipeline 传入 DataCollection 观察其工作原理。
from towhee import pipe, ops, DataCollectionpipe_load = (  from towhee import pipe, ops, DataCollectionpipe_load = (pipe.input('source').map('source', 'doc', ops.text_loader()).flat_map('doc', 'doc_chunks', ops.text_splitter(chunk_size=300)).output('source', 'doc_chunks')
)
DataCollection(pipe_load('https://towhee.io')).show()
以下为输出:
示例 Embedding pipeline
接着,参考以下示例 embedding pipeline 将这些文档块转化为向量。pipeline 通过 map() 在每个文档块上运行 ops.sentence_embedding.sbert()。在示例中,我们传入了1 个文本块。
pipe_embed = (pipe.input('doc_chunk').map('doc_chunk', 'vec', ops.sentence_embedding.sbert(model_name=EMBED_MODEL)).map('vec', 'vec', ops.np_normalize()).output('doc_chunk', 'vec')
)text = '''SOTA ModelsWe provide 700+ pre-trained embedding models spanning 5 fields (CV, NLP, Multimodal, Audio, Medical), 15 tasks, and 140+ model architectures.
These include BERT, CLIP, ViT, SwinTransformer, data2vec, etc.
'''DataCollection(pipe_embed(text)).show()
运行此代码查看这个 pipeline 如何将单个文档片段转换成向量。

设置 Milvus
创建 1 个 Collection 来存储数据。
以下代码中,我们使用 MILVUS_HOST 和 MILVUS_PORT 连接至 Milvus,删除所有现有 Collection ,并定义了 create_collection() 函数以创建 1 个全新的 Collection。
新 Collection 的 Schema 如下所示:
-
id - 标识符,数据类型为整数。
-
embedding - 向量,数据类型为浮点向量。
-
text - 向量对应的文档块文本,数据类型为字符串。
from pymilvus import (connections, utility, Collection,CollectionSchema, FieldSchema, DataType
)def create_collection(collection_name):connections.connect(host=MILVUS_HOST, port=MILVUS_PORT)has_collection = utility.has_collection(collection_name)if has_collection:collection = Collection(collection_name)if DROP_EXIST:collection.drop()else:return collection# 创建 collectionfields = [FieldSchema(name='id', dtype=DataType.INT64, is_primary=True, auto_id=True),FieldSchema(name='embedding', dtype=DataType.FLOAT_VECTOR, dim=DIM),FieldSchema(name='text', dtype=DataType.VARCHAR, max_length=500)]schema = CollectionSchema(fields=fields,description="Towhee demo",enable_dynamic_field=True)collection = Collection(name=collection_name, schema=schema)index_params = {'metric_type': 'IP','index_type': 'IVF_FLAT','params': {'nlist': 1024}}collection.create_index(field_name='embedding', index_params=index_params)return collection
插入 Pipeline
现在,将文本向量插入 Milvus。
以下代码可以:
-
创建新 Collection
-
加载新文档数据
-
将新文档切块
-
使用 EMBED_MODEL 为文本快生成向量
-
将文本块向量和对应文本块数据插入到 Milvus
load_data = (pipe.input('collection_name', 'source').map('collection_name', 'collection', create_collection).map('source', 'doc', ops.text_loader()).flat_map('doc', 'doc_chunk', ops.text_splitter(chunk_size=300)).map('doc_chunk', 'vec', ops.sentence_embedding.sbert(model_name=EMBED_MODEL)).map('vec', 'vec', ops.np_normalize()).map(('collection_name', 'vec', 'doc_chunk'), 'mr',ops.ann_insert.osschat_milvus(host=MILVUS_HOST, port=MILVUS_PORT)).output('mr')
)
通过以下代码,我们将 Frodo Baggins 的百科页面内容转化为文本快向量并插入到 Milvus 中。
project_name = 'towhee_demo'
data_source = 'https://en.wikipedia.org/wiki/Frodo_Baggins'
mr = load_data(COLLECTION_NAME, data_source)print('Doc chunks inserted:', len(mr.to_list()))
最终一共插入 408 个本文块向量:
2023-07-31 16:50:53,369 - 139993906521792 - node.py-node:167 - INFO: Begin to run Node-_input2023-07-31 16:50:53,371 - 139993906521792 - node.py-node:167 - INFO: Begin to run Node-create_collection-02023-07-31 16:50:53,373 - 139993881343680 - node.py-node:167 - INFO: Begin to run Node-text-loader-12023-07-31 16:50:53,374 - 139993898129088 - node.py-node:167 - INFO: Begin to run Node-text-splitter-22023-07-31 16:50:53,376 - 139993872950976 - node.py-node:167 - INFO: Begin to run Node-sentence-embedding/sbert-32023-07-31 16:50:53,377 - 139993385268928 - node.py-node:167 - INFO: Begin to run Node-np-normalize-42023-07-31 16:50:53,378 - 139993376876224 - node.py-node:167 - INFO: Begin to run Node-ann-insert/osschat-milvus-52023-07-31 16:50:53,379 - 139993368483520 - node.py-node:167 - INFO: Begin to run Node-_output(snip)Categories:
2023-07-31 18:07:53,530 - 140552729257664 - logger.py-logger:14 - DETAIL: Skipping sentence because does not exceed 5 word tokens
Categories
2023-07-31 18:07:53,532 - 140552729257664 - logger.py-logger:14 - DETAIL: Skipping sentence because does not exceed 3 word tokens
Hidden categories
2023-07-31 18:07:53,533 - 140552729257664 - logger.py-logger:14 - DETAIL: Skipping sentence because does not exceed 3 word tokens
Hidden categories
2023-07-31 18:07:53,533 - 140552729257664 - logger.py-logger:14 - DETAIL: Not narrative. Text does not contain a verb:Hidden categories:
2023-07-31 18:07:53,534 - 140552729257664 - logger.py-logger:14 - DETAIL: Skipping sentence because does not exceed 5 word tokens
Hidden categoriesDoc chunks inserted: 408
03.检索知识库
Milvus 中已经存储了文本块向量,现在可以进行向量查询了。
以下函数创建了 1 个查询 pipeline。注意,这是本教程中最为关键的一个步骤!
ops.ann_search.osschat_milvus(host=MILVUS_HOST, port=MILVUS_PORT, **{'metric_type': 'IP', 'limit': 3, 'output_fields': ['text']}))
OSSChat_milvus(https://towhee.io/ann-search/osschat-milvus) 查询 Milvus 向量数据库中与查询文本相匹配的文档片段。
以下为整个查询 pipeline 代码:
pipe_search = (pipe.input('collection_name', 'query').map('query', 'query_vec', ops.sentence_embedding.sbert(model_name=EMBED_MODEL)).map('query_vec', 'query_vec', ops.np_normalize()).map(('collection_name', 'query_vec'), 'search_res',ops.ann_search.osschat_milvus(host=MILVUS_HOST, port=MILVUS_PORT,**{'metric_type': 'IP', 'limit': 3, 'output_fields': ['text']})).flat_map('search_res', ('id', 'score', 'text'), lambda x: (x[0], x[1], x[2])).output('query', 'text', 'score')
)
现在,可以尝试查询以下问题:
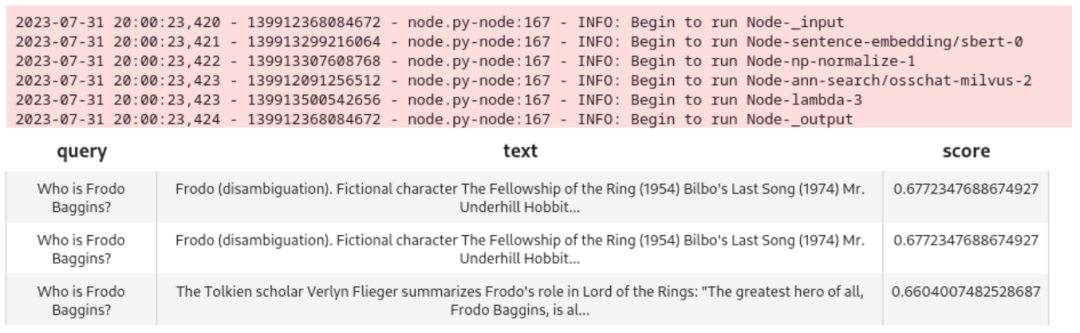
query = 'Who is Frodo Baggins?'
DataCollection(pipe_search(project_name, query)).show()
不难发现,我们使用的模型返还了 3 个相匹配的结果(注:前面 ann_search.osschat_milvus 中指定了 limit=3):
04.加入大语言模型(LLM)
接着,需要在聊天机器人中加入 LLM。这样,用户就可以和聊天机器人开展对话了。本示例中,我们将使用 OpenAI ChatGPT 背后的模型服务:GPT-3.5。
聊天记录
为了使 LLM 回答更准确,我们需要存储用户和机器人的聊天记录,并在查询时调用这些记录,可以用 SQLite 实现聊天记录的管理。
以下函数用于调取聊天记录:
<section id="nice" data-tool="mdnice编辑器" data-website="https://www.mdnice.com" style="font-size: 16px; padding: 0 10px; line-height: 1.6; word-spacing: 0px; letter-spacing: 0px; word-break: break-word; word-wrap: break-word; text-align: left; color: #3E3E3E; font-family: Optima-Regular, Optima, PingFangSC-light, PingFangTC-light, 'PingFang SC', Cambria, Cochin, Georgia, Times, 'Times New Roman', serif;"><pre class="custom" data-tool="mdnice编辑器" style="margin-top: 10px; margin-bottom: 10px; border-radius: 5px; box-shadow: rgba(0, 0, 0, 0.55) 0px 2px 10px; text-align: left;"><span style="display: block; background: url(https://files.mdnice.com/user/3441/876cad08-0422-409d-bb5a-08afec5da8ee.svg); height: 30px; width: 100%; background-size: 40px; background-repeat: no-repeat; background-color: #282c34; margin-bottom: -7px; border-radius: 5px; background-position: 10px 10px;"></span><code class="hljs" style="overflow-x: auto; padding: 16px; color: #abb2bf; display: -webkit-box; font-family: Operator Mono, Consolas, Monaco, Menlo, monospace; font-size: 12px; -webkit-overflow-scrolling: touch; padding-top: 15px; background: #282c34; border-radius: 5px;">query = 'Who is Frodo Baggins?'
DataCollection(pipe_search(project_name, query)).show()
</code></pre>
</section>
以下函数用户存储聊天记录:
pipe_add_history = (pipe.input('collection_name', 'session', 'question', 'answer').map(('collection_name', 'session', 'question', 'answer'), 'history', ops.chat_message_histories.sql(method='add')).output('history')
)
LLM 查询 Pipeline
搭建一个 Pipeline 将查询传递至 LLM 中。
这个 LLM 查询 Pipeline 可以:
-
根据用户查询问题搜索 Milvus 向量数据库
-
调取并存储当前聊天记录
-
将用户查询问题、Milvus 搜索结果、聊天记录三者一并传入 ChatGPT
-
记录本轮问题和答案
-
返回最终回答
chat = (pipe.input('collection_name', 'query', 'session').map('query', 'query_vec', ops.sentence_embedding.sbert(model_name=EMBED_MODEL)).map('query_vec', 'query_vec', ops.np_normalize()).map(('collection_name', 'query_vec'), 'search_res',ops.ann_search.osschat_milvus(host=MILVUS_HOST,port=MILVUS_PORT,**{'metric_type': 'IP', 'limit': 3, 'output_fields': ['text']})).map('search_res', 'knowledge', lambda y: [x[2] for x in y]).map(('collection_name', 'session'), 'history', ops.chat_message_histories.sql(method='get')).map(('query', 'knowledge', 'history'), 'messages', ops.prompt.question_answer()).map('messages', 'answer', ops.LLM.OpenAI(api_key=OPENAI_API_KEY,model_name='gpt-3.5-turbo',temperature=0.8)).map(('collection_name', 'session', 'query', 'answer'), 'new_history', ops.chat_message_histories.sql(method='add')).output('query', 'history', 'answer', )
)
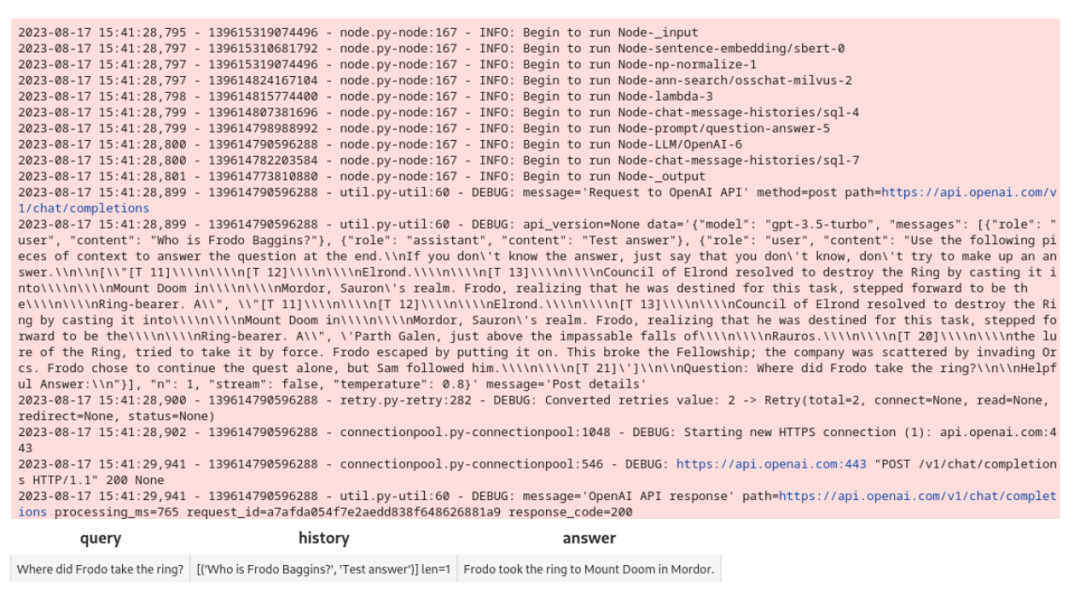
在连接至图形用户界面(GUI)前,我们需要先测试以下这个 Pipeline。
new_query = 'Where did Frodo take the ring?'
DataCollection(chat(COLLECTION_NAME, new_query, session_id)).show()
以下为输出和结果:
恭喜你!这个 Pipeline 搭建成功了!接下来可以搭建 Gradio 界面吧!
Gradio 界面
首先,需要一些函数通过 UUID 来创建 session ID ,接受并响应界面上的用户查询。
import uuidimport iodef create_session_id():uid = str(uuid.uuid4())suid = ''.join(uid.split('-'))return 'sess_' + suiddef respond(session, query):res = chat(COLLECTION_NAME, query, session).get_dict()answer = res['answer']response = res['history']response.append((query, answer))return response
接着,Gradio 界面通过这些函数搭建聊天机器人。Blocks API 用于搭建聊天机器人界面。发送信息(Send Message)按钮通过响应函数将请求发送至 ChatGPT。
import gradio as grwith gr.Blocks() as demo:session_id = gr.State(create_session_id)with gr.Row():with gr.Column(scale=2):gr.Markdown('''## Chat''')conversation = gr.Chatbot(label='conversation').style(height=300)question = gr.Textbox(label='question', value=None)send_btn = gr.Button('Send Message')send_btn.click(fn=respond,inputs=[session_id,question],outputs=conversation,)demo.launch(server_name='127.0.0.1', server_port=8902)
界面如下所示:
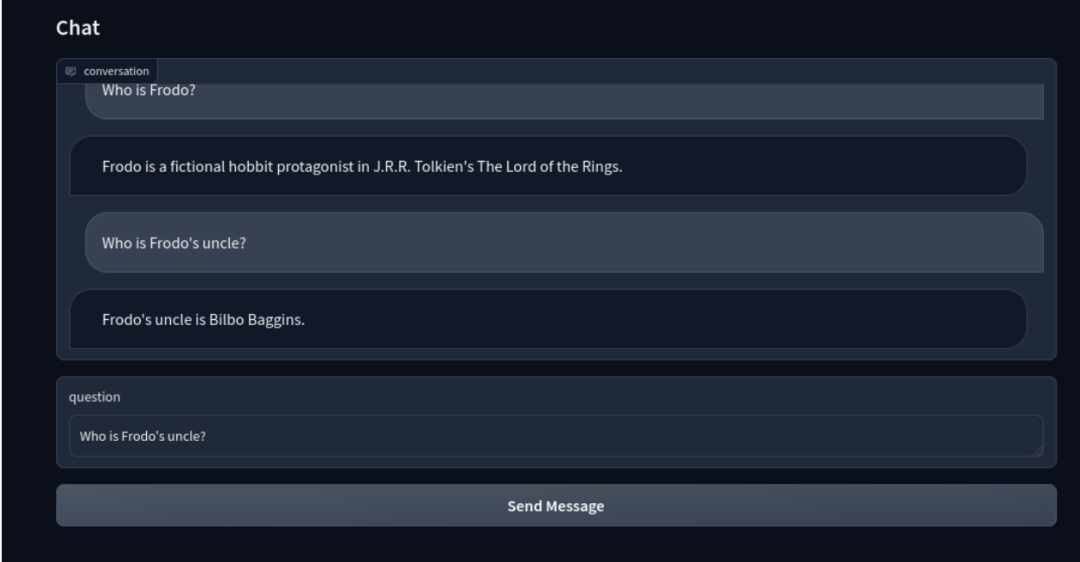
至此,一个结合向量检索和 LLM 生成的智能聊天机器人就搭建完成啦!
05.总结
回顾一下,我们首先创建了 Towhee pipeline 来处理非结构化数据,并将其转化为向量并存储在 Milvus 向量数据库中。然后,搭建了一个查询 Pipeline,在聊天机器人中接入 LLM。最终,一个基础的聊天机器人界面便搭建完成。
简言之,Milvus 高度可扩展,提供高效的向量相似性搜索功能,能够帮助开发者轻松搭建聊天机器人、推荐系统、图片或文本识别等 ML 和 AI 应用。期待大家用 Milvus 搭建更出更棒的应用!
-
本文作者
Eric Goebelbecker 现居纽约,有着 25 年的金融市场从业经验。他负责为金融资讯交换(FIX)协定网络和市场数据分析系统搭建基础设施。Eric 热衷于探索各种提升团队工作效率的工具和软件。
-
如果在使用 Milvus 或 Zilliz 产品有任何问题,可添加小助手微信 “zilliz-tech” 加入交流群。
-
欢迎关注微信公众号“Zilliz”,了解最新资讯。
本文由 mdnice 多平台发布