我们目前使用的光照都来自于空间中的一个点。它能给我们不错的效果,但现实世界中,我们有很多种类的光照,每种的表现都不同。将光投射(Cast)到物体的光源叫做投光物(Light Caster)
平行光
当一个光源处于很远的地方时,来自光源的每条光线就会近似于互相平行。不论物体和/或者观察者的位置,看起来好像所有的光都来自于同一个方向。当我们使用一个假设光源处于无限远处的模型时,它就被称为定向光,因为它的所有光线都有着相同的方向,它与光源的位置是没有关系的。

因为所有的光线都是平行的,所以物体与光源的相对位置是不重要的,因为对场景中每一个物体光的方向都是一致的。由于光的位置向量保持一致,场景中每个物体的光照计算将会是类似的。
我们可以定义一个光线方向向量而不是位置向量来模拟一个定向光。着色器的计算基本保持不变,但这次我们将直接使用光的direction向量而不是通过position来计算lightDir向量。
struct Light {// vec3 position; // 使用定向光就不再需要了vec3 direction;vec3 ambient;vec3 diffuse;vec3 specular;
};
...
void main()
{vec3 lightDir = normalize(-light.direction);...
}注意我们首先对light.direction向量取反。我们目前使用的光照计算需求一个从片段至光源的光线方向,但人们更习惯定义定向光为一个从光源出发的全局方向。所以我们需要对全局光照方向向量取反来改变它的方向,它现在是一个指向光源的方向向量了。而且,记得对向量进行标准化,假设输入向量为一个单位向量是很不明智的。
为了清楚地展示定向光对多个物体具有相同的影响,我们将会再次使用坐标系统章节最后的那个箱子派对的场景。如果你错过了派对,我们先定义了十个不同的箱子位置,并对每个箱子都生成了一个不同的模型矩阵,每个模型矩阵都包含了对应的局部-世界坐标变换:
for(unsigned int i = 0; i < 10; i++)
{glm::mat4 model;model = glm::translate(model, cubePositions[i]);float angle = 20.0f * i;model = glm::rotate(model, glm::radians(angle), glm::vec3(1.0f, 0.3f, 0.5f));lightingShader.setMat4("model", model);glDrawArrays(GL_TRIANGLES, 0, 36);
}不要忘记定义光源的方向(注意我们将方向定义为从光源出发的方向,你可以很容易看到光的方向朝下)。
lightingShader.setVec3("light.direction", -0.2f, -1.0f, -0.3f);5.1.light_casters.vs
#version 330 core
layout (location = 0) in vec3 aPos;
layout (location = 1) in vec3 aNormal;
layout (location = 2) in vec2 aTexCoords;out vec3 FragPos;
out vec3 Normal;
out vec2 TexCoords;uniform mat4 model;
uniform mat4 view;
uniform mat4 projection;void main()
{FragPos = vec3(model * vec4(aPos, 1.0));Normal = mat3(transpose(inverse(model))) * aNormal;  TexCoords = aTexCoords;gl_Position = projection * view * vec4(FragPos, 1.0);
}
5.1.light_casters.fs
#version 330 core
out vec4 FragColor;struct Material {sampler2D diffuse;sampler2D specular;    float shininess;
}; struct Light {//vec3 position;vec3 direction;vec3 ambient;vec3 diffuse;vec3 specular;
};in vec3 FragPos;
in vec3 Normal;
in vec2 TexCoords;uniform vec3 viewPos;
uniform Material material;
uniform Light light;void main()
{// ambientvec3 ambient = light.ambient * texture(material.diffuse, TexCoords).rgb;// diffuse vec3 norm = normalize(Normal);// vec3 lightDir = normalize(light.position - FragPos);vec3 lightDir = normalize(-light.direction);  float diff = max(dot(norm, lightDir), 0.0);vec3 diffuse = light.diffuse * diff * texture(material.diffuse, TexCoords).rgb;  // specularvec3 viewDir = normalize(viewPos - FragPos);vec3 reflectDir = reflect(-lightDir, norm);  float spec = pow(max(dot(viewDir, reflectDir), 0.0), material.shininess);vec3 specular = light.specular * spec * texture(material.specular, TexCoords).rgb;  vec3 result = ambient + diffuse + specular;FragColor = vec4(result, 1.0);
}
5.1.light_cube.vs
#version 330 core
layout (location = 0) in vec3 aPos;uniform mat4 model;
uniform mat4 view;
uniform mat4 projection;void main()
{gl_Position = projection * view * model * vec4(aPos, 1.0);
}
5.1.light_cube.fs
#version 330 core
out vec4 FragColor;void main()
{FragColor = vec4(1.0); // set all 4 vector values to 1.0
}
#include <glad/glad.h>
#include <GLFW/glfw3.h>
#include <stb_image.h>#include <glm/glm.hpp>
#include <glm/gtc/matrix_transform.hpp>
#include <glm/gtc/type_ptr.hpp>#include <learnopengl/shader_m.h>
#include <learnopengl/camera.h>#include <iostream>void framebuffer_size_callback(GLFWwindow* window, int width, int height);
void mouse_callback(GLFWwindow* window, double xpos, double ypos);
void scroll_callback(GLFWwindow* window, double xoffset, double yoffset);
void processInput(GLFWwindow *window);
unsigned int loadTexture(const char *path);// settings
const unsigned int SCR_WIDTH = 800;
const unsigned int SCR_HEIGHT = 600;// camera
Camera camera(glm::vec3(0.0f, 0.0f, 3.0f));
float lastX = SCR_WIDTH / 2.0f;
float lastY = SCR_HEIGHT / 2.0f;
bool firstMouse = true;// timing
float deltaTime = 0.0f;
float lastFrame = 0.0f;int main()
{// glfw: initialize and configure// ------------------------------glfwInit();glfwWindowHint(GLFW_CONTEXT_VERSION_MAJOR, 3);glfwWindowHint(GLFW_CONTEXT_VERSION_MINOR, 3);glfwWindowHint(GLFW_OPENGL_PROFILE, GLFW_OPENGL_CORE_PROFILE);#ifdef __APPLE__glfwWindowHint(GLFW_OPENGL_FORWARD_COMPAT, GL_TRUE);
#endif// glfw window creation// --------------------GLFWwindow* window = glfwCreateWindow(SCR_WIDTH, SCR_HEIGHT, "LearnOpenGL", NULL, NULL);if (window == NULL){std::cout << "Failed to create GLFW window" << std::endl;glfwTerminate();return -1;}glfwMakeContextCurrent(window);glfwSetFramebufferSizeCallback(window, framebuffer_size_callback);glfwSetCursorPosCallback(window, mouse_callback);glfwSetScrollCallback(window, scroll_callback);// tell GLFW to capture our mouseglfwSetInputMode(window, GLFW_CURSOR, GLFW_CURSOR_DISABLED);// glad: load all OpenGL function pointers// ---------------------------------------if (!gladLoadGLLoader((GLADloadproc)glfwGetProcAddress)){std::cout << "Failed to initialize GLAD" << std::endl;return -1;}// configure global opengl state// -----------------------------glEnable(GL_DEPTH_TEST);// build and compile shaders// -------------------------Shader lightingShader("5.1.light_casters.vs", "5.1.light_casters.fs");Shader lightCubeShader("5.1.light_cube.vs", "5.1.light_cube.fs");// set up vertex data (and buffer(s)) and configure vertex attributes// ------------------------------------------------------------------float vertices[] = {// positions // normals // texture coords-0.5f, -0.5f, -0.5f, 0.0f, 0.0f, -1.0f, 0.0f, 0.0f,0.5f, -0.5f, -0.5f, 0.0f, 0.0f, -1.0f, 1.0f, 0.0f,0.5f, 0.5f, -0.5f, 0.0f, 0.0f, -1.0f, 1.0f, 1.0f,0.5f, 0.5f, -0.5f, 0.0f, 0.0f, -1.0f, 1.0f, 1.0f,-0.5f, 0.5f, -0.5f, 0.0f, 0.0f, -1.0f, 0.0f, 1.0f,-0.5f, -0.5f, -0.5f, 0.0f, 0.0f, -1.0f, 0.0f, 0.0f,-0.5f, -0.5f, 0.5f, 0.0f, 0.0f, 1.0f, 0.0f, 0.0f,0.5f, -0.5f, 0.5f, 0.0f, 0.0f, 1.0f, 1.0f, 0.0f,0.5f, 0.5f, 0.5f, 0.0f, 0.0f, 1.0f, 1.0f, 1.0f,0.5f, 0.5f, 0.5f, 0.0f, 0.0f, 1.0f, 1.0f, 1.0f,-0.5f, 0.5f, 0.5f, 0.0f, 0.0f, 1.0f, 0.0f, 1.0f,-0.5f, -0.5f, 0.5f, 0.0f, 0.0f, 1.0f, 0.0f, 0.0f,-0.5f, 0.5f, 0.5f, -1.0f, 0.0f, 0.0f, 1.0f, 0.0f,-0.5f, 0.5f, -0.5f, -1.0f, 0.0f, 0.0f, 1.0f, 1.0f,-0.5f, -0.5f, -0.5f, -1.0f, 0.0f, 0.0f, 0.0f, 1.0f,-0.5f, -0.5f, -0.5f, -1.0f, 0.0f, 0.0f, 0.0f, 1.0f,-0.5f, -0.5f, 0.5f, -1.0f, 0.0f, 0.0f, 0.0f, 0.0f,-0.5f, 0.5f, 0.5f, -1.0f, 0.0f, 0.0f, 1.0f, 0.0f,0.5f, 0.5f, 0.5f, 1.0f, 0.0f, 0.0f, 1.0f, 0.0f,0.5f, 0.5f, -0.5f, 1.0f, 0.0f, 0.0f, 1.0f, 1.0f,0.5f, -0.5f, -0.5f, 1.0f, 0.0f, 0.0f, 0.0f, 1.0f,0.5f, -0.5f, -0.5f, 1.0f, 0.0f, 0.0f, 0.0f, 1.0f,0.5f, -0.5f, 0.5f, 1.0f, 0.0f, 0.0f, 0.0f, 0.0f,0.5f, 0.5f, 0.5f, 1.0f, 0.0f, 0.0f, 1.0f, 0.0f,-0.5f, -0.5f, -0.5f, 0.0f, -1.0f, 0.0f, 0.0f, 1.0f,0.5f, -0.5f, -0.5f, 0.0f, -1.0f, 0.0f, 1.0f, 1.0f,0.5f, -0.5f, 0.5f, 0.0f, -1.0f, 0.0f, 1.0f, 0.0f,0.5f, -0.5f, 0.5f, 0.0f, -1.0f, 0.0f, 1.0f, 0.0f,-0.5f, -0.5f, 0.5f, 0.0f, -1.0f, 0.0f, 0.0f, 0.0f,-0.5f, -0.5f, -0.5f, 0.0f, -1.0f, 0.0f, 0.0f, 1.0f,-0.5f, 0.5f, -0.5f, 0.0f, 1.0f, 0.0f, 0.0f, 1.0f,0.5f, 0.5f, -0.5f, 0.0f, 1.0f, 0.0f, 1.0f, 1.0f,0.5f, 0.5f, 0.5f, 0.0f, 1.0f, 0.0f, 1.0f, 0.0f,0.5f, 0.5f, 0.5f, 0.0f, 1.0f, 0.0f, 1.0f, 0.0f,-0.5f, 0.5f, 0.5f, 0.0f, 1.0f, 0.0f, 0.0f, 0.0f,-0.5f, 0.5f, -0.5f, 0.0f, 1.0f, 0.0f, 0.0f, 1.0f};// positions all containersglm::vec3 cubePositions[] = {glm::vec3( 0.0f, 0.0f, 0.0f),glm::vec3( 2.0f, 5.0f, -15.0f),glm::vec3(-1.5f, -2.2f, -2.5f),glm::vec3(-3.8f, -2.0f, -12.3f),glm::vec3( 2.4f, -0.4f, -3.5f),glm::vec3(-1.7f, 3.0f, -7.5f),glm::vec3( 1.3f, -2.0f, -2.5f),glm::vec3( 1.5f, 2.0f, -2.5f),glm::vec3( 1.5f, 0.2f, -1.5f),glm::vec3(-1.3f, 1.0f, -1.5f)};// first, configure the cube's VAO (and VBO)unsigned int VBO, cubeVAO;glGenVertexArrays(1, &cubeVAO);glGenBuffers(1, &VBO);glBindBuffer(GL_ARRAY_BUFFER, VBO);glBufferData(GL_ARRAY_BUFFER, sizeof(vertices), vertices, GL_STATIC_DRAW);glBindVertexArray(cubeVAO);glVertexAttribPointer(0, 3, GL_FLOAT, GL_FALSE, 8 * sizeof(float), (void*)0);glEnableVertexAttribArray(0);glVertexAttribPointer(1, 3, GL_FLOAT, GL_FALSE, 8 * sizeof(float), (void*)(3 * sizeof(float)));glEnableVertexAttribArray(1);glVertexAttribPointer(2, 2, GL_FLOAT, GL_FALSE, 8 * sizeof(float), (void*)(6 * sizeof(float)));glEnableVertexAttribArray(2);// second, configure the light's VAO (VBO stays the same; the vertices are the same for the light object which is also a 3D cube)unsigned int lightCubeVAO;glGenVertexArrays(1, &lightCubeVAO);glBindVertexArray(lightCubeVAO);glBindBuffer(GL_ARRAY_BUFFER, VBO);// note that we update the lamp's position attribute's stride to reflect the updated buffer dataglVertexAttribPointer(0, 3, GL_FLOAT, GL_FALSE, 8 * sizeof(float), (void*)0);glEnableVertexAttribArray(0);// load textures (we now use a utility function to keep the code more organized)// -----------------------------------------------------------------------------unsigned int diffuseMap = loadTexture(FileSystem::getPath("resources/textures/container2.png").c_str());unsigned int specularMap = loadTexture(FileSystem::getPath("resources/textures/container2_specular.png").c_str());// shader configuration// --------------------lightingShader.use();lightingShader.setInt("material.diffuse", 0);lightingShader.setInt("material.specular", 1);// render loop// -----------while (!glfwWindowShouldClose(window)){// per-frame time logic// --------------------float currentFrame = static_cast<float>(glfwGetTime());deltaTime = currentFrame - lastFrame;lastFrame = currentFrame;// input// -----processInput(window);// render// ------glClearColor(0.1f, 0.1f, 0.1f, 1.0f);glClear(GL_COLOR_BUFFER_BIT | GL_DEPTH_BUFFER_BIT);// be sure to activate shader when setting uniforms/drawing objectslightingShader.use();lightingShader.setVec3("light.direction", -0.2f, -1.0f, -0.3f);lightingShader.setVec3("viewPos", camera.Position);// light propertieslightingShader.setVec3("light.ambient", 0.2f, 0.2f, 0.2f);lightingShader.setVec3("light.diffuse", 0.5f, 0.5f, 0.5f);lightingShader.setVec3("light.specular", 1.0f, 1.0f, 1.0f);// material propertieslightingShader.setFloat("material.shininess", 32.0f);// view/projection transformationsglm::mat4 projection = glm::perspective(glm::radians(camera.Zoom), (float)SCR_WIDTH / (float)SCR_HEIGHT, 0.1f, 100.0f);glm::mat4 view = camera.GetViewMatrix();lightingShader.setMat4("projection", projection);lightingShader.setMat4("view", view);// world transformationglm::mat4 model = glm::mat4(1.0f);lightingShader.setMat4("model", model);// bind diffuse mapglActiveTexture(GL_TEXTURE0);glBindTexture(GL_TEXTURE_2D, diffuseMap);// bind specular mapglActiveTexture(GL_TEXTURE1);glBindTexture(GL_TEXTURE_2D, specularMap);// render the cube// glBindVertexArray(cubeVAO);// glDrawArrays(GL_TRIANGLES, 0, 36);*/// render containersglBindVertexArray(cubeVAO);for (unsigned int i = 0; i < 10; i++){// calculate the model matrix for each object and pass it to shader before drawingglm::mat4 model = glm::mat4(1.0f);model = glm::translate(model, cubePositions[i]);float angle = 20.0f * i;model = glm::rotate(model, glm::radians(angle), glm::vec3(1.0f, 0.3f, 0.5f));lightingShader.setMat4("model", model);glDrawArrays(GL_TRIANGLES, 0, 36);}// a lamp object is weird when we only have a directional light, don't render the light object// lightCubeShader.use();// lightCubeShader.setMat4("projection", projection);// lightCubeShader.setMat4("view", view);// model = glm::mat4(1.0f);// model = glm::translate(model, lightPos);// model = glm::scale(model, glm::vec3(0.2f)); // a smaller cube// lightCubeShader.setMat4("model", model);// glBindVertexArray(lightCubeVAO);// glDrawArrays(GL_TRIANGLES, 0, 36);// glfw: swap buffers and poll IO events (keys pressed/released, mouse moved etc.)// -------------------------------------------------------------------------------glfwSwapBuffers(window);glfwPollEvents();}// optional: de-allocate all resources once they've outlived their purpose:// ------------------------------------------------------------------------glDeleteVertexArrays(1, &cubeVAO);glDeleteVertexArrays(1, &lightCubeVAO);glDeleteBuffers(1, &VBO);// glfw: terminate, clearing all previously allocated GLFW resources.// ------------------------------------------------------------------glfwTerminate();return 0;
}// process all input: query GLFW whether relevant keys are pressed/released this frame and react accordingly
// ---------------------------------------------------------------------------------------------------------
void processInput(GLFWwindow *window)
{if (glfwGetKey(window, GLFW_KEY_ESCAPE) == GLFW_PRESS)glfwSetWindowShouldClose(window, true);if (glfwGetKey(window, GLFW_KEY_W) == GLFW_PRESS)camera.ProcessKeyboard(FORWARD, deltaTime);if (glfwGetKey(window, GLFW_KEY_S) == GLFW_PRESS)camera.ProcessKeyboard(BACKWARD, deltaTime);if (glfwGetKey(window, GLFW_KEY_A) == GLFW_PRESS)camera.ProcessKeyboard(LEFT, deltaTime);if (glfwGetKey(window, GLFW_KEY_D) == GLFW_PRESS)camera.ProcessKeyboard(RIGHT, deltaTime);
}// glfw: whenever the window size changed (by OS or user resize) this callback function executes
// ---------------------------------------------------------------------------------------------
void framebuffer_size_callback(GLFWwindow* window, int width, int height)
{// make sure the viewport matches the new window dimensions; note that width and // height will be significantly larger than specified on retina displays.glViewport(0, 0, width, height);
}// glfw: whenever the mouse moves, this callback is called
// -------------------------------------------------------
void mouse_callback(GLFWwindow* window, double xposIn, double yposIn)
{float xpos = static_cast<float>(xposIn);float ypos = static_cast<float>(yposIn);if (firstMouse){lastX = xpos;lastY = ypos;firstMouse = false;}float xoffset = xpos - lastX;float yoffset = lastY - ypos; // reversed since y-coordinates go from bottom to toplastX = xpos;lastY = ypos;camera.ProcessMouseMovement(xoffset, yoffset);
}// glfw: whenever the mouse scroll wheel scrolls, this callback is called
// ----------------------------------------------------------------------
void scroll_callback(GLFWwindow* window, double xoffset, double yoffset)
{camera.ProcessMouseScroll(static_cast<float>(yoffset));
}// utility function for loading a 2D texture from file
// ---------------------------------------------------
unsigned int loadTexture(char const * path)
{unsigned int textureID;glGenTextures(1, &textureID);int width, height, nrComponents;unsigned char *data = stbi_load(path, &width, &height, &nrComponents, 0);if (data){GLenum format;if (nrComponents == 1)format = GL_RED;else if (nrComponents == 3)format = GL_RGB;else if (nrComponents == 4)format = GL_RGBA;glBindTexture(GL_TEXTURE_2D, textureID);glTexImage2D(GL_TEXTURE_2D, 0, format, width, height, 0, format, GL_UNSIGNED_BYTE, data);glGenerateMipmap(GL_TEXTURE_2D);glTexParameteri(GL_TEXTURE_2D, GL_TEXTURE_WRAP_S, GL_REPEAT);glTexParameteri(GL_TEXTURE_2D, GL_TEXTURE_WRAP_T, GL_REPEAT);glTexParameteri(GL_TEXTURE_2D, GL_TEXTURE_MIN_FILTER, GL_LINEAR_MIPMAP_LINEAR);glTexParameteri(GL_TEXTURE_2D, GL_TEXTURE_MAG_FILTER, GL_LINEAR);stbi_image_free(data);}else{std::cout << "Texture failed to load at path: " << path << std::endl;stbi_image_free(data);}return textureID;
}
如果你现在编译程序,在场景中自由移动,你就可以看到好像有一个太阳一样的光源对所有的物体投光。你能注意到漫反射和镜面光分量的反应都好像在天空中有一个光源的感觉吗?它会看起来像这样:

点光源
定向光对于照亮整个场景的全局光源是非常棒的,但除了定向光之外我们也需要一些分散在场景中的点光源(Point Light)。点光源是处于世界中某一个位置的光源,它会朝着所有方向发光,但光线会随着距离逐渐衰减。想象作为投光物的灯泡和火把,它们都是点光源。
衰减
随着光线传播距离的增长逐渐削减光的强度通常叫做衰减(Attenuation)。随距离减少光强度的一种方式是使用一个线性方程。这样的方程能够随着距离的增长线性地减少光的强度,从而让远处的物体更暗。
运的是一些聪明的人已经帮我们解决了这个问题。下面这个公式根据片段距光源的距离计算了衰减值,之后我们会将它乘以光的强度向量:
在这里d代表了片段距光源的距离。接下来为了计算衰减值,我们定义3个(可配置的)项:常数项Kc、一次项Kl和二次项Kq。
- 常数项通常保持为1.0,它的主要作用是保证分母永远不会比1小,否则的话在某些距离上它反而会增加强度,这肯定不是我们想要的效果。
- 一次项会与距离值相乘,以线性的方式减少强度。
- 二次项会与距离的平方相乘,让光源以二次递减的方式减少强度。二次项在距离比较小的时候影响会比一次项小很多,但当距离值比较大的时候它就会比一次项更大了。

选择正确的值
但是,该对这三个项设置什么值呢?正确地设定它们的值取决于很多因素:环境、希望光覆盖的距离、光的类型等。在大多数情况下,这都是经验的问题,以及适量的调整。下面这个表格显示了模拟一个(大概)真实的,覆盖特定半径(距离)的光源时,这些项可能取的一些值。第一列指定的是在给定的三项时光所能覆盖的距离。这些值是大多数光源很好的起始点,它们由-Point Light Attenuation | Ogre Wiki
| 距离 | 常数项 | 一次项 | 二次项 |
|---|---|---|---|
| 7 | 1.0 | 0.7 | 1.8 |
| 13 | 1.0 | 0.35 | 0.44 |
| 20 | 1.0 | 0.22 | 0.20 |
| 32 | 1.0 | 0.14 | 0.07 |
| 50 | 1.0 | 0.09 | 0.032 |
| 65 | 1.0 | 0.07 | 0.017 |
| 100 | 1.0 | 0.045 | 0.0075 |
| 160 | 1.0 | 0.027 | 0.0028 |
| 200 | 1.0 | 0.022 | 0.0019 |
| 325 | 1.0 | 0.014 | 0.0007 |
| 600 | 1.0 | 0.007 | 0.0002 |
| 3250 | 1.0 | 0.0014 | 0.000007 |
你可以看到,常数项Kc在所有的情况下都是1.0。一次项Kl为了覆盖更远的距离通常都很小,二次项Kq甚至更小。尝试对这些值进行实验,看看它们在你的实现中有什么效果。在我们的环境中,32到100的距离对大多数的光源都足够了。
实现衰减
为了实现衰减,在片段着色器中我们还需要三个额外的值:也就是公式中的常数项、一次项和二次项。它们最好储存在之前定义的Light结构体中。注意我们使用上一节中计算lightDir的方法,而不是上面定向光部分的。
struct Light {vec3 position;  vec3 ambient;vec3 diffuse;vec3 specular;float constant;float linear;float quadratic;
};
然后我们将在OpenGL中设置这些项:我们希望光源能够覆盖50的距离,所以我们会使用表格中对应的常数项、一次项和二次项:
lightingShader.setFloat("light.constant", 1.0f);
lightingShader.setFloat("light.linear", 0.09f);
lightingShader.setFloat("light.quadratic", 0.032f);
在片段着色器中实现衰减还是比较直接的:我们根据公式计算衰减值,之后再分别乘以环境光、漫反射和镜面光分量。
float distance    = length(light.position - FragPos);
float attenuation = 1.0 / (light.constant + light.linear * distance + light.quadratic * (distance * distance));
接下来,我们将包含这个衰减值到光照计算中,将它分别乘以环境光、漫反射和镜面光颜色。
ambient  *= attenuation;
diffuse  *= attenuation;
specular *= attenuation;
5.2.light_casters.vs
#version 330 core
layout (location = 0) in vec3 aPos;
layout (location = 1) in vec3 aNormal;
layout (location = 2) in vec2 aTexCoords;out vec3 FragPos;
out vec3 Normal;
out vec2 TexCoords;uniform mat4 model;
uniform mat4 view;
uniform mat4 projection;void main()
{FragPos = vec3(model * vec4(aPos, 1.0));Normal = mat3(transpose(inverse(model))) * aNormal;  TexCoords = aTexCoords;gl_Position = projection * view * vec4(FragPos, 1.0);
}
5.2.light_casters.fs
#version 330 core
out vec4 FragColor;struct Material {sampler2D diffuse;sampler2D specular;    float shininess;
}; struct Light {vec3 position;  vec3 ambient;vec3 diffuse;vec3 specular;float constant;float linear;float quadratic;
};in vec3 FragPos;
in vec3 Normal;
in vec2 TexCoords;uniform vec3 viewPos;
uniform Material material;
uniform Light light;void main()
{// ambientvec3 ambient = light.ambient * texture(material.diffuse, TexCoords).rgb;// diffuse vec3 norm = normalize(Normal);vec3 lightDir = normalize(light.position - FragPos);float diff = max(dot(norm, lightDir), 0.0);vec3 diffuse = light.diffuse * diff * texture(material.diffuse, TexCoords).rgb;  // specularvec3 viewDir = normalize(viewPos - FragPos);vec3 reflectDir = reflect(-lightDir, norm);  float spec = pow(max(dot(viewDir, reflectDir), 0.0), material.shininess);vec3 specular = light.specular * spec * texture(material.specular, TexCoords).rgb;  // attenuationfloat distance    = length(light.position - FragPos);float attenuation = 1.0 / (light.constant + light.linear * distance + light.quadratic * (distance * distance));    ambient  *= attenuation;  diffuse   *= attenuation;specular *= attenuation;   vec3 result = ambient + diffuse + specular;FragColor = vec4(result, 1.0);
}
5.2.light_cube.vs
#version 330 core
layout (location = 0) in vec3 aPos;uniform mat4 model;
uniform mat4 view;
uniform mat4 projection;void main()
{gl_Position = projection * view * model * vec4(aPos, 1.0);
}
5.2.light_cube.fs
#version 330 core
out vec4 FragColor;void main()
{FragColor = vec4(1.0); // set all 4 vector values to 1.0
}
聚光
我们要讨论的最后一种类型的光是聚光(Spotlight)。聚光是位于环境中某个位置的光源,它只朝一个特定方向而不是所有方向照射光线。这样的结果就是只有在聚光方向的特定半径内的物体才会被照亮,其它的物体都会保持黑暗。聚光很好的例子就是路灯或手电筒。
OpenGL中聚光是用一个世界空间位置、一个方向和一个切光角(Cutoff Angle)来表示的,切光角指定了聚光的半径

LightDir:从片段指向光源的向量。SpotDir:聚光所指向的方向。Phiϕ:指定了聚光半径的切光角。落在这个角度之外的物体都不会被这个聚光所照亮。Thetaθ:LightDir向量和SpotDir向量之间的夹角。在聚光内部的话θ值应该比ϕ值小。
手电筒
手电筒(Flashlight)是一个位于观察者位置的聚光,通常它都会瞄准玩家视角的正前方。基本上说,手电筒就是普通的聚光,但它的位置和方向会随着玩家的位置和朝向不断更新。
所以,在片段着色器中我们需要的值有聚光的位置向量(来计算光的方向向量)、聚光的方向向量和一个切光角。我们可以将它们储存在Light结构体中:
struct Light {vec3  position;vec3  direction;float cutOff;...
};
接下来我们将合适的值传到着色器中:
lightingShader.setVec3("light.position",  camera.Position);
lightingShader.setVec3("light.direction", camera.Front);
lightingShader.setFloat("light.cutOff",   glm::cos(glm::radians(12.5f)));
你可以看到,我们并没有给切光角设置一个角度值,反而是用角度值计算了一个余弦值,将余弦结果传递到片段着色器中。这样做的原因是在片段着色器中,我们会计算LightDir和SpotDir向量的点积,这个点积返回的将是一个余弦值而不是角度值,所以我们不能直接使用角度值和余弦值进行比较。为了获取角度值我们需要计算点积结果的反余弦,这是一个开销很大的计算。所以为了节约一点性能开销,我们将会计算切光角对应的余弦值,并将它的结果传入片段着色器中。由于这两个角度现在都由余弦角来表示了,我们可以直接对它们进行比较而不用进行任何开销高昂的计算。
接下来就是计算θ值,并将它和切光角ϕ对比,来决定是否在聚光的内部:
float theta = dot(lightDir, normalize(-light.direction));if(theta > light.cutOff)
{       // 执行光照计算
}
else  // 否则,使用环境光,让场景在聚光之外时不至于完全黑暗color = vec4(light.ambient * vec3(texture(material.diffuse, TexCoords)), 1.0);
我们首先计算了lightDir和取反的direction向量(取反的是因为我们想让向量指向光源而不是从光源出发)之间的点积。记住要对所有的相关向量标准化。
5.3.light_casters.vs
#version 330 core
layout (location = 0) in vec3 aPos;
layout (location = 1) in vec3 aNormal;
layout (location = 2) in vec2 aTexCoords;out vec3 FragPos;
out vec3 Normal;
out vec2 TexCoords;uniform mat4 model;
uniform mat4 view;
uniform mat4 projection;void main()
{FragPos = vec3(model * vec4(aPos, 1.0));Normal = mat3(transpose(inverse(model))) * aNormal;  TexCoords = aTexCoords;gl_Position = projection * view * vec4(FragPos, 1.0);
}
5.3.light_casters.fs
#version 330 core
out vec4 FragColor;struct Material {sampler2D diffuse;sampler2D specular;    float shininess;
}; struct Light {vec3 position;  vec3 direction;float cutOff;float outerCutOff;vec3 ambient;vec3 diffuse;vec3 specular;float constant;float linear;float quadratic;
};in vec3 FragPos;
in vec3 Normal;
in vec2 TexCoords;uniform vec3 viewPos;
uniform Material material;
uniform Light light;void main()
{vec3 lightDir = normalize(light.position - FragPos);// check if lighting is inside the spotlight conefloat theta = dot(lightDir, normalize(-light.direction)); if(theta > light.cutOff) // remember that we're working with angles as cosines instead of degrees so a '>' is used.{    // ambientvec3 ambient = light.ambient * texture(material.diffuse, TexCoords).rgb;// diffuse vec3 norm = normalize(Normal);float diff = max(dot(norm, lightDir), 0.0);vec3 diffuse = light.diffuse * diff * texture(material.diffuse, TexCoords).rgb;  // specularvec3 viewDir = normalize(viewPos - FragPos);vec3 reflectDir = reflect(-lightDir, norm);  float spec = pow(max(dot(viewDir, reflectDir), 0.0), material.shininess);vec3 specular = light.specular * spec * texture(material.specular, TexCoords).rgb;  // attenuationfloat distance    = length(light.position - FragPos);float attenuation = 1.0 / (light.constant + light.linear * distance + light.quadratic * (distance * distance));    // ambient  *= attenuation; // remove attenuation from ambient, as otherwise at large distances the light would be darker inside than outside the spotlight due the ambient term in the else branchdiffuse   *= attenuation;specular *= attenuation;   vec3 result = ambient + diffuse + specular;FragColor = vec4(result, 1.0);}else {// else, use ambient light so scene isn't completely dark outside the spotlight.FragColor = vec4(light.ambient * texture(material.diffuse, TexCoords).rgb, 1.0);}
}
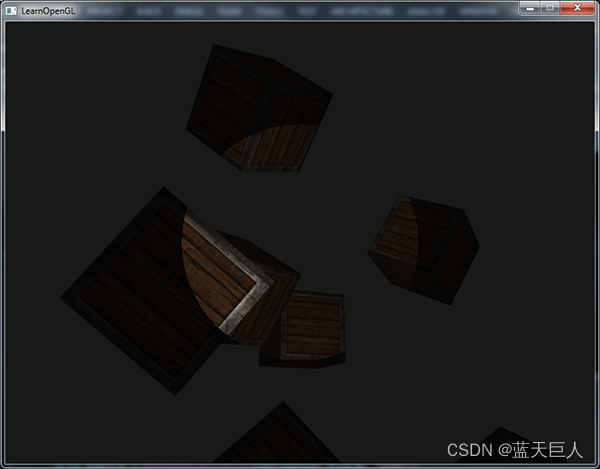
运行程序,你将会看到一个聚光,它仅会照亮聚光圆锥内的片段。看起来像是这样的:



![web:[极客大挑战 2019]LoveSQL](https://img-blog.csdnimg.cn/221489a9e584484683a1e7e8d909c7c0.png)
