一,项目搭建
认识ElementUI
ElementUI是一个基于Vue.js 2.0的桌面端组件库,它提供了一套丰富的UI组件,包括表格、表单、弹框、按钮、菜单等常用组件,具备易用、美观、高效、灵活等优势,能够极大的提高Web应用的开发效率。ElementUI的文档非常详细,示例丰富,易于入手,同时也支持自定义主题,开发者可以根据自己的需要进行调整。ElementUI同时也支持按需加载,可以减少项目体积,提高网页加载速度。由于其易用性和高效性,ElementUI已成为Vue.js开发的首选UI组件库之一。
2.安装ElementUI
安装ElementUI必须借助于vue-cli工具如果没有可观看我上一篇博客
构建好项目后通过npm安装element-ui
cd 项目根路径 #进入新建项目的根目录
npm install element-ui -S #安装element-ui模块

下载好了后进入项目查看package.json查看是否成功(因为有一次某人下载好了cmd窗口并没有提示下载成功)

3.导入组件
打开 src目录下的main.js,该文件是项目的入口文件,所以在这里导入,其他组件均可使用,不用再导入。
import Vue from 'vue'//新添加1
import ElementUI from 'element-ui'
//新增加2,避免后期打包样式不同,要放在import App from './App';之前
import 'element-ui/lib/theme-chalk/index.css'import App from './App'
import router from './router'Vue.use(ElementUI)   //新添加3
Vue.config.productionTip = false
4.创建登录、注册界面
在目录下新建了一个views专门存放一些界面组件,界面可自己设计,列如:
登录界面:
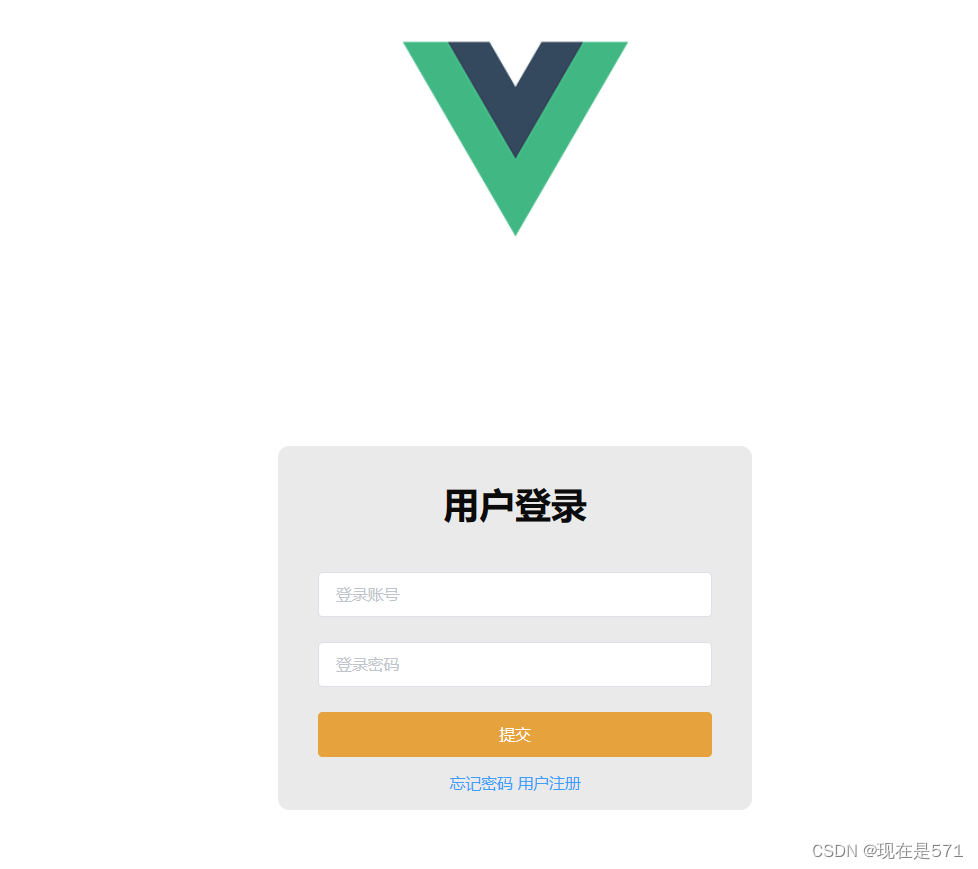
<template><div class="login-wrap"><el-form class="login-container"><h1 class="title">用户登录</h1><el-form-item label=""><el-input type="text" v-model="username" placeholder="登录账号" autocomplete="off"></el-input></el-form-item><el-form-item label=""><el-input type="password" v-model="password" placeholder="登录密码" autocomplete="off"></el-input></el-form-item><el-form-item><el-button type="warning" style="width:100%;" @click="doSubmit()">提交</el-button></el-form-item><el-row style="text-align: center;margin-top:-10px"><el-link type="primary">忘记密码</el-link><el-link type="primary" @click="gotoRegister()">用户注册</el-link></el-row></el-form></div>
</template><script>export default {name: 'Login',data() {return {username: '',password: ''}},methods: {gotoRegister() {this.$router.push("/Register");}}}
</script><style scoped>.login-wrap {box-sizing: border-box;width: 100%;height: 100%;padding-top: 10%;/* background-color: #3b7cf5; */background-repeat: no-repeat;background-position: center right;background-size: 100%;}.login-container {border-radius: 10px;margin: 0px auto;width: 350px;padding: 30px 35px 15px 35px;border: 1px solid #eaeaea;text-align: left;background-color: rgba(229, 229, 229, 0.8);}.title {margin: 0px auto 40px auto;text-align: center;color: #0b0b0b;}
</style>
注册界面:
<template><div class="login-wrap"><el-form class="login-container"><h1 class="title">用户注册</h1><el-form-item label=""><el-input type="text" v-model="username" placeholder="注册账号" autocomplete="off"></el-input></el-form-item><el-form-item label=""><el-input type="password" v-model="password" placeholder="注册密码" autocomplete="off"></el-input></el-form-item><el-form-item><el-button type="warning" style="width:100%;" @click="doSubmit()">提交</el-button></el-form-item><el-row style="text-align: center;margin-top:-10px"><el-link type="primary">忘记密码</el-link><el-link type="primary" @click="gotoLogin()">用户注册</el-link></el-row></el-form></div>
</template><script>export default {name: 'Register',data() {return {username: '',password: ''}},methods: {gotoLogin() {this.$router.push("/");}}}
</script><style scoped>.login-wrap {box-sizing: border-box;width: 100%;height: 100%;padding-top: 10%;
;/* background-color: #3b7cf5; */background-repeat: no-repeat;background-position: center right;background-size: 100%;}.login-container {border-radius: 10px;margin: 0px auto;width: 350px;padding: 30px 35px 15px 35px;border: 1px solid #eaeaea;text-align: left;background-color: rgba(229, 229, 229, 0.8);}.title {margin: 0px auto 40px auto;text-align: center;color: #0b0b0b;}
</style>
注1:<style scoped>
在vue组件中,在style标签上添加scoped属性,以表示它的样式作用于当下的模块,很好的实现了样式私有化的目的注2:auto-complete="off"
autocomplete 属性是 HTML5 中的新属性,off-----禁用自动完成
5配置路由
import Vue from 'vue'
import Router from 'vue-router'
import HelloWorld from '@/components/HelloWorld'
// 导入Login登录组件
import Login from '@/views/Login'
// 导入Register注册组件
import Register from '@/views/Register'Vue.use(Router)export default new Router({routes: [{path: '/',name: 'Login',component: Login},{path: '/Register',name: 'Register',component: Register}]
})
效果:
在项目根目录执行 npm run dev 指令
二、后台交互
1.引入axios
axios是vue2提倡使用的轻量版的ajax。它是基于promise的HTTP库。它会从浏览器中创建XMLHttpRequests,与Vue配合使用非常好。
Tips:vue.js有著名的全家桶系列:vue-router,vuex, vue-resource,再加上构建工具vue-cli,就是一个完整的vue项目的核心构成。 其中vue-resource是Vue.js的一款插件,它可以通过XMLHttpRequest或JSONP发起请求并处理响应,但在vue更新到2.0之后,作者就宣告不再对vue-resource更新,而是推荐的axios
安装指令:
npm i axios -S

2 添加vue-axios的全局配置
Axios是一个基于Promise 用于浏览器和 nodejs 的 HTTP 客户端,本质上也是对原生XHR的封装,只不过它是Promise的实现版本,符合最新的ES规范。
vue-axios是在axios基础上扩展的插件,在Vue.prototype原型上扩展了$http等属性,可以更加方便的使用axios。
通过vue-axios实现对axios的轻量封装:
1.下载安装vue-axios和qs库
npm i vue-axios -S
qs库用于解决POST请求问题,因为POST提交的参数的格式是Request Payload,这样后台取不到数据的。
npm install qs -S2.导入api模块,添加axios的全局配置
在SPA项目的src目录下添加api模块,其中api模块包含了action.js(针对后台请求接口的封装定义)和http.js(针对axios的全局配置)两个文件。
.action.js
/*** 对后台请求的地址的封装,URL格式如下:* 模块名_实体名_操作*/
export default {'SERVER': 'http://localhost:8080/ssm_vue', //服务器'SYSTEM_USER_DOLOGIN': '/user/userLogin', //登陆'SYSTEM_USER_DOREG': '/user/userRegister', //注册'getFullPath': k => { //获得请求的完整地址,用于mockjs测试时使用return this.SERVER + this[k];}
}对后台请求的地址的封装,URL格式:模块名实体名操作
http.js
/*** vue项目对axios的全局配置*/
import axios from 'axios'
import qs from 'qs'//引入action模块,并添加至axios的类属性urls上
import action from '@/api/action'
axios.urls = action// axios默认配置
axios.defaults.timeout = 10000; // 超时时间
// axios.defaults.baseURL = 'http://localhost:8080/j2ee15'; // 默认地址
axios.defaults.baseURL = action.SERVER;//整理数据
// 只适用于 POST,PUT,PATCH,transformRequest` 允许在向服务器发送前,修改请求数据
axios.defaults.transformRequest = function(data) {data = qs.stringify(data);return data;
};// 请求拦截器
axios.interceptors.request.use(function(config) {return config;
}, function(error) {return Promise.reject(error);
});// 响应拦截器
axios.interceptors.response.use(function(response) {return response;
}, function(error) {return Promise.reject(error);
});//最后,代码通过export default语句将axios导出,以便在其他地方可以引入和使用这个axios实例。
export default axios;
3.
修改main.js配置vue-axios
在main.js文件中引入api模块和vue-axios模块,这样我们可以在Vue项目中方便地使用axios进行HTTP请求,并且可以利用VueAxios插件提供的功能来简化HTTP请求的处理和管理。
import axios from '@/api/http'
import VueAxios from 'vue-axios'
Vue.use(VueAxios,axios)3.ssm项目准备 (后端)
以我以前写的代码做演示:
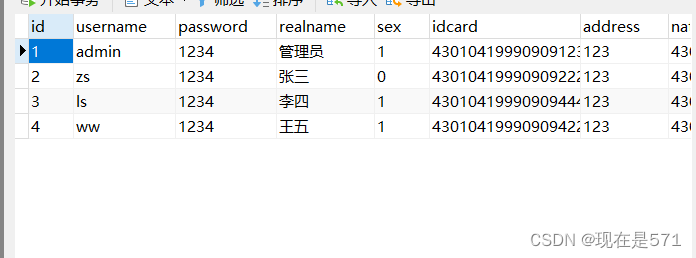
1.准备数据表
编写控制器
package com.zking.ssm.controller;import com.zking.ssm.service.IUserService;
import com.zking.ssm.util.JsonResponseBody;
import com.zking.ssm.util.PageBean;
import com.zking.ssm.vo.UserVo;
import org.springframework.beans.factory.annotation.Autowired;
import org.springframework.stereotype.Controller;
import org.springframework.web.bind.annotation.RequestMapping;
import org.springframework.web.bind.annotation.ResponseBody;import javax.servlet.http.HttpServletRequest;
import javax.servlet.http.HttpServletResponse;
import java.util.HashMap;
import java.util.List;
import java.util.Map;
import com.zking.ssm.jwt.*;@Controller
@RequestMapping("/user")
public class UserController {@Autowiredprivate IUserService userService;//登录方法@RequestMapping("/userLogin")@ResponseBodypublic JsonResponseBody<?> userLogin(UserVo userVo, HttpServletResponse response) {if (userVo.getUsername().equals("xzs") && userVo.getPassword().equals("123")) {//私有要求claim
//            Map<String,Object> json=new HashMap<String,Object>();
//            json.put("username", userVo.getUsername());//生成JWT,并设置到response响应头中
//            String jwt=JwtUtils.createJwt(json, JwtUtils.JWT_WEB_TTL);
//            response.setHeader(JwtUtils.JWT_HEADER_KEY, jwt);return new JsonResponseBody<>("用户登陆成功!", true, 0, null);} else {return new JsonResponseBody<>("用户名或密码错误!", false, 0, null);}}//注册方法@RequestMapping("/userRegister")@ResponseBodypublic JsonResponseBody<?> userRegister(UserVo user, HttpServletResponse response) {int i = userService.insertSelective(user);if (i > 0) {return new JsonResponseBody<>("用户注册成功!", true, 0, null);} else {return new JsonResponseBody<>("用户注册失败!", false, 0, null);}}
}
前端编写
1. 在Login.vue提交按钮的监听函数中加入发送get请求的代码:
<script>export default {name: 'Login',data() {return {username: '',password: ''}},methods: {gotoRegister() {this.$router.push("/Register");},doSubmit() {//定义后台登录方法连接地址let url = this.axios.urls.SYSTEM_USER_DOLOGIN;//获取数据let params = {username: this.username,password: this.password};/* get请求进行参数传递 */this.axios.get(url, {params:params}).then(r => {console.log(r);//判断是否登录成功if (r.data.success) {//利用ElementUI信息提示组件返回登录信息this.$message({message: r.data.msg,type: 'success'});//登陆成功,返回指定界面this.$route.push('主界面');} else {//弹出登录失败信息this.$message.error(r.data.msg);}}).catch(e => {//异常信息});/* post请求方式 *//* this.axios.post(url, params).then(r => {console.log(r);//判断是否登录成功if (r.data.success) {//利用ElementUI信息提示组件返回登录信息this.$message({message: r.data.msg,type: 'success'});//登陆成功,返回指定界面this.$route.push('主界面');} else {//弹出登录失败信息this.$message.error(r.data.msg);}}).catch(function(error) {console.log(error);}); */}}}
</script>
2. 在Register.vue提交按钮的监听函数中加入发送post请求的代码:
<script>export default {name: 'Register',data() {return {username: '',password: ''}},methods: {gotoLogin() {this.$router.push("/");},doSubmit() {//定义后台注册方法连接地址let url = this.axios.urls.SYSTEM_USER_DOREG;//获取数据let params = {username: this.username,password: this.password};/* post请求方式 */this.axios.post(url, params).then(r => {//判断是否注册成功if (r.data.success) {//利用ElementUI信息提示组件返回登录信息this.$message({message: r.data.msg,type: 'success'});//注册成功,返回指定界面//this.$route.push('主界面');} else {//弹出注册失败信息this.$message.error(r.data.msg);}}).catch(function(error) {console.log(error);});}},}
</script>
测试:
1. 启动ssm项目,部署tomcat服务器
2. 运行vue项目 —— 指令:npm run dev
注:项目运行时默认使用的是8080端口,如果其他程序也使用该端口则会引发冲突,如果tomcat默认使用的也是8080,为避免冲突需要改变端口号。
打开项目目录下config/index.js文件,修改dev部分的port即可


![[Machine learning][Part3] numpy 矢量矩阵操作的基础知识](https://img-blog.csdnimg.cn/5ebe08b97ac94f8283df2adfd4a95054.png)

