JUC第十二讲:JUC锁: 锁核心类AQS详解
本文是JUC第十二讲,JUC锁: 锁核心类AQS详解。AbstractQueuedSynchronizer抽象类是核心,需要重点掌握。它提供了一个基于FIFO队列,可以用于构建锁或者其他相关同步装置的基础框架。
文章目录
- JUC第十二讲:JUC锁: 锁核心类AQS详解
- 1、带着BAT大厂的面试问题去理解
- 2、AbstractQueuedSynchronizer简介
- 2.1、AQS 核心思想
- 2.2、AQS 对资源的共享方式
- 2.3、AQS底层使用了模板方法模式
- 3、AbstractQueuedSynchronizer数据结构
- 4、AbstractQueuedSynchronizer源码分析
- 4.1、类的继承关系
- 4.2、AbstractQueuedSynchronizer的内部类 - Node类
- 4.3、AbstractQueuedSynchronizer的内部类 - ConditionObject类
- 4.4、AbstractQueuedSynchronizer的属性
- 4.5、类的构造方法
- 4.6、类的核心方法 - acquire方法
- 4.7、类的核心方法 - release方法
- 5、AbstractQueuedSynchronizer示例详解一
- 6、AbstractQueuedSynchronizer示例详解二
- 7、AbstractQueuedSynchronizer总结
- 8、参考文章
1、带着BAT大厂的面试问题去理解
请带着这些问题继续后文,会很大程度上帮助你更好的理解相关知识点。
- 什么是AQS? 为什么它是核心? 管理共享资源和请求资源的线程
- AQS的核心思想是什么? 它是怎么实现的? 底层数据结构等 CLH(虚拟的双向队列)
- AQS有哪些核心的方法?
- AQS定义什么样的资源获取方式? AQS定义了两种资源获取方式:
独占(只有一个线程能访问执行,又根据是否按队列的顺序分为公平锁和非公平锁,如ReentrantLock) 和共享(多个线程可同时访问执行,如Semaphore、CountDownLatch、CyclicBarrier)。ReentrantReadWriteLock可以看成是组合式,允许多个线程同时对某一资源进行读。 - AQS底层使用了什么样的设计模式? 模板设计模式
- AQS的应用示例?
2、AbstractQueuedSynchronizer简介
AQS是一个用来构建锁和同步器的框架,使用AQS能简单且高效地构造出应用广泛的大量的同步器,比如我们提到的ReentrantLock,Semaphore,其他的诸如 ReentrantReadWriteLock,SynchronousQueue,FutureTask等等,皆是基于AQS的。当然,我们自己也能利用AQS非常轻松容易地构造出符合我们自己需求的同步器。
2.1、AQS 核心思想
AQS核心思想是:如果被请求的共享资源空闲,则将当前请求资源的线程设置为有效的工作线程,并且将共享资源设置为锁定状态。如果被请求的共享资源被占用,那么就需要一套线程阻塞等待以及被唤醒时锁分配的机制,这个机制AQS是用CLH队列锁实现的,即将暂时获取不到锁的线程加入到队列中。
CLH(Craig,Landin,and Hagersten) 队列是一个虚拟的双向队列 (虚拟的双向队列即不存在队列实例,仅存在结点之间的关联关系)。AQS是将每条请求共享资源的线程封装成一个CLH锁队列的一个结点(Node)来实现锁的分配。
AQS使用一个int成员变量来表示同步状态,通过内置的FIFO队列来完成获取资源线程的排队工作。AQS使用CAS对该同步状态进行原子操作实现对其值的修改。
//共享变量,使用volatile修饰保证线程可见性
private volatile int state;
状态信息通过protected类型的 getState,setState,compareAndSetState 进行操作
// 返回同步状态的当前值
protected final int getState() {return state;
}
// 设置同步状态的值
protected final void setState(int newState) {state = newState;
}
// 原子地(CAS操作)将同步状态值设置为给定值update 如果当前同步状态的值等于expect(期望值)
protected final boolean compareAndSetState(int expect, int update) {return unsafe.compareAndSwapInt(this, stateOffset, expect, update);
}
2.2、AQS 对资源的共享方式
AQS定义两种资源共享方式
- Exclusive(独占):只有一个线程能执行,如ReentrantLock。又可分为公平锁和非公平锁:
- 公平锁:按照线程在队列中的排队顺序,先到者先拿到锁
- 非公平锁:当线程要获取锁时,无视队列顺序直接去抢锁,谁抢到就是谁的 (默认)
- ReentrantLock见这篇文章:JUC第十三讲:JUC锁: ReentrantLock详解
- Share(共享):多个线程可同时执行,如Semaphore/CountDownLatch。Semaphore、CountDownLatch、 CyclicBarrier、ReadWriteLock 。
- JUC第十四讲:JUC锁: ReentrantReadWriteLock详解
- JUC第二十六讲:JUC工具类: CountDownLatch详解
- JUC第二十七讲:JUC工具类: CyclicBarrier详解
- JUC第二十八讲:JUC工具类: Semaphore详解
ReentrantReadWriteLock 可以看成是组合式,因为ReentrantReadWriteLock也就是读写锁允许多个线程同时对某一资源进行读。
不同的自定义同步器争用共享资源的方式也不同。自定义同步器在实现时只需要实现共享资源 state 的获取与释放方式即可,至于具体线程等待队列的维护 (如获取资源失败入队 / 唤醒出队等),AQS已经在上层已经帮我们实现好了。
2.3、AQS底层使用了模板方法模式
同步器的设计是基于模板方法模式的,如果需要自定义同步器一般的方式是这样 (模板方法模式很经典的一个应用):
使用者继承 AbstractQueuedSynchronizer 并重写指定的方法。(这些重写方法很简单,无非是对于共享资源state的获取和释放) 将AQS组合在自定义同步组件的实现中,并调用其模板方法,而这些模板方法会调用使用者重写的方法。
这和我们以往通过实现接口的方式有很大区别,模板方法模式请参看:JAVA设计模式第四讲:行为型设计模式 第二节
AQS使用了模板方法模式,自定义同步器时需要重写下面几个AQS提供的模板方法:
// 模版方法1: 释放资源
public final boolean releaseShared(int arg) {if (tryReleaseShared(arg)) {doReleaseShared();return true;}return false;
}
...// 拓展点
isHeldExclusively()//该线程是否正在独占资源。只有用到condition才需要去实现它。
tryAcquire(int)//独占方式。尝试获取资源,成功则返回true,失败则返回false。
tryRelease(int)//独占方式。尝试释放资源,成功则返回true,失败则返回false。
tryAcquireShared(int)//共享方式。尝试获取资源。负数表示失败;0表示成功,但没有剩余可用资源;正数表示成功,且有剩余资源。
tryReleaseShared(int)//共享方式。尝试释放资源,成功则返回true,失败则返回false。
默认情况下,每个方法都抛出 UnsupportedOperationException。这些方法的实现必须是内部线程安全的,并且通常应该简短而不是阻塞。AQS类中的其他方法都是final,所以无法被其他类使用,只有这几个方法可以被其他类使用。
以 ReentrantLock为例,state初始化为0,表示未锁定状态。A线程lock()时,会调用tryAcquire()独占该锁并将state+1。此后,其他线程再tryAcquire()时就会失败,直到A线程unlock() 到 state=0(即释放锁)为止,其它线程才有机会获取该锁。当然,释放锁之前,A线程自己是可以重复获取此锁的(state会累加),这就是可重入的概念。但要注意,获取多少次就要释放多么次,这样才能保证state是能回到零态的。
3、AbstractQueuedSynchronizer数据结构
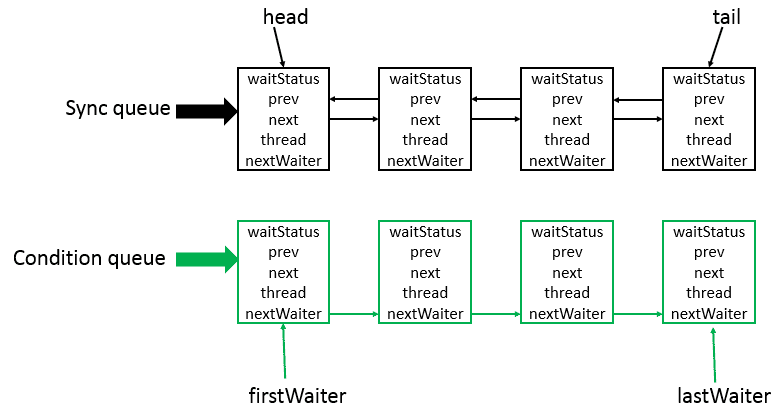
AbstractQueuedSynchronizer类底层的数据结构是使用CLH(Craig,Landin,and Hagersten)队列是一个虚拟的双向队列(虚拟的双向队列即不存在队列实例,仅存在结点之间的关联关系)。AQS是将每条请求共享资源的线程封装成一个CLH锁队列的一个结点(Node)来实现锁的分配。其中Sync queue,即同步队列,是双向链表,包括head结点和tail结点,head结点主要用作后续的调度。而Condition queue不是必须的,其是一个单向链表,只有当使用Condition时,才会存在此单向链表。并且可能会有多个Condition queue。
4、AbstractQueuedSynchronizer源码分析
4.1、类的继承关系
AbstractQueuedSynchronizer 继承自 AbstractOwnableSynchronizer 抽象类,并且实现了Serializable接口,可以进行序列化。
public abstract class AbstractQueuedSynchronizer extends AbstractOwnableSynchronizer implements java.io.Serializable
其中 AbstractOwnableSynchronizer 抽象类的源码如下:
public abstract class AbstractOwnableSynchronizer implements java.io.Serializable {// 版本序列号private static final long serialVersionUID = 3737899427754241961L;// 构造方法protected AbstractOwnableSynchronizer() { }// 独占模式下的线程 (ReentrantLock)private transient Thread exclusiveOwnerThread;// 设置独占线程 protected final void setExclusiveOwnerThread(Thread thread) {exclusiveOwnerThread = thread;}// 获取独占线程 protected final Thread getExclusiveOwnerThread() {return exclusiveOwnerThread;}
}
AbstractOwnableSynchronizer 抽象类中,可以设置独占资源线程和获取独占资源线程。分别为setExclusiveOwnerThread与getExclusiveOwnerThread方法,这两个方法会被子类调用。
AbstractQueuedSynchronizer类有两个内部类,分别为Node类与ConditionObject类。下面分别做介绍。
4.2、AbstractQueuedSynchronizer的内部类 - Node类
static final class Node {// 模式,分为共享与独占// 共享模式 (CountdownLatch,ReadWriteLock)static final Node SHARED = new Node();// 独占模式 (ReentrantLock)static final Node EXCLUSIVE = null;        // 结点状态// CANCELLED,值为1,表示当前的线程被取消// SIGNAL,值为-1,表示当前节点的后继节点包含的线程需要运行,也就是unpark					(唤醒后继结点线程)// CONDITION,值为-2,表示当前节点在等待condition,也就是在condition队列中      (条件队列)// PROPAGATE,值为-3,表示当前场景下后续的 acquireShared 能够得以执行           (获取资源) // 值为0,表示当前节点在sync队列中,等待着获取锁static final int CANCELLED =  1;static final int SIGNAL    = -1;static final int CONDITION = -2;static final int PROPAGATE = -3;        // 结点状态volatile int waitStatus;// 前驱结点volatile Node prev;// 后继结点volatile Node next;// 结点所对应的线程volatile Thread thread;// 下一个等待者Node nextWaiter;// 结点是否在共享模式下等待final boolean isShared() {return nextWaiter == SHARED;}// 获取前驱结点,若前驱结点为空,抛出异常final Node predecessor() {// 保存前驱结点Node p = prev;// 前驱结点为空,抛出异常if (p == null)throw new NullPointerException();else // 前驱结点不为空,返回return p;}// 无参构造方法// Used to establish initial head or SHARED markerNode() {}// 构造方法Node(Thread thread, Node mode) {    // Used by addWaiterthis.nextWaiter = mode;this.thread = thread;}// 构造方法Node(Thread thread, int waitStatus) { // Used by Conditionthis.waitStatus = waitStatus;this.thread = thread;}
}
每个线程被阻塞的线程都会被封装成一个Node结点,放入队列。每个节点包含了一个Thread类型的引用,并且每个节点都存在一个状态,具体状态如下。
CANCELLED,值为1,表示当前的线程被取消;SIGNAL,值为-1,表示当前节点的后继节点包含的线程需要运行,需要进行unpark操作;CONDITION,值为-2,表示当前节点在等待 condition,也就是在 condition queue 中;PROPAGATE,值为-3,表示当前场景下后续的acquireShared能够得以执行;- 值为0,表示当前节点在sync queue中,等待着获取锁。
4.3、AbstractQueuedSynchronizer的内部类 - ConditionObject类
这个类有点长,耐心看下:
// 内部类
public class ConditionObject implements Condition, java.io.Serializable {// 版本号private static final long serialVersionUID = 1173984872572414699L;/** First node of condition queue. */// condition 队列的头节点private transient Node firstWaiter;/** Last node of condition queue. */// condition队列的尾结点private transient Node lastWaiter;/*** Creates a new {@code ConditionObject} instance.*/// 构造方法public ConditionObject() { }// Internal methods/*** Adds a new waiter to wait queue.* @return its new wait node*/// 添加新的waiter到wait队列private Node addConditionWaiter() {// 保存尾结点Node t = lastWaiter;// If lastWaiter is cancelled, clean out.// 尾结点不为空,并且尾结点的状态不为CONDITIONif (t != null && t.waitStatus != Node.CONDITION) {// 清除状态为CONDITION的结点unlinkCancelledWaiters();// 将最后一个结点重新赋值给 tt = lastWaiter;}// 新建一个结点Node node = new Node(Thread.currentThread(), Node.CONDITION);// 尾结点为空if (t == null)// 设置condition队列的头节点firstWaiter = node;else // 尾结点不为空// 设置为节点的nextWaiter域为node结点t.nextWaiter = node;// 更新condition队列的尾结点lastWaiter = node;return node;}/*** Removes and transfers nodes until hit non-cancelled one or* null. Split out from signal in part to encourage compilers* to inline the case of no waiters.* @param first (non-null) the first node on condition queue*/private void doSignal(Node first) {// 循环do {// 该节点的nextWaiter为空if ( (firstWaiter = first.nextWaiter) == null) // 设置尾结点为空lastWaiter = null;// 设置first结点的nextWaiter域first.nextWaiter = null;} while (!transferForSignal(first) && (first = firstWaiter) != null); // 将结点从condition队列转移到sync队列失败并且condition队列中的头节点不为空,一直循环}/*** Removes and transfers all nodes.* @param first (non-null) the first node on condition queue*/private void doSignalAll(Node first) {// condition队列的头节点尾结点都设置为空lastWaiter = firstWaiter = null;// 循环do {// 获取first结点的nextWaiter域结点Node next = first.nextWaiter;// 设置first结点的nextWaiter域为空first.nextWaiter = null;// 将first结点从condition队列转移到sync队列transferForSignal(first);// 重新设置firstfirst = next;} while (first != null);}/*** Unlinks cancelled waiter nodes from condition queue.* Called only while holding lock. This is called when* cancellation occurred during condition wait, and upon* insertion of a new waiter when lastWaiter is seen to have* been cancelled. This method is needed to avoid garbage* retention in the absence of signals. So even though it may* require a full traversal, it comes into play only when* timeouts or cancellations occur in the absence of* signals. It traverses all nodes rather than stopping at a* particular target to unlink all pointers to garbage nodes* without requiring many re-traversals during cancellation* storms.*/// 从 condition 队列中清除状态为CANCEL的结点private void unlinkCancelledWaiters() {// 保存condition队列头节点Node t = firstWaiter;Node trail = null;while (t != null) { // t不为空// 下一个结点Node next = t.nextWaiter;if (t.waitStatus != Node.CONDITION) { // t结点的状态不为CONDTION状态// 设置t节点的nextWaiter域为空t.nextWaiter = null;if (trail == null) // trail为空// 重新设置condition队列的头节点firstWaiter = next;else // trail不为空// 设置trail结点的nextWaiter域为next结点trail.nextWaiter = next;if (next == null) // next结点为空// 设置condition队列的尾结点lastWaiter = trail;}else // t结点的状态为CONDTION状态// 设置trail结点trail = t;// 设置t结点t = next;}}// public methods/*** Moves the longest-waiting thread, if one exists, from the* wait queue for this condition to the wait queue for the* owning lock.** @throws IllegalMonitorStateException if {@link #isHeldExclusively}*         returns {@code false}*/// 唤醒一个等待线程。如果所有的线程都在等待此条件,则选择其中的一个唤醒。在从 await 返回之前,该线程必须重新获取锁。public final void signal() {if (!isHeldExclusively()) // 不被当前线程独占,抛出异常throw new IllegalMonitorStateException();// 保存condition队列头节点Node first = firstWaiter;if (first != null) // 头节点不为空// 唤醒一个等待线程doSignal(first);}/*** Moves all threads from the wait queue for this condition to* the wait queue for the owning lock.** @throws IllegalMonitorStateException if {@link #isHeldExclusively}*         returns {@code false}*/// 唤醒所有等待线程。如果所有的线程都在等待此条件,则唤醒所有线程。在从 await 返回之前,每个线程都必须重新获取锁。public final void signalAll() {if (!isHeldExclusively()) // 不被当前线程独占,抛出异常throw new IllegalMonitorStateException();// 保存condition队列头节点Node first = firstWaiter;if (first != null) // 头节点不为空// 唤醒所有等待线程doSignalAll(first);}/*** Implements uninterruptible condition wait.* <ol>* <li> Save lock state returned by {@link #getState}.* <li> Invoke {@link #release} with saved state as argument,*      throwing IllegalMonitorStateException if it fails.* <li> Block until signalled.* <li> Reacquire by invoking specialized version of*      {@link #acquire} with saved state as argument.* </ol>*/// 等待,当前线程在接到信号之前一直处于等待状态,不响应中断public final void awaitUninterruptibly() {// 添加一个结点到等待队列Node node = addConditionWaiter();// 获取释放的状态int savedState = fullyRelease(node);boolean interrupted = false;while (!isOnSyncQueue(node)) { // // 阻塞当前线程LockSupport.park(this);if (Thread.interrupted()) // 当前线程被中断// 设置interrupted状态interrupted = true; }if (acquireQueued(node, savedState) || interrupted) // selfInterrupt();}/** For interruptible waits, we need to track whether to throw* InterruptedException, if interrupted while blocked on* condition, versus reinterrupt current thread, if* interrupted while blocked waiting to re-acquire.*//** Mode meaning to reinterrupt on exit from wait */private static final int REINTERRUPT =  1;/** Mode meaning to throw InterruptedException on exit from wait */private static final int THROW_IE    = -1;/*** Checks for interrupt, returning THROW_IE if interrupted* before signalled, REINTERRUPT if after signalled, or* 0 if not interrupted.*/private int checkInterruptWhileWaiting(Node node) {return Thread.interrupted() ?(transferAfterCancelledWait(node) ? THROW_IE : REINTERRUPT) :0; }/*** Throws InterruptedException, reinterrupts current thread, or* does nothing, depending on mode.*/private void reportInterruptAfterWait(int interruptMode)throws InterruptedException {if (interruptMode == THROW_IE)throw new InterruptedException();else if (interruptMode == REINTERRUPT)selfInterrupt();}/*** Implements interruptible condition wait.* <ol>* <li> If current thread is interrupted, throw InterruptedException.* <li> Save lock state returned by {@link #getState}.* <li> Invoke {@link #release} with saved state as argument,*      throwing IllegalMonitorStateException if it fails.* <li> Block until signalled or interrupted.* <li> Reacquire by invoking specialized version of*      {@link #acquire} with saved state as argument.* <li> If interrupted while blocked in step 4, throw InterruptedException.* </ol>*/// 等待,当前线程在接到信号或被中断之前一直处于等待状态public final void await() throws InterruptedException {if (Thread.interrupted()) // 当前线程被中断,抛出异常throw new InterruptedException();// 在wait队列上添加一个结点Node node = addConditionWaiter();// int savedState = fullyRelease(node);int interruptMode = 0;while (!isOnSyncQueue(node)) {// 阻塞当前线程LockSupport.park(this);if ((interruptMode = checkInterruptWhileWaiting(node)) != 0) // 检查结点等待时的中断类型break;}if (acquireQueued(node, savedState) && interruptMode != THROW_IE)interruptMode = REINTERRUPT;if (node.nextWaiter != null) // clean up if cancelledunlinkCancelledWaiters();if (interruptMode != 0)reportInterruptAfterWait(interruptMode);}/*** Implements timed condition wait.* <ol>* <li> If current thread is interrupted, throw InterruptedException.* <li> Save lock state returned by {@link #getState}.* <li> Invoke {@link #release} with saved state as argument,*      throwing IllegalMonitorStateException if it fails.* <li> Block until signalled, interrupted, or timed out.* <li> Reacquire by invoking specialized version of*      {@link #acquire} with saved state as argument.* <li> If interrupted while blocked in step 4, throw InterruptedException.* </ol>*/// 等待,当前线程在接到信号、被中断或到达指定等待时间之前一直处于等待状态 public final long awaitNanos(long nanosTimeout)throws InterruptedException {if (Thread.interrupted())throw new InterruptedException();Node node = addConditionWaiter();int savedState = fullyRelease(node);final long deadline = System.nanoTime() + nanosTimeout;int interruptMode = 0;while (!isOnSyncQueue(node)) {if (nanosTimeout <= 0L) {transferAfterCancelledWait(node);break;}if (nanosTimeout >= spinForTimeoutThreshold)LockSupport.parkNanos(this, nanosTimeout);if ((interruptMode = checkInterruptWhileWaiting(node)) != 0)break;nanosTimeout = deadline - System.nanoTime();}if (acquireQueued(node, savedState) && interruptMode != THROW_IE)interruptMode = REINTERRUPT;if (node.nextWaiter != null)unlinkCancelledWaiters();if (interruptMode != 0)reportInterruptAfterWait(interruptMode);return deadline - System.nanoTime();}/*** Implements absolute timed condition wait.* <ol>* <li> If current thread is interrupted, throw InterruptedException.* <li> Save lock state returned by {@link #getState}.* <li> Invoke {@link #release} with saved state as argument,*      throwing IllegalMonitorStateException if it fails.* <li> Block until signalled, interrupted, or timed out.* <li> Reacquire by invoking specialized version of*      {@link #acquire} with saved state as argument.* <li> If interrupted while blocked in step 4, throw InterruptedException.* <li> If timed out while blocked in step 4, return false, else true.* </ol>*/// 等待,当前线程在接到信号、被中断或到达指定最后期限之前一直处于等待状态public final boolean awaitUntil(Date deadline)throws InterruptedException {long abstime = deadline.getTime();if (Thread.interrupted())throw new InterruptedException();Node node = addConditionWaiter();int savedState = fullyRelease(node);boolean timedout = false;int interruptMode = 0;while (!isOnSyncQueue(node)) {if (System.currentTimeMillis() > abstime) {timedout = transferAfterCancelledWait(node);break;}LockSupport.parkUntil(this, abstime);if ((interruptMode = checkInterruptWhileWaiting(node)) != 0)break;}if (acquireQueued(node, savedState) && interruptMode != THROW_IE)interruptMode = REINTERRUPT;if (node.nextWaiter != null)unlinkCancelledWaiters();if (interruptMode != 0)reportInterruptAfterWait(interruptMode);return !timedout;}/*** Implements timed condition wait.* <ol>* <li> If current thread is interrupted, throw InterruptedException.* <li> Save lock state returned by {@link #getState}.* <li> Invoke {@link #release} with saved state as argument,*      throwing IllegalMonitorStateException if it fails.* <li> Block until signalled, interrupted, or timed out.* <li> Reacquire by invoking specialized version of*      {@link #acquire} with saved state as argument.* <li> If interrupted while blocked in step 4, throw InterruptedException.* <li> If timed out while blocked in step 4, return false, else true.* </ol>*/// 等待,当前线程在接到信号、被中断或到达指定等待时间之前一直处于等待状态。此方法在行为上等效于: awaitNanos(unit.toNanos(time)) > 0public final boolean await(long time, TimeUnit unit)throws InterruptedException {long nanosTimeout = unit.toNanos(time);if (Thread.interrupted())throw new InterruptedException();Node node = addConditionWaiter();int savedState = fullyRelease(node);final long deadline = System.nanoTime() + nanosTimeout;boolean timedout = false;int interruptMode = 0;while (!isOnSyncQueue(node)) {if (nanosTimeout <= 0L) {timedout = transferAfterCancelledWait(node);break;}if (nanosTimeout >= spinForTimeoutThreshold)LockSupport.parkNanos(this, nanosTimeout);if ((interruptMode = checkInterruptWhileWaiting(node)) != 0)break;nanosTimeout = deadline - System.nanoTime();}if (acquireQueued(node, savedState) && interruptMode != THROW_IE)interruptMode = REINTERRUPT;if (node.nextWaiter != null)unlinkCancelledWaiters();if (interruptMode != 0)reportInterruptAfterWait(interruptMode);return !timedout;}//  support for instrumentation/*** Returns true if this condition was created by the given* synchronization object.** @return {@code true} if owned*/final boolean isOwnedBy(AbstractQueuedSynchronizer sync) {return sync == AbstractQueuedSynchronizer.this;}/*** Queries whether any threads are waiting on this condition.* Implements {@link AbstractQueuedSynchronizer#hasWaiters(ConditionObject)}.** @return {@code true} if there are any waiting threads* @throws IllegalMonitorStateException if {@link #isHeldExclusively}*         returns {@code false}*///  查询是否有正在等待此条件的任何线程protected final boolean hasWaiters() {if (!isHeldExclusively())throw new IllegalMonitorStateException();for (Node w = firstWaiter; w != null; w = w.nextWaiter) {if (w.waitStatus == Node.CONDITION)return true;}return false;}/*** Returns an estimate of the number of threads waiting on* this condition.* Implements {@link AbstractQueuedSynchronizer#getWaitQueueLength(ConditionObject)}.** @return the estimated number of waiting threads* @throws IllegalMonitorStateException if {@link #isHeldExclusively}*         returns {@code false}*/// 返回正在等待此条件的线程数估计值protected final int getWaitQueueLength() {if (!isHeldExclusively())throw new IllegalMonitorStateException();int n = 0;for (Node w = firstWaiter; w != null; w = w.nextWaiter) {if (w.waitStatus == Node.CONDITION)++n;}return n;}/*** Returns a collection containing those threads that may be* waiting on this Condition.* Implements {@link AbstractQueuedSynchronizer#getWaitingThreads(ConditionObject)}.** @return the collection of threads* @throws IllegalMonitorStateException if {@link #isHeldExclusively}*         returns {@code false}*/// 返回包含那些可能正在等待此条件的线程集合protected final Collection<Thread> getWaitingThreads() {if (!isHeldExclusively())throw new IllegalMonitorStateException();ArrayList<Thread> list = new ArrayList<Thread>();for (Node w = firstWaiter; w != null; w = w.nextWaiter) {if (w.waitStatus == Node.CONDITION) {Thread t = w.thread;if (t != null)list.add(t);}}return list;}
}
此类实现了Condition接口,Condition接口定义了条件操作规范,具体如下
public interface Condition {// 等待,当前线程在接到信号或被中断之前一直处于等待状态void await() throws InterruptedException;// 等待,当前线程在接到信号之前一直处于等待状态,不响应中断void awaitUninterruptibly();// 等待,当前线程在接到信号、被中断或到达指定等待时间之前一直处于等待状态 long awaitNanos(long nanosTimeout) throws InterruptedException;// 等待,当前线程在接到信号、被中断或到达指定等待时间之前一直处于等待状态。此方法在行为上等效于: awaitNanos(unit.toNanos(time)) > 0boolean await(long time, TimeUnit unit) throws InterruptedException;// 等待,当前线程在接到信号、被中断或到达指定最后期限之前一直处于等待状态boolean awaitUntil(Date deadline) throws InterruptedException;// 唤醒一个等待线程。如果所有的线程都在等待此条件,则选择其中的一个唤醒。在从 await 返回之前,该线程必须重新获取锁。void signal();// 唤醒所有等待线程。如果所有的线程都在等待此条件,则唤醒所有线程。在从 await 返回之前,每个线程都必须重新获取锁。void signalAll();
}
Condition接口中定义了await、signal方法,用来等待条件、释放条件。之后会详细分析CondtionObject的源码。
4.4、AbstractQueuedSynchronizer的属性
属性中包含了头节点head,尾结点tail,状态state、自旋时间spinForTimeoutThreshold,还有AbstractQueuedSynchronizer抽象的属性在内存中的偏移地址,通过该偏移地址,可以获取和设置该属性的值,同时还包括一个静态初始化块,用于加载内存偏移地址。
public abstract class AbstractQueuedSynchronizer extends AbstractOwnableSynchronizerimplements java.io.Serializable {    // 版本号private static final long serialVersionUID = 7373984972572414691L;    // 头节点private transient volatile Node head;    // 尾结点private transient volatile Node tail;    // 状态private volatile int state;    // 自旋时间static final long spinForTimeoutThreshold = 1000L;// Unsafe类实例private static final Unsafe unsafe = Unsafe.getUnsafe();// state内存偏移地址private static final long stateOffset;// head内存偏移地址private static final long headOffset;// state内存偏移地址private static final long tailOffset;// tail内存偏移地址private static final long waitStatusOffset;// next内存偏移地址private static final long nextOffset;// 静态初始化块static {try {stateOffset = unsafe.objectFieldOffset(AbstractQueuedSynchronizer.class.getDeclaredField("state"));headOffset = unsafe.objectFieldOffset(AbstractQueuedSynchronizer.class.getDeclaredField("head"));tailOffset = unsafe.objectFieldOffset(AbstractQueuedSynchronizer.class.getDeclaredField("tail"));waitStatusOffset = unsafe.objectFieldOffset(Node.class.getDeclaredField("waitStatus"));nextOffset = unsafe.objectFieldOffset(Node.class.getDeclaredField("next"));} catch (Exception ex) { throw new Error(ex); }}
}
unsafe类可以参考这篇文章:来自美团技术团队:Java魔法类:Unsafe应用解析
4.5、类的构造方法
此类构造方法为从抽象构造方法,供子类调用。
protected AbstractQueuedSynchronizer() { }
4.6、类的核心方法 - acquire方法
该方法以独占模式获取(资源),忽略中断,即线程在aquire过程中,中断此线程是无效的。源码如下:
public final void acquire(int arg) {if (!tryAcquire(arg) && acquireQueued(addWaiter(Node.EXCLUSIVE), arg))selfInterrupt();
}
由上述源码可以知道,当一个线程调用acquire时,调用方法流程如下

- 首先调用tryAcquire方法,调用此方法的线程会试图在独占模式下获取对象状态。此方法应该查询是否允许它在独占模式下获取对象状态,如果允许,则获取它。在AbstractQueuedSynchronizer 源码中默认会抛出一个异常,即需要子类去重写此方法完成自己的逻辑。之后会进行分析。
- 若tryAcquire失败,则调用addWaiter方法,addWaiter方法完成的功能是将调用此方法的线程封装成为一个结点并放入Sync queue。
- 调用acquireQueued方法,此方法完成的功能是Sync queue中的结点不断尝试获取资源,若成功,则返回true,否则,返回false。
- 由于tryAcquire默认实现是抛出异常,所以此时,不进行分析,之后会结合一个例子进行分析。
首先分析addWaiter方法
// 添加等待者
private Node addWaiter(Node mode) {// 新生成一个结点,默认为独占模式Node node = new Node(Thread.currentThread(), mode);// Try the fast path of enq; backup to full enq on failure// 保存尾结点Node pred = tail;// 尾结点不为空,即已经被初始化if (pred != null) {// 将node结点的prev域连接到尾结点node.prev = pred;// 比较pred是否为尾结点,是则将尾结点设置为nodeif (compareAndSetTail(pred, node)) {// 设置尾结点的next域为nodepred.next = node;return node; // 返回新生成的结点}}// 尾结点为空(即还没有被初始化过),或者是compareAndSetTail操作失败,则入队列enq(node);return node;
}
addWaiter方法使用快速添加的方式往sync queue尾部添加结点,如果sync queue队列还没有初始化,则会使用enq插入队列中。enq方法源码如下
private Node enq(final Node node) {for (;;) { // 无限循环,确保结点能够成功入队列// 保存尾结点Node t = tail;if (t == null) { // 尾结点为空,即还没被初始化if (compareAndSetHead(new Node())) // 头节点为空,并设置头节点为新生成的结点tail = head; // 头节点与尾结点都指向同一个新生结点} else { // 尾结点不为空,即已经被初始化过// 将node结点的prev域连接到尾结点node.prev = t;// 比较结点t是否为尾结点,若是则将尾结点设置为nodeif (compareAndSetTail(t, node)) {// 设置尾结点的next域为nodet.next = node;return t; // 返回尾结点}}}
}
enq方法会使用无限循环来确保节点的成功插入。
现在,分析acquireQueue方法。其源码如下
// sync队列中的结点在独占且忽略中断的模式下获取(资源)
final boolean acquireQueued(final Node node, int arg) {// 标志boolean failed = true;try {// 中断标志boolean interrupted = false;for (;;) { // 无限循环// 获取node节点的前驱结点final Node p = node.predecessor(); if (p == head && tryAcquire(arg)) { // 前驱为头节点并且成功获得锁setHead(node); // 设置头节点p.next = null; // help GCfailed = false; // 设置标志return interrupted; }if (shouldParkAfterFailedAcquire(p, node) &&parkAndCheckInterrupt())interrupted = true;}} finally {if (failed)cancelAcquire(node);}
}
首先获取当前节点的前驱节点,如果前驱节点是头节点并且能够获取(资源),代表该当前节点能够占有锁,设置头节点为当前节点,返回。否则,调用 shouldParkAfterFailedAcquire 和 parkAndCheckInterrupt 方法,首先,我们看 shouldParkAfterFailedAcquire 方法,代码如下
// 当获取(资源)失败后,检查并且更新结点状态
private static boolean shouldParkAfterFailedAcquire(Node pred, Node node) {// 获取前驱结点的状态int ws = pred.waitStatus;if (ws == Node.SIGNAL) // 状态为SIGNAL,为-1/** This node has already set status asking a release* to signal it, so it can safely park.*/// 可以进行park操作return true; if (ws > 0) { // 表示状态为CANCELLED,为1/** Predecessor was cancelled. Skip over predecessors and* indicate retry.*/do {node.prev = pred = pred.prev;} while (pred.waitStatus > 0); // 找到pred结点前面最近的一个状态不为CANCELLED的结点// 赋值pred结点的next域pred.next = node; } else { // 为PROPAGATE -3 或者是0 表示无状态,(为CONDITION -2时,表示此节点在condition queue中) /** waitStatus must be 0 or PROPAGATE.  Indicate that we* need a signal, but don't park yet.  Caller will need to* retry to make sure it cannot acquire before parking.*/// 比较并设置前驱结点的状态为SIGNALcompareAndSetWaitStatus(pred, ws, Node.SIGNAL); }// 不能进行park操作return false;
}
只有当该节点的前驱结点的状态为SIGNAL时,才可以对该结点所封装的线程进行park操作。否则,将不能进行park操作。再看parkAndCheckInterrupt方法,源码如下
// 进行park操作并且返回该线程是否被中断
private final boolean parkAndCheckInterrupt() {// 在许可可用之前禁用当前线程,并且设置了blockerLockSupport.park(this);return Thread.interrupted(); // 当前线程是否已被中断,并清除中断标记位
}
parkAndCheckInterrupt方法里的逻辑是首先执行park操作,即禁用当前线程,然后返回该线程是否已经被中断。再看final块中的cancelAcquire方法,其源码如下
// 取消继续获取(资源)
private void cancelAcquire(Node node) {// Ignore if node doesn't exist// node为空,返回if (node == null)return;// 设置node结点的thread为空node.thread = null;// Skip cancelled predecessors// 保存node的前驱结点Node pred = node.prev;while (pred.waitStatus > 0) // 找到node前驱结点中第一个状态小于0的结点,即不为CANCELLED状态的结点node.prev = pred = pred.prev;// predNext is the apparent node to unsplice. CASes below will// fail if not, in which case, we lost race vs another cancel// or signal, so no further action is necessary.// 获取pred结点的下一个结点Node predNext = pred.next;// Can use unconditional write instead of CAS here.// After this atomic step, other Nodes can skip past us.// Before, we are free of interference from other threads.// 设置node结点的状态为CANCELLEDnode.waitStatus = Node.CANCELLED;// If we are the tail, remove ourselves.if (node == tail && compareAndSetTail(node, pred)) { // node结点为尾结点,则设置尾结点为pred结点// 比较并设置pred结点的next节点为nullcompareAndSetNext(pred, predNext, null); } else { // node结点不为尾结点,或者比较设置不成功// If successor needs signal, try to set pred's next-link// so it will get one. Otherwise wake it up to propagate.int ws;if (pred != head && ((ws = pred.waitStatus) == Node.SIGNAL ||(ws <= 0 && compareAndSetWaitStatus(pred, ws, Node.SIGNAL))) &&pred.thread != null) { // (pred结点不为头节点,并且pred结点的状态为SIGNAL)或者// pred结点状态小于等于0,并且比较并设置等待状态为SIGNAL成功,并且pred结点所封装的线程不为空// 保存结点的后继Node next = node.next;// 后继不为空并且后继的状态小于等于0if (next != null && next.waitStatus <= 0)// 比较并设置pred.next = next;compareAndSetNext(pred, predNext, next);} else {unparkSuccessor(node); // 释放node的前一个结点}node.next = node; // help GC}
}
该方法完成的功能就是取消当前线程对资源的获取,即设置该结点的状态为CANCELLED,接着我们再看unparkSuccessor方法,源码如下
// 释放后继结点
private void unparkSuccessor(Node node) {/** If status is negative (i.e., possibly needing signal) try* to clear in anticipation of signalling.  It is OK if this* fails or if status is changed by waiting thread.*/// 获取node结点的等待状态int ws = node.waitStatus;// 状态值小于0,为SIGNAL -1 或 CONDITION -2 或 PROPAGATE -3if (ws < 0)// 比较并且设置结点等待状态,设置为0compareAndSetWaitStatus(node, ws, 0);/** Thread to unpark is held in successor, which is normally* just the next node.  But if cancelled or apparently null,* traverse backwards from tail to find the actual* non-cancelled successor.*/// 获取node节点的下一个结点Node s = node.next;// 下一个结点为空或者下一个节点的等待状态大于0,即为CANCELLEDif (s == null || s.waitStatus > 0) {// s赋值为空s = null;// 从尾结点开始从后往前开始遍历for (Node t = tail; t != null && t != node; t = t.prev)if (t.waitStatus <= 0) // 找到等待状态小于等于0的结点,找到最前的状态小于等于0的结点// 保存结点s = t;}// 该结点不为为空,释放许可if (s != null)LockSupport.unpark(s.thread);
}
该方法的作用就是为了释放node节点的后继结点。
对于cancelAcquire与unparkSuccessor方法,如下示意图可以清晰的表示:

其中node为参数,在执行完 cancelAcquire 方法后的效果就是unpark了s结点所包含的t4线程。
现在,再来看acquireQueued方法的整个的逻辑。逻辑如下:
- 判断结点的前驱是否为head并且是否成功获取(资源);
- 若步骤1均满足,则设置结点为head,之后会判断是否finally模块,然后返回;
- 若步骤2不满足,则判断是否需要park当前线程,是否需要park当前线程的逻辑是:判断结点的前驱结点的状态是否为SIGNAL,若是,则park当前结点,否则,不进行park操作;
- 若park了当前线程,之后某个线程对本线程unpark后,并且本线程也获得机会运行。那么,将会继续进行步骤①的判断。
4.7、类的核心方法 - release方法
以独占模式释放对象,其源码如下:
public final boolean release(int arg) {// 释放成功if (tryRelease(arg)) {// 保存头节点Node h = head;// 头节点不为空并且头节点状态不为0if (h != null && h.waitStatus != 0)//释放头节点的后继结点unparkSuccessor(h);return true;}return false;
}
其中,tryRelease的默认实现是抛出异常,需要具体的子类实现,如果tryRelease成功,那么如果头节点不为空并且头节点的状态不为0,则释放头节点的后继结点,unparkSuccessor 方法已经分析过,不再累赘。
对于其他方法我们也可以分析,与前面分析的方法大同小异,所以,不再累赘。
5、AbstractQueuedSynchronizer示例详解一
借助下面示例来分析 AbstractQueuedSynchronizer 内部的工作机制。示例源码如下
import java.util.concurrent.locks.Lock;
import java.util.concurrent.locks.ReentrantLock;class MyThread extends Thread {private Lock lock;public MyThread(String name, Lock lock) {super(name);this.lock = lock;}public void run () {lock.lock();try {System.out.println(Thread.currentThread() + " running");} finally {lock.unlock();}}
}public class AbstractQueuedSynchronizerDemo {public static void main(String[] args) {Lock lock = new ReentrantLock();MyThread t1 = new MyThread("t1", lock);MyThread t2 = new MyThread("t2", lock);t1.start();t2.start();    }
}
运行结果(可能的一种):
Thread[t1,5,main] running
Thread[t2,5,main] running
结果分析: 从示例可知,线程t1与t2共用了一把锁,即同一个lock。可能会存在如下一种时序。

说明:首先线程t1先执行lock.lock操作,然后t2执行lock.lock操作,然后t1执行lock.unlock操作,最后t2执行lock.unlock操作。基于这样的时序,分析AbstractQueuedSynchronizer内部的工作机制。
- t1线程调用lock.lock方法,其方法调用顺序如下,只给出了主要的方法调用。

说明:其中,前面的部分表示哪个类,后面是具体的类中的哪个方法,AQS表示AbstractQueuedSynchronizer类,AOS表示AbstractOwnableSynchronizer类。
- t2线程调用lock.lock方法,其方法调用顺序如下,只给出了主要的方法调用。

说明: 经过一系列的方法调用,最后达到的状态是禁用t2线程,因为调用了LockSupport.park。
- t1线程调用lock.unlock,其方法调用顺序如下,只给出了主要的方法调用。

说明: t1线程中调用lock.unlock后,经过一系列的调用,最终的状态是释放了许可,因为调用了LockSupport.unpark。这时,t2线程就可以继续运行了。此时,会继续恢复t2线程运行环境,继续执行LockSupport.park后面的语句,即进一步调用如下。

说明:在上一步调用了LockSupport.unpark后,t2线程恢复运行,则运行 parkAndCheckInterrupt,之后,继续运行acquireQueued方法,最后达到的状态是头节点head与尾结点tail均指向了t2线程所在的结点,并且之前的头节点已经从sync队列中断开了。
- t2线程调用lock.unlock,其方法调用顺序如下,只给出了主要的方法调用。

说明: t2线程执行lock.unlock后,最终达到的状态还是与之前的状态一样。
6、AbstractQueuedSynchronizer示例详解二
下面我们结合Condition实现生产者与消费者,来进一步分析 AbstractQueuedSynchronizer 的内部工作机制。
- Depot(仓库)类
import java.util.concurrent.locks.Condition;
import java.util.concurrent.locks.Lock;
import java.util.concurrent.locks.ReentrantLock;public class Depot {private int size; // 是不是应该加上volatile,保证可见性private int capacity;private Lock lock;private Condition fullCondition;private Condition emptyCondition;// Depot depot = new Depot(500);public Depot(int capacity) {this.capacity = capacity;lock = new ReentrantLock();fullCondition = lock.newCondition();emptyCondition = lock.newCondition();}public void produce(int no) {lock.lock();int left = no;try {while (left > 0) {while (size >= capacity)  {System.out.println(Thread.currentThread() + " before await");fullCondition.await(); // 被唤醒System.out.println(Thread.currentThread() + " after await");}int inc = (left + size) > capacity ? (capacity - size) : left; // 500left -= inc; // 0size += inc; // 500System.out.println("produce = " + inc + ", size = " + size);emptyCondition.signal();}} catch (InterruptedException e) {e.printStackTrace();} finally {lock.unlock();}}public void consume(int no) {lock.lock();int left = no; // 500try {            while (left > 0) {while (size <= 0) { // 500System.out.println(Thread.currentThread() + " before await");emptyCondition.await();System.out.println(Thread.currentThread() + " after await");}int dec = (size - left) > 0 ? left : size; // 0left -= dec;size -= dec;System.out.println("consume = " + dec + ", size = " + size);fullCondition.signal();}} catch (InterruptedException e) {e.printStackTrace();} finally {lock.unlock();}}
}
- 测试类
class Consumer {private Depot depot;public Consumer(Depot depot) {this.depot = depot;}public void consume(int no) {new Thread(new Runnable() {@Overridepublic void run() {depot.consume(no);}}, no + " consume thread").start();}
}class Producer {private Depot depot;public Producer(Depot depot) {this.depot = depot;}public void produce(int no) {new Thread(new Runnable() { @Overridepublic void run() {depot.produce(no);}}, no + " produce thread").start();}
}public class ReentrantLockDemo {public static void main(String[] args) throws InterruptedException {Depot depot = new Depot(500);new Producer(depot).produce(500);new Producer(depot).produce(200);new Consumer(depot).consume(500);new Consumer(depot).consume(200);}
}
- 运行结果(可能的一种):
produce = 500, size = 500
Thread[200 produce thread,5,main] before await
consume = 500, size = 0
Thread[200 consume thread,5,main] before await
Thread[200 produce thread,5,main] after await
produce = 200, size = 200
Thread[200 consume thread,5,main] after await
consume = 200, size = 0
说明: 根据结果,我们猜测一种可能的时序如下

说明: p1代表produce 500的那个线程,p2代表produce 200的那个线程,c1代表consume 500的那个线程,c2代表consume 200的那个线程。
- p1线程调用lock.lock,获得锁,继续运行,方法调用顺序在前面已经给出。
- p2线程调用lock.lock,由前面的分析可得到如下的最终状态。

说明: p2线程调用lock.lock后,会禁止p2线程的继续运行,因为执行了LockSupport.park操作。
- c1线程调用lock.lock,由前面的分析得到如下的最终状态。

说明: 最终c1线程会在sync queue队列的尾部,并且其结点的前驱结点(包含p2的结点)的waitStatus变为了SIGNAL。
- c2线程调用lock.lock,由前面的分析得到如下的最终状态。

说明: 最终c2线程会在sync queue队列的尾部,并且其结点的前驱结点(包含c1的结点)的waitStatus变为了SIGNAL。
- p1线程执行emptyCondition.signal,其方法调用顺序如下,只给出了主要的方法调用。

说明:AQS.CO表示AbstractQueuedSynchronizer.ConditionObject类。此时调用signal方法不会产生任何其他效果。
- p1线程执行lock.unlock,根据前面的分析可知,最终的状态如下。

说明:此时,p2线程所在的结点为头节点,并且其他两个线程(c1、c2)依旧被禁止,所以,此时p2线程继续运行,执行用户逻辑。
- p2线程执行fullCondition.await,其方法调用顺序如下,只给出了主要的方法调用。

说明: 最终到达的状态是新生成了一个结点,包含了p2线程,此结点在condition queue中;并且sync queue中p2线程被禁止了,因为在执行了LockSupport.park操作。从方法一些调用可知,在await操作中线程会释放锁资源,供其他线程获取。同时,head结点后继结点的包含的线程的许可被释放了,故其可以继续运行。由于此时,只有c1线程可以运行,故运行c1。
- 继续运行c1线程,c1线程由于之前被park了,所以此时恢复,继续之前的步骤,即还是执行前面提到的acquireQueued方法,之后,c1判断自己的前驱结点为head,并且可以获取锁资源,最终到达的状态如下。

说明: 其中,head设置为包含c1线程的结点,c1继续运行。
- c1线程执行 fullCondtion.signal,其方法调用顺序如下,只给出了主要的方法调用。

说明: signal方法达到的最终结果是将包含p2线程的结点从condition queue中转移到sync queue中,之后condition queue为null,之前的尾结点的状态变为SIGNAL。
- c1线程执行lock.unlock操作,根据之前的分析,经历的状态变化如下。

说明: 最终c2线程会获取锁资源,继续运行用户逻辑。
- c2线程执行emptyCondition.await,由前面的第七步分析,可知最终的状态如下。

说明: await操作将会生成一个结点放入condition queue中与之前的一个condition queue是不相同的,并且unpark头节点后面的结点,即包含线程p2的结点。
-
p2线程被unpark,故可以继续运行,经过CPU调度后,p2继续运行,之后p2线程在AQS:await方法中被park,继续AQS.CO:await方法的运行,其方法调用顺序如下,只给出了主要的方法调用。

-
p2继续运行,执行emptyCondition.signal,根据第九步分析可知,最终到达的状态如下。

说明: 最终,将condition queue中的结点转移到sync queue中,并添加至尾部,condition queue会为空,并且将head的状态设置为SIGNAL。
- p2线程执行lock.unlock操作,根据前面的分析可知,最后的到达的状态如下。

说明: unlock操作会释放c2线程的许可,并且将头节点设置为c2线程所在的结点。
- c2线程继续运行,执行fullCondition. signal,由于此时fullCondition的condition queue已经不存在任何结点了,故其不会产生作用。
- c2执行lock.unlock,由于c2是sync队列中最后一个结点,故其不会再调用unparkSuccessor了,直接返回true。即整个流程就完成了。
7、AbstractQueuedSynchronizer总结
对于 AbstractQueuedSynchronizer 的分析,最核心的就是sync queue的分析。
- 每一个结点都是由前一个结点唤醒;
- 当结点发现前驱结点是head并且尝试获取成功,则会轮到该线程运行;
- condition queue 中的结点向sync queue中转移是通过signal操作完成的;
- 当结点的状态为SIGNAL时,表示后面的结点需要运行。
8、参考文章
- 【JUC】JDK1.8源码分析之AbstractQueuedSynchronizer
- AbstractQueuedSynchronizer的介绍和原理分析
- 深入JVM锁机制2-Lock
- AQS详解