01、Spring MVC 简介
1.1 SpringMVC概述
SpringMVC是一个基于Spring开发的MVC轻量级框架,Spring3.0后发布的组件,SpringMVC和Spring可以无 缝整合,使用DispatcherServlet作为前端控制器,且内部提供了处理器映射器、处理器适配器、视图解析器等组 件,可以简化JavaBean封装,Json转化、文件上传等操作。
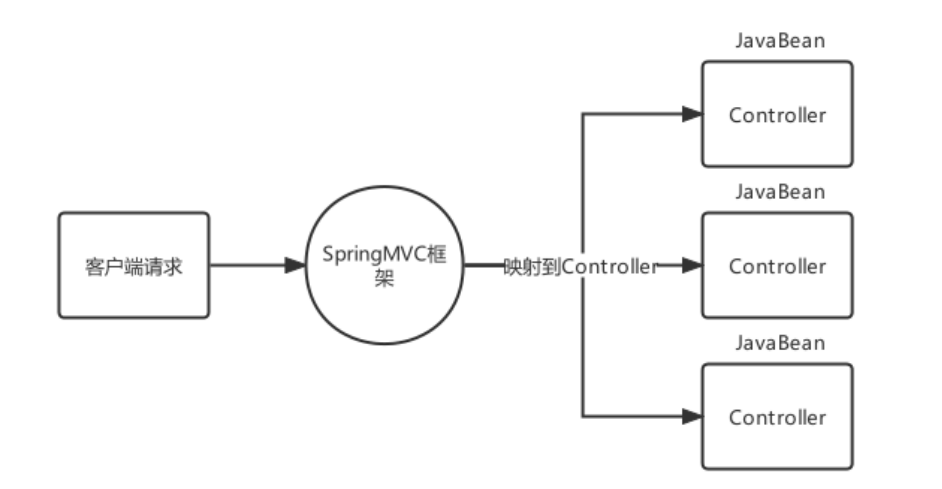
用户请求–> SpringMVC框架(前端控制器)
SpringMVC框架分发请求到不同的Controller
1.2 SpringMVC快速入门
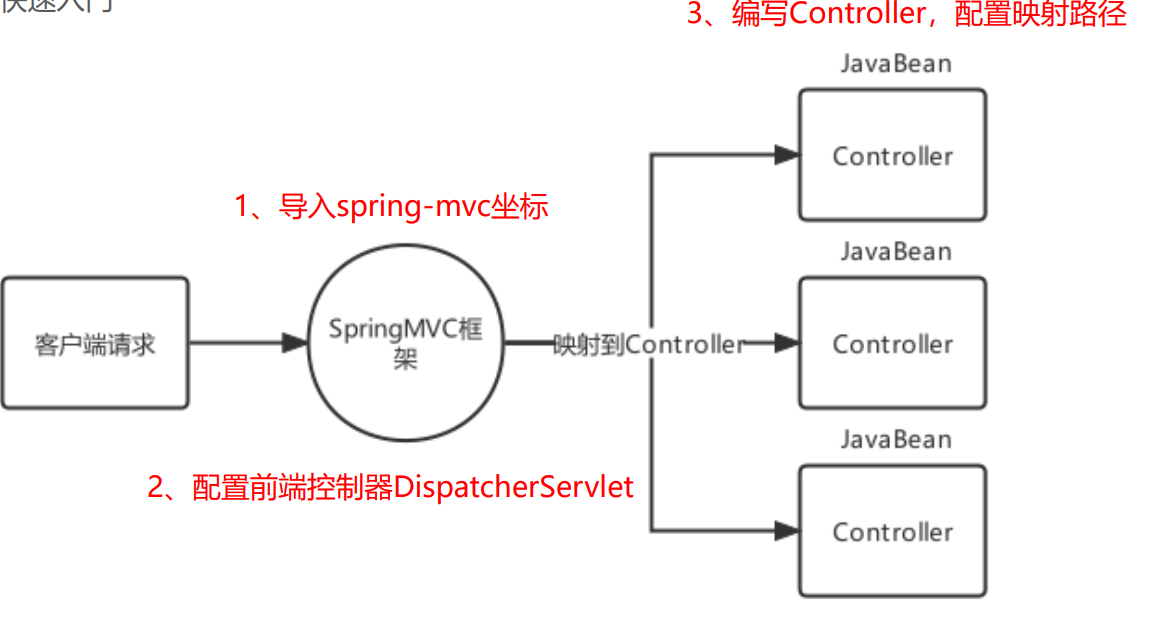
- 导入Spring整合SpringMVC的坐标
<dependency><groupId>org.springframework</groupId><artifactId>spring-webmvc</artifactId><version>5.3.7</version>
</dependency>
- 在web.xml中配置SpringMVC的前端控制器ServletDispatcher
<!-- 创建Servlet WebApplicationContext容器的配置 -->
<servlet><servlet-name>DispatcherServlet</servlet-name><servlet-class>org.springframework.web.servlet.DispatcherServlet</servlet-class><init-param><!--加载Spring MVC的配置文件--><param-name>contextConfigLocation</param-name><param-value>classpath:spring-mvc.xml</param-value></init-param><!--可以设置该servlet在加载时的优先级以及是否在容器中加载该servletTomcat依次执行的是DispatcherServlet中的静态代码块,构造方法,init()方法--><load-on-startup>2</load-on-startup>
</servlet>
<servlet-mapping><servlet-name>DispatcherServlet</servlet-name><url-pattern>/</url-pattern>
</servlet-mapping>
- 编写一个控制器Controller,配置映射信息,并交给SpringMVC容器管理
@Controller
public class QuickController {@RequestMapping("/show")public void show(){System.out.println("show ...");}
}
- 测试,访问
http://localhost:8080/show
页面报错:
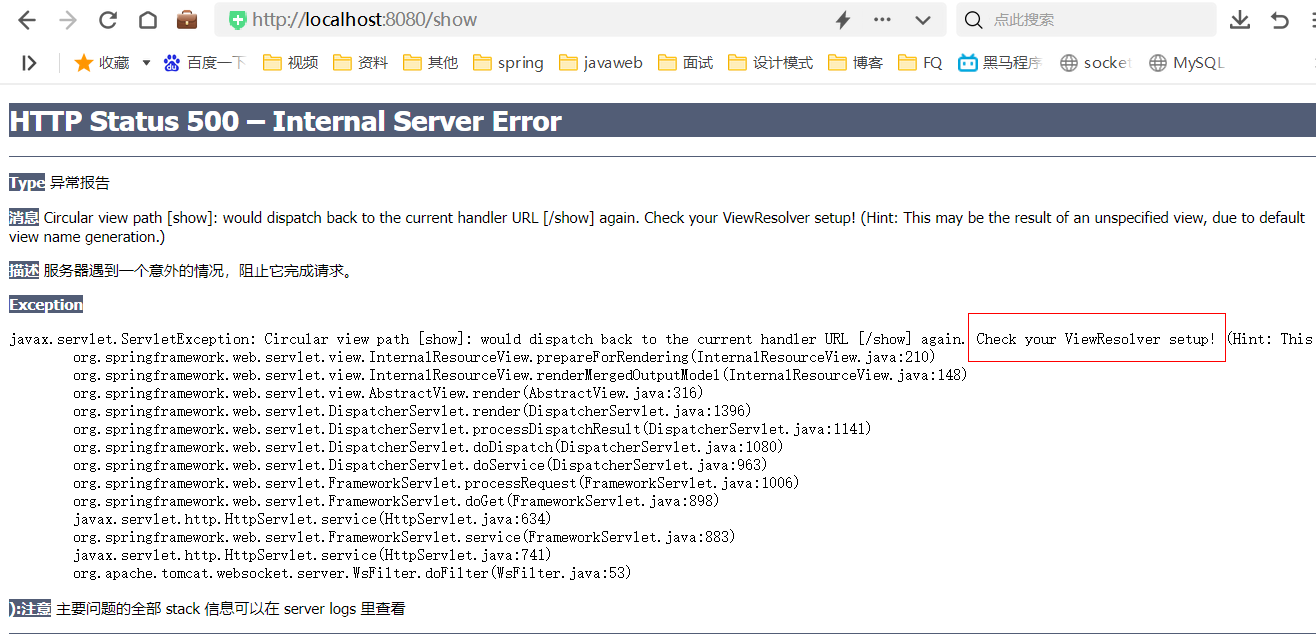
控制台正常打印show ...
- 改进: 将controller层中的
show()方法返回值改为String,并添加上相应的页面
@Controller
public class QuickController {@RequestMapping("/show")public String show(){System.out.println("show ...");return "/show.jsp";}
}
<%@ page contentType="text/html;charset=UTF-8" language="java" %>
<html>
<head><title></title>
</head>
<body><h1>show</h1>
</body>
</html>
访问页面结果:

1.3 Controller中访问容器中的Bean
DispatcherServlet在进行初始化时,加载的spring-mvc.xml配置文件创建的SpringMVC容器,那么web层 Controller被扫描进入到了容器中,而之前Spring容器中的Service是否可以获取到呢?下面搭建Spring的web环 境进行验证
- 创建service层
public interface QuickService {
}@Service
public class QuickServiceImpl implements QuickService {
}
- 创建Spring的配置文件applicationContext.xml,配置Spring包扫描
<!--组件扫描-->
<context:component-scan base-package="com.mem.service"/>
- 在web.xml中配置ContextLoadListener及初始参数
<!-- 创建Root WebApplicationContext容器的配置 -->
<!--加载Spring的配置文件-->
<context-param><param-name>contextConfigLocation</param-name><param-value>classpath:applicationContext.xml</param-value>
</context-param>
<!--配置ContextLoaderListener(官方提供的)-->
<listener><listener-class>org.springframework.web.context.ContextLoaderListener</listener-class>
</listener>
- 在Controller层注入QuickService对象
@Controller
public class QuickController {@Autowiredprivate QuickService quickService;@RequestMapping("/show")public String show(){System.out.println("show ...");System.out.println("quickService:"+quickService);return "/show.jsp";}
}
- 测试:控制台打印出quickService的地址
quickService:com.mem.service.impl.QuickServiceImpl@5f87226c
流程:
- 服务器启动时ServletContext对象创建,ContextLoaderListener监听器执行
- 内部加载applicationContext.xml文件,spring组件扫描执行(扫描service包)
- 解析@Service注解,加入Spring容器
- controller层使用@Autowired在SpringMVC容器中,注入Service
Spring系列第24篇:父子容器详解_路人甲Java的博客-CSDN博客
1.4 SpringMVC关键组件浅析
上面已经完成的快速入门的操作,也在不知不觉中完成的Spring和SpringMVC的整合,我们只需要按照规则去定 义Controller和业务方法就可以。但是在这个过程中,肯定是很多核心功能类参与到其中,这些核心功能类,一般称为组件。当请求到达服务器时,是哪个组件接收的请求,是哪个组件帮我们找到的Controller,是哪个组件帮我们调用的方法,又是哪个组件最终解析的视图?

先简单了解一下以上三个重要组件的关系:
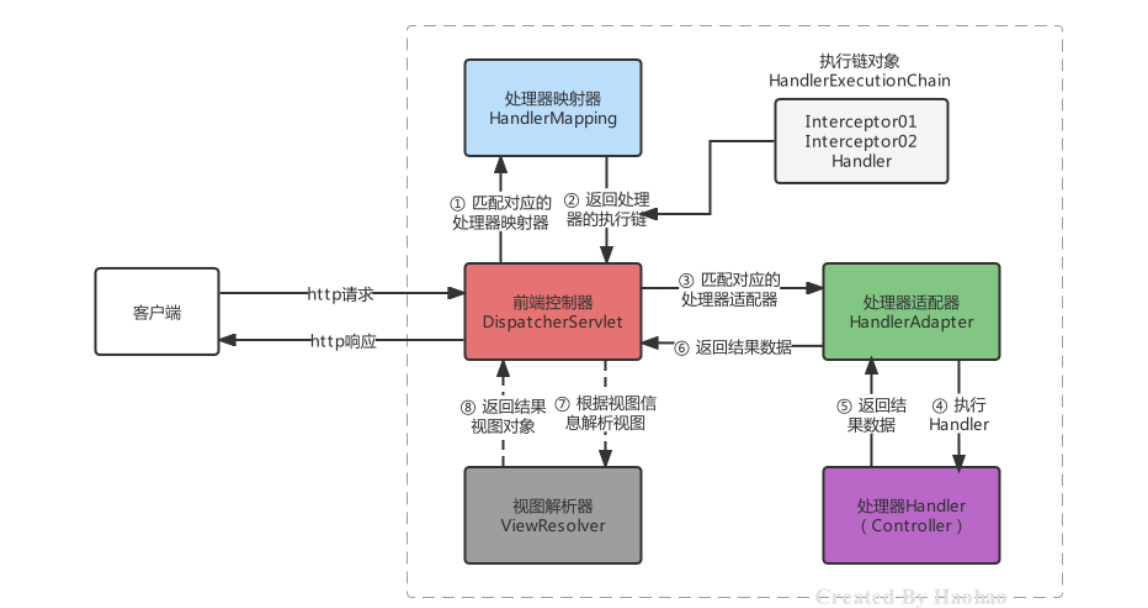
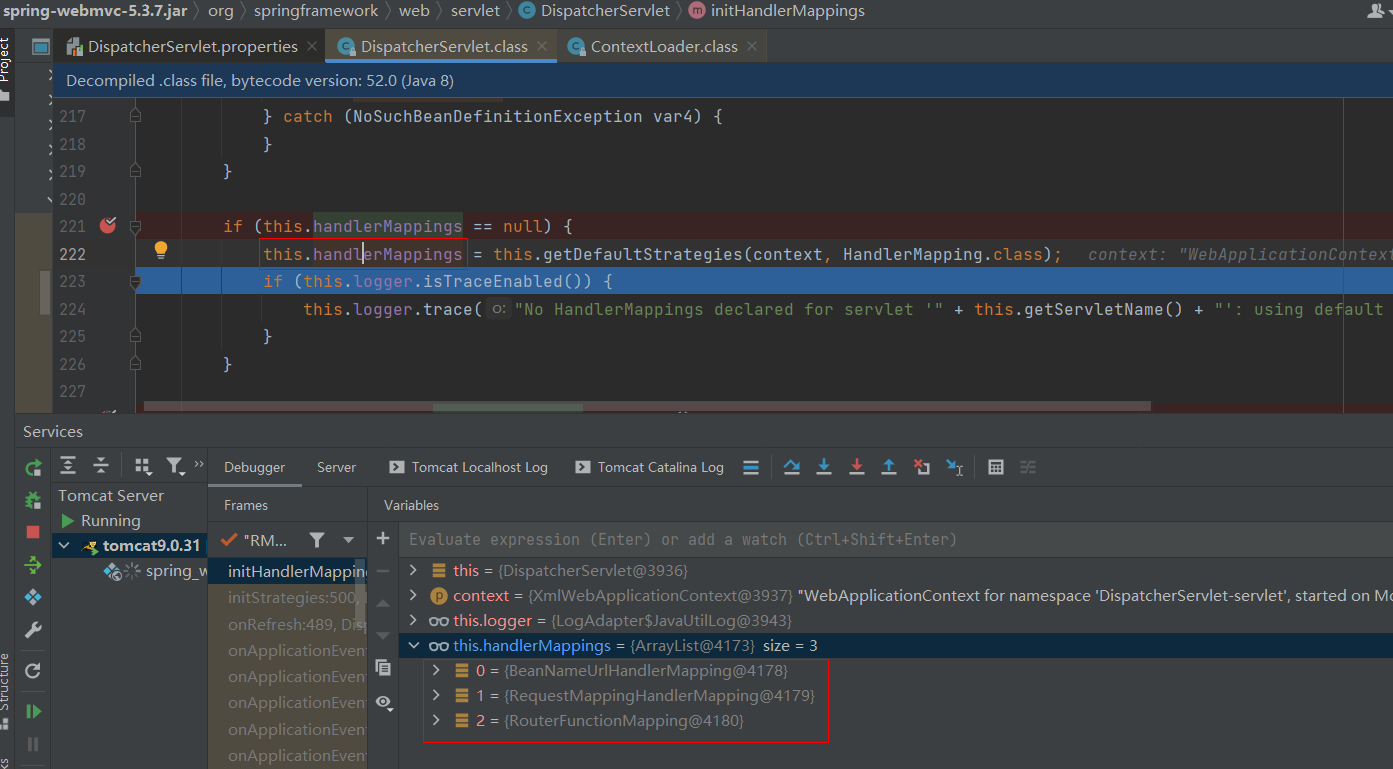
SpringMVC的默认组件,SpringMVC 在前端控制器 DispatcherServlet加载时,就会进行初始化操作,在进行初始化时,就会加载SpringMVC默认指定的一些组件,这些默认组件配置在 DispatcherServlet.properties 文件中,该文件存在与spring-webmvc-5.3.7.jar包下的 org\springframework\web\servlet\DispatcherServlet.properties

这些默认的组件是在DispatcherServlet中进行初始化加载的,在DispatcherServlet中存在集合存储着这些组件, SpringMVC的默认组件会在 DispatcherServlet 中进行维护,但是并没有存储在与SpringMVC的容器中
public class DispatcherServlet extends FrameworkServlet {//存储处理器映射器private List<HandlerMapping> handlerMappings;//存储处理器适配器private List<HandlerAdapter> handlerAdapters;//存储视图解析器private List<ViewResolver> viewResolvers;// ... 省略其他代码 ...protected void initStrategies(ApplicationContext context) {this.initMultipartResolver(context);this.initLocaleResolver(context);this.initThemeResolver(context);this.initHandlerMappings(context); // 以这个为例this.initHandlerAdapters(context);this.initHandlerExceptionResolvers(context);this.initRequestToViewNameTranslator(context);this.initViewResolvers(context);this.initFlashMapManager(context);}private void initHandlerMappings(ApplicationContext context) {// 获取DispatcherServlet.properties文件中的三个类this.handlerMappings = this.getDefaultStrategies(context, HandlerMapping.class);}
}
配置组件代替默认组件,如果不想使用默认组件,可以将替代方案使用Spring Bean的方式进行配置,例如,在 spring-mvc.xml中配置RequestMappingHandlerMapping
<!--使用自定义的HandlerMapping,替代默认的HandlerMapping-->
<bean class="org.springframework.web.servlet.mvc.method.annotation.RequestMappingHandlerMapping"/>
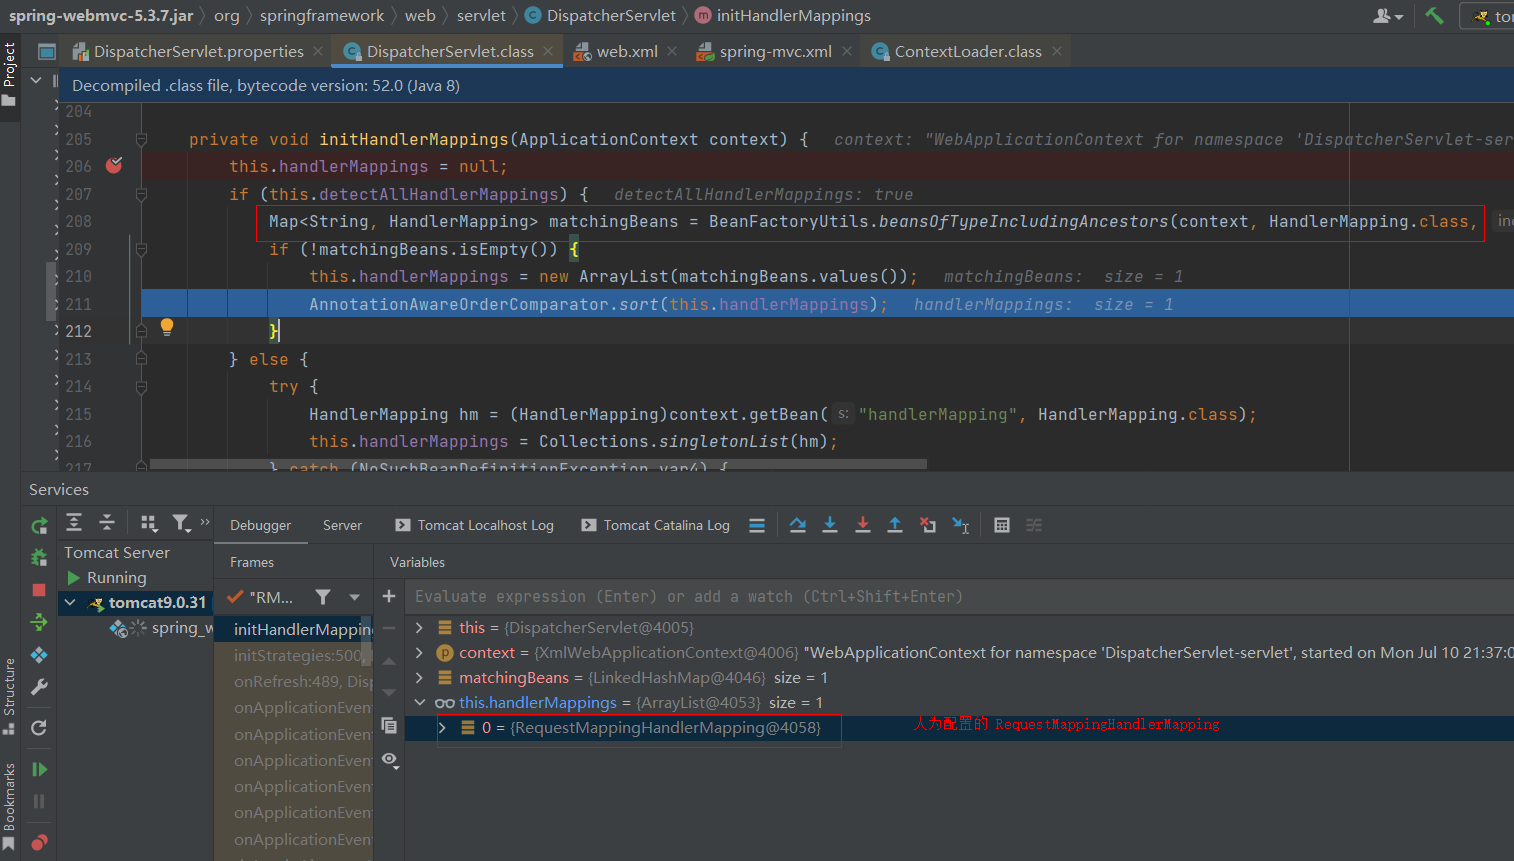
当我们在Spring容器中配置了HandlerMapping,则就不会在加载默认的HandlerMapping策略了,原理比较简单, DispatcherServlet 在进行HandlerMapping初始化时,先从SpringMVC容器中找是否存在HandlerMapping,如果 存在直接取出容器中的HandlerMapping,在存储到 DispatcherServlet 中的handlerMappings集合中去。
02、Spring MVC 的请求处理
2.1 请求映射路径的配置
配置映射路径,映射器处理器才能找到Controller的方法资源,目前主流映射路径配置方式就是@RequestMapping

- @RequestMapping
@RequestMapping注解,主要使用在控制器的方法上,用于标识客户端访问资源路径,常用的属性有value、path 、method、headers、params等。当@RequestMapping只有一个访问路径需要指定时,使用value属性、path属 性或省略value和path,当有多个属性时,value和path不能省略
@RequestMapping(value = "/show")//使用value属性指定一个访问路径
public String show(){}
@RequestMapping(value = {"/show","/haohao","/abc"})//使用value属性指定多个访问路径
public String show(){}
@RequestMapping(path = "/show")//使用path属性指定一个访问路径
public String show(){}
@RequestMapping(path = {"/show","/haohao","/abc"})//使用path属性指定多个访问路径
public String show(){}
@RequestMapping("/show")//如果只设置访问路径时,value和path可以省略
public String show(){}
@RequestMapping({"/show","/haohao","/abc"})
public String show(){}
当@RequestMapping 需要限定访问方式时,可以通过method属性设置
//请求地址是/show,且请求方式必须是POST才能匹配成功
@RequestMapping(value = "/show",method = RequestMethod.POST)
public String show(){}
method的属性值是一个枚举类型,源码如下:
public enum RequestMethod {GET,HEAD,POST,PUT,PATCH,DELETE,OPTIONS,TRACE;private RequestMethod() {}
}- @GetMapping
当请求方式是GET时,我们可以使用@GetMapping替代@RequestMapping
@GetMapping("/show")
public String show(){}
- @PostMapping
当请求方式是POST时,我们可以使用@PostMapping替代@RequestMapping
@PostMapping("/show")
public String show(){}
@RequestMapping 在类上使用,@RequestMapping 、@GetMapping、@PostMapping还可以使用在 Controller类上,使用在类上后,该类所有方法都公用该@RequestMapping设置的属性,访问路径则为类上的映射 地址+方法上的映射地址,例如:
@Controller
@RequestMapping("/xxx")
public class UserController implements ApplicationContextAware, ServletContextAware {@GetMapping("/aaa")public ModelAndView aaa(HttpServletResponse response) throws IOException, ModelAndViewDefiningException {return null;}
}
此时的访问路径为:/xxx/aaa
2.2 请求数据的接收
- 接收普通请求数据,同名形参
接收普通请求数据,当客户端提交的数据是普通键值对形式时,直接使用同名形参接收即可
比如路径为:http://localhost:8080/show?username=haohao&age=35
数据接收如下:
@GetMapping("/show")
public String show(String username, int age){System.out.println(username+"=="+age);return "/index.jsp";
}
- 接收普通请求数据,不同名形参
接收普通请求数据,当请求参数的名称与方法参数名不一致时,可以使用@RequestParam注解进行标注
比如路径为:http://localhost:8080/show?username=haohao&age=35
数据接收如下:
@GetMapping("/show")
public String show(@RequestParam(name = "username",required = true) String name, int age){System.out.println(name+"=="+age);return "/index.jsp";
}
- 接收数组或集合数据,同名形参
接收数组或集合数据,客户端传递多个同名参数时,可以使用数组接收
比如路径为:http://localhost:8080/show?hobbies=eat&hobbies=sleep
数据接收如下:
@GetMapping("/show")
public String show(String[] hobbies){for (String hobby : hobbies) {System.out.println(hobby);}return "/index.jsp";
}
客户端传递多个同名参数时,也可以使用单列集合接收,但是需要使用@RequestParam告知框架传递的参数是要同名设置的,不是对象属性设置的
@GetMapping("/show")
public String show(@RequestParam List<String> hobbies){for (String hobby : hobbies) {System.out.println(hobby);}return "/index.jsp";
}
- 接收数组或集合数据,不同形参
接收数组或集合数据,客户端传递多个不同命参数时,也可以使用Map<String,Object>进行接收,同样需要用 @RequestParam 进行修饰
比如路径为:http://localhost:8080/show?username=haohao&age=35
数据接收如下:
@GetMapping("/show")
public String show(@RequestParam Map<String,Object> params){params.forEach((key,value)->{System.out.println(key+"=="+value);});return "/index.jsp";
}
- 接收实体JavaBean属性数据
接收实体JavaBean属性数据,单个JavaBean数据:提交的参数名称只要与Java的属性名一致,就可以进行自动封装
比如路径为:http://localhost:8080/show?username=haohao&age=35&hobbies=eat&hobbies=sleep
数据接收如下:
public class User {private String username;private Integer age;private String[] hobbies;private Date birthday;private Address address;//... 省略get和set方法 ...
}
public class Address {private String city;private String area;
}@GetMapping("/show")
public String show(User user){System.out.println(user);return "/index.jsp";
}
接收实体JavaBean属性数据,嵌套JavaBean数据:提交的参数名称用 . 去描述嵌套对象的属性关系即可
http://localhost:8080/show?username=haohao&address.city=tianjin&address.area=jinghai
- 接收Json数据格式数据
接收Json数据格式数据,Json数据都是以请求体的方式提交的,且不是原始的键值对格式的,所以我们要使用 @RequestBody注解整体接收该数据。
比如路径为:http://localhost:8080/show, 请求方式:post
{"username":"haohao","age":18,"hobbies":["eat","sleep"],"birthday":"1986-01-01","address":{"city":"tj","area":"binhai"}
}
数据接收如下:
@PostMapping("/show")
public String show((@RequestBody String body){System.out.println(body);return "/index.jsp";
}
改进:使用Json工具( jackson )将Json格式的字符串转化为JavaBean进行操作 (手动)
@PostMapping("/show")
public String show(@RequestBody String body) throws IOException {System.out.println(body);//获取ObjectMapperObjectMapper objectMapper = new ObjectMapper();//将json格式字符串转化成指定的UserUser user = objectMapper.readValue(body, User.class);System.out.println(user);return "/index.jsp";
}
改进:配置RequestMappingHandlerAdapter,指定消息转换器,就不用手动转换json格式字符串了(自动)
<!--
使用RequestMappingHandlerAdapter,
内部添加messageConverters:MappingJackson2HttpMessageConverter
实现遇到json格式自动转换为对象格式
-->
<bean class="org.springframework.web.servlet.mvc.method.annotation.RequestMappingHandlerAdapter"><property name="messageConverters"><list><bean class="org.springframework.http.converter.json.MappingJackson2HttpMessageConverter"/></list></property>
</bean>
配置RequestMappingHandlerAdapter,直接用对象接收
@PostMapping("/show")
public String show(@RequestBody User user){System.out.println(user);return "/index.jsp";
}
配置RequestMappingHandlerAdapter,使用Map接收json格式字符串
@PostMapping("/show")
public String show(@RequestBody Map map){System.out.println(map);return "/index.jsp";
}
- 接收Restful风格数据
什么是Rest风格?
Rest(Representational State Transfer)表象化状态转变(表述性状态转变),在2000年被提出,基于HTTP、URI 、xml、JSON等标准和协议,支持轻量级、跨平台、跨语言的架构设计。是Web服务的一种新网络应用程序的设计风格和开发方式。
Restful风格的请求,常见的规则有如下三点:
- 用URI表示某个模块资源,资源名称为名词;

- 用请求方式表示模块具体业务动作,例如:GET表示查询、POST表示插入、PUT表示更新、DELETE表示删除
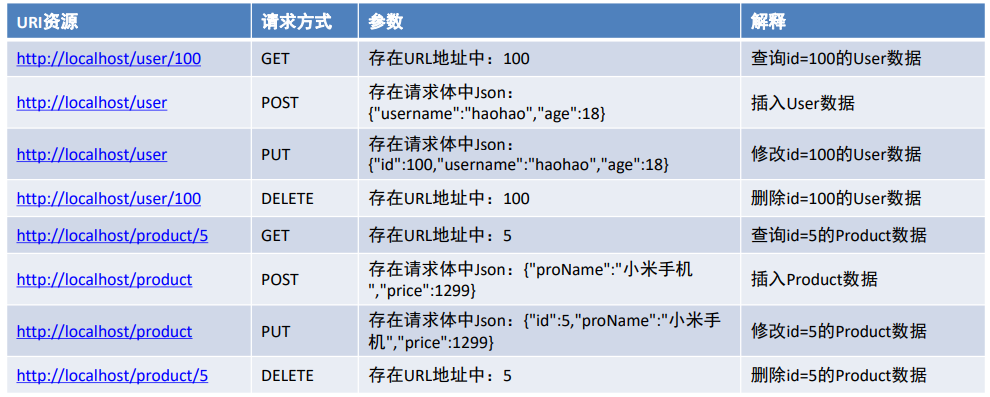
- 用HTTP响应状态码表示结果,国内常用的响应包括三部分:状态码、状态信息、响应数据

使用Rest风格:
接收Restful风格数据,Restful请求数据一般会在URL地址上携带,可以使用注解 @PathVariable(占位符参数名称)
http://localhost:8080/user/100
@PostMapping("/user/{id}")
public String findUserById(@PathVariable("id") Integer id){System.out.println(id);return "/index.jsp";
}请求URL资源地址包含多个参数情况:http://localhost:8080/user/haohao/18
@PostMapping("/user/{username}/{age}")
public String findUserByUsernameAndAge(@PathVariable("username") String username,@PathVariable("age") Integer age){System.out.println(username+"=="+age);return "/index.jsp";
}
- 接收文件上传的数据,文件上传的表单需要一定的要求,如下:
- 表单的提交方式必须是POST
- 表单的enctype属性必须是multipart/form-data
- 文件上传项需要有name属性
<form action="" enctype="multipart/form-data" method="post"><input type="file" name="myFile">
</form>
服务器端,由于映射器适配器需要文件上传解析器,而该解析器默认未被注册,所以手动注册
<!--配置文件上传解析器,注意:id的名字是固定写法-->
<bean id="multipartResolver"
class="org.springframework.web.multipart.commons.CommonsMultipartResolver"><property name="defaultEncoding" value="UTF-8"/><!--文件的编码格式 默认是ISO8859-1--><property name="maxUploadSizePerFile" value="1048576"/><!--上传的每个文件限制的大小 单位字节--><property name="maxUploadSize" value="3145728"/><!--上传文件的总大小--><property name="maxInMemorySize" value="1048576"/><!--上传文件的缓存大小-->
</bean>
而CommonsMultipartResolver底层使用的Apache的是Common-fileuplad等工具API进行的文件上传
<dependency><groupId>commons-fileupload</groupId><artifactId>commons-fileupload</artifactId><version>1.4</version>
</dependency>
使用MultipartFile类型接收上传文件
@PostMapping("/fileUpload")
public String fileUpload(@RequestBody MultipartFile myFile) throws IOException {System.out.println(myFile);//获得上传的文件的流对象InputStream inputStream = myFile.getInputStream();//使用commons-io存储到C:\haohao\abc.txt位置FileOutputStream outputStream = new FileOutputStream("C:\\Users\\haohao\\"+myFile.getOriginalFilename());IOUtils.copy(inputStream,outputStream);//关闭资源inputStream.close();outputStream.close();
return "/index.jsp";
}
若接收多个文件,变为数组即可
- 接收Http请求头数据,接收指定名称的请求头
@GetMapping("/headers")
public String headers(@RequestHeader("Accept-Encoding") String acceptEncoding){System.out.println("Accept-Encoding:"+acceptEncoding);return "/index.jsp";
}
- 接收所有的请求头信息
@GetMapping("/headersMap")
public String headersMap(@RequestHeader Map<String,String> map){map.forEach((k,v)->{System.out.println(k+":"+v);});return "/index.jsp";
}
- 获得客户端携带的Cookie数据
@GetMapping("/cookies")
public String cookies(@CookieValue(value = "JSESSIONID",defaultValue = "") String jsessionid){System.out.println(jsessionid);return "/index.jsp";
}
- 获得转发Request域中数据,在进行资源之间转发时,有时需要将一些参数存储到request域中携带给下一个资源
@GetMapping("/request1")
public String request1(HttpServletRequest request){//存储数据request.setAttribute("username","haohao");return "/request2";
}@GetMapping("/request2")
public String request2(@RequestAttribute("username") String username){System.out.println(username);return "/index.jsp";
}
请求参数乱码的解决方案,Spring已经提供好的CharacterEncodingFilter来进行编码过滤
2.3 Javaweb常用对象的获取
获得Javaweb常见原生对象,有时在我们的Controller方法中需要用到Javaweb的原生对象,例如:Request、 Response等,我们只需要将需要的对象以形参的形式写在方法上,SpringMVC框架在调用Controller方法时,会自动传递实参:
@GetMapping("/javawebObject")
public String javawebObject(HttpServletRequest request, HttpServletResponse response,
HttpSession session){System.out.println(request);System.out.println(response);System.out.println(session);return "/index.jsp";
}
2.4 请求静态资源
静态资源请求失效的原因,当DispatcherServlet的映射路径配置为 / 的时候,那么就覆盖的Tomcat容器默认的缺省 Servlet,在Tomcat的config目录下有一个web.xml 是对所有的web项目的全局配置,其中有如下配置:
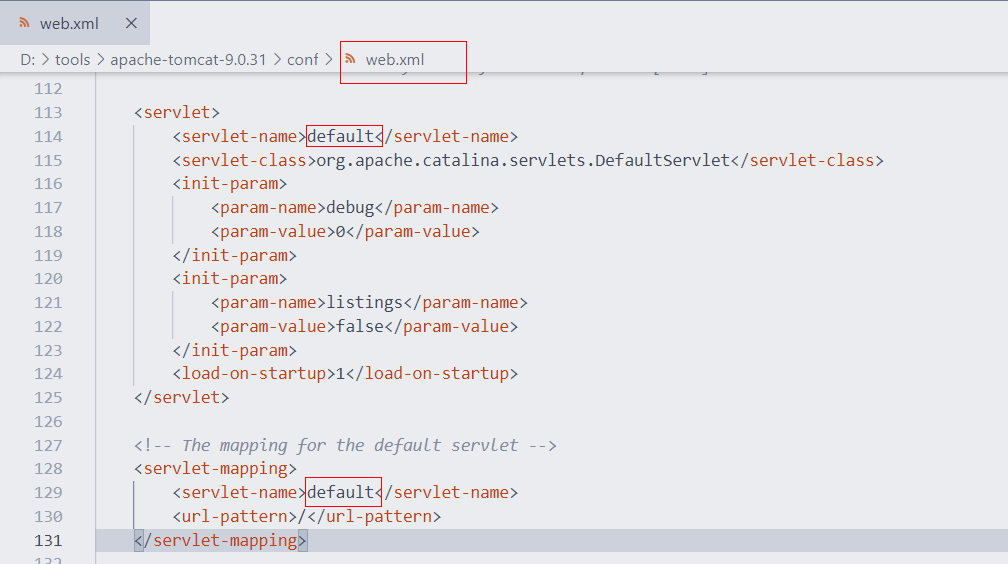
url-pattern配置为 / 的Servlet我们称其为缺省的Servlet,作用是:当其他Servlet都匹配不成功时,就找缺省的Servlet ,静态资源由于没有匹配成功的Servlet,所以会找缺省的DefaultServlet,该DefaultServlet具备二次去匹配静态资源的功能。
但是我们配置DispatcherServlet后就将其覆盖掉了,而DispatcherServlet会将请求的静态资源的名称当成Controller的映射路径去匹配,即静态资源访问不成功了!
静态资源请求的三种解决方案:
第一种方案:
在web.xml中,可以再次激活Tomcat的DefaultServlet,Servlet的url-pattern的匹配优先级是:精确匹配>目录匹配> 扩展名匹配>缺省匹配,所以可以指定某个目录下或某个扩展名的资源使用DefaultServlet进行解析:

第二种方案:
在spring-mvc.xml中去配置静态资源映射,匹配映射路径的请求到指定的位置去匹配资源

第三种方案:
在spring-mvc.xml中去配置mvc:default-servlet-handler,该方式是注册了一个 DefaultServletHttpRequestHandler 处理器,静态资源的访问都由该处理器去处理,这也是开发中使用最多的

2.5 注解驱动mvc:annotation-driven标签
静态资源配置的第二第三种方式我们可以正常访问静态资源了,但是Controller又无法访问了,报错404,即找不到对应的资源
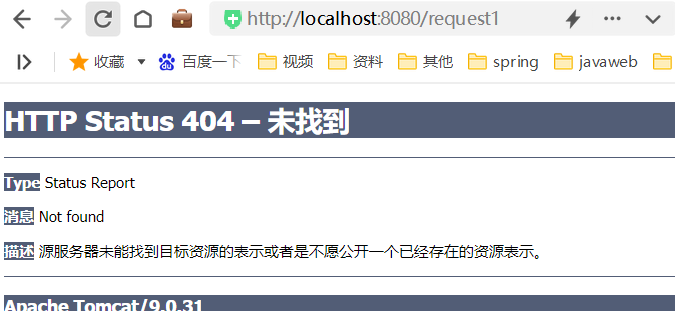
原因分析:
第二种方式<mvc:resources />是通过SpringMVC去解析mvc命名空间下的resources标签完成的静态资源解析、
第三种方式式<mvc:default-servlet-handler>通过SpringMVC去解析mvc命名空间下的default-servlet-handler标签完成的静态资源解析、
根据前面所学习的自定义命 名空间的解析的知识,可以发现不管是以上哪种方式,最终都会注册SimpleUrlHandlerMapping

又结合组件浅析知识点,一旦SpringMVC容器中存在 HandlerMapping 类型的组件时,前端控制器 DispatcherServlet在进行初始化时,就会从容器中获得HandlerMapping ,不在加载 dispatcherServlet.properties 中默认处理器映射器策略,那也就意味着RequestMappingHandlerMapping不会被加载到了。
RequestMappingHandlerMapping的作用是:解析@RequestMapping(“”)注解的,最后容器中没有RequestMappingHandlerMapping的bean 也就没办法识别里面的内容了
解决方法:
手动将RequestMappingHandlerMapping也注册到SpringMVC容器中就可以了,这样DispatcherServlet在进行初始化时,就会从容器中同时获得RequestMappingHandlerMapping存储到DispatcherServlet中名为 handlerMappings的List集合中,对@RequestMapping 注解进行解析。
<bean class="org.springframework.web.servlet.mvc.method.annotation.RequestMappingHandlerMapping"/>
根据上面的讲解,可以总结一下,要想使用@RequestMapping正常映射到资源方法,同时静态资源还能正常访问, 还可以将请求json格式字符串和JavaBean之间自由转换,我们就需要在spring-mvc.xml中进行如下配置:
<!--使用RequestMappingHandlerAdapter,内部添加messageConverters: 实现遇到json格式自动转换为对象格式-->
<bean class="org.springframework.web.servlet.mvc.method.annotation.RequestMappingHandlerAdapter"><property name="messageConverters"><list><bean class="org.springframework.http.converter.json.MappingJackson2HttpMessageConverter"/></list></property>
</bean>
其实,spring作为一个暖男,将上述配置浓缩成了一个简单的配置标签,那就是mvc的注解驱动,该标签内部会帮我们注册RequestMappingHandlerMapping、注册 RequestMappingHandlerAdapter并注入Json消息转换器等,上述配置就可以简化成如下:
<!--访问静态资源的方式3:底层注册一个DefaultServletHttpRequestHandler 来处理静态资源-->
<mvc:default-servlet-handler/>
<!--mvc的注解驱动-->
<mvc:annotation-driven/>
PS: mvc:annotation-driven/ 标签在不同的版本中,帮我们注册的组件不同。
Spring 3.0.X 版本注册是 DefaultAnnotationHandlerMapping 和 AnnotationMethodHandlerAdapter,由于框架的发展,从Spring 3.1.X 开始注册组件变为 RequestMappingHandlerMapping和RequestMappingHandlerAdapter
03、Spring MVC 的响应处理
3.1 传统同步业务数据响应
Spring的接收请求的部分我们讲完了,下面在看一下Spring怎么给客户端响应数据,响应数据主要分为两大部分:
- 传统同步方式:准备好模型数据,在跳转到执行页面进行展示,此方式使用越来越少了,基于历史原因,一些旧 项目还在使用;
- 前后端分离异步方式:前端使用Ajax技术+Restful风格与服务端进行Json格式为主的数据交互,目前市场上几乎 都是此种方式了。
传统方式
传统同步业务在数据响应时,SpringMVC又涉及如下四种形式:
- 请求资源转发;
- 请求资源重定向;
- 响应模型数据;
- 直接回写数据给客户端;
请求资源转发

请求资源重定向

响应模型数据,响应模型数据本质也是转发,在转发时可以准备模型数据
@RequestMapping("/resp3")
public ModelAndView resp3(ModelAndView modelAndView){// ModelAndView封装模型数据和视图名// 设置模型数据User user = new User();user.setUsername("haohao");user.setAge(18);modelAndView.addObject("user",user);// 设置试图名,在页面中展示模型数据modelAndView.setViewName("/show.jsp");return modelAndView;
}
访问:

直接回写数据,直接通过方法的返回值返回给客户端的字符串,但是SpringMVC默认的方法返回值是视图,可以通过 @ResponseBody 注解显示的告知此处的返回值不要进行视图处理,是要以响应体的方式处理的
@RequestMapping("/resp4")
@ResponseBody
public String resp4(){return "hello world!";
}

3.2 前后端分类异步业务数据响应
其实此处的回写数据,跟上面回写数据给客户端的语法方式一样,只不过有如下一些区别:
- 同步方式回写数据,是将数据响应给浏览器进行页面展示的,而异步方式回写数据一般是回写给Ajax引擎的,即 谁访问服务器端,服务器端就将数据响应给谁
- 同步方式回写的数据,一般就是一些无特定格式的字符串,而异步方式回写的数据大多是Json格式字符串
回写普通数据使用@ResponseBody标注方法,直接返回字符串即可,此处不在说明; 回写Json格式的字符串,即将直接拼接Json格式的字符串或使用工具将JavaBean转换成Json格式的字符串回写
@GetMapping("/ajax/resp1")
@ResponseBody
public String resp1(){return "{\"username\":\"haohao\",\"age\":18}";
}@GetMapping("/ajax/resp2")
@ResponseBody
public String resp2() throws JsonProcessingException {//创建JavaBeanUser user = new User();user.setUsername("haohao");user.setAge(19);//使用Jackson转换成json格式的字符串String json = new ObjectMapper().writeValueAsString(user);return json;
}
在讲解SringMVC接收请求数据时,客户端提交的Json格式的字符串,也是使用Jackson进行的手动转换成JavaBean ,可以当我们使用了@RequestBody时,直接用JavaBean就接收了Json格式的数据,原理其实就是SpringMVC底层 帮我们做了转换,此处@ResponseBody也可以将JavaBean自动给我们转换成Json格式字符串回响应
@GetMapping("/ajax/resp3")
@ResponseBody
public User resp3() throws JsonProcessingException {//创建JavaBeanUser user = new User();user.setUsername("haohao");user.setAge(20);//直接返回User对象return user;
}
@ResponseBody注解使用优化,在进行前后端分离开发时,Controller的每个方法都是直接回写数据的,所以每个 方法上都得写@ResponseBody,可以将@ResponseBody写到Controller上,那么该Controller中的所有方法都具备 了返回响应体数据的功能了
@Controller
@ResponseBody
public class ResponseController2 {@GetMapping("/ajax/resp1")//    @ResponseBodypublic String resp1(){return "{\"username\":\"haohao\",\"age\":18}";}@GetMapping("/ajax/resp2")//    @ResponseBodypublic String resp2() throws JsonProcessingException {//创建JavaBeanUser user = new User();user.setUsername("haohao");user.setAge(19);//使用Jackson转换成json格式的字符串String json = new ObjectMapper().writeValueAsString(user);return json;}
}
进一步优化,可以使用@RestController替代@Controller和@ResponseBody,@RestController内部具备的这两个 注解的功能
@RestController
public class ResponseController2 {@GetMapping("/ajax/resp1")//    @ResponseBodypublic String resp1(){return "{\"username\":\"haohao\",\"age\":18}";}@GetMapping("/ajax/resp2")//    @ResponseBodypublic String resp2() throws JsonProcessingException {//创建JavaBeanUser user = new User();user.setUsername("haohao");user.setAge(19);//使用Jackson转换成json格式的字符串String json = new ObjectMapper().writeValueAsString(user);return json;}
}
04、Spring MVC 的拦截器
4.1 拦截器 Interceptor简介
SpringMVC的拦截器Interceptor规范,主要是对Controller资源访问时进行拦截操作的技术,当然拦截后可以进行权限控制,功能增强等都是可以的。拦截器有点类似 Javaweb 开发中的Filter,拦截器与Filter的区别如下图:
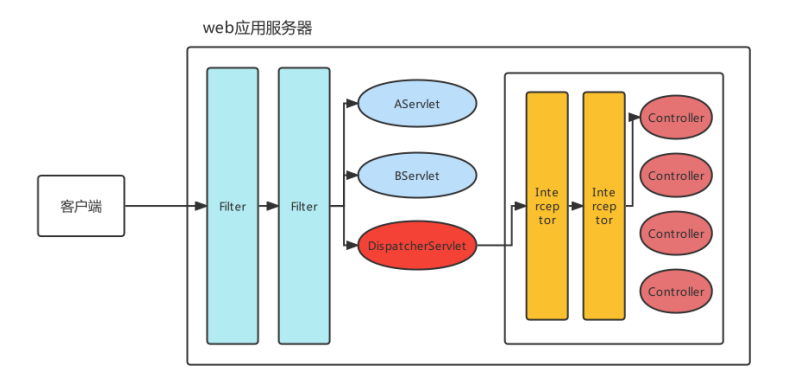
由上图,对Filter 和 Interceptor 做个对比:

实现了HandlerInterceptor接口,且被Spring管理的Bean都是拦截器,接口定义如下:
public interface HandlerInterceptor {default boolean preHandle(HttpServletRequest request, HttpServletResponse response, Object handler) throws Exception {return true;}default void postHandle(HttpServletRequest request, HttpServletResponse response, Object handler, @Nullable ModelAndView modelAndView) throws Exception {}default void afterCompletion(HttpServletRequest request, HttpServletResponse response, Object handler, @Nullable Exception ex) throws Exception {}
}
HandlerInterceptor接口方法的作用及其参数、返回值详解如下:

4.2 拦截器快速入门
编写MyInterceptor1实现HandlerInterceptor接口:
public class MyInterceptor1 implements HandlerInterceptor {@Overridepublic boolean preHandle(HttpServletRequest request, HttpServletResponse response, Object handler) throws Exception {System.out.println("Controller方法执行之前...");return true; // 放行}@Overridepublic void postHandle(HttpServletRequest request, HttpServletResponse response, Object handler, ModelAndView modelAndView) throws Exception {System.out.println("Controller方法执行之后...");}@Overridepublic void afterCompletion(HttpServletRequest request, HttpServletResponse response, Object handler, Exception ex) throws Exception {System.out.println("渲染视图结束,整个流程完毕...");}
}
在spring-mvc.xml中, 配置Interceptor
<!--配置拦截器-->
<mvc:interceptors><mvc:interceptor><!--配置对哪些资源进行拦截操作--><mvc:mapping path="/**"/><bean class="com.mem.interceptor.MyInterceptor1"></bean></mvc:interceptor>
</mvc:interceptors>
controller层,业务代码
// 测试拦截器
@RequestMapping("/interceptor_req")
public String interceptor_req(){System.out.println("interceptor_req ...");return "/show.jsp";
}
测试:
当MyInterceptor1的preHandle返回true,则打印
Controller方法执行之前...
interceptor_req ...
Controller方法执行之后...
渲染视图结束,整个流程完毕...
当MyInterceptor1的preHandle返回false,则打印
Controller方法执行之前...
4.3 拦截器执行顺序
拦截器三个方法的执行顺序
当Interceptor1和Interceptor2处于放行,Interceptor3处于不放行时,三个方法的执行顺序如下:

拦截器执行顺序取决于 interceptor 的配置顺序
<!--配置拦截器-->
<mvc:interceptors><mvc:interceptor><!--配置对哪些资源进行拦截操作--><mvc:mapping path="/**"/><bean class="com.mem.interceptor.MyInterceptor1"></bean></mvc:interceptor><mvc:interceptor><!--配置对哪些资源进行拦截操作--><mvc:mapping path="/**"/><bean class="com.mem.interceptor.MyInterceptor2"></bean></mvc:interceptor>
</mvc:interceptors>
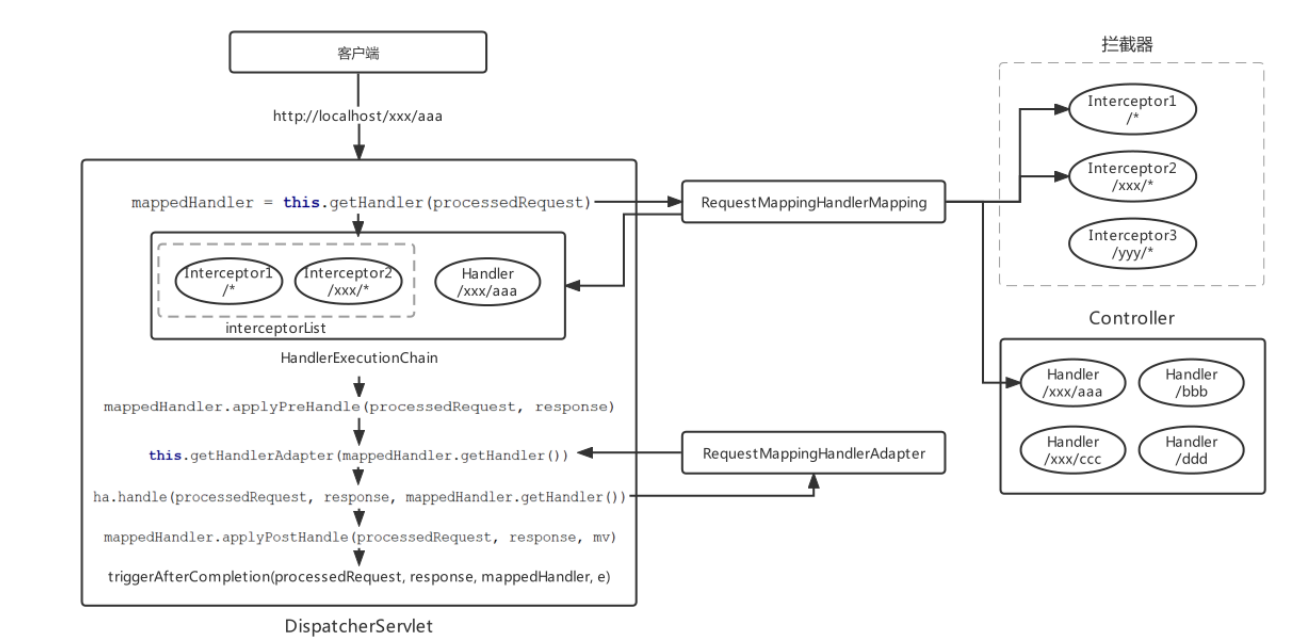
4.4 拦截器执行原理
请求到来时先会使用组件HandlerMapping去匹配Controller的方法(Handler)和符合拦截路径的Interceptor, Handler和多个Interceptor被封装成一个HandlerExecutionChain的对象 HandlerExecutionChain 定义如下:
public class HandlerExecutionChain {// 映射的Controller的方法private final Object handler;// 当前Handler匹配的拦截器集合private final List<HandlerInterceptor> interceptorList;
}
执行过程:
在DispatcherServlet的doDispatch方法中执行拦截器
protected void doDispatch(HttpServletRequest request, HttpServletResponse response) throws Exception {// 根据请求信息获取HandlerExecutionChainHandlerExecutionChain mappedHandler = this.getHandler(processedRequest);// 获取处理器适配器HandlerAdapter ha = this.getHandlerAdapter(mappedHandler.getHandler());// 执行Interceptor的前置方法,前置方法如果返回false,则该流程结束if (!mappedHandler.applyPreHandle(processedRequest, response)) {return;}// 执行handler,一般是HandlerMethodModelAndView mv = ha.handle(processedRequest, response, mappedHandler.getHandler());// 执行后置方法mappedHandler.applyPostHandle(processedRequest, response, mv);// 执行最终方法this.triggerAfterCompletion(processedRequest, response, mappedHandler, var22);
}
跟踪 HandlerExecutionChain的applyPreHandle方法源码:
boolean applyPreHandle(HttpServletRequest request, HttpServletResponse response) throws Exception {// 对interceptorList进行遍历,正向遍历,与此同时使用interceptorIndex进行计数for(int i = 0; i < this.interceptorList.size(); this.interceptorIndex = i++) {// 取出每一个Interceptor对象HandlerInterceptor interceptor = (HandlerInterceptor)this.interceptorList.get(i);// 调用Interceptor的preHandle方法,如果返回false,则直接执行Interceptor的最终方法if (!interceptor.preHandle(request, response, this.handler)) {// 执行Interceptor的最终方法this.triggerAfterCompletion(request, response, (Exception)null);return false;}}return true;
}
跟踪 HandlerExecutionChain的applyPostHandle方法源码:
void applyPostHandle(HttpServletRequest request, HttpServletResponse response, @Nullable ModelAndView mv) throws Exception {// 对interceptorList进行遍历,逆向遍历for(int i = this.interceptorList.size() - 1; i >= 0; --i) {// 取出每一个InterceptorHandlerInterceptor interceptor = (HandlerInterceptor)this.interceptorList.get(i);// 执行Interceptor的postHandle方法interceptor.postHandle(request, response, this.handler, mv);}
}
跟踪HandlerExecutionChain的triggerAfterCompletion方法源码:
void triggerAfterCompletion(HttpServletRequest request, HttpServletResponse response, @Nullable Exception ex) {// 逆向遍历interceptorList,遍历的个数为执行的applyPreHandle次数-1for(int i = this.interceptorIndex; i >= 0; --i) {// 取出每一个InterceptorHandlerInterceptor interceptor = (HandlerInterceptor)this.interceptorList.get(i);try {// 执行Interceptor的afterCompletion方法interceptor.afterCompletion(request, response, this.handler, ex);} catch (Throwable var7) {logger.error("HandlerInterceptor.afterCompletion threw exception", var7);}}
}
流程图:
05、Spring MVC 的全注解开发
5.1 spring-mvc.xml 中组件转化为注解形式
跟之前全注解开发思路一致, xml配置文件使用核心配置类替代,xml中的标签使用对应的注解替代
<!--1. 组件扫描 -->
<!--组件扫描web层-->
<context:component-scan base-package="com.mem.controller"/><!--2. 非自定义的Bean -->
<!--配置文件上传解析器,注意:id的名字是固定写法-->
<bean id="multipartResolver" class="org.springframework.web.multipart.commons.CommonsMultipartResolver"><property name="defaultEncoding" value="UTF-8"/><!--文件的编码格式 默认是ISO8859-1--><property name="maxUploadSizePerFile" value="1048576"/><!--上传的每个文件限制的大小 单位字节--><property name="maxUploadSize" value="3145728"/><!--上传文件的总大小--><property name="maxInMemorySize" value="1048576"/><!--上传文件的缓存大小-->
</bean><!--3. 非Bean的配置 -->
<!--访问静态资源的方式3:底层注册一个DefaultServletHttpRequestHandler 来处理静态资源-->
<mvc:default-servlet-handler/>
<!--mvc的注解驱动-->
<mvc:annotation-driven/>
<!--配置拦截器-->
<mvc:interceptors><mvc:interceptor><!--配置对哪些资源进行拦截操作--><mvc:mapping path="/**"/><bean class="com.mem.interceptor.MyInterceptor1"></bean></mvc:interceptor>
</mvc:interceptors>
第一步,第二步,可以利用之前所学的spring的配置类来搞定
- 组件扫描,可以通过@ComponentScan注解完成;
- 文件上传解析器multipartResolver可以通过非自定义Bean的注解配置方式,即@Bean注解完成
@Configuration
// <context:component-scan base-package="com.mem.controller"/>
@ComponentScan("com.mem.controller")
public class SpringMVCConfig {/*** <bean id="multipartResolver" class="org.springframework.web.multipart.commons.CommonsMultipartResolver">*     <property name="defaultEncoding" value="UTF-8"/><!--文件的编码格式 默认是ISO8859-1-->*     <property name="maxUploadSizePerFile" value="1048576"/><!--上传的每个文件限制的大小 单位字节-->*     <property name="maxUploadSize" value="3145728"/><!--上传文件的总大小-->*     <property name="maxInMemorySize" value="1048576"/><!--上传文件的缓存大小-->* </bean>*/@Beanpublic CommonsMultipartResolver multipartResolver(){CommonsMultipartResolver multipartResolver = new CommonsMultipartResolver();multipartResolver.setDefaultEncoding("UTF-8");multipartResolver.setMaxUploadSizePerFile(1048576);multipartResolver.setMaxUploadSize(3145728);multipartResolver.setMaxInMemorySize(1048576);return multipartResolver;}
}
第三步,非Bean的配置(mvc:default-servlet-handler/、mvc:annotation-driven/、mvc:interceptors) 该怎么办呢?
SpringMVC 提供了一个注解@EnableWebMvc,我们看一下源码,内部通过@Import导入了DelegatingWebMvcConfiguration类
@Retention(RetentionPolicy.RUNTIME)
@Target({ElementType.TYPE})
@Documented
@Import({DelegatingWebMvcConfiguration.class})
public @interface EnableWebMvc {
}
@Configuration(proxyBeanMethods = false)
public class DelegatingWebMvcConfiguration extends WebMvcConfigurationSupport {private final WebMvcConfigurerComposite configurers = new WebMvcConfigurerComposite();// 从容器中注入 WebMvcConfigurer 类型的Bean@Autowired(required = false)public void setConfigurers(List<WebMvcConfigurer> configurers) {if (!CollectionUtils.isEmpty(configurers)) {this.configurers.addWebMvcConfigurers(configurers);}}
}
首先先看下父类WebMvcConfigurationSupport:
public class WebMvcConfigurationSupport implements ApplicationContextAware, ServletContextAware {// 将 RequestMappingHandlerMapping 放入容器@Beanpublic RequestMappingHandlerMapping requestMappingHandlerMapping(@Qualifier("mvcContentNegotiationManager") ContentNegotiationManager contentNegotiationManager, @Qualifier("mvcConversionService") FormattingConversionService conversionService, @Qualifier("mvcResourceUrlProvider") ResourceUrlProvider resourceUrlProvider) {RequestMappingHandlerMapping mapping = this.createRequestMappingHandlerMapping();// 中间省略return mapping;}// 将 RequestMappingHandlerAdapter 放入容器@Beanpublic RequestMappingHandlerAdapter requestMappingHandlerAdapter(@Qualifier("mvcContentNegotiationManager") ContentNegotiationManager contentNegotiationManager, @Qualifier("mvcConversionService") FormattingConversionService conversionService, @Qualifier("mvcValidator") Validator validator) {RequestMappingHandlerAdapter adapter = this.createRequestMappingHandlerAdapter();return adapter;}
}
这一步的效果等同于mvc:annotation-driven/注解驱动
其次:查看WebMvcConfigurer 的源码
WebMvcConfigurer类型的Bean会被注入进来,然后被自动调用,所以可以实现WebMvcConfigurer接口,完成一些 解析器、默认Servlet等的指定,WebMvcConfigurer接口定义如下:
public interface WebMvcConfigurer {//配置默认Servet处理器,代替<mvc:default-servlet-handler/>标签default void configureDefaultServletHandling(DefaultServletHandlerConfigurer configurer) { }//添加拦截器,代替<mvc:interceptors>标签default void addInterceptors(InterceptorRegistry registry) { }//添加资源处理器default void addResourceHandlers(ResourceHandlerRegistry registry) { }//添加视图控制器default void addViewControllers(ViewControllerRegistry registry) { }//配置视图解析器default void configureViewResolvers(ViewResolverRegistry registry) { }//添加参数解析器default void addArgumentResolvers(List<HandlerMethodArgumentResolver> resolvers) { }//... 省略其他代码 ...
}
实现:
创建MyWebMvcConfigurer实现WebMvcConfigurer接口,实现addInterceptors 和 configureDefaultServletHandling方法
@Component
public class MyWebMvcConfigurer implements WebMvcConfigurer {// 替代 <mvc:interceptors>@Overridepublic void addInterceptors(InterceptorRegistry registry) {// 创建拦截器对象,进行注册// Interceptor 的执行顺序也取决于添加顺序registry.addInterceptor(new MyInterceptor1()).addPathPatterns("/**");}// 替代 <mvc:default-servlet-handler/>@Overridepublic void configureDefaultServletHandling(DefaultServletHandlerConfigurer configurer) {// 开启DefaultServlet,就可以处理静态资源了configurer.enable();}
}
创建实现类在包扫描区域内
最后,在SpringMVC核心配置类上添加@EnableWebMvc注解
@Configuration
// <context:component-scan base-package="com.mem.controller"/>
@ComponentScan("com.mem.controller")
@EnableWebMvc
public class SpringMVCConfig {/*** <bean id="multipartResolver" class="org.springframework.web.multipart.commons.CommonsMultipartResolver">*     <property name="defaultEncoding" value="UTF-8"/><!--文件的编码格式 默认是ISO8859-1-->*     <property name="maxUploadSizePerFile" value="1048576"/><!--上传的每个文件限制的大小 单位字节-->*     <property name="maxUploadSize" value="3145728"/><!--上传文件的总大小-->*     <property name="maxInMemorySize" value="1048576"/><!--上传文件的缓存大小-->* </bean>*/@Beanpublic CommonsMultipartResolver multipartResolver(){CommonsMultipartResolver multipartResolver = new CommonsMultipartResolver();multipartResolver.setDefaultEncoding("UTF-8");multipartResolver.setMaxUploadSizePerFile(1048576);multipartResolver.setMaxUploadSize(3145728);multipartResolver.setMaxInMemorySize(1048576);return multipartResolver;}
}
5.2 DispatcherServlet 加载核心配置类
现在是使用SpringMVCConfig核心配置类替代了spring-mvc.xml,怎么加载呢?
<!-- 创建Servlet WebApplicationContext容器的配置 -->
<servlet><servlet-name>DispatcherServlet</servlet-name><servlet-class>org.springframework.web.servlet.DispatcherServlet</servlet-class><!--加载Spring MVC的核心配置文件--><!--        <init-param>--><!--            <param-name>contextConfigLocation</param-name>--><!--            <param-value>classpath:spring-mvc.xml</param-value>--><!--        </init-param>--><!--加载Spring MVC的核心配置类--><init-param><param-name>contextClass</param-name><param-value>org.springframework.web.context.support.AnnotationConfigWebApplicationContext</param-value></init-param><init-param><param-name>contextConfigLocation</param-name><param-value>com.mem.config.SpringMVCConfig</param-value></init-param><!--可以设置该servlet在加载时的优先级以及是否在容器中加载该servletTomcat依次执行的是DispatcherServlet中的静态代码块,构造方法,init()方法--><load-on-startup>2</load-on-startup>
</servlet>
方法2: 参照Spring的 ContextLoaderListener加载核心配置类的做法,定义了一个AnnotationConfigWebApplicationContext,通过 代码注册核心配置类

5.3 消除web.xml
目前,几乎消除了配置文件,但是web工程的入口还是使用的web.xml进行配置的,如下
<!-- 创建Root WebApplicationContext容器的配置 -->
<!--加载Spring的配置文件-->
<context-param><param-name>contextConfigLocation</param-name><param-value>classpath:applicationContext.xml</param-value>
</context-param>
<!--配置ContextLoaderListener(官方提供的)-->
<listener><listener-class>org.springframework.web.context.ContextLoaderListener</listener-class>
</listener>
<!-- 创建Servlet WebApplicationContext容器的配置 -->
<servlet><servlet-name>DispatcherServlet</servlet-name><servlet-class>org.springframework.web.servlet.DispatcherServlet</servlet-class><!--加载Spring MVC的核心配置类--><init-param><param-name>contextClass</param-name><param-value>org.springframework.web.context.support.AnnotationConfigWebApplicationContext</param-value></init-param><init-param><param-name>contextConfigLocation</param-name><param-value>com.mem.config.SpringMVCConfig</param-value></init-param><!--可以设置该servlet在加载时的优先级以及是否在容器中加载该servletTomcat依次执行的是DispatcherServlet中的静态代码块,构造方法,init()方法--><load-on-startup>2</load-on-startup>
</servlet>
<servlet-mapping><servlet-name>DispatcherServlet</servlet-name><url-pattern>/</url-pattern>
</servlet-mapping>
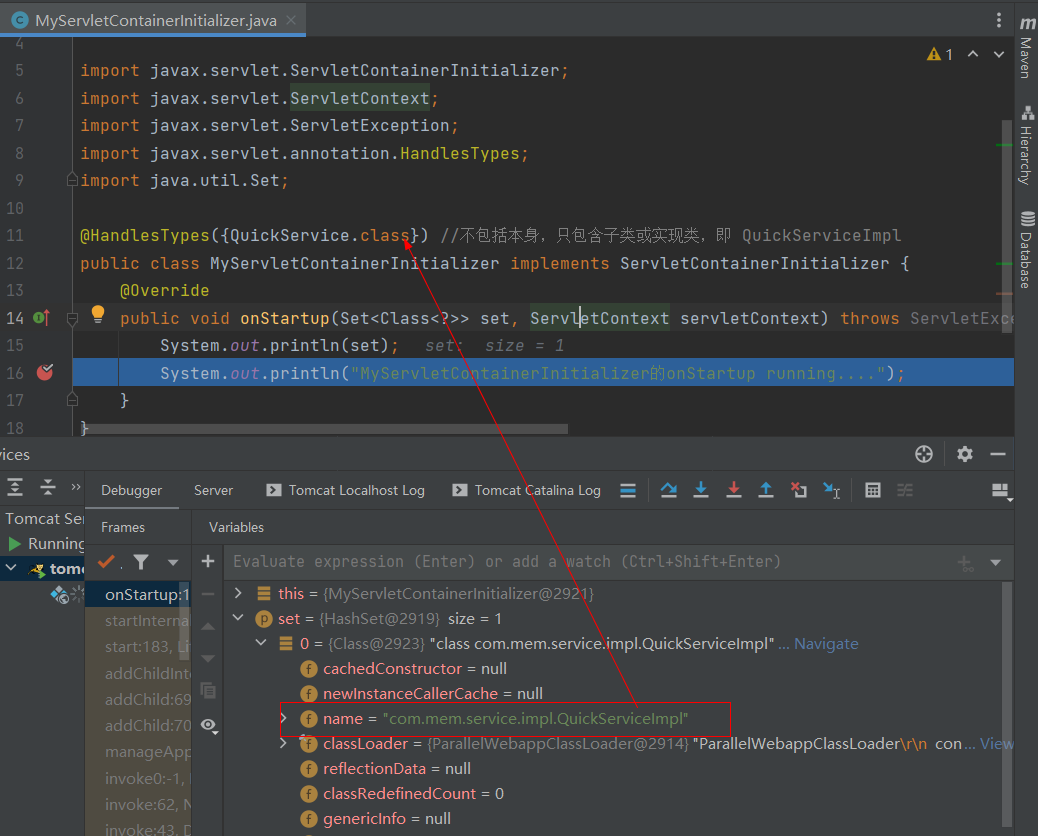
1)Servlet3.0环境中,web容器提供了javax.servlet.ServletContainerInitializer接口,实现了该接口后,在对 应的类加载路径的META-INF/services 目录创建一个名为javax.servlet.ServletContainerInitializer的文件, 文件内容指定具体的ServletContainerInitializer实现类,那么,当web容器启动时就会运行这个初始化器做 一些组件内的初始化工作;
- 在resources目录下新建META-INF/services/javax.servlet.ServletContainerInitializer,内容为
com.mem.init.MyServletContainerInitializer - 新建
MyServletContainerInitializer,内容如下:
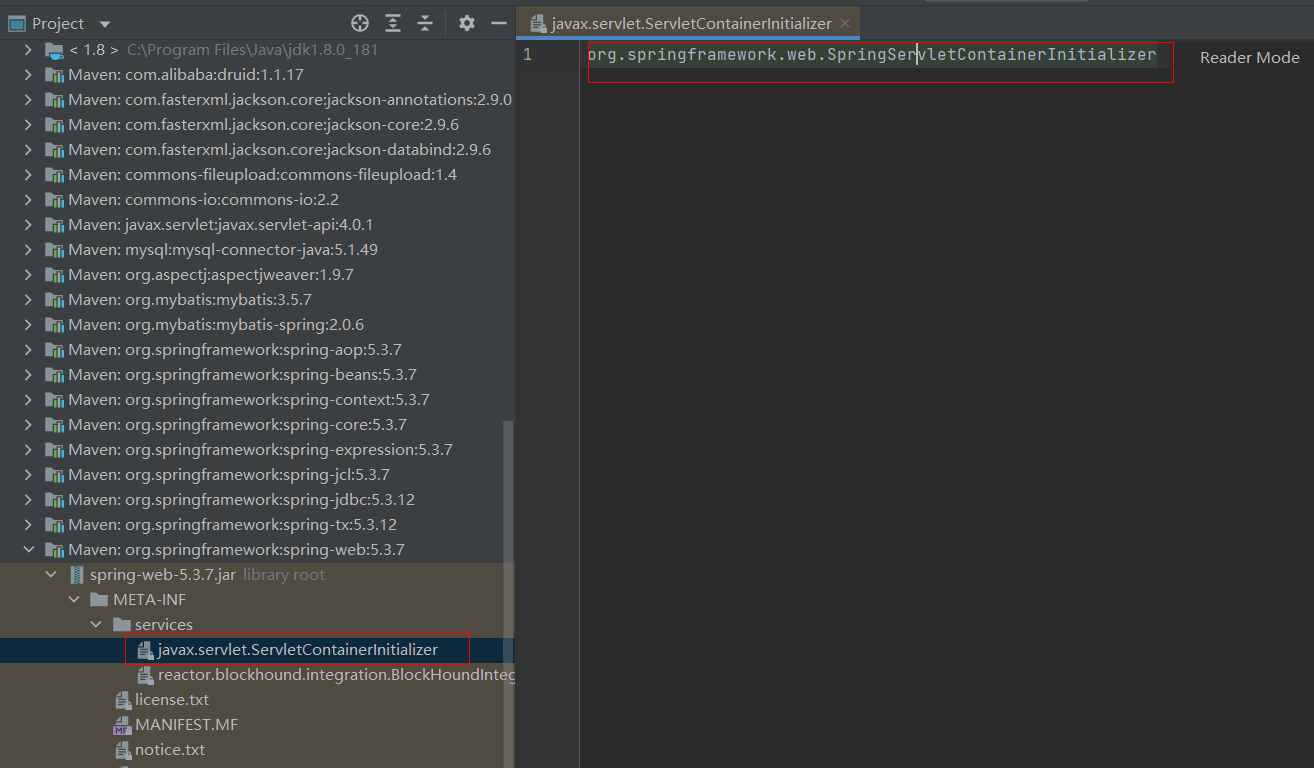
2)基于这个特性,Spring就定义了一个SpringServletContainerInitializer实现了ServletContainerInitializer接 口;
@HandlesTypes({WebApplicationInitializer.class})
public class SpringServletContainerInitializer implements ServletContainerInitializer {public SpringServletContainerInitializer() {}public void onStartup(@Nullable Set<Class<?>> webAppInitializerClasses, ServletContext servletContext) throws ServletException {List<WebApplicationInitializer> initializers = Collections.emptyList();Iterator var4;if (webAppInitializerClasses != null) {initializers = new ArrayList(webAppInitializerClasses.size());var4 = webAppInitializerClasses.iterator();while(var4.hasNext()) {Class<?> waiClass = (Class)var4.next();if (!waiClass.isInterface() && !Modifier.isAbstract(waiClass.getModifiers()) && WebApplicationInitializer.class.isAssignableFrom(waiClass)) {try {((List)initializers).add((WebApplicationInitializer)ReflectionUtils.accessibleConstructor(waiClass, new Class[0]).newInstance());} catch (Throwable var7) {throw new ServletException("Failed to instantiate WebApplicationInitializer class", var7);}}}}if (((List)initializers).isEmpty()) {servletContext.log("No Spring WebApplicationInitializer types detected on classpath");} else {servletContext.log(((List)initializers).size() + " Spring WebApplicationInitializers detected on classpath");AnnotationAwareOrderComparator.sort((List)initializers);var4 = ((List)initializers).iterator();while(var4.hasNext()) {WebApplicationInitializer initializer = (WebApplicationInitializer)var4.next();initializer.onStartup(servletContext);}}}
}
3)而SpringServletContainerInitializer会查找实现了WebApplicationInitializer的类,Spring又提供了一个 WebApplicationInitializer的基础实现类AbstractAnnotationConfigDispatcherServletInitializer,当我们编写类继承AbstractAnnotationConfigDispatcherServletInitializer时,容器就会自动发现我们自己的类, 在该类中我们就可以配置Spring和SpringMVC的入口了。
- 源码分析:
public abstract class AbstractAnnotationConfigDispatcherServletInitializer extends AbstractDispatcherServletInitializer {// 设置spring的核心配置类@Nullableprotected abstract Class<?>[] getRootConfigClasses();// 设置SpringMVC的核心配置类@Nullableprotected abstract Class<?>[] getServletConfigClasses();
}
public abstract class AbstractDispatcherServletInitializer extends AbstractContextLoaderInitializer {// 配置DispatcherServlet的映射路径protected abstract String[] getServletMappings();
}
实现:
按照下面的配置就可以完全省略web.xml
public class MyAbstractAnnotationConfigDispatcherServletInitializer extends AbstractAnnotationConfigDispatcherServletInitializer {@Override//提供Spring容器的核心配置类protected Class<?>[] getRootConfigClasses() {return new Class[]{SpringConfig.class};}@Override// 提供SpringMVC容器的核心配置类protected Class<?>[] getServletConfigClasses() {return new Class[]{SpringMVCConfig.class};}@Override// 提供前端控制器的映射路径protected String[] getServletMappings() {return new String[]{"/"};}
}
06、Spring MVC 的组件原理刨析
6.1 前端控制初始化
前端控制器DispatcherServlet是SpringMVC的入口,也是SpringMVC的大脑,主流程的工作都是在此完成的,梳理一下DispatcherServlet 代码。
DispatcherServlet 本质是个Servlet,当配置了 load-on-startup 时,会在服务器启动时就执行创建和执行初始化init方法,每次请求都会执行service方法
DispatcherServlet 的初始化主要做了两件事:
- 获得了一个 SpringMVC 的ApplicationContext容器;
- 注册了 SpringMVC的九大组件。
删减版继承关系图
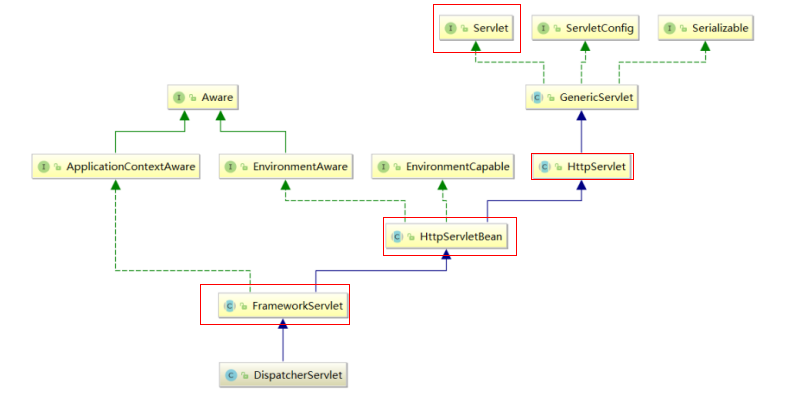
结论:SpringMVC 的ApplicationContext容器创建时机,Servlet 规范的 init(ServletConfig config) 方法经过子类重写 ,最终会调用 FrameworkServlet 抽象类的initWebApplicationContext() 方法,该方法中最终获得 一个根 Spring容器(Spring产生的),一个子Spring容器(SpringMVC产生的)
源码刨析:
先来看看Servlet规范的init(ServletConfig)方法:
public interface Servlet {// 被子类GenericServlet所重写void init(ServletConfig var1) throws ServletException;ServletConfig getServletConfig();void service(ServletRequest var1, ServletResponse var2) throws ServletException, IOException;String getServletInfo();void destroy();
}
接着我们来看子类GenericServlet,重写的init(ServletConfig),并扩展了init()留给子类实现
public abstract class GenericServlet implements Servlet, ServletConfig, Serializable {// 重写父类的init(ServletConfig config)public void init(ServletConfig config) throws ServletException {this.config = config;this.init();}// 留给子类实现(这里指的是HttpServletBean)public void init() throws ServletException {}
}
接着我们来看子类HttpServletBean,重写的init(),并扩展了initServletBean()留给子类实现
public abstract class HttpServletBean extends HttpServlet implements EnvironmentCapable, EnvironmentAware {public final void init() throws ServletException {PropertyValues pvs = new HttpServletBean.ServletConfigPropertyValues(this.getServletConfig(), this.requiredProperties);if (!pvs.isEmpty()) {try {BeanWrapper bw = PropertyAccessorFactory.forBeanPropertyAccess(this);ResourceLoader resourceLoader = new ServletContextResourceLoader(this.getServletContext());bw.registerCustomEditor(Resource.class, new ResourceEditor(resourceLoader, this.getEnvironment()));this.initBeanWrapper(bw);bw.setPropertyValues(pvs, true);} catch (BeansException var4) {if (this.logger.isErrorEnabled()) {this.logger.error("Failed to set bean properties on servlet '" + this.getServletName() + "'", var4);}throw var4;}}// 让子类重写,为了添加额外的初始化工作this.initServletBean();}// 由子类(FrameworkServlet)去重写protected void initServletBean() throws ServletException {}
}
接着我们来看子类FrameworkServlet,重写的initServletBean(),并扩展了initServletBean()留给子类实现
public abstract class FrameworkServlet extends HttpServletBean implements ApplicationContextAware {protected final void initServletBean() throws ServletException {try {// 在这里创建SpringMVC容器this.webApplicationContext = this.initWebApplicationContext();//模板设计模式,供子类覆盖实现,但是子类DispatcherServlet没做使用this.initFrameworkServlet();} catch (RuntimeException | ServletException var4) {this.logger.error("Context initialization failed", var4);throw var4;}}// 在这里创建SpringMVC容器protected WebApplicationContext initWebApplicationContext() {// 创建Spring容器,作为SpringMVC的父容器存在//获得根容器,其实就是通过 ContextLoaderListener 创建的ApplicationContext//如果配置了ContextLoaderListener则获得根容器,没配置获得的是nullWebApplicationContext rootContext = WebApplicationContextUtils.getWebApplicationContext(this.getServletContext());//定义SpringMVC容器,ApplicationContext子容器WebApplicationContext wac = null;// 1. 全注解方式时,在调用此方法之前,已经创建好SpringMVC容器了if (this.webApplicationContext != null) {wac = this.webApplicationContext;if (wac instanceof ConfigurableWebApplicationContext) {ConfigurableWebApplicationContext cwac = (ConfigurableWebApplicationContext)wac;if (!cwac.isActive()) {if (cwac.getParent() == null) {// 全注解方式时,设置父容器cwac.setParent(rootContext);}// 配置和刷新SpringMVC容器this.configureAndRefreshWebApplicationContext(cwac);}}}if (wac == null) {wac = this.findWebApplicationContext();}if (wac == null) {// 2. web.xml 方式时,用这个方法创建// 判断如果为空,则创建SpringMVC的容器wac = this.createWebApplicationContext(rootContext);}if (!this.refreshEventReceived) {synchronized(this.onRefreshMonitor) {this.onRefresh(wac);}}//将SpringMVC子容器存储到ServletContext域中//key名是:org.springframework.web.servlet.FrameworkServlet.CONTEXT.DispatcherServletif (this.publishContext) {String attrName = this.getServletContextAttributeName();this.getServletContext().setAttribute(attrName, wac);}return wac;}// 过渡方法protected WebApplicationContext createWebApplicationContext(@Nullable WebApplicationContext parent) {return this.createWebApplicationContext((ApplicationContext)parent);}// 创建SpringMVC的容器protected WebApplicationContext createWebApplicationContext(@Nullable ApplicationContext parent) {Class<?> contextClass = this.getContextClass();if (!ConfigurableWebApplicationContext.class.isAssignableFrom(contextClass)) {throw new ApplicationContextException("Fatal initialization error in servlet with name '" + this.getServletName() + "': custom WebApplicationContext class [" + contextClass.getName() + "] is not of type ConfigurableWebApplicationContext");} else {//实例化子容器ApplicationContextConfigurableWebApplicationContext wac = (ConfigurableWebApplicationContext)BeanUtils.instantiateClass(contextClass);wac.setEnvironment(this.getEnvironment());// web.xml 方式时,设置父容器// 在这里设置SpringMVC的父容器(Spring容器)// 需要一个Bean时,先从SpringMVC容器中查找,如果没有的话再去Spring容器中找wac.setParent(parent);//获得web.xml配置的classpath:spring-mvc.xmlString configLocation = this.getContextConfigLocation();if (configLocation != null) {//为子容器设置配置加载路径wac.setConfigLocation(configLocation);}// 配置和刷新SpringMVC容器// 初始化子容器(就是加载spring-mvc.xml配置的Bean)this.configureAndRefreshWebApplicationContext(wac);return wac;}}// 配置和刷新SpringMVC容器protected void configureAndRefreshWebApplicationContext(ConfigurableWebApplicationContext wac) {if (ObjectUtils.identityToString(wac).equals(wac.getId())) {if (this.contextId != null) {wac.setId(this.contextId);} else {wac.setId(ConfigurableWebApplicationContext.APPLICATION_CONTEXT_ID_PREFIX + ObjectUtils.getDisplayString(this.getServletContext().getContextPath()) + '/' + this.getServletName());}}wac.setServletContext(this.getServletContext());wac.setServletConfig(this.getServletConfig());wac.setNamespace(this.getNamespace());wac.addApplicationListener(new SourceFilteringListener(wac, new FrameworkServlet.ContextRefreshListener()));ConfigurableEnvironment env = wac.getEnvironment();if (env instanceof ConfigurableWebEnvironment) {((ConfigurableWebEnvironment)env).initPropertySources(this.getServletContext(), this.getServletConfig());}this.postProcessWebApplicationContext(wac);this.applyInitializers(wac);// 重点在这:(之前ioc容器初始化,构造的过程)wac.refresh();}// 内部类:用于监听ContextRefreshedEvent事件private class ContextRefreshListener implements ApplicationListener<ContextRefreshedEvent> {private ContextRefreshListener() {}public void onApplicationEvent(ContextRefreshedEvent event) {// 监听到ContextRefreshedEvent事件时执行onApplicationEvent方法FrameworkServlet.this.onApplicationEvent(event);}}// 监听到ContextRefreshedEvent事件时执行onApplicationEvent方法public void onApplicationEvent(ContextRefreshedEvent event) {this.refreshEventReceived = true;synchronized(this.onRefreshMonitor) {// 空实现this.onRefresh(event.getApplicationContext());}}// 为了子类(DispatcherServlet)扩展protected void onRefresh(ApplicationContext context) {}
}
父容器和子容器概念和关系:
- 父容器:Spring 通过ContextLoaderListener为入口产生的applicationContext容器,内部主要维护的是 applicationContext.xml(或相应配置类)配置的Bean信息;
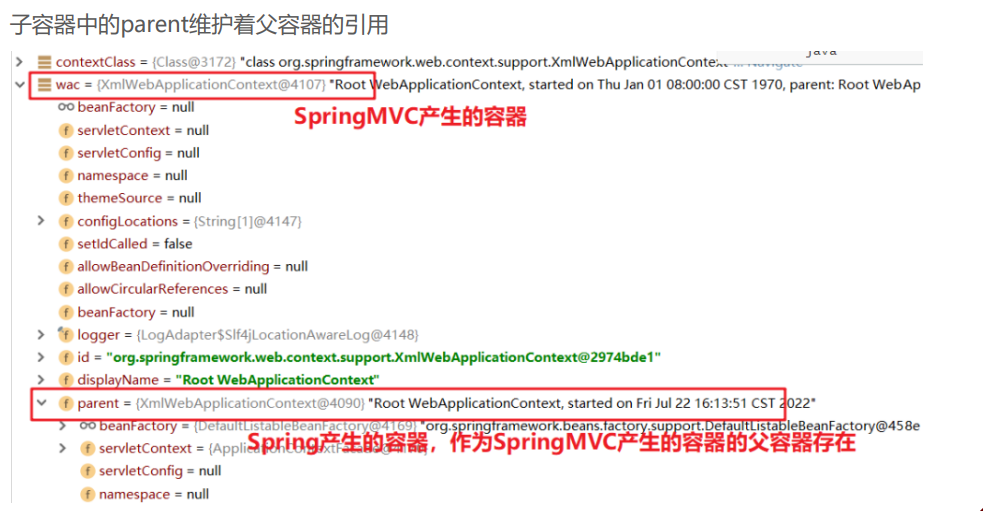
- 子容器:SpringMVC通过DispatcherServlet的init() 方法产生的applicationContext容器,内部主要维护的 是spring-mvc.xml(或相应配置类)配置的Bean信息,且内部还通过parent属性维护这父容器的引用。
- Bean的检索顺序:根据上面子父容器的概念,可以知道Controller存在与子容器中,而Controller中要注入 Service时,会先从子容器本身去匹配,匹配不成功时在去父容器中去匹配,于是最终从父容器中匹配到的 UserService,这样子父容器就可以进行联通了。但是父容器只能从自己容器中进行匹配,不能从子容器中进 行匹配。
接着查看wac.refresh()源码,在AbstractApplicationContext中:
public abstract class AbstractApplicationContext extends DefaultResourceLoader implements ConfigurableApplicationContext {public void refresh() throws BeansException, IllegalStateException {synchronized(this.startupShutdownMonitor) {StartupStep contextRefresh = this.applicationStartup.start("spring.context.refresh");this.prepareRefresh();ConfigurableListableBeanFactory beanFactory = this.obtainFreshBeanFactory();this.prepareBeanFactory(beanFactory);try {this.postProcessBeanFactory(beanFactory);StartupStep beanPostProcess = this.applicationStartup.start("spring.context.beans.post-process");this.invokeBeanFactoryPostProcessors(beanFactory);this.registerBeanPostProcessors(beanFactory);beanPostProcess.end();this.initMessageSource();this.initApplicationEventMulticaster();this.onRefresh();this.registerListeners();this.finishBeanFactoryInitialization(beanFactory);// 完成刷新,底层发布一个事件this.finishRefresh();} catch (BeansException var10) {// ...} finally {// ...}}}// 完成刷新,底层发布一个事件,在FrameworkServlet类中的内部类监听protected void finishRefresh() {// ...// 发布一个ContextRefreshedEvent类型的事件,在FrameworkServlet类中的内部类监听this.publishEvent((ApplicationEvent)(new ContextRefreshedEvent(this)));// ...}
}
由父类(FrameworkServlet)监听到ContextRefreshedEvent类型的事件,执行onRefresh()方法,接着我们来看子类DispatcherServlet,重写的onRefresh()
public class DispatcherServlet extends FrameworkServlet {// 重写父类中的onRefresh方法protected void onRefresh(ApplicationContext context) {// 初始化策略this.initStrategies(context);}// 注册九大组件protected void initStrategies(ApplicationContext context) {//1、初始化文件上传解析器this.initMultipartResolver(context);//2、初始化国际化解析器this.initLocaleResolver(context);//3、初始化模板解析器this.initThemeResolver(context);//4、初始化处理器映射器this.initHandlerMappings(context);//5、初始化处理器适配器this.initHandlerAdapters(context);//6、初始化处理器异常解析器this.initHandlerExceptionResolvers(context);//7、初始化请求视图转换器this.initRequestToViewNameTranslator(context);//8、初始化视图解析器this.initViewResolvers(context);//9、初始化lashMapManager策略组件this.initFlashMapManager(context);}
}
总结:重点在于AbstractApplicationContext类发布事件(ContextRefreshedEvent),FrameworkServlet类的内部类(ContextRefreshListener)监听到了事件,然后由子类DispatcherServlet重写父类的onRefresh()方法,从而实现注册九大组件
以 this.initHandlerMappings(context) 为例,进一步看一下初始化处理器映射器的细节:
public class DispatcherServlet extends FrameworkServlet {//定义List容器存储HandlerMappingprivate List<HandlerMapping> handlerMappings;//初始化HandlerMapping的方法private void initHandlerMappings(ApplicationContext context) {//初始化集合为nullthis.handlerMappings = null;//detectAllHandlerMappings默认为true,代表是否从所有容器中(父子容器)检测 HandlerMappingif (this.detectAllHandlerMappings) {//从Spring容器中去匹配HandlerMappingMap<String, HandlerMapping> matchingBeans = BeanFactoryUtils.beansOfTypeIncludingAncestors(context, HandlerMapping.class, true, false);//如果从容器中获取的HandlerMapping不为null就加入到事先定义好的handlerMappings容器中if (!matchingBeans.isEmpty()) {this.handlerMappings = new ArrayList(matchingBeans.values());AnnotationAwareOrderComparator.sort(this.handlerMappings);}} else {//...}//如果从容器中没有获得HandlerMapping,意味着handlerMappings集合是空的if (this.handlerMappings == null) {//加载默认的HandlerMapping,就是加载DispatcherServlet.properties文件中的键值对this.handlerMappings = this.getDefaultStrategies(context, HandlerMapping.class);}// ...}
}
总结:初始化这些组件,默认先从容器中寻找,如果容器有就用容器的,如果容器没有,就用默认的。
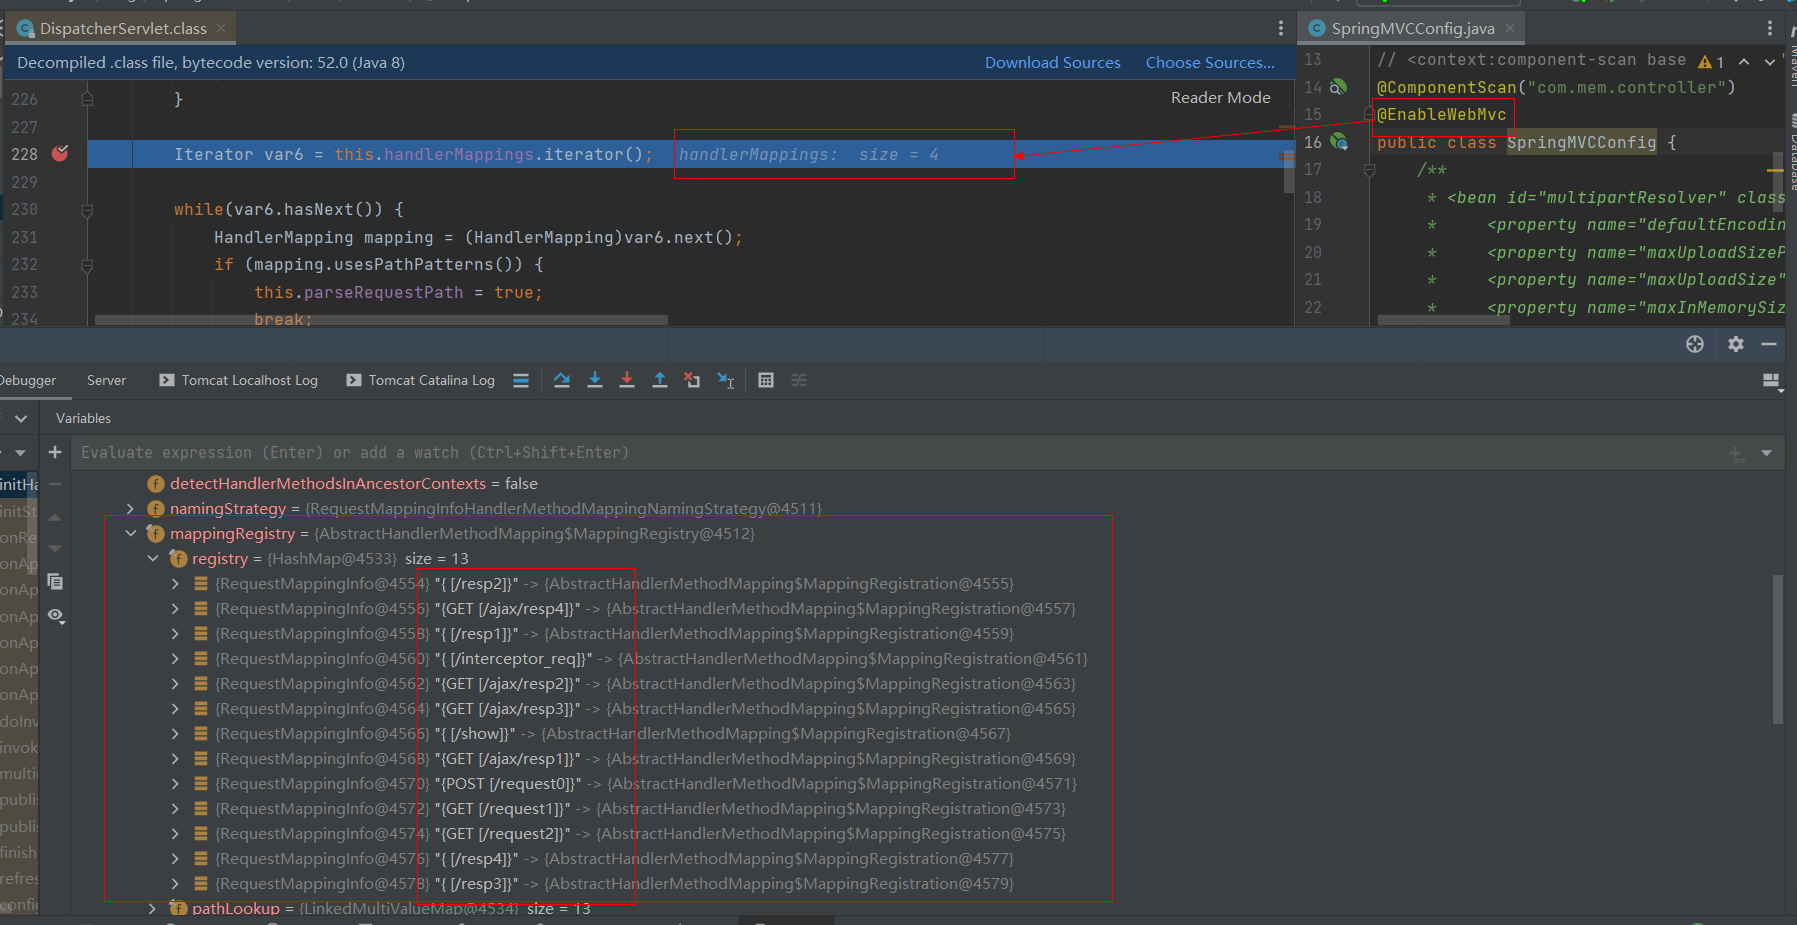
加上@EnableWebMvc后,向容器中注入了4个HandlerMapping,如下图:
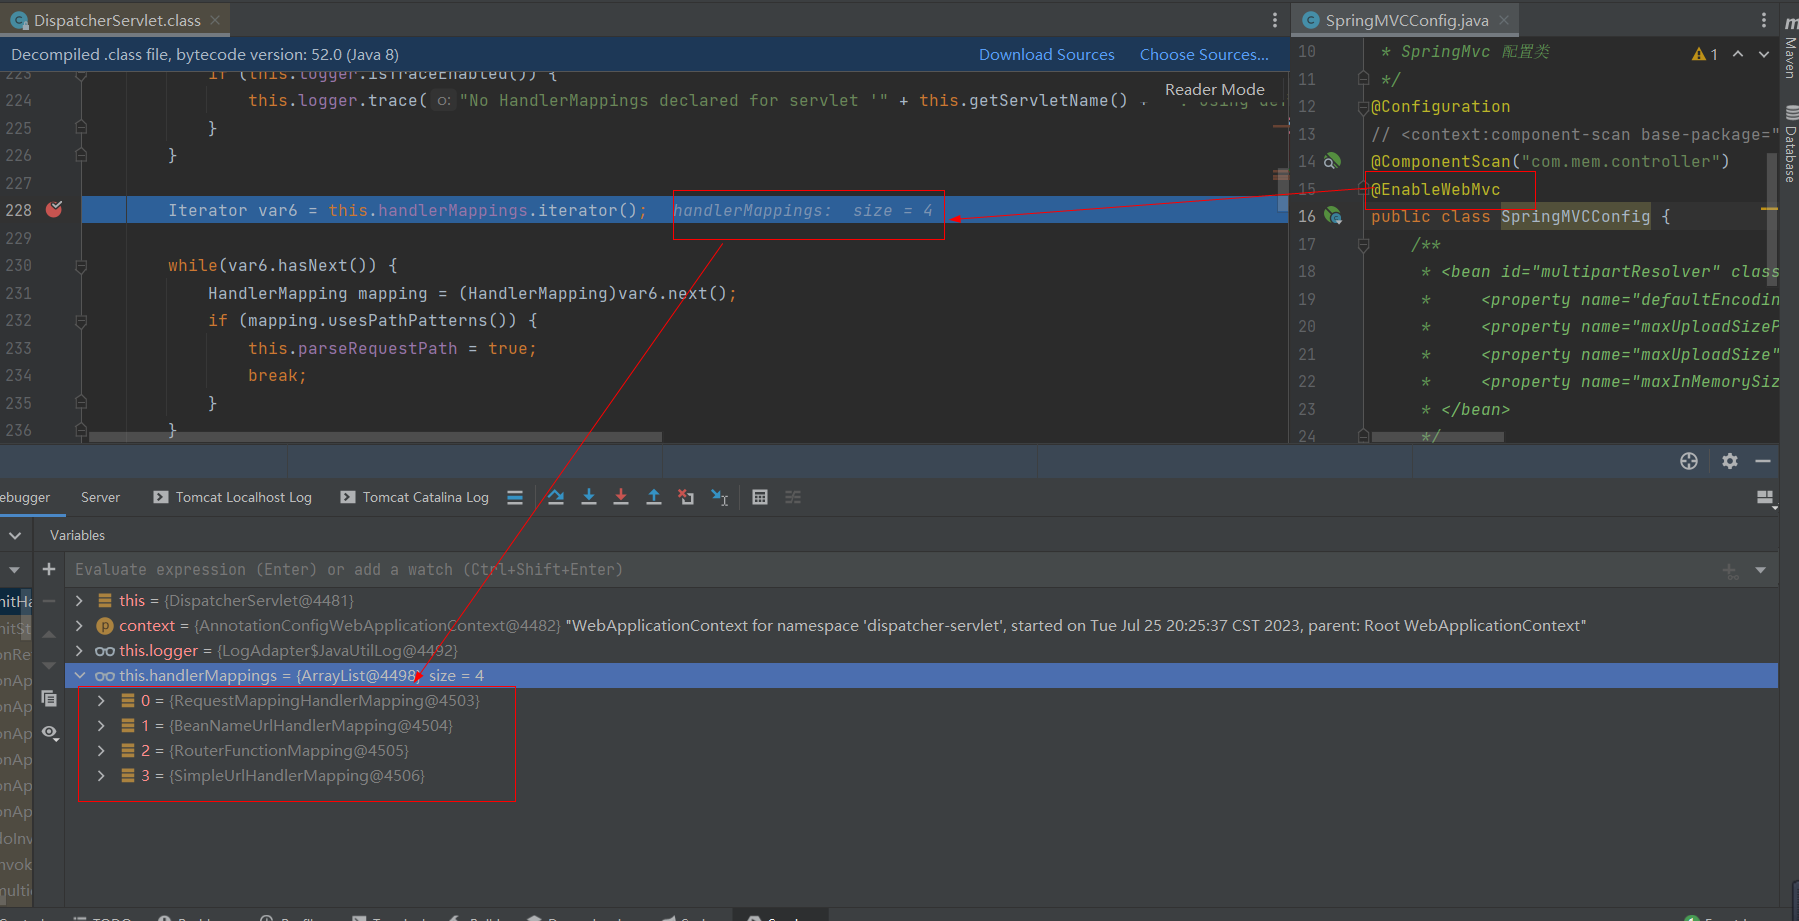
查看RequestMappingHandlerMapping中的mappingRegistry.registry中的映射地址
去掉@EnableWebMvc注解后,就获取默认的3个HandlerMapping,如下图:

6.2 前端控制器执行主流程
上面讲解了一下,当服务器启动时,DispatcherServlet 会执行初始化操作,接下来,每次访问都会执行service 方法,我们先宏观的看一下执行流程,在去研究源码和组件执行细节
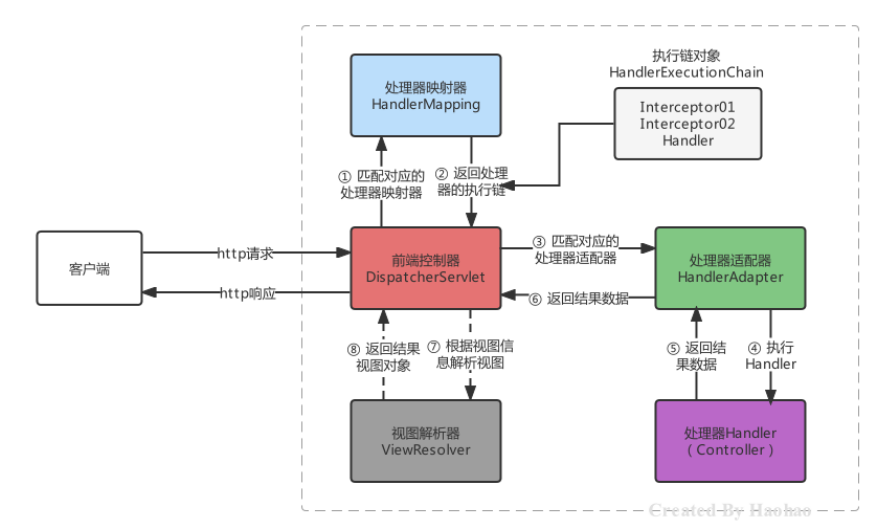
重点掌握HandlerExecutionChain如何生产的,HandlerAdapter如何调用controller方法,并传值的?
源码刨析:
首先看一下Servlet接口中的service方法,注意这个service的参数是没有Http的
public interface Servlet {void service(ServletRequest var1, ServletResponse var2) throws ServletException, IOException;
}
接着,看HttpServlet中重写的service(ServletRequest,ServletResponse)方法,发现他调用了service(HttpServletRequest, HttpServletResponse)
public abstract class HttpServlet extends GenericServlet {public void service(ServletRequest req, ServletResponse res) throws ServletException, IOException {if (req instanceof HttpServletRequest && res instanceof HttpServletResponse) {HttpServletRequest request = (HttpServletRequest)req;HttpServletResponse response = (HttpServletResponse)res;// 调用service,参数是Http类型的this.service(request, response);} else {throw new ServletException("non-HTTP request or response");}}protected void service(HttpServletRequest req, HttpServletResponse resp) throws ServletException, IOException {String method = req.getMethod();long lastModified;if (method.equals("GET")) {lastModified = this.getLastModified(req);if (lastModified == -1L) {this.doGet(req, resp);} else {long ifModifiedSince = req.getDateHeader("If-Modified-Since");if (ifModifiedSince < lastModified) {this.maybeSetLastModified(resp, lastModified);this.doGet(req, resp);} else {resp.setStatus(304);}}} else if (method.equals("HEAD")) {lastModified = this.getLastModified(req);this.maybeSetLastModified(resp, lastModified);this.doHead(req, resp);} else if (method.equals("POST")) {this.doPost(req, resp);} else if (method.equals("PUT")) {this.doPut(req, resp);} else if (method.equals("DELETE")) {this.doDelete(req, resp);} else if (method.equals("OPTIONS")) {this.doOptions(req, resp);} else if (method.equals("TRACE")) {this.doTrace(req, resp);} else {}}protected void doGet(HttpServletRequest req, HttpServletResponse resp) throws ServletException, IOException {String protocol = req.getProtocol();String msg = lStrings.getString("http.method_get_not_supported");if (protocol.endsWith("1.1")) {resp.sendError(405, msg);} else {resp.sendError(400, msg);}}protected void doPost(HttpServletRequest req, HttpServletResponse resp) throws ServletException, IOException {String protocol = req.getProtocol();String msg = lStrings.getString("http.method_post_not_supported");if (protocol.endsWith("1.1")) {resp.sendError(405, msg);} else {resp.sendError(400, msg);}}// do...
}
接着,我们看一下HttpServlet的子类(FrameworkServlet),重写的service(HttpServletRequest, HttpServletResponse)方法:
public abstract class FrameworkServlet extends HttpServletBean implements ApplicationContextAware {protected void service(HttpServletRequest request, HttpServletResponse response) throws ServletException, IOException {HttpMethod httpMethod = HttpMethod.resolve(request.getMethod());if (httpMethod != HttpMethod.PATCH && httpMethod != null) {// 调用父类的service方法super.service(request, response);} else {this.processRequest(request, response);}}// 父类中的doGet/doPost/do...都是调用子类重写的doGet...方法protected final void doGet(HttpServletRequest request, HttpServletResponse response) throws ServletException, IOException {this.processRequest(request, response);}protected final void doPost(HttpServletRequest request, HttpServletResponse response) throws ServletException, IOException {this.processRequest(request, response);}// do...protected final void processRequest(HttpServletRequest request, HttpServletResponse response) throws ServletException, IOException {try {//调用本类中的doService方法this.doService(request, response);} catch (IOException | ServletException var16) {}}// 由子类(DispatcherServlet)实现protected abstract void doService(HttpServletRequest var1, HttpServletResponse var2) throws Exception;
}
接着我们来看子类(DispatcherServlet)实现的doService方法
public class DispatcherServlet extends FrameworkServlet {protected void doService(HttpServletRequest request, HttpServletResponse response) throws Exception {// ...try {this.doDispatch(request, response);} finally {}}// 核心流程都在这个方法里protected void doDispatch(HttpServletRequest request, HttpServletResponse response) throws Exception {HttpServletRequest processedRequest = request;HandlerExecutionChain mappedHandler = null;boolean multipartRequestParsed = false;WebAsyncManager asyncManager = WebAsyncUtils.getAsyncManager(request);try {try {ModelAndView mv = null;Object dispatchException = null;try {processedRequest = this.checkMultipart(request);multipartRequestParsed = processedRequest != request;// 获取HandlerExecutionChain对象mappedHandler = this.getHandler(processedRequest);if (mappedHandler == null) {this.noHandlerFound(processedRequest, response);return;}HandlerAdapter ha = this.getHandlerAdapter(mappedHandler.getHandler());String method = request.getMethod();boolean isGet = HttpMethod.GET.matches(method);if (isGet || HttpMethod.HEAD.matches(method)) {long lastModified = ha.getLastModified(request, mappedHandler.getHandler());if ((new ServletWebRequest(request, response)).checkNotModified(lastModified) && isGet) {return;}}// 执行拦截器的前置方法if (!mappedHandler.applyPreHandle(processedRequest, response)) {return;}// 执行目标方法mv = ha.handle(processedRequest, response, mappedHandler.getHandler());if (asyncManager.isConcurrentHandlingStarted()) {return;}this.applyDefaultViewName(processedRequest, mv);// 执行拦截器的后置方法mappedHandler.applyPostHandle(processedRequest, response, mv);} catch (Exception var20) {dispatchException = var20;} catch (Throwable var21) {dispatchException = new NestedServletException("Handler dispatch failed", var21);}this.processDispatchResult(processedRequest, response, mappedHandler, mv, (Exception)dispatchException);} catch (Exception var22) {// 执行拦截器的最终方法this.triggerAfterCompletion(processedRequest, response, mappedHandler, var22);} catch (Throwable var23) {}} finally {}}// 返回HandlerExecutionChain对象@Nullableprotected HandlerExecutionChain getHandler(HttpServletRequest request) throws Exception {if (this.handlerMappings != null) {Iterator var2 = this.handlerMappings.iterator();while(var2.hasNext()) {HandlerMapping mapping = (HandlerMapping)var2.next();HandlerExecutionChain handler = mapping.getHandler(request);if (handler != null) {return handler;}}}return null;}}
调用mapping.getHandler(request)方法,找实现类AbstractHandlerMapping的getHandler(HttpServletRequest)方法
public abstract class AbstractHandlerMapping extends WebApplicationObjectSupport implements HandlerMapping, Ordered, BeanNameAware {@Nullablepublic final HandlerExecutionChain getHandler(HttpServletRequest request) throws Exception {// 获取controller方法,抽象成handlerObject handler = this.getHandlerInternal(request);if (handler == null) {handler = this.getDefaultHandler();}if (handler == null) {return null;} else {// ...// 返回一个HandlerExecutionChain对象,调用HandlerExecutionChain executionChain = this.getHandlerExecutionChain(handler, request);return executionChain;}}// 实际创建HandlerExecutionChain 对象的地方protected HandlerExecutionChain getHandlerExecutionChain(Object handler, HttpServletRequest request) {HandlerExecutionChain chain = handler instanceof HandlerExecutionChain ? (HandlerExecutionChain)handler : new HandlerExecutionChain(handler);Iterator var4 = this.adaptedInterceptors.iterator();// 循环所有拦截器对象while(var4.hasNext()) {HandlerInterceptor interceptor = (HandlerInterceptor)var4.next();if (interceptor instanceof MappedInterceptor) {MappedInterceptor mappedInterceptor = (MappedInterceptor)interceptor;// 判断是否匹配if (mappedInterceptor.matches(request)) {// 向HandlerExecutionChain对象中加入拦截器chain.addInterceptor(mappedInterceptor.getInterceptor());}} else {chain.addInterceptor(interceptor);}}return chain;}
}
获取完HandlerExecutionChain对象后,执行拦截器前置,目标,后置方法,这里我们主要讲解目标方法的执行,查看实现类RequestMappingHandlerAdapter的 handleInternal() 方法 (由mv = ha.handle()进行调用)
public class RequestMappingHandlerAdapter extends AbstractHandlerMethodAdapter implements BeanFactoryAware, InitializingBean {protected ModelAndView handleInternal(HttpServletRequest request, HttpServletResponse response, HandlerMethod handlerMethod) throws Exception {this.checkRequest(request);ModelAndView mav;if (this.synchronizeOnSession) {} else {// 调用invokeHandlerMethod()方法mav = this.invokeHandlerMethod(request, response, handlerMethod);}return mav;}@Nullableprotected ModelAndView invokeHandlerMethod(HttpServletRequest request, HttpServletResponse response, HandlerMethod handlerMethod) throws Exception {try {// 调用invokeAndHandle()方法invocableMethod.invokeAndHandle(webRequest, mavContainer, new Object[0]);} finally {}return var15;}
}
接着查看ServletInvocableHandlerMethod类的invokeAndHandle()方法:
public class ServletInvocableHandlerMethod extends InvocableHandlerMethod {public void invokeAndHandle(ServletWebRequest webRequest, ModelAndViewContainer mavContainer, Object... providedArgs) throws Exception {// 调用父类中的invokeForRequest()方法Object returnValue = this.invokeForRequest(webRequest, mavContainer, providedArgs);}
}
接着查看父类的invokeForRequest()方法:
public class InvocableHandlerMethod extends HandlerMethod {@Nullablepublic Object invokeForRequest(NativeWebRequest request, @Nullable ModelAndViewContainer mavContainer, Object... providedArgs) throws Exception {// 获取请求中的参数Object[] args = this.getMethodArgumentValues(request, mavContainer, providedArgs);if (logger.isTraceEnabled()) {logger.trace("Arguments: " + Arrays.toString(args));}// 执行doInvoke方法return this.doInvoke(args);}@Nullableprotected Object doInvoke(Object... args) throws Exception {Method method = this.getBridgedMethod();ReflectionUtils.makeAccessible(method);try {// 最终,利用反射,调用method.invoke(getBean,args)方法return KotlinDetector.isSuspendingFunction(method) ? CoroutinesUtils.invokeSuspendingFunction(method, this.getBean(), args) : method.invoke(this.getBean(), args);}}
}
07、Spring MVC 的异常处理机制
7.1 SpringMVC异常处理流程
异常分为编译时异常和运行时异常,对于编译时异常,我们通过try-catch 进行捕获,捕获后自行处理,而运行时异常是不可预期的,就需要规范编码来避免。
在SPringMVC中,不管是编译异常还是运行时异常,都可以最终由SpringMVC提供的异常处理器进行统一处理,这样就避免了随时随地地捕获处理地繁琐性。
当然除了繁琐之外,我们在进行前后端异步开发时,往往返回统一格式地结果给客户端,例如:{"code": 200,"message":"","data":{"username":"haohao","age":18}},即使报异常了,也不能把状态码500直接扔给客户端丢给用户,需要将异常转换成符合上面格式地数据响应给客户端更友好。
SpringMVC处理异常的思路是:一路向上抛,都抛给前端控制器DispatcherServlet,DispatcherServlet再调用异常处理器ExceptionResolver进行处理,如下图:

7.2 SpringMVC的异常处理方式
SpringMVC提供了以下三种处理异常的方式:
- 简单异常处理器:使用SpringMVC内置的异常处理器SimpleMappingExceptionResolver;
- 自定义异常处理器:实现HandlerExceptionResolver接口,自定义异常进行处理;
- 注解方式:使用@ControllerAdvice+@ExceptionHandler来处理。
初始化:
新建一个异常测试Controller:
@RestController
public class ExceptionController {/*** 模拟运行时异常* @return*/@RequestMapping("/exception1")public String exceptionMethod1(){int i = 1/0;return "Hello Exception";}/*** 模拟编译异常* @return*/@RequestMapping("/exception2")public String exceptionMethod2() throws FileNotFoundException {FileInputStream inputStream = new FileInputStream("C:/xx/xx/xx.xx");return "Hello Exception";}
}
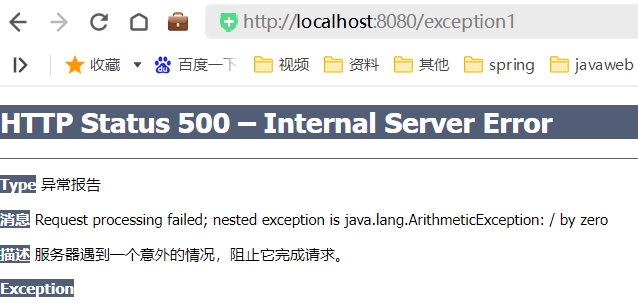
没加上异常处理时的效果
访问exception1时报除零异常:
访问exception2时报找不到文件异常:
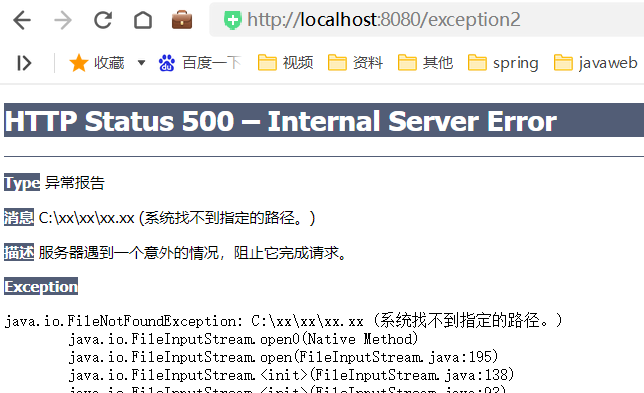
改善1:加上简单异常处理器(SimpleMappingExceptionResolver),对不同的异常进行不同的跳转友好页面,操作如下
- 在配置类上加一个SimpleMappingExceptionResolver类型的Bean
@Configuration
@ComponentScan("com.mem.controller")
@EnableWebMvc
public class SpringMVCConfig {// 配置简单的异常处理器类@Beanpublic SimpleMappingExceptionResolver simpleMappingExceptionResolver(){SimpleMappingExceptionResolver simpleMappingExceptionResolver = new SimpleMappingExceptionResolver();// 不管是什么异常,统一的响应一个友好页面//        simpleMappingExceptionResolver.setDefaultErrorView("/error1.html");// 区分异常类型,根据不同的异常类型,跳转不同的视图Properties properties = new Properties();// 键值对,key:异常的全限定名,value:跳转的视图名properties.setProperty("java.lang.RuntimeException","/error1.html");properties.setProperty("java.io.FileNotFoundException","/error2.html");simpleMappingExceptionResolver.setExceptionMappings(properties);return simpleMappingExceptionResolver;}
}
- 添加错误页面

此时访问exception1时,进入error1.html

访问exception2时,进入error2.html

改善2:自定义异常处理器,实现HandlerExceptionResolver接口,操作如下:
- 添加自定义异常处理器类
@Component
public class MyHandlerExceptionResolver implements HandlerExceptionResolver {/**** @param request 请求* @param response 响应* @param handler Controller层的方法的封装* @param e 异常,可以用于判断* @return*/@Overridepublic ModelAndView resolveException(HttpServletRequest request, HttpServletResponse response, Object handler, Exception e) {System.out.println("request:"+request);System.out.println("response:"+response);System.out.println("handler:"+handler);System.out.println("e:"+e);// 1. 可以简单的响应一个友好的提示页面ModelAndView modelAndView = new ModelAndView();if(e instanceof RuntimeException ){modelAndView.setViewName("/error1.html");}else{modelAndView.setViewName("/error2.html");}return modelAndView;}
}
此时访问exception1时,进入error1.html
控制台输出:

访问exception2时,进入error2.html
控制台输出:

自定义异常处理器还可以以json形式返回:
修改MyHandlerExceptionResolver的resolveException方法:
@Component
public class MyHandlerExceptionResolver implements HandlerExceptionResolver {/**** @param request 请求* @param response 响应* @param handler Controller层的方法的封装* @param e 异常,可以用于判断* @return*/@Overridepublic ModelAndView resolveException(HttpServletRequest request, HttpServletResponse response, Object handler, Exception e) {System.out.println("request:"+request);System.out.println("response:"+response);System.out.println("handler:"+handler);System.out.println("e:"+e);// 1. 可以简单的响应一个友好的提示页面//        ModelAndView modelAndView = new ModelAndView();//        if(e instanceof RuntimeException ){//            modelAndView.setViewName("/error1.html");//        }else{//            modelAndView.setViewName("/error2.html");//        }// 2. 前后端分离开发,响应json格式的字符串 {"code": 200,"message":"","data":{"username":"haohao","age":18}}String resultJson = "{\"code\": 500,\"message\":\"异常\",\"data\":{\"username\":\"haohao\",\"age\":18}}";try {response.getWriter().write(resultJson);} catch (IOException ex) {ex.printStackTrace();}return null;}
}
此时 访问exception1或exception2时,返回如下json串

改善3:使用注解的方式,更加灵活(常用)
新建类(ExceptionByAnno):
@ControllerAdvice
public class ExceptionByAnno {@ExceptionHandler(RuntimeException.class)public ModelAndView RuntimeExceptionResolverMethod(Exception exception){System.out.println("exception:"+exception); // exception:java.lang.ArithmeticException: / by zeroModelAndView modelAndView = new ModelAndView();modelAndView.setViewName("/error1.html");return modelAndView;}@ExceptionHandler(IOException.class)@ResponseBodypublic Result IOExceptionResolverMethod(Exception exception){System.out.println("exception:"+exception); // exception:java.io.FileNotFoundException: C:\xx\xx\xx.xx (系统找不到指定的路径。)Result result = new Result(500,"","");return result;}@ExceptionHandler(FileNotFoundException.class)public ModelAndView FileNotFoundExceptionResolverMethod(Exception exception){System.out.println("exception:"+exception); // exception:java.io.FileNotFoundException: C:\xx\xx\xx.xx (系统找不到指定的路径。)ModelAndView modelAndView = new ModelAndView();modelAndView.setViewName("/error2.html");return modelAndView;}}
IOExceptionResolverMethod和FileNotFoundExceptionResolverMethod都能对exception2进行处理,如果两个都开启,优先选中更匹配的(FileNotFoundExceptionResolverMethod)
7.3 异常处理机制原理刨析
只看,异常处理器如何响应的源码
两种模式
- 返回视图的,即RuntimeExceptionResolverMethod方法
- 返回对象的,即IOExceptionResolverMethod方法
源码刨析:
从DispatcherServlet的doDispatch方法来看
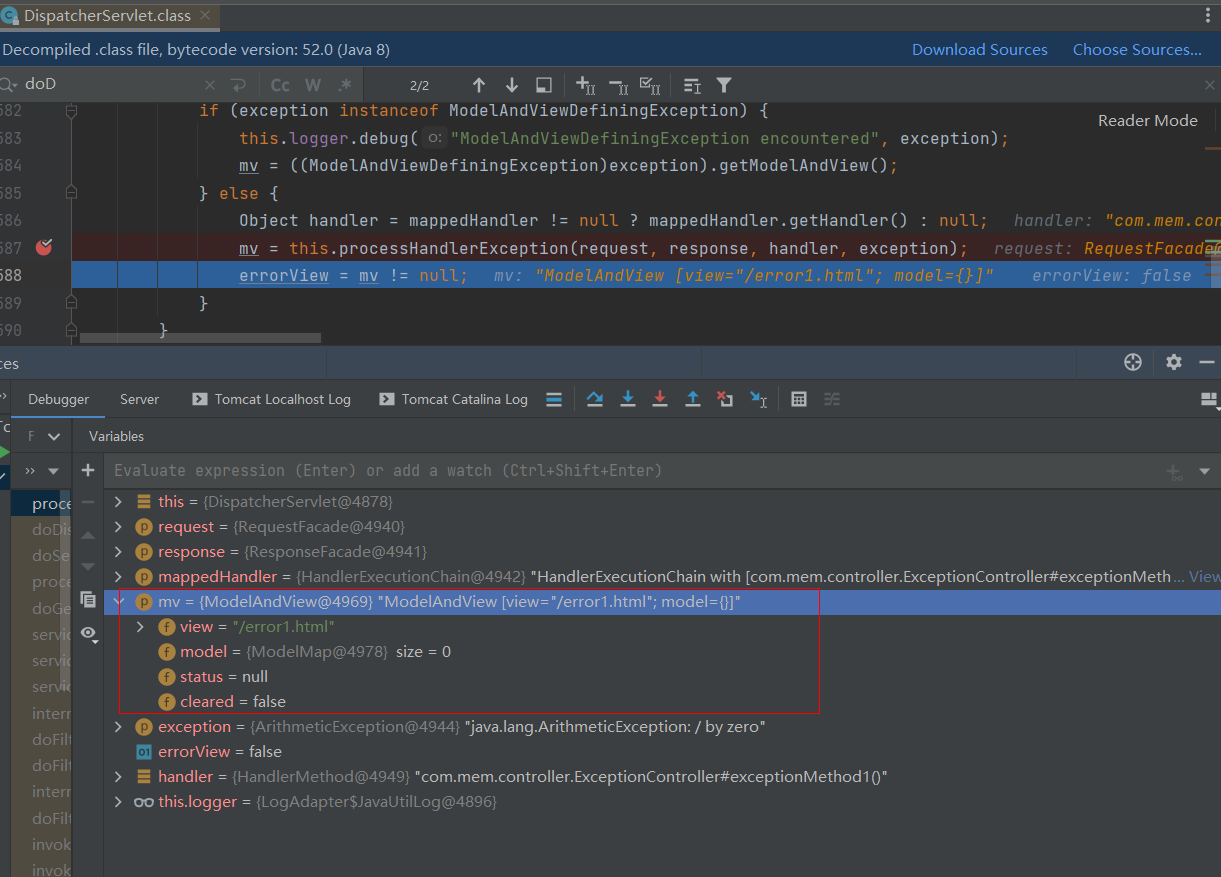
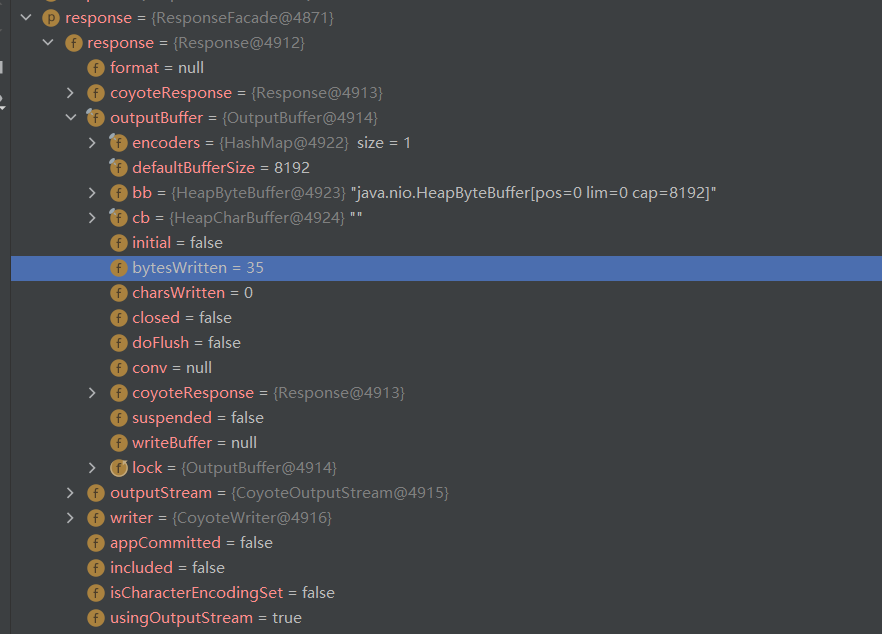
public class DispatcherServlet extends FrameworkServlet {protected void doDispatch(HttpServletRequest request, HttpServletResponse response) throws Exception {// 处理异常的代码在这this.processDispatchResult(processedRequest, response, mappedHandler, mv, (Exception)dispatchException);}private void processDispatchResult(HttpServletRequest request, HttpServletResponse response, @Nullable HandlerExecutionChain mappedHandler, @Nullable ModelAndView mv, @Nullable Exception exception) throws Exception {// 这里是调用异常处理的方法// 当访问的方法是返回视图的这种模式时,会将返回的视图赋值给mv 如图1所示// 当访问的方法是返回字符串的这种模式时,会将返回的字符串放入response响应的缓存里面 如图2所示mv = this.processHandlerException(request, response, handler, exception);}
}
图一:此时mv的view="/error1.html",是因为在RuntimeExceptionResolverMethod方法中设置了view
图二:此时 mv 是 空,bytesWritten = 35 是因为返回内容{"code":500,"message":"","data":""}长度为35
7.4 SpringMVC 常用的异常解析器
SpringMVC相关的处理器异常解析器继承体系如下:


HandlerExceptionResolverComposite 是一个组合体,内部包含了ExceptionHandlerExceptionResolver + DefaultHandlerExceptionResolver + ResponseStatusExceptionResolver
完结撒花
🌹🌹🌹🌹






![[vue-router]vue3.x Hash路由前缀问题](https://img-blog.csdnimg.cn/7e8e9690990a4ea28ef024c88b94e21c.png)
