购物车页面
结算区域
把结算区域封装为组件
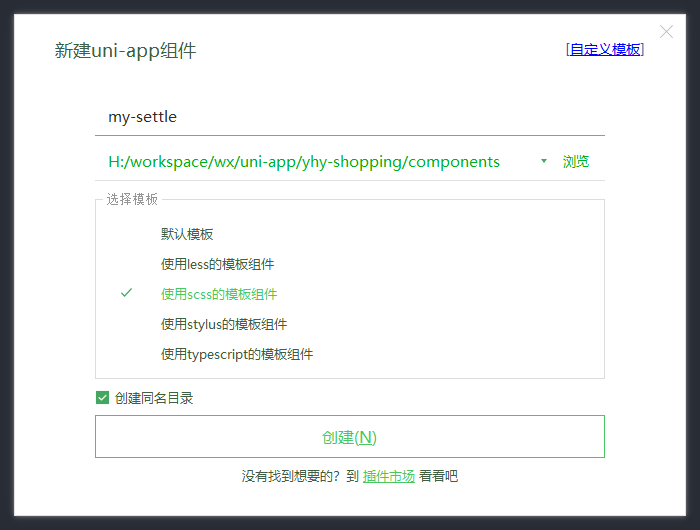
1. 在 components 目录中,新建 my-settle 结算组件:
2. 初始化 my-settle 组件的基本结构和样式:
<template><view class="my-settle-container">结算组件</view>
</template><script>export default {name: "my-settle",data() {return {};}}
</script><style lang="scss">.my-settle-container {/* 底部固定定位 */position: fixed;bottom: 0;left: 0;/* 设置宽高和背景色 */width: 100%;height: 50px;background-color: cyan;}
</style>
3. 在 cart.vue 页面中使用自定义的 my-settle 组件,并美化页面样式,防止页面底部被覆 盖:
<template>
<view class="cart-container">
<!-- 使用自定义的 address 组件 -->
<!-- 购物车商品列表的标题区域 -->
<!-- 商品列表区域 -->
<!-- 结算区域 -->
<my-settle></my-settle>
</view>
</template>
<style lang="scss">
.cart-container {
padding-bottom: 50px;
}
</style>
渲染结算区域的结构和样式
1. 定义如下的 UI 结构:
<!-- 最外层的容器 --><view class="my-settle-container"><!-- 全选区域 --><label class="radio"><radio color="#C00000" :checked="true" /><text>全选</text></label><!-- 合计区域 --><view class="amount-box">合计:<text class="amount">¥1234.00</text></view><!-- 结算按钮 --><view class="btn-settle">结算(0)</view></view>2.美化样式
.my-settle-container {position: fixed;bottom: 0;left: 0;width: 100%;height: 50px;// 将背景色从 cyan 改为 whitebackground-color: white;display: flex;justify-content: space-between;align-items: center;padding-left: 5px;font-size: 14px;.radio {display: flex;align-items: center;}.amount {color: #c00000;}.btn-settle {height: 50px;min-width: 100px;background-color: #c00000;color: white;line-height: 50px;text-align: center;padding: 0 10px;}}动态渲染已勾选商品的总数量
1. 在 store/cart.js 模块中,定义一个名称为 checkedCount 的 getters,用来统计已勾选商 品的总数量:
// 勾选的商品的总数量checkedCount(state) {// 先使用 filter 方法,从购物车中过滤器已勾选的商品// 再使用 reduce 方法,将已勾选的商品总数量进行累加// reduce() 的返回值就是已勾选的商品的总数量return state.cart.filter(x => x.goods_state).reduce((total, item) =>total += item.goods_count, 0)}2. 在 my-settle 组件中,通过 mapGetters 辅助函数,将需要的 getters 映射到当前组件中使 用:
import {mapGetters} from 'vuex'export default {name: "my-settle",computed: {...mapGetters('m_cart', ['checkedCount']),},data() {return {};}}3. 将 checkedCount 的值渲染到页面中:
<!-- 结算按钮 --><view class="btn-settle">结算({{checkedCount}})</view>动态渲染全选按钮的选中状态
1. 使用 mapGetters 辅助函数,将商品的总数量映射到当前组件中使用,并定义一个叫做 isFullCheck 的计算属性:
computed: {// 1. 将 total 映射到当前组件中...mapGetters('m_cart', ['checkedCount', 'total']),// 2. 是否全选isFullCheck() {return this.total === this.checkedCount},},2. 为 radio 组件动态绑定 checked 属性的值:
<!-- 全选区域 --><label class="radio"><radio color="#C00000" :checked="isFullCheck" /><text>全选</text></label>实现商品的全选/反选功能
1. 在 store/cart.js 模块中,定义一个叫做 updateAllGoodsState 的 mutations 方法,用来 修改所有商品的勾选状态:
// 更新所有商品的勾选状态updateAllGoodsState(state, newState) {// 循环更新购物车中每件商品的勾选状态state.cart.forEach(x => x.goods_state = newState)// 持久化存储到本地this.commit('m_cart/saveToStorage')}2. 在 my-settle 组件中,通过 mapMutations 辅助函数,将需要的 mutations 方法映射到当前 组件中使用:
// 1. 按需导入 mapMutations 辅助函数
import { mapGetters, mapMutations } from 'vuex'
export default {
// 省略其它代码
methods: {
// 2. 使用 mapMutations 辅助函数,把 m_cart 模块提供的
updateAllGoodsState 方法映射到当前组件中使用
...mapMutations('m_cart', ['updateAllGoodsState']),
},
}
3. 为 UI 中的 label 组件绑定 click 事件处理函数:
<!-- 全选区域 --><label class="radio" @click="changeAllState"><radio color="#C00000" :checked="isFullCheck" /><text>全选</text></label>4. 在 my-settle 组件的 methods 节点中,声明 changeAllState 事件处理函数:
methods: {// 2. 使用 mapMutations 辅助函数,把 m_cart 模块提供的updateAllGoodsState 方法映射到当前组件中使用...mapMutations('m_cart', ['updateAllGoodsState']),// label 的点击事件处理函数changeAllState() {// 修改购物车中所有商品的选中状态// !this.isFullCheck 表示:当前全选按钮的状态取反之后,就是最新的勾选状态this.updateAllGoodsState(!this.isFullCheck)}},动态渲染已勾选商品的总价格
1. 在 store/cart.js 模块中,定义一个叫做 checkedGoodsAmount 的 getters,用来统计已勾 选商品的总价格:
// 已勾选的商品的总价checkedGoodsAmount(state) {// 先使用 filter 方法,从购物车中过滤器已勾选的商品// 再使用 reduce 方法,将已勾选的商品数量 * 单价之后,进行累加// reduce() 的返回值就是已勾选的商品的总价// 最后调用 toFixed(2) 方法,保留两位小数return state.cart.filter(x => x.goods_state).reduce((total, item) => total += item.goods_count *item.goods_price, 0).toFixed(2)}2. 在 my-settle 组件中,使用 mapGetters 辅助函数,把需要的 checkedGoodsAmount 映射 到当前组件中使用:
...mapGetters('m_cart', ['total', 'checkedCount', 'checkedGoodsAmount']),
3. 在组件的 UI 结构中,渲染已勾选的商品的总价:
<!-- 合计区域 -->
<view class="amount-box">
合计:<text class="amount">¥{{checkedGoodsAmount}}</text>
</view>
动态计算购物车徽标的数值

watch: {// 监听 total 值的变化total() {// 调用 methods 中的 setBadge 方法,重新为 tabBar 的数字徽章赋值this.setBadge()},},渲染购物车为空时的页面结构

<template>
<view class="cart-container" v-if="cart.length !== 0">
<!-- 使用自定义的 address 组件 -->
<!-- 购物车商品列表的标题区域 -->
<!-- 商品列表区域 -->
<!-- 结算区域 -->
</view>
<!-- 空白购物车区域 -->
<view class="empty-cart" v-else>
<image src="/static/cart_empty@2x.png" class="empty-img"></image>
<text class="tip-text">空空如也~</text>
</view>
</template>
3. 美化空白购物车区域的样式:
//空白区域购物车样式.empty-cart {display: flex;flex-direction: column;align-items: center;padding-top: 150px;.empty-img {width: 90px;height: 90px;}.tip-text {font-size: 12px;color: gray;margin-top: 15px;}}分支提交
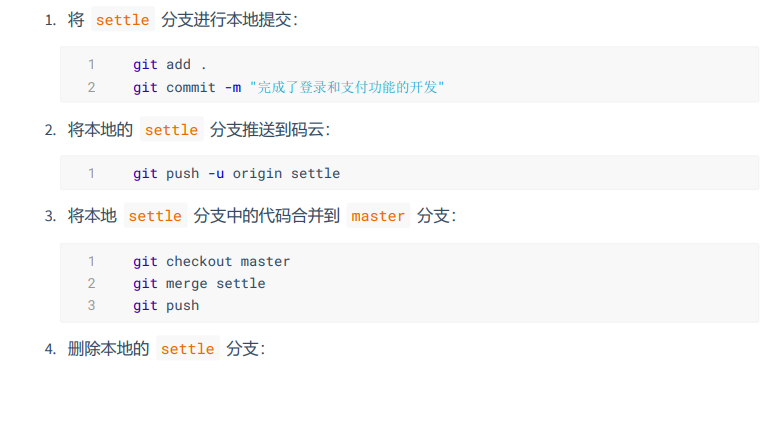
登录与支付
创建 settle 分支

点击结算按钮进行条件判断
说明:用户点击了结算按钮之后,需要先后判断是否勾选了要结算的商品、是否选择了收货地 址、是否登录。
1. 在 my-settle 组件中,为结算按钮绑定点击事件处理函数:
<!-- 结算按钮 -->
<view class="btn-settle" @click="settlement">结算({{checkedCount}})</view>
2. 在 my-settle 组件的 methods 节点中声明 settlement 事件处理函数如下:
// 点击了结算按钮settlement() {// 1. 先判断是否勾选了要结算的商品if (!this.checkedCount) return uni.$showMsg('请选择要结算的商品!')// 2. 再判断用户是否选择了收货地址if (!this.addstr) return uni.$showMsg('请选择收货地址!')// 3. 最后判断用户是否登录了if (!this.token) return uni.$showMsg('请先登录!')}3. 在 my-settle 组件中,使用 mapGetters 辅助函数,从 m_user 模块中将 addstr 映射 到当前组件中使用:
computed: {// 1. 将 total 映射到当前组件中...mapGetters('m_cart', ['total', 'checkedCount', 'checkedGoodsAmount']),// addstr 是详细的收货地址...mapGetters('m_user', ['addstr']),// 2. 是否全选isFullCheck() {return this.total === this.checkedCount},},4. 在 store/user.js 模块的 state 节点中,声明 token 字符串:
// state 数据state: () => ({// 3. 读取本地的收货地址数据,初始化 address 对象address: JSON.parse(uni.getStorageSync('address') || '{}'),// 登录成功之后的 token 字符串token: '',}),5. 在 my-settle 组件中,使用 mapState 辅助函数,从 m_user 模块中将 token 映射到当 前组件中使用:
// token 是用户登录成功之后的 token 字符串...mapState('m_user', ['token']),登录
创建登录组件和用户信息组件
1. 在 components 目录中新建登录组件和用户信息组件:
2. 在 my.vue 页面中,通过 mapState 辅助函数,导入需要的 token 字符串:
import badgeMix from '@/mixins/tabbar-badge.js'
// 1. 从 vuex 中按需导入 mapState 辅助函数
import { mapState } from 'vuex'
export default {
mixins: [badgeMix],
computed: {
// 2. 从 m_user 模块中导入需要的 token 字符串
...mapState('m_user', ['token']),
},
data() {
return {}
},
}
3. 在 my.vue 页面中,实现登录组件和用户信息组件的按需展示:
<template><view>
<!--    用户未登录时,显示登录组件 --><my-login v-if="!token"></my-login><!-- 用户登录后,显示用户信息组件 --><my-userinfo v-else></my-userinfo></view>
</template>
实现登录组件的基本布局
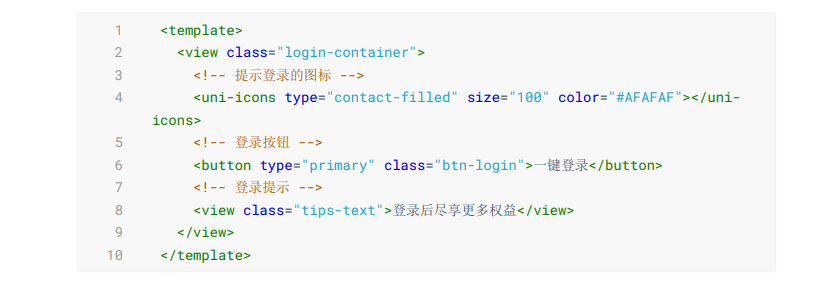
1. 为 my-login 组件定义如下的 UI 结构:
2. 美化登录组件的样式:
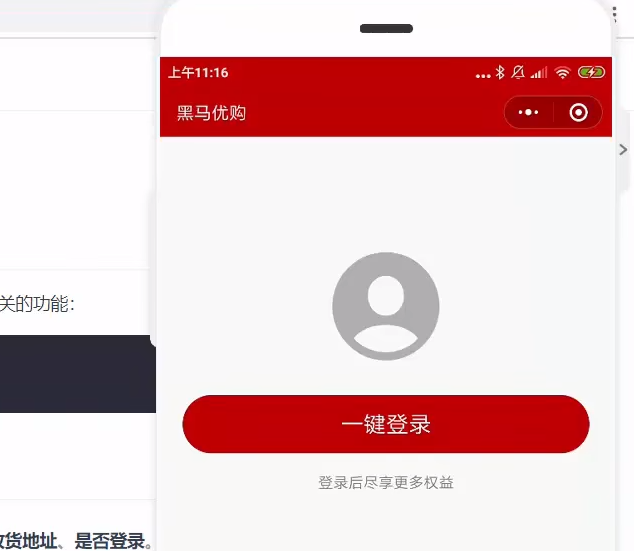
.login-container {// 登录盒子的样式height: 750rpx;display: flex;flex-direction: column;align-items: center;justify-content: center;background-color: #f8f8f8;position: relative;overflow: hidden;// 绘制登录盒子底部的半椭圆造型&::after {content: ' ';display: block;position: absolute;width: 100%;height: 40px;left: 0;bottom: 0;background-color: white;border-radius: 100%;transform: translateY(50%);}// 登录按钮的样式.btn-login {width: 90%;border-radius: 100px;margin: 15px 0;background-color: #c00000;}// 按钮下方提示消息的样式.tips-text {font-size: 12px;color: gray;}}点击登录按钮获取微信用户的基本信息
需求描述:需要获取微信用户的头像、昵称等基本信息。
食大便了,现在要用新东西了。tnnd,现在不能自动获取用户的头像和昵称那些东西了,必须要用户自己填写。看下面这个
头像昵称填写 | 微信开放文档
下面代码全是我改过之后的,需要用户自己上传头像和设置昵称,不然会有默认的设置,用户信息获取到之后会保存到userInfo里面。
<template><view class="login-container"><view class="login-container2"><button class="avatar-wrapper" open-type="chooseAvatar" @chooseavatar="onChooseAvatar"><image class="avatar" :src="avatarUrl"></image></button><input type="nickname" class="weui-input" placeholder="请输入昵称" @input="onInputNickname" /></view><!-- 登录按钮 --><!-- 可以从 @getuserinfo 事件处理函数的形参中,获取到用户的基本信息 --><button type="primary" class="btn-login" @click="getUserProfile">一键登录</button><!-- 登录提示 --><view class="tips-text">登录后尽享更多权益</view></view></template><script>export default {name: "my-login",data() {return {userInfo: {},hasUserInfo: false,avatarUrl: 'https://mmbiz.qpic.cn/mmbiz/icTdbqWNOwNRna42FI242Lcia07jQodd2FJGIYQfG0LAJGFxM4FbnQP6yfMxBgJ0F3YRqJCJ1aPAK2dQagdusBZg/0',nickname: '默认用户'};},methods: {// 获取微信用户的基本信息getUserProfile(e) {uni.getUserProfile({desc: '用于完善会员资料', // 声明获取用户个人信息后的用途,后续会展示在弹窗中,请谨慎填写success: (res) => {this.userInfo = res.userInfo;this.hasUserInfo = true;this.userInfo.avatarUrl=this.avatarUrl;this.userInfo.nickName=this.nickname},fail: (res) => {console.log(res)}})// 判断是否获取用户信息成功// if (e.detail.errMsg === 'getUserProfile:fail auth deny') return// uni.$showMsg('您取消了登录授权!')// 获取用户信息成功, e.detail.userInfo 就是用户的基本信息// console.log(e.detail.userInfo)},onChooseAvatar(e) {const {avatarUrl} = e.detailthis.avatarUrl = avatarUrl},onInputNickname(e) {const {value} = e.target;this.nickname = value;}}}
</script><style lang="scss">.login-container {// 登录盒子的样式height: 750rpx;display: flex;flex-direction: column;align-items: center;justify-content: center;background-color: #f8f8f8;position: relative;overflow: hidden;// 绘制登录盒子底部的半椭圆造型&::after {content: ' ';display: block;position: absolute;width: 100%;height: 40px;left: 0;bottom: 0;background-color: white;border-radius: 100%;transform: translateY(50%);}// 登录按钮的样式.btn-login {width: 90%;border-radius: 100px;margin: 15px 0;background-color: #c00000;}// 按钮下方提示消息的样式.tips-text {font-size: 12px;color: gray;}}.login-container2 {display: flex;flex-direction: column;align-items: center;.avatar-wrapper {margin-bottom: 10px;/* 调整头像框与昵称输入框之间的距离 */width: 80px;/* 调整头像框的宽度 */height: 80px;/* 调整头像框的高度 */border-radius: 50%;/* 使头像框呈圆形 */overflow: hidden;.avatar {width: 100%;height: 100%;object-fit: cover;/* 保持图片比例并填充整个容器 */}}.weui-input {width: 100%;/* 让昵称输入框充满父容器的宽度 */max-width: 200px;/* 设置昵称输入框的最大宽度,避免过宽 */margin-top: 5px;/* 调整昵称输入框与头像框之间的距离 */padding: 10px;/* 添加内边距,增强样式 */border: 1px solid #ccc;/* 添加边框 */border-radius: 5px;/* 圆角边框 */box-sizing: border-box;/* 让边框宽度包含在盒子尺寸内 */font-size: 14px;/* 调整字体大小 */}}
</style>
将用户的基本信息存储到 vuex
1. 在 store/user.js 模块的 state 节点中,声明 userinfo 的信息对象如下:
state: () => ({// 3. 读取本地的收货地址数据,初始化 address 对象address: JSON.parse(uni.getStorageSync('address') || '{}'),// 登录成功之后的 token 字符串token: '',// 用户的基本信息userinfo: JSON.parse(uni.getStorageSync('userinfo') || '{}')}),2. 在 store/user.js 模块的 mutations 节点中,声明如下的两个方法:
// 更新用户的基本信息updateUserInfo(state, userinfo) {state.userinfo = userinfo// 通过 this.commit() 方法,调用 m_user 模块下的 saveUserInfoToStorage 方法, 将 userinfo 对象持久化存储到本地this.commit('m_user/saveUserInfoToStorage')},// 将 userinfo 持久化存储到本地saveUserInfoToStorage(state) {uni.setStorageSync('userinfo', JSON.stringify(state.userinfo))}3. 使用 mapMutations 辅助函数,将需要的方法映射到 my-login 组件中使用:
// 1. 按需导入 mapMutations 辅助函数
import { mapMutations } from 'vuex'   methods: {// 2. 调用 mapMutations 辅助方法,把 m_user 模块中的 updateUserInfo 映射到当前组件中使用...mapMutations('m_user', ['updateUserInfo']),// 获取微信用户的基本信息getUserProfile(e) {let userInfo={}uni.getUserProfile({desc: '用于完善会员资料', // 声明获取用户个人信息后的用途,后续会展示在弹窗中,请谨慎填写success: (res) => {userInfo = res.userInfo;this.hasUserInfo = true;userInfo.avatarUrl = this.avatarUrl;userInfo.nickName = this.nickname// 3. 将用户的基本信息存储到 vuex 中this.updateUserInfo(userInfo)},fail: (res) => {console.log(res)}})// 判断是否获取用户信息成功// if (e.detail.errMsg === 'getUserProfile:fail auth deny') return// uni.$showMsg('您取消了登录授权!')// 获取用户信息成功, e.detail.userInfo 就是用户的基本信息// console.log(e.detail.userInfo)},}
登录获取 Token 字符串
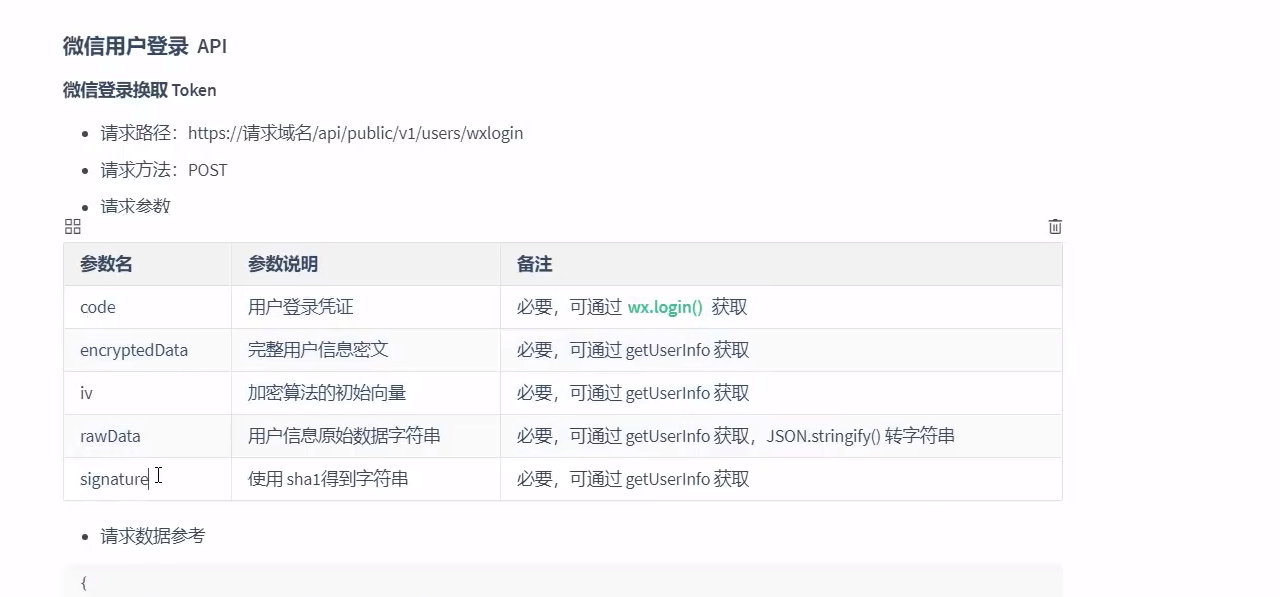
需求说明:当获取到了微信用户的基本信息之后,还需要进一步调用登录相关的接口,从而换取 登录成功之后的 Token 字符串。
1. 在 getUserProfile方法中,预调用 this.getToken() 方法,同时把获取到的用户信息传递进 去:
getUserProfile(e) {let userInfo={}uni.getUserProfile({desc: '用于完善会员资料', // 声明获取用户个人信息后的用途,后续会展示在弹窗中,请谨慎填写success: (res) => {userInfo = res.userInfo;this.hasUserInfo = true;userInfo.avatarUrl = this.avatarUrl;userInfo.nickName = this.nickname// 3. 将用户的基本信息存储到 vuex 中this.updateUserInfo(userInfo)// 获取登录成功后的 Token 字符串this.getToken(e.detail)},fail: (res) => {console.log(res)}})// 判断是否获取用户信息成功// if (e.detail.errMsg === 'getUserProfile:fail auth deny') return// uni.$showMsg('您取消了登录授权!')// 获取用户信息成功, e.detail.userInfo 就是用户的基本信息// console.log(e.detail.userInfo)},2. 在 methods 中定义 getToken 方法,调用登录相关的 API,实现登录的功能:
// 调用登录接口,换取永久的 tokenasync getToken(info) {// 调用微信登录接口let err=null;let res=null;try {const loginResult = await uni.login();res = loginResult} catch (error) {err = error;}// 然后你可以检查 err 或 res 来处理成功或失败的情况if (err) {// 处理错误情况console.error(err);} else {// 处理成功情况console.log(res);// 其他代码...}// 判断是否 wx.login() 调用失败if (err || res.errMsg !== 'login:ok') return uni.$showError('登录失败!')// 准备参数对象const query = {code: res.code,encryptedData: info.encryptedData,iv: info.iv,rawData: info.rawData,signature: info.signature}console.log(query)// 换取 tokenconst {data: loginResult} = awaituni.$http.post('/api/public/v1/users/wxlogin', query)console.log(loginResult)if (loginResult.meta.status !== 200) return uni.$showMsg('登录失败!')uni.$showMsg('登录成功')}将 Token 存储到 vuex
1. 在 store/user.js 模块的 mutations 节点中,声明如下的两个方法:
// 更新 token 字符串updateToken(state, token) {state.token = token// 通过 this.commit() 方法,调用 m_user 模块下的 saveTokenToStorage 方法,将 token 字符串持久化存储到本地this.commit('m_user/saveTokenToStorage')},// 将 token 字符串持久化存储到本地saveTokenToStorage(state) {uni.setStorageSync('token', state.token)}2. 修改 store/user.js 模块的 state 节点如下:
// 登录成功之后的 token 字符串
token: uni.getStorageSync('token') || '',
3. 在 my-login 组件中,把 vuex 中的 updateToken 方法映射到当前组件中使用:
...mapMutations('m_user', ['updateUserInfo', 'updateToken'])//在getToken方法里面更新state里的token
//这里不管statu多少都显示成功登录// if (loginResult.meta.status !== 200) return uni.$showMsg('登录失败!')uni.$showMsg('登录成功')// 2. 更新 vuex 中的 token// this.updateToken(loginResult.message.token)this.updateToken("testToken")
这里有个问题,黑马的这个接口已经不能正常返回token了,所以上面假装登录成功然后返回一个自定义的token.
最后整个my-login组件的代码如下
<template><view class="login-container"><view class="login-container2"><button class="avatar-wrapper" open-type="chooseAvatar" @chooseavatar="onChooseAvatar"><image class="avatar" :src="avatarUrl"></image></button><input type="nickname" class="weui-input" placeholder="请输入昵称" @input="onInputNickname" /></view><!-- 登录按钮 --><!-- 可以从 @getuserinfo 事件处理函数的形参中,获取到用户的基本信息 --><button type="primary" class="btn-login" @click="getUserProfile">一键登录</button><!-- 登录提示 --><view class="tips-text">登录后尽享更多权益</view></view></template><script>// 1. 按需导入 mapMutations 辅助函数import {resolveDirective} from 'vue';import {mapMutations} from 'vuex'export default {name: "my-login",data() {return {hasUserInfo: false,avatarUrl: 'https://mmbiz.qpic.cn/mmbiz/icTdbqWNOwNRna42FI242Lcia07jQodd2FJGIYQfG0LAJGFxM4FbnQP6yfMxBgJ0F3YRqJCJ1aPAK2dQagdusBZg/0',nickname: '默认用户'};},methods: {// 2. 调用 mapMutations 辅助方法,把 m_user 模块中的 updateUserInfo 映射到当前组件中使用
...mapMutations('m_user', ['updateUserInfo', 'updateToken']),// 获取微信用户的基本信息getUserProfile(e) {let userInfo = {}uni.getUserProfile({desc: '用于完善会员资料', // 声明获取用户个人信息后的用途,后续会展示在弹窗中,请谨慎填写success: (res) => {userInfo = res.userInfo;this.hasUserInfo = true;userInfo.avatarUrl = this.avatarUrl;userInfo.nickName = this.nickname// 3. 将用户的基本信息存储到 vuex 中this.updateUserInfo(userInfo)// 获取登录成功后的 Token 字符串this.getToken(res)},fail: (res) => {console.log(res)}})// 判断是否获取用户信息成功// if (e.detail.errMsg === 'getUserProfile:fail auth deny') return// uni.$showMsg('您取消了登录授权!')// 获取用户信息成功, e.detail.userInfo 就是用户的基本信息// console.log(e.detail.userInfo)}, // 调用登录接口,换取永久的 tokenasync getToken(info) {// 调用微信登录接口let err=null;let res=null;try {const loginResult = await uni.login();res = loginResult} catch (error) {err = error;}// 然后你可以检查 err 或 res 来处理成功或失败的情况if (err) {// 处理错误情况console.error(err);} else {// 处理成功情况console.log(res);// 其他代码...}// 判断是否 wx.login() 调用失败if (err || res.errMsg !== 'login:ok') return uni.$showError('登录失败!')// 准备参数对象const query = {code: res.code,encryptedData: info.encryptedData,iv: info.iv,rawData: info.rawData,signature: info.signature}// 换取 tokenconst {data: loginResult} = awaituni.$http.post('/api/public/v1/users/wxlogin', query)// if (loginResult.meta.status !== 200) return uni.$showMsg('登录失败!')uni.$showMsg('登录成功')// 2. 更新 vuex 中的 token// this.updateToken(loginResult.message.token)this.updateToken("testToken")},onChooseAvatar(e) {const {avatarUrl} = e.detailthis.avatarUrl = avatarUrl},onInputNickname(e) {const {value} = e.target;this.nickname = value;}}}
</script><style lang="scss">.login-container {// 登录盒子的样式height: 750rpx;display: flex;flex-direction: column;align-items: center;justify-content: center;background-color: #f8f8f8;position: relative;overflow: hidden;// 绘制登录盒子底部的半椭圆造型&::after {content: ' ';display: block;position: absolute;width: 100%;height: 40px;left: 0;bottom: 0;background-color: white;border-radius: 100%;transform: translateY(50%);}// 登录按钮的样式.btn-login {width: 90%;border-radius: 100px;margin: 15px 0;background-color: #c00000;}// 按钮下方提示消息的样式.tips-text {font-size: 12px;color: gray;}}.login-container2 {display: flex;flex-direction: column;align-items: center;.avatar-wrapper {margin-bottom: 10px;/* 调整头像框与昵称输入框之间的距离 */width: 80px;/* 调整头像框的宽度 */height: 80px;/* 调整头像框的高度 */border-radius: 50%;/* 使头像框呈圆形 */overflow: hidden;.avatar {width: 100%;height: 100%;object-fit: cover;/* 保持图片比例并填充整个容器 */}}.weui-input {width: 100%;/* 让昵称输入框充满父容器的宽度 */max-width: 200px;/* 设置昵称输入框的最大宽度,避免过宽 */margin-top: 5px;/* 调整昵称输入框与头像框之间的距离 */padding: 10px;/* 添加内边距,增强样式 */border: 1px solid #ccc;/* 添加边框 */border-radius: 5px;/* 圆角边框 */box-sizing: border-box;/* 让边框宽度包含在盒子尺寸内 */font-size: 14px;/* 调整字体大小 */}}
</style>
用户信息
实现用户头像昵称区域的基本布局
1. 在 my-userinfo 组件中,定义如下的 UI 结构:
<template><view class="my-userinfo-container"><!-- 头像昵称区域 --><view class="top-box"><image src="" class="avatar"></image><view class="nickname">xxx</view></view></view>
</template>
2. 美化当前组件的样式:
.my-userinfo-container {height: 100%;// 为整个组件的结构添加浅灰色的背景background-color: #f4f4f4;.top-box {height: 400rpx;background-color: #c00000;display: flex;flex-direction: column;align-items: center;justify-content: center;.avatar {display: block;width: 90px;height: 90px;border-radius: 45px;border: 2px solid white;box-shadow: 0 1px 5px black;}.nickname {color: white;font-weight: bold;font-size: 16px;margin-top: 10px;}}}3. 在 my.vue 页面中,为最外层包裹性质的 view 容器,添加 class="my-container" 的类 名,并美化样式如下:
page,
.my-container {
height: 100%;
}
渲染用户的头像和昵称
1. 在 my-userinfo 组件中,通过 mapState 辅助函数,将需要的成员映射到当前组件中使用:
// 按需导入 mapState 辅助函数
import { mapState } from 'vuex'
export default {
computed: {
// 将 m_user 模块中的 userinfo 映射到当前页面中使用
...mapState('m_user', ['userinfo']),
},
data() {
return {}
},
}
2. 将用户的头像和昵称渲染到页面中:
<!-- 头像昵称区域 --><view class="top-box"><image :src="userinfo.avatarUrl" class="avatar"></image><view class="nickname">{{userinfo.nickName}}</view></view>渲染第一个面板区域
 我一直想要的效果,一个区域叠放在另一个区域上面,原来是通过top=-10px实现的
1. 在 my-userinfo 组件中,定义如下的 UI 结构:
<!-- 面板的列表区域 --><view class="panel-list"><!-- 第一个面板 --><view class="panel"><!-- panel 的主体区域 --><view class="panel-body"><!-- panel 的 item 项 --><view class="panel-item"><text>8</text><text>收藏的店铺</text></view><view class="panel-item"><text>14</text><text>收藏的商品</text></view><view class="panel-item"><text>18</text><text>关注的商品</text></view><view class="panel-item"><text>84</text><text>足迹</text></view></view></view><!-- 第二个面板 --><!-- 第三个面板 --></view>2. 美化第一个面板的样式:
.panel-list {padding: 0 10px;position: relative;top: -10px;.panel {background-color: white;border-radius: 3px;margin-bottom: 8px;.panel-body {display: flex;justify-content: space-around;.panel-item {display: flex;flex-direction: column;align-items: center;justify-content: space-around;font-size: 13px;padding: 10px 0;}}}}渲染第二个面板区域
1. 定义第二个面板区域的 UI 结构:
<!-- 第二个面板 --><view class="panel"><!-- 面板的标题 --><view class="panel-title">我的订单</view><!-- 面板的主体 --><view class="panel-body"><!-- 面板主体中的 item 项 --><view class="panel-item"><image src="/static/my-icons/icon1.png" class="icon"></image><text>待付款</text></view><view class="panel-item"><image src="/static/my-icons/icon2.png" class="icon"></image><text>待收货</text></view><view class="panel-item"><image src="/static/my-icons/icon3.png" class="icon"></image><text>退款/退货</text></view><view class="panel-item"><image src="/static/my-icons/icon4.png" class="icon"></image><text>全部订单</text></view></view></view>2. 对之前的 SCSS 样式进行改造,从而美化第二个面板的样式:
.panel {background-color: white;border-radius: 3px;margin-bottom: 8px;.panel-title {line-height: 45px;padding-left: 10px;font-size: 15px;border-bottom: 1px solid #f4f4f4;}.panel-body {display: flex;justify-content: space-around;.panel-item {display: flex;flex-direction: column;align-items: center;justify-content: space-around;font-size: 13px;padding: 10px 0;.icon {width: 35px;height: 35px;}}}}}渲染第三个面板区域
1. 定义第三个面板区域的 UI 结构:
<!-- 第三个面板 --><view class="panel"><view class="panel-list-item"><text>收货地址</text><uni-icons type="arrowright" size="15"></uni-icons></view><view class="panel-list-item"><text>联系客服</text><uni-icons type="arrowright" size="15"></uni-icons></view><view class="panel-list-item"><text>退出登录</text><uni-icons type="arrowright" size="15"></uni-icons></view></view>2. 美化第三个面板区域的样式:
.panel-list-item {
height: 45px;
display: flex;
justify-content: space-between;
align-items: center;
font-size: 15px;
padding: 0 10px;
}
实现退出登录的功能
1. 为第三个面板区域中的 退出登录 项绑定 click 点击事件处理函数:
<view class="panel-list-item" @click="logout"><text>退出登录</text><uni-icons type="arrowright" size="15"></uni-icons></view>2. 在 my-userinfo 组件的 methods 节点中定义 logout 事件处理函数:
这里又进行了一次修改
// 退出登录async logout() {// 询问用户是否退出登录let err=nulllet succ=nulltry{const res = await uni.showModal({title: '提示',content: '确认退出登录吗?'})succ=res} catch (error) {err=error}if (succ && succ.confirm) {// 用户确认了退出登录的操作// 需要清空 vuex 中的 userinfo、token 和 addressthis.updateUserInfo({})this.updateToken('')this.updateAddress({})}}3. 使用 mapMutations 辅助方法,将需要用到的 mutations 方法映射到当前组件中:
// 按需导入辅助函数
import { mapState, mapMutations } from 'vuex'     ...mapMutations('m_user', ['updateUserInfo', 'updateToken','updateAddress']),
三秒后自动跳转
需求描述:在购物车页面,当用户点击 “结算” 按钮时,如果用户没有登录,则 3 秒后自动跳转到 登录页面
1. 在 my-settle 组件的 methods 节点中,声明一个叫做 showTips 的方法,专门用来展示倒 计时的提示消息:
// 展示倒计时的提示消息showTips(n) {// 调用 uni.showToast() 方法,展示提示消息uni.showToast({// 不展示任何图标icon: 'none', // 提示的消息title: '请登录后再结算!' + n + ' 秒后自动跳转到登录页',// 为页面添加透明遮罩,防止点击穿透mask: true,// 1.5 秒后自动消失duration: 1500})}2. 在 data 节点中声明倒计时的秒数:
data() {
return {
// 倒计时的秒数
seconds: 3
}
}
3. 改造 结算 按钮的 click 事件处理函数,如果用户没有登录,则预调用一个叫做 delayNavigate 的方法,进行倒计时的导航跳转:
// 点击了结算按钮settlement() {// 1. 先判断是否勾选了要结算的商品if (!this.checkedCount) return uni.$showMsg('请选择要结算的商品!')// 2. 再判断用户是否选择了收货地址if (!this.addstr) return uni.$showMsg('请选择收货地址!')// 3. 最后判断用户是否登录了,如果没有登录,则调用 delayNavigate() 进行倒计时的导航跳转// if (!this.token) return uni.$showMsg('请先登录!')if (!this.token) return this.delayNavigate()}4. 定义 delayNavigate 方法,初步实现倒计时的提示功能:
// 延迟导航到 my 页面delayNavigate() {// 1. 展示提示消息,此时 seconds 的值等于 3this.showTips(this.seconds)// 2. 创建定时器,每隔 1 秒执行一次setInterval(() => {// 2.1 先让秒数自减 1this.seconds--// 2.2 再根据最新的秒数,进行消息提示this.showTips(this.seconds)}, 1000)}上述代码的问题:定时器不会自动停止,此时秒数会出现等于 0 或小于 0 的情况!
5. 在 data 节点中声明定时器的 Id 如下:
data() {
return {
// 倒计时的秒数
seconds: 3,
// 定时器的 Id
timer: null
}
}
6. 改造 delayNavigate 方法如下:
// 延迟导航到 my 页面delayNavigate() {this.showTips(this.seconds)// 1. 将定时器的 Id 存储到 timer 中this.timer = setInterval(() => {this.seconds--// 2. 判断秒数是否 <= 0if (this.seconds <= 0) {// 2.1 清除定时器clearInterval(this.timer)// 2.2 跳转到 my 页面uni.switchTab({url: '/pages/my/my'})// 2.3 终止后续代码的运行(当秒数为 0 时,不再展示 toast 提示消息)return}this.showTips(this.seconds)}, 1000)},
上述代码的问题:seconds 秒数不会被重置,导致第 2 次,3 次,n 次 的倒计时跳转功能无 法正常工作
7. 进一步改造 delayNavigate 方法,在执行此方法时,立即将 seconds 秒数重置为 3 即 可:
// 延迟导航到 my 页面delayNavigate() {// 把 data 中的秒数重置成 3 秒this.seconds = 3this.showTips(this.seconds)this.timer = setInterval(() => {this.seconds--if (this.seconds <= 0) {clearInterval(this.timer)uni.switchTab({url: '/pages/my/my'})return}this.showTips(this.seconds)}, 1000)}登录成功之后再返回之前的页面
核心实现思路:在自动跳转到登录页面成功之后,把返回页面的信息存储到 vuex 中,从而方便登 录成功之后,根据返回页面的信息重新跳转回去。
返回页面的信息对象,主要包含 { openType, from } 两个属性,其中 openType 表示以哪种方式导 航回之前的页面;from 表示之前页面的 url 地址;
1. 在 store/user.js 模块的 state 节点中,声明一个叫做 redirectInfo 的对象如下:
// 重定向的 object 对象 { openType, from }redirectInfo: null,2. 在 store/user.js 模块的 mutations 节点中,声明一个叫做 updateRedirectInfo 的方 法:
// 更新重定向的信息对象updateRedirectInfo(state, info) {state.redirectInfo = info}3. 在 my-settle 组件中,通过 mapMutations 辅助方法,把 m_user 模块中的 updateRedirectInfo 方法映射到当前页面中使用:
// 把 m_user 模块中的 updateRedirectInfo 方法映射到当前页面中使用
...mapMutations('m_user', ['updateRedirectInfo']),
4. 改造 my-settle 组件 methods 节点中的 delayNavigate 方法,当成功跳转到 my 页面 之 后,将重定向的信息对象存储到 vuex 中:
// 延迟导航到 my 页面delayNavigate() {// 把 data 中的秒数重置成 3 秒this.seconds = 3this.showTips(this.seconds)this.timer = setInterval(() => {this.seconds--if (this.seconds <= 0) {clearInterval(this.timer)uni.switchTab({url: '/pages/my/my',// 页面跳转成功之后的回调函数success: () => {// 调用 vuex 的 updateRedirectInfo 方法,把跳转信息存储到 Store 中this.updateRedirectInfo({// 跳转的方式openType: 'switchTab',// 从哪个页面跳转过去的from: '/pages/cart/cart'})}})return}this.showTips(this.seconds)}, 1000)}5. 在 my-login 组件中,通过 mapState 和 mapMutations 辅助方法,将 vuex 中需要的数据 和方法,映射到当前页面中使用:
// 按需导入辅助函数import {mapMutations,mapState} from 'vuex'export default {computed: {// 调用 mapState 辅助方法,把 m_user 模块中的数据映射到当前用组件中使用...mapState('m_user', ['redirectInfo']),},methods: {// 调用 mapMutations 辅助方法,把 m_user 模块中的方法映射到当前组件中使用...mapMutations('m_user', ['updateUserInfo', 'updateToken','updateRedirectInfo']),},}6. 改造 my-login 组件中的 getToken 方法,当登录成功之后,预调用 this.navigateBack() 方法返回登录之前的页面:
// 调用登录接口,换取永久的 token
async getToken(info) {
// 省略其它代码...
// 判断 vuex 中的 redirectInfo 是否为 null
// 如果不为 null,则登录成功之后,需要重新导航到对应的页面
this.navigateBack()
}
7. 在 my-login 组件中,声明 navigateBack 方法如下:
// 返回登录之前的页面navigateBack() {// redirectInfo 不为 null,并且导航方式为 switchTabif (this.redirectInfo && this.redirectInfo.openType === 'switchTab') {// 调用小程序提供的 uni.switchTab() API 进行页面的导航uni.switchTab({// 要导航到的页面地址url: this.redirectInfo.from,// 导航成功之后,把 vuex 中的 redirectInfo 对象重置为 nullcomplete: () => {this.updateRedirectInfo(null)}})}},微信支付
在请求头中添加 Token 身份认证的字段
1. 原因说明:只有在登录之后才允许调用支付相关的接口,所以必须为有权限的接口添加身份认证 的请求头字段
2. 打开项目根目录下的 main.js ,改造 $http.beforeRequest 请求拦截器中的代码如下:
//请求拦截器
$http.beforeRequest = function(options) {uni.showLoading({title: '数据加载中...'})// 判断请求的是否为有权限的 API 接口if (options.url.indexOf('/my/') !== -1) {// 为请求头添加身份认证字段options.header = {// 字段的值可以直接从 vuex 中进行获取Authorization: store.state.m_user.token,}}
}
微信支付的流程
1. 创建订单
- 请求创建订单的 API 接口:把(订单金额、收货地址、订单中包含的商品信息)发送到服务 器
- 服务器响应的结果:订单编号
2. 订单预支付
- 请求订单预支付的 API 接口:把(订单编号)发送到服务器
- 服务器响应的结果:订单预支付的参数对象 ,里面包含了订单支付相关的必要参数
3. 发起微信支付
- 调用 uni.requestPayment() 这个 API,发起微信支付;把步骤 2 得到的 “订单预支付对 象” 作为参数传递给 uni.requestPayment() 方法
- 监听 uni.requestPayment() 这个 API 的 success , fail , complete 回调函数
创建订单
1. 改造 my-settle 组件中的 settlement 方法,当前三个判断条件通过之后,调用实现微信支 付的方法:
// 点击了结算按钮settlement() {// 1. 先判断是否勾选了要结算的商品if (!this.checkedCount) return uni.$showMsg('请选择要结算的商品!')// 2. 再判断用户是否选择了收货地址if (!this.addstr) return uni.$showMsg('请选择收货地址!')// 3. 最后判断用户是否登录了,如果没有登录,则调用 delayNavigate() 进行倒计时的导航跳转// if (!this.token) return uni.$showMsg('请先登录!')if (!this.token) return this.delayNavigate()// 4. 实现微信支付功能this.payOrder()}2. 在 my-settle 组件中定义 payOrder 方法如下,先实现创建订单的功能:
// 微信支付async payOrder() {// 1. 创建订单// 1.1 组织订单的信息对象const orderInfo = {// 开发期间,注释掉真实的订单价格,// order_price: this.checkedGoodsAmount,// 写死订单总价为 1 分钱order_price: 0.01,consignee_addr: this.addstr,goods: this.cart.filter(x => x.goods_state).map(x => ({goods_id: x.goods_id,goods_number: x.goods_count,goods_price: x.goods_price}))}// 1.2 发起请求创建订单const {data: res} = awaituni.$http.post('/api/public/v1/my/orders/create', orderInfo)if (res.meta.status !== 200) return uni.$showMsg('创建订单失败!')// 1.3 得到服务器响应的“订单编号”const orderNumber = res.message.order_number// 2. 订单预支付// 3. 发起微信支付}订单预支付
1. 改造 my-settle 组件的 payOrder 方法,实现订单预支付功能:
// 2. 订单预支付// 2.1 发起请求获取订单的支付信息const {data: res2} = awaituni.$http.post('/api/public/v1/my/orders/req_unifiedorder', {order_number: orderNumber})// 2.2 预付订单生成失败if (res2.meta.status !== 200) return uni.$showError('预付订单生成失败!')// 2.3 得到订单支付相关的必要参数const payInfo = res2.message.pay发起微信支付
1. 改造 my-settle 组件的 payOrder 方法,实现微信支付的功能:
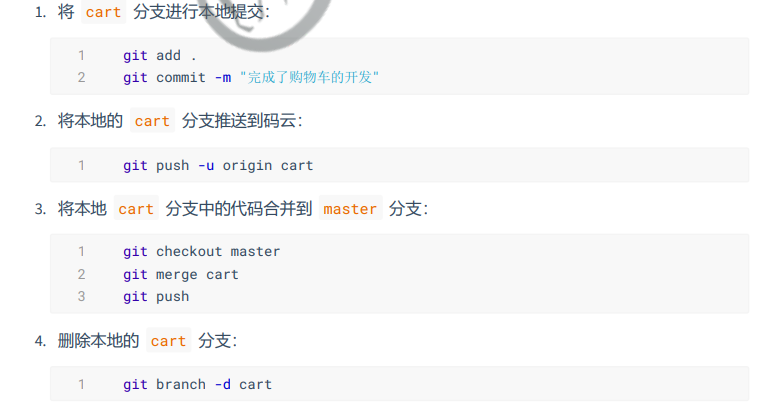
// 3. 发起微信支付// 3.1 调用 uni.requestPayment() 发起微信支付const [err, succ] = await uni.requestPayment(payInfo)// 3.2 未完成支付if (err) return uni.$showMsg('订单未支付!')// 3.3 完成了支付,进一步查询支付的结果const {data: res3} = awaituni.$http.post('/api/public/v1/my/orders/chkOrder', {order_number: orderNumber})// 3.4 检测到订单未支付if (res3.meta.status !== 200) return uni.$showMsg('订单未支付!')// 3.5 检测到订单支付完成uni.showToast({title: '支付完成!',icon: 'success'})分支的合并与提交
提交了个未完成品.除了点击结算之后的订单和支付页面都没有以外其他都还是阔以的。
 发布小程序
发布小程序
为什么要发布
1. 小程序只有发布之后,才能被用户搜索并使用 2. 开发期间的小程序为了便于调试,含有 sourcemap 相关的文件,并且代码没有被压缩,因此体积 较大,不适合直接当作线上版本进行发布 3. 通过执行 “小程序发布”,能够优化小程序的体积,提高小程序的运行性能
发布小程序的流程
1. 点击 HBuilderX 菜单栏上的 发行 -> 小程序-微信(仅适用于uni-app) :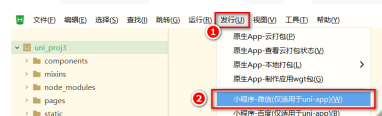
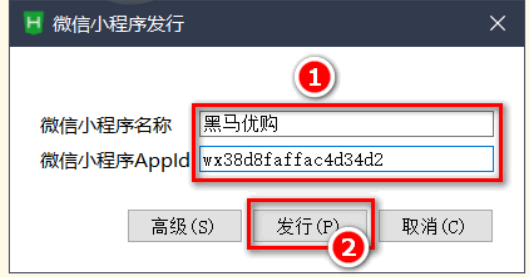
2. 在弹出框中填写要发布的小程序的名称和AppId之后,点击发行按钮:
3. 在 HBuilderX 的控制台中查看小程序发布编译的进度:
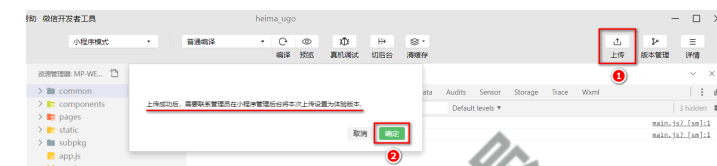
4. 发布编译完成之后,会自动打开一个新的微信开发者工具界面,此时,点击工具栏上的上传按 钮:
5. 填写版本号和项目备注之后,点击上传按钮: 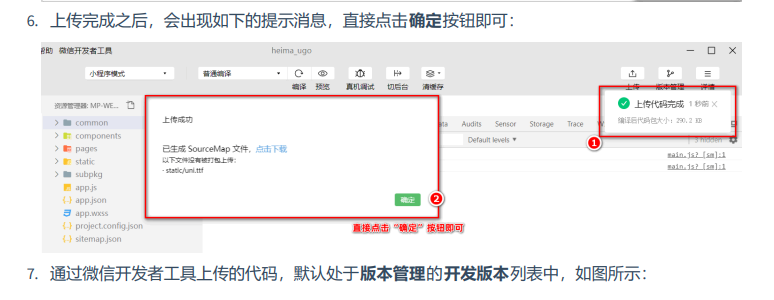
 发布为 Android App 的流程
3. 打开项目根目录中的 manifest.json 配置文件,在基础配置面板中,获取uni-app 应用标 识,并填写应用名称:
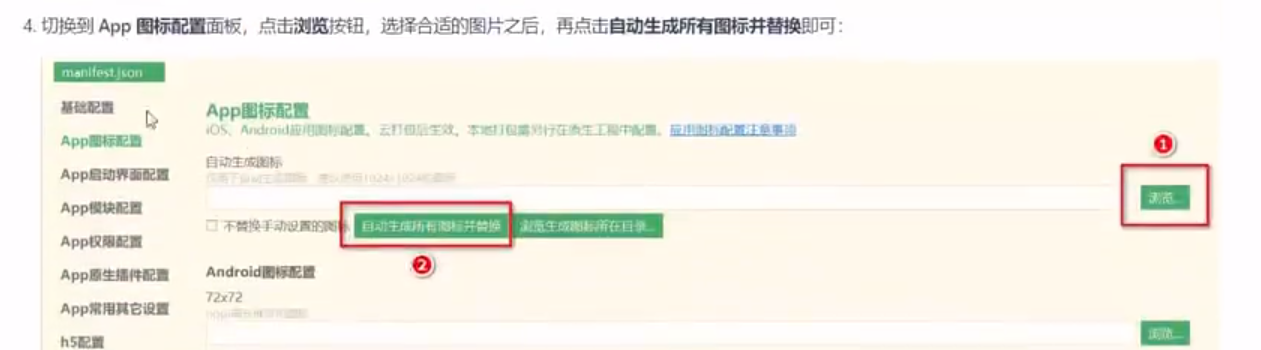
4. 切换到 App 图标配置面板,点击浏览按钮,选择合适的图片之后,再点击自动生成所有图标并 替换即可:
 5. 点击菜单栏上的 发行 -> 原生 App-云打包:
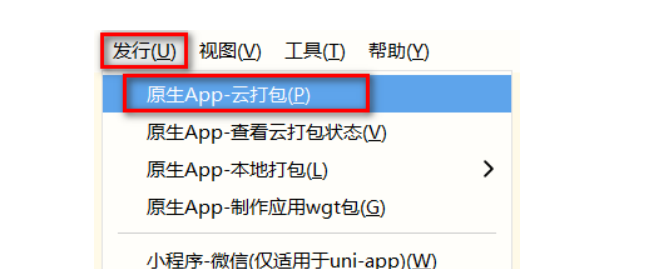
6. 勾选打包配置如下: 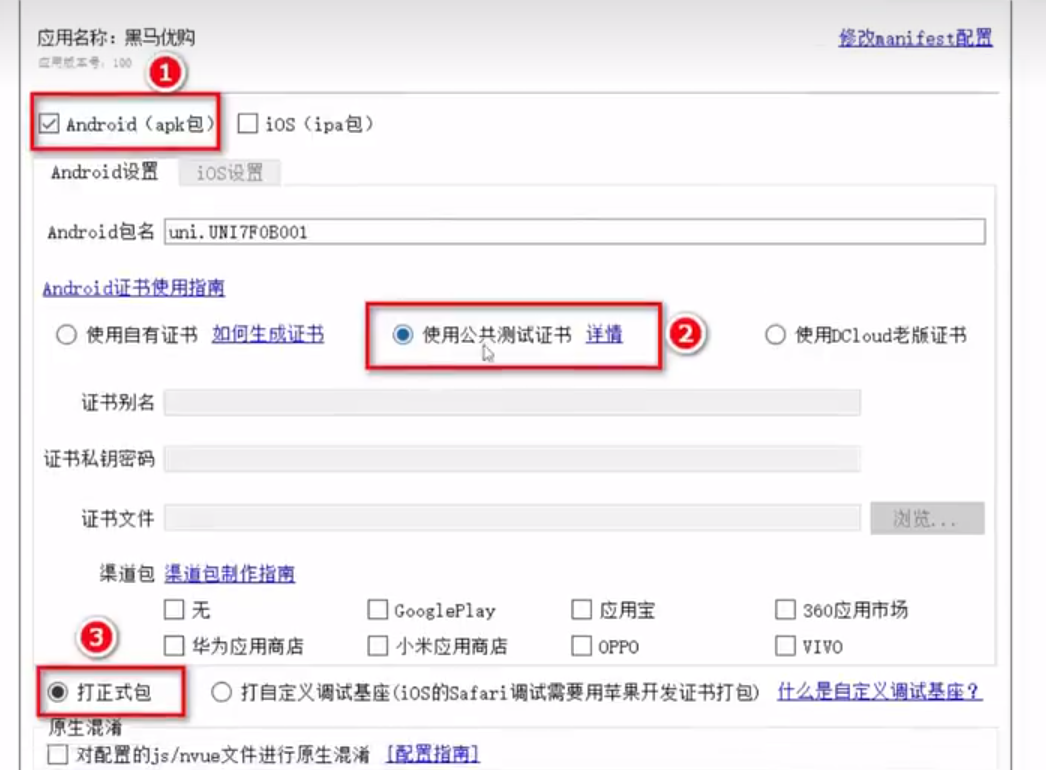
7. 在控制台中查看打包的进度信息:
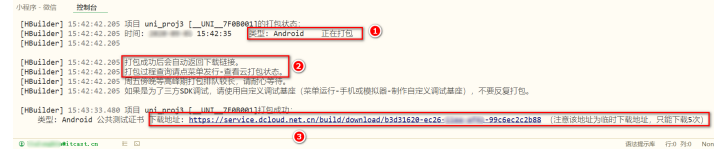
8. 点击链接下载 apk 的安装包,并安装到 Android 手机中查看打包的效果。


![文件上传 [ACTF2020 新生赛]Upload1](https://img-blog.csdnimg.cn/7614308207a84c67b39d215a4a7986e5.png)