黑马React: Redux
Date: November 19, 2023
Sum: Redux基础、Redux工具、调试、美团案例
Redux介绍
Redux 是React最常用的集中状态管理工具,类似于Vue中的Pinia(Vuex),可以独立于框架运行
作用:通过集中管理的方式管理应用的状态
为什么要使用Redux?
- 独立于组件,无视组件之间的层级关系,简化通信问题
- 单项数据流清晰,易于定位bug
- 调试工具配套良好,方便调试
Redux快速体验
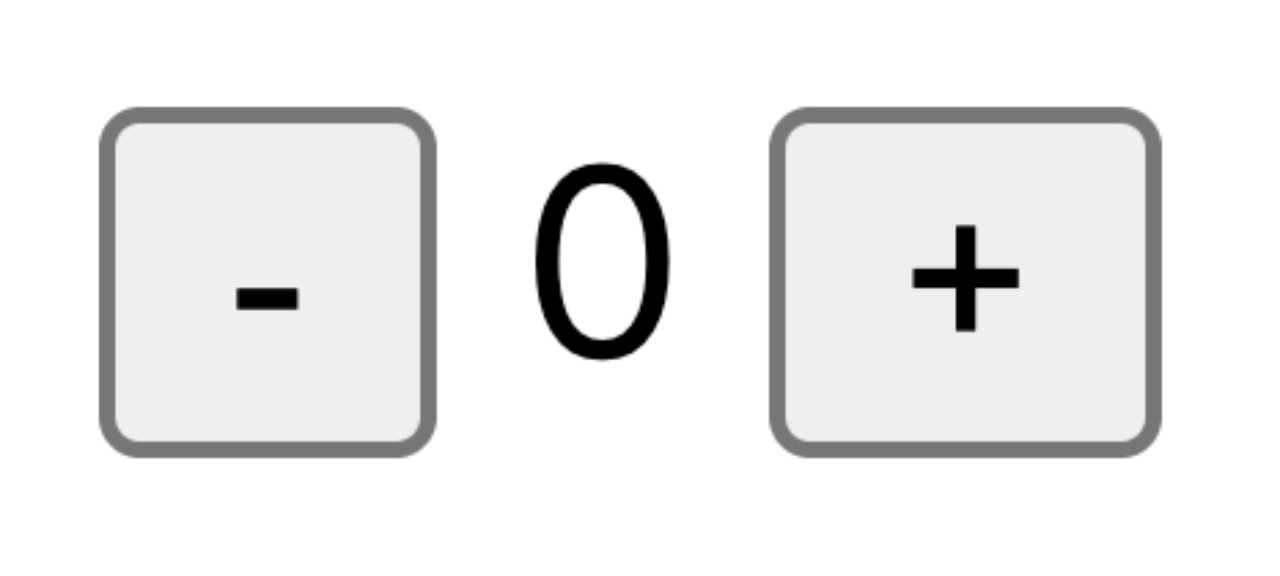
1. 实现计数器
需求:不和任何框架绑定,不使用任何构建工具,使用纯Redux实现计数器
使用步骤:
- 定义一个 reducer 函数 (根据当前想要做的修改返回一个新的状态)
- 使用createStore方法传入 reducer函数 生成一个store实例对象
- 使用store实例的 subscribe方法 订阅数据的变化(数据一旦变化,可以得到通知)
- 使用store实例的 dispatch方法提交action对象 触发数据变化(告诉reducer你想怎么改数据)
- 使用store实例的 getState方法 获取最新的状态数据更新到视图中
代码实现:
<button id="decrement">-</button>
<span id="count">0</span>
<button id="increment">+</button><script src="https://unpkg.com/redux@latest/dist/redux.min.js"></script><script>// 定义reducer函数// 内部主要的工作是根据不同的action 返回不同的statefunction counterReducer (state = { count: 0 }, action) {switch (action.type) {case 'INCREMENT':return { count: state.count + 1 }case 'DECREMENT':return { count: state.count - 1 }default:return state}}// 使用reducer函数生成store实例const store = Redux.createStore(counterReducer)// 订阅数据变化store.subscribe(() => {console.log(store.getState())document.getElementById('count').innerText = store.getState().count})// 增const inBtn = document.getElementById('increment')inBtn.addEventListener('click', () => {store.dispatch({type: 'INCREMENT'})})// 减const dBtn = document.getElementById('decrement')dBtn.addEventListener('click', () => {store.dispatch({type: 'DECREMENT'})})
</script>
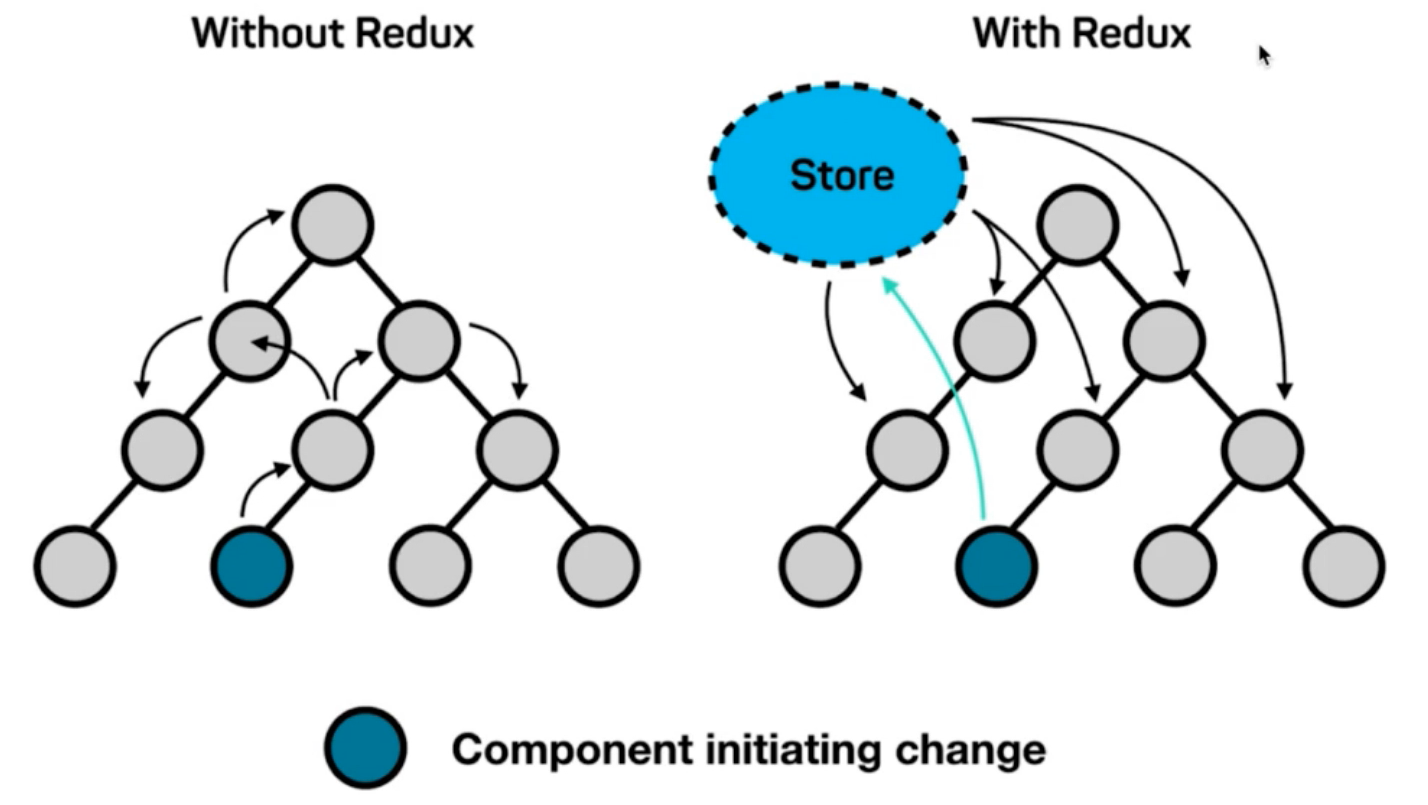
2. Redux数据流架构
Redux的难点是理解它对于数据修改的规则, 下图动态展示了在整个数据的修改中,数据的流向
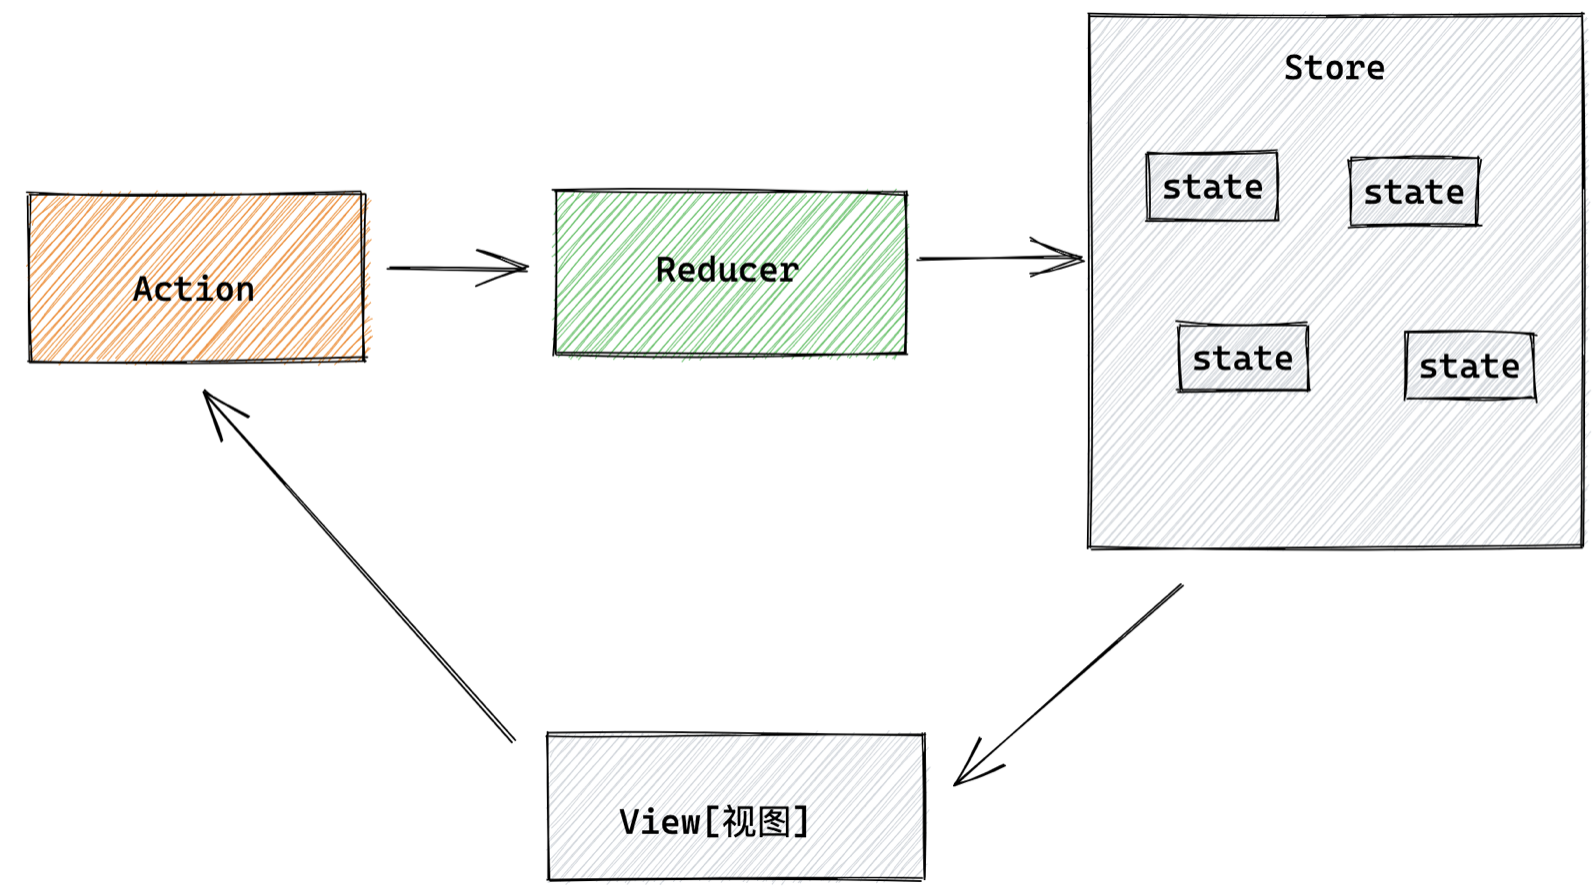
为了职责清晰,Redux代码被分为三个核心的概念,我们学redux,其实就是学这三个核心概念之间的配合,三个概念分别是:
- state: 一个对象 存放着我们管理的数据
- action: 一个对象 用来描述你想怎么改数据
- reducer: 一个函数 根据action的描述更新state
Redux与React - 环境准备
Redux虽然是一个框架无关可以独立运行的插件,但是社区通常还是把它与React绑定在一起使用,以一个计数器案例体验一下Redux + React 的基础使用
1. 配套工具
在React中使用redux,官方要求安装俩个其他插件 - Redux Toolkit 和 react-redux
- Redux Toolkit(RTK)- 官方推荐编写Redux逻辑的方式,是一套工具的集合集,简化书写方式
- react-redux - 用来 链接 Redux 和 React组件 的中间件

2. 配置基础环境
- 使用 CRA 快速创建 React 项目
npx create-react-app react-redux
- 安装配套工具
npm i @reduxjs/toolkit react-redux
- 启动项目
npm run start
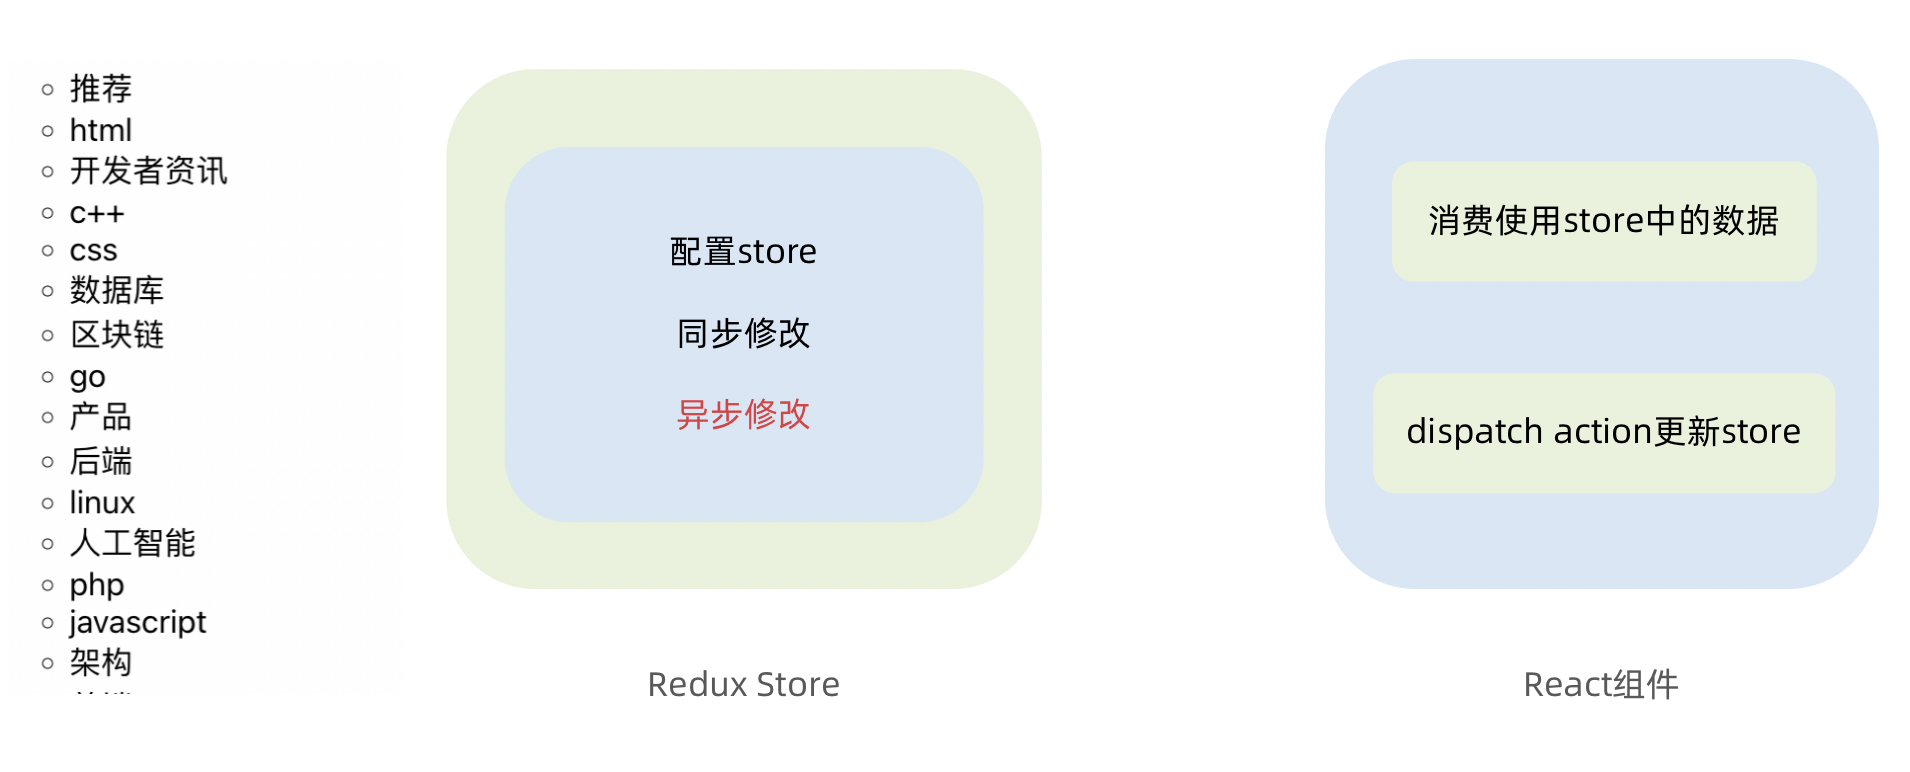
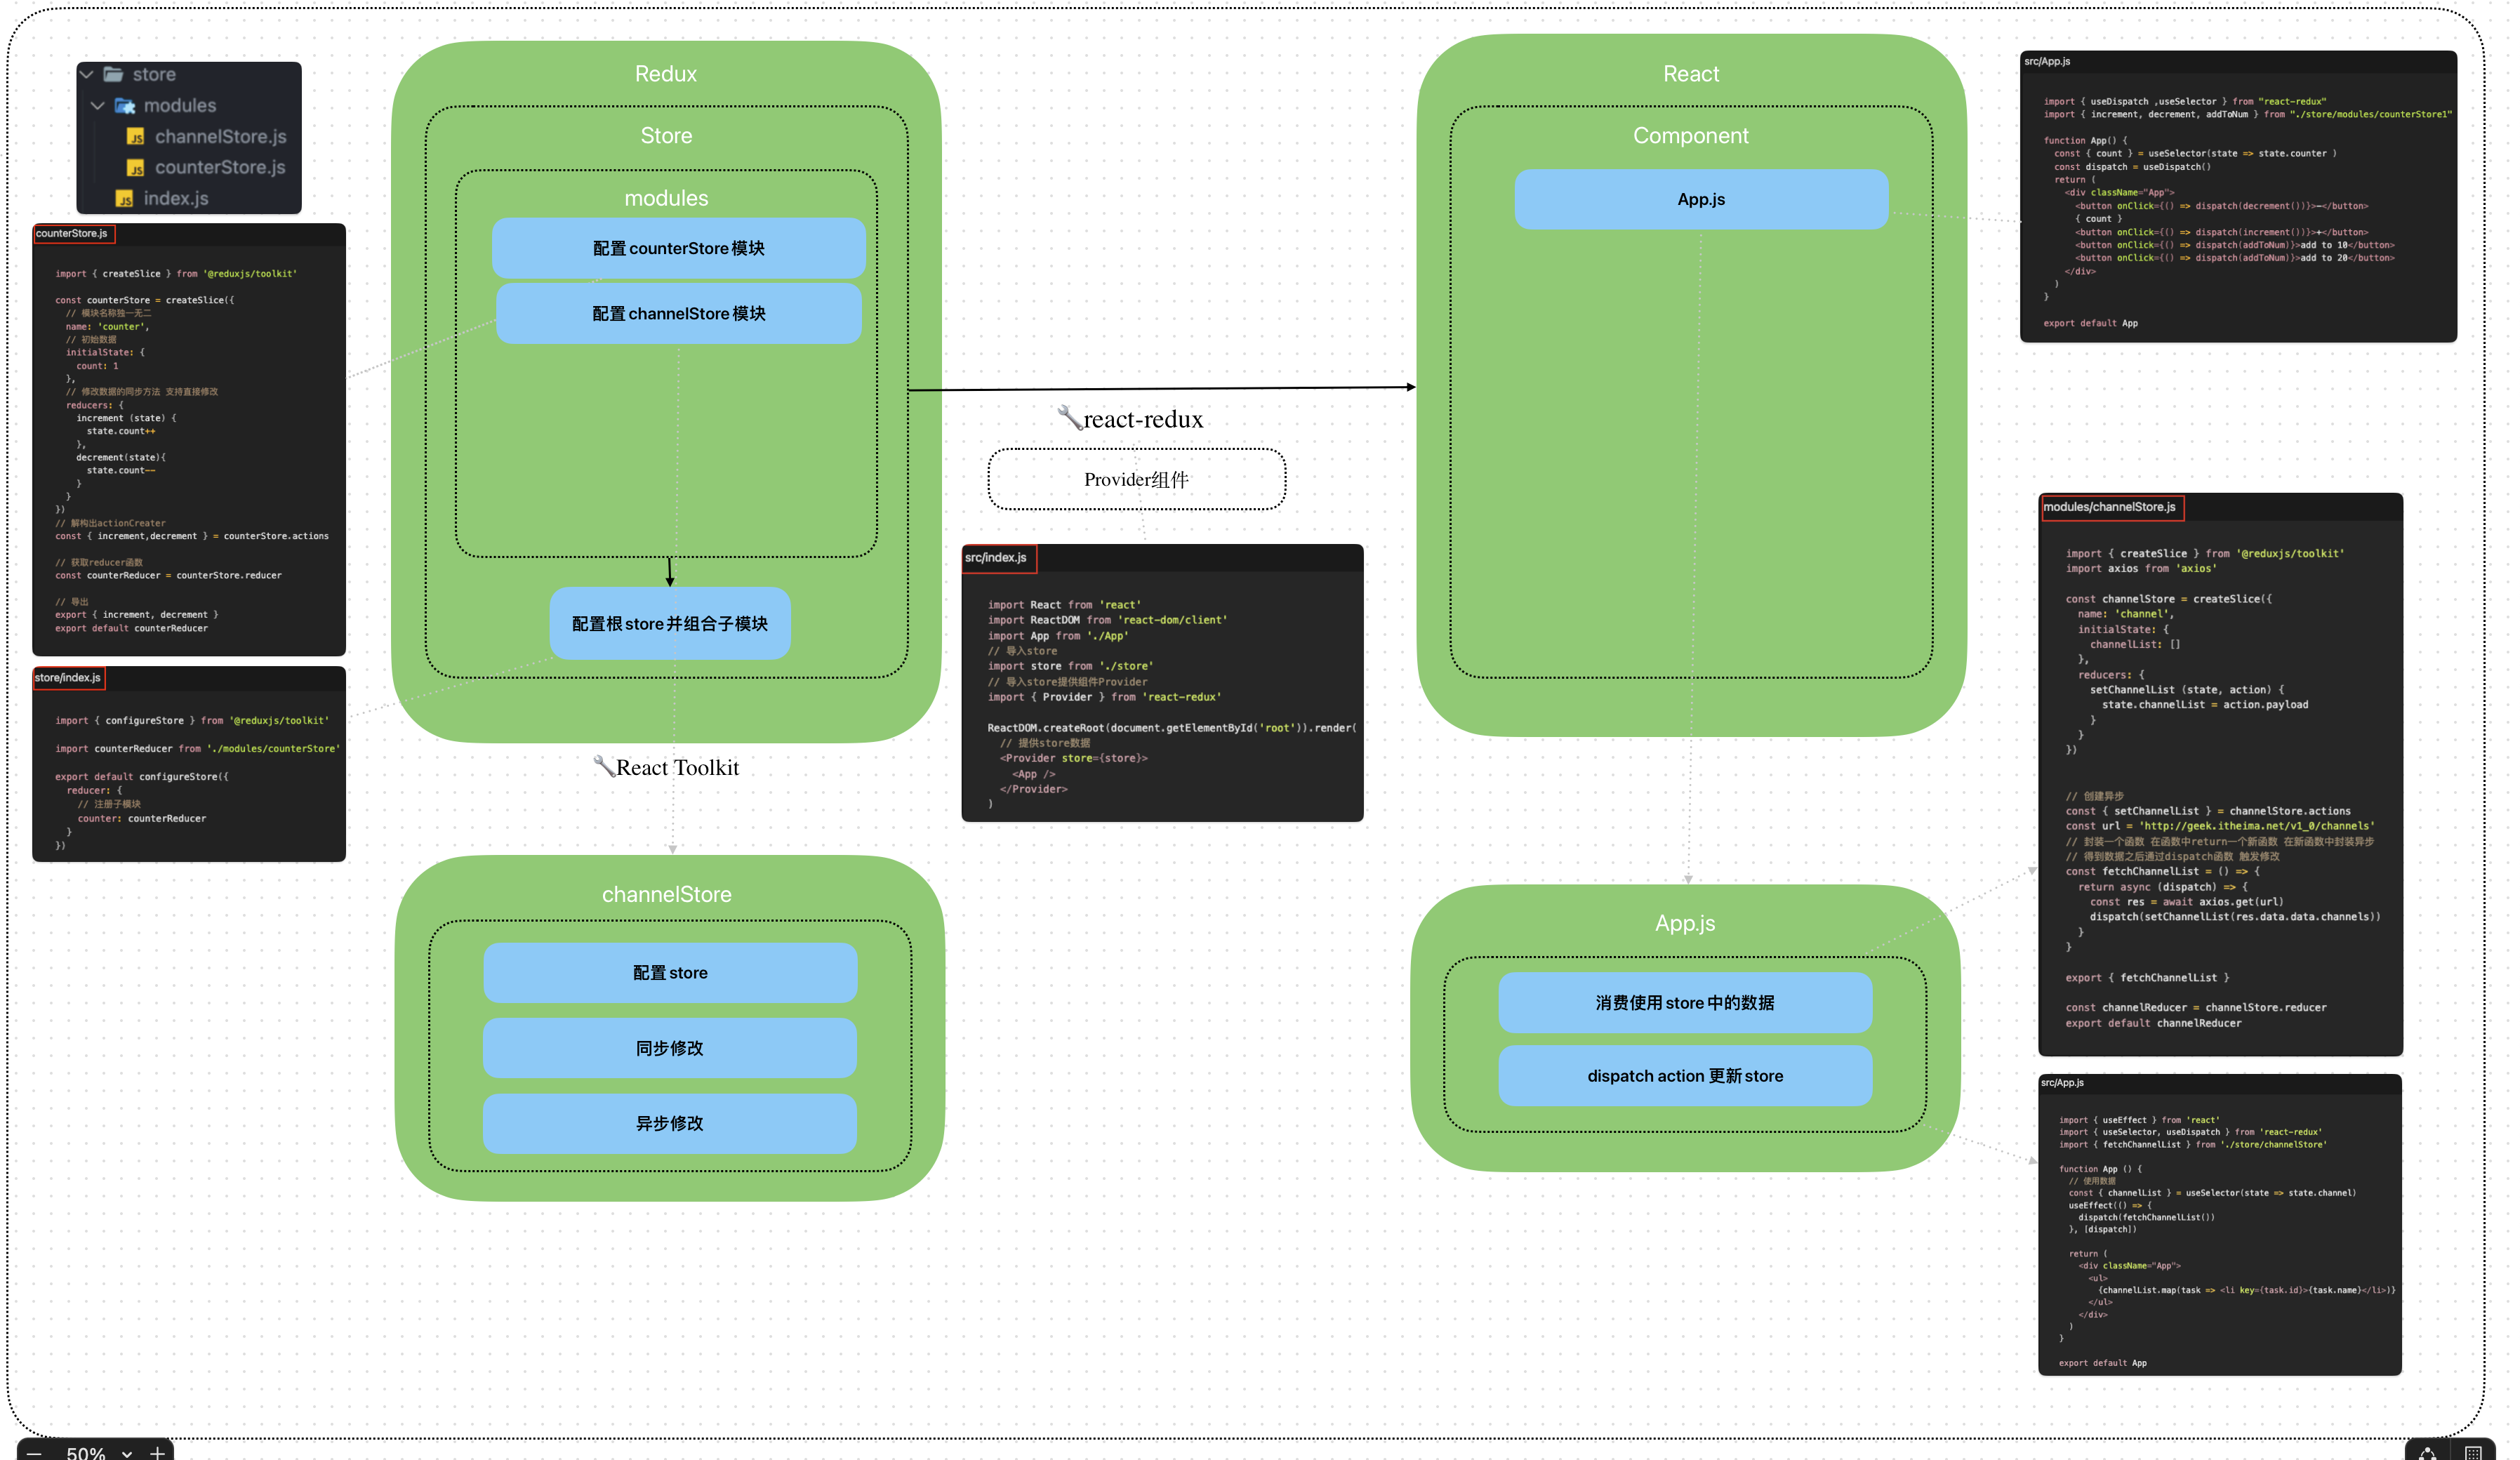
3. store目录结构设计
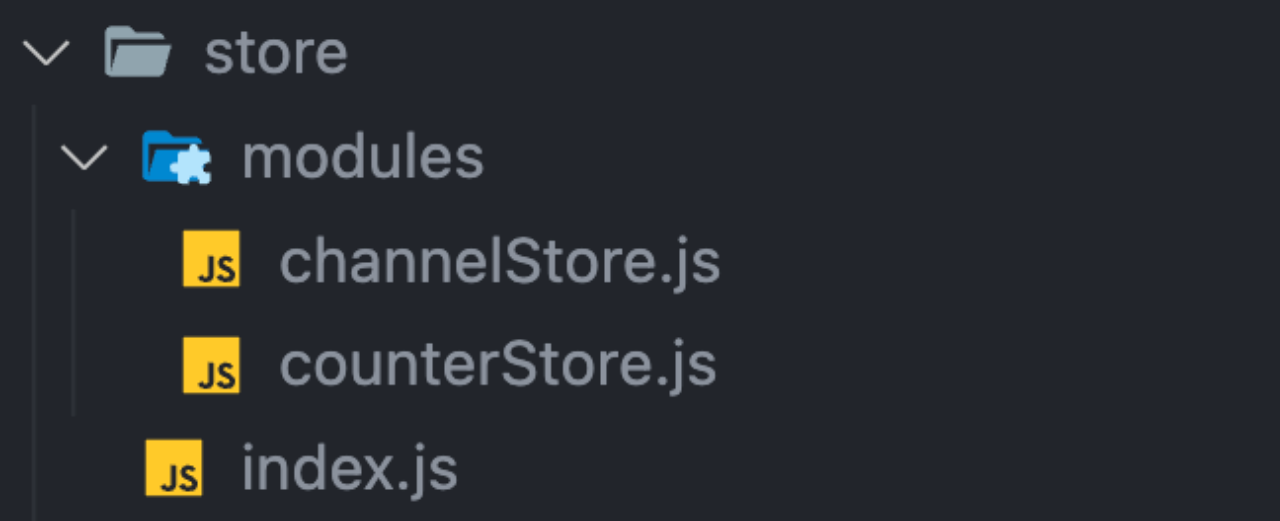
- 通常集中状态管理的部分都会单独创建一个单独的
store目录 - 应用通常会有很多个子store模块,所以创建一个
modules目录,在内部编写业务分类的子store - store中的入口文件 index.js 的作用是组合modules中所有的子模块,并导出store
Redux与React - 实现counter
1. 整体路径熟悉

2. 使用 React Toolkit 创建 counterStore
modules/counterStore.js
import { createSlice } from '@reduxjs/toolkit'const counterStore = createSlice({// 模块名称独一无二name: 'counter',// 初始数据initialState: {count: 1},// 修改数据的同步方法 支持直接修改reducers: {increment (state) {state.count++},decrement(state){state.count--}}
})
// 解构出actionCreater
const { increment,decrement } = counterStore.actions// 获取reducer函数
const counterReducer = counterStore.reducer// 导出
export { increment, decrement }
export default counterReducer
store/index.js
import { configureStore } from '@reduxjs/toolkit'import counterReducer from './modules/counterStore'export default configureStore({reducer: {// 注册子模块counter: counterReducer}
})
3. 为React注入store
react-redux负责把Redux和React 链接 起来,内置 Provider组件 通过 store 参数把创建好的store实例注入到应用中,链接正式建立
src/index.js
import React from 'react'
import ReactDOM from 'react-dom/client'
import App from './App'
// 导入store
import store from './store'
// 导入store提供组件Provider
import { Provider } from 'react-redux'ReactDOM.createRoot(document.getElementById('root')).render(// 提供store数据<Provider store={store}><App /></Provider>
)
✅4. React组件使用store中的数据 - useSelector
在React组件中使用store中的数据,需要用到一个钩子函数 - useSelector,它的作用是把store中的数据映射到组件中,使用样例如下:
useSelector作用:把store中的数据映射到组件中
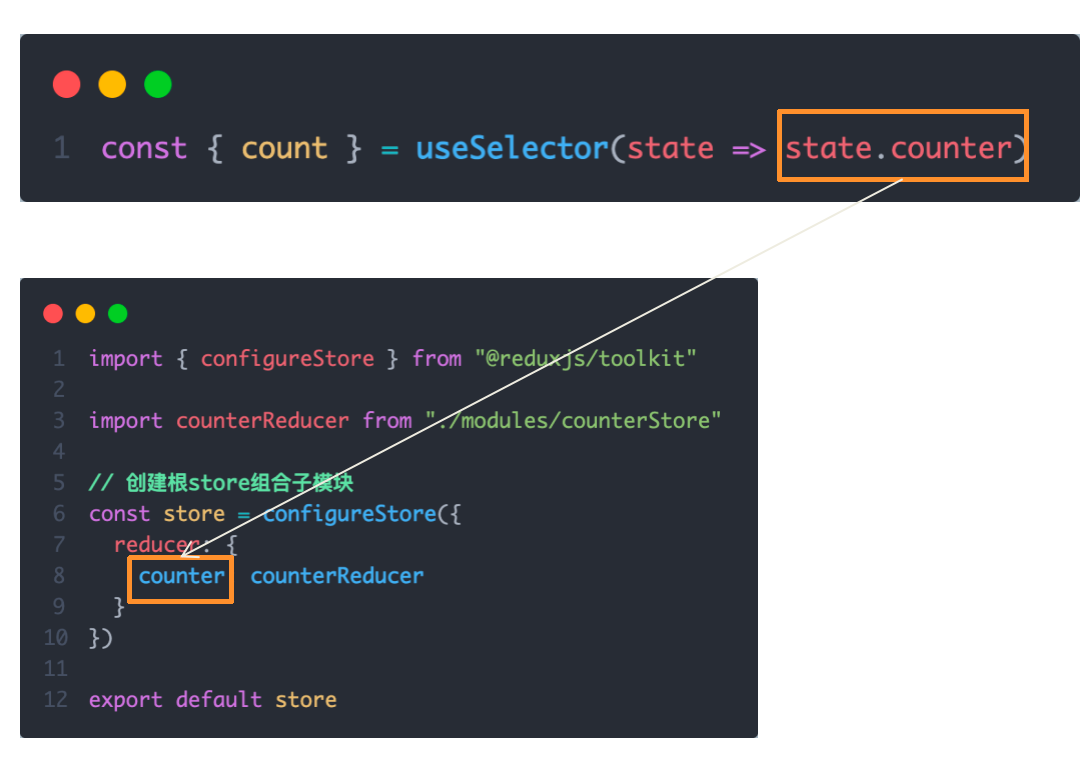
注:上面是组件counterStore,下面是store/index.js. 即根组件
src/App.js
import { useDispatch ,useSelector } from "react-redux"
import { increment, decrement, addToNum } from "./store/modules/counterStore1"function App() {const { count } = useSelector(state => state.counter )const dispatch = useDispatch()return (<div className="App"><button onClick={() => dispatch(decrement())}>-</button>{ count }<button onClick={() => dispatch(increment())}>+</button><button onClick={() => dispatch(addToNum)}>add to 10</button><button onClick={() => dispatch(addToNum)}>add to 20</button></div>)
}export default App
✅5. React组件修改store中的数据 - dispatch
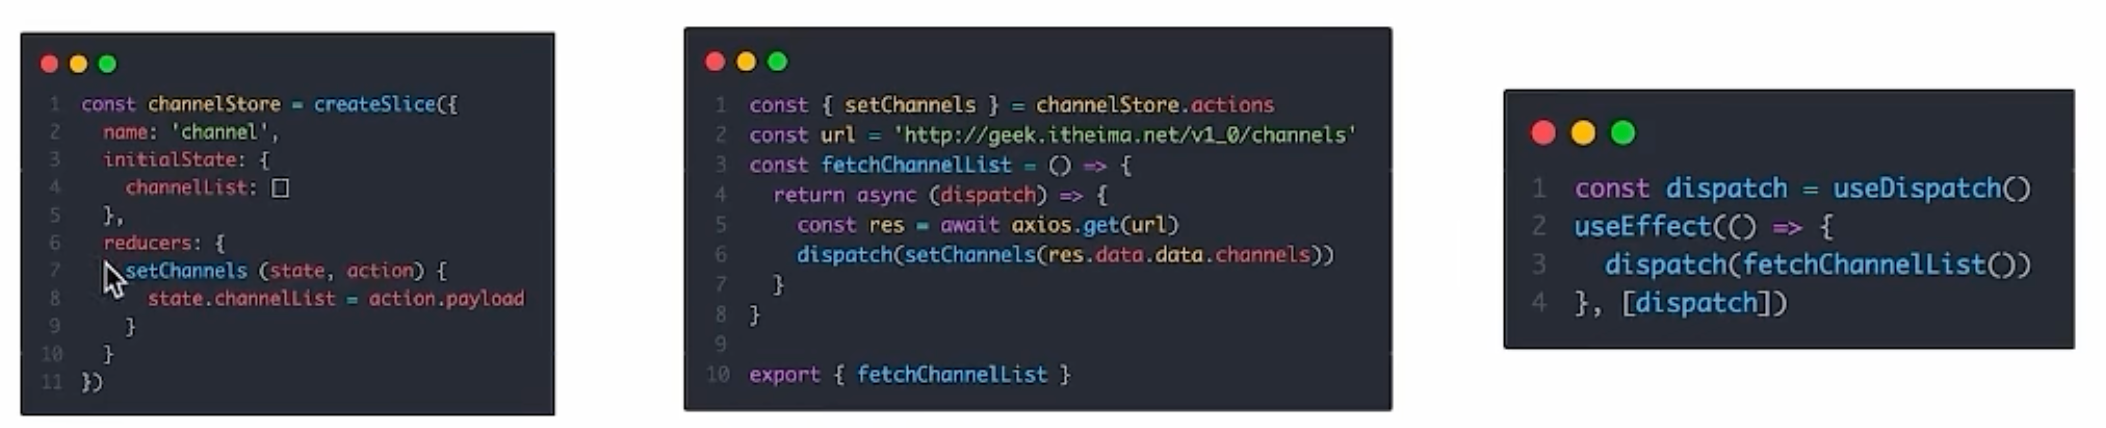
React组件中修改store中的数据需要借助另外一个hook函数 - useDispatch,它的作用是生成提交action对象的dispatch函数
dispatch作用:在组件中提交action对象,从而修改store中数据
使用样例如下:

✅Redux与React - 提交action传参
需求:组件中有俩个按钮2
add to 10
和
add to 20
可以直接把count值修改到对应的数字,目标count值是在组件中传递过去的,需要在提交action的时候传递参数
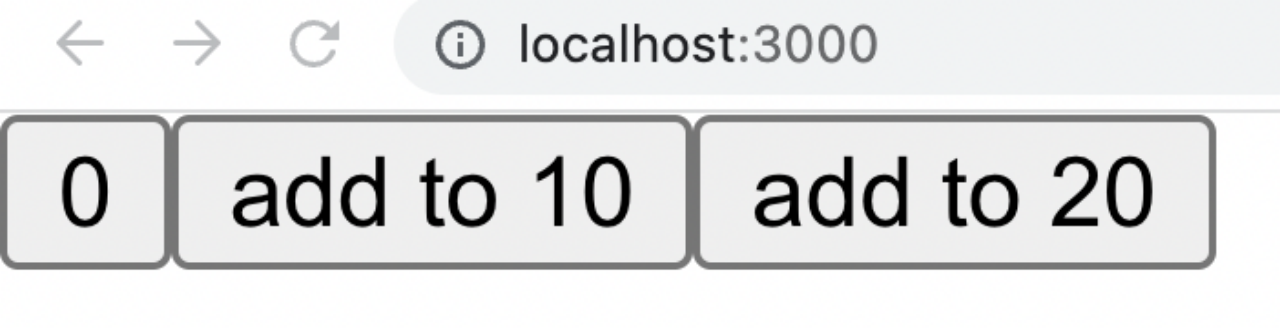
实现方式:利用action传参实现
1-在reducers的同步修改方法中添加action对象参数
在调用actionCreater的时候传递参数,参数会被传递到action对象payload属性上
理解:这边直接理解 addToNum 接受的参数会被传递到 action.payload 即可

总结:
- 组件中使用哪个hook函数获取store中的数据?
useSelector - 组件中使用哪个hook函数获取dispatch方法?
useDispatch - 如何得到要提交action对象?
执行store模块中导出的actionCreater方法
Redux与React - 异步action处理
需求理解
实现步骤
-
创建store的写法保持不变,配置好同步修改状态的方法
-
单独封装一个函数,在函数内部return一个新函数,在新函数中
2.1 封装异步请求获取数据
2.2 调用同步actionCreater传入异步数据生成一个action对象,并使用dispatch提交
-
组件中dispatch的写法保持不变
代码实现 > 测试接口地址: http://geek.itheima.net/v1_0/channels
modules/channelStore.js
import { createSlice } from '@reduxjs/toolkit'
import axios from 'axios'const channelStore = createSlice({name: 'channel',initialState: {channelList: []},reducers: {setChannelList (state, action) {state.channelList = action.payload}}
})// 创建异步
const { setChannelList } = channelStore.actions
const url = 'http://geek.itheima.net/v1_0/channels'
// 封装一个函数 在函数中return一个新函数 在新函数中封装异步
// 得到数据之后通过dispatch函数 触发修改
const fetchChannelList = () => {return async (dispatch) => {const res = await axios.get(url)dispatch(setChannelList(res.data.data.channels))}
}export { fetchChannelList }const channelReducer = channelStore.reducer
export default channelReducer
src/App.js
import { useEffect } from 'react'
import { useSelector, useDispatch } from 'react-redux'
import { fetchChannelList } from './store/channelStore'function App () {// 使用数据const { channelList } = useSelector(state => state.channel)useEffect(() => {dispatch(fetchChannelList())}, [dispatch])return (<div className="App"><ul>{channelList.map(task => <li key={task.id}>{task.name}</li>)}</ul></div>)
}export default App
Redux-React链路过程
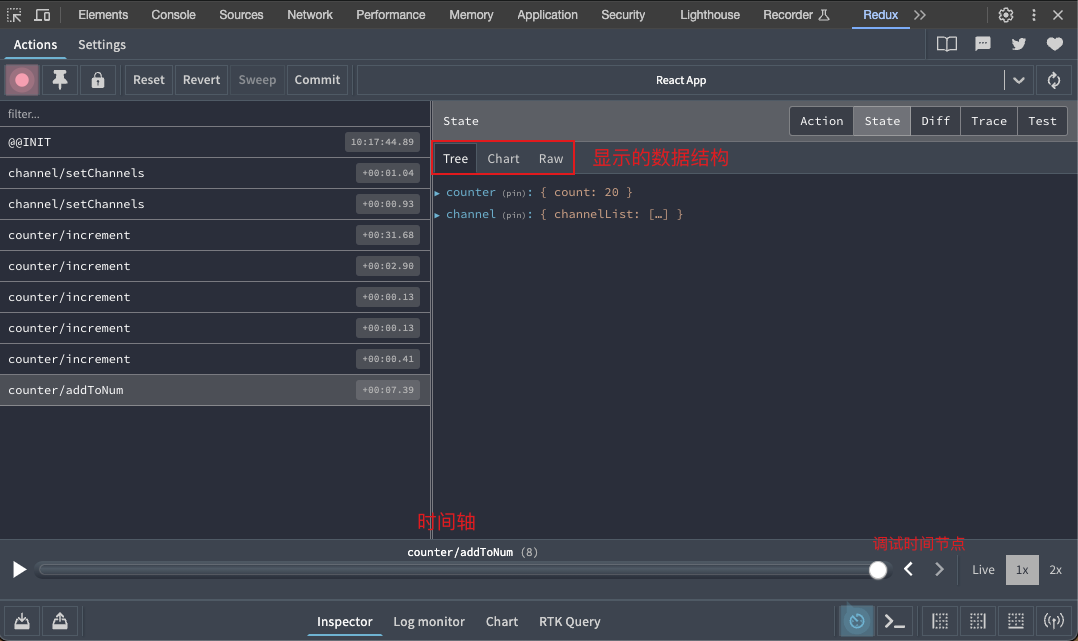
Redux调试 - devtools
Redux官方提供了针对于Redux的调试工具,支持实时state信息展示,action提交信息查看等
工具处理:
美团小案例
1. 案例演示
基本开发思路:
使用 RTK(Redux Toolkit)来管理应用状态, 组件负责 数据渲染 和 dispatch action
2. 准备并熟悉环境
- 克隆项目到本地(内置了基础静态组件和模版)
git clone http://git.itcast.cn/heimaqianduan/redux-meituan.git
- 安装所有依赖
npm i
- 启动mock服务(内置了json-server)
npm run serve
- 启动前端服务
npm run start
3. 分类和商品列表渲染
1- 编写store逻辑
// 编写store
import { createSlice } from "@reduxjs/toolkit"
import axios from "axios"const foodsStore = createSlice({name: 'foods',initialState: {// 商品列表foodsList: []},reducers: {// 更改商品列表setFoodsList (state, action) {state.foodsList = action.payload}}
})// 异步获取部分
const { setFoodsList } = foodsStore.actions
const fetchFoodsList = () => {return async (dispatch) => {// 编写异步逻辑const res = await axios.get('http://localhost:3004/takeaway')// 调用dispatch函数提交actiondispatch(setFoodsList(res.data))}
}export { fetchFoodsList }const reducer = foodsStore.reducerexport default reducer
2- 组件使用store数据
// 省略部分代码
import { useDispatch, useSelector } from 'react-redux'
import { fetchFoodsList } from './store/modules/takeaway'
import { useEffect } from 'react'const App = () => {// 触发action执行// 1. useDispatch -> dispatch 2. actionCreater导入进来 3.useEffectconst dispatch = useDispatch()useEffect(() => {dispatch(fetchFoodsList())}, [dispatch])return (<div className="home">{/* 导航 */}<NavBar />{/* 内容 */}<div className="content-wrap"><div className="content"><Menu /><div className="list-content"><div className="goods-list">{/* 外卖商品列表 */}{foodsList.map(item => {return (<FoodsCategorykey={item.tag}// 列表标题name={item.name}// 列表商品foods={item.foods}/>)})}</div></div></div></div>{/* 购物车 */}<Cart /></div>)
}export default App
4. 点击分类激活交互实现

1- 编写store逻辑
// 编写storeimport { createSlice } from "@reduxjs/toolkit"
import axios from "axios"const foodsStore = createSlice({name: 'foods',initialState: {// 菜单激活下标值activeIndex: 0},reducers: {// 更改activeIndexchangeActiveIndex (state, action) {state.activeIndex = action.payload}}
})// 导出
const { changeActiveIndex } = foodsStore.actionsexport { changeActiveIndex }const reducer = foodsStore.reducerexport default reducer
2- 编写组件逻辑
const Menu = () => {const { foodsList, activeIndex } = useSelector(state => state.foods)const dispatch = useDispatch()const menus = foodsList.map(item => ({ tag: item.tag, name: item.name }))return (<nav className="list-menu">{/* 添加active类名会变成激活状态 */}{menus.map((item, index) => {return (<div// 提交action切换激活indexonClick={() => dispatch(changeActiveIndex(index))}key={item.tag}// 动态控制active显示className={classNames('list-menu-item',activeIndex === index && 'active')}>{item.name}</div>)})}</nav>)
}
5. 商品列表切换显示
image.png
 <div className="list-content"><div className="goods-list">{/* 外卖商品列表 */}{foodsList.map((item, index) => {return (activeIndex === index && <FoodsCategorykey={item.tag}// 列表标题name={item.name}// 列表商品foods={item.foods}/>)})}</div>
</div>
6. 添加购物车实现
1- 编写store逻辑
// 编写storeimport { createSlice } from "@reduxjs/toolkit"
import axios from "axios"const foodsStore = createSlice({name: 'foods',reducers: {// 添加购物车addCart (state, action) {// 是否添加过?以action.payload.id去cartList中匹配 匹配到了 添加过const item = state.cartList.find(item => item.id === action.payload.id)if (item) {item.count++} else {state.cartList.push(action.payload)}}}
})// 导出actionCreater
const { addCart } = foodsStore.actionsexport { addCart }const reducer = foodsStore.reducerexport default reducer
关键:
a.判断商品是否添加过
// 是否添加过?以action.payload.id去cartList中匹配 匹配到了 添加过
const item = state.cartList.find(item => item.id === action.payload.id)
2- 编写组件逻辑
<div className="goods-count">{/* 添加商品 */}<spanclassName="plus"onClick={() => dispatch(addCart({id,picture,name,unit,description,food_tag_list,month_saled,like_ratio_desc,price,tag,count}))}></span>
</div>
Bug修复:
修复count增加问题
7. 统计区域实现
image.png
实现思路
- 基于store中的cartList的length渲染数量
- 基于store中的cartList累加price * count
- 购物车cartList的length不为零则高亮
// 计算总价
const totalPrice = cartList.reduce((a, c) => a + c.price * c.count, 0){/* fill 添加fill类名购物车高亮*/}
{/* 购物车数量 */}
<div onClick={onShow} className={classNames('icon', cartList.length > 0 && 'fill')}>{cartList.length > 0 && <div className="cartCornerMark">{cartList.length}</div>}
</div>
拓展:
react中不存在computed计算属性,因为每次数值的变化都会引起组件的重新渲染
8. 购物车列表功能实现
image.png
1-控制列表渲染
const Cart = () => {return (<div className="cartContainer">{/* 添加visible类名 div会显示出来 */}<div className={classNames('cartPanel', 'visible')}>{/* 购物车列表 */}<div className="scrollArea">{cartList.map(item => {return (<div className="cartItem" key={item.id}><img className="shopPic" src={item.picture} alt="" /><div className="main"><div className="skuInfo"><div className="name">{item.name}</div></div><div className="payableAmount"><span className="yuan">¥</span><span className="price">{item.price}</span></div></div><div className="skuBtnWrapper btnGroup">{/* 数量组件 */}<Countcount={item.count}/></div></div>)})}</div></div></div>)
}export default Cart
2- 购物车增减逻辑实现
// count增
increCount (state, action) {// 关键点:找到当前要修改谁的count idconst item = state.cartList.find(item => item.id === action.payload.id)item.count++
},
// count减
decreCount (state, action) {// 关键点:找到当前要修改谁的count idconst item = state.cartList.find(item => item.id === action.payload.id)if (item.count === 0) {return}item.count--
}
<div className="skuBtnWrapper btnGroup">{/* 数量组件 */}<Countcount={item.count}onPlus={() => dispatch(increCount({ id: item.id }))}onMinus={() => dispatch(decreCount({ id: item.id }))}/>
</div>
3-清空购物车实现
// 清除购物车clearCart (state) { state.cartList = []}
<div className="header"><span className="text">购物车</span><spanclassName="clearCart"onClick={() => dispatch(clearCart())}>清空购物车</span>
</div>
9. 控制购物车显示和隐藏
image.png
// 控制购物车打开关闭的状态
const [visible, setVisible] = useState(false)const onShow = () => {if (cartList.length > 0) {setVisible(true)}
}{/* 遮罩层 添加visible类名可以显示出来 */}
<divclassName={classNames('cartOverlay', visible && 'visible')}onClick={() => setVisible(false)}
/>