Sentinel源码分析
1.Sentinel的基本概念
Sentinel实现限流、隔离、降级、熔断等功能,本质要做的就是两件事情:
统计数据:统计某个资源的访问数据(QPS、RT等信息)
规则判断:判断限流规则、隔离规则、降级规则、熔断规则是否满足
这里的资源就是希望被Sentinel保护的业务,例如项目中定义的controller方法就是默认被Sentinel保护的资源。
1.1.ProcessorSlotChain
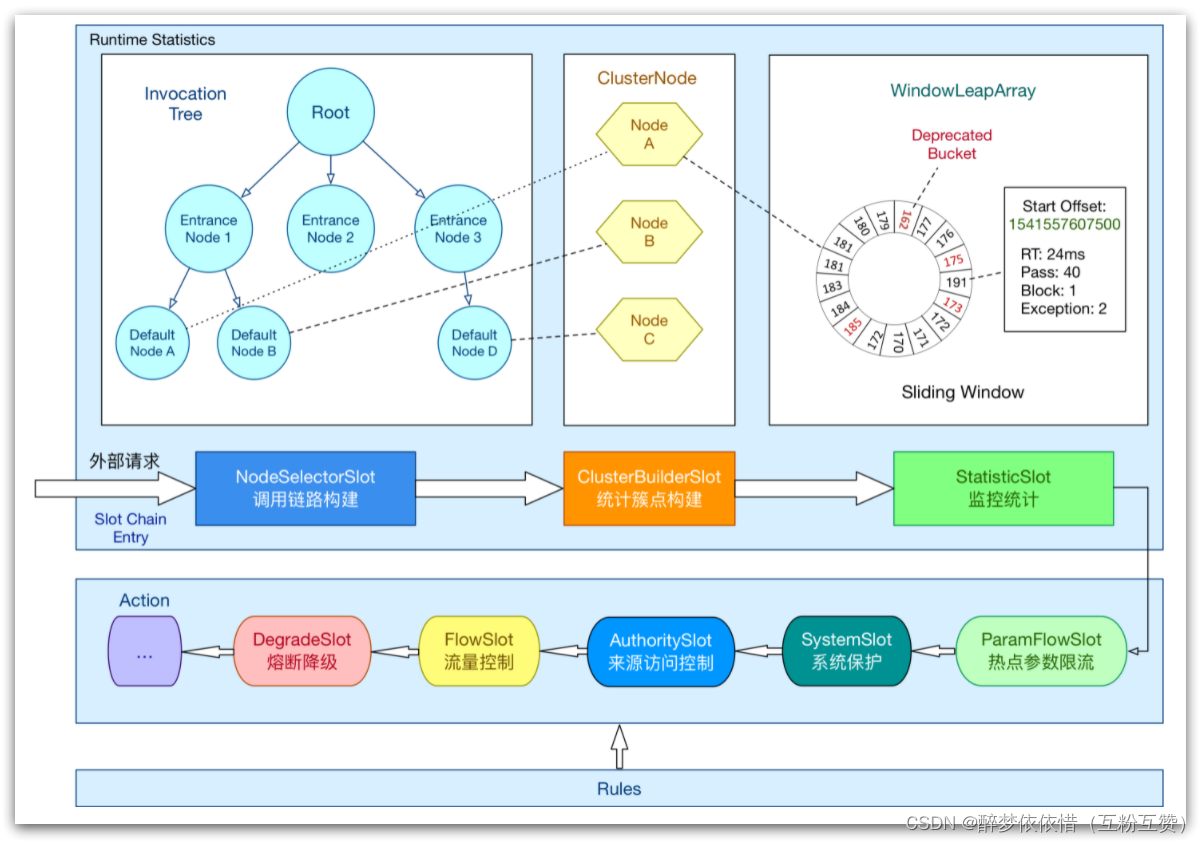
实现上述功能的核心骨架是一个叫做ProcessorSlotChain的类。这个类基于责任链模式来设计,将不同的功能(限流、降级、系统保护)封装为一个个的Slot,请求进入后逐个执行即可。
其工作流如图:
责任链中的Slot也分为两大类:
统计数据构建部分(statistic)
NodeSelectorSlot:负责构建簇点链路中的节点(DefaultNode),将这些节点形成链路树
ClusterBuilderSlot:负责构建某个资源的ClusterNode,ClusterNode可以保存资源的运行信息(响应时间、QPS、block 数目、线程数、异常数等)以及来源信息(origin名称)
StatisticSlot:负责统计实时调用数据,包括运行信息、来源信息等
规则判断部分(rule checking)
AuthoritySlot:负责授权规则(来源控制)
SystemSlot:负责系统保护规则
ParamFlowSlot:负责热点参数限流规则
FlowSlot:负责限流规则
DegradeSlot:负责降级规则
1.2.Node
Sentinel中的簇点链路是由一个个的Node组成的,Node是一个接口,包括下面的实现:
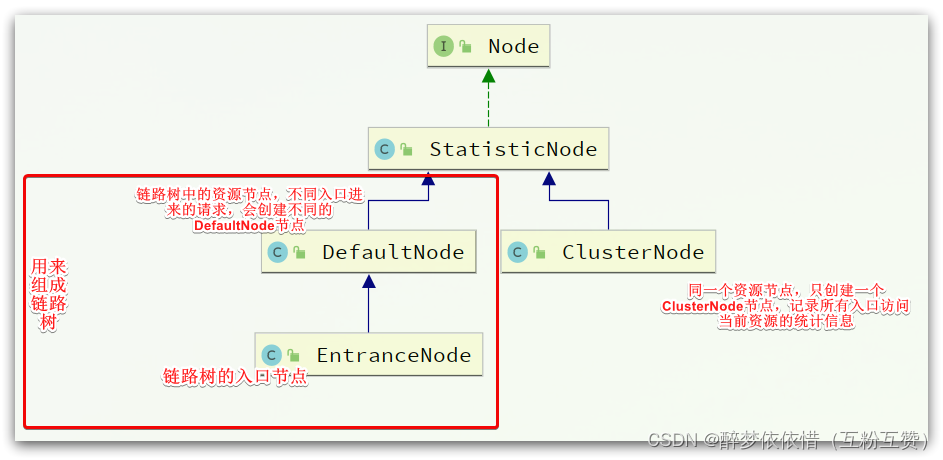
controller里面的每一个方法都是不同的入口节点方法,比如两个controller方法调用service中的同一个方法,那么service的该资源方法就会创建两个不同的defaultNode节点。
可以认为DefaultNode类型是链路模式使用的,而ClusterNode类型则是非链路模式使用。
所有的节点都可以记录对资源的访问统计数据,所以都是StatisticNode的子类。
按照作用分为两类Node:
DefaultNode:代表链路树中的每一个资源,一个资源出现在不同链路中时,会创建不同的DefaultNode节点。而树的入口节点叫EntranceNode,是一种特殊的DefaultNode
ClusterNode:代表资源,一个资源不管出现在多少链路中,只会有一个ClusterNode。记录的是当前资源被访问的所有统计数据之和。
DefaultNode记录的是资源在当前链路中的访问数据,用来实现基于链路模式的限流规则。ClusterNode记录的是资源在所有链路中的访问数据,实现默认模式、关联模式的限流规则。
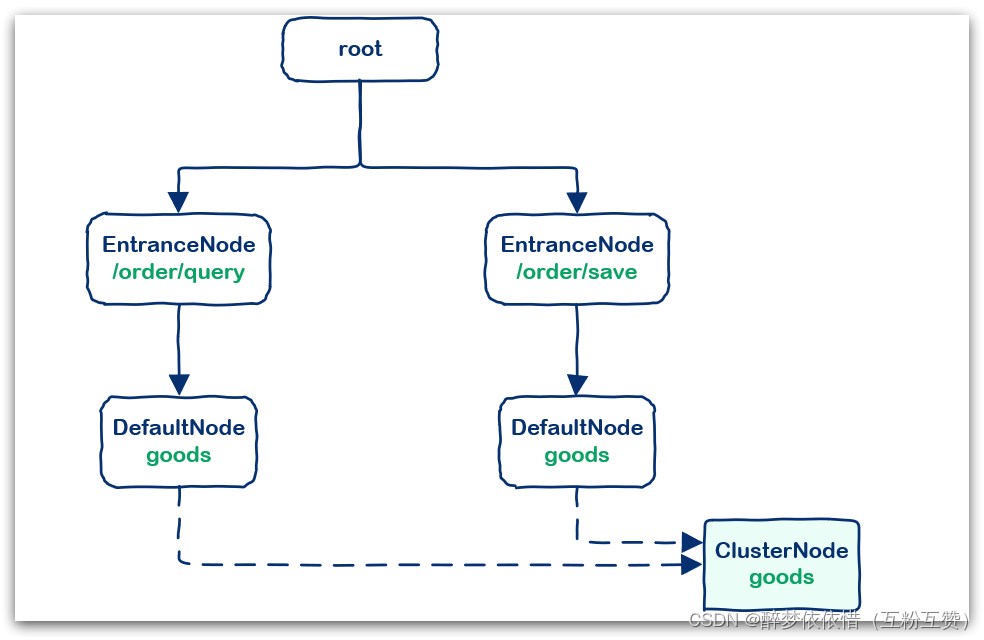
例如:我们在一个SpringMVC项目中,有两个业务:
业务1:controller中的资源
/order/query访问了service中的资源/goods业务2:controller中的资源
/order/save访问了service中的资源/goods创建的链路图如下:
1.3.Entry
默认情况下,Sentinel会将controller中的方法作为被保护资源,那么问题来了,我们该如何将自己的一段代码标记为一个Sentinel的资源呢?
Sentinel中的资源用Entry来表示。声明Entry的API示例:
// 资源名可使用任意有业务语义的字符串,比如方法名、接口名或其它可唯一标识的字符串。
try (Entry entry = SphU.entry("resourceName")) {// 被保护的业务逻辑// do something here...
} catch (BlockException ex) {// 资源访问阻止,被限流或被降级// 在此处进行相应的处理操作
}
1.3.1.自定义资源
例如,我们在order-service服务中,将
OrderService的queryOrderById()方法标记为一个资源。1)首先在order-service中引入sentinel依赖
<!--sentinel-->
<dependency><groupId>com.alibaba.cloud</groupId><artifactId>spring-cloud-starter-alibaba-sentinel</artifactId>
</dependency>
2)然后配置Sentinel地址
spring:cloud:sentinel:transport:dashboard: localhost:8089 # 这里我的sentinel用了8089的端口3)修改OrderService类的queryOrderById方法
代码这样来实现:
public Order queryOrderById(Long orderId) {// 创建Entry,标记资源,资源名为resource1try (Entry entry = SphU.entry("resource1")) {// 1.查询订单,这里是假数据Order order = Order.build(101L, 4999L, "小米 MIX4", 1, 1L, null);// 2.查询用户,基于Feign的远程调用User user = userClient.findById(order.getUserId());// 3.设置order.setUser(user);// 4.返回return order;}catch (BlockException e){log.error("被限流或降级", e);return null;}
}
4)访问
打开浏览器,访问order服务:http://localhost:8080/order/101
然后打开sentinel控制台,查看簇点链路:

1.3.2.基于注解标记资源
在之前学习Sentinel的时候,我们知道可以通过给方法添加@SentinelResource注解的形式来标记资源。
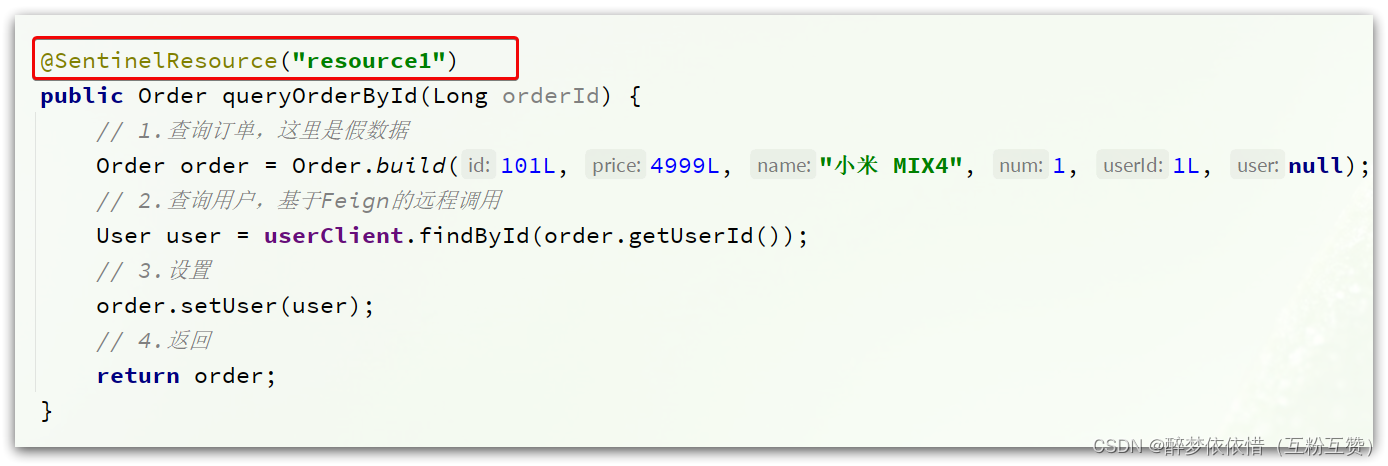
这个是怎么实现的呢?
来看下我们引入的Sentinel依赖包:
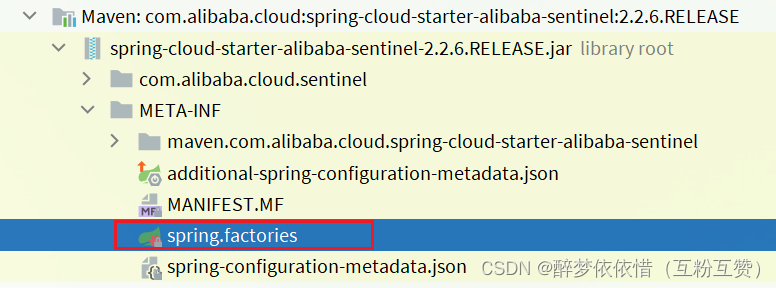
其中的spring.factories声明需要就是自动装配的配置类,内容如下:

我们来看下
SentinelAutoConfiguration这个类: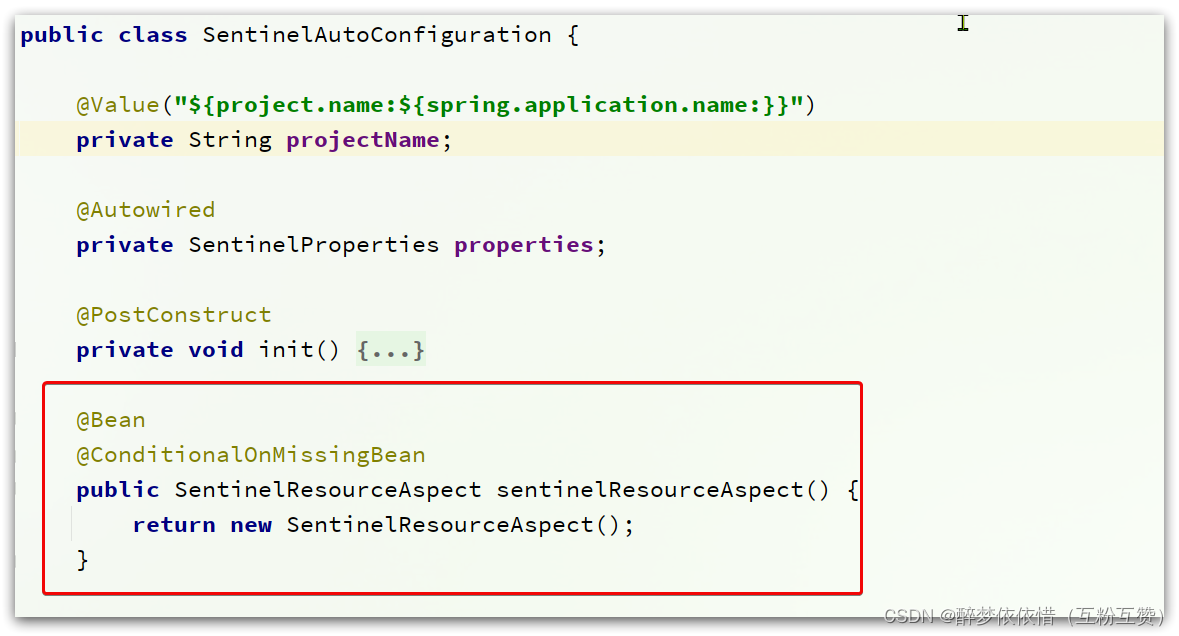
可以看到,在这里声明了一个Bean,
SentinelResourceAspect:/*** Aspect for methods with {@link SentinelResource} annotation.** @author Eric Zhao*/ @Aspect public class SentinelResourceAspect extends AbstractSentinelAspectSupport {// 切点是添加了 @SentinelResource注解的类@Pointcut("@annotation(com.alibaba.csp.sentinel.annotation.SentinelResource)")public void sentinelResourceAnnotationPointcut() {}// 环绕增强@Around("sentinelResourceAnnotationPointcut()")public Object invokeResourceWithSentinel(ProceedingJoinPoint pjp) throws Throwable {// 获取受保护的方法Method originMethod = resolveMethod(pjp);// 获取 @SentinelResource注解SentinelResource annotation = originMethod.getAnnotation(SentinelResource.class);if (annotation == null) {// Should not go through here.throw new IllegalStateException("Wrong state for SentinelResource annotation");}// 获取注解上的资源名称String resourceName = getResourceName(annotation.value(), originMethod);EntryType entryType = annotation.entryType();int resourceType = annotation.resourceType();Entry entry = null;try {// 创建资源 Entryentry = SphU.entry(resourceName, resourceType, entryType, pjp.getArgs());// 执行受保护的方法Object result = pjp.proceed();return result;} catch (BlockException ex) {return handleBlockException(pjp, annotation, ex);} catch (Throwable ex) {Class<? extends Throwable>[] exceptionsToIgnore = annotation.exceptionsToIgnore();// The ignore list will be checked first.if (exceptionsToIgnore.length > 0 && exceptionBelongsTo(ex, exceptionsToIgnore)) {throw ex;}if (exceptionBelongsTo(ex, annotation.exceptionsToTrace())) {traceException(ex);return handleFallback(pjp, annotation, ex);} // No fallback function can handle the exception, so throw it out.throw ex;} finally {if (entry != null) {entry.exit(1, pjp.getArgs());}}} } 简单来说,@SentinelResource注解就是一个标记,而Sentinel基于AOP思想,对被标记的方法做环绕增强,完成资源(
Entry)的创建。1.4.Context
上一节,我们发现簇点链路中除了controller方法、service方法两个资源外,还多了一个默认的入口节点:
sentinel_spring_web_context,是一个EntranceNode类型的节点
这个节点是在初始化Context的时候由Sentinel帮我们创建的。
1.4.1.什么是Context
那么,什么是Context呢?
Context 代表调用链路上下文,贯穿一次调用链路中的所有资源(
Entry),基于ThreadLocal。Context 维持着入口节点(
entranceNode)、本次调用链路的 curNode(当前资源节点)、调用来源(origin)等信息。后续的Slot都可以通过Context拿到DefaultNode或者ClusterNode,从而获取统计数据,完成规则判断
Context初始化的过程中,会创建EntranceNode,contextName就是EntranceNode的名称
对应的API如下:
// 创建context,包含两个参数:context名称、 来源名称
ContextUtil.enter("contextName", "originName");
1.4.2.Context的初始化
那么这个Context又是在何时完成初始化的呢?
1.4.2.1.自动装配
来看下我们引入的Sentinel依赖包:
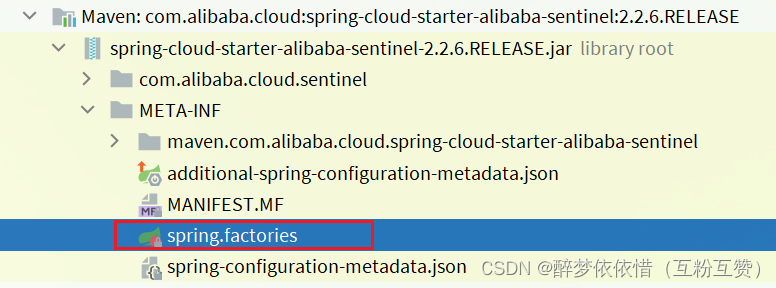
其中的spring.factories声明需要就是自动装配的配置类,内容如下:

我们先看SentinelWebAutoConfiguration这个类:

这个类实现了WebMvcConfigurer,我们知道这个是SpringMVC自定义配置用到的类,可以配置HandlerInterceptor:
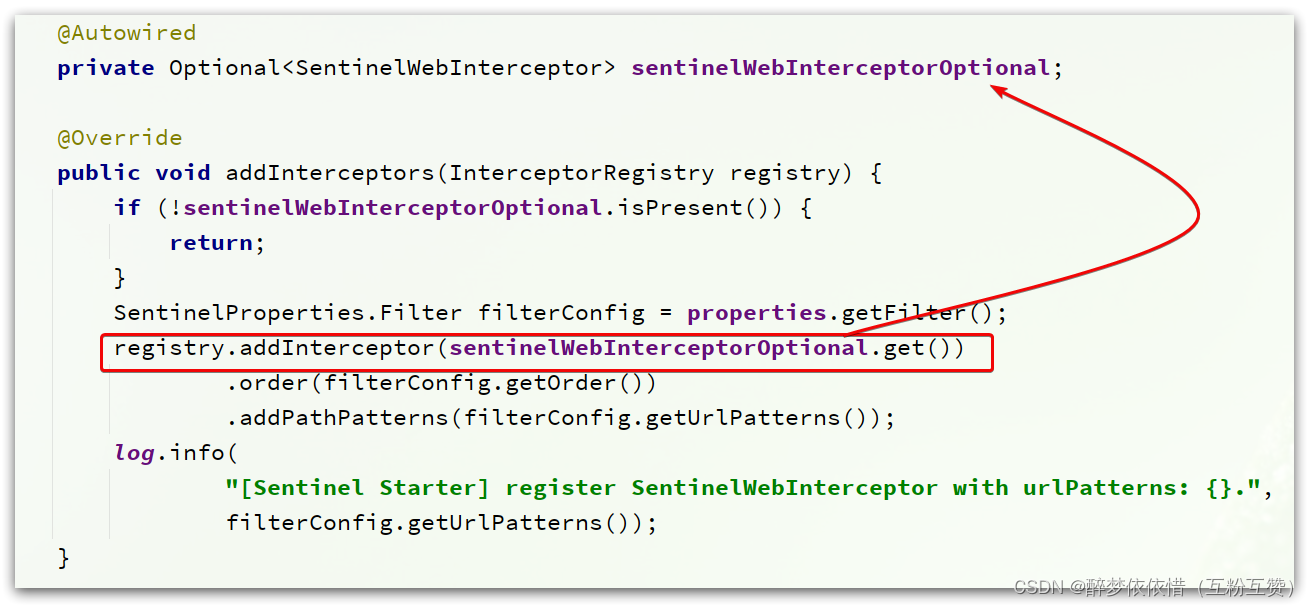
可以看到这里配置了一个
SentinelWebInterceptor的拦截器。
SentinelWebInterceptor的声明如下:
发现它继承了
AbstractSentinelInterceptor这个类。
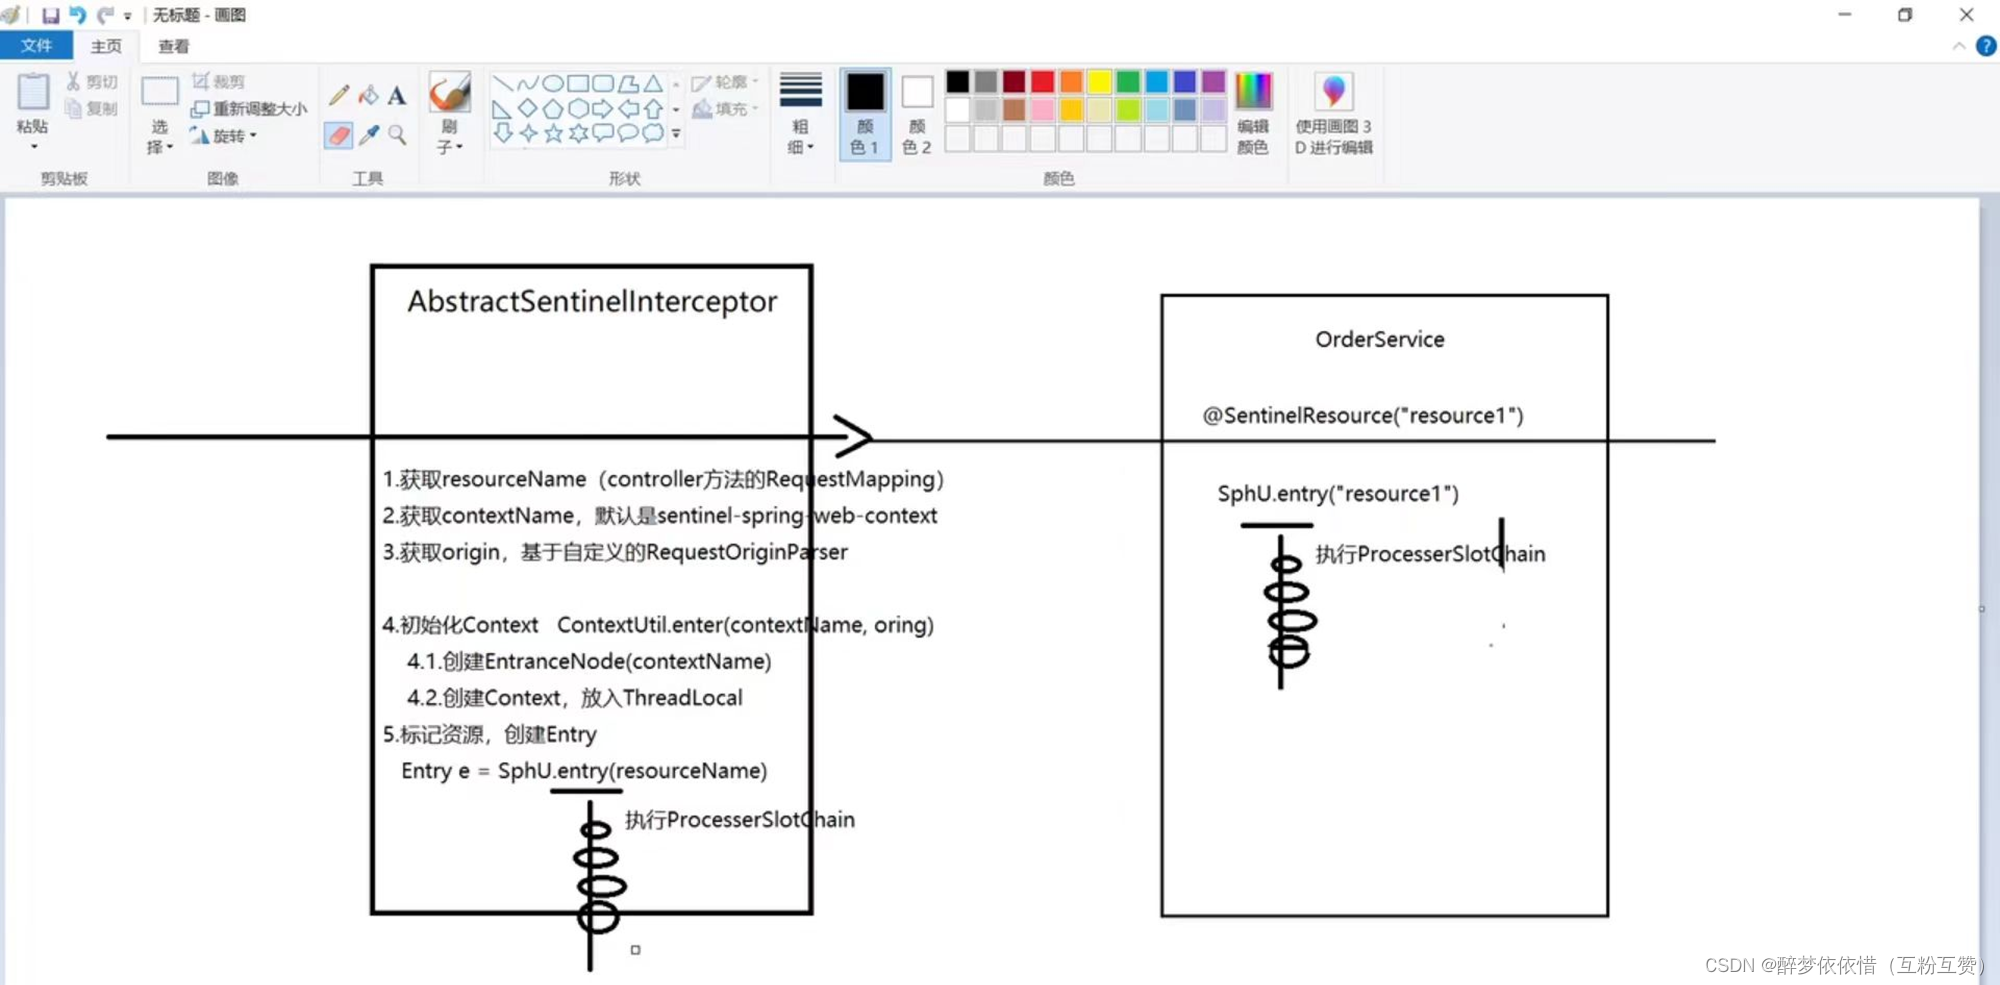
HandlerInterceptor拦截器会拦截一切进入controller的方法,执行preHandle前置拦截方法,而Context的初始化就是在这里完成的。1.4.2.2.AbstractSentinelInterceptor
HandlerInterceptor拦截器会拦截一切进入controller的方法,执行preHandle前置拦截方法,而Context的初始化就是在这里完成的。我们来看看这个类的
preHandle实现:@Override public boolean preHandle(HttpServletRequest request, HttpServletResponse response, Object handler)throws Exception {try {// 获取资源名称,一般是controller方法的@RequestMapping路径,例如/order/{orderId}String resourceName = getResourceName(request);if (StringUtil.isEmpty(resourceName)) {return true;}// 从request中获取请求来源,将来做 授权规则 判断时会用String origin = parseOrigin(request);// 获取 contextName,默认是sentinel_spring_web_contextString contextName = getContextName(request);// 创建 ContextContextUtil.enter(contextName, origin);// 创建资源,名称就是当前请求的controller方法的映射路径Entry entry = SphU.entry(resourceName, ResourceTypeConstants.COMMON_WEB, EntryType.IN);request.setAttribute(baseWebMvcConfig.getRequestAttributeName(), entry);return true;} catch (BlockException e) {try {handleBlockException(request, response, e);} finally {ContextUtil.exit();}return false;} }1.4.2.3.ContextUtil
创建Context的方法就是
ContextUtil.enter(contextName, origin);我们进入该方法:
public static Context enter(String name, String origin) {if (Constants.CONTEXT_DEFAULT_NAME.equals(name)) {throw new ContextNameDefineException("The " + Constants.CONTEXT_DEFAULT_NAME + " can't be permit to defined!");}return trueEnter(name, origin);
}
进入
trueEnter方法:protected static Context trueEnter(String name, String origin) {// 尝试获取contextContext context = contextHolder.get();// 判空if (context == null) {// 如果为空,开始初始化Map<String, DefaultNode> localCacheNameMap = contextNameNodeMap;// 尝试获取入口节点DefaultNode node = localCacheNameMap.get(name);if (node == null) {LOCK.lock();try {node = contextNameNodeMap.get(name);if (node == null) {// 入口节点为空,初始化入口节点 EntranceNodenode = new EntranceNode(new StringResourceWrapper(name, EntryType.IN), null);// 添加入口节点到 ROOTConstants.ROOT.addChild(node);// 将入口节点放入缓存Map<String, DefaultNode> newMap = new HashMap<>(contextNameNodeMap.size() + 1);newMap.putAll(contextNameNodeMap);newMap.put(name, node);contextNameNodeMap = newMap;}} finally {LOCK.unlock();}}// 创建Context,参数为:入口节点 和 contextNamecontext = new Context(node, name);// 设置请求来源 origincontext.setOrigin(origin);// 放入ThreadLocalcontextHolder.set(context);}// 返回return context; }执行逻辑如下图:
2.ProcessorSlotChain执行流程
接下来我们跟踪源码,验证下ProcessorSlotChain的执行流程。
2.1.入口
首先,回到一切的入口,
AbstractSentinelInterceptor类的preHandle方法:
还有,
SentinelResourceAspect的环绕增强方法:
可以看到,任何一个资源必定要执行
SphU.entry()这个方法:public static Entry entry(String name, int resourceType, EntryType trafficType, Object[] args)throws BlockException {return Env.sph.entryWithType(name, resourceType, trafficType, 1, args); } 继续进入Env.sph.entryWithType(name, resourceType, trafficType, 1, args);:@Override public Entry entryWithType(String name, int resourceType, EntryType entryType, int count, boolean prioritized,Object[] args) throws BlockException {// 将 资源名称等基本信息 封装为一个 StringResourceWrapper对象StringResourceWrapper resource = new StringResourceWrapper(name, entryType, resourceType);// 继续return entryWithPriority(resource, count, prioritized, args); }进入
entryWithPriority方法:private Entry entryWithPriority(ResourceWrapper resourceWrapper, int count, boolean prioritized, Object... args)throws BlockException {// 获取 ContextContext context = ContextUtil.getContext();if (context == null) {// Using default context.context = InternalContextUtil.internalEnter(Constants.CONTEXT_DEFAULT_NAME);} 、 // 获取 Slot执行链,同一个资源,会创建一个执行链,放入缓存ProcessorSlot<Object> chain = lookProcessChain(resourceWrapper);// 创建 Entry,并将 resource、chain、context 记录在 Entry中Entry e = new CtEntry(resourceWrapper, chain, context);try {// 执行 slotChainchain.entry(context, resourceWrapper, null, count, prioritized, args);} catch (BlockException e1) {e.exit(count, args);throw e1;} catch (Throwable e1) {// This should not happen, unless there are errors existing in Sentinel internal.RecordLog.info("Sentinel unexpected exception", e1);}return e; }在这段代码中,会获取
ProcessorSlotChain对象,然后基于chain.entry()开始执行slotChain中的每一个Slot. 而这里创建的是其实现类:DefaultProcessorSlotChain.获取ProcessorSlotChain以后会保存到一个Map中,key是ResourceWrapper,值是ProcessorSlotChain.
所以,一个资源只会有一个ProcessorSlotChain.
2.2.DefaultProcessorSlotChain
我们进入DefaultProcessorSlotChain的entry方法:
@Override
public void entry(Context context, ResourceWrapper resourceWrapper, Object t, int count, boolean prioritized, Object... args)throws Throwable {// first,就是责任链中的第一个 slotfirst.transformEntry(context, resourceWrapper, t, count, prioritized, args);
}
这里的first,类型是AbstractLinkedProcessorSlot:

看下继承关系:
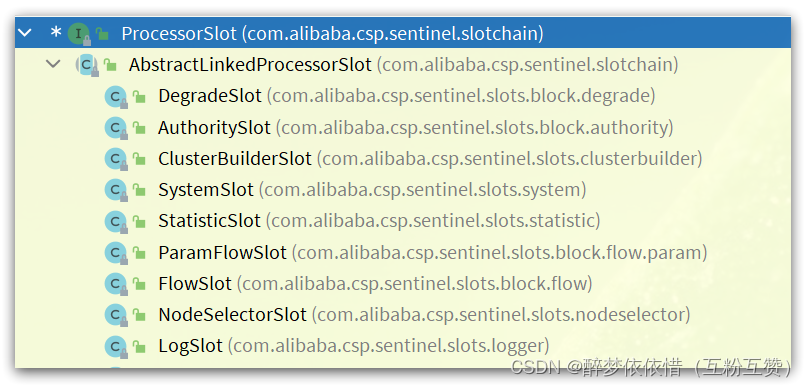
因此,first一定是这些实现类中的一个,按照最早讲的责任链顺序,first应该就是
NodeSelectorSlot。不过,既然是基于责任链模式,所以这里只要记住下一个slot就可以了,也就是next:
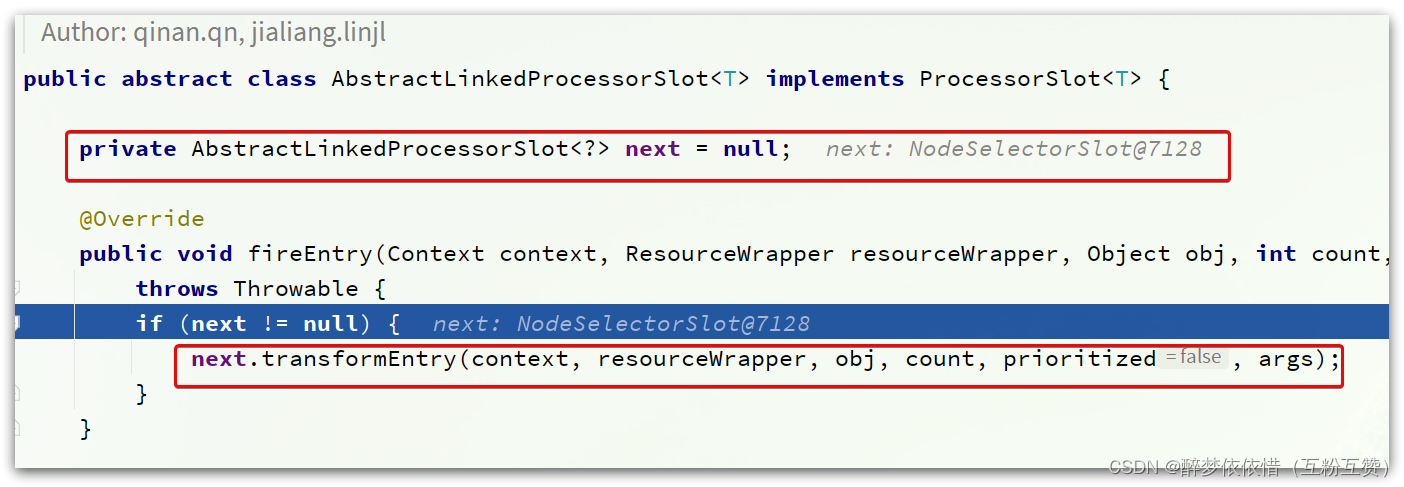
next确实是NodeSelectSlot类型。
而NodeSelectSlot的next一定是ClusterBuilderSlot,依次类推:
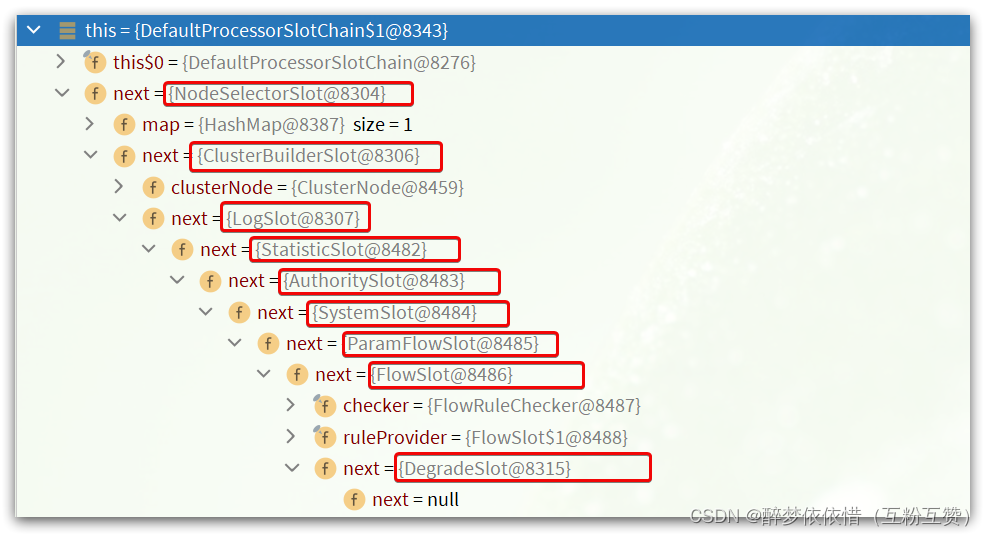
责任链就建立起来了。
2.3.NodeSelectorSlot
NodeSelectorSlot负责构建簇点链路中的节点(DefaultNode),将这些节点形成链路树。
核心代码:
@Override
public void entry(Context context, ResourceWrapper resourceWrapper, Object obj, int count, boolean prioritized, Object... args)throws Throwable {// 尝试获取 当前资源的 DefaultNodeDefaultNode node = map.get(context.getName());if (node == null) {synchronized (this) {node = map.get(context.getName());if (node == null) {// 如果为空,为当前资源创建一个新的 DefaultNodenode = new DefaultNode(resourceWrapper, null);HashMap<String, DefaultNode> cacheMap = new HashMap<String, DefaultNode>(map.size());cacheMap.putAll(map);// 放入缓存中,注意这里的 key是contextName,// 这样不同链路进入相同资源,就会创建多个 DefaultNodecacheMap.put(context.getName(), node);map = cacheMap;// 当前节点加入上一节点的 child中,这样就构成了调用链路树((DefaultNode) context.getLastNode()).addChild(node);}}}// context中的curNode(当前节点)设置为新的 nodecontext.setCurNode(node);// 执行下一个 slotfireEntry(context, resourceWrapper, node, count, prioritized, args);
}
这个Slot完成了这么几件事情:
为当前资源创建 DefaultNode
将DefaultNode放入缓存中,key是contextName,这样不同链路入口的请求,将会创建多个DefaultNode,相同链路则只有一个DefaultNode
将当前资源的DefaultNode设置为上一个资源的childNode
将当前资源的DefaultNode设置为Context中的curNode(当前节点)
下一个slot,就是ClusterBuilderSlot
2.4.ClusterBuilderSlot
ClusterBuilderSlot负责构建某个资源的ClusterNode,核心代码:
@Override
public void entry(Context context, ResourceWrapper resourceWrapper, DefaultNode node,int count, boolean prioritized, Object... args)throws Throwable {// 判空,注意ClusterNode是共享的成员变量,也就是说一个资源只有一个ClusterNode,与链路无关if (clusterNode == null) {synchronized (lock) {if (clusterNode == null) {// 创建 cluster node.clusterNode = new ClusterNode(resourceWrapper.getName(), resourceWrapper.getResourceType());HashMap<ResourceWrapper, ClusterNode> newMap = new HashMap<>(Math.max(clusterNodeMap.size(), 16));newMap.putAll(clusterNodeMap);// 放入缓存,可以是nodeId,也就是resource名称newMap.put(node.getId(), clusterNode);clusterNodeMap = newMap;}}}// 将资源的 DefaultNode与 ClusterNode关联node.setClusterNode(clusterNode);// 记录请求来源 origin 将 origin放入 entryif (!"".equals(context.getOrigin())) {Node originNode = node.getClusterNode().getOrCreateOriginNode(context.getOrigin());context.getCurEntry().setOriginNode(originNode);}// 继续下一个slotfireEntry(context, resourceWrapper, node, count, prioritized, args);
}
2.5.StatisticSlot
StatisticSlot负责统计实时调用数据,包括运行信息(访问次数、线程数)、来源信息等。
StatisticSlot是实现限流的关键,其中基于滑动时间窗口算法维护了计数器,统计进入某个资源的请求次数。
核心代码:
@Override
public void entry(Context context, ResourceWrapper resourceWrapper, DefaultNode node, int count, boolean prioritized, Object... args) throws Throwable {try {// 放行到下一个 slot,做限流、降级等判断fireEntry(context, resourceWrapper, node, count, prioritized, args);// 请求通过了, 线程计数器 +1 ,用作线程隔离node.increaseThreadNum();// 请求计数器 +1 用作限流node.addPassRequest(count);if (context.getCurEntry().getOriginNode() != null) {// 如果有 origin,来源计数器也都要 +1context.getCurEntry().getOriginNode().increaseThreadNum();context.getCurEntry().getOriginNode().addPassRequest(count);}if (resourceWrapper.getEntryType() == EntryType.IN) {// 如果是入口资源,还要给全局计数器 +1.Constants.ENTRY_NODE.increaseThreadNum();Constants.ENTRY_NODE.addPassRequest(count);}// 请求通过后的回调.for (ProcessorSlotEntryCallback<DefaultNode> handler : StatisticSlotCallbackRegistry.getEntryCallbacks()) {handler.onPass(context, resourceWrapper, node, count, args);}} catch (Throwable e) {// 各种异常处理就省略了。。。context.getCurEntry().setError(e);throw e;}
}
另外,需要注意的是,所有的计数+1动作都包括两部分,以
node.addPassRequest(count);为例:@Override public void addPassRequest(int count) {// DefaultNode的计数器,代表当前链路的 计数器super.addPassRequest(count);// ClusterNode计数器,代表当前资源的 总计数器this.clusterNode.addPassRequest(count); }具体计数方式,我们后续再看。
接下来,进入规则校验的相关slot了,依次是:
AuthoritySlot:负责授权规则(来源控制)
SystemSlot:负责系统保护规则
ParamFlowSlot:负责热点参数限流规则
FlowSlot:负责限流规则
DegradeSlot:负责降级规则
2.6.AuthoritySlot
负责请求来源origin的授权规则判断,如图:
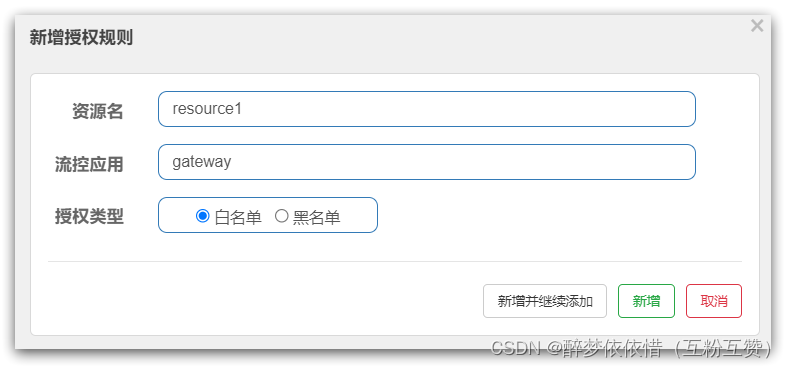
核心API:
@Override
public void entry(Context context, ResourceWrapper resourceWrapper, DefaultNode node, int count, boolean prioritized, Object... args)throws Throwable {// 校验黑白名单checkBlackWhiteAuthority(resourceWrapper, context);// 进入下一个 slotfireEntry(context, resourceWrapper, node, count, prioritized, args);
}
黑白名单校验的逻辑:
void checkBlackWhiteAuthority(ResourceWrapper resource, Context context) throws AuthorityException {// 获取授权规则Map<String, Set<AuthorityRule>> authorityRules = AuthorityRuleManager.getAuthorityRules();if (authorityRules == null) {return;}Set<AuthorityRule> rules = authorityRules.get(resource.getName());if (rules == null) {return;}// 遍历规则并判断for (AuthorityRule rule : rules) {if (!AuthorityRuleChecker.passCheck(rule, context)) {// 规则不通过,直接抛出异常throw new AuthorityException(context.getOrigin(), rule);}}
}
再看下
AuthorityRuleChecker.passCheck(rule, context)方法:static boolean passCheck(AuthorityRule rule, Context context) {// 得到请求来源 originString requester = context.getOrigin();// 来源为空,或者规则为空,都直接放行if (StringUtil.isEmpty(requester) || StringUtil.isEmpty(rule.getLimitApp())) {return true;}// rule.getLimitApp()得到的就是 白名单 或 黑名单 的字符串,这里先用 indexOf方法判断int pos = rule.getLimitApp().indexOf(requester);boolean contain = pos > -1;if (contain) {// 如果包含 origin,还要进一步做精确判断,把名单列表以","分割,逐个判断boolean exactlyMatch = false;String[] appArray = rule.getLimitApp().split(",");for (String app : appArray) {if (requester.equals(app)) {exactlyMatch = true;break;}}contain = exactlyMatch;}// 如果是黑名单,并且包含origin,则返回falseint strategy = rule.getStrategy();if (strategy == RuleConstant.AUTHORITY_BLACK && contain) {return false;}// 如果是白名单,并且不包含origin,则返回falseif (strategy == RuleConstant.AUTHORITY_WHITE && !contain) {return false;}// 其它情况返回truereturn true; }2.7.SystemSlot
SystemSlot是对系统保护的规则校验:
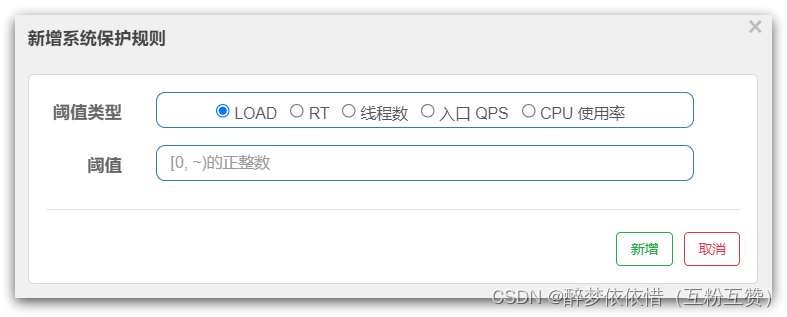
核心API:
@Override
public void entry(Context context, ResourceWrapper resourceWrapper, DefaultNode node, int count,boolean prioritized, Object... args) throws Throwable {// 系统规则校验SystemRuleManager.checkSystem(resourceWrapper);// 进入下一个 slotfireEntry(context, resourceWrapper, node, count, prioritized, args);
}
来看下
SystemRuleManager.checkSystem(resourceWrapper);的代码:public static void checkSystem(ResourceWrapper resourceWrapper) throws BlockException {if (resourceWrapper == null) {return;}// Ensure the checking switch is on.if (!checkSystemStatus.get()) {return;}// 只针对入口资源做校验,其它直接返回if (resourceWrapper.getEntryType() != EntryType.IN) {return;}// 全局 QPS校验double currentQps = Constants.ENTRY_NODE == null ? 0.0 : Constants.ENTRY_NODE.successQps();if (currentQps > qps) {throw new SystemBlockException(resourceWrapper.getName(), "qps");}// 全局 线程数 校验int currentThread = Constants.ENTRY_NODE == null ? 0 : Constants.ENTRY_NODE.curThreadNum();if (currentThread > maxThread) {throw new SystemBlockException(resourceWrapper.getName(), "thread");}// 全局平均 RT校验double rt = Constants.ENTRY_NODE == null ? 0 : Constants.ENTRY_NODE.avgRt();if (rt > maxRt) {throw new SystemBlockException(resourceWrapper.getName(), "rt");}// 全局 系统负载 校验if (highestSystemLoadIsSet && getCurrentSystemAvgLoad() > highestSystemLoad) {if (!checkBbr(currentThread)) {throw new SystemBlockException(resourceWrapper.getName(), "load");}}// 全局 CPU使用率 校验if (highestCpuUsageIsSet && getCurrentCpuUsage() > highestCpuUsage) {throw new SystemBlockException(resourceWrapper.getName(), "cpu");} }2.8.ParamFlowSlot
ParamFlowSlot就是热点参数限流,如图:
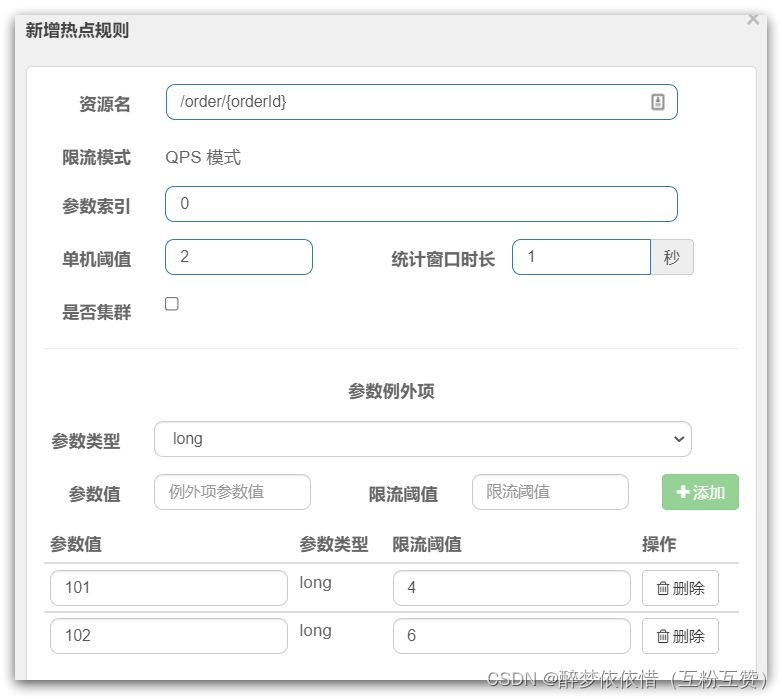
是针对进入资源的请求,针对不同的请求参数值分别统计QPS的限流方式。
这里的单机阈值,就是最大令牌数量:maxCount
这里的统计窗口时长,就是统计时长:duration
含义是每隔duration时间长度内,最多生产maxCount个令牌,上图配置的含义是每1秒钟生产2个令牌。
核心API:
@Override
public void entry(Context context, ResourceWrapper resourceWrapper, DefaultNode node,int count, boolean prioritized, Object... args) throws Throwable {// 如果没有设置热点规则,直接放行if (!ParamFlowRuleManager.hasRules(resourceWrapper.getName())) {fireEntry(context, resourceWrapper, node, count, prioritized, args);return;}// 热点规则判断checkFlow(resourceWrapper, count, args);// 进入下一个 slotfireEntry(context, resourceWrapper, node, count, prioritized, args);
}
2.8.1.令牌桶
热点规则判断采用了令牌桶算法来实现参数限流,为每一个不同参数值设置令牌桶,Sentinel的令牌桶有两部分组成:

这两个Map的key都是请求的参数值,value却不同,其中:
tokenCounters:用来记录剩余令牌数量
timeCounters:用来记录上一个请求的时间
当一个携带参数的请求到来后,基本判断流程是这样的:
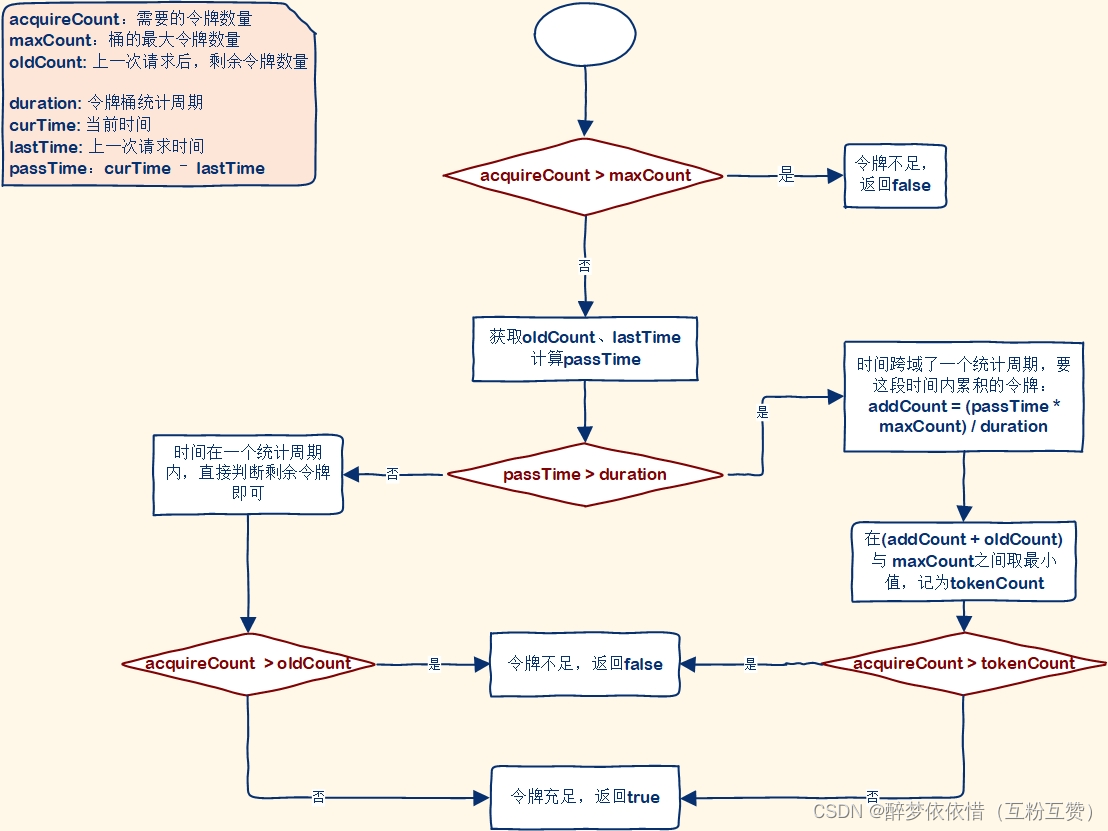
2.9.FlowSlot
FlowSlot是负责限流规则的判断,如图:
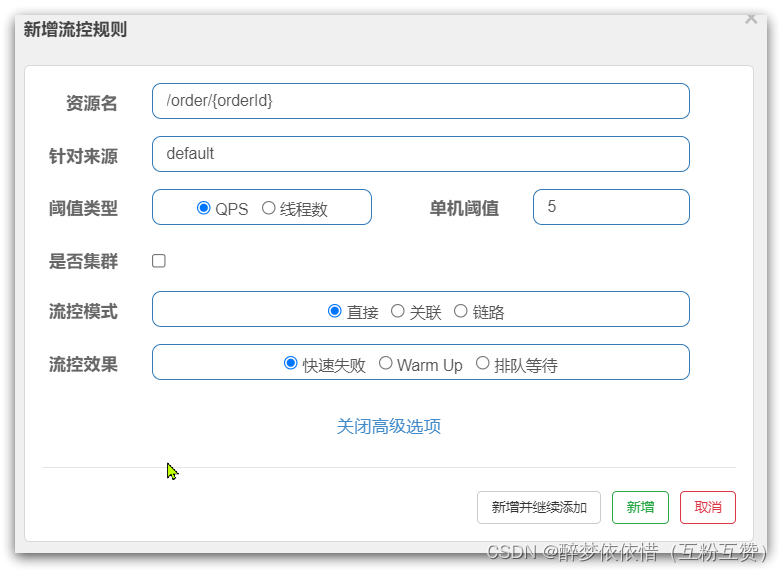
包括:
三种流控模式:直接模式、关联模式、链路模式
三种流控效果:快速失败、warm up、排队等待
三种流控模式,从底层数据统计角度,分为两类:
对进入资源的所有请求(ClusterNode)做限流统计:直接模式、关联模式
对进入资源的部分链路(DefaultNode)做限流统计:链路模式
三种流控效果,从限流算法来看,分为两类:
滑动时间窗口算法:快速失败、warm up
漏桶算法:排队等待效果
2.9.1.核心流程
核心API如下:
@Override
public void entry(Context context, ResourceWrapper resourceWrapper, DefaultNode node, int count,boolean prioritized, Object... args) throws Throwable {// 限流规则检测checkFlow(resourceWrapper, context, node, count, prioritized);// 放行fireEntry(context, resourceWrapper, node, count, prioritized, args);
}
checkFlow方法:void checkFlow(ResourceWrapper resource, Context context, DefaultNode node, int count, boolean prioritized)throws BlockException {// checker是 FlowRuleChecker 类的一个对象checker.checkFlow(ruleProvider, resource, context, node, count, prioritized);
}
跟入FlowRuleChecker:
public void checkFlow(Function<String, Collection<FlowRule>> ruleProvider, ResourceWrapper resource,Context context, DefaultNode node,int count, boolean prioritized) throws BlockException {if (ruleProvider == null || resource == null) {return;}// 获取当前资源的所有限流规则Collection<FlowRule> rules = ruleProvider.apply(resource.getName());if (rules != null) {for (FlowRule rule : rules) {// 遍历,逐个规则做校验if (!canPassCheck(rule, context, node, count, prioritized)) {throw new FlowException(rule.getLimitApp(), rule);}}}}这里的FlowRule就是限流规则接口,其中的几个成员变量,刚好对应表单参数:
public class FlowRule extends AbstractRule {/*** 阈值类型 (0: 线程, 1: QPS).*/private int grade = RuleConstant.FLOW_GRADE_QPS;/*** 阈值.*/private double count;/*** 三种限流模式.** {@link RuleConstant#STRATEGY_DIRECT} 直连模式;* {@link RuleConstant#STRATEGY_RELATE} 关联模式;* {@link RuleConstant#STRATEGY_CHAIN} 链路模式.*/private int strategy = RuleConstant.STRATEGY_DIRECT;/*** 关联模式关联的资源名称.*/private String refResource;/*** 3种流控效果.* 0. 快速失败, 1. warm up, 2. 排队等待, 3. warm up + 排队等待*/private int controlBehavior = RuleConstant.CONTROL_BEHAVIOR_DEFAULT;// 预热时长private int warmUpPeriodSec = 10;/*** 队列最大等待时间.*/private int maxQueueingTimeMs = 500;// 。。。 略
}
校验的逻辑定义在
FlowRuleChecker的canPassCheck方法中:public boolean canPassCheck(/*@NonNull*/ FlowRule rule, Context context, DefaultNode node, int acquireCount,boolean prioritized) {// 获取限流资源名称String limitApp = rule.getLimitApp();if (limitApp == null) {return true;}// 校验规则return passLocalCheck(rule, context, node, acquireCount, prioritized); }进入
passLocalCheck():private static boolean passLocalCheck(FlowRule rule, Context context, DefaultNode node,int acquireCount, boolean prioritized) {// 基于限流模式判断要统计的节点, // 如果是直连模式,关联模式,对ClusterNode统计,如果是链路模式,则对DefaultNode统计Node selectedNode = selectNodeByRequesterAndStrategy(rule, context, node);if (selectedNode == null) {return true;}// 判断规则return rule.getRater().canPass(selectedNode, acquireCount, prioritized); }这里对规则的判断先要通过
FlowRule#getRater()获取流量控制器TrafficShapingController,然后再做限流。而
TrafficShapingController有3种实现:
DefaultController:快速失败,默认的方式,基于滑动时间窗口算法
WarmUpController:预热模式,基于滑动时间窗口算法,只不过阈值是动态的
RateLimiterController:排队等待模式,基于漏桶算法
最终的限流判断都在TrafficShapingController的canPass方法中。
2.9.2.滑动时间窗口
滑动时间窗口的功能分两部分来看:
一是时间区间窗口的QPS计数功能,这个是在StatisticSlot中调用的
二是对滑动窗口内的时间区间窗口QPS累加,这个是在FlowRule中调用的
先来看时间区间窗口的QPS计数功能。
2.9.2.1.时间窗口请求量统计
回顾2.5章节中的StatisticSlot部分,有这样一段代码:

就是在统计通过该节点的QPS,我们跟入看看,这里进入了DefaultNode内部:

发现同时对
DefaultNode和ClusterNode在做QPS统计,我们知道DefaultNode和ClusterNode都是StatisticNode的子类,这里调用addPassRequest()方法,最终都会进入StatisticNode中。随便跟入一个:
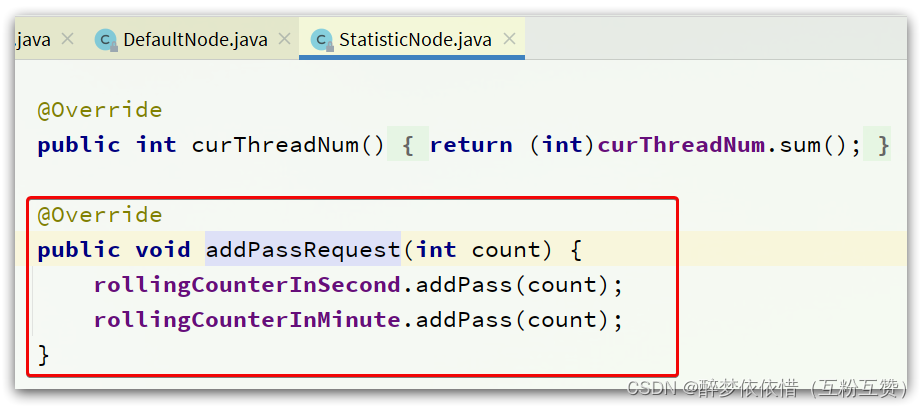
这里有秒、分两种纬度的统计,对应两个计数器。找到对应的成员变量,可以看到:
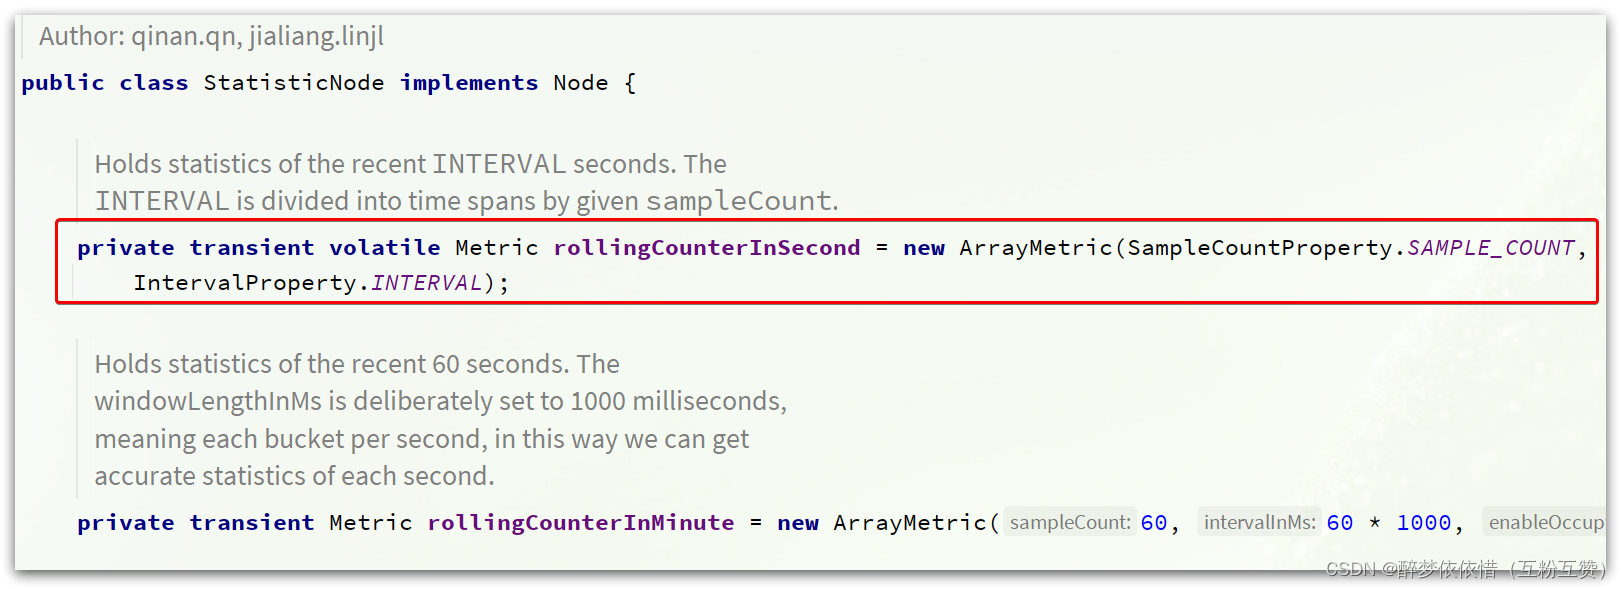
两个计数器都是ArrayMetric类型,并且传入了两个参数:
// intervalInMs:是滑动窗口的时间间隔,默认为 1 秒
// sampleCount: 时间窗口的分隔数量,默认为 2,就是把 1秒分为 2个小时间窗
public ArrayMetric(int sampleCount, int intervalInMs) {this.data = new OccupiableBucketLeapArray(sampleCount, intervalInMs);
}
如图:

接下来,我们进入
ArrayMetric类的addPass方法:@Override public void addPass(int count) {// 获取当前时间所在的时间窗WindowWrap<MetricBucket> wrap = data.currentWindow();// 计数器 +1wrap.value().addPass(count); }那么,计数器如何知道当前所在的窗口是哪个呢?
这里的data是一个LeapArray:

LeapArray的四个属性:
public abstract class LeapArray<T> {// 小窗口的时间长度,默认是500ms ,值 = intervalInMs / sampleCountprotected int windowLengthInMs;// 滑动窗口内的 小窗口 数量,默认为 2protected int sampleCount;// 滑动窗口的时间间隔,默认为 1000msprotected int intervalInMs;// 滑动窗口的时间间隔,单位为秒,默认为 1private double intervalInSecond;
}
LeapArray是一个环形数组,因为时间是无限的,数组长度不可能无限,因此数组中每一个格子放入一个时间窗(window),当数组放满后,角标归0,覆盖最初的window。
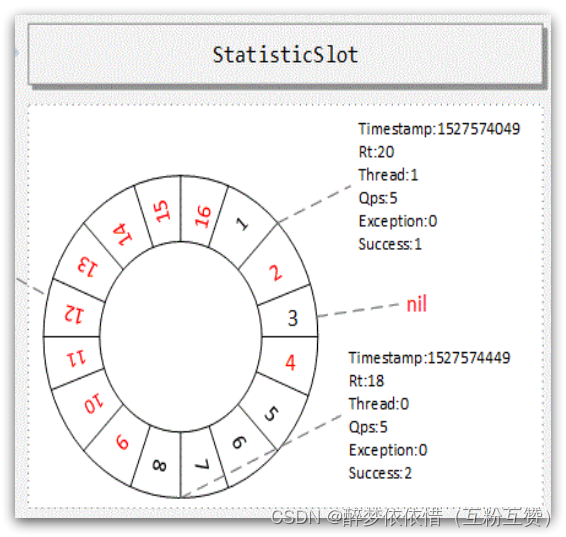
因为滑动窗口最多分成sampleCount数量的小窗口,因此数组长度只要大于sampleCount,那么最近的一个滑动窗口内的2个小窗口就永远不会被覆盖,就不用担心旧数据被覆盖的问题了。
我们跟入
data.currentWindow();方法:public WindowWrap<T> currentWindow(long timeMillis) {if (timeMillis < 0) {return null;}// 计算当前时间对应的数组角标int idx = calculateTimeIdx(timeMillis);// 计算当前时间所在窗口的开始时间.long windowStart = calculateWindowStart(timeMillis);/** 先根据角标获取数组中保存的 oldWindow 对象,可能是旧数据,需要判断.** (1) oldWindow 不存在, 说明是第一次,创建新 window并存入,然后返回即可* (2) oldWindow的 starTime = 本次请求的 windowStar, 说明正是要找的窗口,直接返回.* (3) oldWindow的 starTime < 本次请求的 windowStar, 说明是旧数据,需要被覆盖,创建 * 新窗口,覆盖旧窗口*/while (true) {WindowWrap<T> old = array.get(idx);if (old == null) {// 创建新 windowWindowWrap<T> window = new WindowWrap<T>(windowLengthInMs, windowStart, newEmptyBucket(timeMillis));// 基于CAS写入数组,避免线程安全问题if (array.compareAndSet(idx, null, window)) {// 写入成功,返回新的 windowreturn window;} else {// 写入失败,说明有并发更新,等待其它人更新完成即可Thread.yield();}} else if (windowStart == old.windowStart()) {return old;} else if (windowStart > old.windowStart()) {if (updateLock.tryLock()) {try {// 获取并发锁,覆盖旧窗口并返回return resetWindowTo(old, windowStart);} finally {updateLock.unlock();}} else {// 获取锁失败,等待其它线程处理就可以了Thread.yield();}} else if (windowStart < old.windowStart()) {// 这种情况不应该存在,写这里只是以防万一。return new WindowWrap<T>(windowLengthInMs, windowStart, newEmptyBucket(timeMillis));}} }找到当前时间所在窗口(WindowWrap)后,只要调用WindowWrap对象中的add方法,计数器+1即可。
这里只负责统计每个窗口的请求量,不负责拦截。限流拦截要看FlowSlot中的逻辑。
2.9.2.2.滑动窗口QPS计算
在2.9.1小节我们讲过,FlowSlot的限流判断最终都由
TrafficShapingController接口中的canPass方法来实现。该接口有三个实现类:
DefaultController:快速失败,默认的方式,基于滑动时间窗口算法
WarmUpController:预热模式,基于滑动时间窗口算法,只不过阈值是动态的
RateLimiterController:排队等待模式,基于漏桶算法
因此,我们跟入默认的DefaultController中的canPass方法来分析:
@Override
public boolean canPass(Node node, int acquireCount, boolean prioritized) {// 计算目前为止滑动窗口内已经存在的请求量int curCount = avgUsedTokens(node);// 判断:已使用请求量 + 需要的请求量(1) 是否大于 窗口的请求阈值if (curCount + acquireCount > count) {// 大于,说明超出阈值,返回falseif (prioritized && grade == RuleConstant.FLOW_GRADE_QPS) {long currentTime;long waitInMs;currentTime = TimeUtil.currentTimeMillis();waitInMs = node.tryOccupyNext(currentTime, acquireCount, count);if (waitInMs < OccupyTimeoutProperty.getOccupyTimeout()) {node.addWaitingRequest(currentTime + waitInMs, acquireCount);node.addOccupiedPass(acquireCount);sleep(waitInMs);// PriorityWaitException indicates that the request will pass after waiting for {@link @waitInMs}.throw new PriorityWaitException(waitInMs);}}return false;}// 小于等于,说明在阈值范围内,返回truereturn true;
}
因此,判断的关键就是
int curCount = avgUsedTokens(node);private int avgUsedTokens(Node node) {if (node == null) {return DEFAULT_AVG_USED_TOKENS;}return grade == RuleConstant.FLOW_GRADE_THREAD ? node.curThreadNum() : (int)(node.passQps()); }因为我们采用的是限流,走
node.passQps()逻辑:// 这里又进入了 StatisticNode类 @Override public double passQps() {// 请求量 ÷ 滑动窗口时间间隔 ,得到的就是QPSreturn rollingCounterInSecond.pass() / rollingCounterInSecond.getWindowIntervalInSec(); }那么
rollingCounterInSecond.pass()是如何得到请求量的呢?// rollingCounterInSecond 本质是ArrayMetric,之前说过 @Override public long pass() {// 获取当前窗口data.currentWindow();long pass = 0;// 获取 当前时间的 滑动窗口范围内 的所有小窗口List<MetricBucket> list = data.values();// 遍历for (MetricBucket window : list) {// 累加求和pass += window.pass();}// 返回return pass; }来看看
data.values()如何获取 滑动窗口范围内 的所有小窗口:// 此处进入LeapArray类中:public List<T> values(long timeMillis) {if (timeMillis < 0) {return new ArrayList<T>();}// 创建空集合,大小等于 LeapArray长度int size = array.length();List<T> result = new ArrayList<T>(size);// 遍历 LeapArrayfor (int i = 0; i < size; i++) {// 获取每一个小窗口WindowWrap<T> windowWrap = array.get(i);// 判断这个小窗口是否在 滑动窗口时间范围内(1秒内)if (windowWrap == null || isWindowDeprecated(timeMillis, windowWrap)) {// 不在范围内,则跳过continue;}// 在范围内,则添加到集合中result.add(windowWrap.value());}// 返回集合return result; }那么,
isWindowDeprecated(timeMillis, windowWrap)又是如何判断窗口是否符合要求呢?public boolean isWindowDeprecated(long time, WindowWrap<T> windowWrap) {// 当前时间 - 窗口开始时间 是否大于 滑动窗口的最大间隔(1秒)// 也就是说,我们要统计的时 距离当前时间1秒内的 小窗口的 count之和return time - windowWrap.windowStart() > intervalInMs; }2.9.3.漏桶
上一节我们讲过,FlowSlot的限流判断最终都由
TrafficShapingController接口中的canPass方法来实现。该接口有三个实现类:
DefaultController:快速失败,默认的方式,基于滑动时间窗口算法
WarmUpController:预热模式,基于滑动时间窗口算法,只不过阈值是动态的
RateLimiterController:排队等待模式,基于漏桶算法
因此,我们跟入默认的RateLimiterController中的canPass方法来分析:
@Override
public boolean canPass(Node node, int acquireCount, boolean prioritized) {// Pass when acquire count is less or equal than 0.if (acquireCount <= 0) {return true;}// 阈值小于等于 0 ,阻止请求if (count <= 0) {return false;}// 获取当前时间long currentTime = TimeUtil.currentTimeMillis();// 计算两次请求之间允许的最小时间间隔long costTime = Math.round(1.0 * (acquireCount) / count * 1000);// 计算本次请求 允许执行的时间点 = 最近一次请求的可执行时间 + 两次请求的最小间隔long expectedTime = costTime + latestPassedTime.get();// 如果允许执行的时间点小于当前时间,说明可以立即执行if (expectedTime <= currentTime) {// 更新上一次的请求的执行时间latestPassedTime.set(currentTime);return true;} else {// 不能立即执行,需要计算 预期等待时长// 预期等待时长 = 两次请求的最小间隔 +最近一次请求的可执行时间 - 当前时间long waitTime = costTime + latestPassedTime.get() - TimeUtil.currentTimeMillis();// 如果预期等待时间超出阈值,则拒绝请求if (waitTime > maxQueueingTimeMs) {return false;} else {// 预期等待时间小于阈值,更新最近一次请求的可执行时间,加上costTimelong oldTime = latestPassedTime.addAndGet(costTime);try {// 保险起见,再判断一次预期等待时间,是否超过阈值waitTime = oldTime - TimeUtil.currentTimeMillis();if (waitTime > maxQueueingTimeMs) {// 如果超过,则把刚才 加 的时间再 减回来latestPassedTime.addAndGet(-costTime);// 拒绝return false;}// in race condition waitTime may <= 0if (waitTime > 0) {// 预期等待时间在阈值范围内,休眠要等待的时间,醒来后继续执行Thread.sleep(waitTime);}return true;} catch (InterruptedException e) {}}}return false;
}
与我们之前分析的漏桶算法基本一致:

2.10.DegradeSlot
最后一关,就是降级规则判断了。
Sentinel的降级是基于状态机来实现的:

对应的实现在DegradeSlot类中,核心API:
@Override
public void entry(Context context, ResourceWrapper resourceWrapper, DefaultNode node, int count, boolean prioritized, Object... args) throws Throwable {// 熔断降级规则判断performChecking(context, resourceWrapper);// 继续下一个slotfireEntry(context, resourceWrapper, node, count, prioritized, args);
}
继续进入
performChecking方法:void performChecking(Context context, ResourceWrapper r) throws BlockException {// 获取当前资源上的所有的断路器 CircuitBreakerList<CircuitBreaker> circuitBreakers = DegradeRuleManager.getCircuitBreakers(r.getName());if (circuitBreakers == null || circuitBreakers.isEmpty()) {return;}for (CircuitBreaker cb : circuitBreakers) {// 遍历断路器,逐个判断if (!cb.tryPass(context)) {throw new DegradeException(cb.getRule().getLimitApp(), cb.getRule());}} }2.10.1.CircuitBreaker
我们进入CircuitBreaker的tryPass方法中:
@Override
public boolean tryPass(Context context) {// 判断状态机状态if (currentState.get() == State.CLOSED) {// 如果是closed状态,直接放行return true;}if (currentState.get() == State.OPEN) {// 如果是OPEN状态,断路器打开// 继续判断OPEN时间窗是否结束,如果是则把状态从OPEN切换到 HALF_OPEN,返回truereturn retryTimeoutArrived() && fromOpenToHalfOpen(context);}// OPEN状态,并且时间窗未到,返回falsereturn false;
}
有关时间窗的判断在
retryTimeoutArrived()方法:protected boolean retryTimeoutArrived() {// 当前时间 大于 下一次 HalfOpen的重试时间return TimeUtil.currentTimeMillis() >= nextRetryTimestamp; }OPEN到HALF_OPEN切换在
fromOpenToHalfOpen(context)方法:protected boolean fromOpenToHalfOpen(Context context) {// 基于CAS修改状态,从 OPEN到 HALF_OPENif (currentState.compareAndSet(State.OPEN, State.HALF_OPEN)) {// 状态变更的事件通知notifyObservers(State.OPEN, State.HALF_OPEN, null);// 得到当前资源Entry entry = context.getCurEntry();// 给资源设置监听器,在资源Entry销毁时(资源业务执行完毕时)触发entry.whenTerminate(new BiConsumer<Context, Entry>() {@Overridepublic void accept(Context context, Entry entry) {// 判断 资源业务是否异常if (entry.getBlockError() != null) {// 如果异常,则再次进入OPEN状态currentState.compareAndSet(State.HALF_OPEN, State.OPEN);notifyObservers(State.HALF_OPEN, State.OPEN, 1.0d);}}});return true;}return false; }这里出现了从OPEN到HALF_OPEN、从HALF_OPEN到OPEN的变化,但是还有几个没有:
从CLOSED到OPEN
从HALF_OPEN到CLOSED
2.10.2.触发断路器
请求经过所有插槽 后,一定会执行exit方法,而在DegradeSlot的exit方法中:
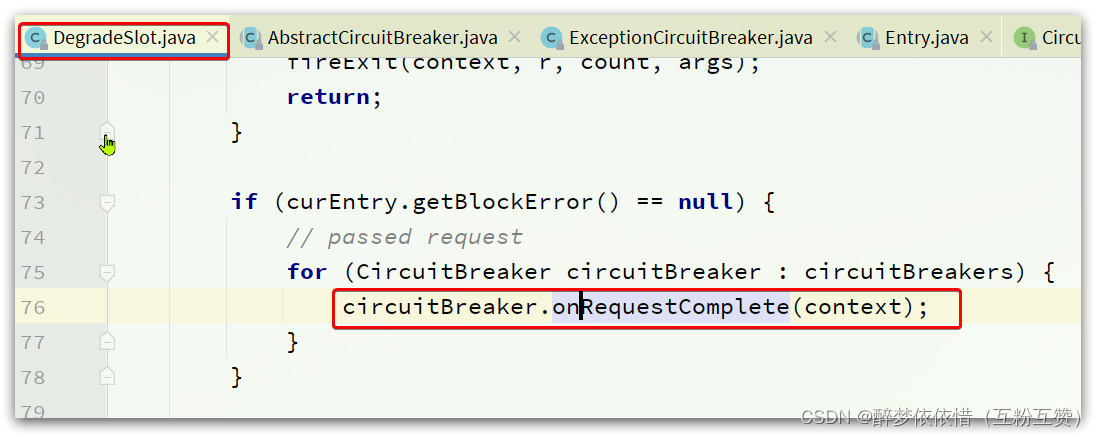
会调用CircuitBreaker的onRequestComplete方法。而CircuitBreaker有两个实现:
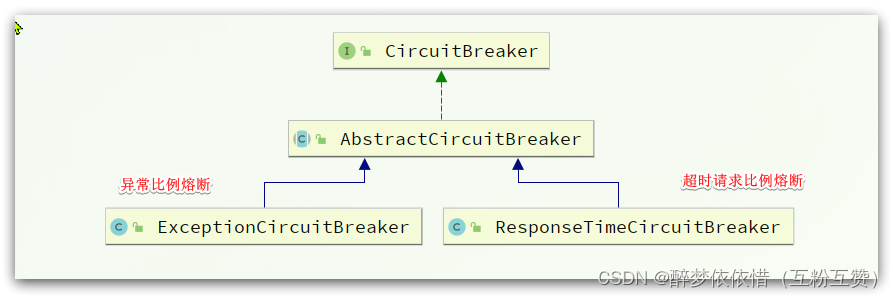
我们这里以异常比例熔断为例来看,进入
ExceptionCircuitBreaker的onRequestComplete方法:@Override public void onRequestComplete(Context context) {// 获取资源 EntryEntry entry = context.getCurEntry();if (entry == null) {return;}// 尝试获取 资源中的 异常Throwable error = entry.getError();// 获取计数器,同样采用了滑动窗口来计数SimpleErrorCounter counter = stat.currentWindow().value();if (error != null) {// 如果出现异常,则 error计数器 +1counter.getErrorCount().add(1);}// 不管是否出现异常,total计数器 +1counter.getTotalCount().add(1);// 判断异常比例是否超出阈值handleStateChangeWhenThresholdExceeded(error); }来看阈值判断的方法:
private void handleStateChangeWhenThresholdExceeded(Throwable error) {// 如果当前已经是OPEN状态,不做处理if (currentState.get() == State.OPEN) {return;}// 如果已经是 HALF_OPEN 状态,判断是否需求切换状态if (currentState.get() == State.HALF_OPEN) {if (error == null) {// 没有异常,则从 HALF_OPEN 到 CLOSEDfromHalfOpenToClose();} else {// 有一次,再次进入OPENfromHalfOpenToOpen(1.0d);}return;}// 说明当前是CLOSE状态,需要判断是否触发阈值List<SimpleErrorCounter> counters = stat.values();long errCount = 0;long totalCount = 0;// 累加计算 异常请求数量、总请求数量for (SimpleErrorCounter counter : counters) {errCount += counter.errorCount.sum();totalCount += counter.totalCount.sum();}// 如果总请求数量未达到阈值,什么都不做if (totalCount < minRequestAmount) {return;}double curCount = errCount;if (strategy == DEGRADE_GRADE_EXCEPTION_RATIO) {// 计算请求的异常比例curCount = errCount * 1.0d / totalCount;}// 如果比例超过阈值,切换到 OPENif (curCount > threshold) {transformToOpen(curCount);}
}
60.Sentinel源码分析
本文来自互联网用户投稿,该文观点仅代表作者本人,不代表本站立场。本站仅提供信息存储空间服务,不拥有所有权,不承担相关法律责任。如若转载,请注明出处:http://www.rhkb.cn/news/219582.html
如若内容造成侵权/违法违规/事实不符,请联系长河编程网进行投诉反馈email:809451989@qq.com,一经查实,立即删除!相关文章
亚马逊云科技 re:Invent 大会 - S3 对象存储华丽升级
亚马逊云科技 re:Invent 大会 - S3 对象存储华丽升级
本篇文章授权活动官方亚马逊云科技文章转发、改写权,包括不限于在 亚马逊云科技开发者社区, 知乎,自媒体平台,第三方开发者媒体等亚马逊云科技官方渠道。 文章目录 亚马逊云科技 re:Inv…
Flink系列之:大状态与 Checkpoint 调优
Flink系列之:大状态与 Checkpoint 调优 一、概述二、监控状态和 Checkpoints三、Checkpoint 调优四、RocksDB 调优五、增量 Checkpoint六、RocksDB 或 JVM 堆中的计时器七、RocksDB 内存调优八、容量规划九、压缩十、Task 本地恢复十一、主要(分布式存储…
智能优化算法应用:基于JAYA算法3D无线传感器网络(WSN)覆盖优化 - 附代码
智能优化算法应用:基于JAYA算法3D无线传感器网络(WSN)覆盖优化 - 附代码 文章目录 智能优化算法应用:基于JAYA算法3D无线传感器网络(WSN)覆盖优化 - 附代码1.无线传感网络节点模型2.覆盖数学模型及分析3.JAYA算法4.实验参数设定5.算法结果6.参考文献7.MA…
【MySQL】MySQL表的操作-创建查看删除和修改
文章目录 1.创建表2.查看表结构3.修改表4.删除表 1.创建表
语法:
CREATE TABLE table_name (field1 datatype,field2 datatype,field3 datatype
) character set 字符集 collate 校验规则 engine 存储引擎;说明:
field 表示列名datatype 表示列的类型…
flask简单应用-1
目标: 做一个搜索网页,搜索当前路径下是否含有指定关键字的文件,如果有就列出来,没有返回消息
第一步:我们需要先显示一个搜索页面,页面上需要有一个可以输入的对话框,一个按钮执行搜索 建立ht…
基于开源的JAVA mongodb jdbc 驱动 使用教程
基于开源的JAVA mongodb jdbc 驱动 使用教程介绍
介绍
本文介绍一款开源的基于JAVA的 Mongodb JDBC 驱动使用教程
开源地址
https://gitee.com/bgong/jdbc-mongodb-driver功能价值
与mybaits融合:复用mybatis的功能特性,如:缓存,if动态判断标签等特…
[计网01] 物理层 详细解析笔记,特性
计算机网络的物理层是网络协议栈中的第一层,负责传输原始的比特流(bitstream)通过物理媒介进行通信。物理层主要关注传输介质、信号的编码和调制、数据传输速率以及数据传输的物理连接等方面。
相关特性
机械特性(Mechanical Ch…
【JAVA】CyclicBarrier源码解析以及示例
文章目录 前言CyclicBarrier源码解析以及示例主要成员变量核心方法 应用场景任务分解与合并应用示例 并行计算应用示例 游戏开发应用示例输出结果 数据加载应用示例 并发工具的协同应用示例 CyclicBarrier和CountDownLatch的区别循环性:计数器的变化:用途…
C# 命令行参数解析库示例
写在前面
在日常开发中,我们经常会用到命令行参数,比如cmd下的各种指令;还有C#的控制台类型的项目,在默认入口Main函数中,那个args参数,就是有系统传入到程序进程的命令行参数;在传入的参数相对…
晚期食管癌肿瘤治疗线程分类
文章目录 1、肿瘤治疗的线数1.1 基础概念1.2 线程定义1.3 如何计算治疗线数 2 食管癌治疗指南2.1 食管癌诊疗指南2.1 CSCO 本文前半部分主要来源于参考文件1,其余部分来源于官方指南。无原创内容,全部为摘要。 1、肿瘤治疗的线数
1.1 基础概念 抗肿瘤药…
信息安全和网络安全的区别
信息安全与网络安全都属于安全领域,但它们的范围和重点不同。
信息安全主要关注数据的保护,包括对敏感数据进行加密、防止数据丢失或泄露等措施。信息安全通常与数据存储、传输和处理相关。
而网络安全更侧重于保护计算机系统和网络免受攻击、病毒、蠕…
SCI一区级 | Matlab实现GWO-CNN-GRU-selfAttention多变量多步时间序列预测
SCI一区级 | Matlab实现GWO-CNN-GRU-selfAttention多变量多步时间序列预测 目录 SCI一区级 | Matlab实现GWO-CNN-GRU-selfAttention多变量多步时间序列预测预测效果基本介绍程序设计参考资料 预测效果 基本介绍
1.Matlab实现GWO-CNN-GRU-selfAttention灰狼算法优化卷积门控循环…
I.MX RT1170双核学习(3):多核管理之MCMGR源码分析详解
本文通过SDK中最简单的hello_world例程来说明一下双核程序如何运行。在CM7和CM4的工程中都有一个MCMGR(Multicore Manager)文件夹,它是用来管理多核之间的操作的,当然也包括我们前面提到的那些寄存器的设置。 文章目录 1 MCMGR_EarlyInit1.1 MCMGR_Trigg…
关于mysql存储过程中N/A和null的使用注意事项
oracle和mysql的存储过程大同小异,但是一些细节还是需要留意的。最近发现mysql的N/A和null在存储过程中容易忽略的一点,这会导致我们的存储过程提前结束。今天突然想起来了就记录一下。 mysql的N/A和null区别网上也说得很详细了,我就不赘…
RabbitMq交换机详解
目录 1.交换机类型2.Fanout交换机2.1.声明队列和交换机2.2.消息发送2.3.消息接收2.4.总结 3.Direct交换机3.1.声明队列和交换机3.2.消息接收3.3.消息发送3.4.总结 4.Topic交换机4.1.说明4.2.消息发送4.3.消息接收4.4.总结 5.Headers交换机5.1.说明5.2.消息发送5.3.消息接收5.4.…
开源 LLM 微调训练指南:如何打造属于自己的 LLM 模型
一、介绍
今天我们来聊一聊关于LLM的微调训练,LLM应该算是目前当之无愧的最有影响力的AI技术。尽管它只是一个语言模型,但它具备理解和生成人类语言的能力,非常厉害!它可以革新各个行业,包括自然语言处理、机器翻译、…
【POI的如何做大文件的写入】
🔓POI如何做大文件的写入 🏆文件和POI之间的区别是什么?🏆POI对于当今的社会发展有何重要性?🏆POI大文件的写入🎖️使用XSSF写入文件🎖️使用SXSSFWorkbook写入文件🎖️对…
webpack详细教程
1,什么是webpackwebpack | webpack中文文档 | webpack中文网
Webpack 不仅是一个模块打包器(bundler),更完整的讲是一个前端自动化构建工具。在 Webpack 看来前端的所有资源文件(s/json/css/img/less/...)都会作为横块处理它将根据模块的依赖关系进行静…
推荐文章
- 服务拆分的原则
- multiprocessing.shared_memory --- 可跨进程直接访问的共享内存
- ORACLE wallet实现无需输入用户名与密码登陆数据库 注意修改目录权限
- 乐视回应四天半工作制:体感非常好;OpenAI CEO 否认在训练 GPT-5;iOS 17 或增加更多灵动岛功能|极客头条...
- 你真的了解黑马程序员的助教么?
- # 解析Pikachu靶场:一个安全研究的练习场
- # 利刃出鞘_Tomcat 核心原理解析(十)-- Tomcat 性能调优--1
- ###C语言程序设计-----C语言学习(9)#函数基础
- #41 AI-002-十分钟理解ChatGPT的技术逻辑及演进(前世 、今生)
- #力扣:面试题 02.03. 删除中间节点@FDDLC
- (2022级)成都工业学院数据库原理及应用实验一:CASE工具概念数据模型建模
- (9)svelte 教程: Event Modifiers



![[计网01] 物理层 详细解析笔记,特性](https://img-blog.csdnimg.cn/direct/93e31d78ef9a463098704c288688565f.png)


