目录
前言
一、CoapServer对象
1、类对象定义
2、ServerInterface接口
3、CoapServer对象
二、CoapServer服务运行分析
1、CoapServer对象实例化
1.1 调用构造方法
1.2 生成全局配置
1.3 创建Resource对象
1.4-1.8、配置消息传递器、添加CoapResource
1.9-1.12 创建线程池
1.3-1.7 端口绑定、服务配置
2、添加处理器
3、服务启动
1.1-1.5、绑定端口及相关服务
1.7-1.8 循环启动EndPoint
4、服务运行
总结
前言
在之前的博客物联网协议之COAP简介及Java实践中,我们采用使用Java开发的Californium框架下进行Coap协议的Server端和Client的协议开发。由于最基础的入门介绍博客,我们没有对它的CoapServer的实现进行深层次的分析。众所周知,Coap和Http协议类似,是分为Server端和Client端的,Server负责接收请求,同时负责业务请求的的处理。而Client负责发起服务,同时接收Server端返回的响应。
这里将首先介绍CoapServer的内容,本文将采用OOP的设计方法对Californium中Server的实现和启动进行源码级的分析,让读者对Coap的实现有进一步的了解,帮助掌握其设计和实现细节。
一、CoapServer对象
CoapServer对象是Californium中的核心对象,主要功能作用是创建一个Coap协议的服务端,在指定端口和设置资源处理控制器后,就可以用于接收来自客户端的请求。CoapServer的基本架构如下:
* +------------------------------------- CoapServer --------------------------------------+* | |* | +-----------------------+ |* | | MessageDeliverer +--> (Resource Tree) |* | +---------A-A-A---------+ |* | | | | |* | | | | |* | .-------->>>------------' | '--------<<<------------. |* | / | \ |* | | | | |* | * A * A * A |* | +-----------------------+ +-----------------------+ +-----------------------+ |* | | Endpoint | | Endpoint | | Endpoint | |* | +-----------------------+ +-----------------------+ +-----------------------+ |* +------------v-A--------------------------v-A-------------------------v-A---------------+* v A v A v A * v A v A v A * (Network) (Network) (Network)* 1、类对象定义
首先我们来看一下CoapServer的类图,从它的类图看一下涉及的类的实现关系。具体如下图所示:
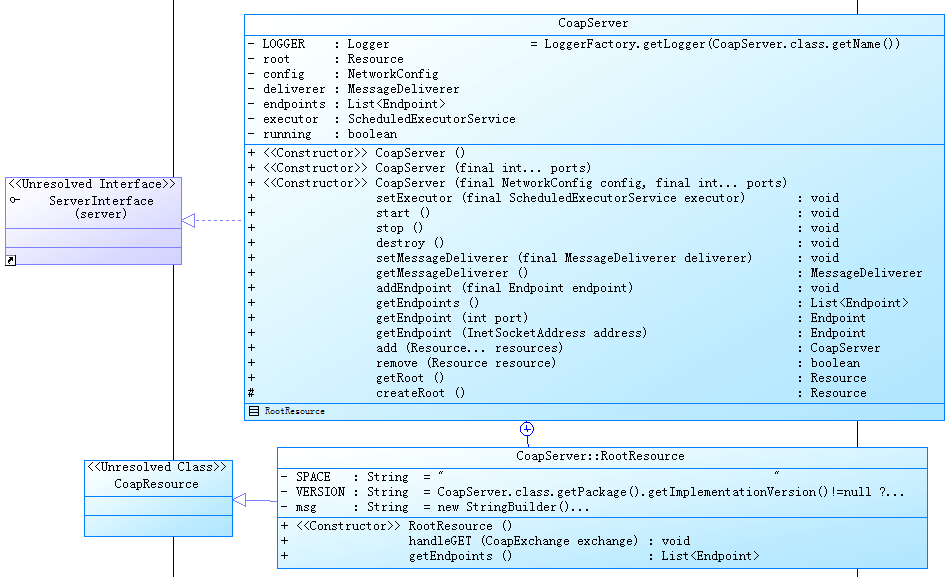
从上图可以很清晰的看到CoapServer对象的依赖关系,它是ServerInterface的实现类,内部定义了RootResource,它是CoapResource的一个子类。
2、ServerInterface接口
ServerInterface接口中定义了CoapServer的方法,比如启动、停止、移除、添加服务实例、销毁、addEndpoint等等。来看看其具体的定义:
package org.eclipse.californium.core.server;
import java.net.InetSocketAddress;
import java.util.List;
import org.eclipse.californium.core.network.Endpoint;
import org.eclipse.californium.core.server.resources.Resource;public interface ServerInterface {/*** 启动服务*/void start();/***停止服务*/void stop();/*** 销毁服务*/void destroy();/*** 增加资源到服务实例中*/ServerInterface add(Resource... resources);/*** 从服务实例中移除资源*/boolean remove(Resource resource);void addEndpoint(Endpoint endpoint);List<Endpoint> getEndpoints();Endpoint getEndpoint(InetSocketAddress address);Endpoint getEndpoint(int port);}| 序号 | 方法 | 说明 |
| 1 | void start(); | Starts the server by starting all endpoints this server is assigned to Each endpoint binds to its port. If no endpoint is assigned to the server, the server binds to CoAP's default port 5683. |
| 2 | void stop(); | Stops the server, i.e. unbinds it from all ports. |
| 3 | void destroy(); | Destroys the server, i.e. unbinds from all ports and frees all system resources. |
| 4 | ServerInterface add(Resource... resources); | Adds one or more resources to the server. |
| 5 | boolean remove(Resource resource); | Adds an endpoint for receive and sending CoAP messages on. |
| 6 | List<Endpoint> getEndpoints(); | Gets the endpoints this server is bound to. |
3、CoapServer对象
作为ServerInterface的实现子类,我们来看看Server的具体实现,首先来看下类图:
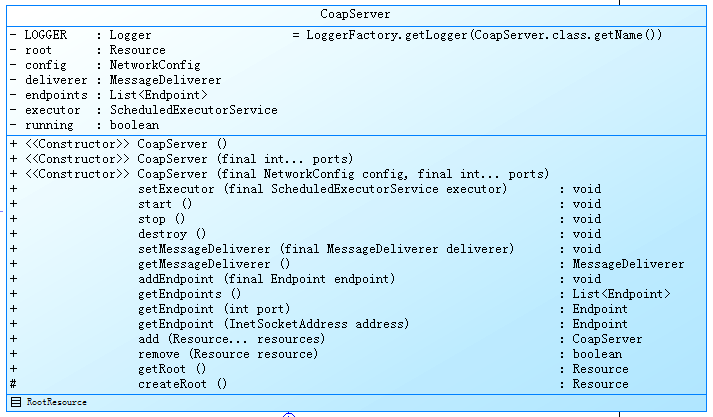
成员属性:
| 序号 | 属性 | 说明 |
| 1 | Resource root | The root resource. |
| 2 | NetworkConfig config | 网络配置对象 |
| 3 | MessageDeliverer deliverer | The message deliverer |
| 4 | List<Endpoint> endpoints | The list of endpoints the server connects to the network. |
| 5 | ScheduledExecutorService executor; | The executor of the server for its endpoints (can be null). |
| 6 | boolean running | false |
| 7 | class RootResource extends CoapResource | 内部实现类 |
成员方法除了实现ServerInterface接口的方法之外,还提供以下方法:
| 序号 | 方法 | 说明 |
| 1 | Resource getRoot() | Gets the root of this server |
| 2 | Resource createRoot() | Creates a root for this server. Can be overridden to create another root. |

二、CoapServer服务运行分析
在了解了上述的CoapServer的相关接口和类的设计和实现后,我们可以来跟踪调试一下CoapServer的实际服务运行过程。它的生命周期运行是一个怎么样的过程,通过下面的章节来进行讲解。
1、CoapServer对象实例化
在之前的代码中,我们对CoapServer对象进行了创建,来看一下关键代码。从使用者的角度来看,这是最简单不过的一个Java对象实例的创建,并没有稀奇。然而我们要深入到其类的内部实现,明确了解在创建CoapServer的过程中调用了什么逻辑。这里我们将结合时序图的方式进行讲解。
CoapServer server = new CoapServer();// 主机为localhost 端口为默认端口5683
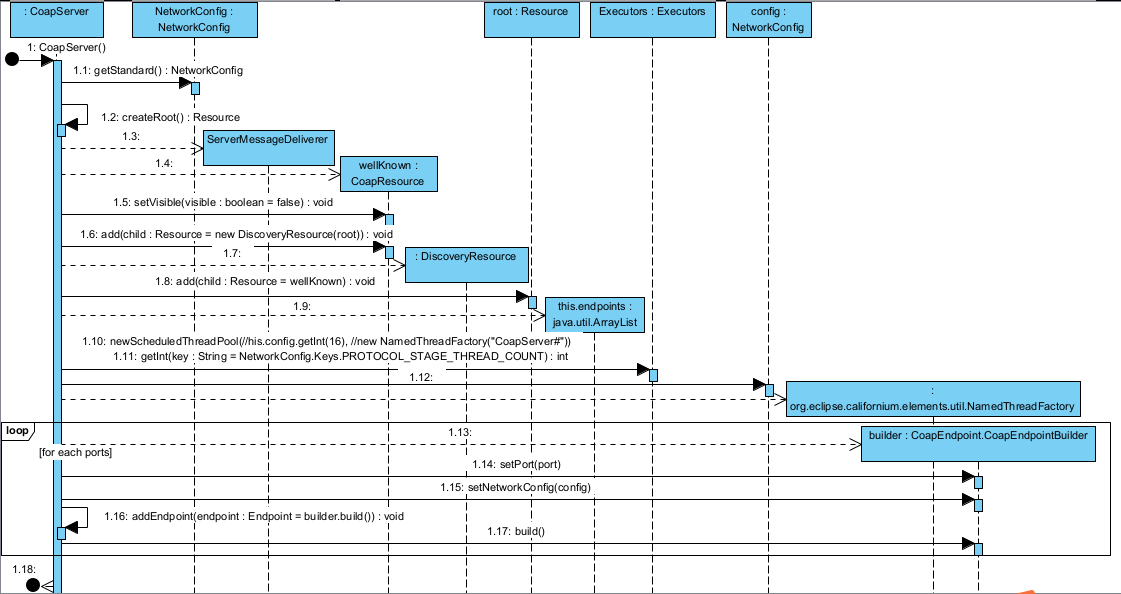
从上面的时序图可以看到,在CoaServer的内部,在创建其实例的时候。其实做了很多的业务调用,大致可以分为18个步骤,下面结合代码进行介绍:
1.1 调用构造方法
/*** Constructs a server with the specified configuration that listens to the* specified ports after method {@link #start()} is called.** @param config the configuration, if <code>null</code> the configuration returned by* {@link NetworkConfig#getStandard()} is used.* @param ports the ports to bind to*/public CoapServer(final NetworkConfig config, final int... ports) {// global configuration that is passed down (can be observed for changes)if (config != null) {this.config = config;} else {this.config = NetworkConfig.getStandard();}// resourcesthis.root = createRoot();this.deliverer = new ServerMessageDeliverer(root);CoapResource wellKnown = new CoapResource(".well-known");wellKnown.setVisible(false);wellKnown.add(new DiscoveryResource(root));root.add(wellKnown);// endpointsthis.endpoints = new ArrayList<>();// sets the central thread pool for the protocol stage over all endpointsthis.executor = Executors.newScheduledThreadPool(//this.config.getInt(NetworkConfig.Keys.PROTOCOL_STAGE_THREAD_COUNT), //new NamedThreadFactory("CoapServer#")); //$NON-NLS-1$// create endpoint for each portfor (int port : ports) {CoapEndpoint.CoapEndpointBuilder builder = new CoapEndpoint.CoapEndpointBuilder();builder.setPort(port);builder.setNetworkConfig(config);addEndpoint(builder.build());}}1.2 生成全局配置
在这里,系统会根据传入的参数进行全局配置,如果不传入config,则自动根据默认参数进行系统配置。否则根据传入参数进行配置。在系统分析时可以看到,如果系统第一次运行,配置文件是不存在的,因此在不存在的时候,会将默认配置写入到工程下面的配置文件中。
public static NetworkConfig getStandard() {synchronized (NetworkConfig.class) {if (standard == null)createStandardWithFile(new File(DEFAULT_FILE_NAME));}return standard;}public static NetworkConfig createWithFile(final File file, final String header, final NetworkConfigDefaultHandler customHandler) {NetworkConfig standard = new NetworkConfig();if (customHandler != null) {customHandler.applyDefaults(standard);}if (file.exists()) {standard.load(file);} else {standard.store(file, header);}return standard;}public void store(File file, String header) {if (file == null) {throw new NullPointerException("file must not be null");} else {try (FileWriter writer = new FileWriter(file)) {properties.store(writer, header);} catch (IOException e) {LOGGER.warn("cannot write properties to file {}: {}",new Object[] { file.getAbsolutePath(), e.getMessage() });}}}1.3 创建Resource对象
通过Server对象本身提供的createRoot()方法进行Resource对象的创建。
1.4-1.8、配置消息传递器、添加CoapResource
CoapResource wellKnown = new CoapResource(".well-known");
wellKnown.setVisible(false);
wellKnown.add(new DiscoveryResource(root));
root.add(wellKnown);
this.endpoints = new ArrayList<>();
1.9-1.12 创建线程池
这里很重要,通过创建一个容量为16的线程池来进行服务对象的处理。
// sets the central thread pool for the protocol stage over all endpoints
this.executor=Executors.newScheduledThreadPool(this.config.getInt(NetworkConfig.Keys.PROTOCOL_STAGE_THREAD_COUNT), new NamedThreadFactory("CoapServer#")); //$NON-NLS-1$
1.3-1.7 端口绑定、服务配置
在这里通过for循环的方式,将各个需要处理的端口与应用程序进行深度绑定,配置对应的服务。到此,CoapServer对象已经完成了初始创建。
2、添加处理器
在创建好了CoapServer对象后,我们使用server.add(new CoapResource())进行服务的绑定,这里的CoapResource其实就是类似于我们常见的Controller类或者servlet。
3、服务启动
下面来看下CoapServer的启动过程,它的启动主要是调用start方法。时序图调用如下图所示:

1.1-1.5、绑定端口及相关服务
if (endpoints.isEmpty()) {// servers should bind to the configured port (while clients should use an ephemeral port through the default endpoint)int port = config.getInt(NetworkConfig.Keys.COAP_PORT);LOGGER.info("no endpoints have been defined for server, setting up server endpoint on default port {}", port);CoapEndpoint.CoapEndpointBuilder builder = new CoapEndpoint.CoapEndpointBuilder();builder.setPort(port);builder.setNetworkConfig(config);addEndpoint(builder.build());}1.7-1.8 循环启动EndPoint
int started = 0;for (Endpoint ep : endpoints) {try {ep.start();// only reached on success++started;} catch (IOException e) {LOGGER.error("cannot start server endpoint [{}]", ep.getAddress(), e);}}
每个EndPoint会设置自己的启动方法,
@Overridepublic synchronized void start() throws IOException {if (started) {LOGGER.debug("Endpoint at {} is already started", getUri());return;}if (!this.coapstack.hasDeliverer()) {setMessageDeliverer(new ClientMessageDeliverer());}if (this.executor == null) {setExecutor(Executors.newSingleThreadScheduledExecutor(new DaemonThreadFactory("CoapEndpoint-" + connector + '#'))); addObserver(new EndpointObserver() {@Overridepublic void started(final Endpoint endpoint) {// do nothing}@Overridepublic void stopped(final Endpoint endpoint) {// do nothing}@Overridepublic void destroyed(final Endpoint endpoint) {executor.shutdown();}});}try {started = true;matcher.start();connector.start();for (EndpointObserver obs : observers) {obs.started(this);}startExecutor();} catch (IOException e) {stop();throw e;}}4、服务运行
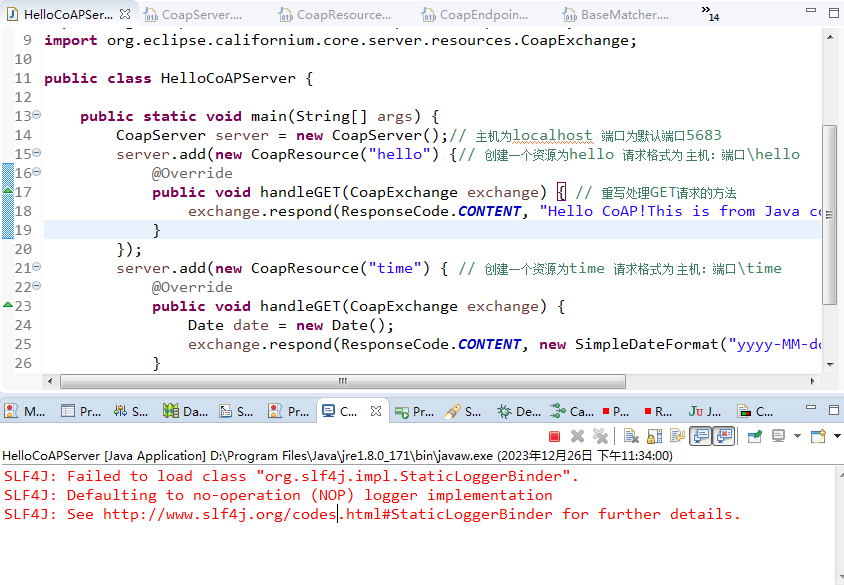
在经过了上述的实例对象创建、请求资源绑定、服务启动三个环节,一个可用的CoapServer才算是真正完成。运行终端代码可以看到服务已经正常启动。
由于篇幅有限,类里面还有其他重要的方法不能逐一讲解,感兴趣的各位,可以在工作中认真分析源代码,真正掌握其核心逻辑,做到胸有成竹。
总结
以上就是本文的主要内容,本文将采用OOP的设计方法对Californium中Server的实现和启动进行源码级的分析,让读者对Coap的实现有进一步的了解,帮助掌握其设计和实现细节。行文仓促,难免有遗漏和不当之处,欢迎各位朋友在评论区批评指正。