最近学习Netty,学习到WebSocket一章节,将Netty中WebSocket的样例代码做了一些简单的改造,实现了一个简易的WebSocket网络聊天室,源码并非完全自己实现,只是将一些别人的代码做了下整合改造,今分享至此,希望对大家学习Netty有所帮助。
首先介绍下什么是WebSocket,这就不得不先提到HTTP协议了。众所周知,在HTTP/2发布前,所有HTTP请求都是 请求-应答的 模式,这就意味着客户端只能向服务器要数据,然后服务端被动应答,而服务器无法主动将数据推送给客户端。这就导致一些高时效性的场景用HTTP就会有些问题,就拿实时聊天举例吧,客户端想知道近期有没有人说过话,就只能不断问服务器 有没有人发了消息? 有的话服务器就返回,没有就不返回,这种行为被称为轮询。 轮询的问题在于如果询问的时间间隔太长,消息的及时性无法得到保证,但如果时间太短,对服务器的压力就会大幅提升(因为不断要请求响应)。 有没有可能服务器有消息的时候,主动推送给客户端?
WebSocket因此而诞生,它允许客户端和服务端之间在HTTP之上建立一个全双工的TCP长连接,这里的关键点在于全双工,意味着服务端也能通过这个连接给客户端发送即时消息,从而解决了轮询的性能和时效性矛盾的问题。了解过Socket编程的同学应该很容易理解了,WebSocket其实本质上就是Socket,只不过WebSocket是建立在HTTP协议之上的。
回到我们的正题,如何用Netty+WebSocket写一个网络聊天室? 其实Netty里已经封装好了HTTP和WebSocket的实现,我们只需要实现部分聊天室的功能即可,接下来看下我实现的完整代码:
首先是ServerBootstrap的部分,这里是Netty的启动入口。
@Service
public class WebSocketServer {static final String WEBSOCKET_PATH = "/ws";private ChannelFuture f;@Resourceprivate WebSocketFrameHandler webSocketFrameHandler;@PostConstructprivate void init() {bind(Constant.SOCKET_PORT);}public static voud bind(int port) {EventLoopGroup bossGroup = new NioEventLoopGroup(1);EventLoopGroup workerGroup = new NioEventLoopGroup();try {ServerBootstrap b = new ServerBootstrap();b.group(bossGroup, workerGroup).channel(NioServerSocketChannel.class).handler(new LoggingHandler(LogLevel.INFO)).childHandler(new ChannelInitializer<SocketChannel>() {@Overrideprotected void initChannel(SocketChannel ch) throws Exception {ChannelPipeline pipeline = ch.pipeline();pipeline.addLast(new HttpServerCodec());  // netty中http协议的编解码pipeline.addLast(new HttpObjectAggregator(65536));  pipeline.addLast(new WebSocketServerCompressionHandler());pipeline.addLast(new WebSocketServerProtocolHandler(WEBSOCKET_PATH, null, true));pipeline.addLast(new WebSocketIndexPageHandler(WEBSOCKET_PATH));  // demo页面的handler,这个是非必须的,可以换成其他第三方的WebSocket客户端工具  pipeline.addLast(webSocketFrameHandler); // 聊天室的主要逻辑}});Channel f = b.bind(port).sync().channel();f.closeFuture().sync();} catch (Exception e) {} finally {bossGroup.shutdownGracefully();workerGroup.shutdownGracefully();}}
}
因为HttpServerCodec HttpObjectAggregator WebSocketServerCompressionHandler WebSocketServerProtocolHandler是Netty组件中提供的组件,其作用就是完成Http和WebSocket协议数据到Java对象的相互转换,这里就不再展开了,我们直接看下剩下的两个Handler。
首先是WebSocketIndexPageHandler,这个也是我直接从Netty样例中Copy出来的,它的作用就是构建一个Http首页,这个首页实现了一个简单的WebSocket网页客户端,如果你不需要这个网页客户端,你也可直接删掉。
public class WebSocketIndexPageHandler extends SimpleChannelInboundHandler<FullHttpRequest> {private final String websocketPath;public WebSocketIndexPageHandler(String websocketPath) {this.websocketPath = websocketPath;}private static void sendHttpResponse(ChannelHandlerContext ctx, FullHttpRequest req, FullHttpResponse res) {// Generate an error page if response getStatus code is not OK (200).HttpResponseStatus responseStatus = res.status();if (responseStatus.code() != 200) {ByteBufUtil.writeUtf8(res.content(), responseStatus.toString());HttpUtil.setContentLength(res, res.content().readableBytes());}// Send the response and close the connection if necessary.boolean keepAlive = HttpUtil.isKeepAlive(req) && responseStatus.code() == 200;HttpUtil.setKeepAlive(res, keepAlive);ChannelFuture future = ctx.writeAndFlush(res);if (!keepAlive) {future.addListener(ChannelFutureListener.CLOSE);}}private static String getWebSocketLocation(ChannelPipeline cp, HttpRequest req, String path) {String protocol = "ws";if (cp.get(SslHandler.class) != null) {// SSL in use so use Secure WebSocketsprotocol = "wss";}return protocol + "://" + req.headers().get(HttpHeaderNames.HOST) + path;}@Overrideprotected void channelRead0(ChannelHandlerContext ctx, FullHttpRequest req) throws Exception {// Handle a bad request.if (!req.decoderResult().isSuccess()) {sendHttpResponse(ctx, req, new DefaultFullHttpResponse(req.protocolVersion(), BAD_REQUEST,ctx.alloc().buffer(0)));return;}// Allow only GET methods.if (!GET.equals(req.method())) {sendHttpResponse(ctx, req, new DefaultFullHttpResponse(req.protocolVersion(), FORBIDDEN,ctx.alloc().buffer(0)));return;}// Send the index pageif ("/".equals(req.uri()) || "/index.html".equals(req.uri())) {String webSocketLocation = getWebSocketLocation(ctx.pipeline(), req, websocketPath);ByteBuf content = WebSocketServerIndexPage.getContent(webSocketLocation);FullHttpResponse res = new DefaultFullHttpResponse(req.protocolVersion(), OK, content);res.headers().set(CONTENT_TYPE, "text/html; charset=UTF-8");HttpUtil.setContentLength(res, content.readableBytes());sendHttpResponse(ctx, req, res);} else {sendHttpResponse(ctx, req, new DefaultFullHttpResponse(req.protocolVersion(), NOT_FOUND,ctx.alloc().buffer(0)));}}@Overridepublic void exceptionCaught(ChannelHandlerContext ctx, Throwable cause) {cause.printStackTrace();ctx.close();}
}
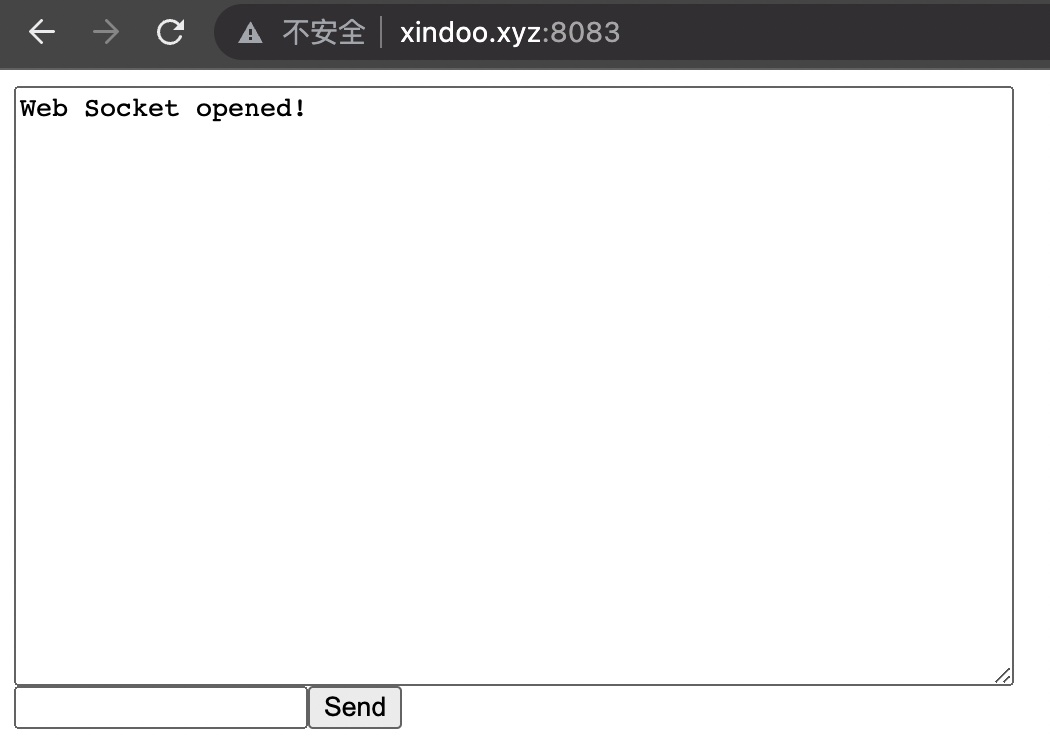
上面这部分代码还依赖于一个静态的页面,我对这个页面做了简单的改造,方便大家愉快地一起聊天。
public final class WebSocketServerIndexPage {public static ByteBuf getContent(String webSocketLocation) {return Unpooled.copiedBuffer("\n"+ "<html><head><title>Web Socket Test</title></head>\n"+ "<body>\n"+ "<script type=\"text/javascript\">\n"+ "var socket;\n"+ "if (!window.WebSocket) {\n"+ "  window.WebSocket = window.MozWebSocket;\n"+ "}\n"+ "if (window.WebSocket) {\n"+ "  socket = new WebSocket(\"" + webSocketLocation + "\");\n"+ "  socket.onmessage = function(event) {\n"+ "    var ta = document.getElementById('responseText');\n"+ "    ta.value = ta.value + '\\n' + event.data\n"+ "    ta.scrollTop = ta.scrollHeight\n"+ "  };\n"+ "  socket.onopen = function(event) {\n"+ "    var ta = document.getElementById('responseText');\n"+ "    ta.value = \"Web Socket opened!\";\n"+ "    ta.scrollTop = ta.scrollHeight\n"+ "  };\n"+ "  socket.onclose = function(event) {\n"+ "    var ta = document.getElementById('responseText');\n"+ "    ta.value = ta.value + \"Web Socket closed!\";\n"+ "    ta.scrollTop = ta.scrollHeight\n"+ "  };\n"+ "} else {\n"+ "  alert(\"Your browser does not support Web Socket.\");\n"+ "}\n"+ "\n"+ "function send(message) {\n"+ "  if (!window.WebSocket) { return; }\n"+ "  if (socket.readyState == WebSocket.OPEN) {\n"+ "    socket.send(message);\n"+ "    document.getElementById('msgForm').value = ''\n"+ "  } else {\n"+ "    alert(\"The socket is not open.\");\n"+ "  }\n"+ "}\n"+ "</script>\n"+ "<textarea id=\"responseText\" style=\"width:500px;height:300px;\"></textarea>\n"+ "<form οnsubmit=\"return false;\">\n"+ "<input type=\"text\" name=\"message\" id=\"msgForm\"/><input type=\"button\" value=\"Send\"\n"+ "       οnclick=\"send(this.form.message.value)\" />\n"+ "</form>\n"+ "</body>\n"+ "</html>\n", CharsetUtil.US_ASCII);}
}
改造后的页面效果长这样,虽然有些简陋,但还是可以收发消息。
最核心的就是WebSocketFrameHandler这个类了,所有的逻辑都是在这里面的,其实也不复杂,就是在连接建立后,给这个连接分配一个随机名字,将某个人发的消息转发到其他已有的连接上,另外及时清理掉断开的连接,防止资源泄露,代码很简单,相信你一看就懂。
@Service
@Slf4j
@ChannelHandler.Sharable
public class WebSocketFrameHandler extends SimpleChannelInboundHandler<WebSocketFrame> {// 我直接取了天龙八部里的名字,给每个聊天的人随机分配一个 private final List<String> names =List.of("刀白凤", "丁春秋", "马夫人", "马五德", "小翠", "于光豪", "巴天石", "不平道人", "邓百川", "风波恶","甘宝宝", "公冶乾", "木婉清", "少林老僧", "太皇太后", "天狼子", "天山童姥", "王语嫣", "乌老大","无崖子", "云岛主", "云中鹤", "止清", "白世镜", "包不同", "本参", "本观", "本相", "本因", "出尘子","冯阿三", "兰剑", "古笃诚", "过彦之", "平婆婆", "石清露", "石嫂", "司空玄", "司马林", "玄慈","玄寂", "玄苦", "玄难", "玄生", "玄痛", "叶二娘", "竹剑", "左子穆", "华赫艮", "乔峰", "李春来","李傀儡", "李秋水", "刘竹庄", "朴者和尚", "祁六三", "全冠清", "阮星竹", "西夏宫女", "许卓诚","朱丹臣", "努儿海", "阿碧", "阿洪", "阿胜", "阿朱", "阿紫", "波罗星", "陈孤雁", "鸠摩智", "来福儿","孟师叔", "宋长老", "苏星河", "苏辙", "完颜阿古打", "耶律洪基", "耶律莫哥", "耶律涅鲁古","耶律重元", "吴长风", "吴光胜", "吴领军", "辛双清", "严妈妈", "余婆婆", "岳老三", "张全祥","单伯山", "单季山", "单叔山", "单小山", "单正", "段延庆", "段誉", "段正淳", "段正明", "范禹","范百龄", "范骅", "苟读", "和里布", "何望海", "易大彪", "郁光标", "卓不凡", "宗赞王子", "哈大霸","姜师叔", "枯荣长老", "梦姑", "姚伯当", "神山上人", "神音", "狮鼻子", "室里", "项长老", "幽草","赵钱孙", "赵洵", "哲罗星", "钟灵", "钟万仇", "高升泰", "龚光杰", "贾老者", "康广陵", "秦红棉","虚竹", "容子矩", "桑土公", "唐光雄", "奚长老", "徐长老", "诸保昆", "崔百泉", "崔绿华", "符敏仪","黄眉和尚", "菊剑", "聋哑婆婆", "梅剑", "萧远山", "游骥", "游驹", "游坦之", "程青霜", "傅思归","葛光佩", "缘根", "智光大师", "鲍千灵", "褚万里", "瑞婆婆", "端木元", "黎夫人", "薛慕华", "慕容博","慕容复", "谭公", "谭婆", "谭青", "摘星子", "慧方", "慧观", "慧净", "慧真", "穆贵妃", "赫连铁树");// 名字到连接的映射private final Map<String, ChannelHandlerContext> name2ctx = new ConcurrentHashMap<>();// 连接到名字的映射private final Map<ChannelHandlerContext, String> ctx2name = new ConcurrentHashMap<>();@Overridepublic void channelRegistered(ChannelHandlerContext ctx) throws Exception {// 先分配当前没有在使用中的名字Optional<String> nameOp = names.stream().filter(x -> !name2ctx.containsKey(x)).findFirst();if (!nameOp.isPresent()) {// 如果没分配到名字,直接断开连接,这么写的话,同时在线的人数取决于名字列表的大小ctx.writeAndFlush(new TextWebSocketFrame("当前连接人数过多,请稍后重试!"));log.info("当前连接人数过多,请稍后重试!");ctx.close();return;}String name = nameOp.get();name2ctx.put(name, ctx);ctx2name.put(ctx, name);broadcast(name + "加入了群聊!");}@Overridepublic void channelUnregistered(ChannelHandlerContext ctx) throws Exception {String name = ctx2name.getOrDefault(ctx, "");name2ctx.remove(name);ctx2name.remove(ctx);broadcast(name + "离开了群聊!");}@Overrideprotected void channelRead0(ChannelHandlerContext ctx, WebSocketFrame frame) throws Exception {// 收到消息后将消息群发给所有人if (frame instanceof TextWebSocketFrame) {String request = ((TextWebSocketFrame) frame).text();String name = ctx2name.getOrDefault(ctx, "");broadcast(name + ":" + request);} else {String message = "unsupported frame type: " + frame.getClass().getName();throw new UnsupportedOperationException(message);}}/*** 将消息群发给所有在线的人*/private void broadcast(String msg) {log.info("msg:{}", msg);name2ctx.entrySet().parallelStream().forEach(e -> {String name = e.getKey();ChannelHandlerContext ctx = e.getValue();if (ctx.channel().isActive()) {ctx.writeAndFlush(new TextWebSocketFrame(msg));} else {// 广播时清理掉不活跃的连接ctx2name.remove(ctx);name2ctx.remove(name);}});}
}
这里特别提醒下,想实现群聊,那WebSocketFrameHandler必须标记为Sharable,并且全局共享一个对象,所以需要注意下线程安全的问题,这里我都用了ConcurrentHashMap。
以上就是完整的代码了,有兴趣可以自己跑一跑,另外这个网络聊天室我已经部署的我的服务器上了,也可以直接点开体验下 http://xindoo.xyz:8083/。


