课程地址:【新课uniapp零基础入门到项目打包(微信小程序/H5/vue/安卓apk)全掌握】 https://www.bilibili.com/video/BV1mT411K7nW/?p=12&share_source=copy_web&vd_source=b1cb921b73fe3808550eaf2224d1c155
目录
5 API
5.1 页面和路由
5.1.2 uni.redirectTo
5.1.3 uni.reLaunch
5.1.4 uni.switchTab
5.1.6 EventChannel
5.1.7 uni.preloadPage
5.2 onLoad接收页面跳转时的传参
5.2.1 vueroute路由传参
5.2.2 onLoad传参
5.2.3 传递多个参数
5.3 界面
5.3.1 交互反馈
5.3.1.1 uni.showToast消息提示框
5.3.1.2 uni.hideToast
5.3.1.3 uni.showLoading(OBJECT)显示loading提示框
5.3.1.4 uni.hideLoading()
5.3.1.5 uni.showModal(OBJECT)模态弹窗
5.3.1.6 uni.showActionSheet(OBJECT)弹出操作菜单
5.3.2 设置导航条
5.3.3 设置TabBar
5.3.4 其他
5.4 网络
5.4.1 发起请求
5.4.1.1 uni.request(OBJECT)
5.4.2 uni.request的其他参数
1 timeout
2 data
3 dataType
4 methods
5.5 案例
5.5.1 list页面
5.5.2 跳转详情页
1 从list页面跳转详情页
2 动态展示详情页数据
3 添加加载效果
4 列表页向详情页传参
5.5.3 动态展示每条详情下的评论列表
1 评论模块的template
2 样式
3 逻辑
5.6 uniapp数据缓存Storage
5.6.1 uni.setStorage & uni.setStorageSync
1 uni.setStorage 异步
2 uni.setStorageSync
5.6.2 uni.getStorage & uni.getStorageSync
5.6.3 清除缓存
5.7 总结
5 API
API 概述 | uni-app官网
uniapp和微信小程序的文档是一致的。uniapp的api与微信小程序的api命名保持一致。

5.1 页面和路由
uniapp官网-组件-内置组件-路由和页面跳转-navigator,2种跳转方式:1 navigatei标签;2 uni.navigateTo跳转(js逻辑实现跳转)
uni.navigateTo(OBJECT) | uni-app官网
wx.switchTab(Object object) | 微信开放文档
区别在于微信小程序前面有wx.xxx,uniapp前面有uni.xxxx

5.1.1 uni.navigateTo
uni.navigateTo(OBJECT) | uni-app官网
相当于跳转到某一个页面。

navigate标签实现页面跳转
<navigator url="/pages/demo4/demo4" open-type="redirect">demo4</navigator>效果
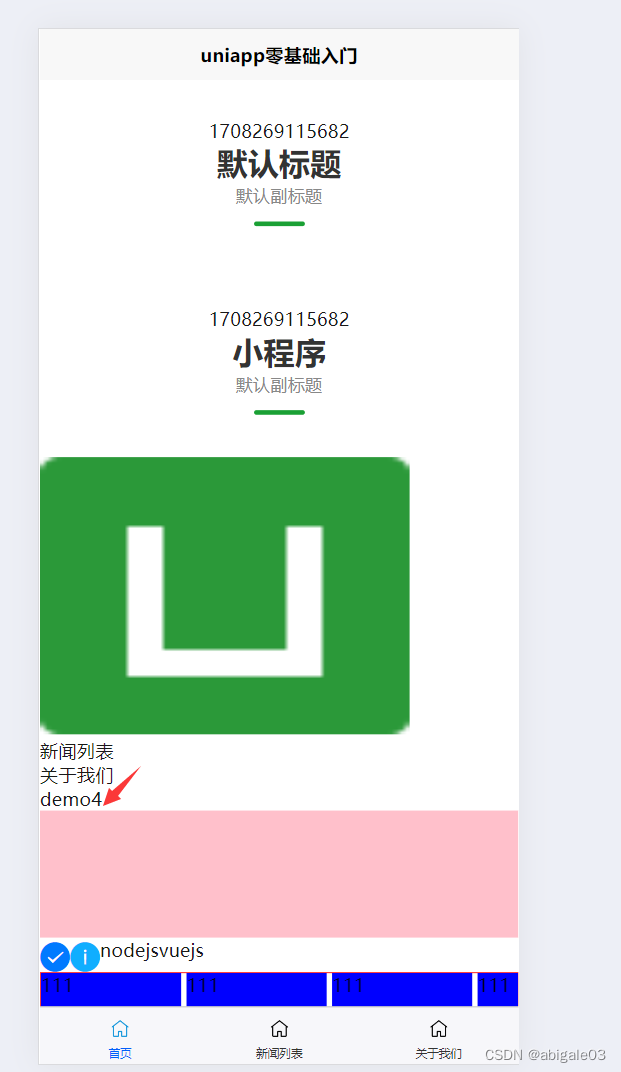
点击demo4,跳转到demo4页面

问题:我想让一个view块点击时实现页面跳转。
方法:给view加一个点击事件,在事件处理函数里用uni.navigateTo方法实现页面跳转。
<view style="height: 100px; width: 200px;background-color: aqua;" @click="goDemo4"> </view>事件处理函数
methods: {goDemo4() {uni.navigateTo({url: '/pages/demo4/demo4'})}}- 总结:页面跳转形式
- 1、navigator标签实现页面跳转
- 2、uni.navigateTo方法实现页面跳转(在要跳转的view里添加click事件,事件处理函数里使用uni.navigateTo方法)
参数的其他属性
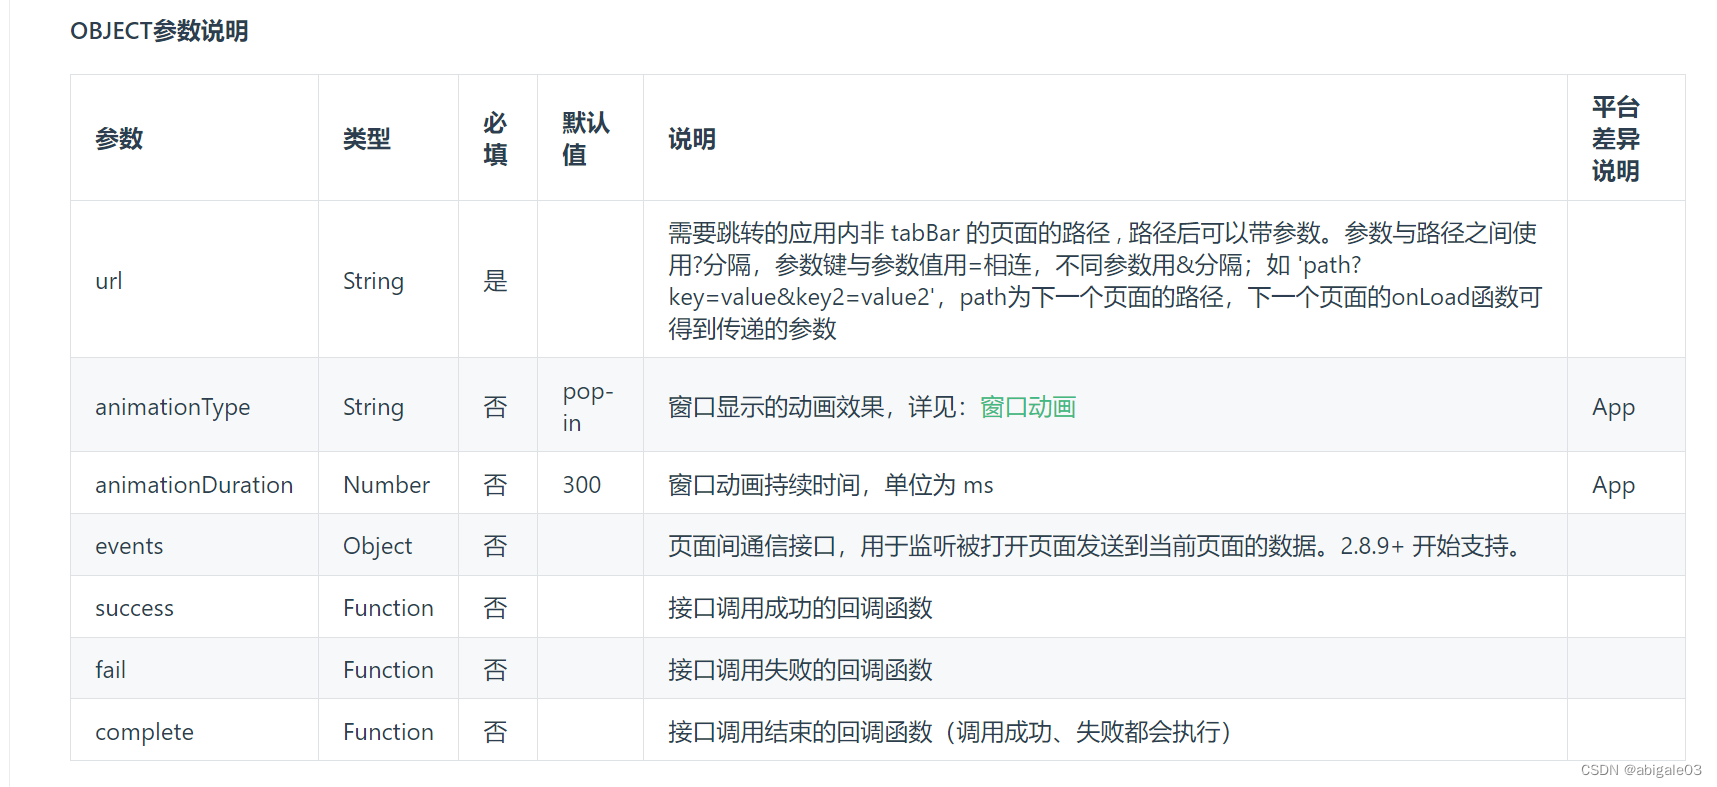
举例
methods: {goDemo4() {uni.navigateTo({url: '/pages/demo4/demo4',success:res=> {console.log(res);}})}}5.1.2 uni.redirectTo
uni.navigateTo(OBJECT) | uni-app官网
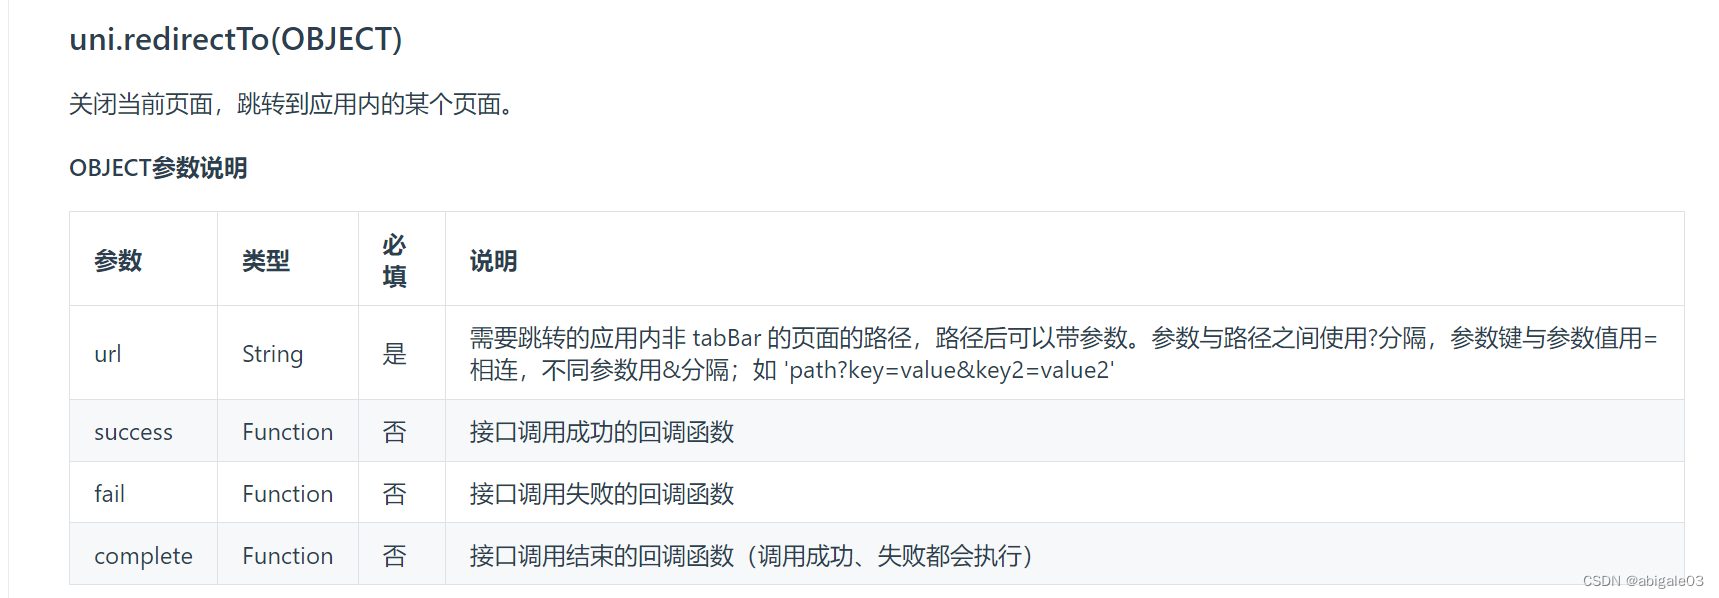
跳转时关闭当前页面。
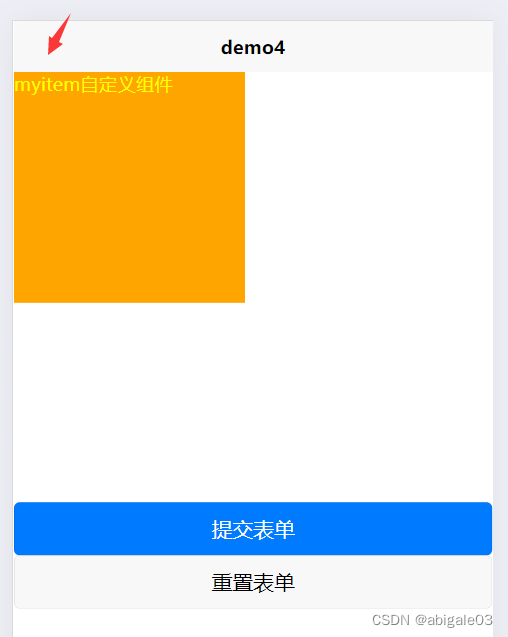
uni.navigateTo方法,在跳转时,跳转后的页面左上角有箭头,表示可以回到上一个页面。
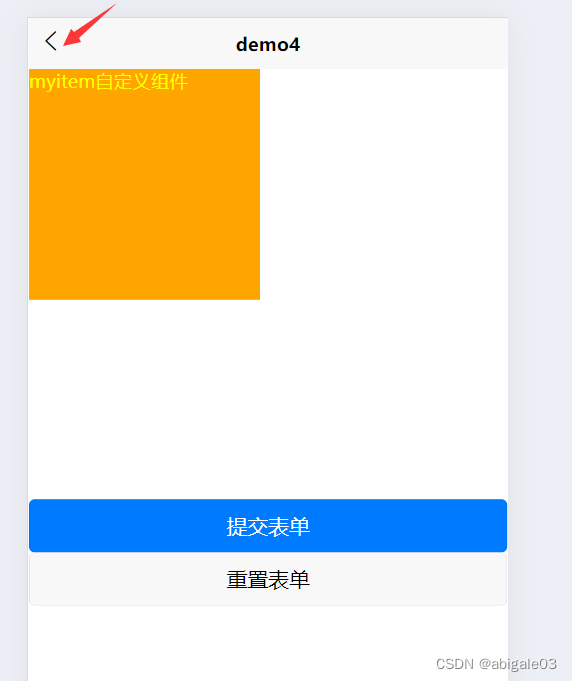
而uni.redirectTo方法,跳转后的页面左上方没有箭头,即不能回到上一个页面。
5.1.3 uni.reLaunch
uni.navigateTo(OBJECT) | uni-app官网
打开导航页面(tabBar页面)。uni.navigateTo和uni.redirectTo方法不能打开导航页面。
比如项目里的about页面,就是导航页面。只能用uni.reLaunch方法跳转到。

使用
methods: {goDemo4() {uni.reLaunch({url: '/pages/about/about'})}}导航页面,比如首页,新闻列表和关于我们(about)是导航页面。

5.1.4 uni.switchTab
uni.navigateTo(OBJECT) | uni-app官网
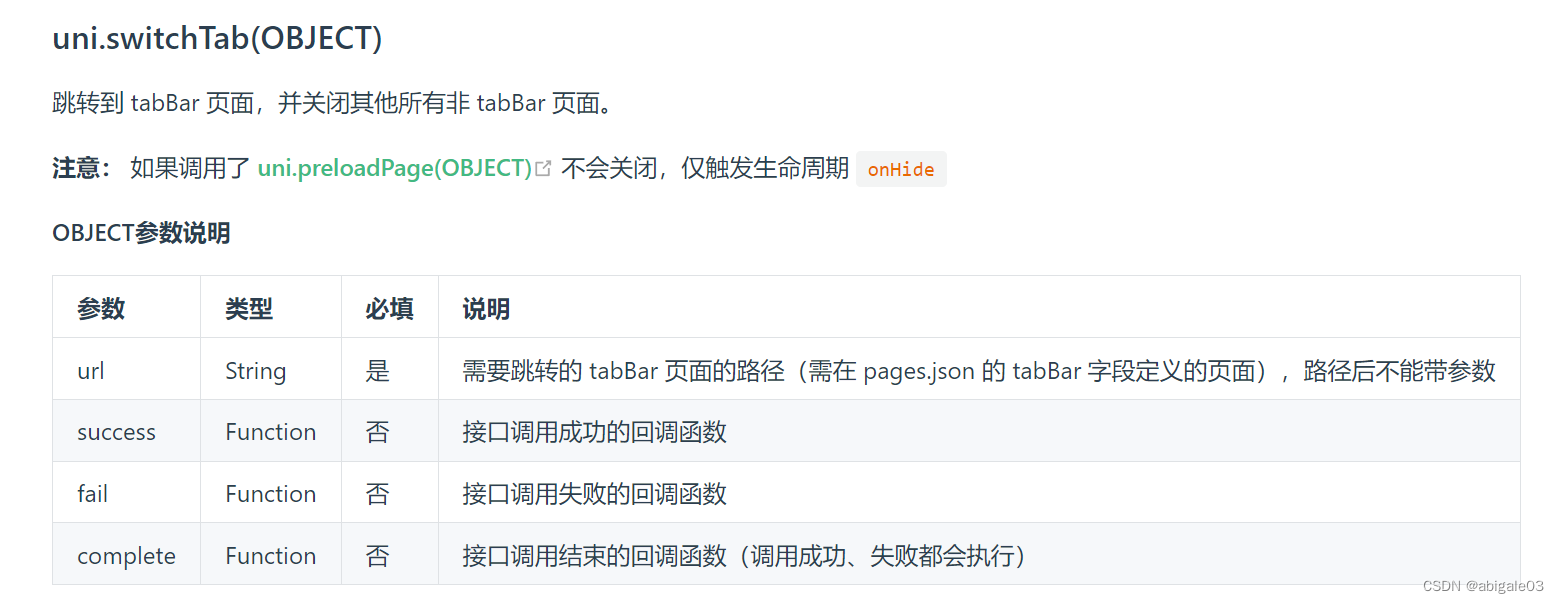
与uni.reLaunch方法的功能是一致的,但是不能携带参数(uni.reLaunch可以携带参数)
下面num就是url里携带的参数,uni.reLaunch方法可以这样,uni.switchTab不可以。
methods: {goDemo4() {uni.reLaunch({url: '/pages/about/about?num=3'})}}5.1.5 uni.navigateBack
uni.navigateTo(OBJECT) | uni-app官网
返回上一个页面
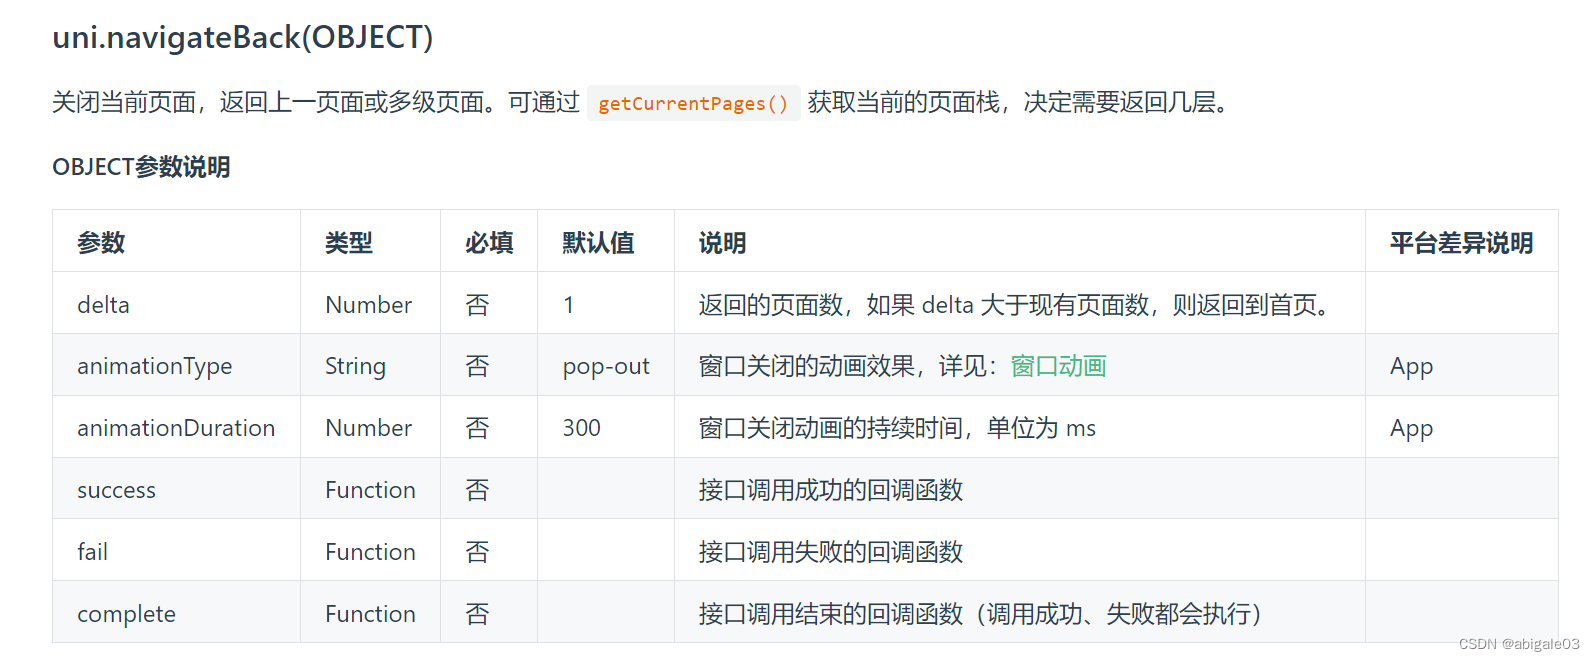
在跳转后的页面中,view里绑定一个click事件,事件处理函数里使用uni.navigateBack返回上一页。
<view class="" @click="goBack">< 返回上一页</view> methods: {goBack() {uni.navigateBack();}}效果
点击箭头处,返回首页。

5.1.6 EventChannel
页面通信
5.1.7 uni.preloadPage
有平台差异,就不展开了。
5.2 onLoad接收页面跳转时的传参
5.2.1 vueroute路由传参
在navigator标签的url属性里添加字段wd字段,值为uniapp
<navigator url="/pages/demo4/demo4?wd=uniapp" open-type="redirect">demo4</navigator>在index首页点击该标签,跳转到demo4页面,可以在地址栏看到成功传值
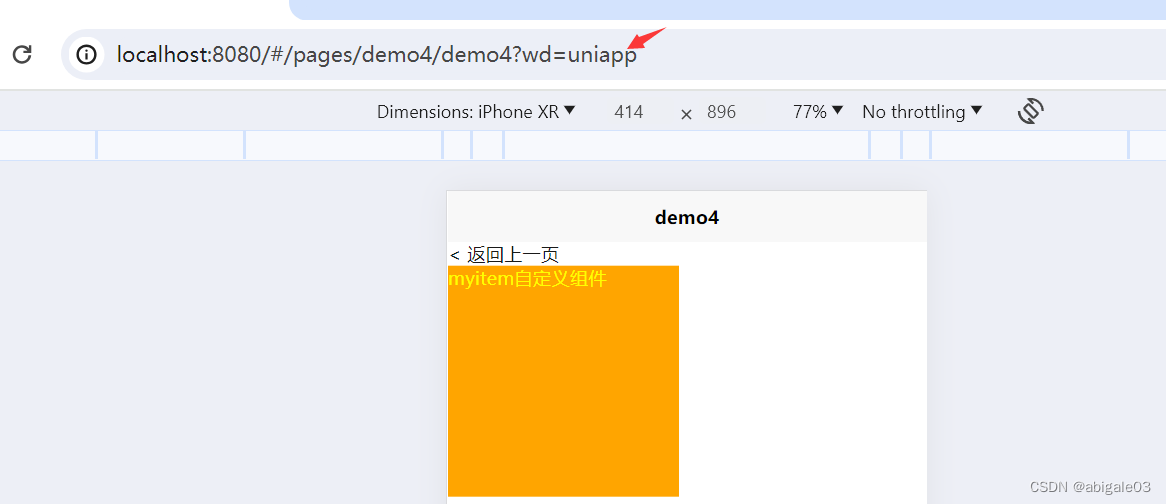
要想在页面获取到wd字段,可以使用vuerouter。要传递的wd字段在this.$route.query里

因此在生命周期mounted里,打印demo4页面接收的wd值。
mounted() {console.log(this.$route.query.wd);}上面使用navigator标签实现页面跳转,uni.navigateTo方法是一样的,也是在方法的url里添加要传递的字段。
需要兼容小程序
5.2.2 onLoad传参
小程序不支持以上的route路由跳转。
规范:使用小程序的onLoad生命周期,此时onLoad参数即为传递的参数。
onLoad(e) {console.log(e);}
总结:可以直接使用onLoad获取传递的参数。
5.2.3 传递多个参数
url的参数用&连接。
<navigator url="/pages/demo4/demo4?wd=uniapp&author=瑶瑶" open-type="redirect">demo4</navigator>效果

5.3 界面
比如页面提示“操作失败”、“发布成功”等提示信息。
uni.showToast(OBJECT) | uni-app官网
(这里新建一个demo2项目)
5.3.1 交互反馈
5.3.1.1 uni.showToast消息提示框
uni.showToast(OBJECT) | uni-app官网


使用
给图标加了个点击事件,事件处理函数如下
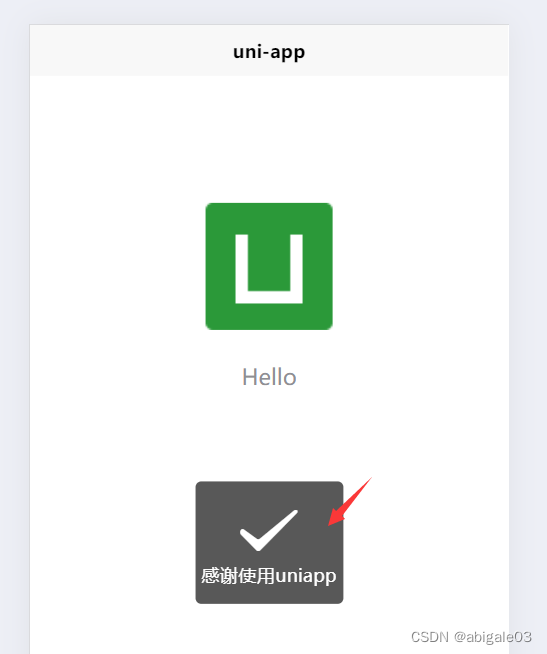
methods: {clickImg() {uni.showToast({title:"感谢使用uniapp"})}}点击图标的效果
默认成功的效果
失败效果
clickImg() {uni.showToast({title:"操作失败",icon: 'error'})}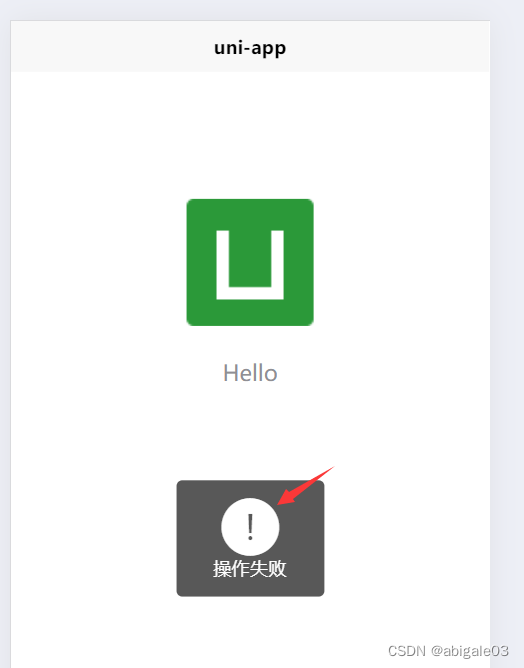

上面是H5运行,下面是小程序运行效果。
小程序的显示效果是一样的。

自定义图标路径
clickImg() {uni.showToast({title:"操作失败",image:'/static/logo.png'})}
mask,是否显示透明蒙层。点击弹框,其实是显示了整个页面。此时无法点击页面其他位置。
要求点击弹窗时不可跳转demo页面。
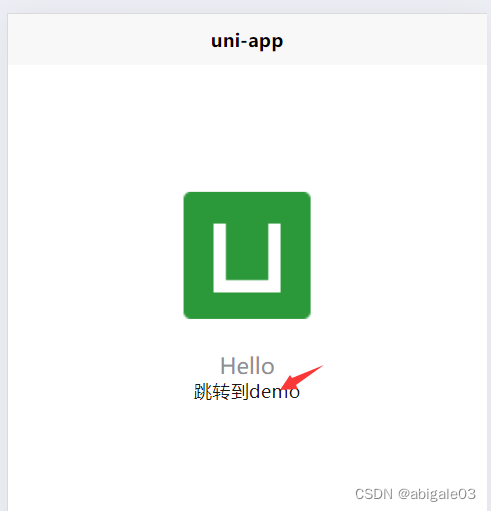
此时将mask置为true
clickImg() {uni.showToast({title:"操作失败",image:'/static/logo.png',mask: true})}点击弹窗时,不可跳转页面demo

还有加载效果,icon取值为loading,显示加载效果。

none,不显示图标。

显示时间,duration:1500,显示1.5秒,一般设置为此值。
success,成功后的回调函数。一般不这样使用,而是额外使用setTimeout来实现延迟跳转。
clickImg() {uni.showToast({title:"操作失败",icon: 'loading',mask: true,duration: 1000}),setTimeout(()=>{uni.navigateTo({url:'/pages/demo/demo'})},1500)}执行完uni.showToast方法后,在1.5秒后跳转demo页面。
fail,失败的回调函数。
complete,接口调用结束的回调函数。
5.3.1.2 uni.hideToast
尺寸 如果规定时间内没有取消掉,那么可以使用uni.hideToast隐藏 
5.3.1.3 uni.showLoading(OBJECT)显示loading提示框
uni.showToast(OBJECT) | uni-app官网
显示 loading 提示框, 需主动调用 uni.hideLoading 才能关闭提示框。
5.3.1.4 uni.hideLoading()
uni.showToast(OBJECT) | uni-app官网

5.3.1.5 uni.showModal(OBJECT)模态弹窗
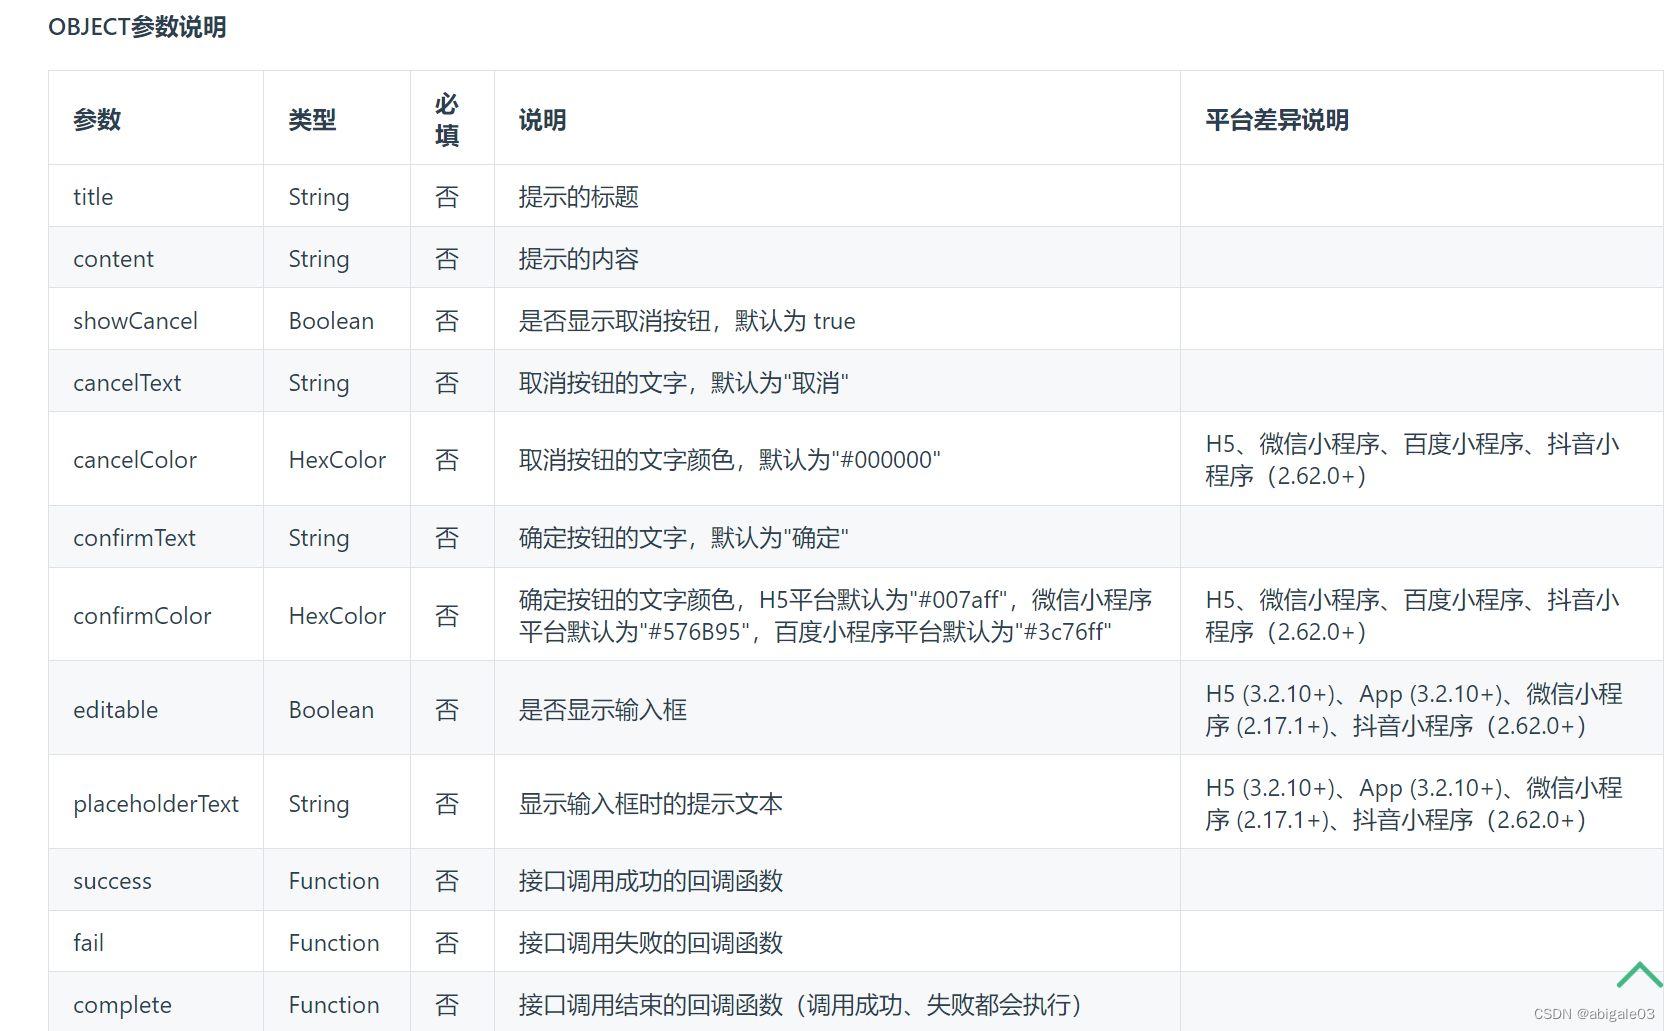
显示模态弹窗,可以只有一个确定按钮,也可以同时有确定和取消按钮。类似于一个API整合了 html 中:alert、confirm。
有title、content、cancelText、cancelColor等属性
5.3.1.6 uni.showActionSheet(OBJECT)弹出操作菜单
uni.showToast(OBJECT) | uni-app官网

示例
uni.showActionSheet({itemList: ['A', 'B', 'C'],success: function (res) {console.log('选中了第' + (res.tapIndex + 1) + '个按钮');},fail: function (res) {console.log(res.errMsg);}
});
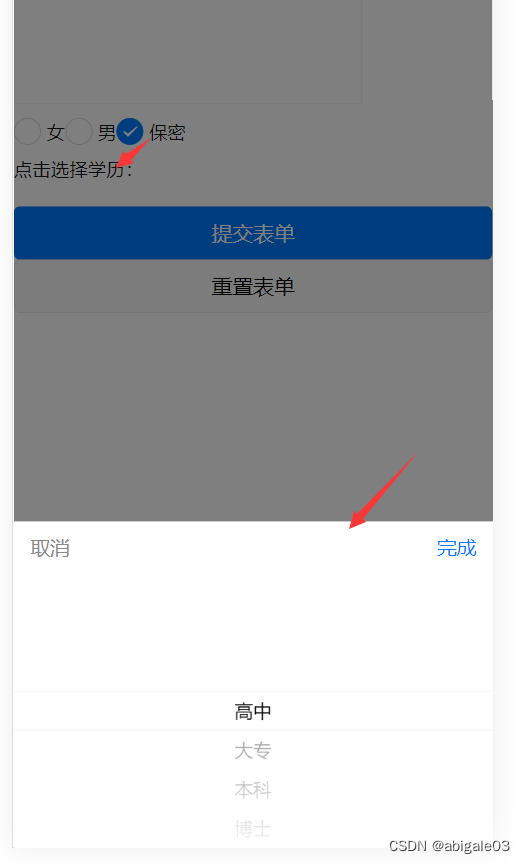
自底部向上弹出操作菜单。
跟前面的组件picker底部选择器的作用是类似的。
5.3.2 设置导航条
uni.setNavigationBarTitle(OBJECT) | uni-app官网
导航条,就是下图最上方的uni-app区域

pages.json 页面路由 | uni-app官网

设置导航栏背景色,在pages.json中进行设置
{"path" : "pages/demo/demo","style" : {"navigationBarTitleText" : "demo","navigationBarBackgroundColor": "#c00", //导航栏背景色"enablePullDownRefresh" : false}}效果

使用uniapp的api设置导航条属性,有以下方法,用于设置导航条1标题、2背景色(前景色(文字颜色)只能使用黑色或白色)、3显示加载效果(转圈)、4隐藏加载效果、5隐藏返回首页按钮(平台差异大,不建议使用),在当前页面的onLoad方法中进行调用,来对当前页面的导航条进行设置。
uni.setNavigationBarTitle(OBJECT)
uni.setNavigationBarColor(OBJECT)
uni.showNavigationBarLoading(OBJECT)
uni.hideNavigationBarLoading(OBJECT)
uni.hideHomeButton(OBJECT)
设置背景色功能,方便开发调试。
5.3.3 设置TabBar
TabBar设置见2.4.13【b站咸虾米】chapter1&2_uniapp介绍与uniapp基础_新课uniapp零基础入门到项目打包(微信小程序/H5/vue/安卓apk)全掌握_uniapp 打包微信app 配置-CSDN博客
对TabBar的内容、样式、隐藏、显示、某一项tabBar的右上角添加文本,显示tabBar某一项的右上角红点或隐藏、监听中间按钮的点击事件(只有app支持,平台差异大)。p39。
uni.setTabBarItem(OBJECT)
uni.setTabBarStyle(OBJECT)
uni.hideTabBar(OBJECT)
uni.showTabBar(OBJECT)
uni.setTabBarBadge(OBJECT)
uni.removeTabBarBadge(OBJECT)
uni.showTabBarRedDot(OBJECT)
uni.hideTabBarRedDot(OBJECT)
uni.onTabBarMidButtonTap(CALLBACK)
5.3.4 其他
其他的东西有需要可以去看文档。
uni.setBackgroundColor(OBJECT) | uni-app官网
5.4 网络
uni.request(OBJECT) | uni-app官网
5.4.1 发起请求
uni.request(OBJECT)
uni.configMTLS(OBJECT)
5.4.1.1 uni.request(OBJECT)
发起网络请求。
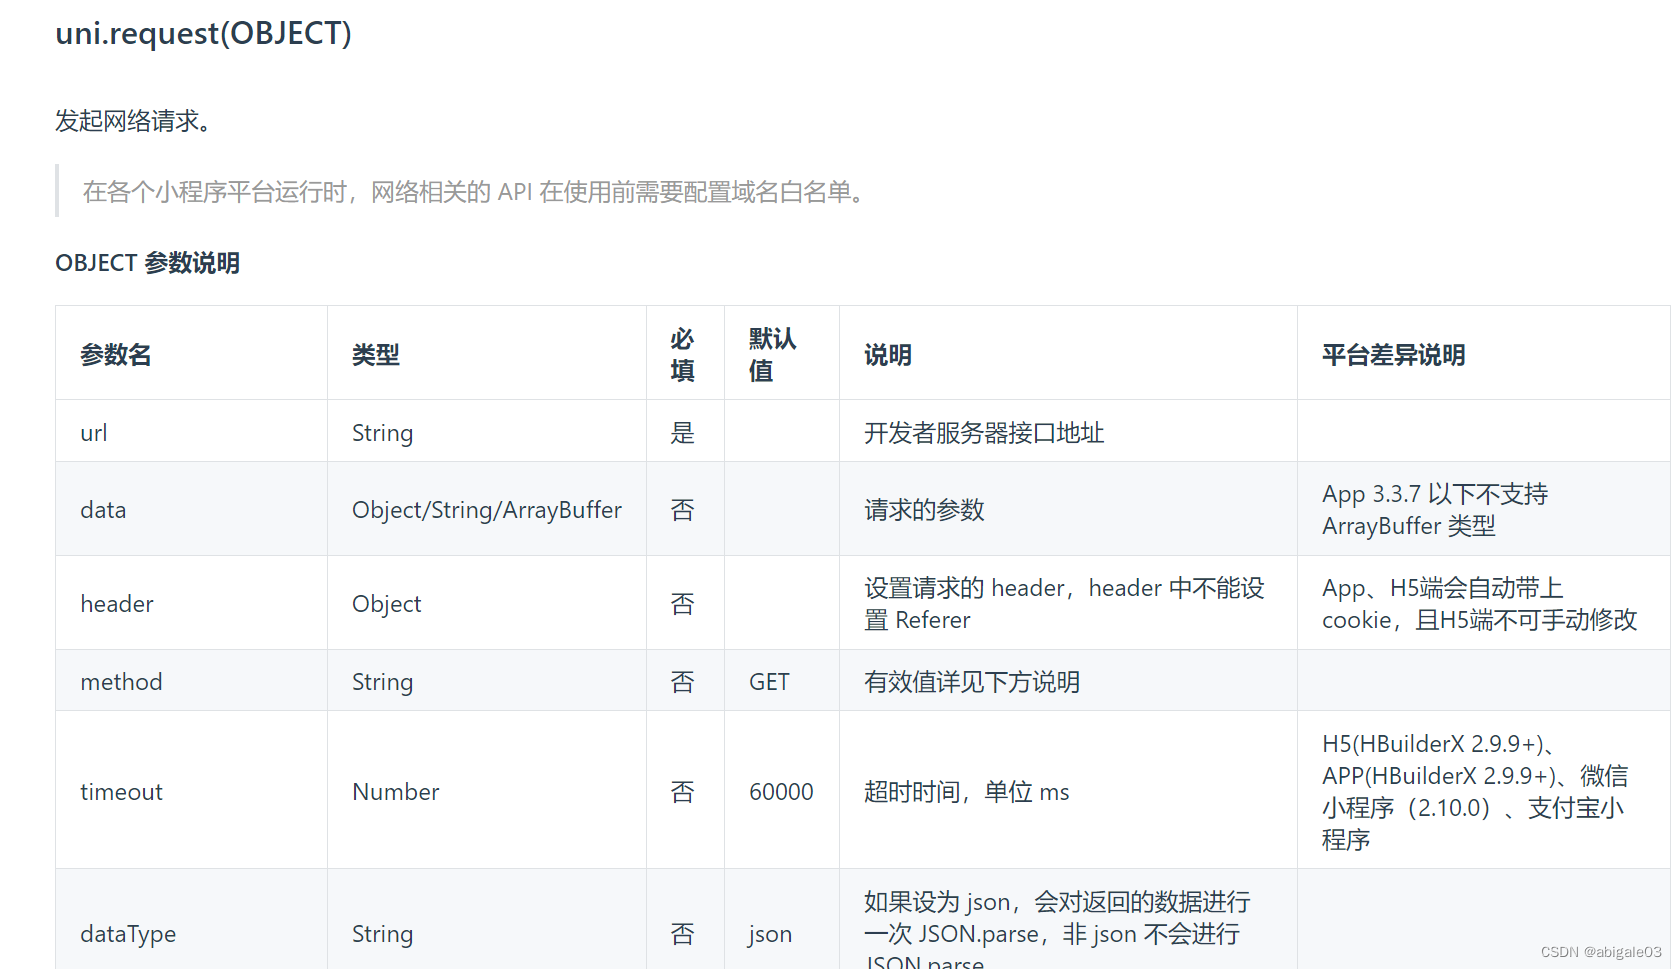
api:应用程序接口,Application Programming Interface
网上的免费api接口:随机小狗图片https://dog.ceo/api/breeds/image/random
ApiPost软件,测试接口
每个接口返回的对象不一样,这根据个人的习惯。
举例
注意:1 uni.request的使用,url,然后success回调函数,可以接收接口返回的值;
2 uni.showLoading,在发起请求前使用。在请求成功后,在success回调中使用uni.hideLoading方法关闭加载效果。
<template><view><image :src="picUrl" mode="aspectFill" @click="getPicUrl"></image></view>
</template><script>export default {data() {return {picUrl: ""}},methods: {getPicUrl() {uni.showLoading({title: "数据加载中"});uni.request({url: "https://dog.ceo/api/breeds/image/random",// 网络地址,api,使用后端完成success:res=>{console.log(res);this.picUrl = res.data.message;uni.hideLoading();//请求成功后隐藏加载效果}// 接收的回调函数})}},onLoad() {this.getPicUrl();}}
</script><style></style>
效果
点击图片,随机加载一张狗狗照片
(???,我不是猫门的吗)

5.4.2 uni.request的其他参数
1 timeout
请求超时

设置超时时间。
注意是number类型
uni.request({url: "https://dog.ceo/api/breeds/image/random",// 网络地址,api,使用后端完成timeout:3000,success:res=>{console.log(res);this.picUrl = res.data.message;},// 接收的回调函数fail: err=> {console.log(err);},complete: ()=> {// 请求成功或失败都要隐藏加载效果uni.hideLoading(); }})2 data
带传参的接口:随机小猫咪图片https://api.thecatapi.com/v1/images/search?limit=1
换接口的话,一定要自己打印看一下,因为可能新接口数据可能就变了。

可以看出,这次返回的data里有个数组。因此要用v-for来显示图片。
示例
这个v-for是我实现的,老师实现的话外层有个v-for的view,里面是item的image。
这里注意,api接口可以传参,这里的参数是limit=1.
<template><view><image v-for="item in picUrl" :src="item.url" mode="aspectFill" @click="getPicUrl"></image></view>
</template><script>export default {data() {return {picUrl: []}},methods: {getPicUrl() {uni.showLoading({title: "数据加载中"});uni.request({url: "https://api.thecatapi.com/v1/images/search?limit=2",// 网络地址,api,使用后端完成timeout:3000,success:res=>{console.log(res);this.picUrl = res.data;},// 接收的回调函数fail: err=> {console.log(err);},complete: ()=> {// 请求成功或失败都要隐藏加载效果uni.hideLoading();						}})}},onLoad() {this.getPicUrl();}}
</script>
<style>
</style>
效果

传参有2种写法,
写法1:在url后。

写法2:在参数data中添加传递的参数。

有的传参就不是url后面+?+字段=值,而是通过/进行分割,比如有道云。
比如有30条数据,在原本url基础长+/1,则会返回第1条数据。具体就不展开了。
3 dataType
默认是json,也有text方式的,大多数都是json。
4 methods
请求发送的类型。


get和post请求的区别(面试题)
methods值也就是请求的类型,要跟后端沟通。
网络这部分暂时只讲uni.request这个请求。后面的其他知识这里就不讲了。

5.5 案例
5.5.1 list页面
https://jsonplaceholder.typicode.com
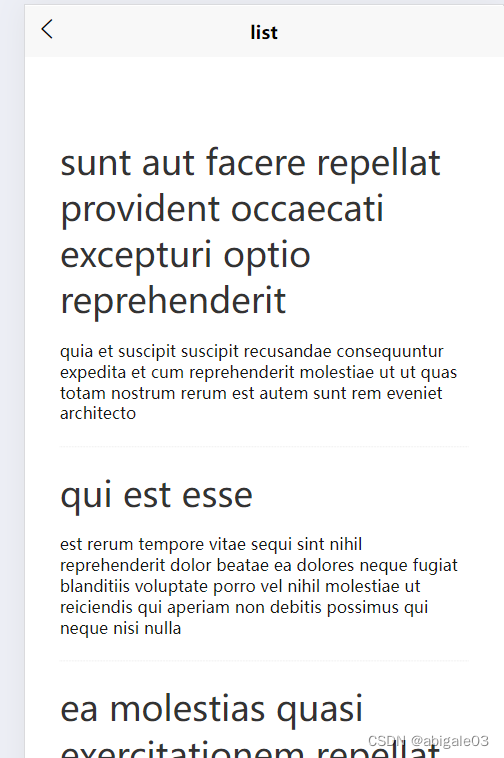
list页面实现获取列表详情展现到页面
接口返回的data是个数据,每个元素包括body和title,以及id等属性。

实现
<template><view class="out"><!-- 并且有id作为唯一标识符 --><view class="row" v-for="item in listArr" :key="item.id"><view class="title">{{ item.title }}</view><view class="content">{{ item.body }}</view></view></view>
</template><script>export default {data() {return {listArr: []}},methods: {getData() {uni.request({url: "https://jsonplaceholder.typicode.com/posts",success: res=> {console.log(res);this.listArr = res.data;}})}},onLoad() {this.getData();}}
</script><style>
.out{padding: 50px 30px;.row {padding: 20px 0;border-bottom: 1px dotted #e4e4e4;.title{font-size: 30px;padding-bottom: 15px;color:#333;}.content {font-size: 14px;			}}
}
</style>
其实跟5.4.2.2差不多了。
效果
5.5.2 跳转详情页
1 从list页面跳转详情页
跳转到新闻列表的详情页detail。
实现list页面向detail页面的跳转,使用uni.navigateTo。
一般布局改完了,就不再对template里的标签元素进行更改了。
给list的view添加点击事件。
详情页的参数是/posts/1(其实就是list页面请求的第一条数据)
list页面代码
<template><view class="out"><!-- 并且有id作为唯一标识符 --><view class="row" v-for="item in listArr" :key="item.id" @click="clickItem"><view class="title">{{ item.title }}</view><view class="content">{{ item.body }}</view></view></view>
</template><script>export default {data() {return {listArr: []}},methods: {getData() {uni.request({url: "https://jsonplaceholder.typicode.com/posts",success: res=> {console.log(res);this.listArr = res.data;}})},// 点击跳转详情clickItem() {uni.navigateTo({url:"/pages/detail/detail"})}},onLoad() {this.getData();}}
</script><style>
.out{padding: 50px 30px;.row {padding: 20px 0;border-bottom: 1px dotted #e4e4e4;.title{font-size: 30px;padding-bottom: 15px;color:#333;}.content {font-size: 14px;			}}
}
</style>
2 动态展示详情页数据
3 添加加载效果
4 列表页向详情页传参
传参通过uni.navigateTo实现。
list页面,点击事件添加所点击信息的id,通过uni.navigateTo拼接到url中,传递给detail页面。

url传参

detail页面对id进行获取,在onLoad中获取。

然后在请求接口的url里拼接获取到的id

然后就实现了点击列表的每条数据,都可以跳转到对应的详情页面。
5.5.3 动态展示每条详情下的评论列表
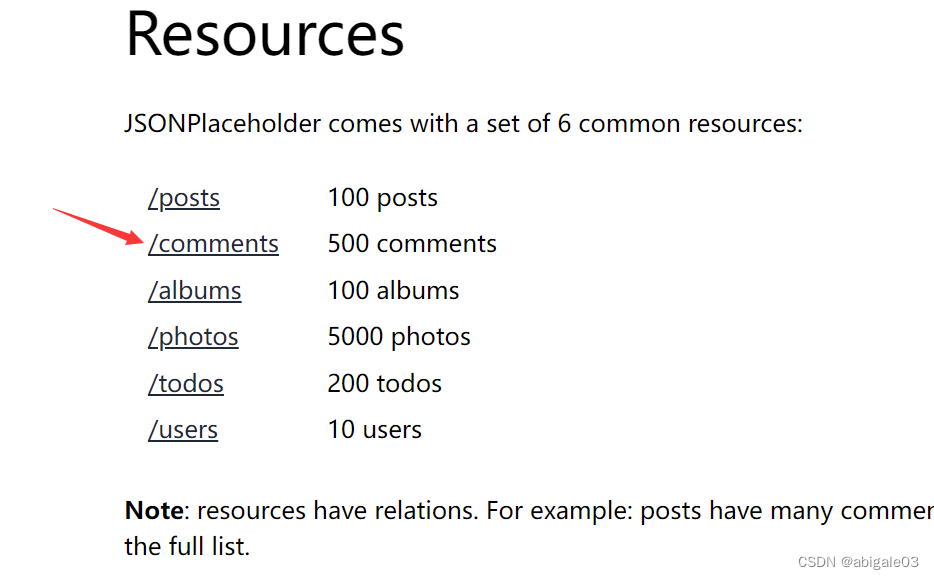
JSONPlaceholder - Free Fake REST API
详情
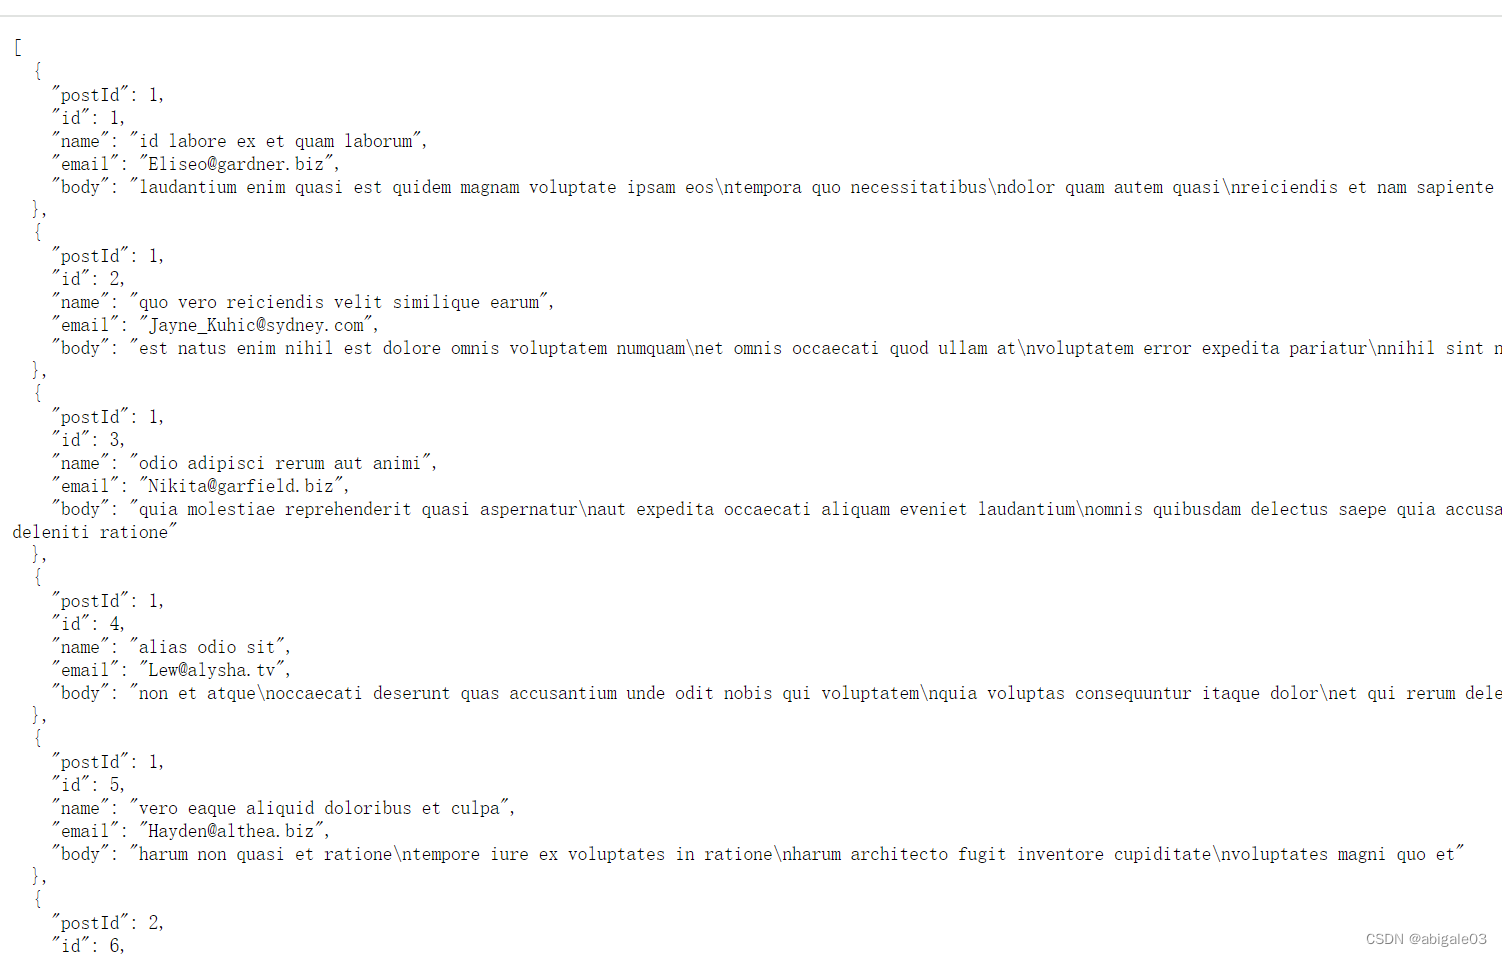
实现
1 评论模块的template
注意:评论模块还是在detail详情页里,即在具体的新闻信息下面
<template><view class=""><view class="detail"><view class="title">{{ objData.title}}</view><view class="content">{{ objData.body }}</view></view><view class="comment"><view class="text">评论</view><view class="row"><view class="top"><view class="name">名称</view><view class="email">邮箱</view></view><view class="body">评论的内容</view></view></view></view>
</template>
2 样式
.comment {padding: 30px;background: #f8f8f8;.text {font-size: 46px;margin-bottom: 30px;}.row {border-bottom: 1px solid #e8e8e8;padding: 20px, 0;.top {display: flex;justify-content: space-between;font-size: 22px;color: #999;padding-bottom: 10px;}.body {font-size: 28px;color: #555;}}
}
效果
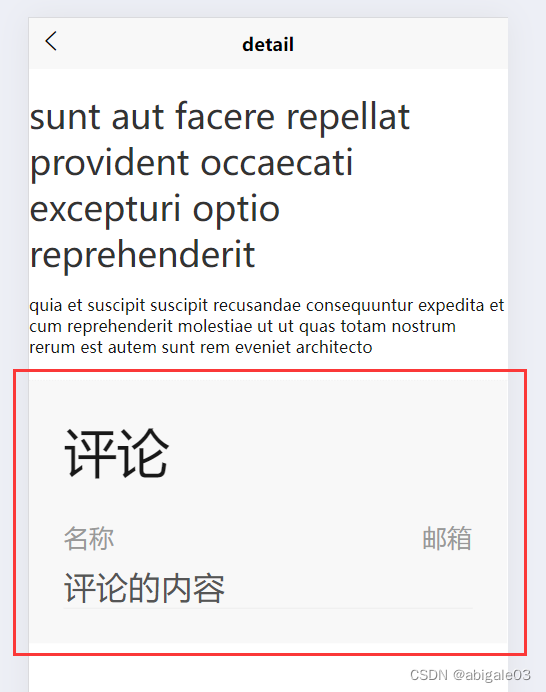
3 逻辑
注意:评论是根据id来的,这个id是公用的,不只可以查询具体的新闻详情,还可以查询新闻详情下对应的评论。

注意:url用一对反引号``,变量用${}包裹,例如url:`https://jsonplaceholder.typicode.com/posts/${this.id}/comments`
使用这种方式就不需要使用加号来拼接变量了,例如url:"https://jsonplaceholder.typicode.com/posts/"+this.id,
实现
首先是获取评论的方法
注意这里的url形式,与获取详情的url不同。
getComments() {uni.request({url:`https://jsonplaceholder.typicode.com/posts/${this.id}/comments`,success: res=> {console.log(res);this.comments = res.data;}})},且初始化评论变量
data() {return {objData: {},id: 1,comments: []}},且方法要在onLoad里调用
onLoad(e) { this.id = e.id;this.getDetail();this.getComments();}最后修改一下template里的数据
<view class="comment"><view class="text">评论</view><view class="row" v-for="item in comments" :key="item.id"><view class="top"><view class="name">{{ item.name }}</view><view class="email">{{ item.email }}</view></view><view class="body">{{ item.body }}</view></view></view>效果
这里老师用的字体单位都是rpx,我用的都是px,所以字体会变大很多。这不重要。

问题:有的新闻评论很多,加载比较慢
解决:添加加载效果。这里就不加了。
完整detial页面代码
<template><view class=""><view class="detail"><view class="title">{{ objData.title}}</view><view class="content">{{ objData.body }}</view></view><view class="comment"><view class="text">评论</view><view class="row" v-for="item in comments" :key="item.id"><view class="top"><view class="name">{{ item.name }}</view><view class="email">{{ item.email }}</view></view><view class="body">{{ item.body }}</view></view></view></view>
</template><script>export default {data() {return {objData: {},id: 1,comments: []}},methods: {getComments() {uni.request({url:`https://jsonplaceholder.typicode.com/posts/${this.id}/comments`,success: res=> {console.log(res);this.comments = res.data;}})},getDetail() {uni.showLoading({title:'数据加载中',mask: true})uni.request({url:"https://jsonplaceholder.typicode.com/posts/"+this.id,success: res=>{console.log(res);// debugger;this.objData = res.data;console.log(this.id);},complete: res=> {uni.hideLoading();}})}			},onLoad(e) {	this.id = e.id;this.getDetail();this.getComments();}}
</script><style>
.detail {padding: 20px 0;border-bottom: 1px dotted #e4e4e4;.title {font-size: 30px;padding-bottom: 15px;color:#333;}.content {font-size: 14px;			}
}
.comment {padding: 30px;background: #f8f8f8;.text {font-size: 46px;margin-bottom: 30px;}.row {border-bottom: 1px solid #e8e8e8;padding: 20px, 0;.top {display: flex;justify-content: space-between;font-size: 22px;color: #999;padding-bottom: 10px;}.body {font-size: 28px;color: #555;}}
}
</style>
5.6 uniapp数据缓存Storage
uni.setStorage(OBJECT) @setstorage | uni-app官网
数据缓存非常重要,是一个永久化的存储,有助于在页面间跳转把一些参数进行存储,比如登陆信息、用户信息存储在本地。随便一个网站都有数据缓存,比如百度,在检查->Application中。

这有助于在跳转其他页面的时候直接读取缓存信息。
5.6.1 uni.setStorage & uni.setStorageSync
将数据存储在本地缓存中指定的 key 中,会覆盖掉原来该 key 对应的内容,这是一个异步接口。
uni.setStorage:异步接口,有success参数。
uni.setStorageSync:同步接口,没有success参数。
其他方法也是,每个异步方法都对应有一个同步方法。

1 uni.setStorage 异步
在首页index的onLoad方法里使用uni.setStorage方法
onLoad() {uni.setStorage({key: "demo",data: 123123,success:res=> {console.log(res)}})},效果
可以看到,设置成功,且打印成功
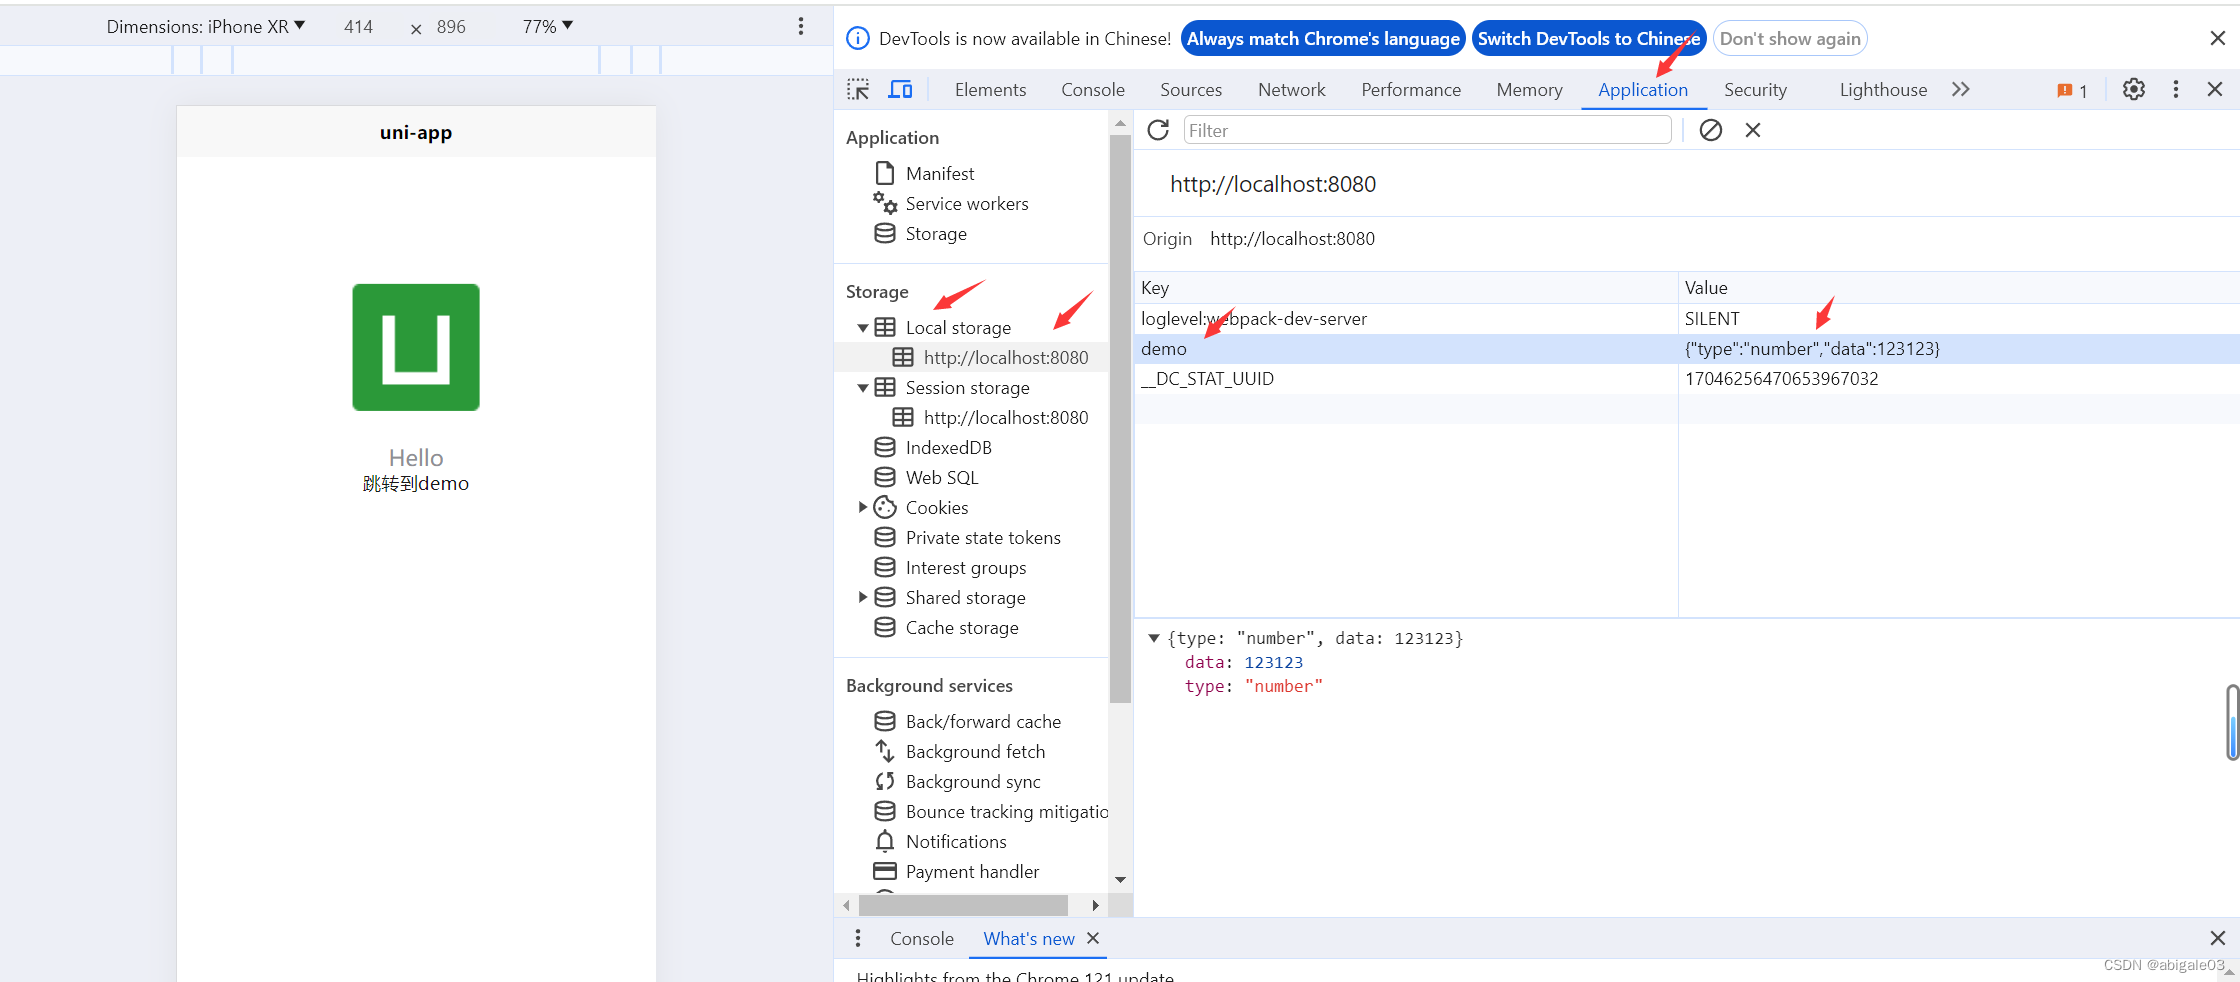
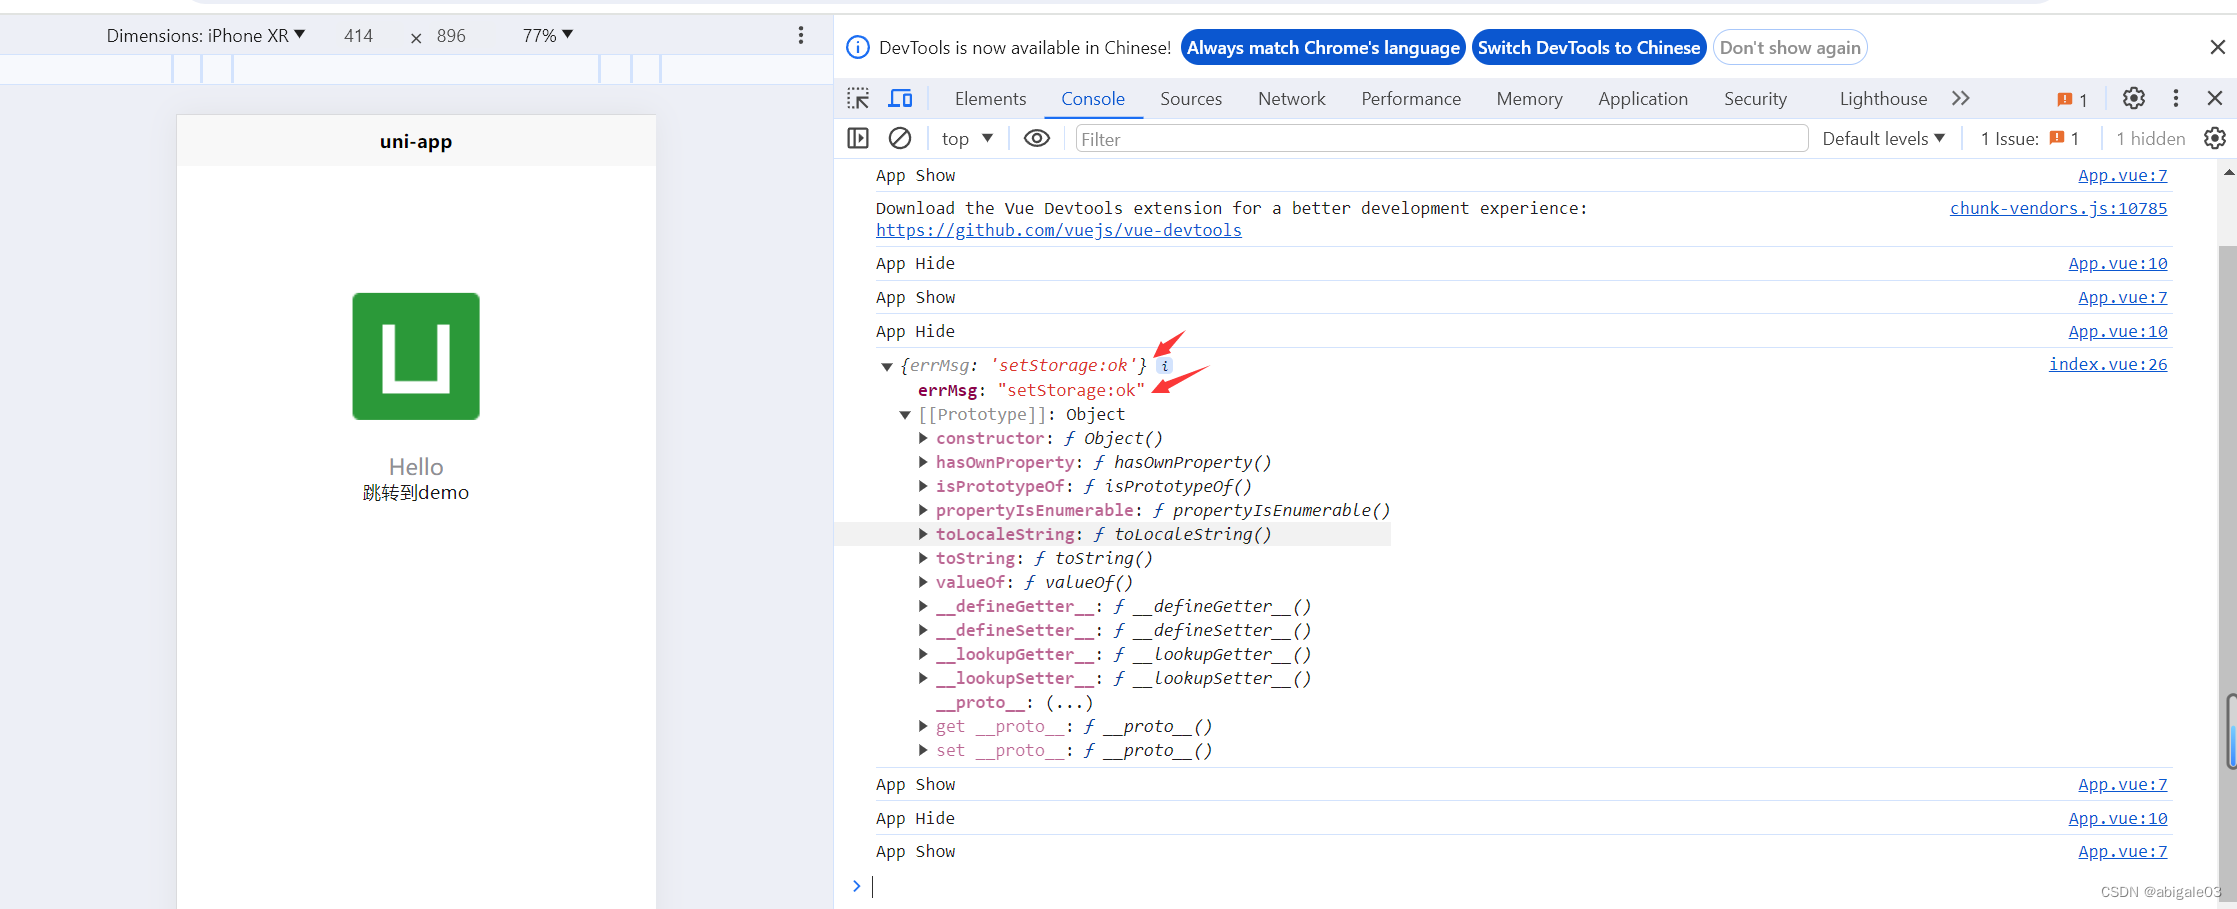
2 uni.setStorageSync
其实没有必要知道success,所以用uni.setStorageSync就可以了。
onLoad() {uni.setStorageSync('storage_key', 'hello');},效果
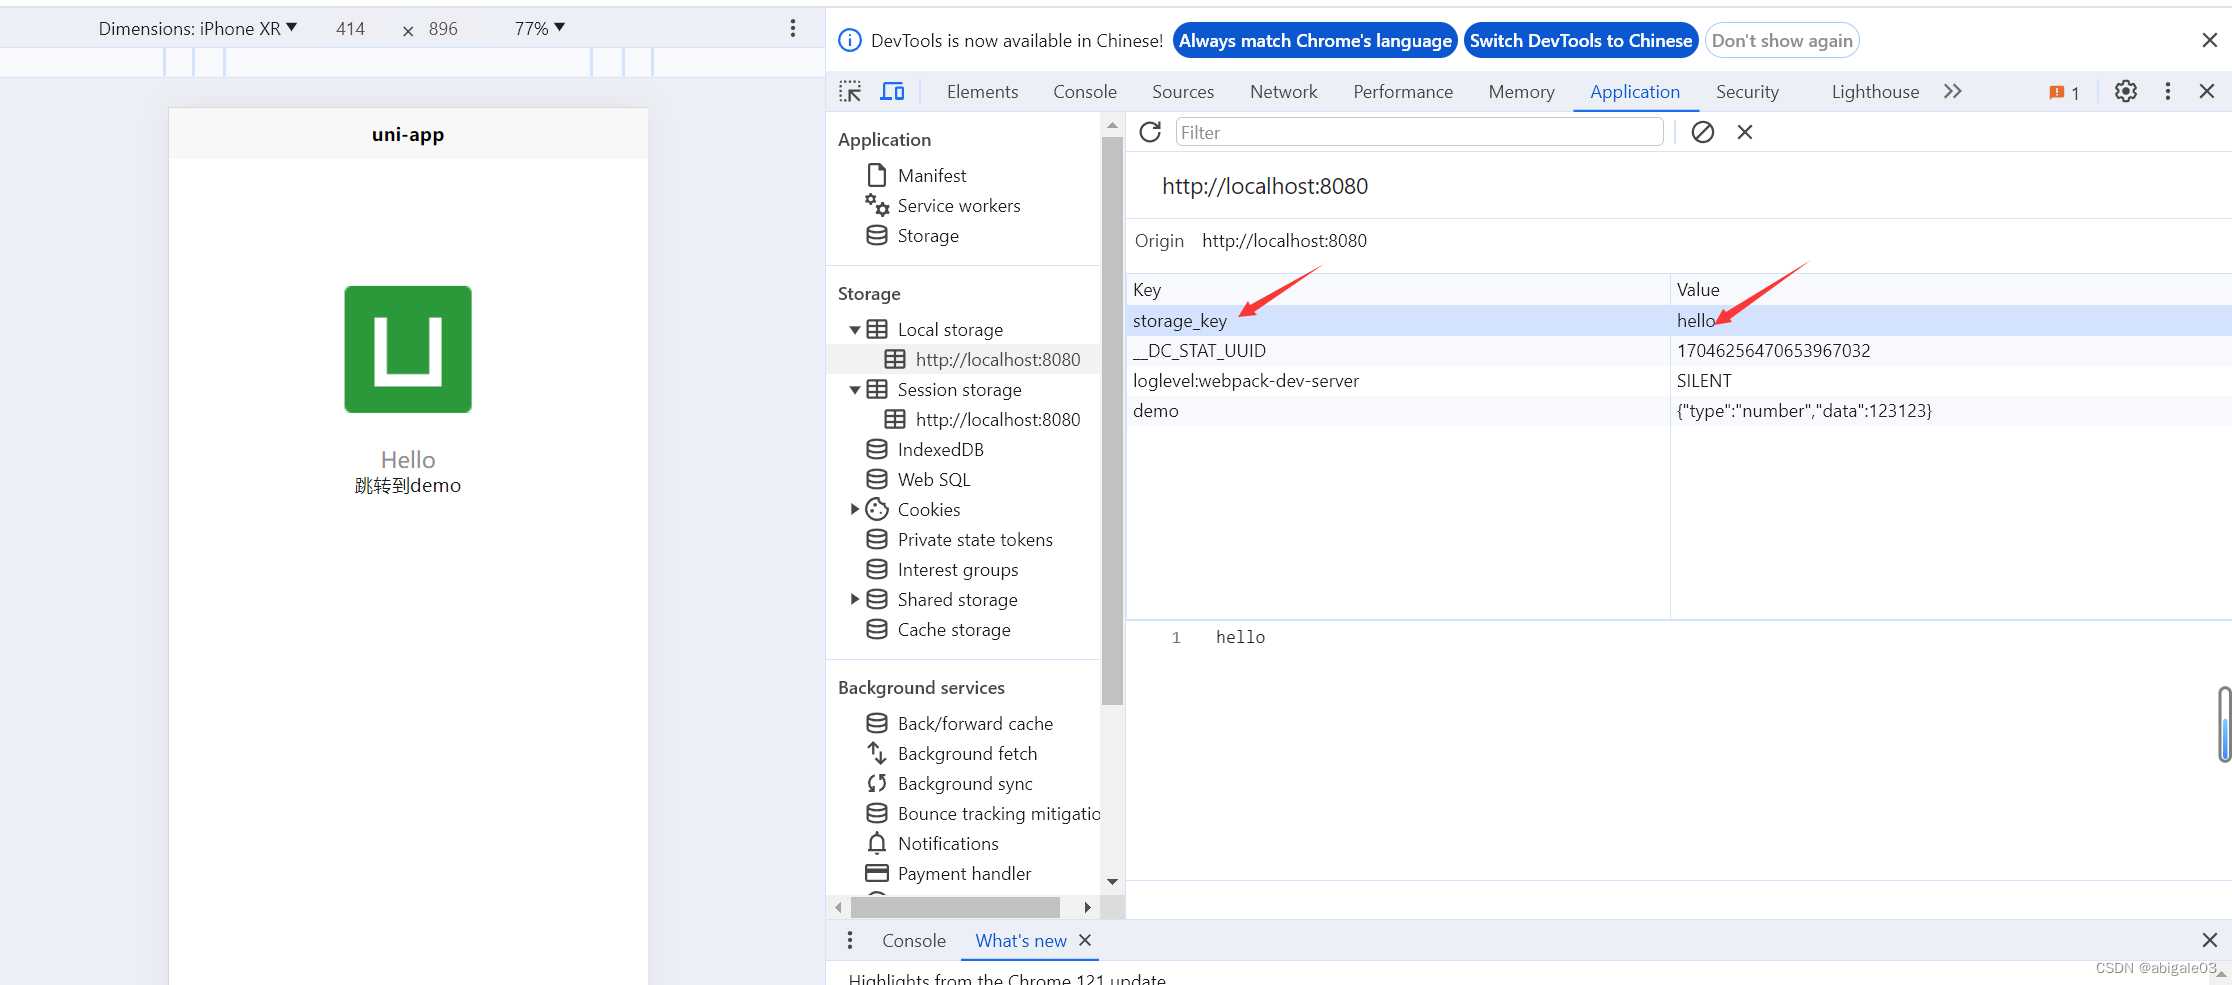
无论怎么刷新,依然存在。即使关掉页面,再次打开的时候在Local Storage里依然存在,但是Session就不一样了,页面关掉就没了。
Local Storage用来记录登录信息、用户信息等页面非重要信息。
5.6.2 uni.getStorage & uni.getStorageSync
uni.getStorage: 从本地缓存中异步获取指定 key 对应的内容。。
uni.getStorageSync: 从本地缓存中同步获取指定 key 对应的内容。
onLoad() {uni.setStorageSync('storage_key', 'hello');let mykey = uni.getStorageSync('storage_key');console.log(mykey);},效果

5.6.3 清除缓存
uni.removeStorage(OBJECT)
uni.removeStorageSync(KEY)
uni.clearStorage()
uni.clearStorageSync()
搜索记录,在app上的搜索,一般都会存储在缓存中。
uni.removeStorageSync(KEY),清除某一项缓存记录。
uni.clearStorageSync():清理本地所有缓存。谨慎使用。
5.7 总结
uniCloud,云存储,可以不借助后端语言,去部署后台程序,前端进行调用就行。


![[C++]18:set和map的使用](https://img-blog.csdnimg.cn/direct/f42e5f0bc9d34349a6ae4386cec324ff.png)

