下载文中数据、代码、绘图结果
文章目录
- 关于数据
- 绘图函数
- 完整可运行的代码
- 运行结果
关于数据
如果想知道本文的关联规则数据是怎么来的,请阅读这篇文章
绘图函数
Python中似乎没有很方便的绘制网络图的函数。
下面是本人自行实现的绘图函数,如果想要运行,请点击上文的链接,下载数据和代码。
传入一个关联规则数据的DataFrame,这个DataFrame应该包含三列数据:antecedents,consequents,confidence,分别代表前件,后件,置信度。
def plot_rules_net(rules: pd.DataFrame):import matplotlib.patches as patches# 假设你有一个包含所有药材的列表items = list(set([item for sublist in rules['antecedents'].tolist() + rules['consequents'].tolist() for item in sublist]))# 计算药材数量,确定顶点数n_items = len(items)# 创建一个正n_items边形的顶点坐标radius = 5 # 可以调整半径angle = np.linspace(0, 2 * np.pi, n_items, endpoint=False)x = radius * np.cos(angle)y = radius * np.sin(angle)# 绘制正多边形和顶点fig, ax = plt.subplots(figsize=(10, 10))polygon = patches.RegularPolygon((0, 0), n_items, radius=radius, fill=False, edgecolor='k')ax.add_patch(polygon)def get_label_position(angle):label_offset_value = 0.2 # 定义一个变量来存储偏移量# 根据角度确定文本标签的对齐方式和位置if angle < np.pi / 2:ha, va = "center", "bottom"offset = np.array([label_offset_value, label_offset_value])elif angle < np.pi:ha, va = "center", "bottom"offset = np.array([-label_offset_value, label_offset_value])elif angle < 3 * np.pi / 2:ha, va = "center", "top"offset = np.array([-label_offset_value, -label_offset_value])else:ha, va = "center", "top"offset = np.array([label_offset_value, -label_offset_value])return ha, va, offset# 在绘制顶点的循环中调整文本位置for (i, j), label, angle in zip(zip(x, y), items, angle):ha, va, offset = get_label_position(angle)ax.plot(i, j, 'o', markersize=10)ax.text(i + offset[0], j + offset[1], label, fontsize=12, ha=ha, va=va)# 获取confidence的最小值和最大值min_confidence = rules['confidence'].min()max_confidence = rules['confidence'].max()# 使用colormap - 可以根据需要选择合适的colormap# 这里我们使用'Greens',因为你想要的是颜色越深表示权重越大cmap = plt.get_cmap('Greens')# 线性映射函数,将confidence值映射到0-1之间,用于colormapdef get_color(confidence):return cmap((confidence - min_confidence) / (max_confidence - min_confidence))# 绘制边for _, row in rules.iterrows():antecedents = row['antecedents']consequents = row['consequents']confidence = row['confidence']for antecedent in antecedents:for consequent in consequents:start_idx = items.index(antecedent)end_idx = items.index(consequent)start_point = (x[start_idx], y[start_idx])end_point = (x[end_idx], y[end_idx])color = get_color(confidence)# 修改箭头的绘制方式,使其从节点边缘出发ax.annotate("",xy=end_point, xytext=start_point,arrowprops=dict(arrowstyle="->", color=color,shrinkA=5, shrinkB=5, # shrinkA和shrinkB应该是半径的大小,不是索引connectionstyle="arc3"),)ax.set_xlim([-radius * 1.1, radius * 1.1])ax.set_ylim([-radius * 1.1, radius * 1.1])ax.axis('off') # 隐藏坐标轴plt.suptitle('前24个最高频次药物的关联规则图', fontsize=20) # 主标题plt.xlabel('颜色深代表置信度高', fontsize=14) # X轴标签save_path = os.path.join('.', '关联规则网络图.jpg')plt.savefig(save_path)plt.show()完整可运行的代码
下方就是完整可运行的代码,在本文的下载链接中也一并包含,如有需要请复制并运行。
import osimport matplotlib
import numpy as np
import pandas as pd
from matplotlib import pyplot as pltplt.rcParams['font.sans-serif'] = ['Simhei']  # 显示中文标签
plt.rcParams['axes.unicode_minus'] = Falsedef plot_rules_net(rules: pd.DataFrame):import matplotlib.patches as patches# 假设你有一个包含所有药材的列表items = list(set([item for sublist in rules['antecedents'].tolist() + rules['consequents'].tolist() for item in sublist]))# 计算药材数量,确定顶点数n_items = len(items)# 创建一个正n_items边形的顶点坐标radius = 5  # 可以调整半径angle = np.linspace(0, 2 * np.pi, n_items, endpoint=False)x = radius * np.cos(angle)y = radius * np.sin(angle)# 绘制正多边形和顶点fig, ax = plt.subplots(figsize=(10, 10))polygon = patches.RegularPolygon((0, 0), n_items, radius=radius, fill=False, edgecolor='k')ax.add_patch(polygon)def get_label_position(angle):label_offset_value = 0.2  # 定义一个变量来存储偏移量# 根据角度确定文本标签的对齐方式和位置if angle < np.pi / 2:ha, va = "center", "bottom"offset = np.array([label_offset_value, label_offset_value])elif angle < np.pi:ha, va = "center", "bottom"offset = np.array([-label_offset_value, label_offset_value])elif angle < 3 * np.pi / 2:ha, va = "center", "top"offset = np.array([-label_offset_value, -label_offset_value])else:ha, va = "center", "top"offset = np.array([label_offset_value, -label_offset_value])return ha, va, offset# 在绘制顶点的循环中调整文本位置for (i, j), label, angle in zip(zip(x, y), items, angle):ha, va, offset = get_label_position(angle)ax.plot(i, j, 'o', markersize=10)ax.text(i + offset[0], j + offset[1], label, fontsize=12, ha=ha, va=va)# 获取confidence的最小值和最大值min_confidence = rules['confidence'].min()max_confidence = rules['confidence'].max()# 使用colormap - 可以根据需要选择合适的colormap# 这里我们使用'Greens',因为你想要的是颜色越深表示权重越大cmap = plt.get_cmap('Greens')# 线性映射函数,将confidence值映射到0-1之间,用于colormapdef get_color(confidence):return cmap((confidence - min_confidence) / (max_confidence - min_confidence))# 绘制边for _, row in rules.iterrows():antecedents = row['antecedents']consequents = row['consequents']confidence = row['confidence']for antecedent in antecedents:for consequent in consequents:start_idx = items.index(antecedent)end_idx = items.index(consequent)start_point = (x[start_idx], y[start_idx])end_point = (x[end_idx], y[end_idx])color = get_color(confidence)# 修改箭头的绘制方式,使其从节点边缘出发ax.annotate("",xy=end_point, xytext=start_point,arrowprops=dict(arrowstyle="->", color=color,shrinkA=5, shrinkB=5,  # shrinkA和shrinkB应该是半径的大小,不是索引connectionstyle="arc3"),)ax.set_xlim([-radius * 1.1, radius * 1.1])ax.set_ylim([-radius * 1.1, radius * 1.1])ax.axis('off')  # 隐藏坐标轴plt.suptitle('前24个最高频次药物的关联规则图', fontsize=20)  # 主标题plt.xlabel('颜色深代表置信度高', fontsize=14)  # X轴标签save_path = os.path.join('.', '关联规则网络图.jpg')plt.savefig(save_path)plt.show()freq = pd.read_excel(r'万条处方的药物出现频次.xlsx')fd = {k : v for _, (k, v) in freq.iterrows()}# 指定保留前24最高频次的中药材
most_freq_num = 24
top_24_herbs = sorted(fd, key=lambda x: fd.get(x), reverse=True)[:most_freq_num]# 读取关联规则分析的结果
rules = pd.read_excel('关联规则分析结果.xlsx')
rules['antecedents'] = rules['antecedents'].apply(lambda x: x.split(', '))
rules['consequents'] = rules['consequents'].apply(lambda x: x.split(', '))# 过滤关联规则,仅保留包含这24种药物的规则
filtered_rules = rules[rules['antecedents'].apply(lambda x: any(item in x for item in top_24_herbs)) &rules['consequents'].apply(lambda x: any(item in x for item in top_24_herbs))]plot_rules_net(filtered_rules)
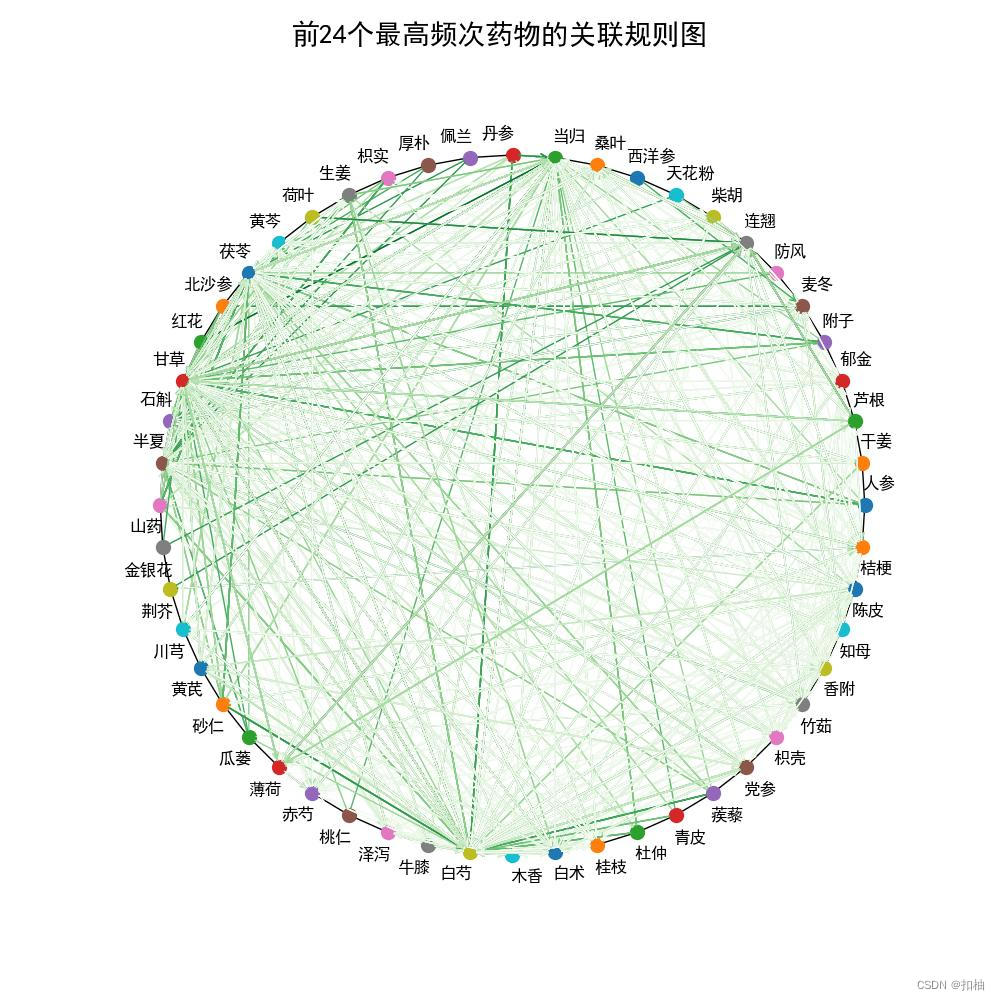
运行结果
颜色越粗,置信度越高。
我们可以看到砂仁和白芍,还有荷叶和连翘等等,有着很高的置信度。








![【洛谷 P8781】[蓝桥杯 2022 省 B] 修剪灌木 题解(数学)](https://img-blog.csdnimg.cn/direct/dd3e9093e1af4fba9c07f073ab925b5a.png)
