【Golang】golang使用三方SDK操作容器指南
大家好 我是寸铁👊
总结了一篇 golang使用三方SDK操作容器✨
喜欢的小伙伴可以点点关注 💝
这应该是目前全网最全golang使用三方SDK操作容器的指南了✌️
CreateConfig
主要是创建容器的配置信息,常用的字段
使用包如下:
"github.com/docker/docker/api/types"
配置创建Docker 容器的结构体,具体字段的含义和用途如下:
1.Hostname: 容器的主机名。
2.Domainname: 容器的域名。
3.User: 执行容器内命令的用户,也支持指定用户和用户组。
4.AttachStdin: 是否连接标准输入,使得用户可以与容器进行交互。
5.AttachStdout: 是否连接标准输出。
6.AttachStderr: 是否连接标准错误输出。
7.ExposedPorts: 用于指定容器暴露的端口,是一个 nat.PortSet 类型的字段。
8.Tty: 是否将标准流连接到 tty(终端),包括标准输入(如果它没有关闭的话)。
9.OpenStdin: 是否打开标准输入。
10.StdinOnce: 如果为 true,在第一个连接的客户端断开连接后关闭标准输入。
11.Env: 设置在容器中使用的环境变量的列表。
12.Cmd: 在启动容器时运行的命令。
13.Healthcheck: 描述容器健康状况检查的配置。
14.ArgsEscaped: 如果为 true,表示命令已经被转义,即将其视为命令行(特定于 Windows)。
15.Image: 由操作者传递的镜像的名称。
16.Volumes: 用于指定容器使用的卷(挂载)的列表。
17.WorkingDir: 容器中命令执行的当前目录(PWD)。
18.Entrypoint: 在启动容器时运行的入口点。
19.NetworkDisabled: 是否禁用网络。
20.MacAddress: 容器的 MAC 地址。注意,此字段在 API 版本 v1.44 后已被废弃,建议使用 EndpointSettings.MacAddress 替代。
21.OnBuild:在 Dockerfile 中定义的 ONBUILD 元数据。这个字段用于保存在构建镜像时定义的 ONBUILD 指令,它们将在基础镜像的构建过程中执行。
22.Labels:容器的标签列表。这个字段是一个映射,用于存储容器的元数据信息,如作者、版本、描述等。标签可以用于组织和识别容器,也可以用于进行元数据查询。
23.StopSignal:停止容器时发送的信号。这个字段指定了停止容器时使用的信号,例如 SIGTERM 或 SIGKILL。
24.StopTimeout:停止容器的超时时间(以秒为单位)。这个字段指定了在发送停止信号后等待容器停止的时间。如果容器在超时时间内未停止,则强制终止。
25.Shell:用于 shell 形式的 RUN、CMD、ENTRYPOINT 的 shell。这个字段指定了容器内部使用的 shell 解释器,用于执行 Dockerfile 中的命令。omitempty 表示如果字段为空,则在 JSON 输出中省略该字段。
基本操作demo
package mainimport ("context""fmt""github.com/docker/docker/api/types""github.com/docker/docker/api/types/container""github.com/docker/docker/client"
)func main() {// 初始化 Docker 客户端cli, err := client.NewClientWithOpts(client.FromEnv)if err != nil {panic(err)}//创建容器的配置信息createConfig := &container.Config{Image: "your_image_name",// 可以根据需要配置其他容器参数}//停止容器的配置信息stopConfig := container.StopOptions{}//删除容器的配置信息removeOptions := types.ContainerRemoveOptions{RemoveVolumes: true, // 删除容器关联的卷Force:         true, // 强制删除容器}// 列出所有容器的列表containers, err := cli.ContainerList(context.Background(), types.ContainerListOptions{})if err != nil {panic(err)}//操作每个容器的信息和容器的各种操作for _, dockerContainer := range containers {fmt.Printf("容器 ID:%s\n", dockerContainer.ID)fmt.Printf("容器 名称:%s\n", dockerContainer.Names)// 在这里可以添加逻辑来判断特定条件下的容器,并对其进行操作// 例如,暂停、删除等操作//容器的创建//使用容器的名字创建容器,配置文件配置镜像等等信息。//创建容器的时候返回创建的容器IDcreateID, err := cli.ContainerCreate(context.Background(), createConfig, nil, nil, nil, "my-container-18")if err != nil {panic(err)}fmt.Println("创建的容器ID为: ", createID)//容器的删除err = cli.ContainerRemove(context.Background(), dockerContainer.ID, removeOptions)if err != nil {panic(err)}//容器的暂停err = cli.ContainerPause(context.Background(), dockerContainer.ID)if err != nil {panic(err)}//容器的恢复err = cli.ContainerUnpause(context.Background(), dockerContainer.ID)if err != nil {panic(err)}//容器的停止err = cli.ContainerStop(context.Background(), dockerContainer.ID, stopConfig)if err != nil {panic(err)}//容器的重启err = cli.ContainerRestart(context.Background(), dockerContainer.ID, stopConfig)if err != nil {panic(err)}}
}
查找容器信息
cmd
对应于cmd的命令如下:
docker ps
类似于cmd的方式,这里可以使用golang程序拿到如下字段信息,查出当前运行的所有容器的信息。

实例
package mainimport ("context""fmt""github.com/docker/docker/api/types""github.com/docker/docker/client"
)/*
需求:
尝试在golang中拉取镜像、创建容器、删除容器、停止容器、暂停容器、恢复容器、重启容器。
运行容器、怎么使用docker run去运行一个容器、怎么使用docer build命令
看看其他在docker-cli中执行的命令是否使用go程序也能够正常执行。
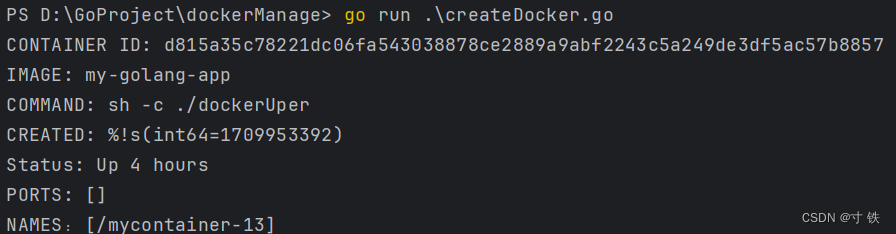
*/func main() {// 初始化 Docker 客户端cli, err := client.NewClientWithOpts(client.FromEnv)if err != nil {panic(err)}// 先得到列出所有容器的列表containers, err := cli.ContainerList(context.Background(), types.ContainerListOptions{})if err != nil {panic(err)}// 对应为docker ps -a 命令// 再从列表中拿到信息for _, container := range containers {fmt.Printf("CONTAINER ID: %s\n", container.ID)fmt.Printf("IMAGE: %s \n", container.Image)fmt.Printf("COMMAND: %s \n", container.Command)fmt.Printf("CREATED: %s \n", container.Created)fmt.Printf("Status: %s \n", container.Status)fmt.Printf("PORTS: %s \n", container.Ports)fmt.Printf("NAMES:%s\n", container.Names)}
}运行结果
遍历容器,拿到容器的各种字段信息,与docker ps 命令的信息一致。
创建容器
cmd
运行容器,一般是指定容器内的端口和容器的名字(不能与之前的名字重复)
--expose:编辑容器内的端口
--name:编辑容器的名字
最后的my-golang-app 为镜像源
docker run --expose 3888/tcp --name mycontainer-15 my-golang-app
结果如下:

实例
package mainimport ("context""github.com/docker/docker/api/types""github.com/docker/docker/api/types/container""github.com/docker/docker/api/types/network""github.com/docker/docker/client""github.com/docker/go-connections/nat""io""log""os"
)func main() {ctx := context.Background()cli, err := client.NewClientWithOpts(client.FromEnv, client.WithAPIVersionNegotiation())if err != nil {log.Fatal(err)}//配置容器的各种信息,如镜像源、容器内的端口containerConfig := &container.Config{Image: "my-golang-app",ExposedPorts: nat.PortSet{"3889/tcp": {},},}hostConfig := &container.HostConfig{}networkingConfig := &network.NetworkingConfig{}//创建容器resp, err := cli.ContainerCreate(ctx, containerConfig, hostConfig, networkingConfig, nil, "mycontainer-20")if err != nil {log.Fatal(err)}//启动容器if err := cli.ContainerStart(ctx, resp.ID, types.ContainerStartOptions{}); err != nil {log.Fatal(err)}//容器在后台运行//fmt.Println("容器ID为: " , resp.ID)// 获取容器的日志out, err := cli.ContainerLogs(ctx, resp.ID, types.ContainerLogsOptions{ShowStdout: true, ShowStderr: true})if err != nil {log.Fatal(err)}defer out.Close()// 打印容器的日志到控制台go func() {_, err := io.Copy(os.Stdout, out)if err != nil && err != io.EOF {log.Fatal(err)}}()// 等待容器运行完成statusCh, errCh := cli.ContainerWait(ctx, resp.ID, container.WaitConditionNotRunning)for {select {case err := <-errCh:if err != nil {log.Fatal(err)}case <-statusCh:returndefault:// 如果没有接收到任何数据,则继续等待}}
}
运行结果
查看创建的容器的基本信息,如容器的端口和名字等等。
对照一下,两种方式创建的结果都是一样的。

程序中使用日志的方式打印出使用dockerfile的go程序运行的结果,但是打印一个数字后被阻塞了。

如果不使用上面程序的日志输出,运行时是以后台的方式运行的,也就不会直接把程序运行的结果输出来。可以先创建,再使用
Attach方法进入容器,就可以输出程序的内容了。具体见下面进入容器部分。
删除容器
cmd
docker rm -f 容器ID
查看结果如下:

实例
package mainimport ("context""fmt""github.com/docker/docker/api/types""github.com/docker/docker/client"
)func main() {// 创建 Docker 客户端cli, err := client.NewEnvClient()if err != nil {panic(err)}// 定义要删除的容器 IDcontainerID := "d815a35c7822"// 定义删除容器时的选项options := types.ContainerRemoveOptions{Force:         true,  // 强制删除容器RemoveVolumes: true,  // 删除关联的数据卷RemoveLinks:   false, // 不删除关联的链接}// 调用 ContainerRemove 方法删除容器err = cli.ContainerRemove(context.Background(), containerID, options)if err != nil {fmt.Printf("Failed to remove container: %v\n", err)} else {fmt.Println("Container removed successfully")}
}
运行结果
程序运行结果如下:

删除容器13之前

容器13成功删除了

停止容器
cmd
docker stop 容器ID
停止容器前,状态为Up。

停止容器后,状态为Exited。

实例
package mainimport ("context""fmt""github.com/docker/docker/api/types/container""github.com/docker/docker/client"
)func main() {// 创建 Docker 客户端cli, err := client.NewEnvClient()if err != nil {panic(err)}// 定义要停止的容器 IDcontainerID := "b50423e8aade"stopOptions := container.StopOptions{}// 调用 ContainerStop 方法停止容器err = cli.ContainerStop(context.Background(), containerID, stopOptions)if err != nil {fmt.Printf("Failed to stop container: %v\n", err)} else {fmt.Println("Container stopped successfully")}
}
运行结果
程序执行结果如下:

检查是否停止成功如下:
停止前

停止后

程序执行结果与cmd停止命令一致。
重启容器
cmd
docker restart 9ef8ae3b59d9
容器已停止:

重启容器:

重启容器后,容器的状态如下:

实例
package mainimport ("context""fmt""github.com/docker/docker/api/types/container""github.com/docker/docker/client"
)func main() {// 创建 Docker 客户端cli, err := client.NewEnvClient()if err != nil {panic(err)}// 定义要重启的容器 IDcontainerID := "746a98dfb20c"topOptions := container.StopOptions{}// 调用 ContainerRestart 方法重启容器err = cli.ContainerRestart(context.Background(), containerID, topOptions)if err != nil {panic(err)}fmt.Printf("Container %s has been restarted.\n", containerID)
}
运行结果
重启前:

重启后:

运行结果如下:

重启完成,和cmd的执行结果一致。
暂停容器
cmd
docker pause 容器ID
暂停容器前

暂停容器后

实例
package mainimport ("context""fmt""github.com/docker/docker/client"
)func main() {// 创建 Docker 客户端cli, err := client.NewEnvClient()if err != nil {panic(err)}// 定义要暂停的容器 IDcontainerID := "e4d6650df3af"// 暂停容器err = cli.ContainerPause(context.Background(), containerID)if err != nil {fmt.Printf("Failed to pause container: %v\n", err)} else {fmt.Println("Container paused successfully")}
}
运行结果
暂停容器前:

暂停容器:

运行结果如下:

恢复暂停
cmd
docker unpause 容器ID
恢复暂停前:

恢复暂停成功:

实例
package mainimport ("context""fmt""github.com/docker/docker/client"
)func main() {// 创建 Docker 客户端cli, err := client.NewEnvClient()if err != nil {panic(err)}// 定义要暂停的容器 IDcontainerID := "e4d6650df3af"// 暂停容器err = cli.ContainerPause(context.Background(), containerID)if err != nil {fmt.Printf("Failed to pause container: %v\n", err)} else {fmt.Println("Container paused successfully")}
}
运行结果
恢复前:

恢复暂停:

运行结果如下:

说明确实是恢复暂停成功了!
进入容器
Attach
cmd
docker attach 容器ID
运行结果如下:
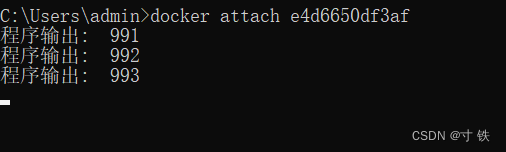
退出容器,发现容器也停止掉了。

注意: 这种进入容器的方式使用
exit退出会把整个容器都停止掉。但是使用go的程序停止却不会使得容器停止。
实例
要进入容器,可以使用 Docker 客户端的 ContainerAttach 方法。这个方法允许您连接到容器的标准输入、输出和错误流,并与容器进行交互。
package mainimport ("context""fmt""io""os""github.com/docker/docker/api/types""github.com/docker/docker/client"
)func main() {// 创建 Docker 客户端cli, err := client.NewEnvClient()if err != nil {panic(err)}// 定义要进入的容器 IDcontainerID := "e4d6650df3af"// 定义进入容器时的选项options := types.ContainerAttachOptions{Stream: true,Stdin:  true,Stdout: true,Stderr: true,}// 调用 ContainerAttach 方法进入容器resp, err := cli.ContainerAttach(context.Background(), containerID, options)if err != nil {panic(err)}defer resp.Close()// 将容器的标准输入输出连接到当前进程的标准输入输出go io.Copy(os.Stdout, resp.Reader)go io.Copy(resp.Conn, os.Stdin)// 等待用户输入以继续运行fmt.Println("Press enter to exit...")fmt.Scanln()
}
运行结果
运行结果如下:
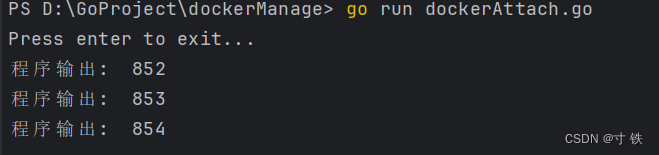
退出程序:
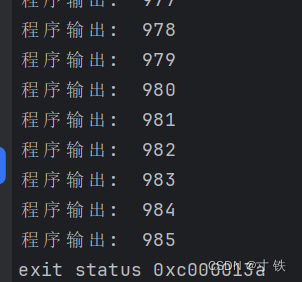
退出程序但是不会停止掉程序:

ExecAttach
cmd
docker exec -it mycontainer-18 bash
这样的进入容器是以命令行的方式进入容器的,所以不会输出程序的运行结果,但是使用exit退出程序不会关闭程序。
退出程序:
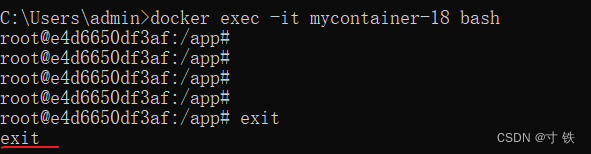
使用exit退出程序,发现确实是没有关闭程序。

实例
package mainimport ("context""fmt""io""os""github.com/docker/docker/api/types""github.com/docker/docker/client"
)func main() {// 创建 Docker 客户端cli, err := client.NewEnvClient()if err != nil {panic(err)}// 定义要进入的容器 IDcontainerID := "e4d6650df3af"// 定义要执行的命令cmd := []string{"sh"} // 这里可以根据需要修改为其他交互式 shell,如 bash// 准备执行命令的选项createResp, err := cli.ContainerExecCreate(context.Background(), containerID, types.ExecConfig{Cmd:          cmd,AttachStdin:  true,AttachStdout: true,AttachStderr: true,Tty:          true,})if err != nil {panic(err)}// 连接到正在运行的命令以进行交互resp, err := cli.ContainerExecAttach(context.Background(), createResp.ID, types.ExecStartCheck{Tty: true,})if err != nil {panic(err)}defer resp.Close()// 将容器的标准输入输出连接到当前进程的标准输入输出go func() {if _, err := io.Copy(os.Stdout, resp.Reader); err != nil {panic(err)}}()go func() {if _, err := io.Copy(resp.Conn, os.Stdin); err != nil {panic(err)}}()// 等待用户输入以继续运行fmt.Println("Press enter to exit...")fmt.Scanln()
}
运行结果
以命令行的方式进入容器进行交互,和直接使用cmd的方式是一样的。

小结
以上两种方式都可以进入容器,需要结合具体使用场景进行权衡。
- 其中一个是可以看到程序的执行结果,但是退出会直接关闭掉容器。
- 另一个是以命令行的方式进入容器进行交互,退出不会直接关闭容器。
拉取镜像
cmd
对应到cmd命令如下:
docker pull 镜像名
如下:
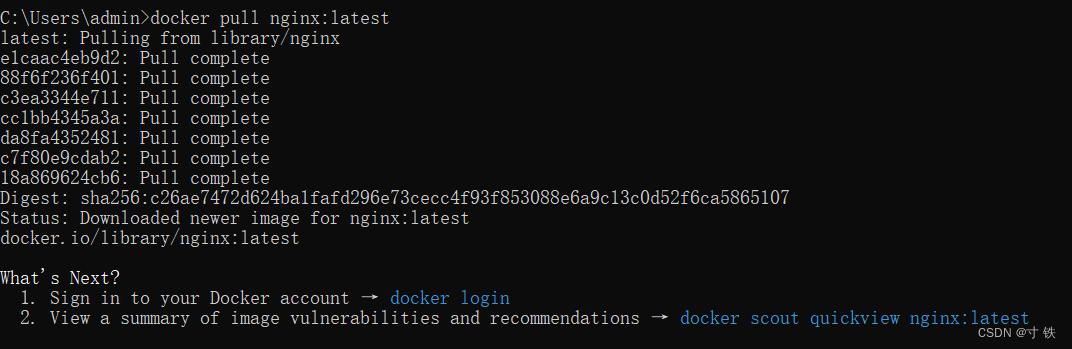
docker pull nginx:latest
拉取结果如下:
实例
package mainimport ("context""encoding/json""fmt""github.com/docker/docker/api/types""github.com/docker/docker/client"
)func main() {// 创建 Docker 客户端cli, err := client.NewEnvClient()if err != nil {panic(err)}// 定义要拉取的镜像的名称和标签imageName := "redis"imageTag := "latest"imageRef := imageName + ":" + imageTag// 拉取镜像out, err := cli.ImagePull(context.Background(), imageRef, types.ImagePullOptions{})if err != nil {panic(err)}defer out.Close()// 解析拉取镜像的输出var pullResponse struct {Status string `json:"status"`}if err := json.NewDecoder(out).Decode(&pullResponse); err != nil {panic(err)}fmt.Printf("Pulling image %s: %s\n", imageRef, pullResponse.Status)
}
运行结果
拉取镜像成功,和cmd拉取镜像的方式一致。

拉取镜像
cmd
对应到cmd命令如下:
docker pull 镜像名
如下:
docker pull nginx:latest
拉取结果如下:
![[外链图片转存中...(img-XuptRPZC-1709983420532)]](https://img-blog.csdnimg.cn/direct/6c144a096a14493f8427c4244553b00d.png)
实例
package mainimport ("context""encoding/json""fmt""github.com/docker/docker/api/types""github.com/docker/docker/client"
)func main() {// 创建 Docker 客户端cli, err := client.NewEnvClient()if err != nil {panic(err)}// 定义要拉取的镜像的名称和标签imageName := "redis"imageTag := "latest"imageRef := imageName + ":" + imageTag// 拉取镜像out, err := cli.ImagePull(context.Background(), imageRef, types.ImagePullOptions{})if err != nil {panic(err)}defer out.Close()// 解析拉取镜像的输出var pullResponse struct {Status string `json:"status"`}if err := json.NewDecoder(out).Decode(&pullResponse); err != nil {panic(err)}fmt.Printf("Pulling image %s: %s\n", imageRef, pullResponse.Status)
}
运行结果
拉取镜像成功,和cmd拉取镜像的方式一致。
![[外链图片转存中...(img-2KfAupd8-1709983420532)]](https://img-blog.csdnimg.cn/direct/11a4af194b314e43a6cdaa4d6735e856.png)
更新容器
应用场景
- 动态调整资源限制: 您可能希望根据应用程序的负载情况动态调整容器的资源限制,例如内存限制、CPU 配额等。通过更新容器配置,您可以在不停止容器的情况下调整这些限制,从而使容器能够适应不同的负载。
- 修改网络配置: 在某些情况下,您可能需要修改容器的网络配置,例如更改容器的端口映射、连接到不同的网络或修改容器的主机名等。通过更新容器配置,您可以实现这些网络配置的变更,而无需重新创建容器。
- 更新挂载卷: 如果您使用了挂载卷来与容器共享数据或配置文件,可能会需要在运行时更新挂载卷的配置。通过更新容器配置,您可以修改容器挂载的卷,例如更改卷的路径或添加新的挂载卷。
- 应用配置更改: 在某些情况下,您可能需要更新容器中运行的应用程序的配置。通过更新容器配置,您可以传递新的环境变量、更新容器的命令或参数等,从而修改容器中应用程序的配置。
总的来说,ContainerUpdate 方法可以用于在容器运行时对其进行动态配置更改,而不需要停止和重新启动容器。这种能力使得容器的管理更加灵活,并能够在不中断服务的情况下进行必要的调整和更新。
cmd
docker update命令用于更新一个正在运行的容器的配置。它允许你修改容器的资源限制、重启策略和其他配置选项。以下是docker update命令的基本用法:
docker update 容器id/名字
实例
cli.ContainerUpdate 更新容器的资源限制、重启策略和其他配置选项,并不是更新容器的镜像、端口之类的配置。其他暂无直接更新的API。
采用:先删除原有容器,再根据配置信息进行重建的封装函数。不过,这么做需要会影响容器内正在运行的服务,需要考虑一下。
更新的结构体如下:
updateConfig := container.UpdateConfig{Resources: container.Resources{Memory: 512000000, // 设置内存限制为 512MBNanoCPUs: 1000000000, // 设置 CPU 配额(以纳秒为单位)},}
端口和挂载卷配置示例:
// 容器端口映射,键为容器端口,值为宿主机端口portMapping := map[string]string{"80/tcp": "8080",}// 容器挂载卷volumeMounts := []mount.Mount{{Type: mount.TypeBind,Source: "/host/path", // 宿主机路径Target: "/container/path", // 容器路径},}
demo
package mainimport ("context""fmt""log""github.com/docker/docker/api/types/container""github.com/docker/docker/client"
)func main() {// 创建 Docker 客户端cli, err := client.NewClientWithOpts(client.FromEnv, client.WithAPIVersionNegotiation())if err != nil {log.Fatal(err)}// 容器ID,需要根据实际情况修改containerID := "your_container_id_here"// 配置更新updateConfig := container.UpdateConfig{Resources: container.Resources{Memory:   512000000,  // 设置内存限制为 512MBNanoCPUs: 1000000000, // 设置 CPU 配额(以纳秒为单位)},}// 执行容器更新err = updateContainer(cli, containerID, updateConfig)if err != nil {log.Fatal(err)}fmt.Println("容器配置已更新")
}// updateContainer 函数用于更新容器的配置信息
func updateContainer(cli *client.Client, containerID string, updateConfig container.UpdateConfig) error {ctx := context.Background()// 执行容器更新_, err := cli.ContainerUpdate(ctx, containerID, updateConfig)if err != nil {return err}return nil
}
运行结果
更新容器的内存资源限制(单位bytes)
运行结果如下:

补充
还了解到一个方法:cli.ConfigUpdate() ,不过这个更新不是更新容器信息的,可更新的配置信息也非常少,基本与容器无关。
后面了解到,其实它主要用于更新 Docker Swarm 配置的信息。
在 Docker 中,Swarm 是 Docker 官方提供的用于容器编排和集群管理的工具。Swarm 允许您将多个 Docker 主机组合成一个虚拟的、单一的 Docker 主机。Swarm 中有许多配置项可以控制集群的行为,例如服务配置、网络配置、秘密配置等。
方法体如下:
// ConfigUpdate attempts to update a config
func (cli *Client) ConfigUpdate(ctx context.Context, id string, version swarm.Version, config swarm.ConfigSpec) error {if err := cli.NewVersionError(ctx, "1.30", "config update"); err != nil {return err}query := url.Values{}query.Set("version", version.String())resp, err := cli.post(ctx, "/configs/"+id+"/update", query, config, nil)ensureReaderClosed(resp)return err
}待配置结构体swarm.ConfigSpec信息如下:
// ConfigSpec represents a config specification from a config in swarm
type ConfigSpec struct {AnnotationsData []byte `json:",omitempty"`// Templating controls whether and how to evaluate the config payload as// a template. If it is not set, no templating is used.Templating *Driver `json:",omitempty"`
}
Annotations字段信息如下:
// Annotations represents how to describe an object.
type Annotations struct {Name   string            `json:",omitempty"`Labels map[string]string `json:"Labels"`
}
容器函数库
将上面的各个函数集成到一个文件,形成一个函数库,便于用户使用和调用。
package mainimport ("context""encoding/json""fmt""github.com/docker/docker/api/types""github.com/docker/docker/api/types/container""github.com/docker/docker/api/types/network""github.com/docker/docker/client""github.com/docker/go-connections/nat""github.com/opencontainers/image-spec/specs-go/v1""io""log""os"
)func main() {cli, err := client.NewClientWithOpts(client.FromEnv, client.WithAPIVersionNegotiation())if err != nil {log.Fatal(err)}//查找容器信息getInfoOptions := types.ContainerListOptions{}getContainerInfo(cli, getInfoOptions)//配置创建容器的属性containerConfig := &container.Config{Image: "my-golang-app",ExposedPorts: nat.PortSet{"3889/tcp": {},},}//配置容器主机的属性//主要用于配置容器的运行环境和资源限制等主机级别的设置//配置的是容器的主机配置,而不是宿主机(即物理计算机或虚拟机)的主机配置。hostConfig := &container.HostConfig{}//主要用于配置容器的网络连接和端口映射等网络设置networkingConfig := &network.NetworkingConfig{}//主要用于指定容器的运行平台信息,以便 Docker 在部署时选择合适的环境。platformConfig := &v1.Platform{}//创建的容器名字,唯一标识containerName := "mycontainer-30"//调用createContainer创建容器并启动containerId, err := createContainer(cli, containerConfig, hostConfig, networkingConfig, platformConfig, containerName)fmt.Printf("容器%s已创建好 ", containerId)// 删除容器是通过Id进行删除的,需要根据名字查找到容器Id// 根据容器的名字查找出要删除容器的IdcontainerID, err := getContainerIDByName(cli, containerName)if err != nil {log.Fatal(err)}// 定义删除容器时的选项removeOptions := types.ContainerRemoveOptions{Force:         true,  // 强制删除容器RemoveVolumes: true,  // 删除关联的数据卷RemoveLinks:   false, // 不删除关联的链接}// 调用removeContainer删除容器removeContainer(cli, containerID, removeOptions)//根据容器的新配置重新创建容器reUpdateContainer(cli, removeOptions, containerConfig, hostConfig, networkingConfig, platformConfig, containerName)// 停止容器stopOptions := container.StopOptions{}stopContainer(cli, containerID, stopOptions)// 重启容器restartContainer(cli, containerID, stopOptions)// 暂停容器pauseContainer(cli, containerID)// 恢复暂停unpauseContainer(cli, containerID)// 定义进入容器时的选项attachOptions := types.ContainerAttachOptions{Stream: true,Stdin:  true,Stdout: true,Stderr: true,}attachContainer(cli, containerID, attachOptions)// 定义以命令行进入容器的选项execAttachConfig := types.ExecConfig{Cmd:          []string{"sh"},AttachStdin:  true,AttachStdout: true,AttachStderr: true,Tty:          true,}execAttachCheck := types.ExecStartCheck{Tty: true,}execAttachContainer(cli, containerID, execAttachConfig, execAttachCheck)// 定义拉取镜像的选项// 定义要拉取的镜像的名称和标签imageName := "redis"imageTag := "latest"imageRef := imageName + ":" + imageTagimagePulloptions := types.ImagePullOptions{}pullImage(cli, imageRef, imagePulloptions)//获取容器内所有镜像的信息getImageOptions := types.ImageListOptions{}err = getAllImagesInfo(cli, getImageOptions)if err != nil {log.Fatal(err)}// 定义更新容器的选项// 更新容器配置信息// 配置更新updateConfig := container.UpdateConfig{Resources: container.Resources{// Minimum memory limit allowed is 6MB// 单位为byte(字节数)Memory:     60000000,MemorySwap: 60000000, //设置Memory小于交换内存MemorySwap 需要同时配置MemorySwapNanoCPUs:   1,        // 设置 CPU 配额(以纳秒为单位)范围: 0.01 - 8.00},}err = updateContainer(cli, containerID, updateConfig)if err != nil {log.Fatal(err)}}/*
作用: 查找出容器的所有信息(容器ID、镜像名、端口、运行状态等等)
*/
func getContainerInfo(cli *client.Client, getInfoOptions types.ContainerListOptions) {// 先得到列出所有容器的列表containers, err := cli.ContainerList(context.Background(), getInfoOptions)if err != nil {panic(err)}// 对应为docker ps -a 命令// 再从列表(map)中拿到信息for _, container := range containers {fmt.Printf("CONTAINER ID: %s\n", container.ID)fmt.Printf("IMAGE: %s \n", container.Image)fmt.Printf("COMMAND: %s \n", container.Command)fmt.Printf("CREATED: %s \n", container.Created)fmt.Printf("Status: %s \n", container.Status)fmt.Printf("PORTS: %s \n", container.Ports)fmt.Printf("NAMES:%s\n", container.Names)}
}/*
作用: 根据容器名字和配置的创建选项创建容器
*/
func createContainer(cli *client.Client, containerConfig *container.Config, hostConfig *container.HostConfig, networkingConfig *network.NetworkingConfig, platformConfig *v1.Platform, containerName string) (containerId string, err error) {// 创建容器resp, err := cli.ContainerCreate(context.Background(), containerConfig, hostConfig, networkingConfig, platformConfig, containerName)if err != nil {log.Fatal(err)}// 启动容器if err := cli.ContainerStart(context.Background(), resp.ID, types.ContainerStartOptions{}); err != nil {log.Fatal(err)}//返回创建好的容器IDreturn resp.ID, err
}/*
作用: 根据容器ID和配置的删除选项删除容器
*/
func removeContainer(cli *client.Client, containerID string, removeOptions types.ContainerRemoveOptions) {// 调用 ContainerRemove 方法删除容器err := cli.ContainerRemove(context.Background(), containerID, removeOptions)if err != nil {fmt.Printf("Failed to remove container: %v\n", err)} else {fmt.Println("Container removed successfully")}
}/*
作用: 根据容器ID和配置的停止选项停止容器
*/
func stopContainer(cli *client.Client, containerID string, stopOptions container.StopOptions) {// 调用 ContainerStop 方法停止容器err := cli.ContainerStop(context.Background(), containerID, stopOptions)if err != nil {fmt.Printf("Failed to stop container: %v\n", err)} else {fmt.Println("Container stopped successfully")}
}/*
作用: 根据容器ID和配置的停止选项重启容器
*/
func restartContainer(cli *client.Client, containerID string, stopOptions container.StopOptions) {// 调用 ContainerRestart 方法重启容器err := cli.ContainerRestart(context.Background(), containerID, stopOptions)if err != nil {panic(err)}fmt.Printf("Container %s has been restarted.\n", containerID)
}/*
作用: 根据容器ID暂停容器
*/
func pauseContainer(cli *client.Client, containerID string) {// 暂停容器err := cli.ContainerPause(context.Background(), containerID)if err != nil {fmt.Printf("Failed to pause container: %v\n", err)} else {fmt.Println("Container paused successfully")}
}/*
作用: 根据容器ID恢复容器暂停
*/
func unpauseContainer(cli *client.Client, containerID string) {// 恢复暂停err := cli.ContainerUnpause(context.Background(), containerID)if err != nil {fmt.Printf("Failed to pause container: %v\n", err)} else {fmt.Println("Container paused successfully")}
}/*
作用: 根据容器ID和配置的进入选项进入容器内部
*/
func attachContainer(cli *client.Client, containerID string, attachOptions types.ContainerAttachOptions) {// 调用 ContainerAttach 方法进入容器resp, err := cli.ContainerAttach(context.Background(), containerID, attachOptions)if err != nil {panic(err)}defer resp.Close()// 将容器的标准输入输出连接到当前进程的标准输入输出go io.Copy(os.Stdout, resp.Reader)go io.Copy(resp.Conn, os.Stdin)// 等待用户输入以继续运行fmt.Println("Press enter to exit...")fmt.Scanln()
}/*
作用: 通过容器ID配置的进入选项以命令行的方式进入容器内部
*/
func execAttachContainer(cli *client.Client, containerID string, execAttachConfig types.ExecConfig, execAttachCheck types.ExecStartCheck) {// 准备执行命令的选项createResp, err := cli.ContainerExecCreate(context.Background(), containerID, execAttachConfig)if err != nil {panic(err)}// 连接到正在运行的命令以进行交互resp, err := cli.ContainerExecAttach(context.Background(), createResp.ID, execAttachCheck)if err != nil {panic(err)}defer resp.Close()// 将容器的标准输入输出连接到当前进程的标准输入输出go func() {if _, err := io.Copy(os.Stdout, resp.Reader); err != nil {panic(err)}}()go func() {if _, err := io.Copy(resp.Conn, os.Stdin); err != nil {panic(err)}}()// 等待用户输入以继续运行fmt.Println("Press enter to exit...")fmt.Scanln()
}/*
作用: 通过配置拉取的镜像名和拉取选项拉取镜像
*/
func pullImage(cli *client.Client, imageRef string, imagePulloptions types.ImagePullOptions) {// 拉取镜像out, err := cli.ImagePull(context.Background(), imageRef, imagePulloptions)if err != nil {panic(err)}defer out.Close()// 解析拉取镜像的输出var pullResponse struct {Status string `json:"status"`}if err := json.NewDecoder(out).Decode(&pullResponse); err != nil {panic(err)}fmt.Printf("Pulling image %s: %s\n", imageRef, pullResponse.Status)
}/*
作用: 通过容器ID和编写的更新配置动态更新容器配置信息(主要是资源限制、重启选项)
*/
func updateContainer(cli *client.Client, containerID string, updateConfig container.UpdateConfig) error {// 执行容器更新_, err := cli.ContainerUpdate(context.Background(), containerID, updateConfig)if err != nil {return err}fmt.Println("容器配置已更新")return nil
}/*
作用: 根据容器名字和容器的新配置创建容器,用于对容器的配置进行静态的修改。
*/
func reUpdateContainer(cli *client.Client, removeOptions types.ContainerRemoveOptions, containerConfig *container.Config, hostConfig *container.HostConfig, networkingConfig *network.NetworkingConfig, platformConfig *v1.Platform, containerName string) {// 一开始调用函数时就要传入创建、删除容器的配置//传入要删除的名字,得到要删除的容器ID。containerID, err := getContainerIDByName(cli, containerName)if err != nil {log.Fatal(err)}//删除容器removeContainer(cli, containerID, removeOptions)//调用创建api,创建新的容器containerId, err := createContainer(cli, containerConfig, hostConfig, networkingConfig, platformConfig, containerName)fmt.Printf("容器%s已重新创建好 ", containerId)
}/*
作用:通过容器名查找容器ID,常用于需要使用容器ID的容器操作
*/
func getContainerIDByName(cli *client.Client, containerName string) (string, error) {containers, err := cli.ContainerList(context.Background(), types.ContainerListOptions{})if err != nil {return "", err}for _, container := range containers {for _, name := range container.Names {// 注意: 容器名字以 "/" 开头,例如:你创建的名字为mycontainer-30 实际在容器中为"/mycontainer-30"// 在查找时前面要拼接上一个 /if name == "/"+containerName {return container.ID, nil}}}return "", fmt.Errorf("未找到容器名称为 %s 的容器", containerName)
}/*
作用: 获取容器的所有镜像信息(不包含镜像的名字)
*/
func getAllImagesInfo(cli *client.Client, getImageOptions types.ImageListOptions) error {// 调用 Docker API 获取所有镜像的摘要信息images, err := cli.ImageList(context.Background(), getImageOptions)if err != nil {return err}// 打印每个镜像的信息for _, image := range images {fmt.Printf("镜像ID: %s\n", image.ID)fmt.Printf("标签: %s\n", image.Labels["com.docker.compose.version"])fmt.Printf("大小: %d bytes\n", image.Size)fmt.Println("--------------")}return nil
}
往期好文💕
保姆级教程
【保姆级教程】Windows11下go-zero的etcd安装与初步使用
【保姆级教程】Windows11安装go-zero代码生成工具goctl、protoc、go-zero
【Go-Zero】手把手带你在goland中创建api文件并设置高亮
报错解决
【Go-Zero】Error: user.api 27:9 syntax error: expected ‘:‘ | ‘IDENT‘ | ‘INT‘, got ‘(‘ 报错解决方案及api路由注意事项
【Go-Zero】Error: only one service expected goctl一键转换生成rpc服务错误解决方案
【Go-Zero】【error】 failed to initialize database, got error Error 1045 (28000):报错解决方案
【Go-Zero】Error 1045 (28000): Access denied for user ‘root‘@‘localhost‘ (using password: YES)报错解决方案
【Go-Zero】type mismatch for field “Auth.AccessSecret“, expect “string“, actual “number“报错解决方案
【Go-Zero】Error: user.api 30:2 syntax error: expected ‘)‘ | ‘KEY‘, got ‘IDENT‘报错解决方案
【Go-Zero】Windows启动rpc服务报错panic:context deadline exceeded解决方案
Go面试向
【Go面试向】defer与time.sleep初探
【Go面试向】defer与return的执行顺序初探
【Go面试向】Go程序的执行顺序
【Go面试向】rune和byte类型的认识与使用
【Go面试向】实现map稳定的有序遍历的方式