本文是zookeeper系列之快速入门中的第一篇,欢迎大家观看与指出不足。
写在前面:
不影响教程,笔者安装zookeeper用的是WSL(windows下的linux子系统),当然你想直接在windows上用zookeeper也是可以的。
如果你也想用wsl,可以参考这篇文章Windows10安装Linux系统(WSL)
目录
一、zookeeper下载
二、安装zookeeper
三、linux下启动zookeeper
四、windows下启动zookeeper
进入正题:
一、zookeeper下载
镜像站下载:http://mirrors.hust.edu.cn/apache/zookeeper/
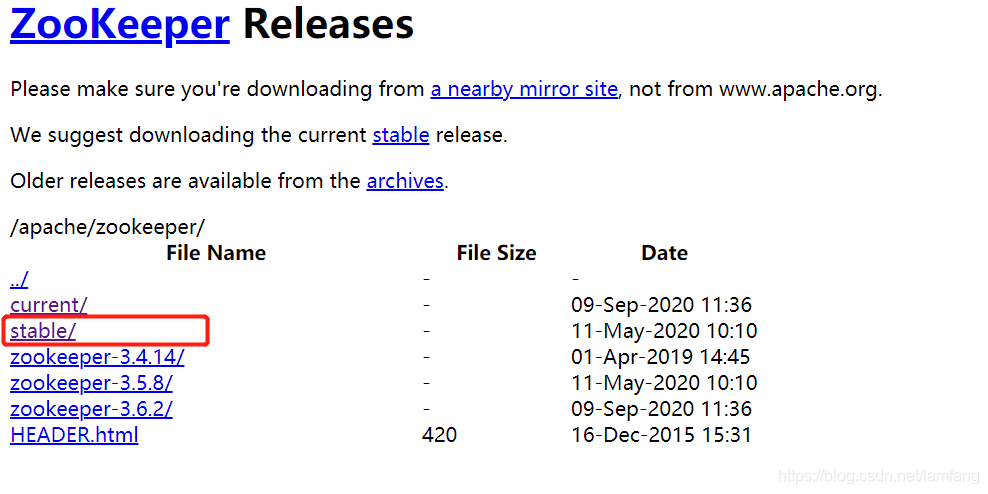
记住选择带bin的。从版本3.5.5开始,带有bin名称的包才是我们想要的下载可以直接使用的里面有编译后的二进制的包,而之前的普通的tar.gz的包里面是只是源码的包无法直接使用。不然会爆:
错误: 找不到或无法加载主类 org.apache.zookeeper.server.quorum.QuorumPeerMain

下载后解压到自己的电脑位置,比如:D:\apache-zookeeper-3.5.8-bin
若用wsl,请将apache-zookeeper-3.5.8-bin.tar.gz拷贝到wsl下面后再解压,可以参考WSL访问windows下的文件
解压后目录结构:
-
bin目录
- zk的可执行脚本目录,包括zk服务进程,zk客户端,等脚本。其中,.sh是Linux环境下的脚本,.cmd是Windows环境下的脚本。
- conf目录
配置文件目录。zoo_sample.cfg为样例配置文件,需要修改为自己的名称,一般为zoo.cfg。log4j.properties为日志配置文件。 - lib
zk依赖的包。 - contrib目录
一些用于操作zk的工具包。 - recipes目录
zk某些用法的代码示例
二、安装zookeeper
ZooKeeper的安装包括单机模式安装,以及集群模式安装。
开发情况下由于资源有限一般用单机模式,我们先讲单机模式,让zookeeper跑起来。后面实践案例再讲集群模式。
在启动zookeeper之前,我们需要先修改zookeeper的配置信息,我们先进入zookeeper-3.5.8-bin/conf目录,修改zoo_sample.cfg文件为:
# The number of milliseconds of each tick
tickTime=2000
# The number of ticks that the initial
# synchronization phase can take
initLimit=10
# The number of ticks that can pass between
# sending a request and getting an acknowledgement
syncLimit=5
# the directory where the snapshot is stored.
# do not use /tmp for storage, /tmp here is just
# example sakes.
dataDir=/tmp/zookeeper(修改为自己的目录)dataLogDir=/tmp/zookeeper(修改为自己的目录)
# the port at which the clients will connect
clientPort=2181
# the maximum number of client connections.
# increase this if you need to handle more clients
#maxClientCnxns=60
#
# Be sure to read the maintenance section of the
# administrator guide before turning on autopurge.
#
# http://zookeeper.apache.org/doc/current/zookeeperAdmin.html#sc_maintenance
#
# The number of snapshots to retain in dataDir
#autopurge.snapRetainCount=3
# Purge task interval in hours
# Set to "0" to disable auto purge feature
#autopurge.purgeInterval=1
主要修改项为dataDir和dataLogDir,dataDir是zookeeper存放数据的地方,dataLogDir是存放zookeeper日志的地方。
如果只配置dataDir,则数据和日志都会创建在dataDir目录下。默认情况下zookeeper会占有8080端口,如果你不想8080端口被占用,增加一行admin.serverPort=8082,指定你自己的端口。
其他配置项的意思我们留到后面再说。
注意:如果你是在windows下使用zookeeper,需要将zoo_sample.cfg改名为zoo.cfg
三、linux下启动zookeeper
我们需要先启动zookeeper服务端,再启动客户端。
首先进入 zookeeper-3.5.8-bin/bin目录

输入命令 ./zkServer.sh start (我之前安装的是zookeeper-3.4.13版本,所以图里的版本和文章的版本不一致,不影响)

可以看到STARTED,zookeeper服务端启动成功了。
接下来启动客户端。输入命令 ./zkCli.sh -server 127.0.0.1:2181 (-server参数就代表我们要连接哪个zookeeper服务端)
![]()
连接成功出现:
![]()
这样就算启动成功了。如果不放心,可以输入下面两条命令(创建节点和获取节点)测试一下。

四、windows下启动zookeeper
windows和linux大同小异。只不过执行文件从zkServer.sh替换成zkServer.cmd,zkCli.sh替换成zkCli.cmd。
如果你前面没有改名的话,需要将conf目录下的zoo_sample.cfg改名为zoo.cfg
用cmd进入我们zookeeper的bin目录。

输入zkServer.cmd

双击zkCli.cmd

出现:

同样输入create /zk "test" 和get /zk测试一下

至此,zookeeper安装与启动到此结束~
下一篇:zookeeper快速入门二:zookeeper基本概念
