前言:
本文记录学习使用 Git 版本管理工具的学习笔记,通过阅读参考链接中的博文和实际操作,快速的上手使用 Git 工具。
本文参考了引用链接博文里的内容。
引用:
重学Git-Git远程仓库管理_git remote add origin-CSDN博客
Git学习笔记(四)——远程仓库_git remote add origin-CSDN博客
Git学习笔记(一)(结合VS Code)-CSDN博客
添加远程库 - 廖雪峰的官方网站
https://blog.51cto.com/u_15300875/3070190
正文
远程仓库
远程仓库就是春初项目点吗的地方,由于认证方式的不同,远程仓库的链接可以分为两种:
- HTTPS链接:
- SSH链接:
给远程仓库(链接)起一个名字
在Git使用过程中,如果每次提交到远程仓库都使用链接的话,命令会显得很长,且当有多有仓库在管理时,就会显很麻烦。所以Git提供了一个给远程仓库链接起一个简单名字的操作,叫做创建远程仓库,其实就是讲本地的某个名字与远程仓库关联起来。
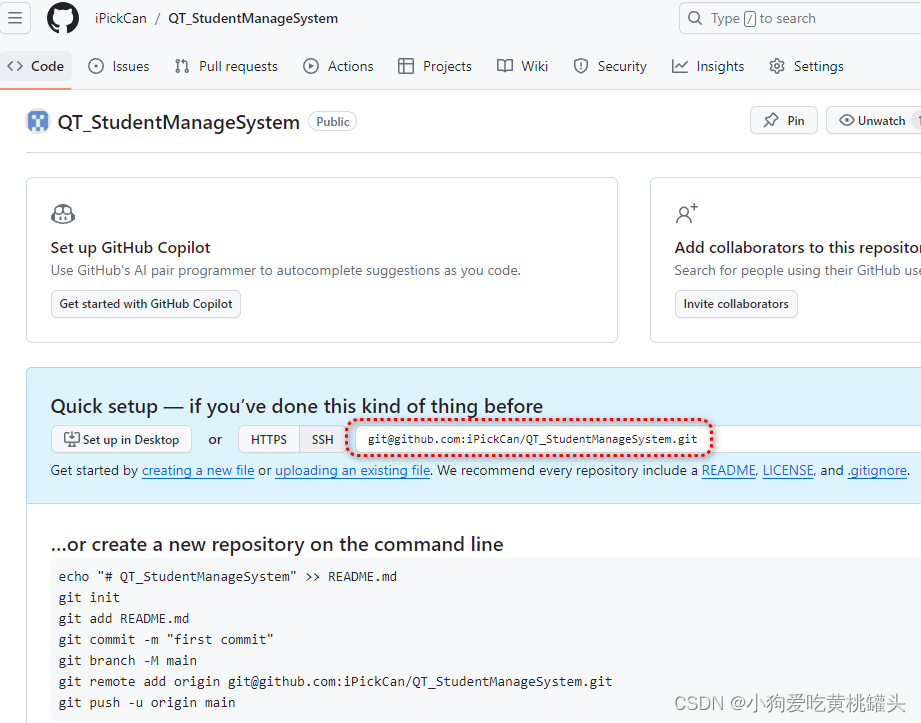
git add original <REMOTE_URL>例如把Github仓库URL 和本地名字 original 关联起来
dimon@dimon-VirtualBox:~/OSPractice$ git remote add origin git@github.com:iPickCan/QT_StudentManageSystem.git
dimon@dimon-VirtualBox:~/OSPractice$
其中的 git remote add 是标准命令,后面的 original 指的是远程仓库的名字(可以自己随意指定), <REMOTE_UTL> 指的是远程仓库的链接URL。
远程仓库名字修改
正常情况下 git push 会有两个参数,分别是远程链接名和分支名。如 git push original main 命令的意思是将修改提交到远程链接名为original 的 main 分支。
original 是给某个远程仓库的链接指定的一个别名,可以使用命令行修改远程链接的名字
###查看现有远程仓库
dimon@dimon-VirtualBox:~/OSPractice$ git remote -v
origin	git@github.com:iPickCan/QT_StudentManageSystem.git (fetch)
origin	git@github.com:iPickCan/QT_StudentManageSystem.git (push)
dimon@dimon-VirtualBox:~/OSPractice$ ###远程名从 'origin' 更改为 'destRepo'
dimon@dimon-VirtualBox:~/OSPractice$ git remote rename origin destRepo
dimon@dimon-VirtualBox:~/OSPractice$ ###查看现有远程仓库,已经显示新名称
dimon@dimon-VirtualBox:~/OSPractice$ git remote -v
destRepo	git@github.com:iPickCan/QT_StudentManageSystem.git (fetch)
destRepo	git@github.com:iPickCan/QT_StudentManageSystem.git (push)
dimon@dimon-VirtualBox:~/OSPractice$
名字所对应的链接的修改
删除远程了连接
###查看当前远程仓库
dimon@dimon-VirtualBox:~/OSPractice$ git remote -v
destRepo	git@github.com:iPickCan/QT_StudentManageSystem.git (fetch)
destRepo	git@github.com:iPickCan/QT_StudentManageSystem.git (push)
origin	git@github.com:iPickCan/QT_StudentManageSystem.git (fetch)
origin	git@github.com:iPickCan/QT_StudentManageSystem.git (push)
dimon@dimon-VirtualBox:~/OSPractice$ ###删除远程仓库名'destRepo'
dimon@dimon-VirtualBox:~/OSPractice$ git remote rm destRepo###查看当前远程仓库
dimon@dimon-VirtualBox:~/OSPractice$
dimon@dimon-VirtualBox:~/OSPractice$ git remote -v
origin	git@github.com:iPickCan/QT_StudentManageSystem.git (fetch)
origin	git@github.com:iPickCan/QT_StudentManageSystem.git (push)
dimon@dimon-VirtualBox:~/OSPractice$
远程仓库和本地仓库关联起来
把远程仓库和本地仓库关联起来,分为两种情况
1. 第一种,已经创建了本地仓库的情况下,把本地仓库和远程仓库关联起来。
###创建初始化本地仓库,并提交文件到本地仓库
git init
git add README.md
git commit -m 'add readme file'###远程仓库和名字'origin'关联起来
git remote add origin <远程仓库>###'git push'提交本地修改到远程仓库。‘master’是说提交本地的master分支到远程仓库origin
git push -u origin master
在'git push -u origin master' 向远程仓库提交的时候,会提示错误提交失败,因为远程仓库已经有更新,需要先把远程仓库的更新合入进来后才能提交,并且Git提醒我们使用 'git pull'从远程仓库更新改动到本地仓库。

运行 'git pull' 命令,提示错误“没有共同的提交”,原因是当前的本地Git仓库分支'master'和远程仓库之间没有关联,Git提示我们使用命令 'gti pull <远程> <分支>'或 git branch --set-upstream-to=origin/<分支> master 来把本地Git仓库分支和远程仓库分支关联起来。
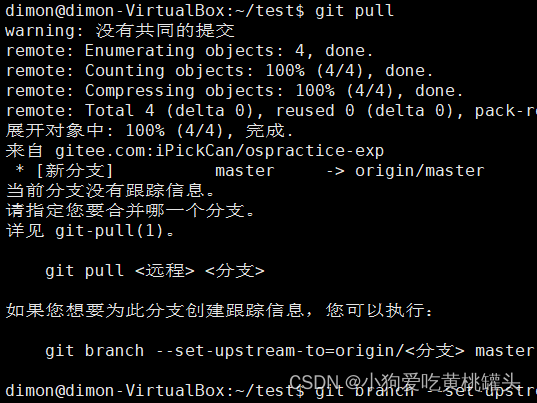
执行 'git branch --set-upstream-to=origin/<分支> master' 关联本地分支和远程仓库分支,命令执行成功。执行结果说明本地 Git仓库的'master'分支已经跟踪关联了远程 origin 仓库的 'master'分支。
dimon@dimon-VirtualBox:~/test$ git branch --set-upstream-to=origin/master master
分支 'master' 设置为跟踪来自 'origin' 的远程分支 'master'。
dimon@dimon-VirtualBox:~/test$
再次执行 ' git pull ' 同步远程仓库的改动到本地Git仓库,提示错误‘fatal: 拒绝合并无关的历史’。这是因为我们是分别创建了本地的Git仓库,和远程的Git仓库,而本地的仓库和远程的仓库之间没有共同祖先。默认情况下,git合并命令拒绝合并没有共同祖先的历史。

解决办法是, ' git pull origin master --allow-unrelated-histories ' 命令,,当两个项目的历史独立地开始时,这个‘--allow-unrelated-histories ’ 选项可以被用来覆盖这个安全Git拒绝合并没有共同祖先的两个分支。
命令执行后本地仓库的'master'分支和远程仓库成功关联起来。

执行' git push origin master ' 把本地仓库的'master'分支改动推送到远程仓库,命令执行成功。

2. 第二种,只有远程仓库的情况下,从远程仓库克隆到本地仓库。
git clone <远程仓库>
git add test.txt
git commit -m 'add test file'
git pull
git push
使用Gitee远程仓库
由于某些你懂得原因在国内使用 Github 网站经常会出现连接不上去,或者访问Github网站非常慢的情况。我们可以使用国内的Gitee网站作为远程的代码托管仓库。
首先注册创建一个Gitee账号,设置好自己的Gitee账号信息。

注册创建好Gitee账号之后,登录自己的Gitee账号

可以新建一个自己的仓库
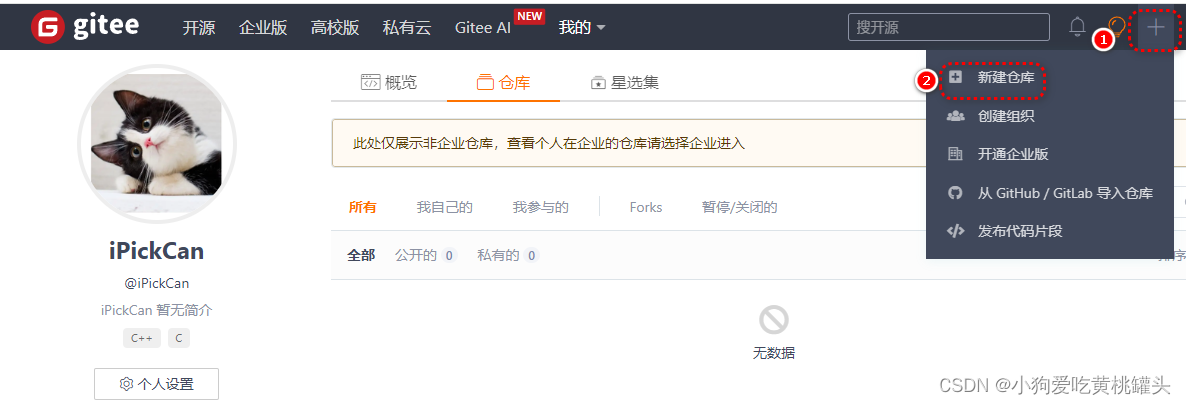
创建自己的源码仓库
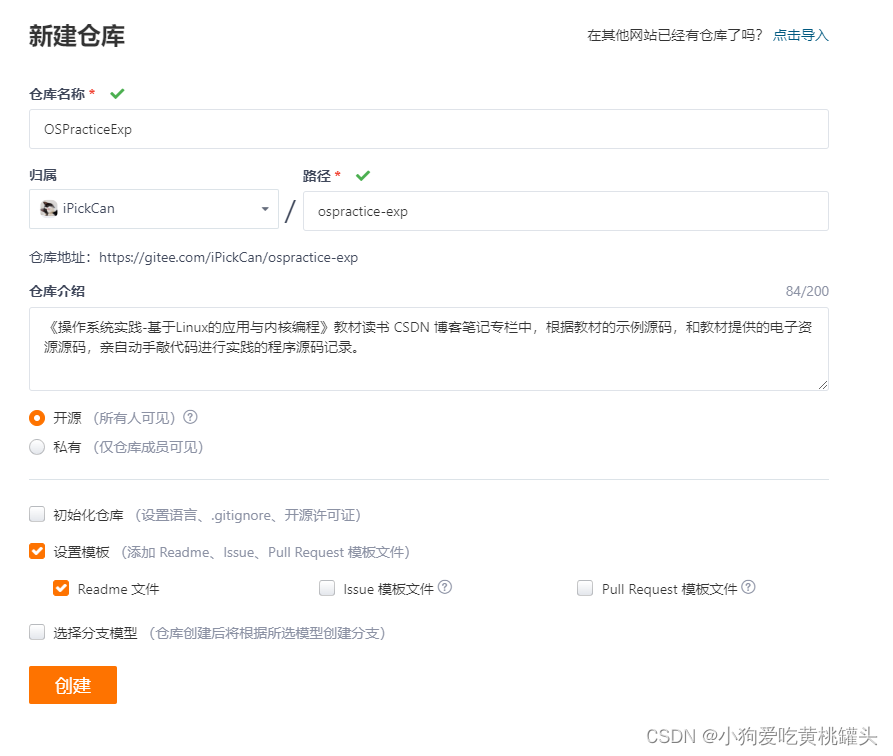
查看创建出来的源码Gitee仓库,点击“克隆/下载” 获取到克隆这个远程Gitee仓库的链接地址,我们选择 ssh 方式。

点击“克隆/下载”,之后我们可以选择需要克隆/拷贝这个Gitee远程仓库的方法,一般有Https, SSH 等。我们使用Git SSH的方式来克隆这个远程仓库,在弹出的提示窗口里已经给出了克隆这个远程仓库需要的命令'git clone git@gitee.com:xxxx',并且在弹出窗口里也提示了你如何配置自己本地的Git账号,Git邮箱名,和如何配置Gitee SSH公钥。

按照提示,我们来配置本地 Ubuntu 客户端的Git用户名,邮箱,和Git SSH公钥。
dimon@dimon-VirtualBox:~$ git config -l
user.email=1181302388@qq.com
dimon@dimon-VirtualBox:~$
dimon@dimon-VirtualBox:~$ git config --global user.name 'iPickCan'
dimon@dimon-VirtualBox:~$
dimon@dimon-VirtualBox:~$ git config -l
user.email=1181302388@qq.com
user.name=iPickCan
dimon@dimon-VirtualBox:~$
生成ssh rsa key 公钥,提示生成的公钥在你自己的Ubuntu home 目录下'/home/xxx/.ssh/id_rsa'
dimon@dimon-VirtualBox:~$ ssh-keygen -t rsa
Generating public/private rsa key pair.
Enter file in which to save the key (/home/dimon/.ssh/id_rsa):
/home/dimon/.ssh/id_rsa already exists.
Overwrite (y/n)?
dimon@dimon-VirtualBox:~$
根据Gitee弹出窗口的提示,把自己的 ssh key 公钥增加到 Gitee 中。用'cat ~/.ssh/id_ras.pub'命令打出自己的ssh 公钥,把打印出来的公钥字符串文件复制到剪贴板,单间Gitee弹出窗上的'SSH'链接,在新窗口里黏贴上之前复制的ssh公钥。


把上面生成并且打印出来的ssh 公钥字符串黏贴到Gitee网站上,并可以随意给这个公钥文件取一个名字。

本地创建一个并初始化一个 Git 仓库,然后参考上面一节的命令,把本地仓库的'master'分支推送到远程仓库' git@gitee.com:iPickCan/ospractice-exp.git ' 。
dimon@dimon-VirtualBox:~/Gitee$ git clone git@gitee.com:iPickCan/ospractice-exp.git
正克隆到 'ospractice-exp'...
remote: Enumerating objects: 9, done.
remote: Counting objects: 100% (9/9), done.
remote: Compressing objects: 100% (7/7), done.
remote: Total 9 (delta 0), reused 0 (delta 0), pack-reused 0
接收对象中: 100% (9/9), 完成.
dimon@dimon-VirtualBox:~/Gitee$
dimon@dimon-VirtualBox:~/Gitee$ ls
ospractice-exp
dimon@dimon-VirtualBox:~/Gitee$ cd ospractice-exp/
dimon@dimon-VirtualBox:~/Gitee/ospractice-exp$ ls
1.txt  README.en.md  README.md
dimon@dimon-VirtualBox:~/Gitee/ospractice-exp$ cd ..
dimon@dimon-VirtualBox:~/Gitee$ git status
fatal: 不是一个 git 仓库(或者任何父目录):.git
dimon@dimon-VirtualBox:~/Gitee$ clear
dimon@dimon-VirtualBox:~/Gitee$ ls
ospractice-exp
dimon@dimon-VirtualBox:~/Gitee$ cd ospractice-exp/
dimon@dimon-VirtualBox:~/Gitee/ospractice-exp$ ls
1.txt  README.en.md  README.md
dimon@dimon-VirtualBox:~/Gitee/ospractice-exp$ git status
位于分支 master
您的分支与上游分支 'origin/master' 一致。无文件要提交,干净的工作区
dimon@dimon-VirtualBox:~/Gitee/ospractice-exp$
dimon@dimon-VirtualBox:~/Gitee/ospractice-exp$ mkdir ch10
dimon@dimon-VirtualBox:~/Gitee/ospractice-exp$ mv QChatServer/ ch10/
dimon@dimon-VirtualBox:~/Gitee/ospractice-exp$ ls
1.txt  ch10  README.en.md  README.md
dimon@dimon-VirtualBox:~/Gitee/ospractice-exp$ clear
dimon@dimon-VirtualBox:~/Gitee/ospractice-exp$ ls -l
总用量 12
-rw-rw-r-- 1 dimon dimon    0 3月  18 14:40 1.txt
drwxrwxr-x 3 dimon dimon 4096 3月  18 14:41 ch10
-rw-rw-r-- 1 dimon dimon 1039 3月  18 14:40 README.en.md
-rw-rw-r-- 1 dimon dimon 1128 3月  18 14:40 README.md
dimon@dimon-VirtualBox:~/Gitee/ospractice-exp$
dimon@dimon-VirtualBox:~/Gitee/ospractice-exp$
dimon@dimon-VirtualBox:~/Gitee/ospractice-exp$ git  status
位于分支 master
您的分支与上游分支 'origin/master' 一致。未跟踪的文件:(使用 "git add <文件>..." 以包含要提交的内容)ch10/提交为空,但是存在尚未跟踪的文件(使用 "git add" 建立跟踪)
dimon@dimon-VirtualBox:~/Gitee/ospractice-exp$ git add ch10
dimon@dimon-VirtualBox:~/Gitee/ospractice-exp$ git status
位于分支 master
您的分支与上游分支 'origin/master' 一致。要提交的变更:(使用 "git reset HEAD <文件>..." 以取消暂存)新文件:   ch10/QChatServer/.gitignore新文件:   ch10/QChatServer/QChatServer.pro新文件:   ch10/QChatServer/main.cpp新文件:   ch10/QChatServer/qchatserver.cpp新文件:   ch10/QChatServer/qchatserver.h新文件:   ch10/QChatServer/qchatserver.ui新文件:   ch10/QChatServer/qmydb.cpp新文件:   ch10/QChatServer/qmydb.h新文件:   ch10/QChatServer/qserver.cpp新文件:   ch10/QChatServer/qserver.h新文件:   ch10/QChatServer/qtcpthread.cpp新文件:   ch10/QChatServer/qtcpthread.h新文件:   ch10/QChatServer/quser.cpp新文件:   ch10/QChatServer/quser.hdimon@dimon-VirtualBox:~/Gitee/ospractice-exp$ git commit -m 'add ch10/QChatServer source code'
[master 3c3f44e] add ch10/QChatServer source code14 files changed, 589 insertions(+)create mode 100644 ch10/QChatServer/.gitignorecreate mode 100644 ch10/QChatServer/QChatServer.procreate mode 100644 ch10/QChatServer/main.cppcreate mode 100644 ch10/QChatServer/qchatserver.cppcreate mode 100644 ch10/QChatServer/qchatserver.hcreate mode 100644 ch10/QChatServer/qchatserver.uicreate mode 100644 ch10/QChatServer/qmydb.cppcreate mode 100644 ch10/QChatServer/qmydb.hcreate mode 100644 ch10/QChatServer/qserver.cppcreate mode 100644 ch10/QChatServer/qserver.hcreate mode 100644 ch10/QChatServer/qtcpthread.cppcreate mode 100644 ch10/QChatServer/qtcpthread.hcreate mode 100644 ch10/QChatServer/quser.cppcreate mode 100644 ch10/QChatServer/quser.h
dimon@dimon-VirtualBox:~/Gitee/ospractice-exp$ git pull
已经是最新的。
dimon@dimon-VirtualBox:~/Gitee/ospractice-exp$ git push
对象计数中: 18, 完成.
压缩对象中: 100% (17/17), 完成.
写入对象中: 100% (18/18), 5.70 KiB | 5.70 MiB/s, 完成.
Total 18 (delta 1), reused 0 (delta 0)
remote: Powered by GITEE.COM [GNK-6.4]
To gitee.com:iPickCan/ospractice-exp.gitffb96b2..3c3f44e  master -> master
dimon@dimon-VirtualBox:~/Gitee/ospractice-exp$
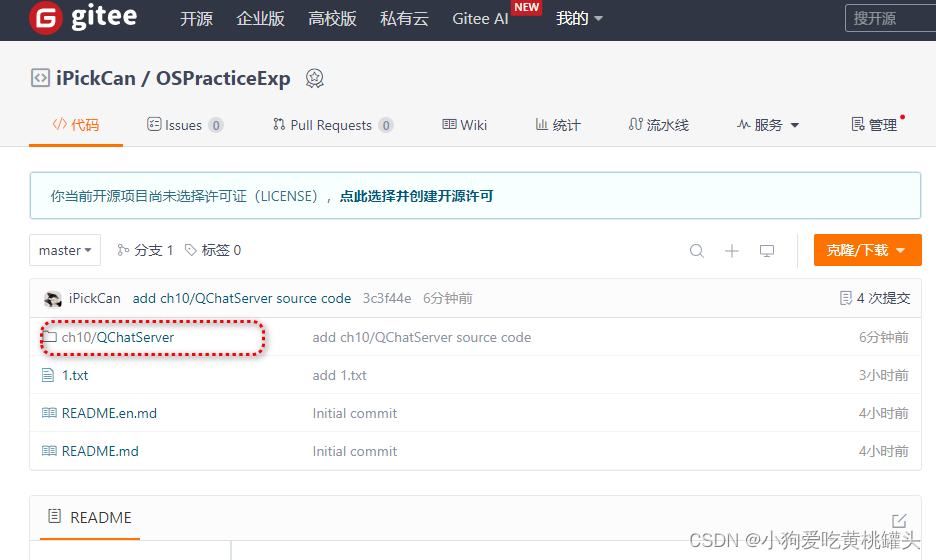
把本地的一个目录 'ch10/QChatServer' 添加并提交到本地仓库 ' git add xxx; git commit -m "xxx" ',然后 ' git push ' 推送到远程Gitee仓库。
查看远程Gitee仓库,发现我们在本地提交的文件已经在远程仓库上可以看到。




![Obsidian插件PicGo-图床创建使用[腾讯云保姆级教程]](https://img-blog.csdnimg.cn/img_convert/d7c52e502d4624bf535433fcb3f95460.png)

