前言
本篇文章将会对spring框架做出一个比较详细的讲解,并且每个知识点基本都会有例子演示,详细记录下了我在学习Spring时所了解到全部知识点。
在了解是什么spring之前,我们要先知道spring框架在开发时,服务器端采用三层架构的方式,分成了表现层、业务层和持久层。
例如:表现层使用JSP和Servlet程序,与浏览器客户端进行数据的交互。业务层使用Service程序,进行业务逻辑处理和事务处理。持久层使用Dao程序,进行数据库的持久化操作。数据库使用MySQL数据库。
首先什么是Spring?
Spring是一个开放源代码的设计层面框架,它解决的是业务逻辑层和其他各层的松耦合问题,方便开发,因此它将面向接口的编程思想贯穿整个系统应用。
Spring的核心是控制反转(IoC控制反转)和面向切面(AOP)。
Spring具备的优点
- 方便解耦,简化开发,Spring就是一个大工厂,可以将所有对象创建和依赖关系维护,交给Spring管理。IOC的作用。
- AOP编程的支持,Spring提供面向切面编程,可以方便的实现对程序进行权限拦截、运行监控等功能。(可扩展性)
可扩展性:不需要动用服务器中源代码的情况下,添加功能 - 声明式事务的支持,只需要通过配置就可以完成对事务的管理,而无需手动编程。 不知道什么是事务搜:(mysql事务,事务的特性,ACID是什么?)一个事务中如果中间出现了错误,不会提交事务,会回滚事务(jdbc中如何控制事务?)
- 方便程序的测试,Spring对Junit4支持,可以通过注解方便的测试Spring程序。
- 方便集成各种优秀框架,Spring不排斥各种优秀的开源框架,其内部提供了对各种优秀框架(如:Struts2、Hibernate、MyBatis、Quartz等)的直接支持。
- 降低JavaEE API的使用难度,Spring 对JavaEE开发中非常难用的一些API(JDBC、JavaMail、远程调用等),都提供了封装,使这些API应用难度大大降低。
IOC
IOC(控制反转)是spring的核心之一,它是指将将对象的创建权力反转给Spring框架,让spring框架来创建对象,并管理对象之间复杂的依赖关系。
IOC是面向对象编程中的一种设计原则,可以用来减低计算机代码之间的耦合度。它是一种思想。实现IOC的技术是DI
解决问题:使用IOC可以解决的程序耦合性高的问题!!通过Spring的工厂读取配置文件。
例如:可以减少频繁new对象的操作,降低耦合
简单实现IOC
下面编写一个程序来简单实现一下IOC
1.创建一个mavenJava项目,并导入spring依赖
需要导入的依赖:(注意spring-context5.0.2依赖引入以后,junit必须使用4以上的版本否则会产生版本冲突)
<dependencies><!--通过maven传递依赖,导入依赖的jar包--><dependency><groupId>org.springframework</groupId><artifactId>spring-context</artifactId><version>5.0.2.RELEASE</version></dependency><dependency><groupId>commons-logging</groupId><artifactId>commons-logging</artifactId><version>1.2</version></dependency><dependency><groupId>log4j</groupId><artifactId>log4j</artifactId><version>1.2.12</version></dependency><dependency><groupId>junit</groupId><artifactId>junit</artifactId><version>4.12</version><scope>test</scope></dependency>
</dependencies>
2.编写接口和实现类,
在java文件夹中创建包如com.qcby.service
创建一个接口UserService
package com.qcby.service;
public interface UserService {//接口中的方法public void hello();
}
创建一个实现类;
package com.qcby.service;public class UserServiceImpl implements UserService{
/*** 接口中方法实现*/public void hello(){System.out.println("Hello IOC!!!");}}
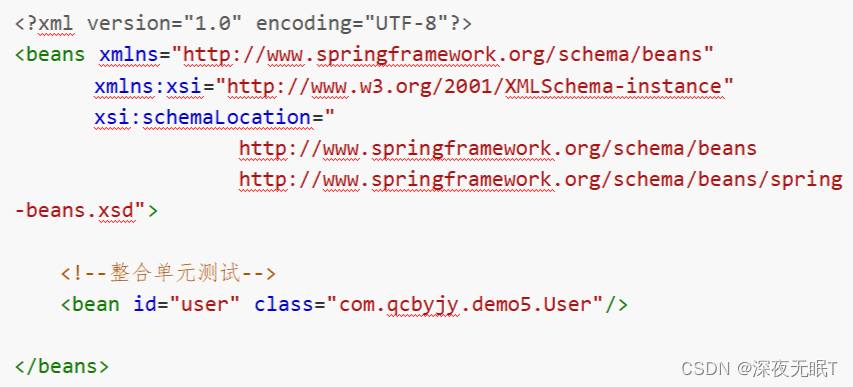
3.在resourses中配置bean文件,该文件用于存放spring的相关配置。
创建applicationContext.xml文件进行文件配置,实例化bean对象
<?xml version="1.0" encoding="UTF-8"?>
<beans xmlns="http://www.springframework.org/schema/beans"xmlns:xsi="http://www.w3.org/2001/XMLSchema-instance"xsi:schemaLocation="http://www.springframework.org/schema/beanshttp://www.springframework.org/schema/beans/spring-beans.xsd"><!--在spring的配置文件中 配置一个bean 就相当于把这个类交给spring的ioc容器去管理 spring管理的类的对象就叫做 bean对象--><bean id="us" class="com.qcby.service.UserServiceImpl"/></beans>
再引入一个日志log4j.properties
4.在test中测试
可以不通过new创建对象,这样耦合度就降低了(后面还会有更简单的创建方式,这种一般不用)
通过bean工厂加载配置文件,获取到bean工厂,通过调用方法创建对象
public void run1(){//spring的工厂对象/bean工厂ApplicationContext ac = new ClassPathXmlApplicationContext("applicationContext.xml");加载类路径下的Spring配置文件。//工厂对象的方法UserService us =(UserService) ac.getBean("us");us.hello();
}
也可以通过加载本地磁盘下的获取到bean对象(一般不用)
public void run2(){ApplicationContext ac=new FileSystemXmlApplicationContext("D:\\demo00001\\applicationContext.xml");UserService us = (UserService) ac.getBean("us");us.hello();
}
这样一个简单的ioc的使用就实现了。
Spring框架的Bean管理的配置文件方式
上面提到了配置文件,spring可以用配置文件的方式来管理创建的bean对象。
配置文件中可以使用bean标签来管理bean对象,它具有多个属性可以设置。
id属性: bean对象获取的名字id。Bean起个名字,在约束中采用ID的约束,唯一,取值要求:必须以字母开始,可以使用字母、数字、连字符、下划线、句话、冒号 id:不能出现特殊字符。
class属性:交给spring管理的那个类,放入路径加全包名
scope属性:scope代表bean的作用范围
作用范围有以下几个比较常用:
- singleton单例(默认值),最常用的方式。
- prototype多例
- request应用在Web项目中,每次HTTP请求都会创建一个新的Bean(很少用 )多例
- session应用在Web项目中,同一个HTTP Session 共享一个Bean(很少用 )多例
说明:Spring初始化bean或销毁bean时,有时需要作一些处理工作,因此spring可以在创建和拆卸bean的时候调用bean的两个生命周期方法。
init-method:当bean被载入到容器的时候调用init-method属性指定的方法
单例的对象销毁:跟着容器工厂关闭才销毁
多例的对象销毁:垃圾回收机制进行回收
多例创建的时候是在用的时候创建
单例是在工厂创建好时就创建好的
destroy-method:当bean从容器中删除的时候调用destroy-method属性指定的方法
例如:
<bean id="us" class="com.qcby.service.UserSericeImpl"
scope="prototype"
init-method="init"
destroy-method="destroy"/>
交给spring管理的是UserServiceImpl类
表示是默认的单例模式,创建时调用实现类中的init方法,摧毁时用destory方法
另外spring还支持多配置文件的方式
可以让一个配置文件包含另一个配置文件,这样引入一个主配置文件即可
在主配置文件中添加其他配置文件
如:
<import resource="applicationContext2.xml"/>
实例化bean对象的三种方式
spring管理bean对象有三种方法
默认方式(最常用的方式):
无参的构造方法
<bean id="us" class="com.qcbyjy.service.UserServiceImpl" />
静态工厂的方法:(不常用)
1.创建静态工厂类
package com.qcby.service;public class StaticFactory {public static UserService createUs(){return new UserServiceImpl();}
}
2.将静态工厂类交给spring去管理(放在applicationContext.xml配置文件中)
<bean id="usFactory" class="com.qcby.service.StaticFactory" factory-method="createUs"> </bean>
3.在测试中调用
@Test
public void run2(){//spring静态工厂的形式ApplicationContext ac = new ClassPathXmlApplicationContext("applicationContext.xml");UserService us =(UserService) ac.getBean("usFactory");us.hello();
}
动态工厂的方式:(不常用)
1.创建动态工厂类
public class Dfactory {public UserService createUs(){System.out.println("实例化工厂的方式...");return new UserServiceImpl();}
}
2.将动态工厂类交给spring去管理
<bean id="dfactory" class="com.qcby.service.Dfactory" />
3.测试
public void run3(){//spring动态工厂的形式ApplicationContext ac = new ClassPathXmlApplicationContext("applicationContext.xml");Dfactory us =(Dfactory) ac.getBean("dfactory");us.createUs();
}
DI依赖注入
在Spring框架负责创建Bean对象时,动态的将依赖对象注入到Bean组件中!!
set方法注入
例子:
创建业务层接口及其实现类,加上一些值并提供set方法
/*** 订单业务层接口*/
public interface OrderService {//业务层保存订单的接口方法public void saveOrder();}
/***订单业务层接口的实现类*/
public class OrderServiceImpl implements OrderService {private OrderDao orderDao;private String msg;private  int age;public OrderDao getOrderDao() {return orderDao;}public void setOrderDao(OrderDao orderDao) {this.orderDao = orderDao;}public void setMsg(String msg) {this.msg = msg;}public void setAge(int age) {this.age = age;}public void saveOrder(){System.out.println("业务层:保存订单"+msg+"-"+age);orderDao.saveOrder();}@Overridepublic String toString() {return "OrderServiceImpl{" +"orderDao=" + orderDao +", msg='" + msg + '\'' +", age=" + age +'}';}
}
创建持久层接口和实现类
/*** 订单业务的持久层接口* 操作数据库持久化的*/
public interface OrderDao {public void saveOrder();
}
实现接口
public class OrderDaoImpl implements OrderDao{public void saveOrder(){System.out.println("持久层:保持订单");}
}
最后把持久层的类和业务层的类交给spring管理
业务层中添加类中变量的默认数值,是引用类型的用ref,如下方的ref=“dao”,引用spring管理的持久层的类
<bean id="dao" class="com.qcby.demo.OrderDaoImpl"/>
<bean id="os" class="com.qcby.demo.OrderServiceImpl"><property name="orderDao" ref="dao"></property><property name="msg" value="1"></property><property name="age" value="1"></property>
</bean>
最后测试
@Test
public void run5(){//set注入后ApplicationContext ac = new ClassPathXmlApplicationContext("applicationContext.xml");OrderService os =(OrderService) ac.getBean("os");os.saveOrder();
}
结果如下,看到创建对象时,该对象中的值有了初始值

属性构造方法方式注入
大致过程与set注入时相同,不同处在于不用在实现类中写set方法,而是写构造方法
例如
写一个student类
public class Student {private int id;private int age;private String name;public Student(){}public Student(int id, int age, String name) {this.id = id;this.age = age;this.name = name;}@Overridepublic String toString() {return "Student{" +"id=" + id +", age=" + age +", name='" + name + '\'' +'}';}
}
在配置文件中使用constructor-arg注入值
<bean id="student" class="com.qcby.service.Student"><constructor-arg name="id" value="01"></constructor-arg><constructor-arg name="age" value="18"></constructor-arg><constructor-arg name="name" value="张三"></constructor-arg>
</bean>
测试
@Test
public void run6(){//属性构造方法注入后ApplicationContext ac = new ClassPathXmlApplicationContext("applicationContext.xml");Student student =(Student) ac.getBean("student");System.out.println(student);
}
结果:

数组,集合(List,Set,Map),Properties等的注入
流程与上方一样,这里使用set注入
实现类:
public class CollectionBean {private String[] strs;private List<String> list;private Map<String,String> map;private Properties properties;public void setMap(Map<String, String> map) {this.map = map;}public void setProperties(Properties properties) {this.properties = properties;}public void setStrs(String[] strs) {this.strs = strs;}public void setList(List<String> list) {this.list = list;}@Overridepublic String toString() {return "CollectionBean{" +"strs=" + Arrays.toString(strs) +", list=" + list +", map=" + map +", properties=" + properties +'}';}
}
配置文件
<bean id="collectionBean" class="com.qcby.demo2.CollectionBean"><property name="strs"><array><value>张三</value><value>张4</value><value>张5</value><value>张6</value></array></property><property name="list"><list><value>李1</value><value>李2</value><value>李3</value></list></property><property name="map"><map><entry key="aaa" value="z1"></entry><entry key="bbb" value="z2"></entry></map></property><property name="properties"><props><prop key="username">root</prop><prop key="password">123456</prop></props></property>
</bean>
测试
@Test
public void run7(){//set,map等的注入ApplicationContext ac = new ClassPathXmlApplicationContext("applicationContext.xml");CollectionBean collectionBean =(CollectionBean) ac.getBean("collectionBean");System.out.println(collectionBean);
}
结果:可以发现注入成功

IOC注解
我们在spring中使用ioc除了可以使用配置文件的方式,还可以使用配置文件加注解的方法或是纯注解的方式。
配置文件+注解
举个例子:
假如先有以下接口和实现类
public interface UserService {public void hello();
}
------------------------------------
public class UserServiceImpl implements UserService {public void hello(){System.out.println("hellow ioc注解");}
}
想要实现IOC,可以在需要管理的类上添加@Component注解
/*** @Component相当于<bean id="us" class="com.qcby.demo.UserServiceImpl"></bean>* 注解当中如果有value属性可以不写* 加了这个注解的类将这个类交给spring去管理* 如果不加value属性值,默认是该类的首字符小写userServiceImpl*/
@Component("us")
public class UserServiceImpl implements UserService {public void hello(){System.out.println("hellow ioc注解");}
}
再编写配置文件,写入需要的配置,
还需要在applicatioonContext.xml配置文件中加上,base-package中写包的路径,会包含写入包内的所有类
<?xml version="1.0" encoding="UTF-8"?>
<beans xmlns="http://www.springframework.org/schema/beans"xmlns:xsi="http://www.w3.org/2001/XMLSchema-instance"xmlns:context="http://www.springframework.org/schema/context" xsi:schemaLocation="http://www.springframework.org/schema/beanshttp://www.springframework.org/schema/beans/spring-beans.xsdhttp://www.springframework.org/schema/contexthttp://www.springframework.org/schema/context/spring-context.xsd"><!--开启注解的配置--><context:component-scan base-package="com.qcby"/>
</beans>
常用的注解
交给spring管理的四个注解
@Component 普通的类
@Controller 表现层
@Service 业务层
@Repository 持久层
依赖注入的注解
不需要依靠set就可完成注解
依赖注入常用的注解
@Value 用于注入普通类型(String,int,double等类型)
如:
@Value("400000")
private Double money;
@Autowired 默认按类型进行自动装配(引用类型)
这样的单例模式节省了内存,速度会更快
如:注入了person类中的依赖注入值
public class Car {@Autowiredprivate Person person;
}
-----------------------------
public class Person {@Value("张三")private String name;
}
@Qualifier 按照名称+类型的方式注入,这样更具体
如:@Qualifier(“per”) 找到compent注解value值是per的类
public class Car {@Qualifier("per")private Person person;
}
---------------------------
@Component("per")
public class Person {@Value("张三")private String name;
}
@Resource Java提供的注解,也被支持。使用name属性,按名称注入。
写了name就必须写值,不能省略不写使用默认
如:
@Resource(name="per")//写了name就必须写值,不能省略不学使用默认
private Person person;
-----------------------------------------
@Component("per")
public class Person {@Value("张三")private String name;
}
对象生命周期(作用范围)注解
@Scope 生命周期注解,取值singleton(默认值,单实例)和prototype(多例)
加在类前,决定该类是单例还是多例
初始化方法和销毁方法注解(了解)
@PostConstruct 相当于init-method
@PreDestroy 相当于destroy-method
单例的销毁时机是跟随容器的,容器销毁,单例销毁
多例的销毁时间是Java的垃圾回收机制控制的
如:
@Component
public class Car {@Value("奔驰")private String name;@Value("400000")private Double money;//@Autowired 按照类型注入//@Qualifier("per")按照名称+类型的方式注入,这样更具体//@Resource 注解代替的是前两个,没有value,有name 这是Java提供的 前两个是框架提供的@Resource(name="per")//写了name就必须写值,不能省略不学使用默认private Person person;@PostConstruct//相当于init-method,加了之后在创建对象时就会运行public void init(){System.out.println("初始化方法");}
}
纯注解
纯注解的方式是微服务架构开发的主要方式,所以也是非常的重要。纯注解的目的是替换掉所有的配置文件。但是需要编写配置类。
流程如:
先创建个实体类
@Component("or")
public class Order {@Value("北京")private String address;@Overridepublic String toString() {return "Order{" +"address='" + address + '\'' +'}';}
}
再编写配置类
通常给该类起名为SpringConfig
/***  成为一个配置类,*  加上@Configuration,声明当前类是配置类*  @ComponentScan("com.qcby.demo3")代替配置文件中的<context:component-scan base-package="com.qcby"/>*/
@Configuration
@ComponentScan("com.qcby.demo3")
public class SpringConfig {
}
进行测试,使用AnnotationConfigApplicationContext直接读取类
@Test
public void run4(){ApplicationContext ac = new AnnotationConfigApplicationContext(SpringConfig.class);Order order = (Order) ac.getBean("or");System.out.println(order);
}
结果:Order{address=‘北京’}
这样就实现了纯注解方式spring管理类并注入默认值
使用@import可以在一个配置类中引入多个配置类,如
@Import(value = {SpringConfig2.class})
要使用多个配置类也可以再创建对象时引入两个类
ApplicationContext ac = new AnnotationConfigApplicationContext(SpringConfig.class,SpringConfig2.class);
@Bean用于将第三方包的注解交给spring去管理,一般放在方法前
Spring框架整合JUnit单元测试
每次进行单元测试的时候,都需要编写创建工厂,加载配置文件等代码,比较繁琐。Spring提供了整合Junit单元测试的技术,可以简化测试开发。
配置文件+注解的方法
导入spring-test的坐标依赖
<dependency><groupId>org.springframework</groupId><artifactId>spring-test</artifactId><version>5.0.2.RELEASE</version><scope>test</scope>
</dependency>
正常编写配置文件
在测试类中引入,进行测试
/*** Spring整合Junit单元测试 * */
@RunWith(SpringJUnit4ClassRunner.class) // 运行单元测试
@ContextConfigurat/*** Spring整合Junit单元测试 * */
@RunWith(SpringJUnit4ClassRunner.class) // 运行单元测试
@ContextConfiguration("classpath:applicationContext_demo1.xml")// 加载类路径下的配置文件
public class Demo5 { // 测试哪一个对象,把该对象注入进来,在测试环境下,可以使用注解的方式注入测试的对象 // 按类型自动注入 @Autowired private User user; @Test public void run1(){ // 创建工厂,加载配置文件...... // 调用对象的方法 user.sayHello(); }}ion("classpath:applicationContext_demo1.xml")// 加载类路径下的配置文件
public class Demo5 { // 测试哪一个对象,把该对象注入进来,在测试环境下,可以使用注解的方式注入测试的对象 // 按类型自动注入 @Autowired private User user; @Test public void run1(){ // 创建工厂,加载配置文件...... // 调用对象的方法 user.sayHello(); }}
纯注解的方法
编写配置类
/**
* Spring整合Junit配置类
*/
// 声明
@Configuration
// 扫描包结构
@ComponentScan(value = "com.qcbyjy.demo6")
public class SpringConfig6 {
}
编写测试方法
/*** Spring整合Junit 注解的方式测试 * */
@RunWith(SpringJUnit4ClassRunner.class)
// 加载配置类
@ContextConfiguration(classes = SpringConfig6.class)
public class Demo5 { // 测试哪一个对象,把该对象注入进来,在测试环境下,可以使用注解的方式注入测试的对象 // 按类型自动注入 @Autowired private Customer customer; @Test public void run1(){ customer.save(); }}
AOP
AOP的相关概念
AOP为Aspect Oriented Programming的缩写,意为:面向切面编程
AOP是一种编程范式
AOP的底层实现原理:
JDK的动态代理(必须有接口),生成代理对象相同的接口
1、为接口创建代理类的字节码文件
2、使用ClassLoader将字节码文件加载到JVM
3、创建代理类实例对象,执行对象的目标方法
AOP的相关术语
Joinpoint(连接点) 所谓连接点是指那些被拦截到的点。在spring中,这些点指的是方法,因为spring只支持方法类型的连接点
Pointcut(切入点) – 所谓切入点是指我们要对哪些Joinpoint进行拦截的定义
Advice(通知/增强)-- 所谓通知是指拦截到Joinpoint之后所要做的事情就是通知.通知分为前置通知,后置通知,异常通知,最终通知,环绕通知(切面要完成的功能)
Target(目标对象)-- 代理的目标对象
Weaving(织入)-- 是指把增强应用到目标对象来创建新的代理对象的过程
Proxy(代理)-- 一个类被AOP织入增强后,就产生一个结果代理类
Aspect(切面)-- 是切入点和通知的结合,以后咱们自己来编写和配置的
切入点表达式:
切入点表达式:execution(public void com.qcby.demo1.UserServiceImpl())
execution() 切入点表达式的规范写法 格式
public void com.qcby.demo1.UserServiceImpl.save() 要增强的方法
public 可写可不写
void 返回值
com.qcby.demo1.UserServiceImpl.save() 全包名赵目标对象以及目标对象的方法
切入点的表达式:
execution() 固定的写法
public 是可以省略不写的
方法的返回值 int String 通用的写法,可以编写 * 不能省略不写的
包名+类名 不能省略不写的,编写 * UserServiceImpl AccountServiceImpl
方法名称 save() 可以写 *
参数列表 (…) 表示任意类型和个数的参数
比较通用的表达式:execution(public * com.qcbyjy.*.ServiceImpl.(…))
切入点表达式格式:execution([修饰符] 返回值类型 包名.类名.方法名(参数))
修饰符可以省略不写,不是必须要出现的。
返回值类型是不能省略不写的,根据你的方法来编写返回值。可以使用 * 代替。
首先com是不能省略不写的,但是可以使用 * 代替,中间的包名可以使用 * 号代替
如果想省略中间的包名可以使用 …
类名也可以使用 * 号代替,也有类似的写法:*DaoImpl
方法也可以使用 * 号代替
参数如果是一个参数可以使用 * 号代替,如果想代表任意参数使用 …
AOP事务增强
业务的事务增强有三种方法:JDK动态代理,装设者模式,父子类继承
动态代理的模式在不动原代码的情况下,对目标对象的方法进行增强
JDK动态代理:
用AOP配置文件的方式进行事务增强:
导入依赖
<dependencies><dependency><groupId>org.springframework</groupId><artifactId>spring-context</artifactId><version>5.0.2.RELEASE</version></dependency><dependency><groupId>commons-logging</groupId><artifactId>commons-logging</artifactId><version>1.2</version></dependency><dependency><groupId>log4j</groupId><artifactId>log4j</artifactId><version>1.2.12</version></dependency><!--有单元测试的环境,Spring5版本,Junit4.12版本--><dependency><groupId>junit</groupId><artifactId>junit</artifactId><version>4.12</version><scope>test</scope></dependency><!--连接池--><dependency><groupId>com.alibaba</groupId><artifactId>druid</artifactId><version>1.1.10</version></dependency><!--mysql驱动包--><dependency><groupId>mysql</groupId><artifactId>mysql-connector-java</artifactId><version>5.1.6</version></dependency><!-- Spring整合Junit测试的jar包 --><dependency><groupId>org.springframework</groupId><artifactId>spring-test</artifactId><version>5.0.2.RELEASE</version><scope>test</scope></dependency><!-- AOP联盟 --><dependency><groupId>aopalliance</groupId><artifactId>aopalliance</artifactId><version>1.0</version></dependency><!-- Spring Aspects --><dependency><groupId>org.springframework</groupId><artifactId>spring-aspects</artifactId><version>5.0.2.RELEASE</version></dependency><!-- aspectj --><dependency><groupId>org.aspectj</groupId><artifactId>aspectjweaver</artifactId><version>1.8.3</version></dependency>
</dependencies>
创建包结构,编写具体的接口和实现类
public class UserServiceImpl implements UserService{public void save(){System.out.println("业务层:进行了保存用户");}
}
定义切面类
/*** 定义一个自己的切面类*/
public class MyXmlAspect {public void log(){System.out.println("增强的方法执行了");}
}
创建Spring的配置文件,引入具体的AOP的schema约束,编写配置
<?xml version="1.0" encoding="UTF-8"?>
<beans xmlns="http://www.springframework.org/schema/beans"xmlns:xsi="http://www.w3.org/2001/XMLSchema-instance"xmlns:context="http://www.springframework.org/schema/context"xmlns:aop="http://www.springframework.org/schema/aop"xsi:schemaLocation="http://www.springframework.org/schema/beanshttp://www.springframework.org/schema/beans/spring-beans.xsdhttp://www.springframework.org/schema/contexthttp://www.springframework.org/schema/context/spring-context.xsdhttp://www.springframework.org/schema/aophttp://www.springframework.org/schema/aop/spring-aop.xsd"><bean id="userService" class="com.qcby.demo1.UserServiceImpl"/><bean id="myXmlAspect" class="com.qcby.demo1.MyXmlAspect"/>在配置文件中完成aop的配置<!--配置aop增强--><!--aop的配置标签--><aop:config><aop:aspect ref="myXmlAspect"><aop:before method="log" pointcut="execution(public void com.qcby.demo1.UserServiceImpl.save())"/></aop:aspect></aop:config>
完成测试
@RunWith(SpringJUnit4ClassRunner.class)
@ContextConfiguration("classpath:applicationContext_demo1.xml")
public class DeomTest1 {@Autowiredprivate UserService userService;@Testpublic void run(){userService.save();}
}
AOP的通知类型:
- 前置通知 目标方法执行前,进行增强。
- 最终通知 目标方法执行成功或者失败,进行增强。
- 后置通知 目标方法执行成功后,进行增强。
- 异常通知 目标方法执行失败后,进行增强。
- 环绕通知 目标方法执行前后,都可以进行增强。目标对象的方法需要手动执行。
配置文件的方式来增强:
切面类:
public class MyXmlAspect {/*** 前置通知*/public void log(){System.out.println("前置通知的方法执行了");}/*** 后置通知*/public void afterReturn(){System.out.println("后置通知方法执行了");}/*** 最终通知*/public void after(){System.out.println("最终通知方法执行了");}/*** 异常通知*/public void afterThrowing(){System.out.println("异常通知方法执行了");}/*** 环绕通知方法*/public void  aroundLog(ProceedingJoinPoint point){try {System.out.println("前置通知方法执行了");//执行业务逻辑//执行目标对象的业务逻辑  jdk动态代理中的 method.invoke执行目标方法//让目标对象的方法进行执行point.proceed();System.out.println("后置通知方法执行了");}catch (Throwable throwable ){throwable.printStackTrace();//出现异常执行的System.out.println("异常通知方法执行了");}finally {//无论如何都是执行的System.out.println("最终通知方法执行了");}}
}
单个增强
<!--前置通知-->
<aop:before method="log" pointcut="execution(public void com.qcby.demo1.UserServiceImpl.save())"/>
<!--后置-->
<aop:after-returning method="afterReturn" pointcut="execution(public void com.qcby.demo1.UserServiceImpl.save())"/>
<!--最终-->
<aop:after method="after" pointcut="execution(public void com.qcby.demo1.UserServiceImpl.save())"/>
<!--异常-->
<aop:after-throwing method="afterThrowing" pointcut="execution(public void com.qcby.demo1.UserServiceImpl.save())"/>
<!--环绕-->
<aop:around method="aroundLog" pointcut="execution(public void com.qcby.demo1.UserServiceImpl.save())"/>
AOP注解方式
半注解的方式:
实体类和接口
public interface OrderService {public void save();
}
---------------------------------
@Service
public class OrderServiceImpl implements OrderService{public void save(){System.out.println("被曾强");}
}
编写切面类
给切面类添加注解 @Aspect,编写增强的方法,使用通知类型注解声明
**** 注解实现切面类*/
@Component// 把该类交给spring的IOC去管理
@Aspect  // 声明是切面类  == <aop:aspect ref="myXmlAspect">
public class MyAnnoAspect {/*** @Before(value = "切入点的表达式")前置* 各个通知方法都有自己相对应的注解方法*  @After() 最终*  @AfterReturning 后置*  @AfterThrowing  异常*  @Around()环绕*/@Before(value = "execution(public void com.qcby.demo2.OrderServiceImpl.save())")public void log(){System.out.println("前置通知");}@AfterReturning(value = "execution(public void com.qcby.demo2.OrderServiceImpl.save())")public void afterReturn(){System.out.println("后置通知");}
}
@Before(value = “切入点的表达式”)前置
各个通知方法都有自己相对应的注解方法
@After() 最终
@AfterReturning 后置
@AfterThrowing 异常
@Around()环绕
配置文件中开启代理
<?xml version="1.0" encoding="UTF-8"?>
<beans xmlns="http://www.springframework.org/schema/beans"xmlns:xsi="http://www.w3.org/2001/XMLSchema-instance"xmlns:context="http://www.springframework.org/schema/context"xmlns:aop="http://www.springframework.org/schema/aop"xsi:schemaLocation="http://www.springframework.org/schema/beanshttp://www.springframework.org/schema/beans/spring-beans.xsdhttp://www.springframework.org/schema/contexthttp://www.springframework.org/schema/context/spring-context.xsdhttp://www.springframework.org/schema/aophttp://www.springframework.org/schema/aop/spring-aop.xsd"><aop:aspectj-autoproxy/>配置文件中开启代理<context:component-scan base-package="com.qcby"/>
</beans>
测试:
@RunWith(SpringJUnit4ClassRunner.class)
@ContextConfiguration("classpath:applicationContext_demo2.xml")
public class DemoTest2 {@Autowiredprivate OrderService orderService;@Testpublic void run(){orderService.save();}
}
纯注解方式:
编写配置类
@Configuration //声明为配置类
@ComponentScan("com.qcby.demo2")
@EnableAspectJAutoProxy  // 开启自动代理 == <aop:aspectj-autoproxy />
public class SpringConfig {
}
无需编写配置文件
测试:
@RunWith(SpringJUnit4ClassRunner.class)
@ContextConfiguration(classes = SpringConfig.class)
public class DemoTest2 {@Autowiredprivate OrderService orderService;@Testpublic void run(){orderService.save();}
}
Spring框架的JDBC模板技术
Spring框架管理开源的连接池
引入依赖
<!--连接池-->
<dependency><groupId>com.alibaba</groupId><artifactId>druid</artifactId><version>1.1.10</version>
</dependency>
创建jdbc.properties文件,将数据库连接的信息配置到属性文件中
jdbc.driverClassName=com.mysql.jdbc.Driver
jdbc.url=jdbc:mysql:///spring_db
jdbc.username=root
jdbc.password=root
##或者
driverClass=com.mysql.jdbc.Driver
url=jdbc:mysql:///ssm
#如果使用uername 会导致读取时和电脑系统变量命名冲突
uname=root
pword=root
完成核心配置文件
<?xml version="1.0" encoding="UTF-8"?>
<beans xmlns="http://www.springframework.org/schema/beans"xmlns:xsi="http://www.w3.org/2001/XMLSchema-instance"xmlns:context="http://www.springframework.org/schema/context"xmlns:aop="http://www.springframework.org/schema/aop"xsi:schemaLocation="http://www.springframework.org/schema/beanshttp://www.springframework.org/schema/beans/spring-beans.xsdhttp://www.springframework.org/schema/contexthttp://www.springframework.org/schema/context/spring-context.xsdhttp://www.springframework.org/schema/aophttp://www.springframework.org/schema/aop/spring-aop.xsd"><!--加载属性的文件--><bean id="dataSource" class="com.alibaba.druid.pool.DruidDataSource"><property name="driverClassName" value="${driverClass}" /><property name="url" value="${url}" /><property name="username" value="${uname}" /><property name="password" value="${pword}" /></bean><!--加载属性文件--><bean id="placeholderConfigurer" class="org.springframework.beans.factory.config.PropertyPlaceholderConfigurer"><property name="location" value="classpath:jdbc.properties" /></bean><!--第二种加载jdbc.properties方式:使用提供标签的方式--><context:property-placeholder location="classpath:jdbc.properties" /><!--配置jdbc模板--><bean id="jdbcTemplate" class="org.springframework.jdbc.core.JdbcTemplate"><property name="dataSource" ref="dataSource"></property></bean>
</beans>
用配置好的Spring框架的JDBC模板进行简单操作
测试:
@RunWith(SpringJUnit4ClassRunner.class)
@ContextConfiguration(value = "classpath:applicationContext_demo3.xml")
public class Demo1 {@Autowiredprivate JdbcTemplate jdbcTemplate;/*** 使用new对象方式完成*/@Testpublic void run(){jdbcTemplate.update("insert into account values (null,?,?)","熊大",1000);}@Testpublic void run1(){// 完成数据的增删改查jdbcTemplate.update("delete from account where id = ?",10);}@Testpublic void run2(){// 完成数据的增删改查jdbcTemplate.update("update account set name = ?,money = ? where id = ?","光头强",100,7);}@Testpublic void run3(){Account account = jdbcTemplate.queryForObject("select * from account where id = ?", new BeanMapper(), 6);System.out.println(account);}@Testpublic void run4(){List<Account> list = jdbcTemplate.query("select * from account", new BeanMapper());for (Account account : list) {System.out.println(account);}}}
Spring框架的事务管理
spring实现事务管理可以使用PlatformTransactionManager接口
接口方法如下:
void commit(TransactionStatus status)
void rollback(TransactionStatus status)
如果使用的Spring的JDBC模板或者MyBatis框架,需要选择DataSourceTransactionManager实现类
如果使用的是Hibernate的框架,需要选择HibernateTransactionManager实现类
TransactionDefinition接口,事务定义信息接口
定义了事务隔离级别
事务的隔离级别(设置数据库的隔离级别,根据级别的不同,解决上述的读的问题)
- Read uncommitted ‐‐ 什么都解决不了
- Read committed ‐‐ 避免脏读,但是不可重复读和虚读有可能产生
- Repeatable read ‐‐ 避免脏读和不可重复读,虚度有可能产生的
- Serializable ‐‐ 避免各种读
定义了事务传播行为