删除前面配置的目的地规则
[root@k8s-master ~]# kubectl delete destinationrule details
destinationrule.networking.istio.io "details" deleted
[root@k8s-master ~]# kubectl delete destinationrule productpage
destinationrule.networking.istio.io "productpage" deleted
[root@k8s-master ~]# kubectl delete destinationrule ratings
destinationrule.networking.istio.io "ratings" deleted
[root@k8s-master ~]# kubectl delete destinationrule reviews
destinationrule.networking.istio.io "reviews" deleted
删除前面配置的VirtualService
[root@k8s-master rules]# kubectl get VirtualService
NAME       GATEWAYS             HOSTS   AGE
bookinfo   [bookinfo-gateway]   [*]     60m
[root@k8s-master rules]# kubectl delete VirtualService bookinfo
virtualservice.networking.istio.io "bookinfo" deleted
删除前面配置的gateway
[root@k8s-master rules]# kubectl delete gateway bookinfo-gateway
gateway.networking.istio.io "bookinfo-gateway" deleted
或者执行清理脚本
[root@k8s-master ~]#  . /usr/local/istio-1.10.4/samples/bookinfo/platform/kube/cleanup.sh
namespace ? [default]
using NAMESPACE=default
destinationrule.networking.istio.io "details" deleted
destinationrule.networking.istio.io "httpbin" deleted
destinationrule.networking.istio.io "productpage" deleted
destinationrule.networking.istio.io "ratings" deleted
destinationrule.networking.istio.io "reviews" deleted
virtualservice.networking.istio.io "bookinfo" deleted
virtualservice.networking.istio.io "details" deleted
virtualservice.networking.istio.io "productpage" deleted
virtualservice.networking.istio.io "ratings" deleted
virtualservice.networking.istio.io "reviews" deleted
gateway.networking.istio.io "bookinfo-gateway" deleted
Application cleanup may take up to one minute
service "details" deleted
serviceaccount "bookinfo-details" deleted
deployment.apps "details-v1" deleted
service "ratings" deleted
serviceaccount "bookinfo-ratings" deleted
deployment.apps "ratings-v1" deleted
service "reviews" deleted
serviceaccount "bookinfo-reviews" deleted
deployment.apps "reviews-v1" deleted
deployment.apps "reviews-v2" deleted
deployment.apps "reviews-v3" deleted
service "productpage" deleted
serviceaccount "bookinfo-productpage" deleted
deployment.apps "productpage-v1" deleted
Application cleanup successful
进入 Istio 安装目录。
Istio 默认自动注入 Sidecar. 请为 default 命名空间打上标签 istio-injection=enabled:
$ kubectl label namespace default istio-injection=enabled
使用 kubectl 部署应用:
$ kubectl apply -f samples/bookinfo/platform/kube/bookinfo.yaml
参考文档,除Sidecar 手动注入部分,其余一样。
流量路由管理
在 Istio 中,流量路由管理是通过 DestinationRule 和 VirtualService 这两个资源来实现的。DestinationRule 用于定义服务的目标规则,例如负载均衡策略、连接池设置等。而 VirtualService 则用于定义服务的路由规则,包括如何将流量路由到不同的版本或实例。
- 创建Istio Ingress Gateway,并与应用程序关联
2bookinfo-gateway.yaml
apiVersion: networking.istio.io/v1alpha3
kind: Gateway
metadata:name: bookinfo-gateway
spec:selector:istio: ingressgateway # use istio default controllerservers:- port:number: 80name: httpprotocol: HTTPhosts:- "*"
---
apiVersion: networking.istio.io/v1alpha3
kind: VirtualService
metadata:name: bookinfo
spec:hosts:- "*"gateways:- bookinfo-gatewayhttp:- match:- uri:exact: /productpage- uri:prefix: /static- uri:exact: /login- uri:exact: /logout- uri:prefix: /api/v1/productsroute:- destination:host: productpageport:number: 9080
创建Istio Ingress Gateway,并与应用程序关联
[root@k8s-master rules]# kubectl apply -f 2bookinfo-gateway.yaml
gateway.networking.istio.io/bookinfo-gateway created
virtualservice.networking.istio.io/bookinfo unchanged
- 为所有服务创建DestinationRule(目的地规则)
为bookinfo所有的服务创建DestinationRule,该CRD定义了服务所有的版本子集。
3destination-rule-all.yaml
apiVersion: networking.istio.io/v1alpha3
kind: DestinationRule
metadata:name: productpage
spec:host: productpagesubsets:- name: v1labels:version: v1
---
apiVersion: networking.istio.io/v1alpha3
kind: DestinationRule
metadata:name: reviews
spec:host: reviewssubsets:- name: v1labels:version: v1- name: v2labels:version: v2- name: v3labels:version: v3
---
apiVersion: networking.istio.io/v1alpha3
kind: DestinationRule
metadata:name: ratings
spec:host: ratingssubsets:- name: v1labels:version: v1- name: v2labels:version: v2- name: v2-mysqllabels:version: v2-mysql- name: v2-mysql-vmlabels:version: v2-mysql-vm
---
apiVersion: networking.istio.io/v1alpha3
kind: DestinationRule
metadata:name: details
spec:host: detailssubsets:- name: v1labels:version: v1- name: v2labels:version: v2
---
创建目标规则
[root@k8s-master rules]# kubectl apply -f 3destination-rule-all.yaml
destinationrule.networking.istio.io/productpage created
destinationrule.networking.istio.io/reviews created
destinationrule.networking.istio.io/ratings created
destinationrule.networking.istio.io/details created
- 创建VirtualService
通过创建VirtualService并设置路由规则可以配置流量的流向。
这里配置一个将所有流量路由到所有服务的v1 版本。
4virtual-service-all-v1.yaml
apiVersion: networking.istio.io/v1alpha3
kind: VirtualService
metadata:name: productpage
spec:hosts:- productpagehttp:- route:- destination:host: productpagesubset: v1
---
apiVersion: networking.istio.io/v1alpha3
kind: VirtualService
metadata:name: reviews
spec:hosts:- reviewshttp:- route:- destination:host: reviewssubset: v1
---
apiVersion: networking.istio.io/v1alpha3
kind: VirtualService
metadata:name: ratings
spec:hosts:- ratingshttp:- route:- destination:host: ratingssubset: v1
---
apiVersion: networking.istio.io/v1alpha3
kind: VirtualService
metadata:name: details
spec:hosts:- detailshttp:- route:- destination:host: detailssubset: v1
---
应用服务
[root@k8s-master rules]# kubectl apply -f 4virtual-service-all-v1.yaml
virtualservice.networking.istio.io/productpage created
virtualservice.networking.istio.io/reviews created
virtualservice.networking.istio.io/ratings created
virtualservice.networking.istio.io/details created
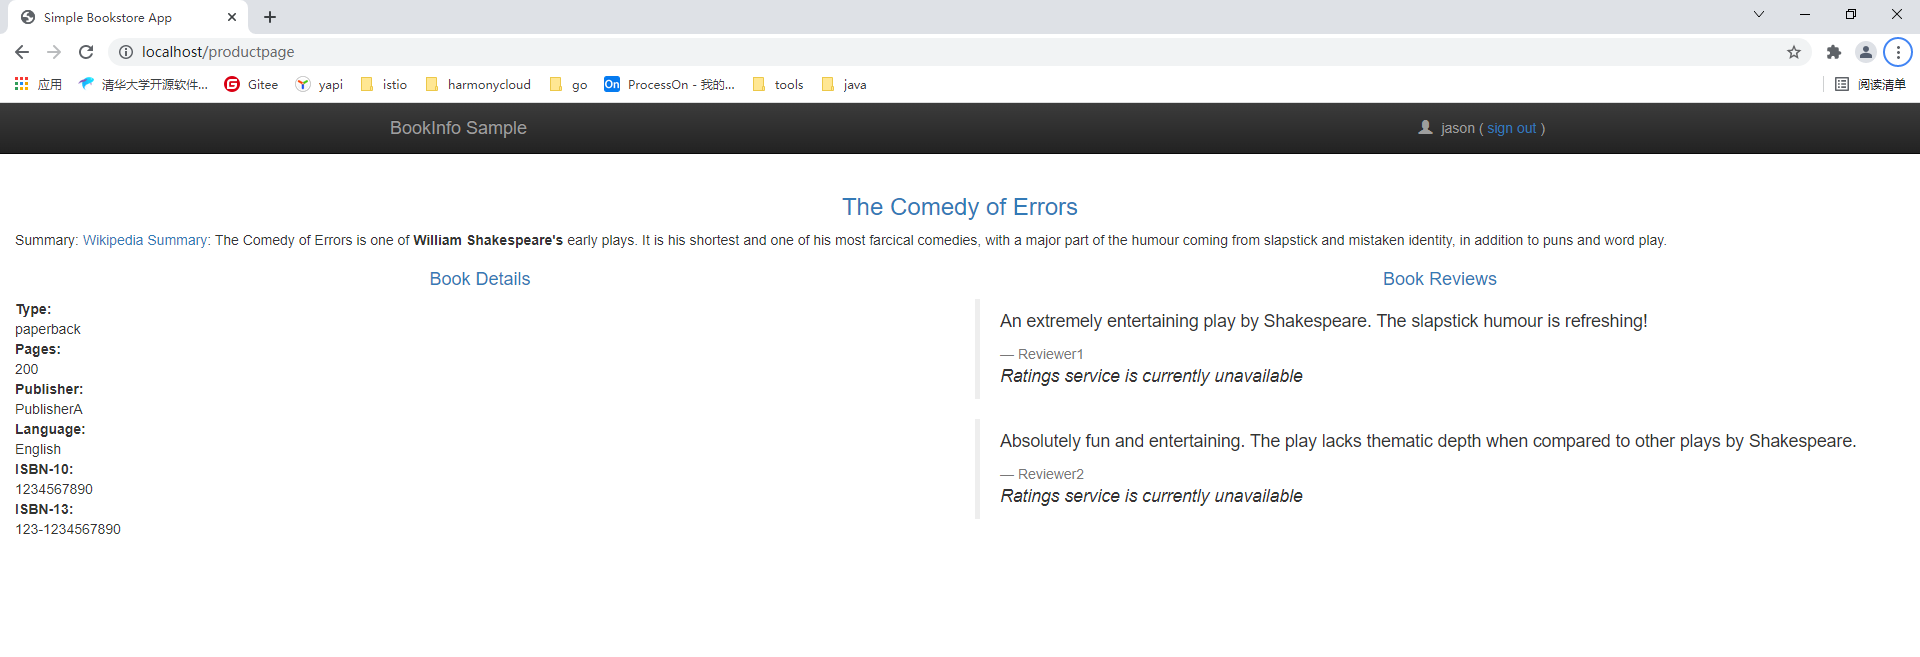
访问http://192.168.200.129:31743/productpage

此时无论如何刷新页面,只可以看见没有星星图案版本的Reviews服务,也就是v1版本的Reviews服务。
基于流量比例的路由
通过Istio我们可以设定流向每个版本流量的比例。在下面的规则中reviews配置了80%v1,20%v2。
5virtual-service-reviews-80-20.yaml
apiVersion: networking.istio.io/v1alpha3
kind: VirtualService
metadata:name: reviews
spec:hosts:- reviewshttp:- route:- destination:host: reviewssubset: v1weight: 80- destination:host: reviewssubset: v2weight: 20
应用服务
[root@k8s-master rules]# kubectl apply -f 5virtual-service-reviews-80-20.yaml
virtualservice.networking.istio.io/reviews configured
配置了20%流量流向v2版本,80%的流量流向v1版本。
刷新页面可以看见黑色星标服务与没有星标的服务交替出现,并且出现的比例大致在1:4左右。
我们可以修改权重,配置可以实时生效,达到灰度发布的目的。
基于身份的路由配置
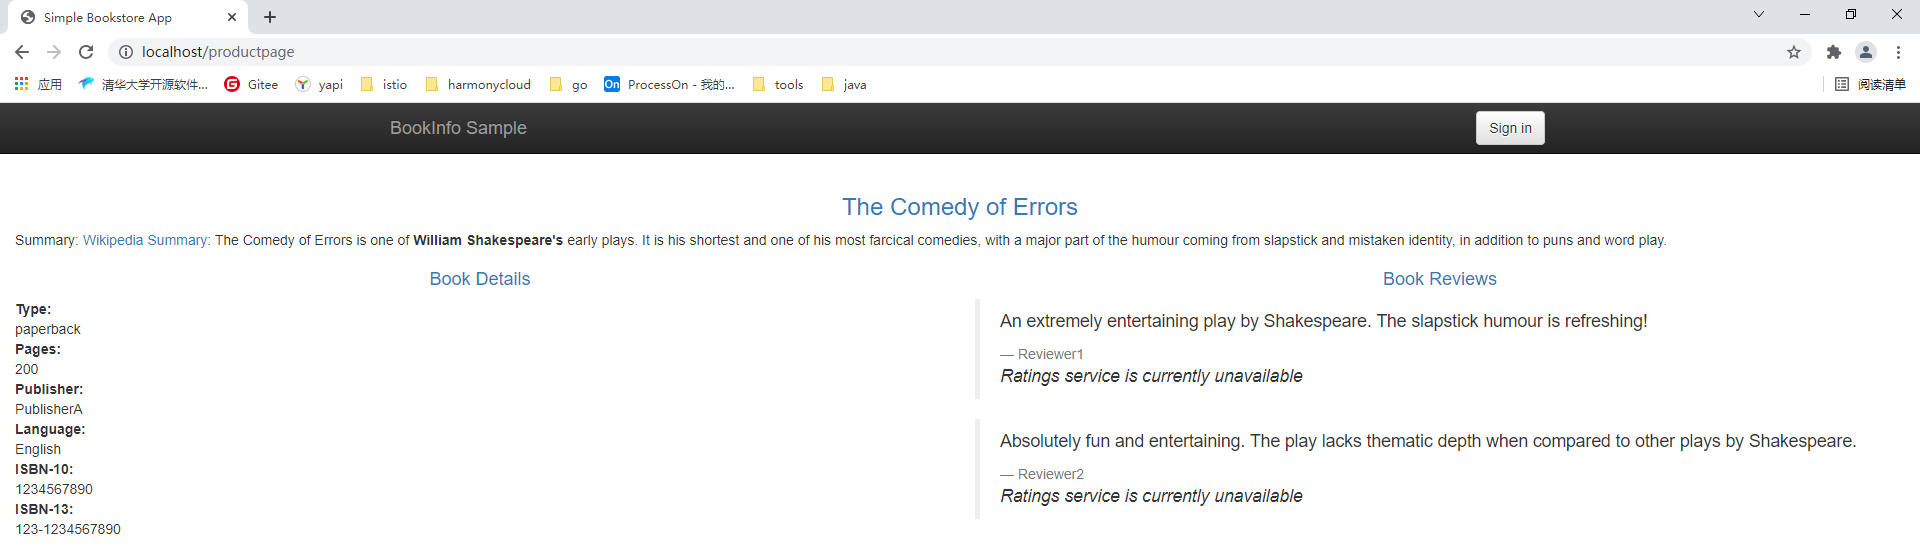
接下来,将更改路由配置,以将来自特定用户的所有流量路由到特定服务版本。在这种情况下,来自名为 Jason 的用户的所有流量都将路由到该服务reviews:v2。
此示例是由于该productpage服务会为所有出站 HTTP 请求添加自定义标头。
6virtual-service-reviews-test-v2.yaml
apiVersion: networking.istio.io/v1alpha3
kind: VirtualService
metadata:name: reviews
spec:hosts:- reviewshttp:- match:- headers:end-user:exact: jasonroute:- destination:host: reviewssubset: v2- route:- destination:host: reviewssubset: v1
应用服务
[root@k8s-master rules]# kubectl apply -f 6virtual-service-reviews-test-v2.yaml
virtualservice.networking.istio.io/reviews configured
当我们未登录时将无法看见带有星星标记的服务

当我们以jason用户登录时,将会看见带有星星标记的服务
故障注入
故障注入是一种测试技术,用于模拟系统中的故障情况,以验证系统在异常情况下的行为。在 Istio 中,可以使用 Fault Injection 来模拟各种不同类型的故障,例如延迟、错误码、中断等。这有助于评估系统在异常情况下的可靠性和容错性。
延时注入
上文reviews:v2中已经对用户jason进行了基于身份的路由配置
这里在用户 jason 下的reviews:v2和ratings微服务的服务调用之间注入 7 秒延迟。此测试将发现一个有意引入 Bookinfo 应用程序的错误。
请注意,该reviews:v2服务有一个 10 秒的硬编码连接超时。
7virtual-service-ratings-test-delay.yaml
apiVersion: networking.istio.io/v1alpha3
kind: VirtualService
metadata:name: ratings
spec:hosts:- ratingshttp:- match:- headers:end-user:exact: jasonfault:delay:percentage:value: 100.0fixedDelay: 7sroute:- destination:host: ratingssubset: v1- route:- destination:host: ratingssubset: v1[root@k8s-master rules]# kubectl apply -f 7virtual-service-ratings-test-delay.yaml
virtualservice.networking.istio.io/ratings configured当我们以未登录的状态访问bookinfo应用时,我们不会看见星星标记的服务。
当我们用jason登录时,页面会有一个7秒左右的延迟,并且最后由于超时的原因页面会有错误提示。
Http故障注入
也可以为服务注入一个Http的故障,如500等。
8virtual-service-ratings-test-abort.yaml
apiVersion: networking.istio.io/v1alpha3
kind: VirtualService
metadata:name: ratings
spec:hosts:- ratingshttp:- match:- headers:end-user:exact: jasonfault:abort:percentage:value: 100.0httpStatus: 500route:- destination:host: ratingssubset: v1- route:- destination:host: ratingssubset: v1[root@k8s-master rules]# kubectl apply -f 8virtual-service-ratings-test-abort.yaml
virtualservice.networking.istio.io/ratings configured当我们以未登录的状态访问bookinfo应用时,服务可以正常访问。
当我们用jason登录时,用户登录时会发现ratings服务不可用。
设置超时时间
我们将前一步的延时缩短一点,缩短为2s,让服务不会因为延时而超时,当我们登录时会有2s左右的延时,但是页面可以正常访问,reviews服务正常提供服务。
我们可以通过配置VirtualService设定服务的超时时间。
9virtual-service-rewiews-test-v2-timeout.yaml
apiVersion: networking.istio.io/v1alpha3
kind: VirtualService
metadata:name: reviews
spec:hosts:- reviewshttp:- route:- destination:host: reviewssubset: v2timeout: 0.5s[root@k8s-master rules]# kubectl apply -f 9virtual-service-rewiews-test-v2-timeout.yaml
virtualservice.networking.istio.io/reviews configured我们设置服务超时的时间为0.5s。
当我们再已jason用户登录时,2s的延迟后服务将会超时报错。
配置熔断
开启自动注入:kubectl label namespace default istio-injection=enabled
1.启动httpbin实例
httpbin.yaml在/usr/local/istio-1.10.4/samples/httpbin下。
[root@k8s-master httpbin]# kubectl apply -f /usr/local/istio-1.10.4/samples/httpbin/httpbin.yaml
serviceaccount/httpbin created
service/httpbin created
deployment.apps/httpbin created
2.配置熔断器
10dr-httpbin.yaml
apiVersion: networking.istio.io/v1alpha3
kind: DestinationRule
metadata:name: httpbin
spec:host: httpbintrafficPolicy:connectionPool:tcp:maxConnections: 1http:http1MaxPendingRequests: 1maxRequestsPerConnection: 1outlierDetection:consecutive5xxErrors: 1interval: 1sbaseEjectionTime: 3mmaxEjectionPercent: 100[root@k8s-master rules]# kubectl apply -f 10dr-httpbin.yaml
destinationrule.networking.istio.io/httpbin created配置文件设置了httpbin服务的tcp流量的最大连接数和http流量的最大请求数为1。
4.启动客户端,连接httpbin服务
root@k8s-master sample-client]# kubectl apply -f /usr/local/istio-1.10.4/samples/httpbin/sample-client/fortio-deploy.yaml
service/fortio created
deployment.apps/fortio-deploy created
foritio作为客户端对httpbin服务发起请求。
查询foritio 服务pod的名称,进入foritio服务容器,对httpbin服务发起请求。
[root@k8s-master sample-client]# kubectl get po
NAME                                   READY   STATUS    RESTARTS   AGE
busybox-7c84546778-9jzpx               1/1     Running   28         68d
busybox-7c84546778-rs5d9               1/1     Running   29         68d
details-v1-6486db986c-8w4m9            2/2     Running   2          5d2h
fortio-deploy-6dc9b4d7d9-m2hpl         1/1     Running   0          36s
httpbin-66cdbdb6c5-c4fqq               1/1     Running   0          4m33s
kindly-robin-mychart-fb68878c8-dlzw8   1/1     Running   1          5d3h
productpage-v1-76ddd6867b-l2sll        2/2     Running   2          5d2h
ratings-v1-54bf9bb699-7sssb            2/2     Running   2          5d2h
reviews-v1-76d5495769-xs4gx            2/2     Running   2          5d2h
reviews-v2-5ff5f7dd8b-jw6wm            2/2     Running   2          5d2h
reviews-v3-7f8467c6ff-wnt6d            2/2     Running   2          5d2h
[root@k8s-master sample-client]# kubectl exec fortio-deploy-6dc9b4d7d9-m2hpl -c fortio -- /usr/bin/fortio curl -quiet http://httpbin:8000/get
HTTP/1.1 200 OK
Server: gunicorn/19.9.0
Date: Tue, 26 Mar 2024 10:09:38 GMT
Connection: keep-alive
Content-Type: application/json
Content-Length: 177
Access-Control-Allow-Origin: *
Access-Control-Allow-Credentials: true{"args": {},"headers": {"Host": "httpbin:8000","User-Agent": "fortio.org/fortio-1.17.1"},"origin": "10.244.2.69","url": "http://httpbin:8000/get"
}
可以看见服务请求成功,那么我们就可以开始提高并发数,测试熔断。
使用两个并发连接 ( -c 2)调用服务并发送 20 个请求 ( -n 20):
$ kubectl exec fortio-deploy-6dc9b4d7d9-m2hpl -c fortio -- /usr/bin/fortio load -c 2 -qps 0 -n 20 -loglevel Warning http://httpbin:8000/get
02:35:44 I logger.go:127> Log level is now 3 Warning (was 2 Info)
Fortio 1.17.1 running at 0 queries per second, 8->8 procs, for 20 calls: http://httpbin:8000/get
Starting at max qps with 2 thread(s) [gomax 8] for exactly 20 calls (10 per thread + 0)
Ended after 45.6804ms : 20 calls. qps=437.82
Aggregated Function Time : count 20 avg 0.00447278 +/- 0.002527 min 0.0030049 max 0.0126282 sum 0.0894556
# range, mid point, percentile, count
>= 0.0030049 <= 0.004 , 0.00350245 , 70.00, 14
> 0.004 <= 0.005 , 0.0045 , 90.00, 4
> 0.011 <= 0.012 , 0.0115 , 95.00, 1
> 0.012 <= 0.0126282 , 0.0123141 , 100.00, 1
# target 50% 0.00369382
# target 75% 0.00425
# target 90% 0.005
# target 99% 0.0125026
# target 99.9% 0.0126156
Sockets used: 2 (for perfect keepalive, would be 2)
Jitter: false
Code 200 : 20 (100.0 %)
Response Header Sizes : count 20 avg 230 +/- 0 min 230 max 230 sum 4600
Response Body/Total Sizes : count 20 avg 854 +/- 0 min 854 max 854 sum 17080
All done 20 calls (plus 0 warmup) 4.473 ms avg, 437.8 qps
可以看到有20%的服务被熔断了。
Istio中的安全策略
Istio中可以直接配置服务间访问时的安全策略,并实时生效
1.Http流量的授权策略
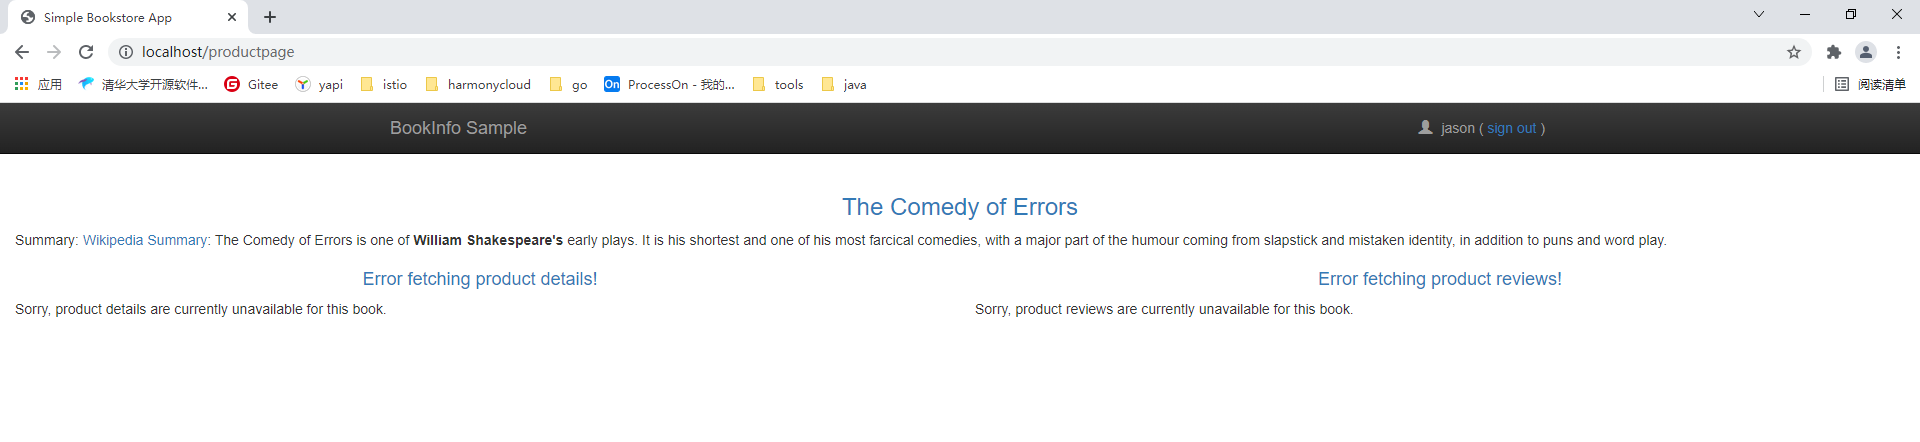
为Http服务设置授权策略可以设定该服务接受哪些服务的调用,这里我们演示的思路是设定一个全局的访问拒绝策略,通过修改配置,一步一步开放每个服务,使其出现在浏览器上。
创建一个全局的访问拒绝策略。
11authorizationPolicy.yaml
apiVersion: security.istio.io/v1beta1
kind: AuthorizationPolicy
metadata:name: allow-nothingnamespace: default
spec:{}[root@k8s-master rules]# kubectl apply -f 11authorizationPolicy.yaml
authorizationpolicy.security.istio.io/allow-nothing created
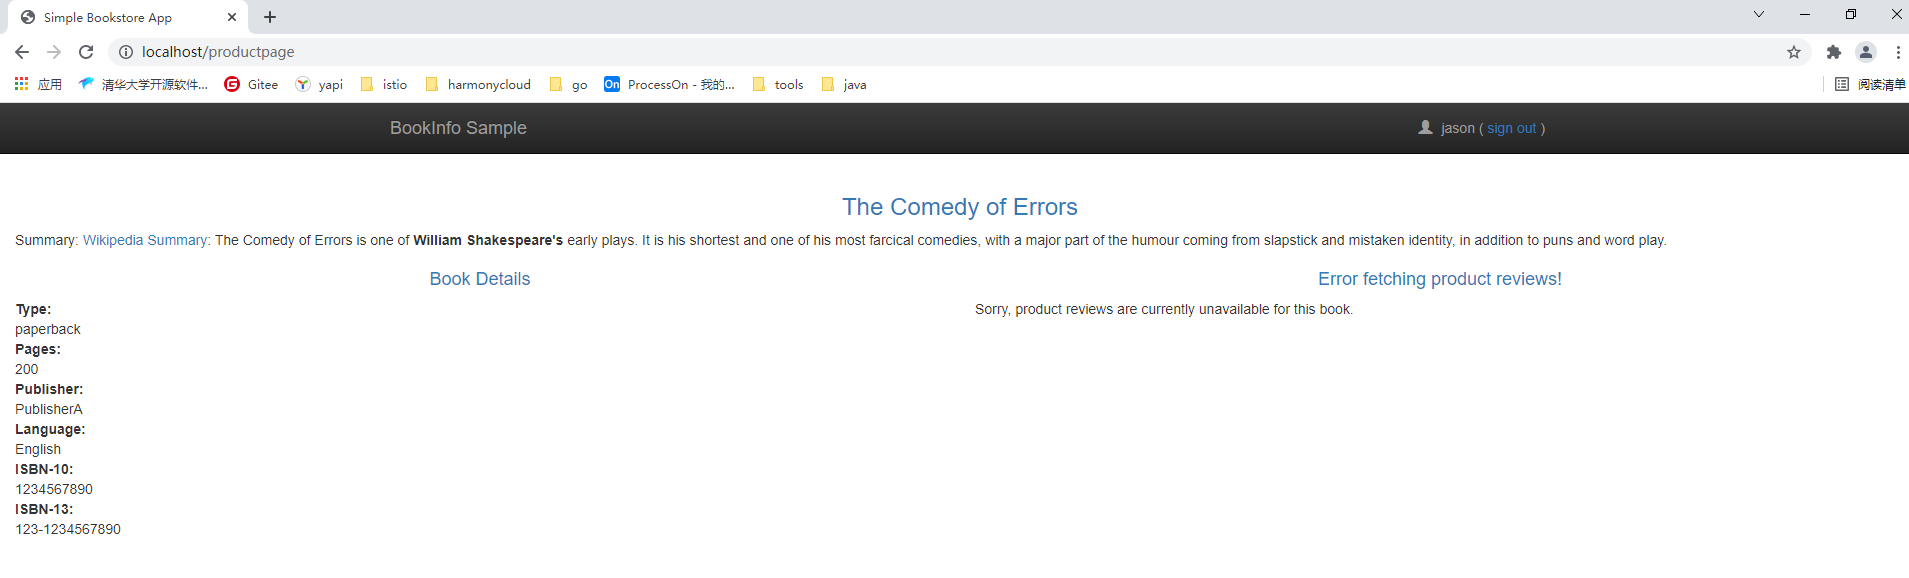
该策略将会拒绝所有对default命名空间下工作负载的访问,我们访问页面,会发现访问被拒绝了。

2 开放ProductPage服务
apiVersion: security.istio.io/v1beta1
kind: AuthorizationPolicy
metadata:name: "productpage-viewer"namespace: default
spec:selector:matchLabels:app: productpageaction: ALLOWrules:- to:- operation:methods: ["GET"]
运行该配置文件,会为productpage服务设置授权策略,该策略为设置from字段,则运行所有用户对productpage工作负载进行访问,并且只开放了GET方法的访问。
等待几秒钟,Istiod将规则下发,刷新页面我们会看到productpage页面可以正常访问,但是details服务和reviews服务任然无法正常访问。
3.开放Details服务
apiVersion: security.istio.io/v1beta1
kind: AuthorizationPolicy
metadata:name: "details-viewer"namespace: default
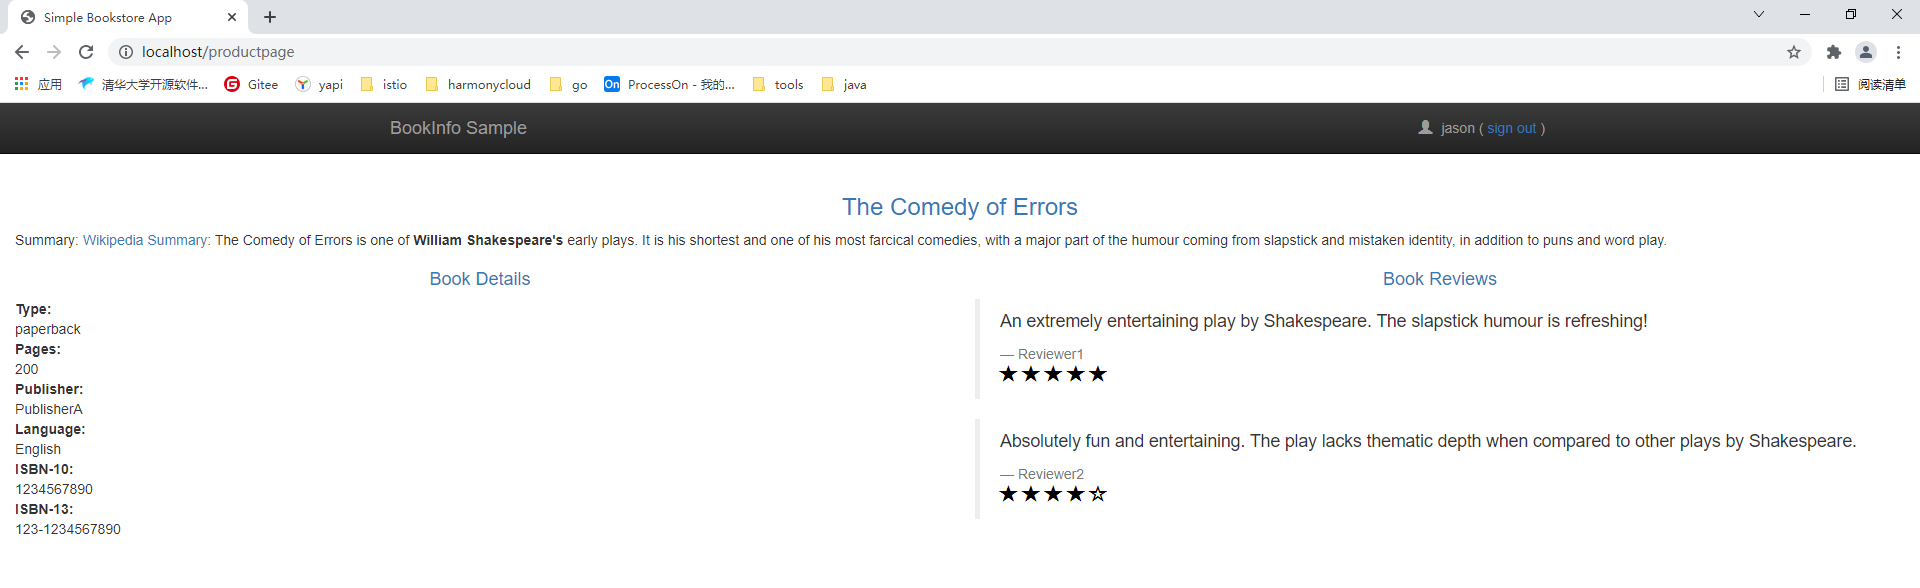
spec:selector:matchLabels:app: detailsaction: ALLOWrules:- from:- source:principals: ["cluster.local/ns/default/sa/bookinfo-productpage"]to:- operation:methods: ["GET"]同样配置授权策略为Details服务开放访问,此时配置了from字段,并且绑定了productpage服务的serviceAccount,说明Details服务只接受来自与bookinfo-productpage这个serviceAccount绑定的工作负载的Get请求访问。
运行该配置,等待几秒钟后刷新页面将会看到Details服务可以正常显示了,而reviews服务任然处于拒绝访问状态。

5.开放Reviews服务
apiVersion: security.istio.io/v1beta1
kind: AuthorizationPolicy
metadata:name: "reviews-viewer"namespace: default
spec:selector:matchLabels:app: reviewsaction: ALLOWrules:- from:- source:principals: ["cluster.local/ns/default/sa/bookinfo-productpage"]to:- operation:methods: ["GET"]
同样我们可以看到reviews服务可以正常访问
6.开放ratings服务
apiVersion: security.istio.io/v1beta1
kind: AuthorizationPolicy
metadata:name: "ratings-viewer"namespace: default
spec:selector:matchLabels:app: ratingsaction: ALLOWrules:- from:- source:principals: ["cluster.local/ns/default/sa/bookinfo-reviews"]to:- operation:methods: ["GET"]
可以看到ratings服务已经恢复正常。
文章参考
清除所有策略
kubectl delete authorizationpolicy.security.istio.io/allow-nothing
kubectl delete authorizationpolicy.security.istio.io/productpage-viewer
kubectl delete authorizationpolicy.security.istio.io/details-viewer
kubectl delete authorizationpolicy.security.istio.io/reviews-viewer
kubectl delete authorizationpolicy.security.istio.io/ratings-viewer