基于qemu9.0.0
简介
QEMU是一个开源的虚拟化软件,它能够模拟各种硬件设备,支持多种虚拟化技术,如TCG、Xen、KVM等
TCG 是 QEMU 中的一个组件,它可以将高级语言编写的代码(例如 C 代码)转换为可在虚拟机中执行的低级代码(例如 x86 机器指令)。TCG 生成的代码通常比直接使用 CPU 指令更简单、更小,但执行速度可能稍慢。同时,TCG不仅可以将高级语言代码转换为低级代码,还可以执行其他优化,例如常量折叠和死代码消除。
Xen 是一种开源虚拟化技术,它直接嵌入到 Linux 内核中。这意味着 Xen 可以直接访问硬件资源,从而提供高性能的虚拟化。然而,Xen 的配置和管理可能比较复杂。Xen 支持准虚拟化,这允许客户机操作系统直接访问某些硬件资源,从而提高性能。
KVM 是 QEMU 中最常使用的一种虚拟化技术,它利用 Linux 内核提供的虚拟化功能。KVM 的优势在于其因为它提供了良好的性能和广泛的操作系统支持。但是要注意一点的是:KVM 依赖于 Linux 内核提供的虚拟化功能,因此它仅适用于 Linux 主机操作系统在 QEMU 中,KVM 的初始化过程主要包括以下步骤:
**加载虚拟机监控器模块:**首先,需要加载 KVM 模块,以便在内核中启用虚拟化功能。这一步通常在系统启动时完成。
**创建虚拟机:**接下来,使用 QEMU 命令或 API 创建一个新的虚拟机实例。在创建过程中,需要指定虚拟机的配置参数,例如内存大小、CPU 数量等。
**分配资源:**在虚拟机创建后,需要为其分配所需的资源,包括 CPU、内存和设备。这些资源由物理硬件提供,并通过虚拟化技术映射到虚拟机上。
**启动虚拟机:**一旦资源分配完成,就可以启动虚拟机了。这时,KVM 将接管虚拟机的执行,并将其与物理硬件隔离。
**执行客户机操作系统:**客户机操作系统现在可以在虚拟机中执行,就好像它直接运行在物理硬件上一样。
相关功能的源码在
target/$(arch)/kvm.c(tcg/)

QEMU 可以模拟几百个设备:

QEMU 所有支持的机器类型QEMU 可以模拟的设备QEMU 在设备模拟上采取了前端和后端分离的设计模式:
前端:
QEMU 虚拟机管理器:负责管理虚拟机实例和提供用户界面。
ARM 虚拟化扩展 (VE):在 ARM 处理器上提供虚拟化支持。
后端:
ARM CPU 模型:模拟 ARM 处理器,包括指令集、寄存器和内存管理单元 (MMU)。
ARM 虚拟 I/O 设备模型:模拟 ARM 架构中的通用虚拟 I/O 设备,例如:virtio-blk:模 拟虚拟块设备
virtio-net:模拟虚拟网络接口
virtio-serial:模拟虚拟串行端口
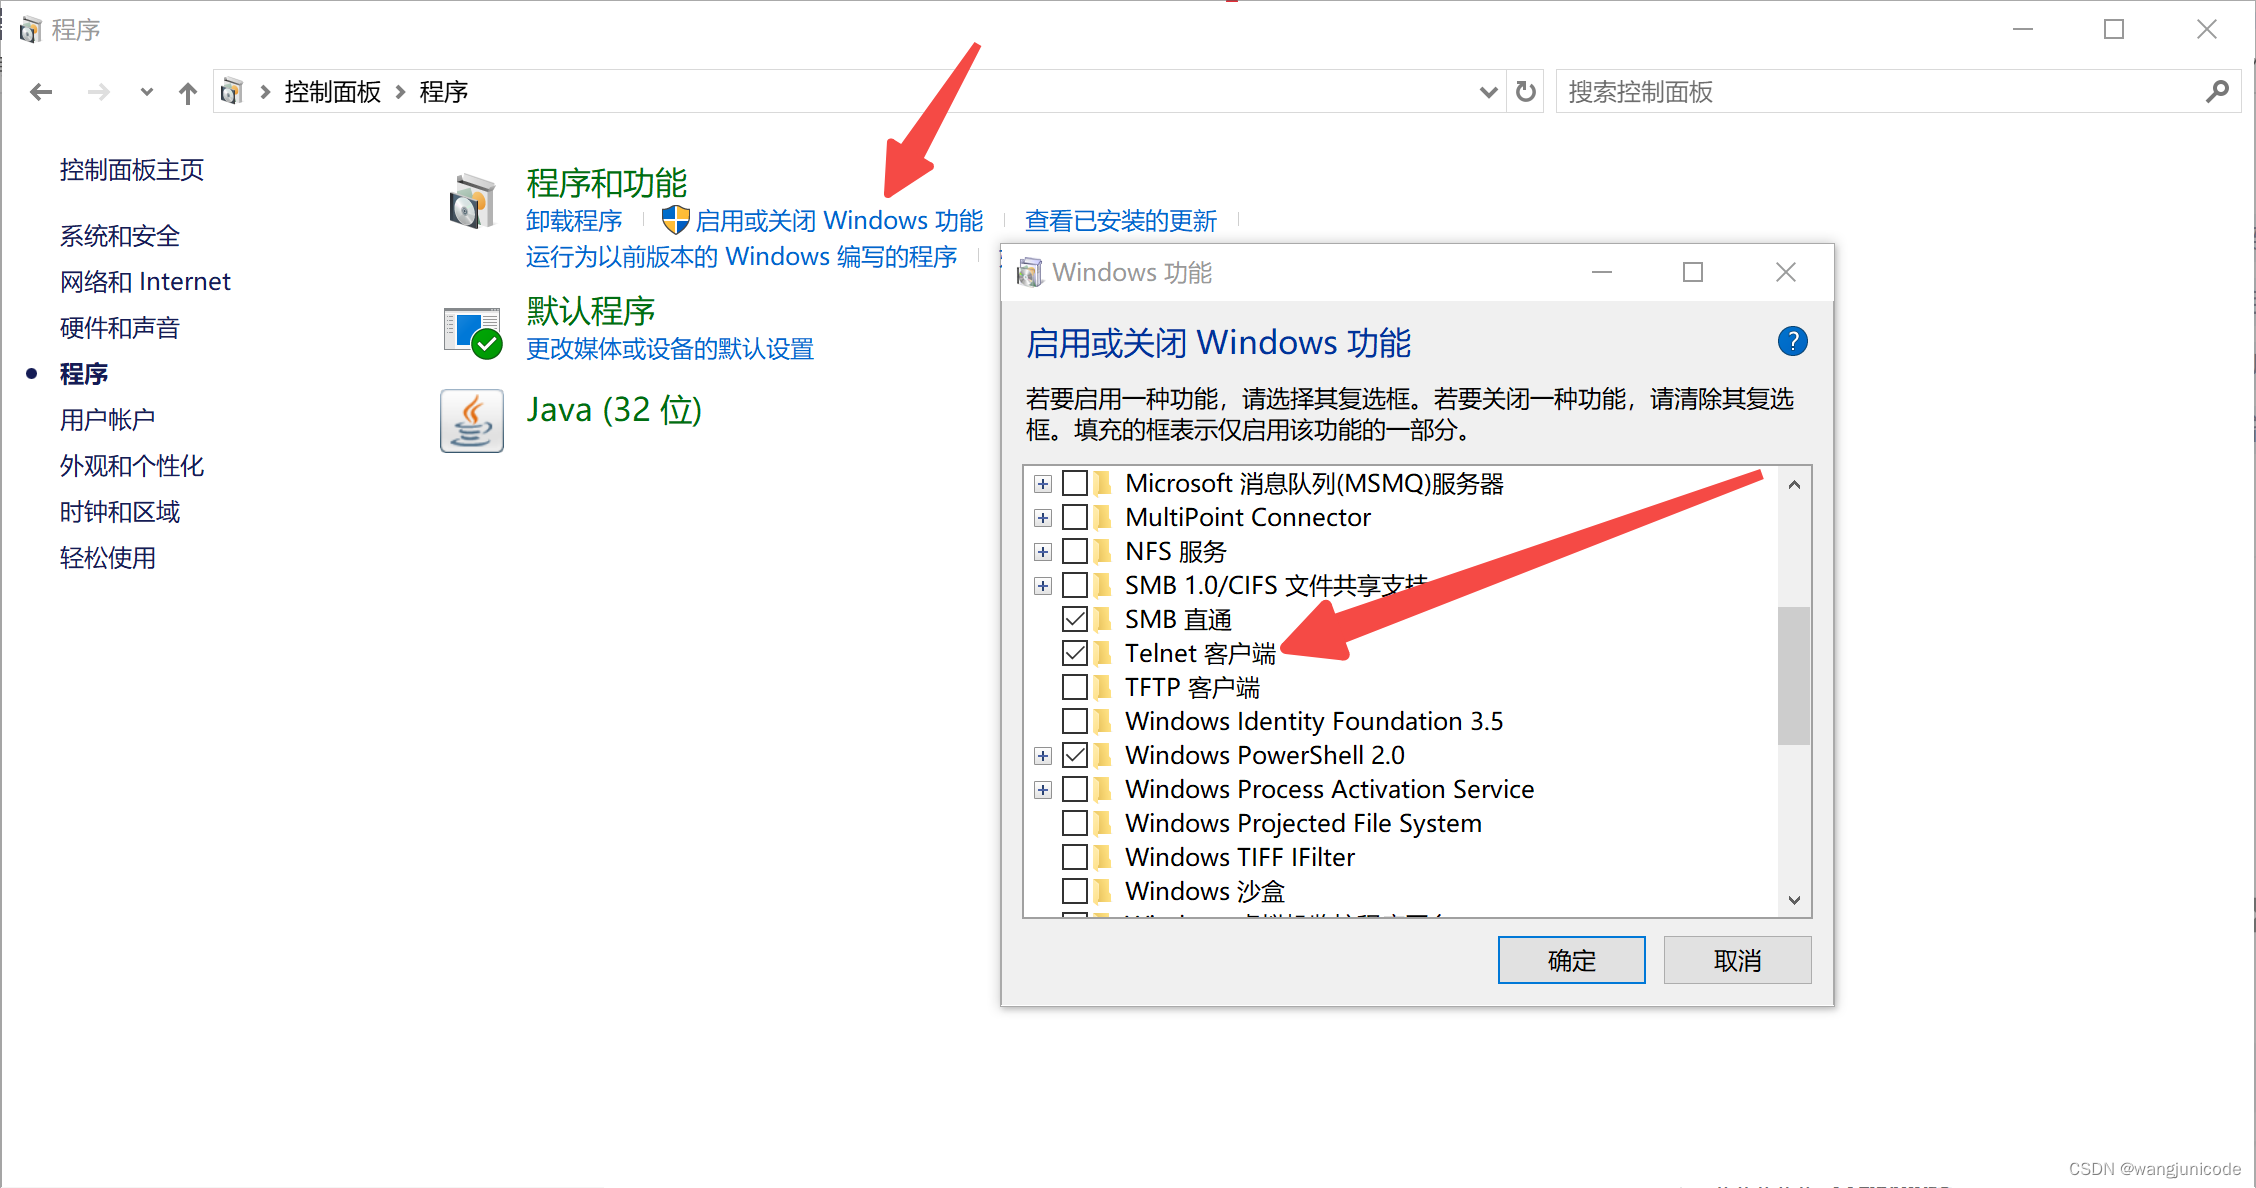
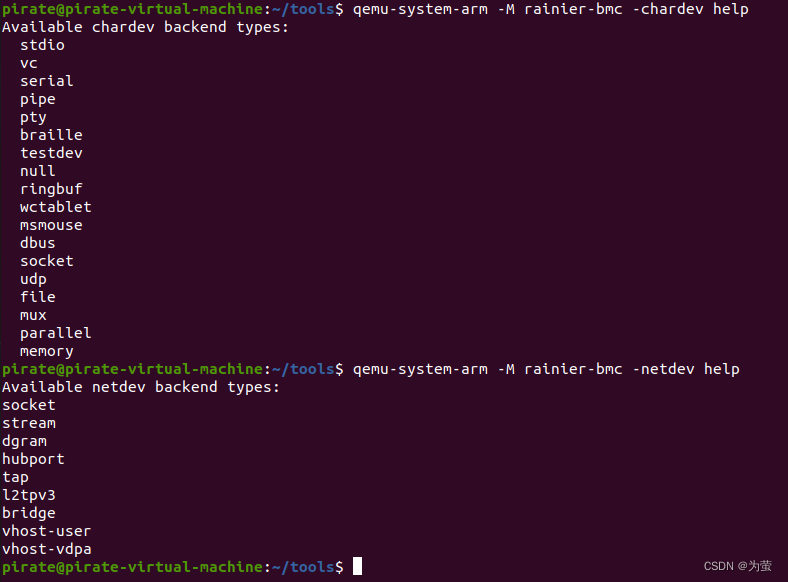
检查可以支持的后端的方法(字符和网络):
QEMU 初始化过程分析
select_machine函数(选择机器类型)
/system/vl.c
此函数用于选择要运行的机器类型。它从命令行选项或默认值中获取机器类型,然后返回所选机器的 MachineClass 结构。
static MachineClass *select_machine(QDict *qdict, Error **errp)
{const char *machine_type = qdict_get_try_str(qdict, "type");GSList *machines = object_class_get_list(TYPE_MACHINE, false);MachineClass *machine_class;Error *local_err = NULL;if (machine_type) {machine_class = find_machine(machine_type, machines);qdict_del(qdict, "type");if (!machine_class) {error_setg(&local_err, "unsupported machine type");}} else {machine_class = find_default_machine(machines);if (!machine_class) {error_setg(&local_err, "No machine specified, and there is no default");}}g_slist_free(machines);if (local_err) {error_append_hint(&local_err, "Use -machine help to list supported machines\n");error_propagate(errp, local_err);}return machine_class;
}
cpu_exec_init_all(初始化所有 CPU 的执行引擎)
io_mem_init函数
此函数初始化 I/O 内存区域。,可见其调用了memory_region_init_io()函数
static void io_mem_init(void)
{memory_region_init_io(&io_mem_unassigned, NULL, &unassigned_mem_ops, NULL,NULL, UINT64_MAX);
}memory_region_init_io函数
- 调用
memory_region_init函数初始化内存区域的公共部分。 - 设置内存区域的操作集。如果未指定操作集,则使用
unassigned_mem_ops默认操作集。 - 设置内存区域的不透明数据指针。
- 将内存区域标记为终止区域。这意味着当内存区域被销毁时,它将自动从其父区域中删除。
/system/memory.c
void memory_region_init_io(MemoryRegion *mr,Object *owner,const MemoryRegionOps *ops,void *opaque,const char *name,uint64_t size)
{memory_region_init(mr, owner, name, size);mr->ops = ops ? ops : &unassigned_mem_ops;mr->opaque = opaque;mr->terminates = true;
}
memory_region_init 函数
用于初始化 MemoryRegion 结构,调用了object_initialize 函数和memory_region_do_init函数
object_initialize 函数用于初始化一个对象。它执行以下操作:
- 分配对象的内存。
- 设置对象的类型。
- 设置对象的父对象(如果存在)。
- 调用对象的
init函数(如果存在)。
/system/memory.c
void memory_region_init(MemoryRegion *mr,Object *owner,const char *name,uint64_t size)
{object_initialize(mr, sizeof(*mr), TYPE_MEMORY_REGION);memory_region_do_init(mr, owner, name, size);
}memory_region_do_init函数
它执行以下操作:
- 设置内存区域的大小。如果大小为
UINT64_MAX,则将其设置为INT128_MAX。 - 设置内存区域的名称。
- 设置内存区域的所有者对象。
- 设置内存区域的设备状态对象(如果所有者对象是设备)。
- 设置内存区域的 RAM 块(如果存在)。
- 如果内存区域有名称,则将其添加到其所有者的子对象列表中。
static void memory_region_do_init(MemoryRegion *mr,Object *owner,const char *name,uint64_t size)
{mr->size = int128_make64(size);if (size == UINT64_MAX) {mr->size = int128_2_64();}mr->name = g_strdup(name);mr->owner = owner;mr->dev = (DeviceState *) object_dynamic_cast(mr->owner, TYPE_DEVICE);mr->ram_block = NULL;if (name) {char *escaped_name = memory_region_escape_name(name);char *name_array = g_strdup_printf("%s[*]", escaped_name);if (!owner) {owner = container_get(qdev_get_machine(), "/unattached");}object_property_add_child(owner, name_array, OBJECT(mr));object_unref(OBJECT(mr));g_free(name_array);g_free(escaped_name);}
}
补充:
MemoryRegion 是 QEMU 中表示内存区域的抽象数据结构。它提供了一个统一的接口来访问和操作不同的类型的内存,例如物理内存、I/O 内存和设备内存。可以将 MemoryRegion 想象成一个计算机中的内存块。它有一个名称、大小和地址。你可以通过 MemoryRegion 的接口来读取和写入内存块中的数据,也可以设置回调函数来处理对内存块的访问。
/include/exec/memory.h
memory_map_init函数
-
分配内存:
分配内存用于系统内存和 I/O 空间。 -
初始化内存区域:
使用memory_region_init函数初始化系统内存区域。使用memory_region_init_io函数初始化 I/O 空间区域。 -
初始化地址空间:
使用address_space_init函数初始化用于访问系统内存和 I/O 空间的地址空间。
/system/physmem.c
static void memory_map_init(void)
{system_memory = g_malloc(sizeof(*system_memory));memory_region_init(system_memory, NULL, "system", UINT64_MAX);address_space_init(&address_space_memory, system_memory, "memory");system_io = g_malloc(sizeof(*system_io));memory_region_init_io(system_io, NULL, &unassigned_io_ops, NULL, "io",65536);address_space_init(&address_space_io, system_io, "I/O");
}
通俗的讲:QEMU 是一个城市,而内存映射是城市的地图。memory_map_init 函数负责创建这个地图,它定义了城市中不同区域(内存和 I/O 空间)的位置和大小。system_memory 和 io_memory 是两个容器,分别代表城市中的住宅区(内存)和商业区(I/O 空间)。address_space_io 和 address_space_memory 是两张地图,分别显示如何到达住宅区和商业区。
page_size_init(初始化页大小)
configure_accelerator(配置加速器)
accel_init_machine函数
- 将加速器与虚拟机关联起来
- 调用加速器的
init_machine函数来进行特定于加速器的初始化 - 设置加速器的兼容性属性
/accl/accl-system.c
int accel_init_machine(AccelState *accel, MachineState *ms)
{AccelClass *acc = ACCEL_GET_CLASS(accel);int ret;ms->accelerator = accel;*(acc->allowed) = true;ret = acc->init_machine(ms);if (ret < 0) {ms->accelerator = NULL;*(acc->allowed) = false;object_unref(OBJECT(accel));} else {object_set_accelerator_compat_props(acc->compat_props);}return ret;
}
machine_run_board_init函数(初始化机器)
machine_run_board_init 函数负责初始化虚拟机的硬件平台。
- 检查虚拟机的内存大小是否有效
- 创建默认的内存后端(如果需要)
- 完成 NUMA 配置
- 创建虚拟机的 RAM
- 检查 CPU 类型是否受支持
- 初始化加速器接口
- 调用虚拟机类的
init函数 - 推进虚拟机生命周期到
PHASE_MACHINE_INITIALIZED阶段
/hw/core/machine.c
void machine_run_board_init(MachineState *machine, const char *mem_path, Error **errp)
{ERRP_GUARD();MachineClass *machine_class = MACHINE_GET_CLASS(machine);/* This checkpoint is required by replay to separate prior clockreading from the other reads, because timer polling functions queryclock values from the log. */replay_checkpoint(CHECKPOINT_INIT);if (!xen_enabled()) {/* On 32-bit hosts, QEMU is limited by virtual address space */if (machine->ram_size > (2047 << 20) && HOST_LONG_BITS == 32) {error_setg(errp, "at most 2047 MB RAM can be simulated");return;}}if (machine->memdev) {ram_addr_t backend_size = object_property_get_uint(OBJECT(machine->memdev),"size",  &error_abort);if (backend_size != machine->ram_size) {error_setg(errp, "Machine memory size does not match the size of the memory backend");return;}} else if (machine_class->default_ram_id && machine->ram_size &&numa_uses_legacy_mem()) {if (object_property_find(object_get_objects_root(),machine_class->default_ram_id)) {error_setg(errp, "object's id '%s' is reserved for the default"" RAM backend, it can't be used for any other purposes",machine_class->default_ram_id);error_append_hint(errp,"Change the object's 'id' to something else or disable"" automatic creation of the default RAM backend by setting"" 'memory-backend=%s' with '-machine'.\n",machine_class->default_ram_id);return;}if (!create_default_memdev(current_machine, mem_path, errp)) {return;}}if (machine->numa_state) {numa_complete_configuration(machine);if (machine->numa_state->num_nodes) {machine_numa_finish_cpu_init(machine);if (machine_class->cpu_cluster_has_numa_boundary) {validate_cpu_cluster_to_numa_boundary(machine);}}}if (!machine->ram && machine->memdev) {machine->ram = machine_consume_memdev(machine, machine->memdev);}/* Check if the CPU type is supported */if (machine->cpu_type && !is_cpu_type_supported(machine, errp)) {return;}if (machine->cgs) {/** With confidential guests, the host can't see the real* contents of RAM, so there's no point in it trying to merge* areas.*/machine_set_mem_merge(OBJECT(machine), false, &error_abort);/** Virtio devices can't count on directly accessing guest* memory, so they need iommu_platform=on to use normal DMA* mechanisms.  That requires also disabling legacy virtio* support for those virtio pci devices which allow it.*/object_register_sugar_prop(TYPE_VIRTIO_PCI, "disable-legacy","on", true);object_register_sugar_prop(TYPE_VIRTIO_DEVICE, "iommu_platform","on", false);}accel_init_interfaces(ACCEL_GET_CLASS(machine->accelerator));machine_class->init(machine);phase_advance(PHASE_MACHINE_INITIALIZED);
}
pc_init1函数
该函数初始化 PC 特定的设置,包括创建 CPU 和内存。
-
内存分配和 ROM/BIOS 加载
- 为 RAM 分配内存并从 ROM/BIOS 加载固件。
- 如果启用了 Xen,则使用 Xen 特定的内存设置。
-
PCI 总线初始化(如果启用)
- 创建 PCI 主桥设备并将其连接到系统内存、I/O 和 PCI 内存。
- 设置 PCI 总线大小和 PCI 孔位 64 位地址空间大小。
- 将 PCI 设备映射到中断请求 (IRQ)。
-
ISA 总线初始化(如果 PCI 未启用)
- 创建 ISA 总线并将其连接到系统内存和 I/O。
- 注册 ISA 总线输入 IRQ。
-
基本设备初始化
- 初始化基本 PC 硬件,包括:
- 实时时钟 (RTC)
- 可编程中断控制器 (PIC)
- 串口和并口
- 超级 I/O 设备
- 初始化基本 PC 硬件,包括:
-
网络设备初始化
- 根据机器类型初始化网络设备。
-
IDE 设备初始化(如果 ISA 总线启用)
- 初始化 IDE 控制器和设备。
-
ACPI 初始化(如果启用)
- 创建 ACPI 设备并将其连接到 SMBus 和 SMI 中断。
-
NV DIMM 初始化(如果启用)
- 初始化 NV DIMM ACPI 状态,使其与系统 I/O 和固件配置表 (FW_CFG) 交互。
-
其他设备初始化
- 初始化 VGA 控制器。
- 根据配置设置虚拟机端口 (VMP)。
/hw/i386/pc_piix.c
/* PC hardware initialisation */
static void pc_init1(MachineState *machine, const char *pci_type)
{PCMachineState *pcms = PC_MACHINE(machine);PCMachineClass *pcmc = PC_MACHINE_GET_CLASS(pcms);X86MachineState *x86ms = X86_MACHINE(machine);MemoryRegion *system_memory = get_system_memory();MemoryRegion *system_io = get_system_io();Object *phb = NULL;ISABus *isa_bus;Object *piix4_pm = NULL;qemu_irq smi_irq;GSIState *gsi_state;MemoryRegion *ram_memory;MemoryRegion *pci_memory = NULL;MemoryRegion *rom_memory = system_memory;ram_addr_t lowmem;uint64_t hole64_size = 0;/** Calculate ram split, for memory below and above 4G.  It's a bit* complicated for backward compatibility reasons ...**  - Traditional split is 3.5G (lowmem = 0xe0000000).  This is the*    default value for max_ram_below_4g now.**  - Then, to gigabyte align the memory, we move the split to 3G*    (lowmem = 0xc0000000).  But only in case we have to split in*    the first place, i.e. ram_size is larger than (traditional)*    lowmem.  And for new machine types (gigabyte_align = true)*    only, for live migration compatibility reasons.**  - Next the max-ram-below-4g option was added, which allowed to*    reduce lowmem to a smaller value, to allow a larger PCI I/O*    window below 4G.  qemu doesn't enforce gigabyte alignment here,*    but prints a warning.**  - Finally max-ram-below-4g got updated to also allow raising lowmem,*    so legacy non-PAE guests can get as much memory as possible in*    the 32bit address space below 4G.**  - Note that Xen has its own ram setup code in xen_ram_init(),*    called via xen_hvm_init_pc().** Examples:*    qemu -M pc-1.7 -m 4G    (old default)    -> 3584M low,  512M high*    qemu -M pc -m 4G        (new default)    -> 3072M low, 1024M high*    qemu -M pc,max-ram-below-4g=2G -m 4G     -> 2048M low, 2048M high*    qemu -M pc,max-ram-below-4g=4G -m 3968M  -> 3968M low (=4G-128M)*/if (xen_enabled()) {xen_hvm_init_pc(pcms, &ram_memory);} else {ram_memory = machine->ram;if (!pcms->max_ram_below_4g) {pcms->max_ram_below_4g = 0xe0000000; /* default: 3.5G */}lowmem = pcms->max_ram_below_4g;if (machine->ram_size >= pcms->max_ram_below_4g) {if (pcmc->gigabyte_align) {if (lowmem > 0xc0000000) {lowmem = 0xc0000000;}if (lowmem & (1 * GiB - 1)) {warn_report("Large machine and max_ram_below_4g ""(%" PRIu64 ") not a multiple of 1G; ""possible bad performance.",pcms->max_ram_below_4g);}}}if (machine->ram_size >= lowmem) {x86ms->above_4g_mem_size = machine->ram_size - lowmem;x86ms->below_4g_mem_size = lowmem;} else {x86ms->above_4g_mem_size = 0;x86ms->below_4g_mem_size = machine->ram_size;}}pc_machine_init_sgx_epc(pcms);x86_cpus_init(x86ms, pcmc->default_cpu_version);if (kvm_enabled()) {kvmclock_create(pcmc->kvmclock_create_always);}if (pcmc->pci_enabled) {pci_memory = g_new(MemoryRegion, 1);memory_region_init(pci_memory, NULL, "pci", UINT64_MAX);rom_memory = pci_memory;phb = OBJECT(qdev_new(TYPE_I440FX_PCI_HOST_BRIDGE));object_property_add_child(OBJECT(machine), "i440fx", phb);object_property_set_link(phb, PCI_HOST_PROP_RAM_MEM,OBJECT(ram_memory), &error_fatal);object_property_set_link(phb, PCI_HOST_PROP_PCI_MEM,OBJECT(pci_memory), &error_fatal);object_property_set_link(phb, PCI_HOST_PROP_SYSTEM_MEM,OBJECT(system_memory), &error_fatal);object_property_set_link(phb, PCI_HOST_PROP_IO_MEM,OBJECT(system_io), &error_fatal);object_property_set_uint(phb, PCI_HOST_BELOW_4G_MEM_SIZE,x86ms->below_4g_mem_size, &error_fatal);object_property_set_uint(phb, PCI_HOST_ABOVE_4G_MEM_SIZE,x86ms->above_4g_mem_size, &error_fatal);object_property_set_str(phb, I440FX_HOST_PROP_PCI_TYPE, pci_type,&error_fatal);sysbus_realize_and_unref(SYS_BUS_DEVICE(phb), &error_fatal);pcms->pcibus = PCI_BUS(qdev_get_child_bus(DEVICE(phb), "pci.0"));pci_bus_map_irqs(pcms->pcibus,xen_enabled() ? xen_pci_slot_get_pirq: pc_pci_slot_get_pirq);hole64_size = object_property_get_uint(phb,PCI_HOST_PROP_PCI_HOLE64_SIZE,&error_abort);}/* allocate ram and load rom/bios */if (!xen_enabled()) {pc_memory_init(pcms, system_memory, rom_memory, hole64_size);} else {assert(machine->ram_size == x86ms->below_4g_mem_size +x86ms->above_4g_mem_size);pc_system_flash_cleanup_unused(pcms);if (machine->kernel_filename != NULL) {/* For xen HVM direct kernel boot, load linux here */xen_load_linux(pcms);}}gsi_state = pc_gsi_create(&x86ms->gsi, pcmc->pci_enabled);if (pcmc->pci_enabled) {PCIDevice *pci_dev;DeviceState *dev;size_t i;pci_dev = pci_new_multifunction(-1, pcms->south_bridge);object_property_set_bool(OBJECT(pci_dev), "has-usb",machine_usb(machine), &error_abort);object_property_set_bool(OBJECT(pci_dev), "has-acpi",x86_machine_is_acpi_enabled(x86ms),&error_abort);object_property_set_bool(OBJECT(pci_dev), "has-pic", false,&error_abort);object_property_set_bool(OBJECT(pci_dev), "has-pit", false,&error_abort);qdev_prop_set_uint32(DEVICE(pci_dev), "smb_io_base", 0xb100);object_property_set_bool(OBJECT(pci_dev), "smm-enabled",x86_machine_is_smm_enabled(x86ms),&error_abort);dev = DEVICE(pci_dev);for (i = 0; i < ISA_NUM_IRQS; i++) {qdev_connect_gpio_out_named(dev, "isa-irqs", i, x86ms->gsi[i]);}pci_realize_and_unref(pci_dev, pcms->pcibus, &error_fatal);if (xen_enabled()) {pci_device_set_intx_routing_notifier(pci_dev, piix_intx_routing_notifier_xen);/** Xen supports additional interrupt routes from the PCI devices to* the IOAPIC: the four pins of each PCI device on the bus are also* connected to the IOAPIC directly.* These additional routes can be discovered through ACPI.*/pci_bus_irqs(pcms->pcibus, xen_intx_set_irq, pci_dev,XEN_IOAPIC_NUM_PIRQS);}isa_bus = ISA_BUS(qdev_get_child_bus(DEVICE(pci_dev), "isa.0"));x86ms->rtc = ISA_DEVICE(object_resolve_path_component(OBJECT(pci_dev),"rtc"));piix4_pm = object_resolve_path_component(OBJECT(pci_dev), "pm");dev = DEVICE(object_resolve_path_component(OBJECT(pci_dev), "ide"));pci_ide_create_devs(PCI_DEVICE(dev));pcms->idebus[0] = qdev_get_child_bus(dev, "ide.0");pcms->idebus[1] = qdev_get_child_bus(dev, "ide.1");} else {isa_bus = isa_bus_new(NULL, system_memory, system_io,&error_abort);isa_bus_register_input_irqs(isa_bus, x86ms->gsi);x86ms->rtc = isa_new(TYPE_MC146818_RTC);qdev_prop_set_int32(DEVICE(x86ms->rtc), "base_year", 2000);isa_realize_and_unref(x86ms->rtc, isa_bus, &error_fatal);i8257_dma_init(OBJECT(machine), isa_bus, 0);pcms->hpet_enabled = false;}if (x86ms->pic == ON_OFF_AUTO_ON || x86ms->pic == ON_OFF_AUTO_AUTO) {pc_i8259_create(isa_bus, gsi_state->i8259_irq);}if (phb) {ioapic_init_gsi(gsi_state, phb);}if (tcg_enabled()) {x86_register_ferr_irq(x86ms->gsi[13]);}pc_vga_init(isa_bus, pcmc->pci_enabled ? pcms->pcibus : NULL);assert(pcms->vmport != ON_OFF_AUTO__MAX);if (pcms->vmport == ON_OFF_AUTO_AUTO) {pcms->vmport = xen_enabled() ? ON_OFF_AUTO_OFF : ON_OFF_AUTO_ON;}/* init basic PC hardware */pc_basic_device_init(pcms, isa_bus, x86ms->gsi, x86ms->rtc, true,0x4);pc_nic_init(pcmc, isa_bus, pcms->pcibus);#ifdef CONFIG_IDE_ISAif (!pcmc->pci_enabled) {DriveInfo *hd[MAX_IDE_BUS * MAX_IDE_DEVS];int i;ide_drive_get(hd, ARRAY_SIZE(hd));for (i = 0; i < MAX_IDE_BUS; i++) {ISADevice *dev;char busname[] = "ide.0";dev = isa_ide_init(isa_bus, ide_iobase[i], ide_iobase2[i],ide_irq[i],hd[MAX_IDE_DEVS * i], hd[MAX_IDE_DEVS * i + 1]);/** The ide bus name is ide.0 for the first bus and ide.1 for the* second one.*/busname[4] = '0' + i;pcms->idebus[i] = qdev_get_child_bus(DEVICE(dev), busname);}}
#endifif (piix4_pm) {smi_irq = qemu_allocate_irq(pc_acpi_smi_interrupt, first_cpu, 0);qdev_connect_gpio_out_named(DEVICE(piix4_pm), "smi-irq", 0, smi_irq);pcms->smbus = I2C_BUS(qdev_get_child_bus(DEVICE(piix4_pm), "i2c"));/* TODO: Populate SPD eeprom data.  */smbus_eeprom_init(pcms->smbus, 8, NULL, 0);object_property_add_link(OBJECT(machine), PC_MACHINE_ACPI_DEVICE_PROP,TYPE_HOTPLUG_HANDLER,(Object **)&x86ms->acpi_dev,object_property_allow_set_link,OBJ_PROP_LINK_STRONG);object_property_set_link(OBJECT(machine), PC_MACHINE_ACPI_DEVICE_PROP,piix4_pm, &error_abort);}if (machine->nvdimms_state->is_enabled) {nvdimm_init_acpi_state(machine->nvdimms_state, system_io,x86_nvdimm_acpi_dsmio,x86ms->fw_cfg, OBJECT(pcms));}
}
创建和初始化CPU
pc_init1:初始化 PC 特定的设置,包括创建 CPU 和内存。x86_cpus_init:根据配置创建和初始化多个 CPU。x86_cpu_new:创建一个新的 X86CPU 设备。qdev_realize:经过 QOM 的object_property机制,最后调用到device_set_realized。device_set_realized:标记设备已实现,并调用设备的realize函数。x86_cpu_realizefn:X86CPU 设备的realize函数,负责初始化 CPU 的寄存器、内存映射和中断。
x86_cpus_init函数
-
设置默认 CPU 版
-
计算 CPU APIC ID 限制(计算 CPU APIC ID 的最大值,以确保所有 CPU APIC ID 都小于此限制)
-
检查 APIC ID 255 或更高(如果启用了 KVM 并且 APIC ID 限制大于 255,则检查是否启用了内核中的 lapic 和 X2APIC 用户空间 API)
-
设置 KVM 最大 APIC ID(如果启用了 KVM,则设置 KVM 的最大 APIC ID)
-
设置 APIC 最大 APIC ID(如果内核中没有 irqchip,则设置 APIC 的最大 APIC ID)
-
获取可能的 CPU 架构 ID 列表(获取机器类支持的可能 CPU 架构 ID 列表)
-
创建 CPU(对于每个 CPU,创建并初始化一个新的 CPU)
/hw/i386/x86.c
void x86_cpus_init(X86MachineState *x86ms, int default_cpu_version)
{int i;const CPUArchIdList *possible_cpus;MachineState *ms = MACHINE(x86ms);MachineClass *mc = MACHINE_GET_CLASS(x86ms);x86_cpu_set_default_version(default_cpu_version);/** Calculates the limit to CPU APIC ID values** Limit for the APIC ID value, so that all* CPU APIC IDs are < x86ms->apic_id_limit.** This is used for FW_CFG_MAX_CPUS. See comments on fw_cfg_arch_create().*/x86ms->apic_id_limit = x86_cpu_apic_id_from_index(x86ms,ms->smp.max_cpus - 1) + 1;/** Can we support APIC ID 255 or higher?  With KVM, that requires* both in-kernel lapic and X2APIC userspace API.** kvm_enabled() must go first to ensure that kvm_* references are* not emitted for the linker to consume (kvm_enabled() is* a literal `0` in configurations where kvm_* aren't defined)*/if (kvm_enabled() && x86ms->apic_id_limit > 255 &&kvm_irqchip_in_kernel() && !kvm_enable_x2apic()) {error_report("current -smp configuration requires kernel ""irqchip and X2APIC API support.");exit(EXIT_FAILURE);}if (kvm_enabled()) {kvm_set_max_apic_id(x86ms->apic_id_limit);}if (!kvm_irqchip_in_kernel()) {apic_set_max_apic_id(x86ms->apic_id_limit);}possible_cpus = mc->possible_cpu_arch_ids(ms);for (i = 0; i < ms->smp.cpus; i++) {x86_cpu_new(x86ms, possible_cpus->cpus[i].arch_id, &error_fatal);}
}
x86_cpu_new函数
-
创建 CPU 对象
-
设置 APIC ID
-
实现 CPU
-
清理(取消引用 CPU 对象)
/hw/i386/x86.c
void x86_cpu_new(X86MachineState *x86ms, int64_t apic_id, Error **errp)
{Object *cpu = object_new(MACHINE(x86ms)->cpu_type);if (!object_property_set_uint(cpu, "apic-id", apic_id, errp)) {goto out;}qdev_realize(DEVICE(cpu), NULL, errp);out:object_unref(cpu);
}
qdev_realize函数
该函数负责实现设备
/hw/i386/x86.c
bool qdev_realize(DeviceState *dev, BusState *bus, Error **errp)
{assert(!dev->realized && !dev->parent_bus);if (bus) {if (!qdev_set_parent_bus(dev, bus, errp)) {return false;}} else {assert(!DEVICE_GET_CLASS(dev)->bus_type);}return object_property_set_bool(OBJECT(dev), "realized", true, errp);
}
device_set_realized函数
- 设置设备的已实现标志
- 调用设备类的
realize函数(如果存在) - 调用设备监听器的
realize函数 - 设置设备的规范路径
- 注册设备的 VM 状态(如果存在)
- 实现设备的子总线
- 如果设备是热插拔的,则复位设备并将其插入父总线
- 设置设备的挂起已删除事件标志
- 调用设备的热插拔处理程序(如果存在)
- 释放与设备关联的内存
- 取消实现设备的子总线
- 取消注册设备的 VM 状态(如果存在)
- 设置设备的规范路径为 NULL
- 调用设备类的
unrealize函数(如果存在) - 调用设备监听器的
unrealize函数 - 设置设备的已实现标志为 false
/hw/core/qdev.c
static void device_set_realized(Object *obj, bool value, Error **errp)
{DeviceState *dev = DEVICE(obj);DeviceClass *dc = DEVICE_GET_CLASS(dev);HotplugHandler *hotplug_ctrl;BusState *bus;NamedClockList *ncl;Error *local_err = NULL;bool unattached_parent = false;static int unattached_count;if (dev->hotplugged && !dc->hotpluggable) {error_setg(errp, QERR_DEVICE_NO_HOTPLUG, object_get_typename(obj));return;}if (value && !dev->realized) {if (!check_only_migratable(obj, errp)) {goto fail;}if (!obj->parent) {gchar *name = g_strdup_printf("device[%d]", unattached_count++);object_property_add_child(container_get(qdev_get_machine(),"/unattached"),name, obj);unattached_parent = true;g_free(name);}hotplug_ctrl = qdev_get_hotplug_handler(dev);if (hotplug_ctrl) {hotplug_handler_pre_plug(hotplug_ctrl, dev, &local_err);if (local_err != NULL) {goto fail;}}if (dc->realize) {dc->realize(dev, &local_err);if (local_err != NULL) {goto fail;}}DEVICE_LISTENER_CALL(realize, Forward, dev);/** always free/re-initialize here since the value cannot be cleaned up* in device_unrealize due to its usage later on in the unplug path*/g_free(dev->canonical_path);dev->canonical_path = object_get_canonical_path(OBJECT(dev));QLIST_FOREACH(ncl, &dev->clocks, node) {if (ncl->alias) {continue;} else {clock_setup_canonical_path(ncl->clock);}}if (qdev_get_vmsd(dev)) {if (vmstate_register_with_alias_id(VMSTATE_IF(dev),VMSTATE_INSTANCE_ID_ANY,qdev_get_vmsd(dev), dev,dev->instance_id_alias,dev->alias_required_for_version,&local_err) < 0) {goto post_realize_fail;}}/** Clear the reset state, in case the object was previously unrealized* with a dirty state.*/resettable_state_clear(&dev->reset);QLIST_FOREACH(bus, &dev->child_bus, sibling) {if (!qbus_realize(bus, errp)) {goto child_realize_fail;}}if (dev->hotplugged) {/** Reset the device, as well as its subtree which, at this point,* should be realized too.*/resettable_assert_reset(OBJECT(dev), RESET_TYPE_COLD);resettable_change_parent(OBJECT(dev), OBJECT(dev->parent_bus),NULL);resettable_release_reset(OBJECT(dev), RESET_TYPE_COLD);}dev->pending_deleted_event = false;if (hotplug_ctrl) {hotplug_handler_plug(hotplug_ctrl, dev, &local_err);if (local_err != NULL) {goto child_realize_fail;}}qatomic_store_release(&dev->realized, value);} else if (!value && dev->realized) {/** Change the value so that any concurrent users are aware* that the device is going to be unrealized** TODO: change .realized property to enum that states* each phase of the device realization/unrealization*/qatomic_set(&dev->realized, value);/** Ensure that concurrent users see this update prior to* any other changes done by unrealize.*/smp_wmb();QLIST_FOREACH(bus, &dev->child_bus, sibling) {qbus_unrealize(bus);}if (qdev_get_vmsd(dev)) {vmstate_unregister(VMSTATE_IF(dev), qdev_get_vmsd(dev), dev);}if (dc->unrealize) {dc->unrealize(dev);}dev->pending_deleted_event = true;DEVICE_LISTENER_CALL(unrealize, Reverse, dev);}assert(local_err == NULL);return;child_realize_fail:QLIST_FOREACH(bus, &dev->child_bus, sibling) {qbus_unrealize(bus);}if (qdev_get_vmsd(dev)) {vmstate_unregister(VMSTATE_IF(dev), qdev_get_vmsd(dev), dev);}post_realize_fail:g_free(dev->canonical_path);dev->canonical_path = NULL;if (dc->unrealize) {dc->unrealize(dev);}fail:error_propagate(errp, local_err);if (unattached_parent) {/** Beware, this doesn't just revert* object_property_add_child(), it also runs bus_remove()!*/object_unparent(OBJECT(dev));unattached_count--;}
}
x86_cpu_realizefn函数
该函数负责实现 x86 CPU。其主要功能包括:
* 初始化 CPU 状态,包括 APIC ID、Hyper-V 增强功能、CPU 特性等。
* 调用框架实现函数,执行 CPU 特定的初始化。
* 检查主机 CPUID 要求,确保加速器支持请求的特性。
* 设置微码版本、MWAIT 扩展信息、物理位数等 CPU 参数。
* 初始化缓存信息。
* 创建 APIC(仅限 KVM)。
* 初始化机器检查异常 (MCE)。
* 初始化 VCPU。
* 警告超线程问题(如果存在)。
* 实现 APIC(仅限 KVM)。
* 重置 CPU。
* 调用 CPU 类父类的实现函数。
* 释放与 CPU 关联的内存。
/target/i386/cpu.c
static void x86_cpu_realizefn(DeviceState *dev, Error **errp)
{CPUState *cs = CPU(dev);X86CPU *cpu = X86_CPU(dev);X86CPUClass *xcc = X86_CPU_GET_CLASS(dev);CPUX86State *env = &cpu->env;Error *local_err = NULL;static bool ht_warned;unsigned requested_lbr_fmt;#if defined(CONFIG_TCG) && !defined(CONFIG_USER_ONLY)/* Use pc-relative instructions in system-mode */cs->tcg_cflags |= CF_PCREL;
#endifif (cpu->apic_id == UNASSIGNED_APIC_ID) {error_setg(errp, "apic-id property was not initialized properly");return;}/** Process Hyper-V enlightenments.* Note: this currently has to happen before the expansion of CPU features.*/x86_cpu_hyperv_realize(cpu);x86_cpu_expand_features(cpu, &local_err);if (local_err) {goto out;}/** Override env->features[FEAT_PERF_CAPABILITIES].LBR_FMT* with user-provided setting.*/if (cpu->lbr_fmt != ~PERF_CAP_LBR_FMT) {if ((cpu->lbr_fmt & PERF_CAP_LBR_FMT) != cpu->lbr_fmt) {error_setg(errp, "invalid lbr-fmt");return;}env->features[FEAT_PERF_CAPABILITIES] &= ~PERF_CAP_LBR_FMT;env->features[FEAT_PERF_CAPABILITIES] |= cpu->lbr_fmt;}/** vPMU LBR is supported when 1) KVM is enabled 2) Option pmu=on and* 3)vPMU LBR format matches that of host setting.*/requested_lbr_fmt =env->features[FEAT_PERF_CAPABILITIES] & PERF_CAP_LBR_FMT;if (requested_lbr_fmt && kvm_enabled()) {uint64_t host_perf_cap =x86_cpu_get_supported_feature_word(FEAT_PERF_CAPABILITIES, false);unsigned host_lbr_fmt = host_perf_cap & PERF_CAP_LBR_FMT;if (!cpu->enable_pmu) {error_setg(errp, "vPMU: LBR is unsupported without pmu=on");return;}if (requested_lbr_fmt != host_lbr_fmt) {error_setg(errp, "vPMU: the lbr-fmt value (0x%x) does not match ""the host value (0x%x).",requested_lbr_fmt, host_lbr_fmt);return;}}x86_cpu_filter_features(cpu, cpu->check_cpuid || cpu->enforce_cpuid);if (cpu->enforce_cpuid && x86_cpu_have_filtered_features(cpu)) {error_setg(&local_err,accel_uses_host_cpuid() ?"Host doesn't support requested features" :"TCG doesn't support requested features");goto out;}/* On AMD CPUs, some CPUID[8000_0001].EDX bits must match the bits on* CPUID[1].EDX.*/if (IS_AMD_CPU(env)) {env->features[FEAT_8000_0001_EDX] &= ~CPUID_EXT2_AMD_ALIASES;env->features[FEAT_8000_0001_EDX] |= (env->features[FEAT_1_EDX]& CPUID_EXT2_AMD_ALIASES);}x86_cpu_set_sgxlepubkeyhash(env);/** note: the call to the framework needs to happen after feature expansion,* but before the checks/modifications to ucode_rev, mwait, phys_bits.* These may be set by the accel-specific code,* and the results are subsequently checked / assumed in this function.*/cpu_exec_realizefn(cs, &local_err);if (local_err != NULL) {error_propagate(errp, local_err);return;}if (xcc->host_cpuid_required && !accel_uses_host_cpuid()) {g_autofree char *name = x86_cpu_class_get_model_name(xcc);error_setg(&local_err, "CPU model '%s' requires KVM or HVF", name);goto out;}if (cpu->ucode_rev == 0) {/** The default is the same as KVM's. Note that this check* needs to happen after the evenual setting of ucode_rev in* accel-specific code in cpu_exec_realizefn.*/if (IS_AMD_CPU(env)) {cpu->ucode_rev = 0x01000065;} else {cpu->ucode_rev = 0x100000000ULL;}}/** mwait extended info: needed for Core compatibility* We always wake on interrupt even if host does not have the capability.** requires the accel-specific code in cpu_exec_realizefn to* have already acquired the CPUID data into cpu->mwait.*/cpu->mwait.ecx |= CPUID_MWAIT_EMX | CPUID_MWAIT_IBE;/* For 64bit systems think about the number of physical bits to present.* ideally this should be the same as the host; anything other than matching* the host can cause incorrect guest behaviour.* QEMU used to pick the magic value of 40 bits that corresponds to* consumer AMD devices but nothing else.** Note that this code assumes features expansion has already been done* (as it checks for CPUID_EXT2_LM), and also assumes that potential* phys_bits adjustments to match the host have been already done in* accel-specific code in cpu_exec_realizefn.*/if (env->features[FEAT_8000_0001_EDX] & CPUID_EXT2_LM) {if (cpu->phys_bits &&(cpu->phys_bits > TARGET_PHYS_ADDR_SPACE_BITS ||cpu->phys_bits < 32)) {error_setg(errp, "phys-bits should be between 32 and %u "" (but is %u)",TARGET_PHYS_ADDR_SPACE_BITS, cpu->phys_bits);return;}/** 0 means it was not explicitly set by the user (or by machine* compat_props or by the host code in host-cpu.c).* In this case, the default is the value used by TCG (40).*/if (cpu->phys_bits == 0) {cpu->phys_bits = TCG_PHYS_ADDR_BITS;}} else {/* For 32 bit systems don't use the user set value, but keep* phys_bits consistent with what we tell the guest.*/if (cpu->phys_bits != 0) {error_setg(errp, "phys-bits is not user-configurable in 32 bit");return;}if (env->features[FEAT_1_EDX] & (CPUID_PSE36 | CPUID_PAE)) {cpu->phys_bits = 36;} else {cpu->phys_bits = 32;}}/* Cache information initialization */if (!cpu->legacy_cache) {const CPUCaches *cache_info =x86_cpu_get_versioned_cache_info(cpu, xcc->model);if (!xcc->model || !cache_info) {g_autofree char *name = x86_cpu_class_get_model_name(xcc);error_setg(errp,"CPU model '%s' doesn't support legacy-cache=off", name);return;}env->cache_info_cpuid2 = env->cache_info_cpuid4 = env->cache_info_amd =*cache_info;} else {/* Build legacy cache information */env->cache_info_cpuid2.l1d_cache = &legacy_l1d_cache;env->cache_info_cpuid2.l1i_cache = &legacy_l1i_cache;env->cache_info_cpuid2.l2_cache = &legacy_l2_cache_cpuid2;env->cache_info_cpuid2.l3_cache = &legacy_l3_cache;env->cache_info_cpuid4.l1d_cache = &legacy_l1d_cache;env->cache_info_cpuid4.l1i_cache = &legacy_l1i_cache;env->cache_info_cpuid4.l2_cache = &legacy_l2_cache;env->cache_info_cpuid4.l3_cache = &legacy_l3_cache;env->cache_info_amd.l1d_cache = &legacy_l1d_cache_amd;env->cache_info_amd.l1i_cache = &legacy_l1i_cache_amd;env->cache_info_amd.l2_cache = &legacy_l2_cache_amd;env->cache_info_amd.l3_cache = &legacy_l3_cache;}#ifndef CONFIG_USER_ONLYMachineState *ms = MACHINE(qdev_get_machine());qemu_register_reset(x86_cpu_machine_reset_cb, cpu);if (cpu->env.features[FEAT_1_EDX] & CPUID_APIC || ms->smp.cpus > 1) {x86_cpu_apic_create(cpu, &local_err);if (local_err != NULL) {goto out;}}
#endifmce_init(cpu);qemu_init_vcpu(cs);/** Most Intel and certain AMD CPUs support hyperthreading. Even though QEMU* fixes this issue by adjusting CPUID_0000_0001_EBX and CPUID_8000_0008_ECX* based on inputs (sockets,cores,threads), it is still better to give* users a warning.** NOTE: the following code has to follow qemu_init_vcpu(). Otherwise* cs->nr_threads hasn't be populated yet and the checking is incorrect.*/if (IS_AMD_CPU(env) &&!(env->features[FEAT_8000_0001_ECX] & CPUID_EXT3_TOPOEXT) &&cs->nr_threads > 1 && !ht_warned) {warn_report("This family of AMD CPU doesn't support ""hyperthreading(%d)",cs->nr_threads);error_printf("Please configure -smp options properly"" or try enabling topoext feature.\n");ht_warned = true;}#ifndef CONFIG_USER_ONLYx86_cpu_apic_realize(cpu, &local_err);if (local_err != NULL) {goto out;}
#endif /* !CONFIG_USER_ONLY */cpu_reset(cs);xcc->parent_realize(dev, &local_err);out:if (local_err != NULL) {error_propagate(errp, local_err);return;}
}
初始化 PC 的内存和固件
- 初始化内存并将其添加到系统中。
- 加载 BIOS 映像。
- 将 BIOS 映像添加到 ROM 列表中。
- 将 ROM 列表插入到系统中。
- 将 BIOS 的最后 128KB 映射到 ISA 空间。
- 将所有 BIOS 映射到内存顶部。
- 创建可选 ROM 区域。
- 创建 FWCfgState 并初始化参数。
- 使用 FWCfgState 初始化全局 fw_cfg。
- 如果指定了内核,则加载内核。
- 添加 ROM 镜像。