🏠关于专栏:Linux的浅学到熟知专栏用于记录Linux系统编程、网络编程等内容。
🎯每天努力一点点,技术变化看得见
文章目录
- 进程程序替换
- 什么是程序替换及其原理
- 替换函数
- execl
- execlp
- execle
- execv
- execvp
- execvpe
- execve
- 替换函数总结
- 实现简易Shell
进程程序替换
什么是程序替换及其原理
父进程创建子进程的目的只有一个:让子进程帮助父进程完成某些任务。如果要让子进程执行与父进程不同的代码有两种方式↓↓↓
- 通过if分支判断语句决定父子进程各自的执行代码
#include <stdio.h>
#include <unistd.h>
#include <sys/types.h>int main()
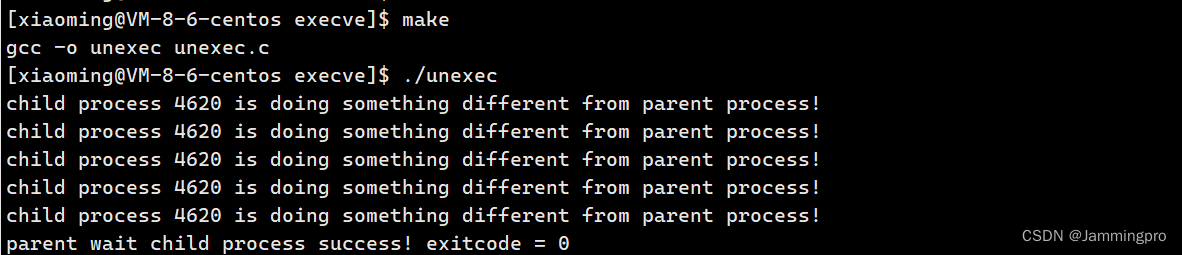
{pid_t id = fork();if(id < 0)//进程创建错误{perror("fork");exit(1);}else if(id == 0)//子进程{int cnt = 5;while(cnt){printf("child process %d is doing something different from parent process!\n");cnt--;}exit(0);}else//父进程{int status = 0;pid_t ret = waitpid(id, &status, 0);if(ret == id){printf("parent wait child process success! exitcode = %d\n", WEXITSTATUS(status));}}return 0;
}
- 通过进程程序替换,让子进程执行与父进程完全不同代码
下面仅是演示代码,关于进程程序替换的详细内容将在下文介绍↓↓↓
#include <stdio.h>
#include <stdlib.h>
#include <unistd.h>
#include <sys/types.h>
#include <sys/wait.h>int main()
{pid_t id = fork();if(id < 0){perror("fork");exit(1);}else if(id == 0){execlp("top", "top", NULL);exit(2);}else{int status = 0;pid_t ret = waitpid(id, &status, 0);if(WIFEXITED(status)){printf("wait success! exitcode = %d\n", WEXITSTATUS(status));}}return 0;
}

从上面可知,用fork创建子进程后可以执行的程序和父进程相同的程序(但可能执行不同的代码分支),也可以通过调用exec系列函数接口来执行另一个程序。
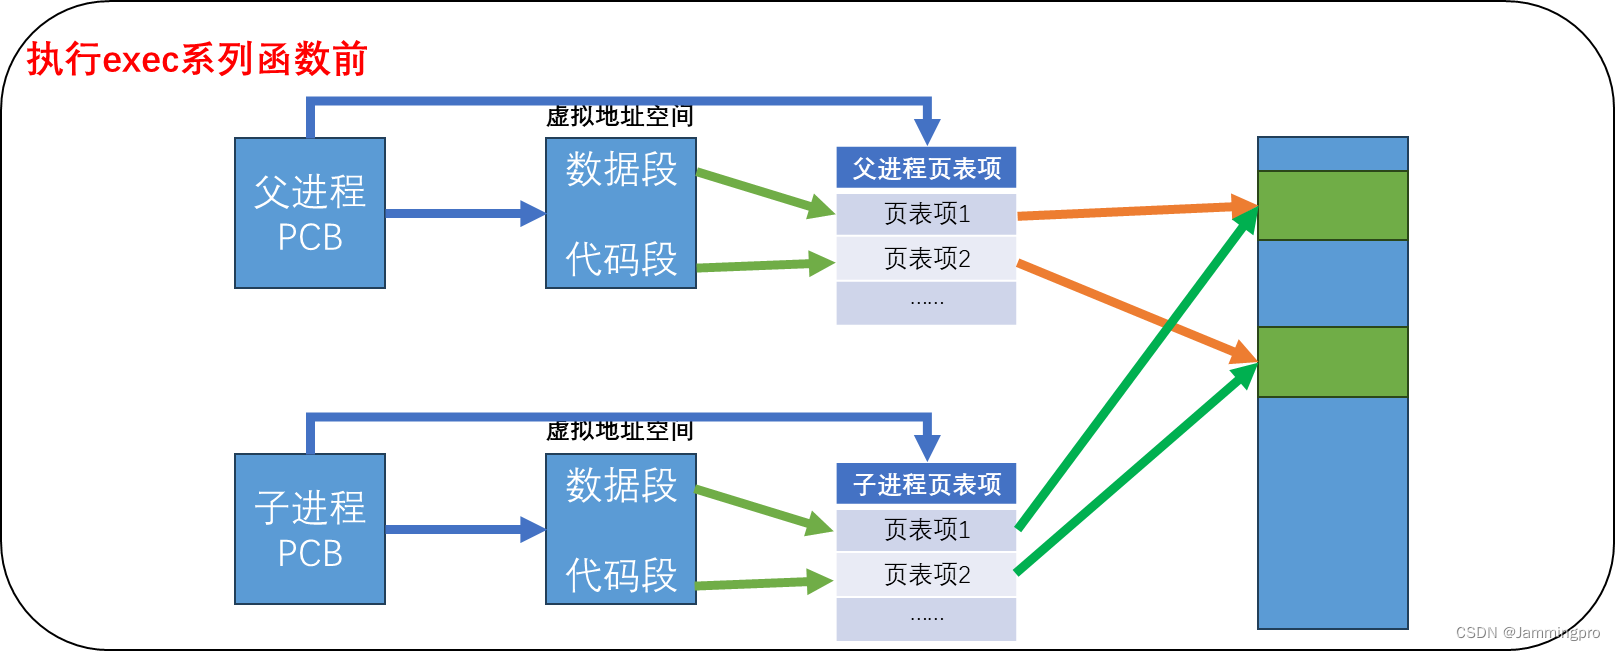
当程序调用exec系列函数中的一个时,该进程的用户空间的代码和数据完全被新程序替换,从新程序的启动例程开始执行。调用exec并没有创建新进程,所以调用exec前后该子进程的id并没有改变。调用了exec函数后,会对子进程的数据和代码做写入,此时会发生写时拷贝(即子进程不再与父进程共享代码和数据,而是在物理空间中拥有自己独立的代码和数据)。
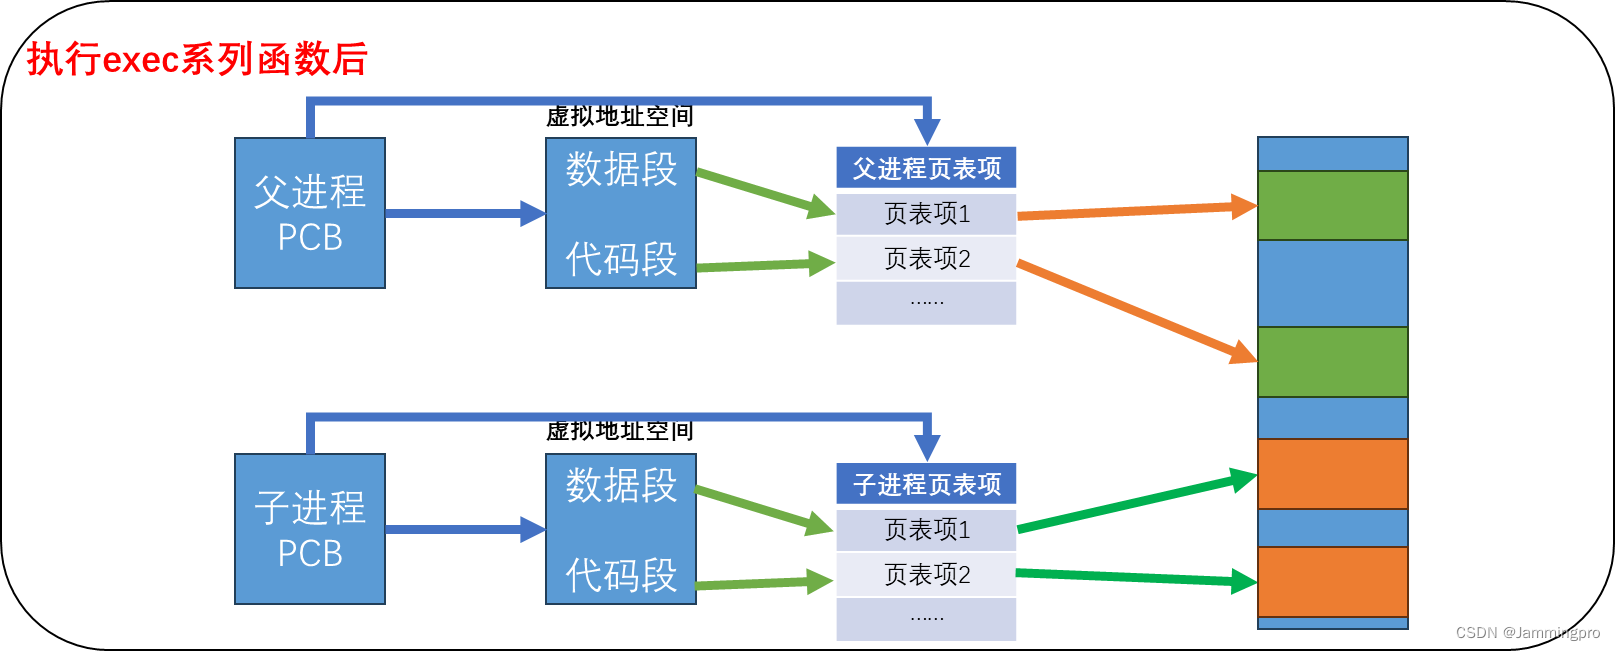
★ps:CPU如何得知替换后程序的入口?Linux中形成的可执行文件是有格式的(即ELF),可执行文件的表头包含可执行程序的入口地址、页表、mm_struct(程序地址空间)等。
替换函数
下面了解一下exec系列函数->替换换函数共有7个,先看一下它们,对它们有一个大致印象↓↓↓(除了execve在2号man手册,其余均位于3号man手册)
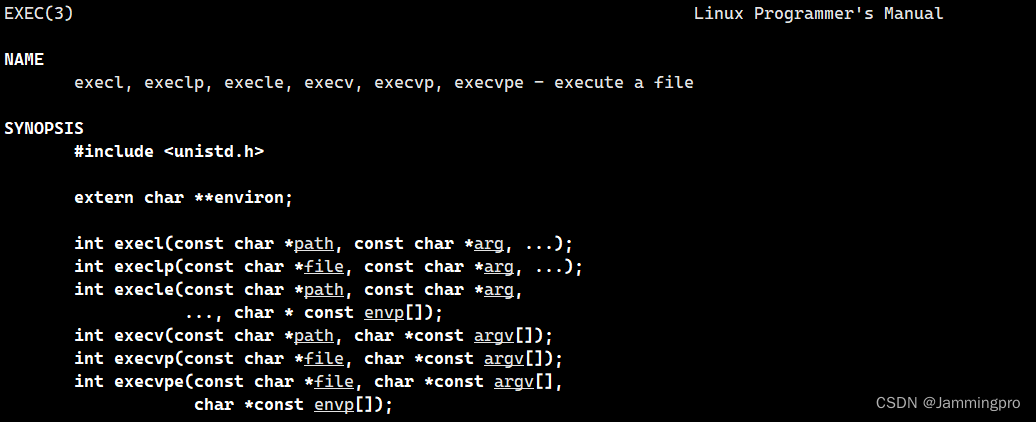

下面给出每个exec系列函数的使用方法↓↓↓
execl
int execl(const char* path, const char* arg, ...)
execl的第一个参数需要传入可执行文件的绝对路径,例如,可以传入/usr/bin/ls。而余下参数为可变参数,传入形式就和我们使用命令行命令一样,先给出命令名称,再给出命令行参数,最终以NULL结尾,例如,“ls”、“-a”、“-l”、NULL。
★ps:execl的l表示list(列出)的意思,即需要列出每个命令行参数。
下面给出接口使用示例↓↓↓
#include <stdio.h>
#include <stdlib.h>
#include <unistd.h>
#include <sys/types.h>
#include <sys/wait.h>int main()
{pid_t id = fork();if(id < 0){perror("fork");exit(1);}else if(id == 0){execl("/usr/bin/ls", "ls", "-a", "-l", NULL);exit(2);}else{int status = 0;pid_t ret = waitpid(id, &status, 0);if(WIFEXITED(status)){printf("Wait %d success! exitcode is %d\n", ret, WEXITSTATUS(status));}}return 0;
}

execlp
int execlp(const char* file, const char* arg, ...);
execlp第一个参数如果是存在于PATH环境变量中的可执行文件(如命令等),可以直接写出可执行文件名称即可,不用写绝对路径,因为execlp在执行时,会在PATH环境变量中的各个目录下查找对应的可执行文件;但如果是不存放于PATH环境变量中的各个目录下的可执行文件,则需要使用绝对路径。而余下参数为可变参数,传入形式就和我们使用命令行命令一样,先给出命令名称,再给出命令行参数,最终以NULL结尾,这与execl相同。
★ps:exec系列函数中,主要带有p的,如果可执行文件存在于PATH环境变量中,均不需要使用绝对路径,只需要给出可执行文件名即可。
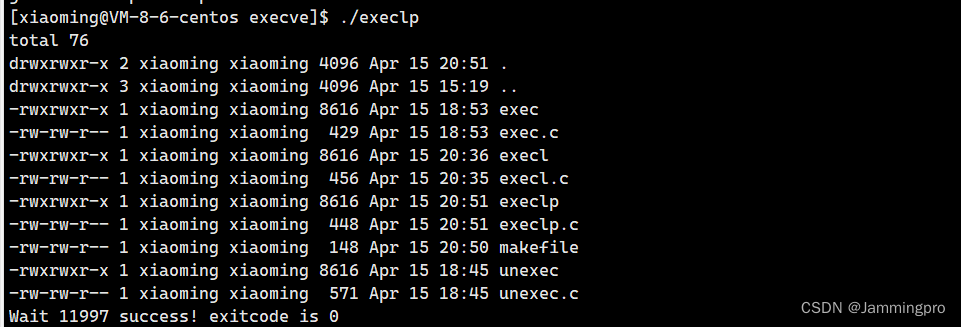
下面给出接口使用示例↓↓↓
#include <stdio.h>
#include <stdlib.h>
#include <unistd.h>
#include <sys/types.h>
#include <sys/wait.h>int main()
{pid_t id = fork();if(id < 0){perror("fork");exit(1);}else if(id == 0){execlp("ls", "ls", "-a", "-l", NULL);exit(2);}else{int status = 0;pid_t ret = waitpid(id, &status, 0);if(WIFEXITED(status)){printf("Wait %d success! exitcode is %d\n", ret, WEXITSTATUS(status));}}return 0;
}
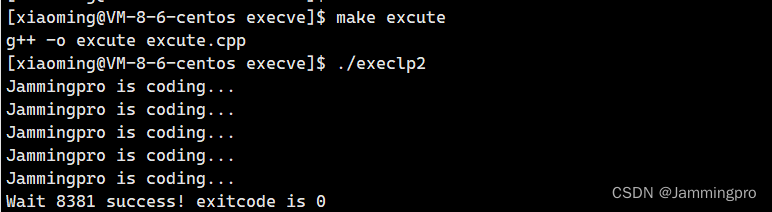
★ps:如果我们的exec系列函数能够执行系统命令,那如何执行我们自己编写的可执行程序呢?下面演示C语言程序调用C++程序↓↓↓
excute.cpp↓↓↓
#include <iostream>
using namespace std;int main()
{for(int i = 0; i < 5; i++){cout << "Jammingpro is coding..." << endl;}return 0;
}
execlp2.c
#include <stdio.h>
#include <stdlib.h>
#include <unistd.h>
#include <sys/types.h>
#include <sys/wait.h>int main()
{pid_t id = fork();if(id < 0){perror("fork");exit(1);}else if(id == 0){execlp("./excute", "excute", NULL);exit(2);}else{int status = 0;pid_t ret = waitpid(id, &status, 0);if(WIFEXITED(status)){printf("Wait %d success! exitcode is %d\n", ret, WEXITSTATUS(status));}}return 0;
}
execle
int execle(const char *path, const char *arg,..., char * const envp[]);
该接口函数的第一个参数path需要使用传入可执行文件的绝对路径,紧接其后的arg与execl用法一致,传入形式就和我们使用命令行命令一样,先给出命令名称,再给出命令行参数,最终以NULL结尾。最后一个参数envp表示环境变量。
子进程默认继承父进程的环境变量,那环境变量是什么时候传给子进程的呢?环境变量也是数据,创建子进程的时候,环境变量就被子进程继承下去了。即使对代码和数据修改时发生写时拷贝,也不会影响父子进程共享同一片环境变量空间。所以发生程序替换时,环境变量信息不会被替换。如果需要对子进程的环境变量做修改可以选择execle、execvpe、execve,这3个exec系列接口。这里先通过execle接口介绍execle、execvpe、execve的两个应用场景↓↓↓
- 希望子进程增加新增或覆盖某些环境变量
下面代码中,父进程fork创建子进程后,子进程在进行程序替换前,给自己增加了一个"Jammingpro=666"的环境变量。子进程能获取该环境变量,而父进程无法获取该环境变量。
execle_test.c↓↓↓
#include <stdio.h>
#include <stdlib.h>int main()
{char* s = getenv("Jammingpro");if(s != NULL) printf("%s\n", s);return 0;
}
execle1.c↓↓↓
#include <stdio.h>
#include <stdlib.h>
#include <unistd.h>
#include <sys/types.h>
#include <sys/wait.h>int main()
{extern char **environ;pid_t id = fork();if(id < 0){perror("fork");exit(1);}else if(id == 0)//子进程{extern char **environ;putenv("Jammingpro=666");//给子进程新增环境变量,该语句子进程会执行execle("./execle_test", "execle_test", NULL, environ);exit(2);}else//父进程{int status = 0;pid_t ret = waitpid(id, &status, 0);char* s = getenv("Jammingpro");if(s != NULL) printf("%s", s);if(WIFEXITED(status)){printf("Wait %d success! exitcode is %d\n", ret, WEXITSTATUS(status));}}return 0;
}

- 安全考虑及定制化场景
出于安全考虑,不希望子进程获取父进程的环境变量;或者因为子进程需要定制与父进程完全不一样的环境变量。可以定义一个字符指针数组,在该数组中存储子进程专属的环境变量,当使用execle、execvpe、execve将该环境变量传入时,会直接覆盖从父进程继承下来的环境变量。
下面代码中,给子进程创建专门的环境变量,子进程此时可以获取专门的环境变量"Jammingpro=666",但无法获取父进程的环境变量PWD,因为使用exec带e的接口时,直接覆盖了子进程从父进程那里继承的环境变量。而父进程能获取从bash继承下来的环境变量,而无法获取子进程专属的环境变量。
execle_test2.c↓↓↓
#include <stdio.h>
#include <stdlib.h>int main()
{char* s = getenv("Jammingpro");if(s != NULL) printf("%s\n", s);else printf("Don't have Jammingpro\n");s = getenv("PWD");if(s != NULL) printf("%s\n", s);else printf("Don't have PWD\n");return 0;
}
execle2.c↓↓↓
#include <stdio.h>
#include <stdlib.h>
#include <unistd.h>
#include <sys/types.h>
#include <sys/wait.h>int main()
{extern char **environ;pid_t id = fork();if(id < 0){perror("fork");exit(1);}else if(id == 0)//子进程{char* env[] = {"Jammingpro=666", "xiaoming=888"};execle("./execle_test2", "execle_test2", NULL, env);exit(2);}else//父进程{int status = 0;pid_t ret = waitpid(id, &status, 0);char* s = getenv("Jammingpro");if(s != NULL) printf("%s\n", s);else printf("Don't have Jammingpro\n");s = getenv("PWD");if(s != NULL) printf("%s\n", s);else printf("Don't have PWD\n");if(WIFEXITED(status)){printf("Wait %d success! exitcode is %d\n", ret, WEXITSTATUS(status));}}return 0;
}

★ps:关于putenv与exec带e系列接口原理探索
子进程和父进程的PCB内都有一个环境变量表指针,当子进程刚创建时,子进程的环境变量表指针与父进程指向同一个位置,一旦子进程调用putenv尝试对环境表做修改,此时则会发生写时拷贝。
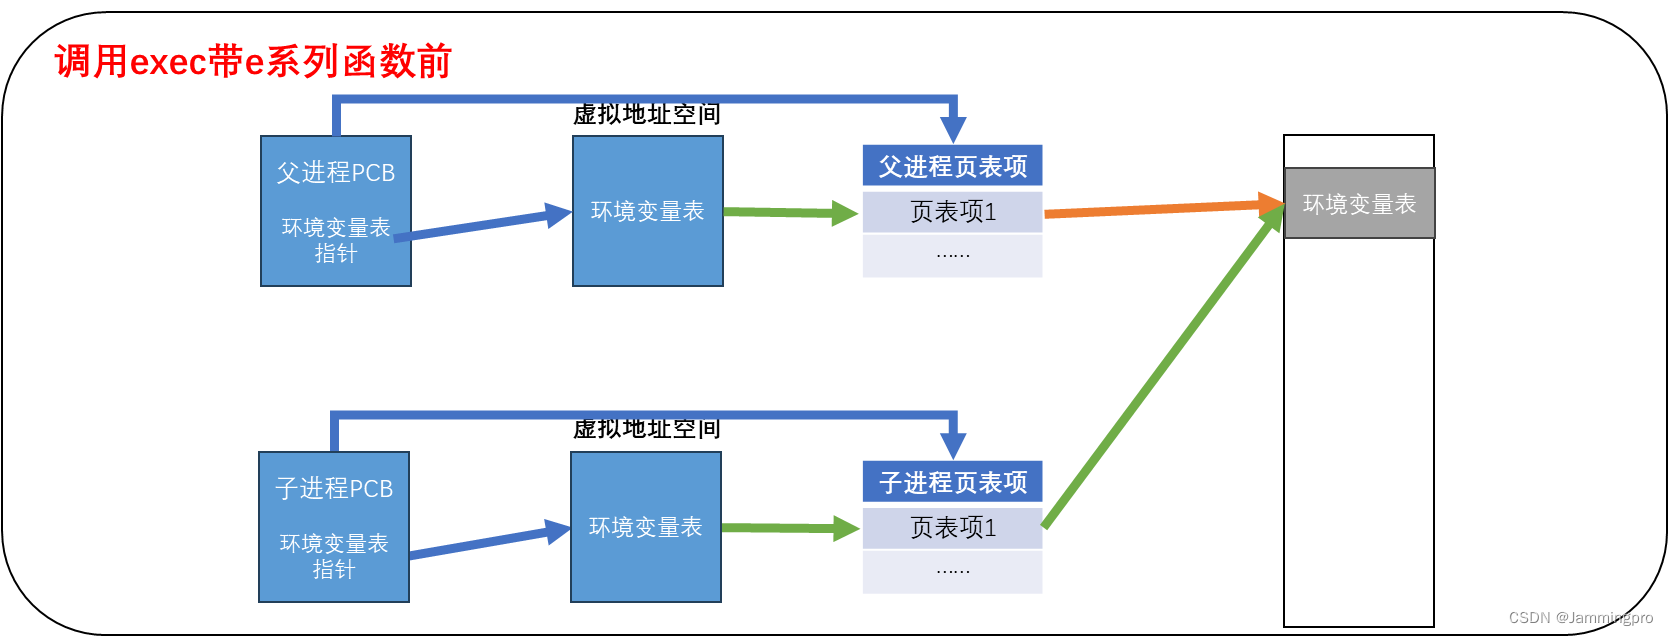

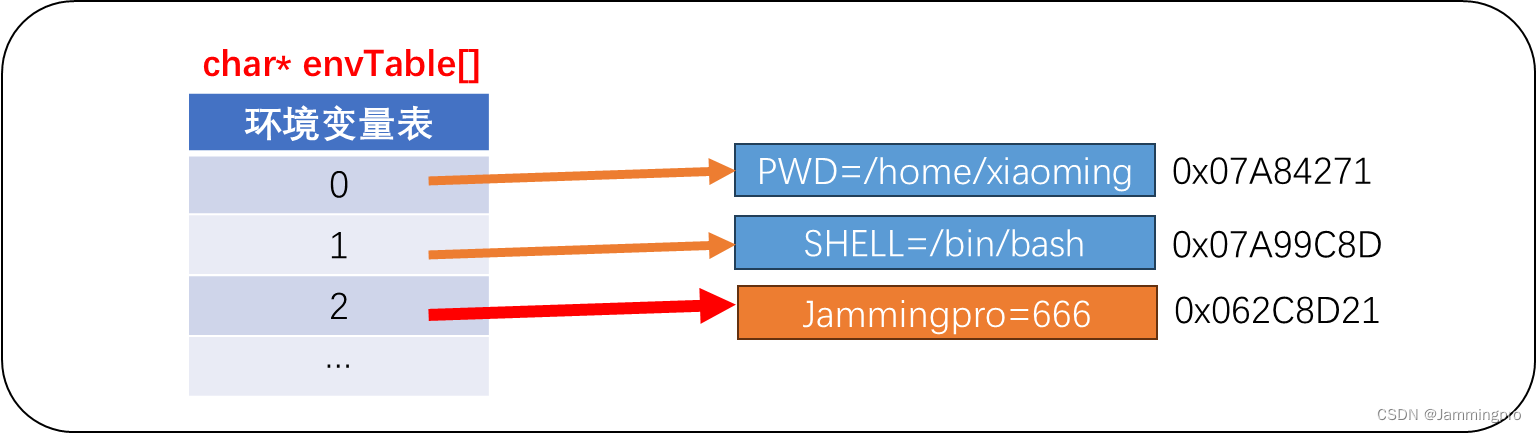
环境变量表是是一个字符指针数组,也就是说:环境变量表中并不会直接存储对应的环境变量,而是存储各个环境变量的存储地址。当我们使用putenv时,本质是将我们定义环境变量(字符串或char类型数组)的首地址存储到该环境变量中。如果定义一个char env[100] = "Jammingpro=666",再执行putenv(env),则会将env的首地址存储到环境变量表中。此时不可以修改env数组中的内容,一旦修改,则对应的环境变量会跟着发生变化。
putenv只是修改环境变量表中某个表项的指向。但如果我们使用的是exec带e系列函数,则会直接修改进程PCB中环境变量表指针的指向。
execv
int execv(const char *path, char *const argv[]);
该接口第一个参数需要传入可执行程序的绝对路径,第二参数需要传入命令行参数,不同的是,这里并不是使用可变参数列表的方式,而是使用字符指针数组的方式。例如,我们需要执行ls命令,则第一个参数需要传入/usr/bin/ls,第二个参数需要先定义一个字符指针数组char* opts[] = {"ls", "-a", "-l", NULL},再将该数组作为第二参数传入。
★ps:exec系列函数中,带v的,则第二个参数需要以字符指针数组的形式传入命令行参数。
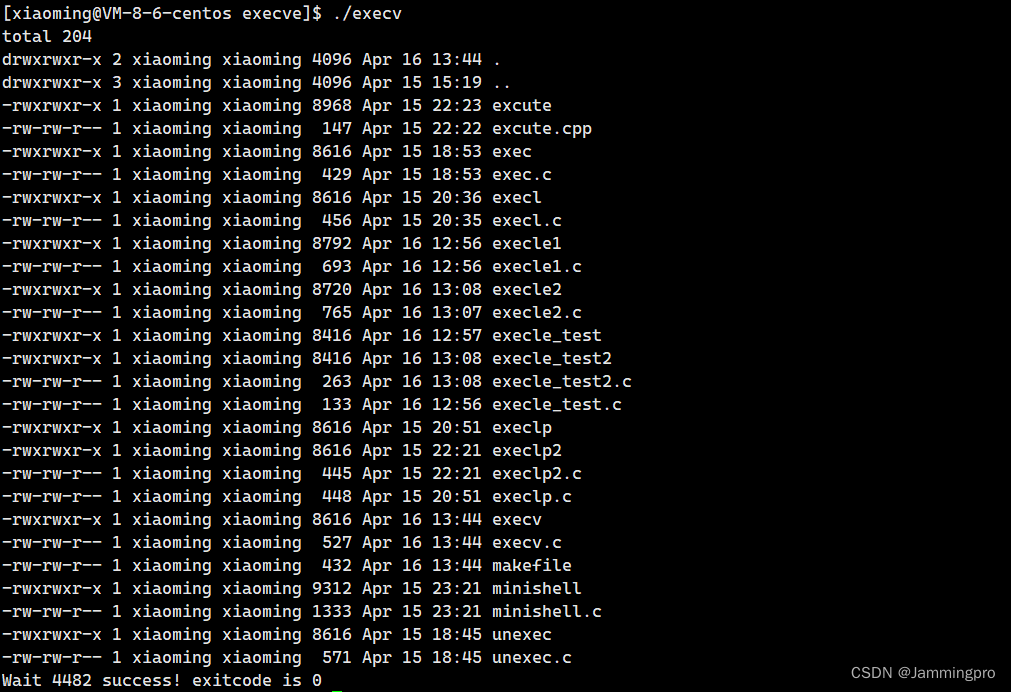
下面给出接口使用示例↓↓↓
#include <stdio.h>
#include <stdlib.h>
#include <unistd.h>
#include <sys/types.h>
#include <sys/wait.h>int main()
{extern char **environ;pid_t id = fork();if(id < 0){perror("fork");exit(1);}else if(id == 0)//子进程{char* opts[] = {"ls", "-a", "-l", NULL};execv("/usr/bin/ls", opts);exit(2);}else//父进程{int status = 0;pid_t ret = waitpid(id, &status, 0);if(WIFEXITED(status)){printf("Wait %d success! exitcode is %d\n", ret, WEXITSTATUS(status));}}return 0;
}
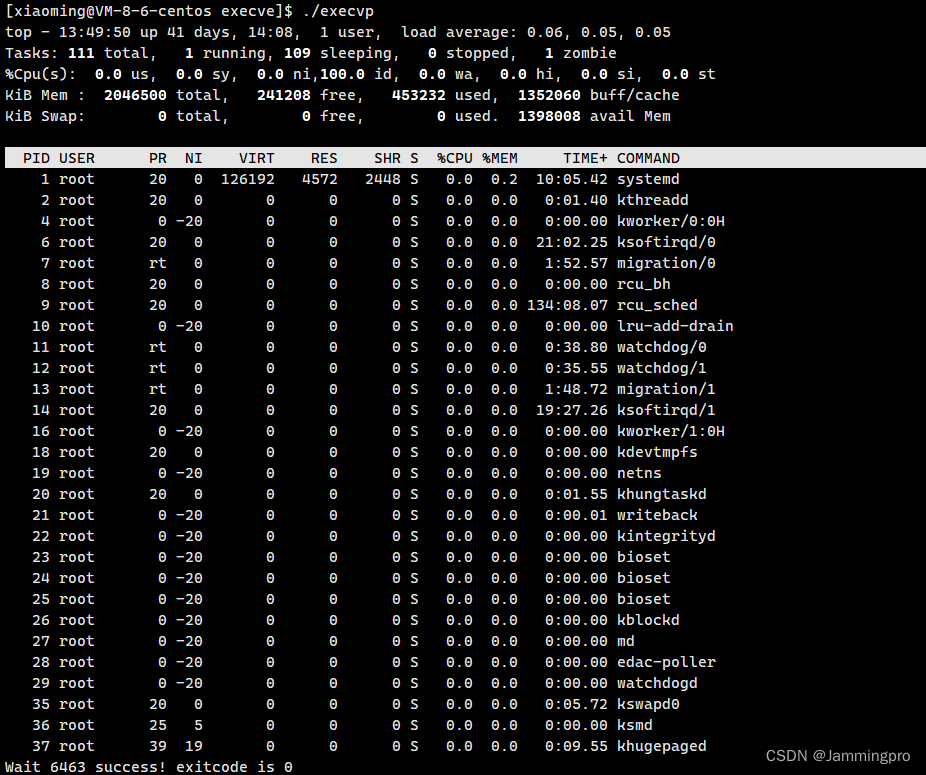
execvp
int execvp(const char *file, char *const argv[]);
该接口第一个参数传入可执行文件,如果该可执行文件可以在PATH环境变量中找到,则不需要使用绝对路径,否则需要使用绝对路径;第二个参数需要以字符指针数组的形式传入命令行参数。
下面给出接口使用示例↓↓↓
#include <stdio.h>
#include <stdlib.h>
#include <unistd.h>
#include <sys/types.h>
#include <sys/wait.h>int main()
{extern char **environ;pid_t id = fork();if(id < 0){perror("fork");exit(1);}else if(id == 0)//子进程{char* opts[] = {"top", NULL};execvp("top", opts);exit(2);}else//父进程{int status = 0;pid_t ret = waitpid(id, &status, 0);if(WIFEXITED(status)){printf("Wait %d success! exitcode is %d\n", ret, WEXITSTATUS(status));}}return 0;
}
execvpe
int execvpe(const char *file, char *const argv[],char *const envp[]);
该接口第一个参数传入可执行文件,如果该可执行文件可以在PATH环境变量中找到,则不需要使用绝对路径,否则需要使用绝对路径;第二个参数需要以字符指针数组的形式传入命令行参数;第三个参数需要传入环境变量。
下面给出接口使用示例(给子进程传入自定义环境变量)↓↓↓
#include <stdio.h>
#include <stdlib.h>
#include <unistd.h>
#include <sys/types.h>
#include <sys/wait.h>int main()
{extern char **environ;pid_t id = fork();if(id < 0){perror("fork");exit(1);}else if(id == 0)//子进程{char* opts[] = {"top", NULL};char* env[] = {"Jammingpro=666"};execvpe("./execle_test", opts, env);exit(2);}else//父进程{int status = 0;pid_t ret = waitpid(id, &status, 0);if(WIFEXITED(status)){printf("Wait %d success! exitcode is %d\n", ret, WEXITSTATUS(status));}}return 0;
}

execve
int execve(const char *filename, char *const argv[],char *const envp[]);
该接口第一个参数需要传入可执行程序的绝对路径,第二个参数需要以指针数组的方式传入命令行参数,第三个参数需要传入环境变量。
下面给出该接口的使用方式↓↓↓
#include <stdio.h>
#include <stdlib.h>
#include <unistd.h>
#include <sys/types.h>
#include <sys/wait.h>int main()
{extern char **environ;pid_t id = fork();if(id < 0){perror("fork");exit(1);}else if(id == 0)//子进程{char* opts[] = {"top", NULL};char* env[] = {"Jammingpro=666"};execve("./execle_test", opts, env);exit(2);}else//父进程{int status = 0;pid_t ret = waitpid(id, &status, 0);if(WIFEXITED(status)){printf("Wait %d success! exitcode is %d\n", ret, WEXITSTATUS(status));}}return 0;
}

替换函数总结
上面总结上面介绍的各个替换函数↓↓↓
| 函数名 | 参数格式 | PATH中可执行程序是否需要带绝对路径 | 是否使用当前环境变量 |
|---|---|---|---|
| execl | 列表 | 是 | 是 |
| execlp | 列表 | 不是 | 是 |
| execle | 列表 | 是 | 不是,需自己组装环境变量 |
| execv | 数组 | 是 | 是 |
| execvp | 数组 | 不是 | 是 |
| execvpe | 数组 | 不是 | 不是,需自己组装环境变量 |
| execve | 数组 | 是 | 不是,需自己组装环境变量 |
上面的exec系列函数中,如果带有p的,则第一个参数的可执行文件若存在于PATH环境变量中,则只需要填写可执行文件名;如果带有v的,则需要以字符指针数组的形式传入命令行参数;如果是带e的,则需要自己组装环境变量。
上面的各个接口统称为加载器,它们为即将替换进来的可执行程序加载入参数列表、环境变量等信息。下面我们使用execvpe接口给自定义可执行程序传入命令行参数及环境变量,该可执行程序将会把命令行参数及环境变量打印至显示器↓↓↓
printInfo.c
#include <stdio.h>int main(int argc, char* argv[]; char* env[])
{printf("传入%d个命令行参数,分别是:\n", argc);int i = 0;for(; argv[i]; i++){printf("[%d]->%s\n", i, argv[i]);}printf("--------------------------------------\n");printf("环境变量分别是:\n");i = 0;for(; env[i]; i++){printf("[%d]->%s\n", i, env[i]);}return 0;
}
execvpe2.c
#include <stdio.h>
#include <stdlib.h>
#include <unistd.h>
#include <sys/types.h>
#include <sys/wait.h>int main()
{extern char **environ;pid_t id = fork();if(id < 0){perror("fork");exit(1);}else if(id == 0)//子进程{char* opts[] = {"printInfo", NULL};char* env[] = {"Jammingpro=666", "xiaoming=888"};execvpe("./printInfo", opts, env);exit(2);}else//父进程{int status = 0;pid_t ret = waitpid(id, &status, 0);if(WIFEXITED(status)){printf("Wait %d success! exitcode is %d\n", ret, WEXITSTATUS(status));}}return 0;
}
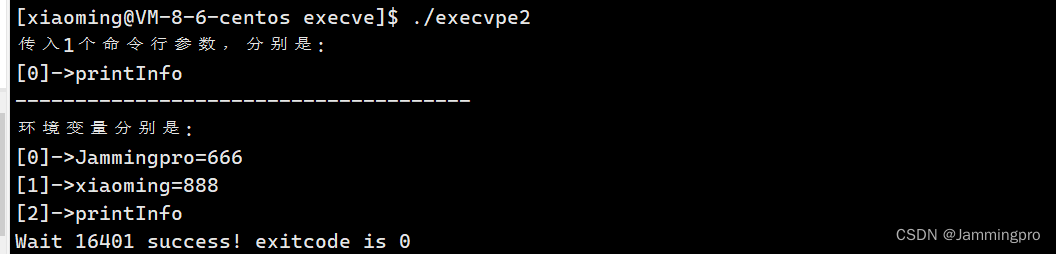
上述各个接口中,只有execve是系统调用,其他均是对该系统调用接口的封装。这也就是为什么execve位于2号手册,而其他接口函数位于3号手册的原因。
实现简易Shell
我们来模拟实现一个Shell,这个Shell具有一些常用的简易功能。下面我们用一张图了解一下Linux中bash(Shell的一种)的执行过程↓↓↓
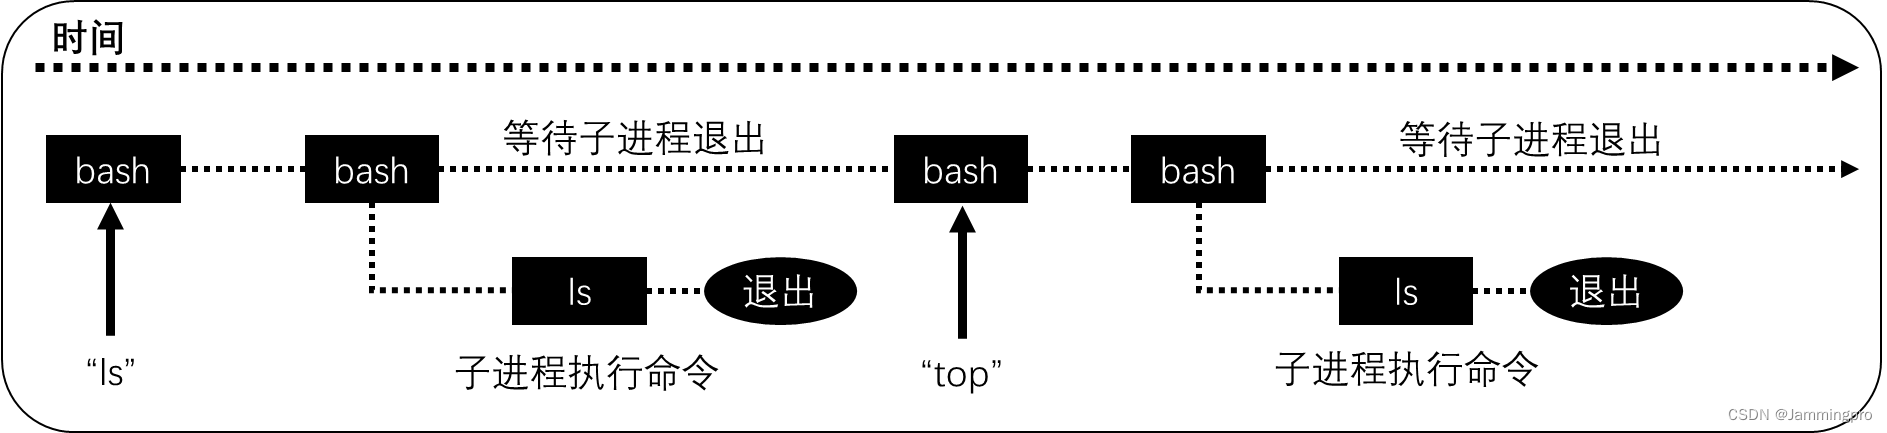
一个shell程序需要循环做的事如下:
1.获取命令行
2.解析命令行
3.创建子程序
4.替换子程序
5.父进程等待子进程退出
下面我们先来完成第一步获取命令行↓↓↓
#include <stdio.h>
#include <stdlib.h>
#include <string.h>
#include <assert.h>
#include <unistd.h>
#include <sys/types.h>
#include <sys/wait.h>#define LEFT "["
#define RIGHT "]"
#define LABLE "#"#define COM_LEN 1024	//输入命令行长度
#define PWD_LEN 128		//当前路径长度char command[COM_LEN];	//命令行缓冲区
char pwd[PWD_LEN];		//当前路径缓冲区//获取用户名
const char* getUser()
{return getenv("USER");
}//获取当前路径
const char* getPWD()
{getcwd(pwd, sizeof(pwd));return pwd;
}//获取主机名
const char* getHostName()
{return getenv("HOSTNAME");
}//输出提示信息&&获取用户输入
void getCommand()
{printf(LEFT"%s@%s %s"RIGHT""LABLE" ", getHostName(), getUser(), getPWD());char* s = fgets(command, sizeof(command), stdin);assert(s != NULL);(void)s;s[strlen(command) - 1] = '\0';printf("%s\n", command);
}int main()
{while(1){getCommand();}return 0;
}

下面我们需要对获取的字符串进行切割↓↓↓
★ps:下面spliteString中使用了条件编译,当编译时带上-DDEBUG,就可以输出分隔的结果
#include <stdio.h>
#include <stdlib.h>
#include <string.h>
#include <assert.h>
#include <unistd.h>
#include <sys/types.h>
#include <sys/wait.h>#define LEFT "["
#define RIGHT "]"
#define LABLE "#"
#define SEP " \t"#define COM_LEN 1024
#define ARG_LEN 64
#define PWD_LEN 128char command[COM_LEN];
char *argv[ARG_LEN];
char pwd[PWD_LEN];
int argc = 0;const char* getUser()
{return getenv("USER");
}const char* getPWD()
{getcwd(pwd, sizeof(pwd));return pwd;
}const char* getHostName()
{return getenv("HOSTNAME");
}//输出提示信息&&获取用户输入
void getCommand()
{printf(LEFT"%s@%s %s"RIGHT""LABLE" ", getHostName(), getUser(), getPWD());char* s = fgets(command, sizeof(command), stdin);assert(s != NULL);(void)s;s[strlen(command) - 1] = '\0';
}//分隔字符串
void spliteString()
{argc = 0;argv[argc++] = strtok(command, SEP);while(argv[argc++] = strtok(NULL, SEP));
#ifdef DEBUG int j = 0;for(;argv[j]; j++){printf("[%d]->%s\n", j, argv[j]);}
#endif
}int main()
{while(1){getCommand();spliteString();}return 0;
}
使用normalExcute创建子进程,使用程序替换的方式,让子进程执行指定程序,如果子进程替换失败则返回EXIT_CODE。父进程等待子进程,并将子进程退出码保存在exitcode中。
#include <stdio.h>
#include <stdlib.h>
#include <string.h>
#include <assert.h>
#include <unistd.h>
#include <sys/types.h>
#include <sys/wait.h>#define LEFT "["
#define RIGHT "]"
#define LABLE "#"
#define SEP " \t"
#define EXIT_CODE 66#define COM_LEN 1024
#define ARG_LEN 64
#define ENV_LEN 32
#define PWD_LEN 128char command[COM_LEN];
char *argv[ARG_LEN];
char pwd[PWD_LEN];
int argc = 0;
int exitcode = 0;const char* getUser()
{return getenv("USER");
}const char* getPWD()
{getcwd(pwd, sizeof(pwd));return pwd;
}const char* getHostName()
{return getenv("HOSTNAME");
}//输出提示信息&&获取用户输入
void getCommand()
{printf(LEFT"%s@%s %s"RIGHT""LABLE" ", getHostName(), getUser(), getPWD());char* s = fgets(command, sizeof(command), stdin);assert(s != NULL);(void)s;s[strlen(command) - 1] = '\0';
}//分隔字符串
void spliteString()
{argc = 0;argv[argc++] = strtok(command, SEP);while(argv[argc++] = strtok(NULL, SEP));
#ifdef DEBUG int j = 0;for(;argv[j]; j++){printf("[%d]->%s\n", j, argv[j]);}
#endif
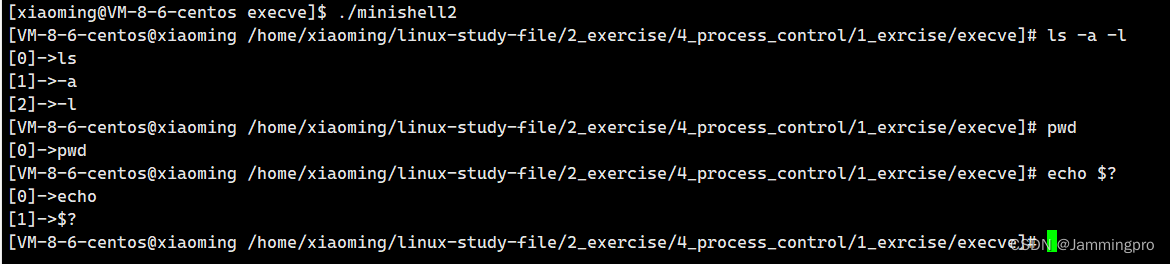
}void normalExcute()
{pid_t id = fork();assert(id != -1);if(id == 0){exitcode = 0;execvp(argv[0], argv);exit(EXIT_CODE);}else {int status = 0;pid_t id = waitpid(id, &status, 0);exitcode = WEXITSTATUS(status);}
}int main()
{while(1){getCommand();spliteString();normalExcute();}return 0;
}
截至到这里,我们已经实现了能够执行大部分命令的Shell程序。但如果我们执行cd命令,当前路径却没有改变。这是为什么呢?
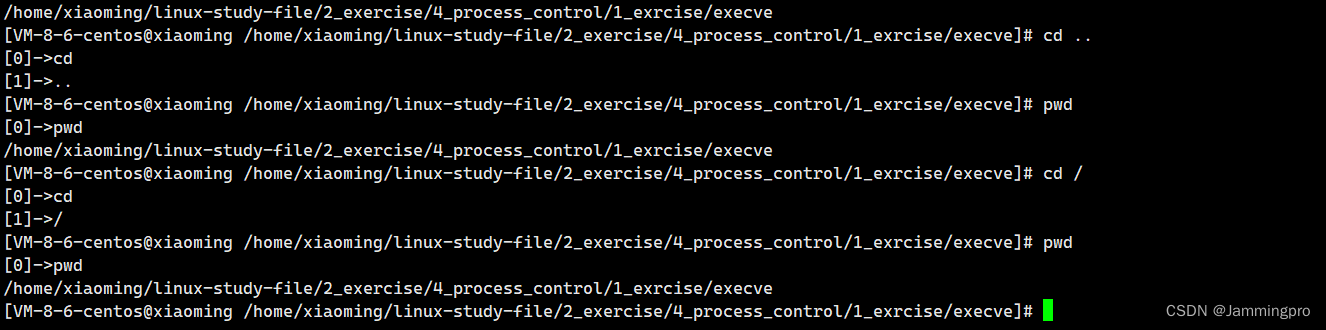
当子进程被创建后,由子进程执行cd命令,则修改环境变量PWD时,子进程会发生写时拷贝,保证父子进程的独立性。因而,子进程的PWD改变,不会影响父进程。像这样的命令需要使用内建命令的方式解决,即遇到这类命令时,不让子进程执行,而是由父进程自己执行对应的函数。下面通过设置buildExcute函数,不能交由子进程执行的命令进行了特殊处理↓↓↓
#include <stdio.h>
#include <stdlib.h>
#include <string.h>
#include <assert.h>
#include <unistd.h>
#include <sys/types.h>
#include <sys/wait.h>#define LEFT "["
#define RIGHT "]"
#define LABLE "#"
#define SEP " \t"
#define EXIT_CODE 66#define COM_LEN 1024
#define ARG_LEN 64
#define ENV_LEN 32
#define PWD_LEN 128char *env[ENV_LEN];
char command[COM_LEN];
char *argv[ARG_LEN];
char pwd[PWD_LEN];
int argc = 0;
int envNum = 0;
int exitcode = 0;const char* getUser()
{return getenv("USER");
}const char* getPWD()
{getcwd(pwd, sizeof(pwd));return pwd;
}const char* getHostName()
{return getenv("HOSTNAME");
}//输出提示信息&&获取用户输入
void getCommand()
{printf(LEFT"%s@%s %s"RIGHT""LABLE" ", getHostName(), getUser(), getPWD());char* s = fgets(command, sizeof(command), stdin);assert(s != NULL);(void)s;s[strlen(command) - 1] = '\0';
}//分隔字符串
void spliteString()
{argc = 0;argv[argc++] = strtok(command, SEP);while(argv[argc++] = strtok(NULL, SEP));
#ifdef DEBUG int j = 0;for(;argv[j]; j++){printf("[%d]->%s\n", j, argv[j]);}
#endif
}void normalExcute()
{pid_t id = fork();assert(id != -1);if(id == 0){exitcode = 0;execvp(argv[0], argv);exit(EXIT_CODE);}else {int status = 0;pid_t id = waitpid(id, &status, 0);exitcode = WEXITSTATUS(status);}
}int buildExcute()
{if(argc == 3 && strcmp(argv[0], "cd") == 0){int ret = chdir(argv[1]);if(ret != -1) exitcode = 0;else exitcode = EXIT_CODE;return 1;}else if(argc == 3 && strcmp(argv[0], "export") == 0){env[envNum] = (char*)malloc(sizeof(argv[1]) + 1);strcpy(env[envNum], argv[1]);int ret = putenv(env[envNum++]);if(ret == 0) exitcode = 0;else exitcode = EXIT_CODE;return 1;}else if(argc == 3 && strcmp(argv[0], "echo") == 0){if(strcmp(argv[1], "$?") == 0) printf("%d\n", exitcode);else printf("%s\n", argv[1]);return 1;}else if(strcmp(argv[0], "ls") == 0){argv[argc - 1] = (char*)"--color=auto";argv[argc] = NULL;}return 0;
}int main()
{while(1){getCommand();spliteString();int ret = buildExcute();if(!ret) normalExcute();}return 0;
}
至此,能执行大部分命令的Shell程序就大功告成了。但该程序并没有所有内建命令做处理。

★ps:当我们登录Linux的时候,就要启动一个shell进程,该进程会从用户home目录的.bash_profile中获取环境变量,从而读入环境变量。从上面的自定义实现shell程序中可知,export导入环境变量仅在当前shell进程有效。如果需要设置永久性环境变量,需要修改系统的环境变量配置文件。
★ps:现象:程序替换成功后,exec系列函数后的代码不会被执行;若替换失败,则继续向下执行。这也解释了exec系列函数为什么只有失败返回值,而没有正确返回值。一旦正确,后序代码不会执行,该正确返回值也无法使用。

🎈欢迎进入从浅学到熟知Linux专栏,查看更多文章。
如果上述内容有任何问题,欢迎在下方留言区指正b( ̄▽ ̄)d