系列文章目录
- React 使用 three.js 加载 gltf 3D模型 | three.js 入门
- React + three.js 3D模型骨骼绑定
- React + three.js 3D模型面部表情控制
- React + three.js 实现人脸动捕与3D模型表情同步
- 结合 react-webcam、three.js 与 electron 实现桌面人脸动捕应用
示例项目(github):https://github.com/couchette/simple-facial-expression-sync-desktop-app-demo
文章目录
- 系列文章目录
- 前言
- 一、准备工作
- 1. 创建项目
- 2. 安装依赖
- 3. 本地化配置
- 下载AI模型
- 下载模型配置文件
- 复制transcoder配置文件
- 下载3D模型
- 配置CSP允许使用wasm
- 设置webpack配置
- 二、实现步骤
- 1.创建detecor
- 2. 实现WebCam
- 3. 创建3D模型渲染容器
- 4. 将三者组合起来实现一个页面
- 三、最终效果
- 总结
前言
开发桌面级别的人脸动捕应用程序是一个具有挑战性但也充满创意的任务。本文将介绍如何利用 React-Webcam、Three.js 和 Electron 结合起来,轻松实现一个功能强大的桌面人脸动捕应用。
在本文中,我们将详细介绍如何结合这三种技术,从搭建基础环境到实现人脸捕捉和渲染,最终打造出一个功能完善的桌面人脸动捕应用。无论您是想要深入了解这些技术的原理,还是想要快速构建一个个性化的人脸动捕应用,本文都将为您提供全面的指导和实践经验。
一、准备工作
1. 创建项目
参考让你的软件自动更新,如何使用github和electron-react-boilerplate跨平台应用模板项目实现软件的自动更新功能 使用electron-react-boilerpalte 作为模版项目创建项目,本地将以下面的fork项目作为模版项目,创建项目,该fork包括electron配置脚本(用于配置镜像地址),和一些自制的组件,有实力的小伙伴也可以自制属于自己的模板项目。
https://github.com/couchette/electron-react-boilerplate
2. 安装依赖
npm i
npm i react-webcam antd three @mediapipe/tasks-vision
npm i -D copy-webpack-plugin
3. 本地化配置
下载AI模型
从下面的地址下载模型到assets/ai_models目录下
https://storage.googleapis.com/mediapipe-models/face_landmarker/face_landmarker/float16/1/face_landmarker.task
下载模型配置文件
从下面地址下载wasm目录到assets/fileset_resolver目录下
https://cdn.jsdelivr.net/npm/@mediapipe/tasks-vision@0.10.0/wasm
复制transcoder配置文件
复制目录 node_modules/three/examples/jsm/libs/basis到assets目录下
下载3D模型
从下面地址下载3D人脸模型到目录assets/models目录下
https://github.com/mrdoob/three.js/blob/master/examples/models/gltf/facecap.glb
配置CSP允许使用wasm
修改src/render/index.ejs内容如下(这将导致CSP安全警告,目前没有不清楚有其他方法可以在electron-react-boilerplate使用wasm,有知道的大神请告诉我该如何配置,拜谢了)
<!doctype html>
<html><head><meta charset="utf-8" /><metahttp-equiv="Content-Security-Policy"content="script-src 'self' 'unsafe-inline' 'unsafe-eval'; worker-src 'self' blob:;"/><title>emberface</title></script></head><body><div id="root"></div></body>
</html>
设置webpack配置
修改.erb/configs/webpack.config.base.ts文件内容如下
/*** Base webpack config used across other specific configs*/import path from 'path';
import webpack from 'webpack';
import TsconfigPathsPlugins from 'tsconfig-paths-webpack-plugin';
import CopyPlugin from 'copy-webpack-plugin';
import webpackPaths from './webpack.paths';
import { dependencies as externals } from '../../release/app/package.json';const configuration: webpack.Configuration = {externals: [...Object.keys(externals || {})],stats: 'errors-only',module: {rules: [{test: /\.[jt]sx?$/,exclude: /node_modules/,use: {loader: 'ts-loader',options: {// Remove this line to enable type checking in webpack buildstranspileOnly: true,compilerOptions: {module: 'esnext',},},},},],},output: {path: webpackPaths.srcPath,// https://github.com/webpack/webpack/issues/1114library: {type: 'commonjs2',},},/*** Determine the array of extensions that should be used to resolve modules.*/resolve: {extensions: ['.js', '.jsx', '.json', '.ts', '.tsx'],modules: [webpackPaths.srcPath, 'node_modules'],// There is no need to add aliases here, the paths in tsconfig get mirroredplugins: [new TsconfigPathsPlugins()],},plugins: [new CopyPlugin({patterns: [{from: path.join(webpackPaths.rootPath, 'assets', 'models'),to: path.join(webpackPaths.distRendererPath, 'models'),},{from: path.join(webpackPaths.rootPath, 'assets', 'ai_models'),to: path.join(webpackPaths.distRendererPath, 'ai_models'),},{from: path.join(webpackPaths.rootPath, 'assets', 'basis'),to: path.join(webpackPaths.distRendererPath, 'basis'),},{from: path.join(webpackPaths.rootPath, 'assets', 'fileset_resolver'),to: path.join(webpackPaths.distRendererPath, 'fileset_resolver'),},],}),new webpack.EnvironmentPlugin({NODE_ENV: 'production',}),],
};export default configuration;
二、实现步骤
1.创建detecor
在src/renderer/components/Detector.js中创建Detector单例类,封装模型的初始化和运行方法
import { FaceLandmarker, FilesetResolver } from '@mediapipe/tasks-vision';export default class Detector {constructor() {}// 获取单例实例的静态方法static async getInstance() {if (!Detector.instance) {Detector.instance = new Detector();Detector.instance.results = null;Detector.instance.video = null;const filesetResolver = await FilesetResolver.forVisionTasks(// 'https://cdn.jsdelivr.net/npm/@mediapipe/tasks-vision@0.10.0/wasm','fileset_resolver/wasm',);Detector.instance.faceLandmarker = await FaceLandmarker.createFromOptions(filesetResolver,{baseOptions: {modelAssetPath:// "https://storage.googleapis.com/mediapipe-models/face_landmarker/face_landmarker/float16/1/face_landmarker.task",'ai_models/face_landmarker.task',delegate: 'GPU',},outputFaceBlendshapes: true,outputFacialTransformationMatrixes: true,runningMode: 'VIDEO',numFaces: 1,},);}return Detector.instance;}bindVideo(video) {this.video = video;}detect() {return this.faceLandmarker.detectForVideo(this.video, Date.now());}async detectLoop() {this.results = this.detect();this.detectLoop();}async run() {if (!this.video.srcObject) throw new Error('Video bind is null');this.detectLoop();}
}
2. 实现WebCam
在src/renderer/components/WebCam.js中使用react-webcam实现webcam功能,代码如下
import React, { useState, useRef, useEffect } from 'react';
import { Button, Select, Layout } from 'antd';
import Webcam from 'react-webcam';const { Option } = Select;
const { Content } = Layout;function WebCam({isShowCanvas,canvasHeight,canvasWidth,stream,setStream,videoRef,loaded,setLoaded,
}) {const [isStartCamButtonLoading, setIsStartCamButtonLoading] = useState(false);const [selectedDevice, setSelectedDevice] = useState(null);const [devices, setDevices] = useState([]);const handleVideoLoad = (videoNode) => {const video = videoNode.target;videoRef.current = videoNode.target;if (video.readyState !== 4) return;if (loaded) return;setLoaded(true);setIsStartCamButtonLoading(false);console.log('loaded');};// 获取可用的视频设备列表const getVideoDevices = async () => {const devicesInfo = await navigator.mediaDevices.enumerateDevices();const videoDevices = devicesInfo.filter((device) => device.kind === 'videoinput',);setDevices(videoDevices);};// 切换相机设备const handleDeviceChange = (deviceId) => {setSelectedDevice(deviceId);};// 开启摄像头const startCamera = async () => {setIsStartCamButtonLoading(true);if (!loaded) {const constraints = {video: {deviceId: selectedDevice ? { exact: selectedDevice } : undefined,},};const tempStream = await navigator.mediaDevices.getUserMedia(constraints);setStream(tempStream);}};// 停止摄像头const stopCamera = () => {if (stream) {stream.getTracks().forEach((track) => track.stop());setStream(null);setSelectedDevice(null);setLoaded(false);}};// 获取视频设备列表React.useEffect(() => {getVideoDevices();}, []);return (<Contentstyle={{display: 'flex',flexDirection: 'column',alignItems: 'center',justifyContent: 'center',}}><Selectplaceholder="选择相机"style={{ width: '150px', marginBottom: 16 }}onChange={handleDeviceChange}>{devices.map((device) => (<Option key={device.deviceId} value={device.deviceId}>{device.label || `Camera ${device.deviceId}`}</Option>))}</Select><divstyle={{display: 'flex',flexDirection: 'row',alignContent: 'center',justifyContent: 'center',}}><Button onClick={startCamera} loading={isStartCamButtonLoading}>启动相机</Button><Button onClick={stopCamera} style={{ marginLeft: 8 }}>关闭相机</Button></div><divstyle={{height: String(canvasHeight) + 'px',width: String(canvasWidth) + 'px',margin: '10px',position: 'relative',}}>{stream && (<Webcamstyle={{visibility: isShowCanvas ? 'visible' : 'hidden',position: 'absolute',top: '0',bottom: '0',left: '0',right: '0',}}width={canvasWidth}height={canvasHeight}videoConstraints={{deviceId: selectedDevice ? { exact: selectedDevice } : undefined,}}onLoadedData={handleVideoLoad}/>)}</div></Content>);
}export default WebCam;
3. 创建3D模型渲染容器
在src/renderer/components/ThreeContainer.js中创建3D模型渲染组件,代码内容如下
import * as THREE from 'three';import { OrbitControls } from 'three/addons/controls/OrbitControls.js';
import { RoomEnvironment } from 'three/addons/environments/RoomEnvironment.js';import { GLTFLoader } from 'three/addons/loaders/GLTFLoader.js';
import { KTX2Loader } from 'three/addons/loaders/KTX2Loader.js';
import { MeshoptDecoder } from 'three/addons/libs/meshopt_decoder.module.js';import { GUI } from 'three/addons/libs/lil-gui.module.min.js';
import { useRef, useEffect, useState } from 'react';// Mediapipeconst blendshapesMap = {// '_neutral': '',browDownLeft: 'browDown_L',browDownRight: 'browDown_R',browInnerUp: 'browInnerUp',browOuterUpLeft: 'browOuterUp_L',browOuterUpRight: 'browOuterUp_R',cheekPuff: 'cheekPuff',cheekSquintLeft: 'cheekSquint_L',cheekSquintRight: 'cheekSquint_R',eyeBlinkLeft: 'eyeBlink_L',eyeBlinkRight: 'eyeBlink_R',eyeLookDownLeft: 'eyeLookDown_L',eyeLookDownRight: 'eyeLookDown_R',eyeLookInLeft: 'eyeLookIn_L',eyeLookInRight: 'eyeLookIn_R',eyeLookOutLeft: 'eyeLookOut_L',eyeLookOutRight: 'eyeLookOut_R',eyeLookUpLeft: 'eyeLookUp_L',eyeLookUpRight: 'eyeLookUp_R',eyeSquintLeft: 'eyeSquint_L',eyeSquintRight: 'eyeSquint_R',eyeWideLeft: 'eyeWide_L',eyeWideRight: 'eyeWide_R',jawForward: 'jawForward',jawLeft: 'jawLeft',jawOpen: 'jawOpen',jawRight: 'jawRight',mouthClose: 'mouthClose',mouthDimpleLeft: 'mouthDimple_L',mouthDimpleRight: 'mouthDimple_R',mouthFrownLeft: 'mouthFrown_L',mouthFrownRight: 'mouthFrown_R',mouthFunnel: 'mouthFunnel',mouthLeft: 'mouthLeft',mouthLowerDownLeft: 'mouthLowerDown_L',mouthLowerDownRight: 'mouthLowerDown_R',mouthPressLeft: 'mouthPress_L',mouthPressRight: 'mouthPress_R',mouthPucker: 'mouthPucker',mouthRight: 'mouthRight',mouthRollLower: 'mouthRollLower',mouthRollUpper: 'mouthRollUpper',mouthShrugLower: 'mouthShrugLower',mouthShrugUpper: 'mouthShrugUpper',mouthSmileLeft: 'mouthSmile_L',mouthSmileRight: 'mouthSmile_R',mouthStretchLeft: 'mouthStretch_L',mouthStretchRight: 'mouthStretch_R',mouthUpperUpLeft: 'mouthUpperUp_L',mouthUpperUpRight: 'mouthUpperUp_R',noseSneerLeft: 'noseSneer_L',noseSneerRight: 'noseSneer_R',// '': 'tongueOut'
};function ThreeContainer({ videoHeight, videoWidth, detectorRef }) {const containerRef = useRef(null);const isContainerRunning = useRef(false);useEffect(() => {if (!isContainerRunning.current && containerRef.current) {isContainerRunning.current = true;init();}async function init() {const renderer = new THREE.WebGLRenderer({ antialias: true });renderer.setPixelRatio(window.devicePixelRatio);renderer.setSize(window.innerWidth, window.innerHeight);renderer.toneMapping = THREE.ACESFilmicToneMapping;const element = renderer.domElement;containerRef.current.appendChild(element);const camera = new THREE.PerspectiveCamera(60,window.innerWidth / window.innerHeight,1,100,);camera.position.z = 5;const scene = new THREE.Scene();scene.scale.x = -1;const environment = new RoomEnvironment(renderer);const pmremGenerator = new THREE.PMREMGenerator(renderer);scene.background = new THREE.Color(0x666666);scene.environment = pmremGenerator.fromScene(environment).texture;// const controls = new OrbitControls(camera, renderer.domElement);// Facelet face, eyeL, eyeR;const eyeRotationLimit = THREE.MathUtils.degToRad(30);const ktx2Loader = new KTX2Loader().setTranscoderPath('/basis/').detectSupport(renderer);new GLTFLoader().setKTX2Loader(ktx2Loader).setMeshoptDecoder(MeshoptDecoder).load('models/facecap.glb', (gltf) => {const mesh = gltf.scene.children[0];scene.add(mesh);const head = mesh.getObjectByName('mesh_2');head.material = new THREE.MeshNormalMaterial();face = mesh.getObjectByName('mesh_2');eyeL = mesh.getObjectByName('eyeLeft');eyeR = mesh.getObjectByName('eyeRight');// GUIconst gui = new GUI();gui.close();const influences = head.morphTargetInfluences;for (const [key, value] of Object.entries(head.morphTargetDictionary,)) {gui.add(influences, value, 0, 1, 0.01).name(key.replace('blendShape1.', '')).listen(influences);}renderer.setAnimationLoop(() => {animation();});});// const texture = new THREE.VideoTexture(video);// texture.colorSpace = THREE.SRGBColorSpace;const geometry = new THREE.PlaneGeometry(1, 1);const material = new THREE.MeshBasicMaterial({// map: texture,depthWrite: false,});const videomesh = new THREE.Mesh(geometry, material);scene.add(videomesh);const transform = new THREE.Object3D();function animation() {if (detectorRef.current !== null) {// console.log(detectorRef.current);const results = detectorRef.current.detect();if (results.facialTransformationMatrixes.length > 0) {const facialTransformationMatrixes =results.facialTransformationMatrixes[0].data;transform.matrix.fromArray(facialTransformationMatrixes);transform.matrix.decompose(transform.position,transform.quaternion,transform.scale,);const object = scene.getObjectByName('grp_transform');object.position.x = transform.position.x;object.position.y = transform.position.z + 40;object.position.z = -transform.position.y;object.rotation.x = transform.rotation.x;object.rotation.y = transform.rotation.z;object.rotation.z = -transform.rotation.y;}if (results.faceBlendshapes.length > 0) {const faceBlendshapes = results.faceBlendshapes[0].categories;// Morph values does not exist on the eye meshes, so we map the eyes blendshape score into rotation valuesconst eyeScore = {leftHorizontal: 0,rightHorizontal: 0,leftVertical: 0,rightVertical: 0,};for (const blendshape of faceBlendshapes) {const categoryName = blendshape.categoryName;const score = blendshape.score;const index =face.morphTargetDictionary[blendshapesMap[categoryName]];if (index !== undefined) {face.morphTargetInfluences[index] = score;}// There are two blendshape for movement on each axis (up/down , in/out)// Add one and subtract the other to get the final score in -1 to 1 rangeswitch (categoryName) {case 'eyeLookInLeft':eyeScore.leftHorizontal += score;break;case 'eyeLookOutLeft':eyeScore.leftHorizontal -= score;break;case 'eyeLookInRight':eyeScore.rightHorizontal -= score;break;case 'eyeLookOutRight':eyeScore.rightHorizontal += score;break;case 'eyeLookUpLeft':eyeScore.leftVertical -= score;break;case 'eyeLookDownLeft':eyeScore.leftVertical += score;break;case 'eyeLookUpRight':eyeScore.rightVertical -= score;break;case 'eyeLookDownRight':eyeScore.rightVertical += score;break;}}eyeL.rotation.z = eyeScore.leftHorizontal * eyeRotationLimit;eyeR.rotation.z = eyeScore.rightHorizontal * eyeRotationLimit;eyeL.rotation.x = eyeScore.leftVertical * eyeRotationLimit;eyeR.rotation.x = eyeScore.rightVertical * eyeRotationLimit;}}videomesh.scale.x = videoWidth / 100;videomesh.scale.y = videoHeight / 100;renderer.render(scene, camera);// controls.update();}window.addEventListener('resize', function () {camera.aspect = window.innerWidth / window.innerHeight;camera.updateProjectionMatrix();renderer.setSize(window.innerWidth, window.innerHeight);});}}, []);return (<divref={containerRef}style={{position: 'relative',top: '0',left: '0',width: '100vw',height: '100vh',}}></div>);
}export default ThreeContainer;
4. 将三者组合起来实现一个页面
详细代码如下
import React, { useEffect, useState, useRef } from 'react';
import { Page } from './Page';
import ThreeContainer from '../components/ThreeContainer';
import WebCam from '../components/WebCam';
import Detector from '../components/Detector';function PageContent() {const [stream, setStream] = useState(null);const videoRef = useRef(null);const [isWebCamLoaded, setIsWebCamLoaded] = useState(false);const detectorRef = useRef(null);useEffect(() => {async function init() {Detector.getInstance().then((rtn) => {detectorRef.current = rtn;detectorRef.current.bindVideo(videoRef.current);});}if (isWebCamLoaded) {init();}}, [isWebCamLoaded]);return (<divstyle={{position: 'relative',top: '0',left: '0',bottom: '0',right: '0',}}><ThreeContainerid="background"videoHeight={window.innerHeight}videoWidth={window.innerWidth}detectorRef={detectorRef}/><divid="UI"style={{position: 'absolute',top: '0',left: '0',bottom: '0',right: '0',}}><WebCamisShowCanvas={false}canvasHeight={480}canvasWidth={640}stream={stream}setStream={setStream}videoRef={videoRef}isLoaded={isWebCamLoaded}setLoaded={setIsWebCamLoaded}/></div></div>);
}export function App() {return (<Page><PageContent /></Page>);
}
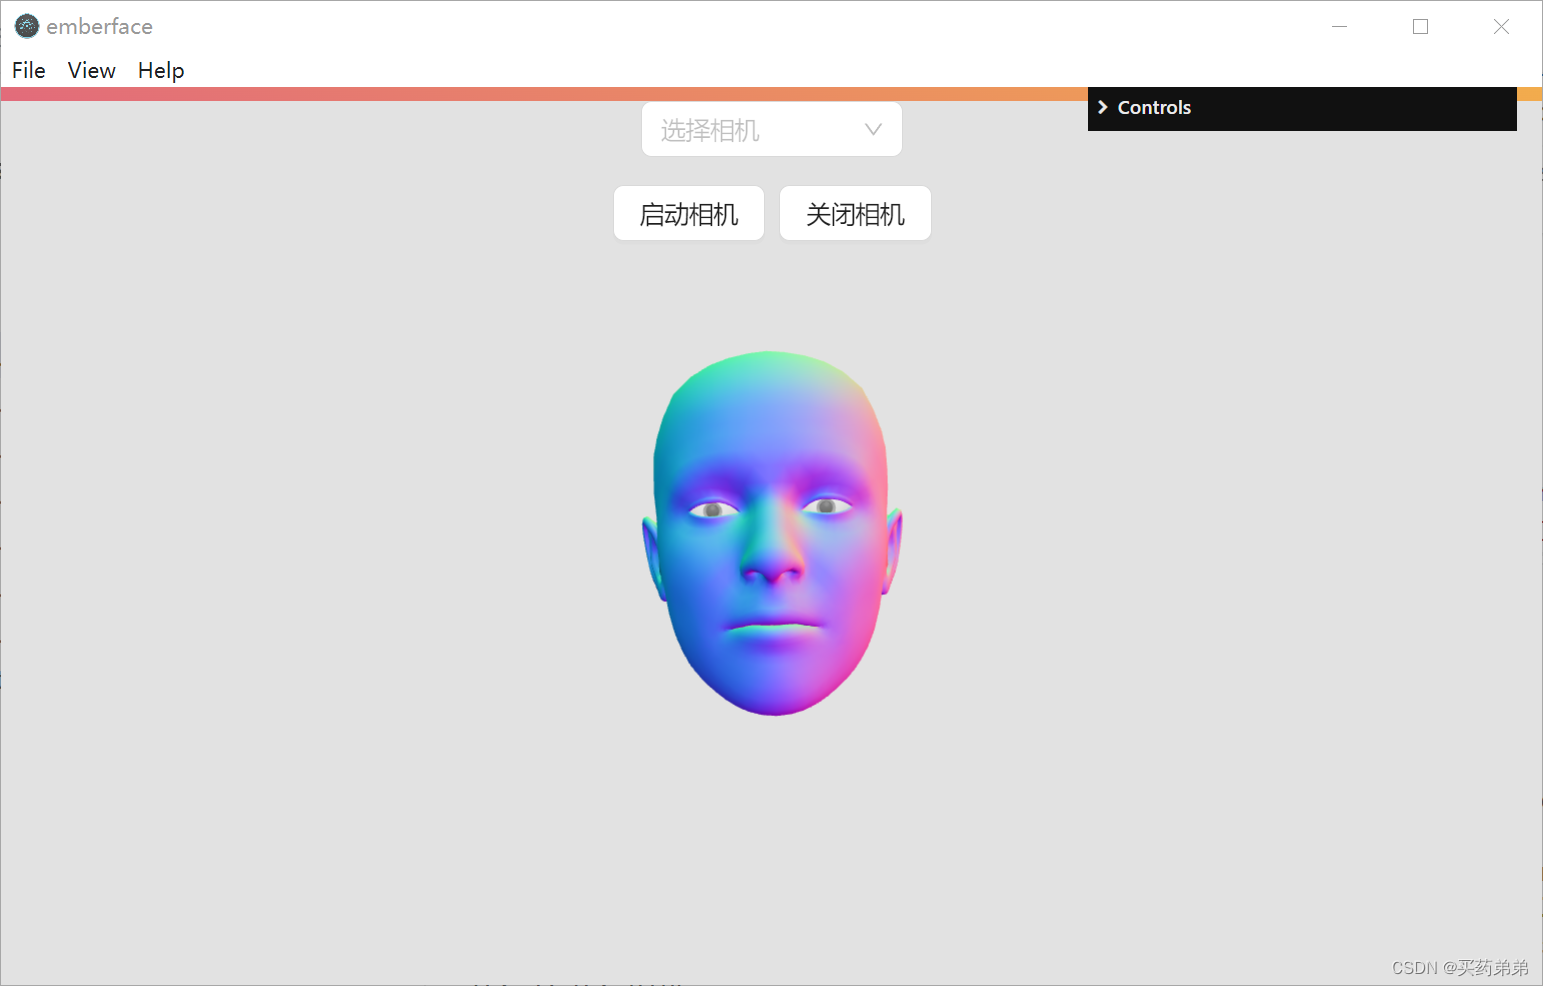
export default App;三、最终效果
运行项目npm start,效果如下
总结
本文介绍了如何结合 react-webcam、three.js 与 electron 实现桌面人脸动捕应用,希望对您有所帮助,如果文章中存在任何问题、疏漏,或者您对文章有任何建议,请在评论区提出。