一、爬虫基础流程
爬虫的过程模块化,基本上可以归纳为以下几个步骤:
1、分析网页URL:打开你想要爬取数据的网站,然后寻找真实的页面数据URL地址;
2、请求网页数据:模拟请求网页数据,这里我们介绍requests库的使用;
3、解析网页数据:根据请求获得的网页数据我们用不同的方式解析成我们需要用的数据(如果网页数据为html源码,我们用Beautiful Soup、xpath和re正则表达式三种解析;若网页数据为json格式,我们可以直接用字典列表等基础知识处理)
4、存储网页数据:一般来说,解析后的数据是比较结构化的,可以保存为txt、csv、json或excel等文本,亦或者可以存储在数据库如MySql、MongoDB或SqlLite中。
二、分析网页URL:
当我们有一个目标网站,有时候会发现对于静态网页,我们只需要把网页地址栏中的URL传到get请求中就可以直接取到网页的数据。但如果这是动态网页,我们便无法通过简单的传递网页地址栏的URL给get请求来获取网页数据,往往这个时候,我们进行翻页的时候还会发现网页地址栏中的URL是不会发生变化的。接下来,我们来分别介绍这两种情况下如何获取真实的页面数据URL地址。
1、静态网页
对于静态网页来说,其实网页地址栏中的URL就是我们需要的。
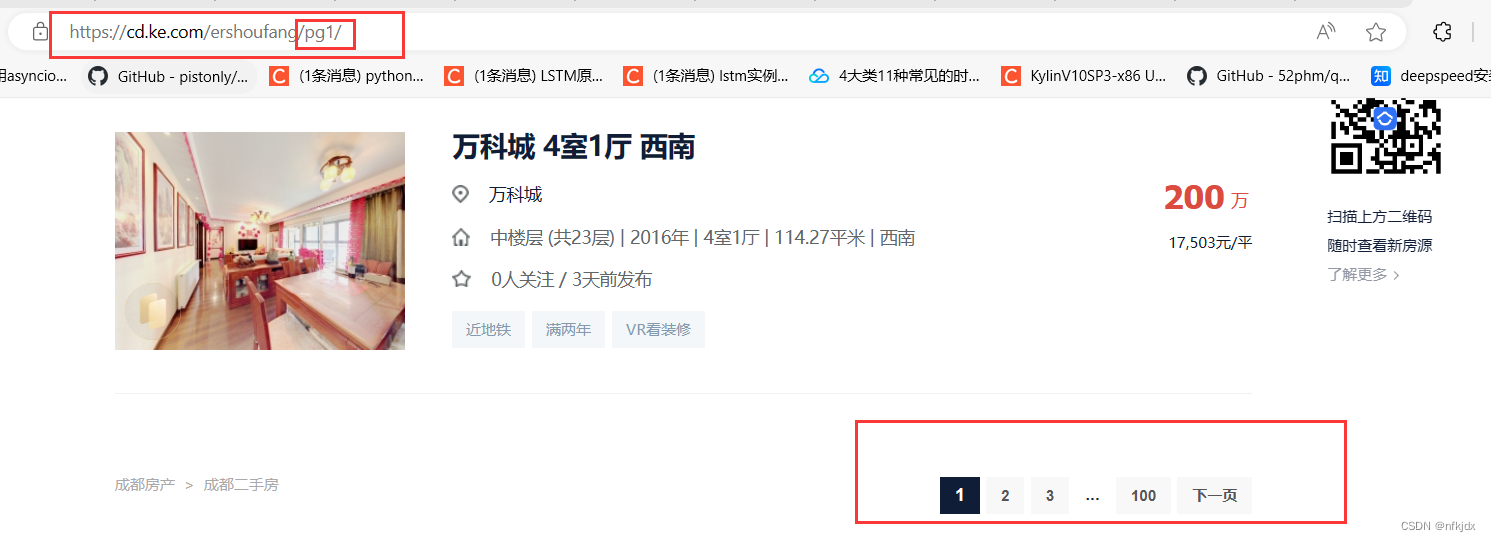
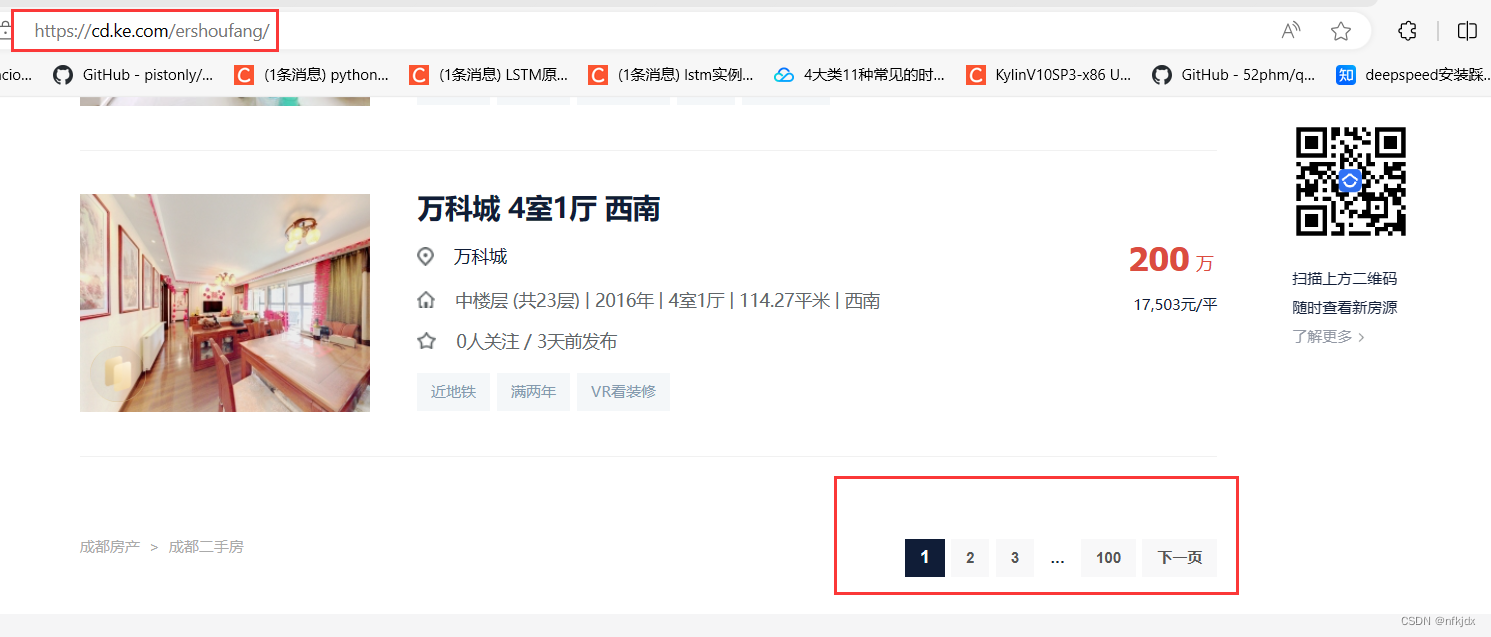
以贝壳二手房网(https://cd.ke.com/ershoufang/) 为例,我们可以看到进行翻页(如到第2页)的时候网页地址栏的URL变为了(https://cd.ke.com/ershoufang/pg2/)。类型这种情况,多半就是静态网页了,而且翻页的URL规律十分明显。
如下图所示:
2、 动态网页
对于动态网页来说,我们一般可以通过以下几个步骤找到真实URL地址:
需要按“F12”进入到浏览器的开发者模式;
点击“Network”—>XHR或JS或者你全部查找看;
进行翻页(可能是点击下一页或者下滑加载更多);
观察第2步中name模块的内容变化,寻找。
以虎牙星秀区(https://www.huya.com/g/xingxiu) 为例,我们可以看到进行翻页(如到第2页)的时候网页地址栏的URL没有发生任何改变。
为了便于找到真实的URL地址,我们可以在开发者模式中找以下截图中的几点,preview是预览结果,可以便于我们进行匹配定位具体的Name。
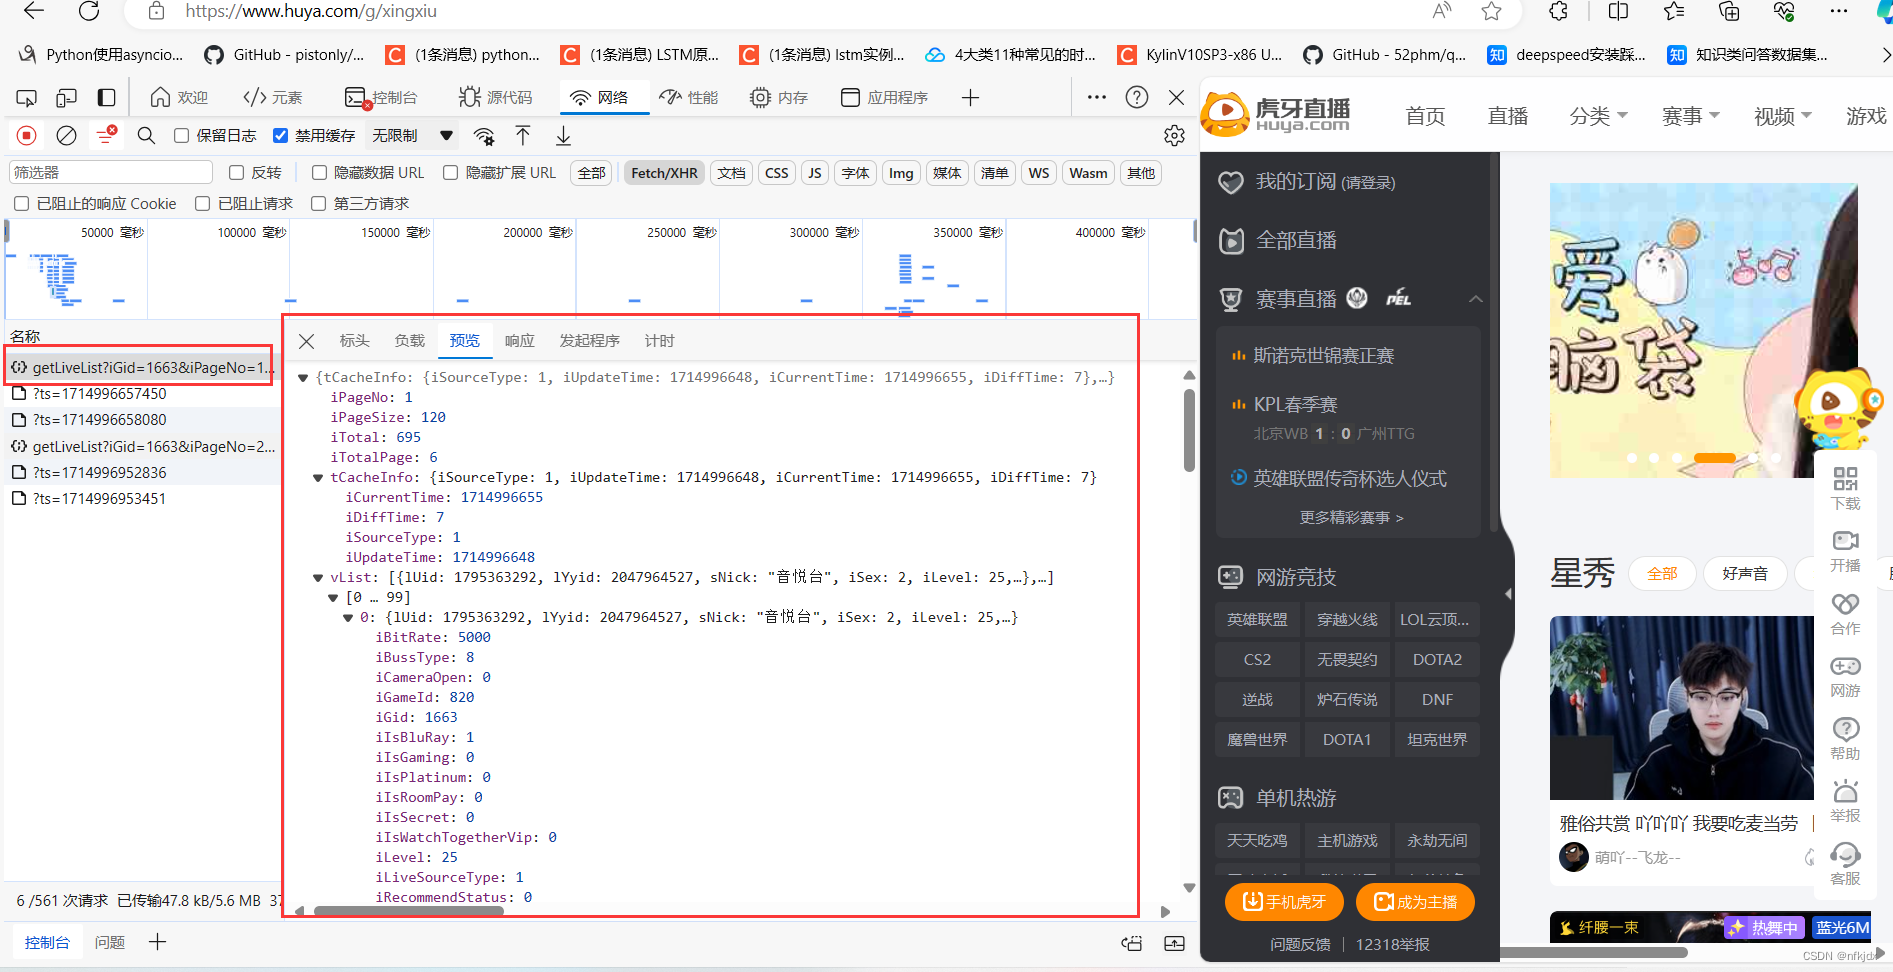
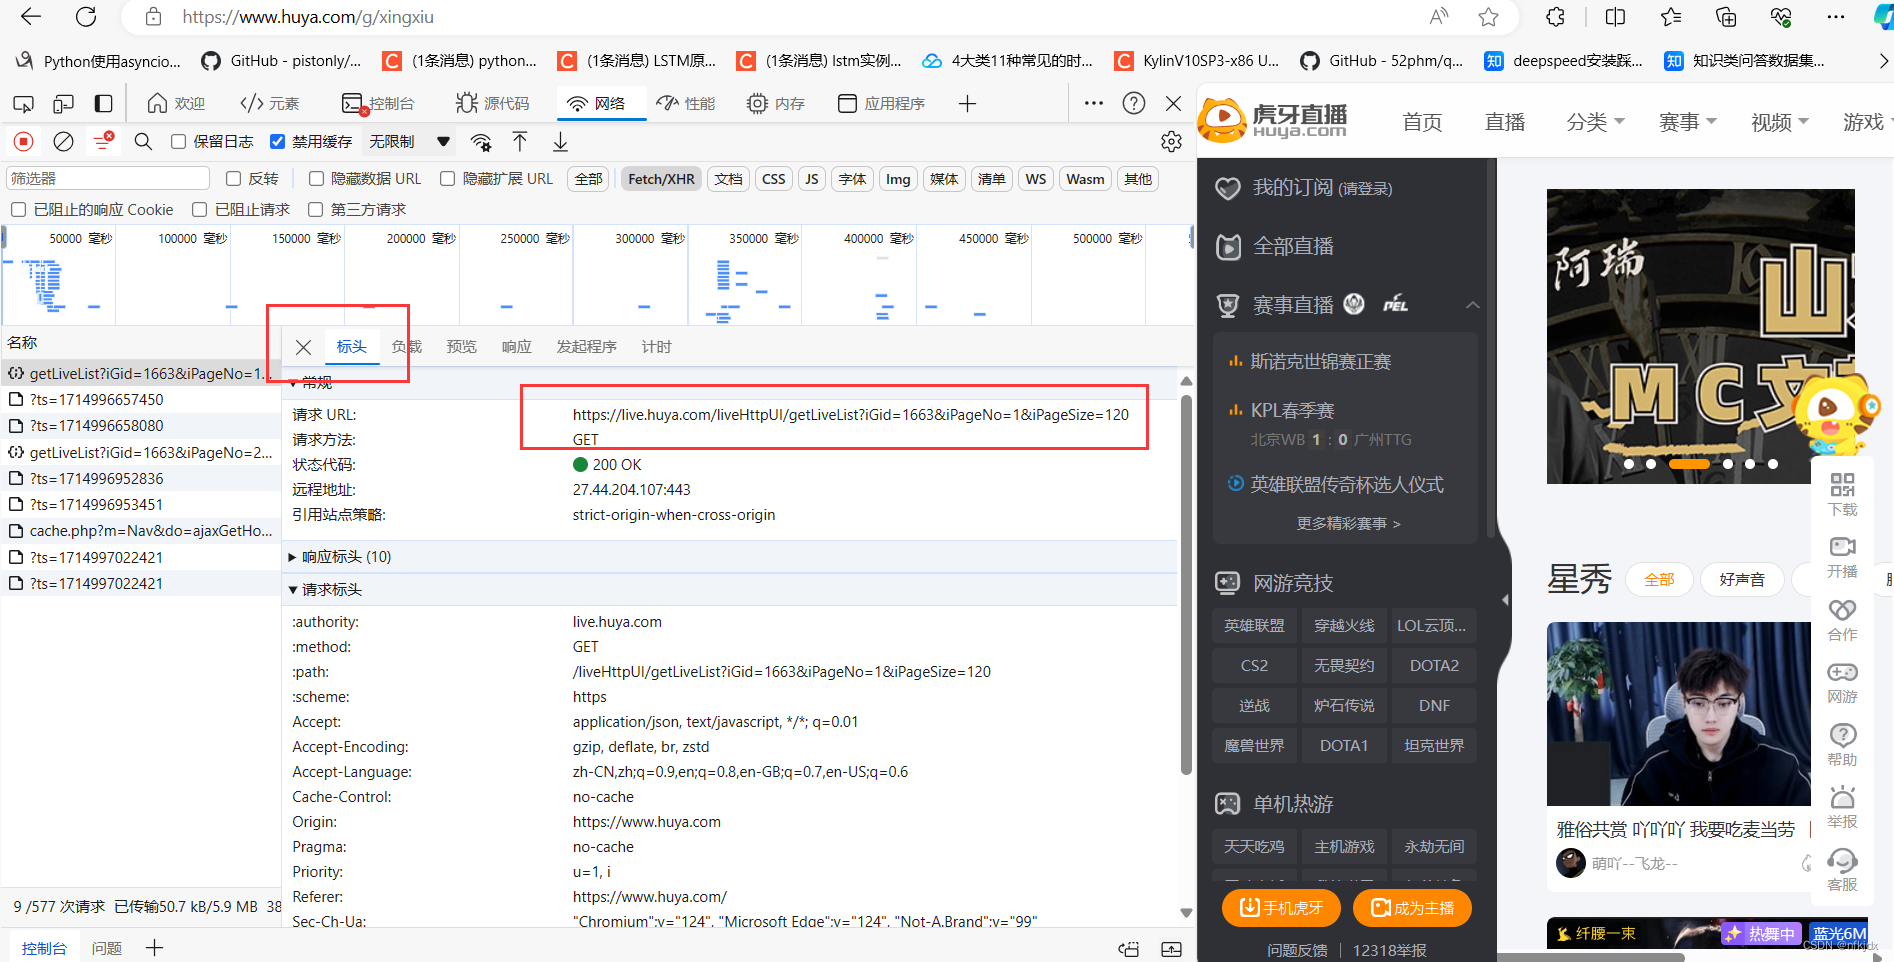
当我们定位到具体的Name后,右侧选择Headers可以查看到请求网页需要的相关参数信息,而且比较好拟清其变化规律。以虎牙星秀为例,其真实URL地址及变化规律如下:
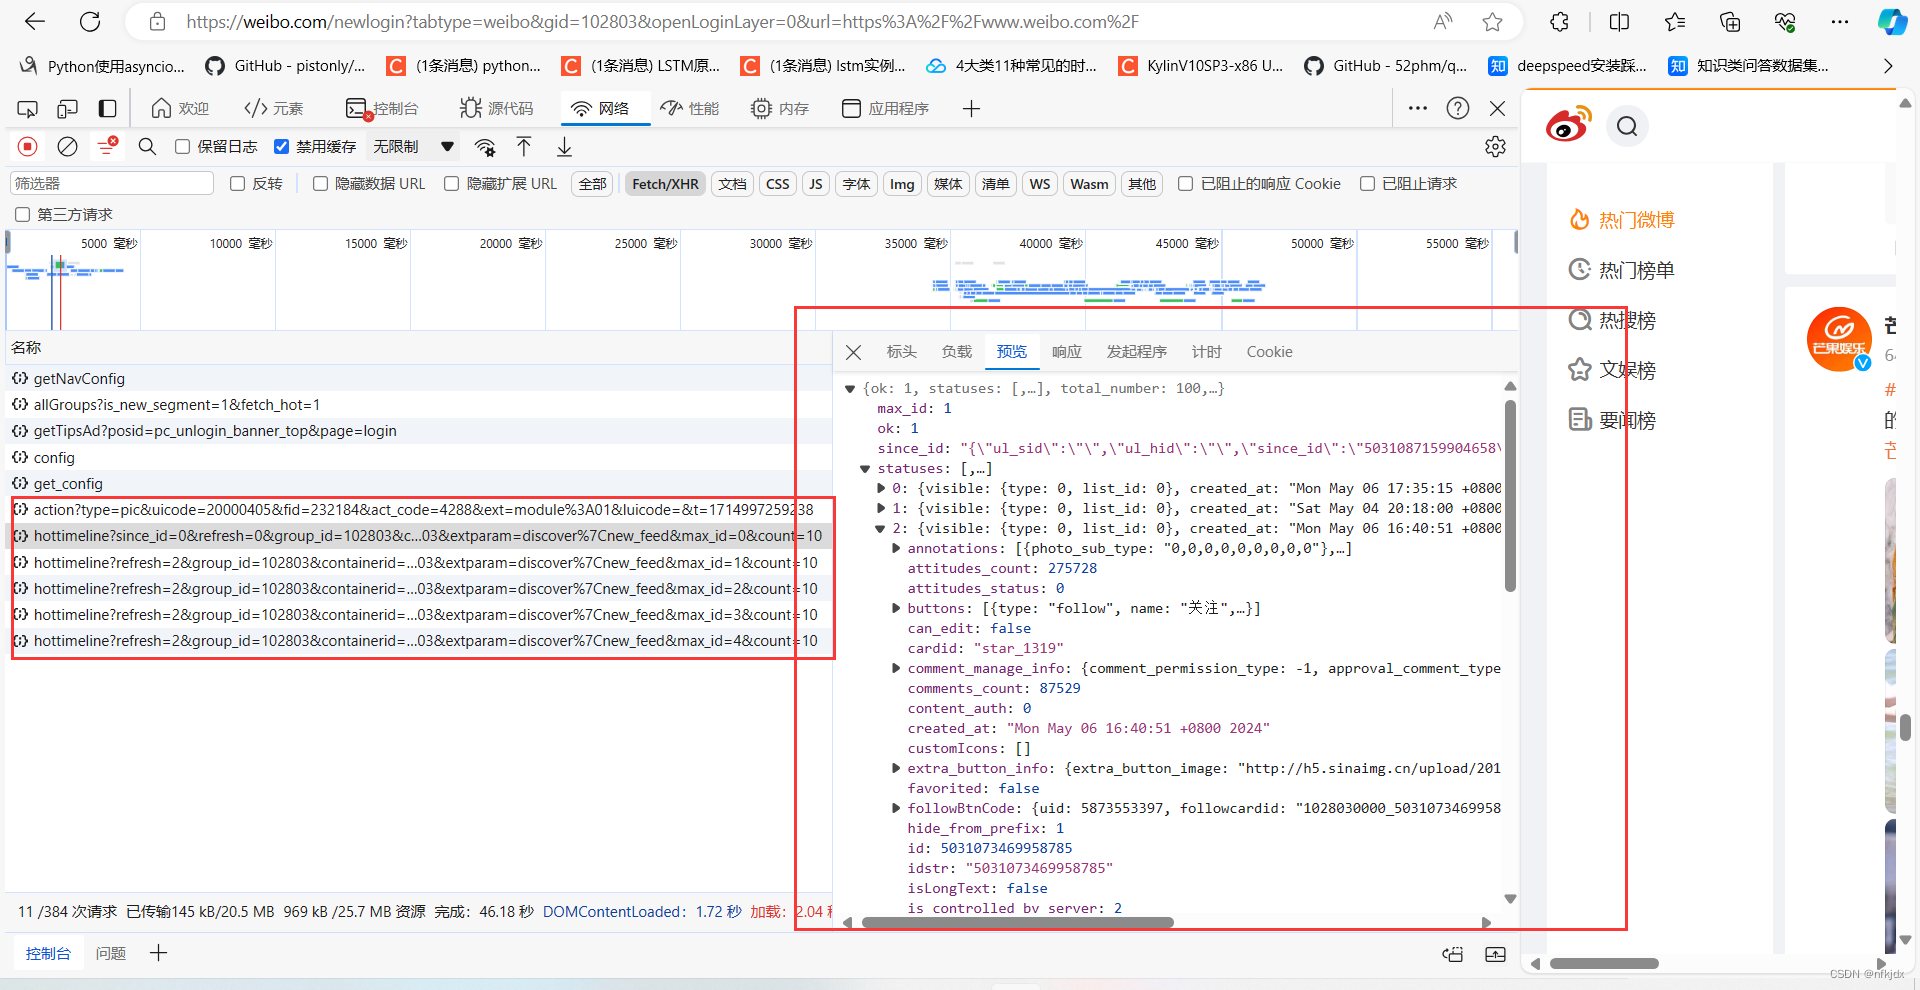
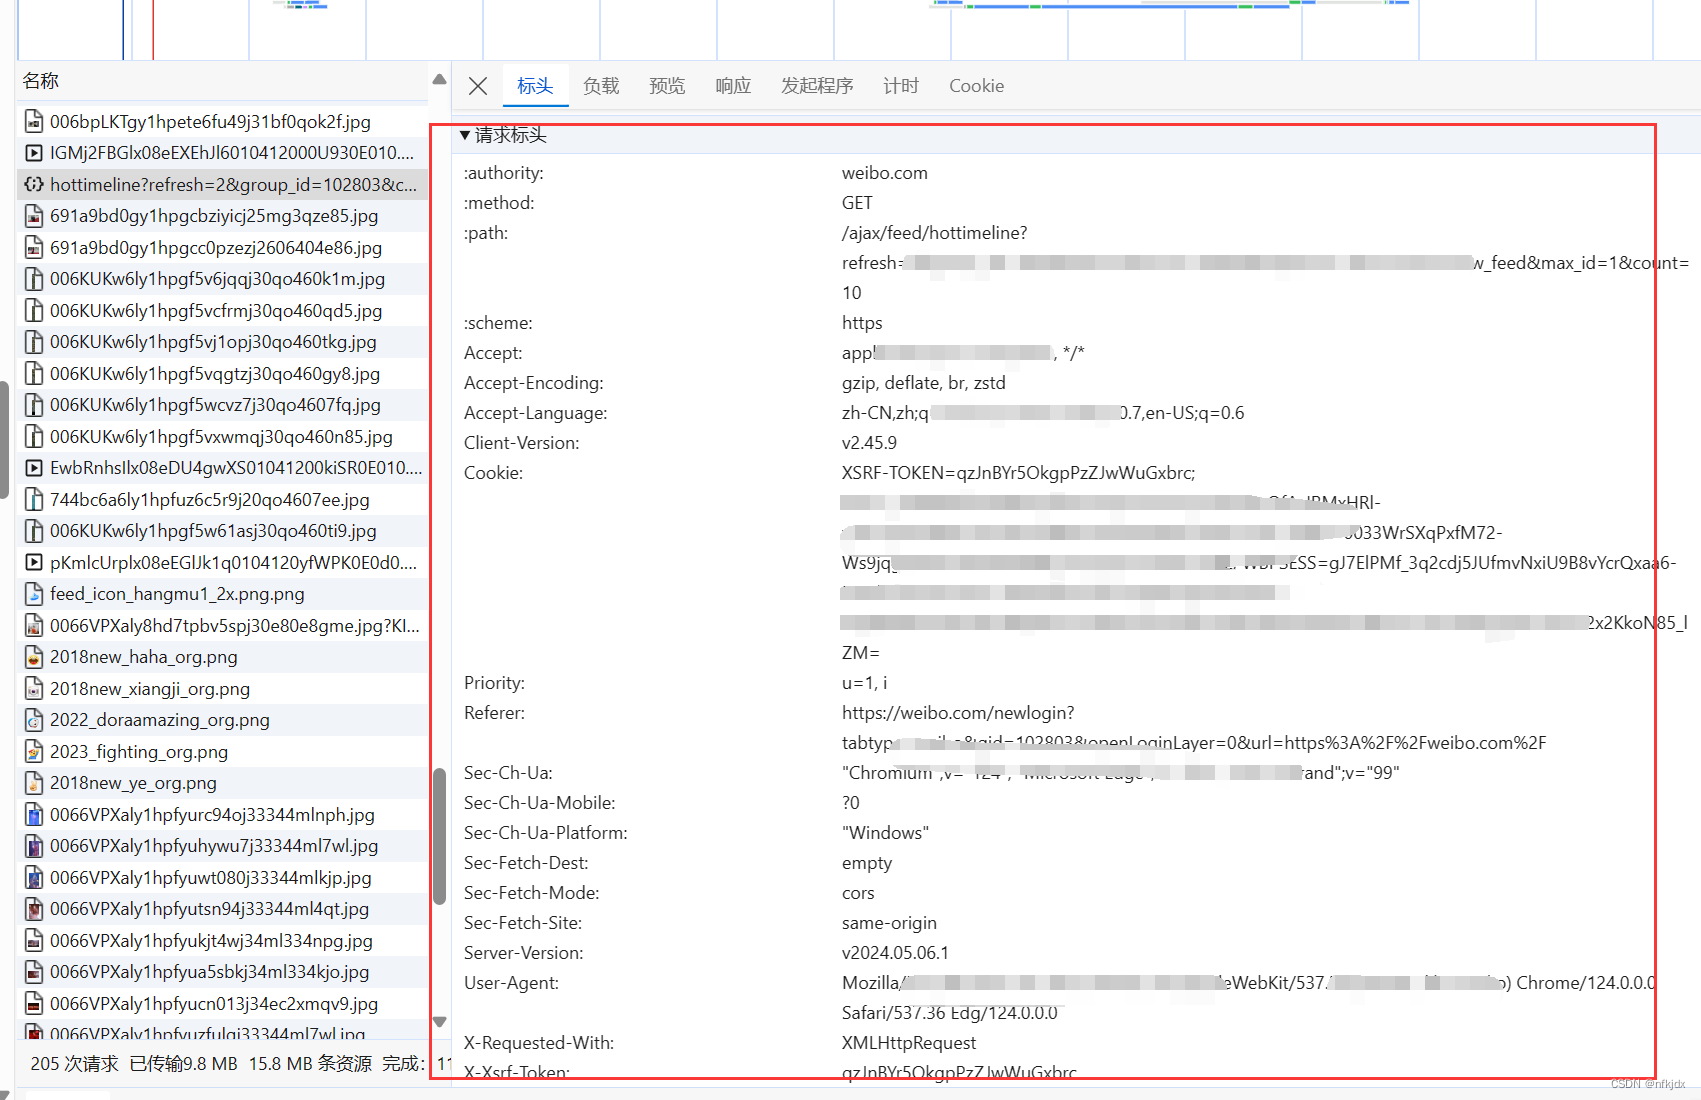
以某博为例(https://weibo.com/newlogin?tabtype=weibo&gid=102803&openLoginLayer=0&url=https%3A%2F%2Fwww.weibo.com%2F) 为例,我们可以看到一直往下拖拉时候网页地址栏的URL没有发生任何改变。这是我们需要按“F12”进入到浏览器的开发者模式,一边往下拖拉一边查看network里面内容的变化:
三、请求网页数据
当我们确定了真实数据的URL后,这里便可以用requests的get或post方法进行请求网页数据。关于requests库的更多使用方式,大家可以前往(https://requests.readthedocs.io/zh_CN/latest/ 或 https://www.cnblogs.com/aaronthon/p/9332757.html)查看。
1、发送get请求
(1)对于静态网页
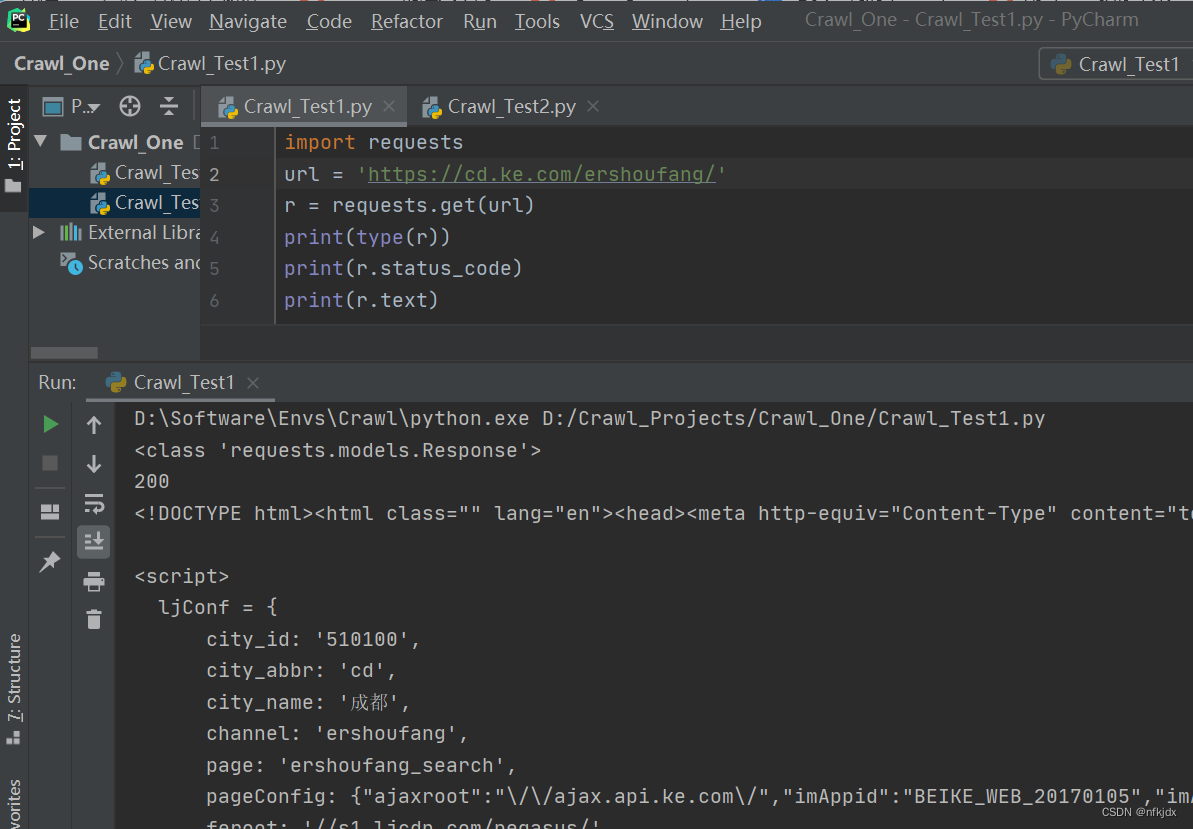
我们得到的是一个Response对象,如果我们想要获取网页数据,可以使用text或content属性来获取,另外如果获取的网页数据是json格式的则可以使用Requests 中内置的 **json()**解码器方法,助你处理json 数据。r.text:字符串类型的数据,一般网页数据为文本类用此属性
r.content:二进制类型的数据,一般网页数据为视频或者图片时用此属性
r.json():json数据解码,一般网页数据为json格式时用此方法
(2)对于动态网页
对于一些动态网页,请求的网址是基础url和关键字参数组合而成,这个时候我们可以使用 params 关键字参数,以一个字符串字典来提供这些参数。如下:
import requests
url = 'https://www.huya.com/cache.php'
parames = {'m': 'LiveList','do': 'getLiveListByPage','gameId': 1663,'tagAll': 0,'page': 2, # 翻页变化的就是这个参数}
r = requests.get(url, params=parames)
print(r.url)  # https://www.huya.com/cache.php?m=LiveList&do=getLiveListByPage&gameId=1663&tagAll=0&page=2
2、发送post请求
通常,你想要发送一些编码为表单形式的数据——非常像一个 HTML 表单。要实现这个,只需简单地传递一个字典给 data 参数。你的数据字典在发出请求时会自动编码为表单形式:
>>> payload = {'key1': 'value1', 'key2': 'value2'}
>>> r = requests.post("http://httpbin.org/post", data=payload)
很多时候你想要发送的数据并非编码为表单形式的。如果你传递一个 string 而不是一个 dict,那么数据会被直接发布出去。>>> import json
>>> url = 'https://api.github.com/some/endpoint'
>>> payload = {'some': 'data'}
>>> r = requests.post(url, data=json.dumps(payload))此处除了可以自行对 dict 进行编码,你还可以使用 json 参数直接传递,然后它就会被自动编码。
>>> url = 'https://api.github.com/some/endpoint'
>>> payload = {'some': 'data'}
>>> r = requests.post(url, json=payload)
3、定制请求头
在模拟请求时,如果不设置请求头的话是比较容易被网站发现是来自爬虫脚本,一些网站会对这种模拟请求进行拒绝。因此我们可以简单设置一下请求头做伪装,一般是设置浏览器。headers = {"User-Agent": "Mozilla/5.0 (Windows NT 10.0; Win64; x64) AppleWebKit/537.36 (KHTML, like Gecko) Chrome/87.0.4280.66 Safari/537.36",}
r = requests.get(url, headers=headers)
其实,对于请求头还可以设置很多参数,具体大家可以在实际爬虫过程中在开发者模式看看里面的请求头模块进行分析处理。
4、响应码
我们在 2.1 中看到获取响应码的是通过 r.status_code属性,一般来说如果 返回 数字 200,则表示成功获取了网页数据。
响应码分为五种类型,由它们的第一位数字表示:1xx:信息,请求收到,继续处理 2xx:成功,行为被成功地接受、理解和采纳 3xx:重定向,为了完成请求,必须进一步执行的动作 4xx:客户端错误,请求包含语法错误或者请求无法实现 5xx:服务器错误,服务器不能实现一种明显无效的请求
四、解析数据
上面有提到我们请求的网页数据有Html源码文本或者是json字符串文本,两者的解析方式不同。以下我们分别进行简单说明,大家在实际操作中视情况而定即可。
1、网页html文本解析
对于网页html文本来说,这里介绍Beautiful Soup、xpath和re正则表达式三种解析方法。
以贝壳二手房最新房源(https://cd.ke.com/ershoufang/co32/)为例,其html源码如下,我们通过get请求后的数据进行解析。
(1)Beautiful Soup
from bs4 import BeautifulSoup
html_doc = """
<html><head><title>The Dormouse's story</title></head>
<body>
<p class="title"><b>The Dormouse's story</b></p>
<p class="story">Once upon a time there were three little sisters; and their names were
<a href="http://example.com/elsie" class="sister" id="link1">Elsie</a>,
<a href="http://example.com/lacie" class="sister" id="link2">Lacie</a> and
<a href="http://example.com/tillie" class="sister" id="link3">Tillie</a>;
and they lived at the bottom of a well.</p>
<p class="story">...</p>
"""
# 创建一个 soup 对象
soup = BeautifulSoup(html_doc, 'lxml')
print(soup, type(soup))  # <class 'bs4.BeautifulSoup'>
# 格式化文档输出
print(soup.prettify())
# 获取 title 标签的名称 title
print(soup.title.name)  # title
# 获取 title 标签内容
print(soup.title)  # <title>The Dormouse's story</title>
# title 标签里面的文本内容
print(soup.title.string)
# 获取 p 段落
print(soup.p)Beautiful Soup 是一个可以从 HTML 或 XML 文件中提取数据的 Python 库。
关于Beautiful Soup库的更多使用方式,大家可以前往查看(https://beautifulsoup.readthedocs.io/zh_CN/v4.4.0/)
首先安装pip install beautifulsoup4。
我们将网页html文本内容r.text当作第一个参数传给BeautifulSoup对象,该对象的第二个参数为解析器的类型(这里使用lxml),此时就完成了BeaufulSoup对象的初始化。然后,将这个对象赋值给soup变量。如下所示:from bs4 import BeautifulSoup
import requests
url = 'https://cd.ke.com/ershoufang/pg1/'
r = requests.get(url)
soup = BeautifulSoup(r.text, 'lxml')
解析来分析网页,寻找节点:
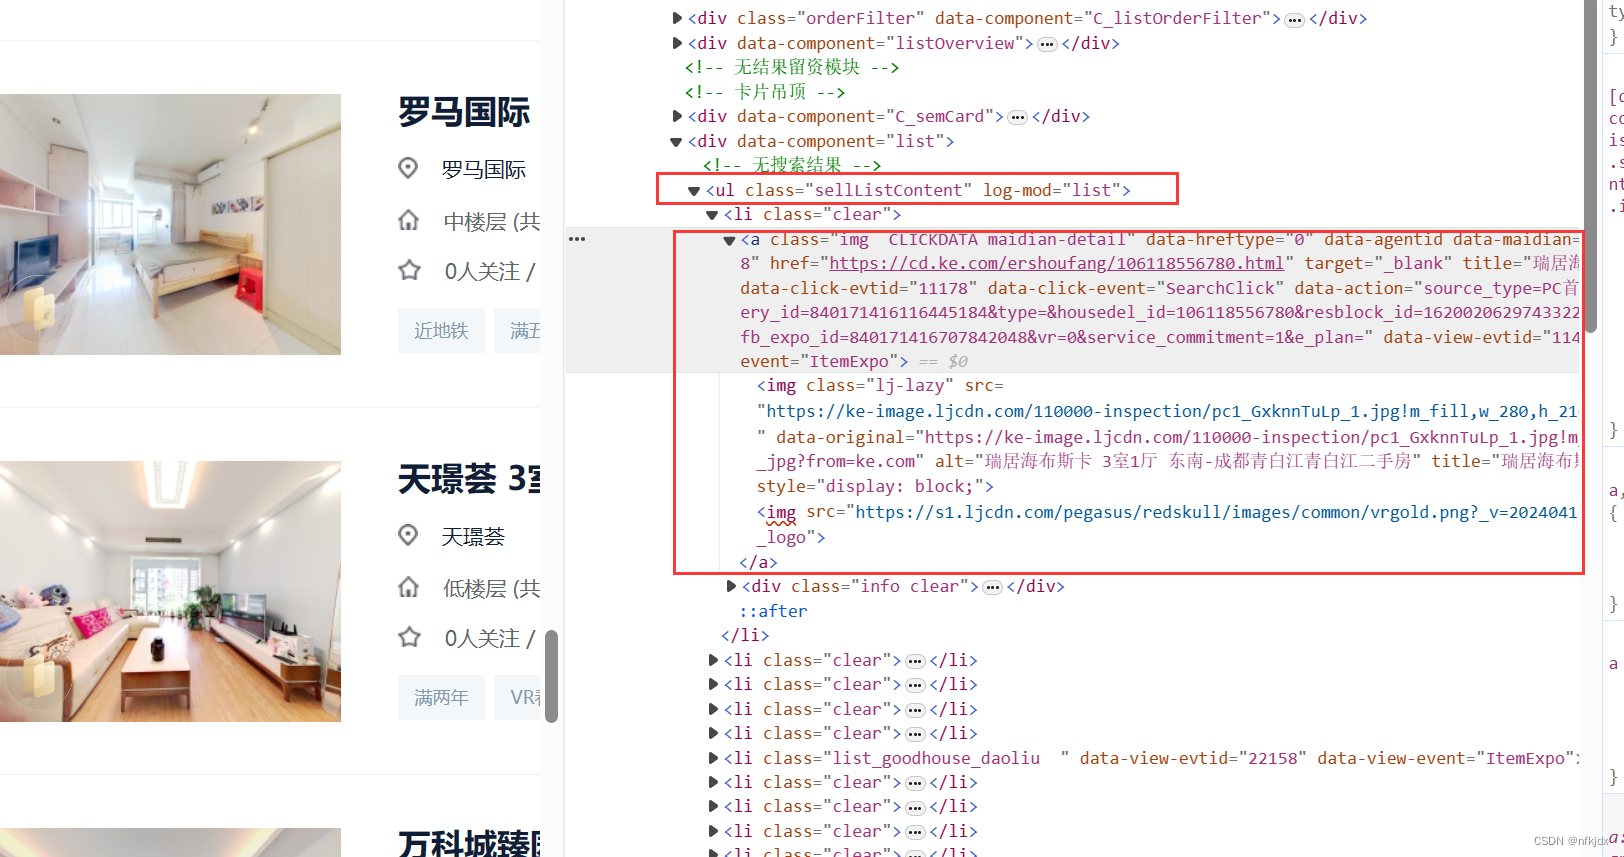
发现所有数据都在class="sellListContent"节点下,因此对它下面的数据进行提取:
# 获取全部房源 所在的节点
sellList = soup.find(class_="sellListContent")
# 获取全部房源节点列表
lis = sellList.find_all('li',class_="clear")
# 选取第一个房源节点
div = lis[0].find('div',class_="info clear")
# 采集房源名称
title = div.find('div',class_="title")
print(title.text)
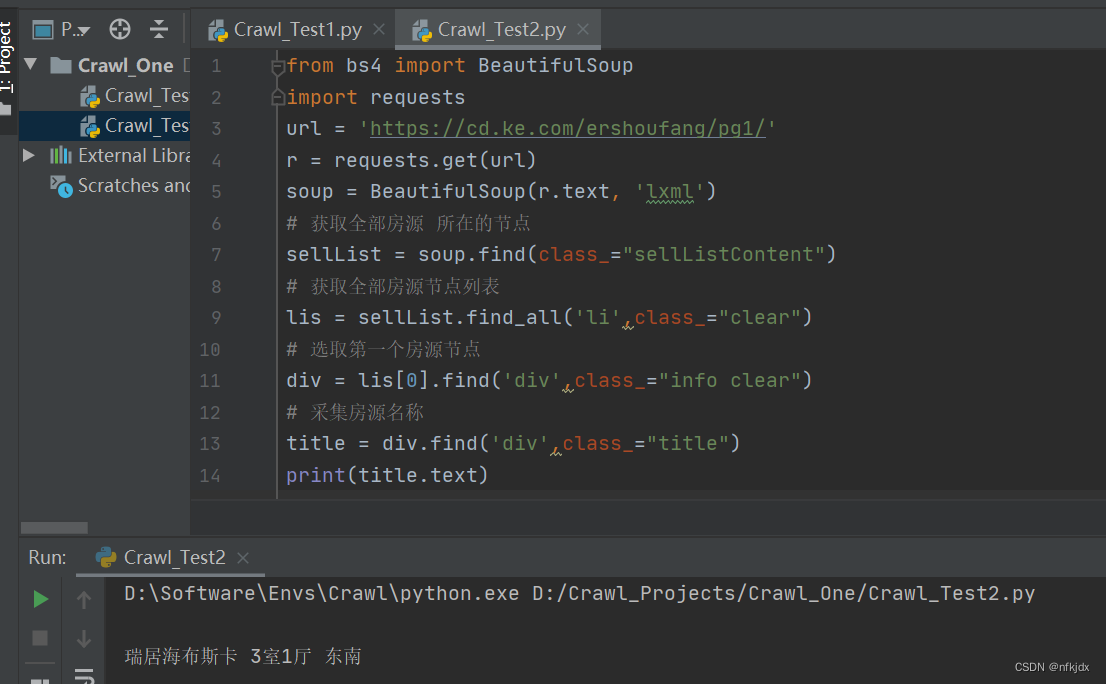
房源其他信息大家可以自己处理!!
(2)xpath
XPath,全称 XML Path Language,即 XML 路径语言,它是一门在 XML 文档中查找信息的语言。
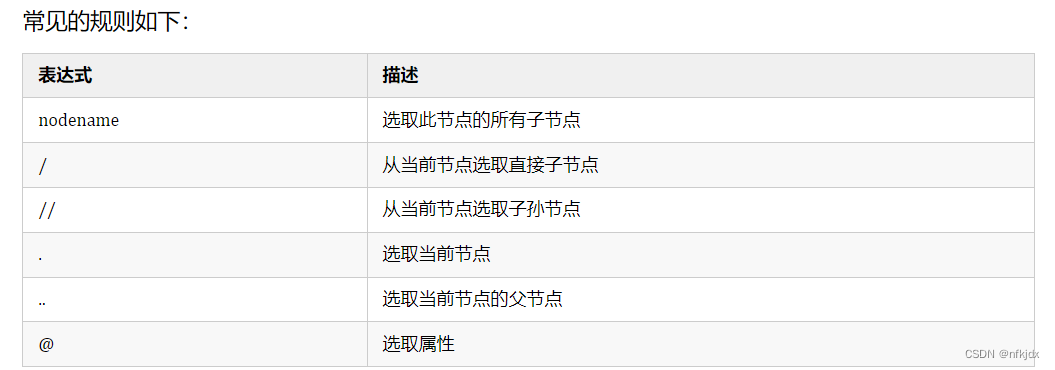
首先导入 lxml 库的 etree 模块,然后声明一段 HTML 文本,调用 HTML 类进行初始化,成功构造一个 XPath 解析对象。
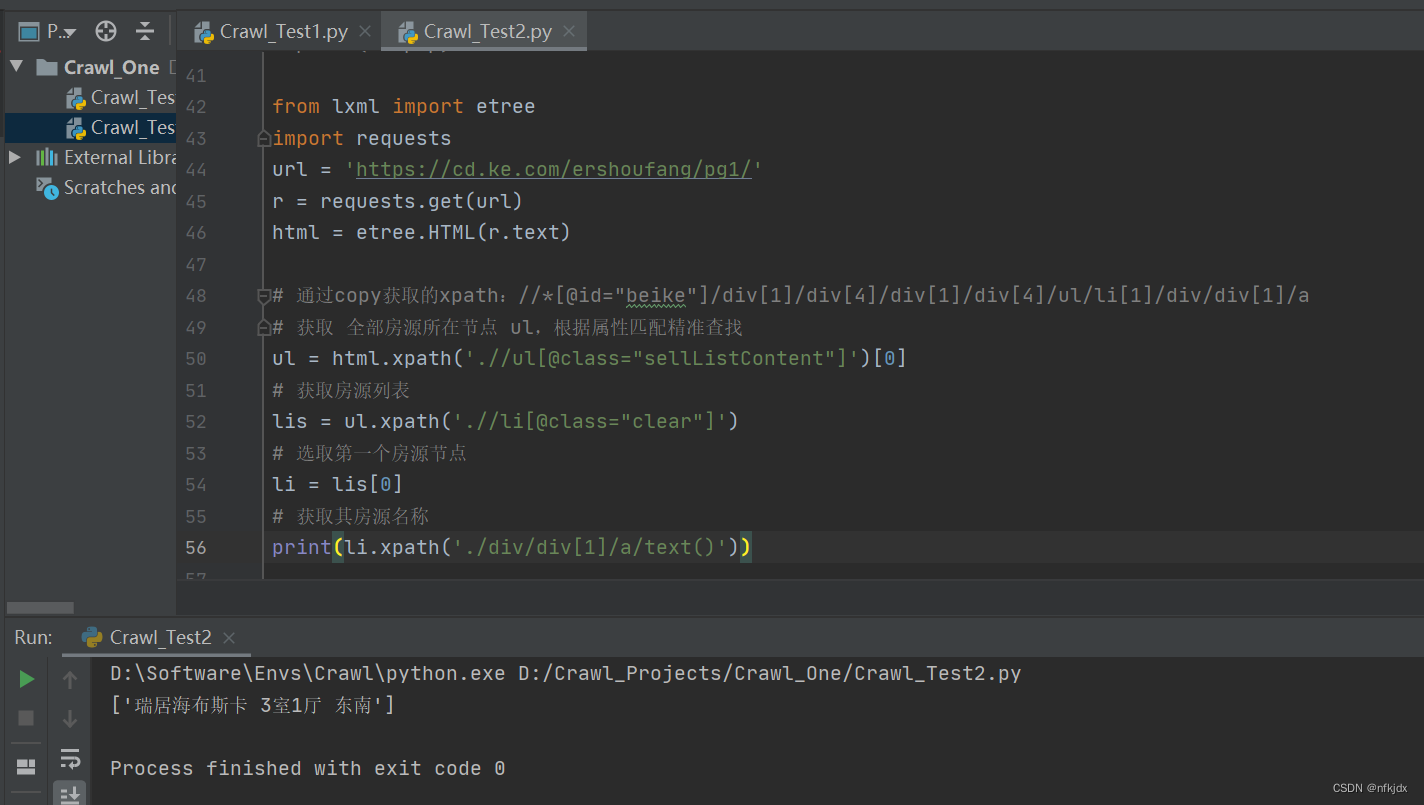
from lxml import etree
import requests
url = 'https://cd.ke.com/ershoufang/pg1/'
r = requests.get(url)
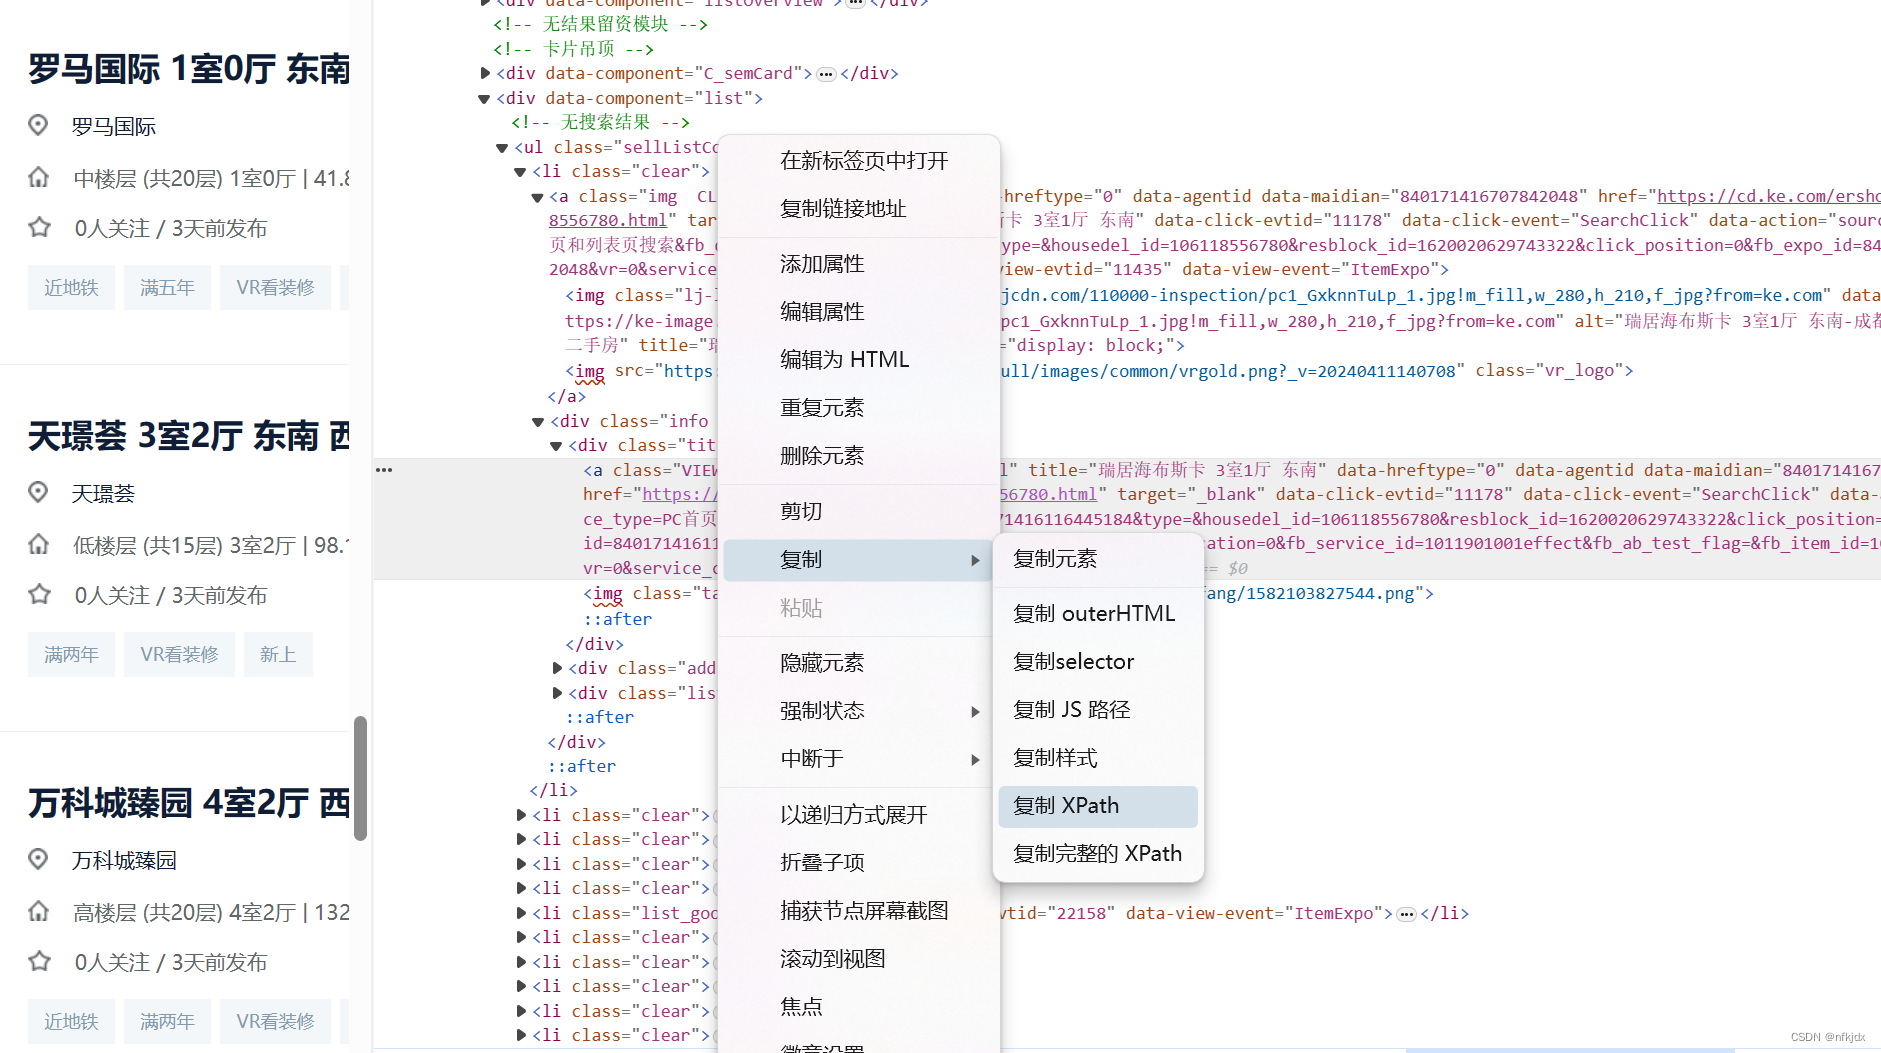
html = etree.HTML(r.text)# 通过copy获取的xpath://*[@id="beike"]/div[1]/div[4]/div[1]/div[4]/ul/li[1]/div/div[1]/a
# 获取 全部房源所在节点 ul,根据属性匹配精准查找
ul = html.xpath('.//ul[@class="sellListContent"]')[0]
# 获取房源列表
lis = ul.xpath('.//li[@class="clear"]')
# 选取第一个房源节点
li = lis[0]
# 获取其房源名称
li.xpath('./div/div[1]/a/text()')
其他房源信息,大家可以自行处理!!
(3)re正则
关于re正则解析网页html大家也可以前往查看https://blog.csdn.net/wtt234/article/details/128360395进行学习。

2、json文本解析
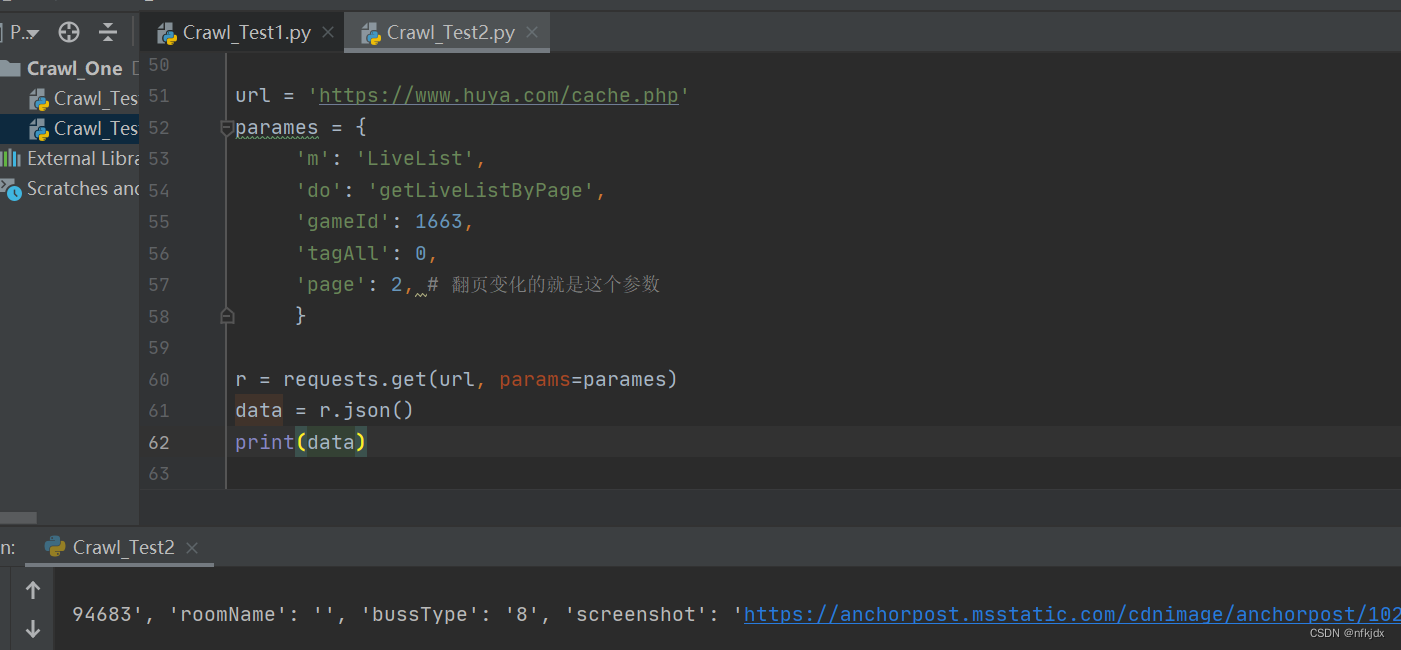
在requests提供了r.json(),可以用于json数据解码,一般网页数据为json格式时用此方法。除此之外,还可以通过json.loads()和eval()方法进行处理。
url = 'https://www.huya.com/cache.php'
parames = {'m': 'LiveList','do': 'getLiveListByPage','gameId': 1663,'tagAll': 0,'page': 2, # 翻页变化的就是这个参数}
r = requests.get(url, params=parames)
data = r.json()
print(data)
五、存储数据
当我们获取了到想要的数据后,便可以写入本地了。
对于文本类数据,可以通过csv模块或pandas模块进行写入到本地csv文件或excel文件;同时也可以用pymysql模块写入到数据库或者sqlite写入到本地数据库。
对于视频或者图片,可以open一个文件然后写入二进制内容后保存本地亦可。
关于存储数据大家可以结合实际案例进行学习。
六、爬取、清洗并保存上面几个网站的数据完整代码带有解释
1、谋壳二手房数据:
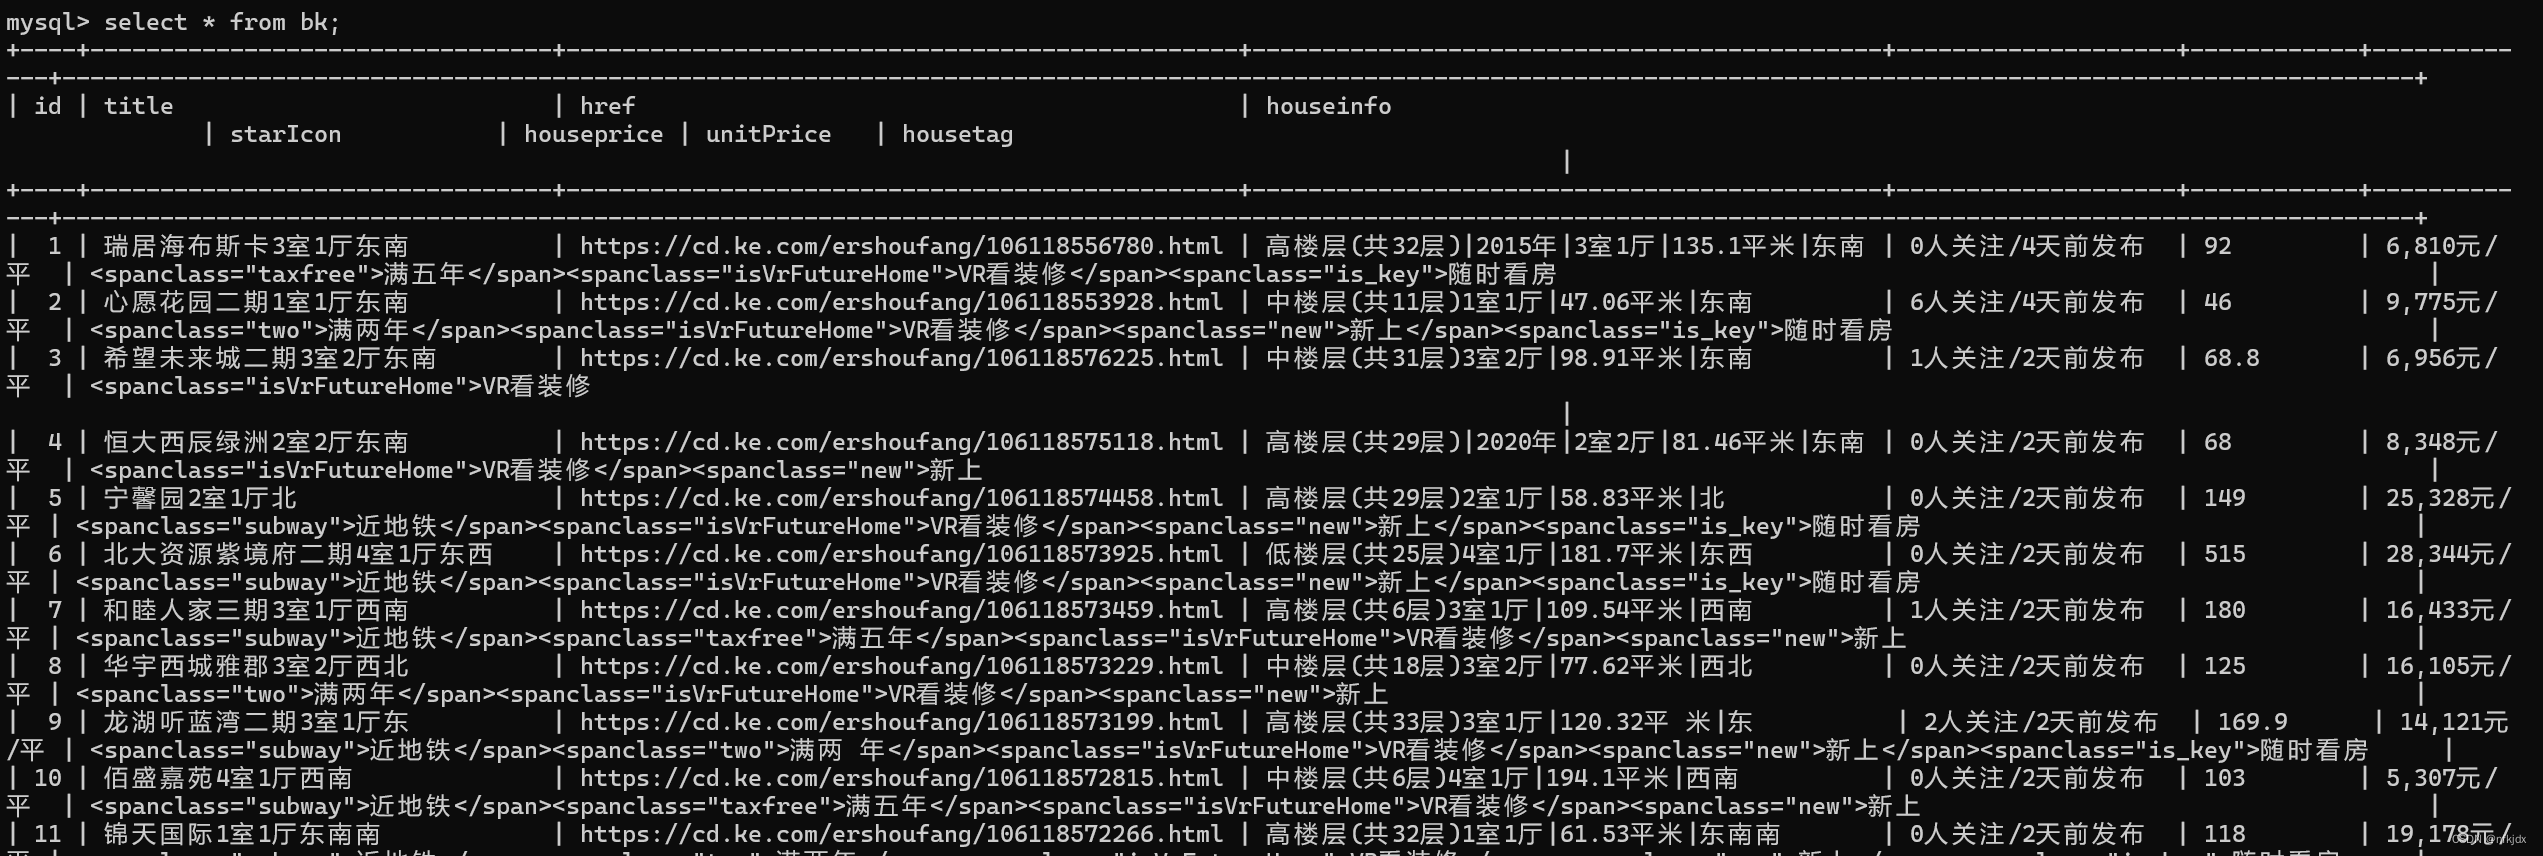
正则提取数据保存在csv、xlsx与mysql里面
# coding:utf-8
import re,requests,time
import pandas as pd
import mysql.connectorclass RenrenLogin(object):def __init__(self):# 设置存储数据文件路径self.csvlj = r"C:\Users\xxx\xxx\bk1.csv"self.excellj = r"C:\Users\xxx\xxx\bk2.xlsx"def get_html(self,url):# 由于获取的html最后是text(文本)形式,因此直接去掉文本里面的空格、换行符和回车符html = requests.get(url=url).text.replace("\n", "").replace("\r", "").replace(" ","")return htmldef parse_html(self, html):# 房源名称title = re.findall(r'<aclass="VIEWDATACLICKDATAmaidian-detail"title="(.*?)"', html, re.S)# 房源链接href = re.findall(r'<aclass="VIEWDATACLICKDATAmaidian-detail"title=".*?"data-hreftype=".*?"data-agentid=".*?"data-maidian=".*?"href="(.*?)"',html, re.S)# 房源信息houseinfo = re.findall(r'<spanclass="houseIcon"></span>(.*?)</div><divclass="followInfo">',html,re.S)# 关注量与发布天数starIcon = re.findall(r'<spanclass="starIcon"></span>(.*?)</div><divclass="tag">',html,re.S)# 房源总价格houseprice = re.findall(r'<divclass="totalPricetotalPrice2"><i></i><spanclass="">(.*?)</span><i>万</i></div>',html,re.S)# 房源单价unitPrice = re.findall(r'<divclass="unitPrice"data-hid=".*?"data-price=""><span>(.*?)</span></div>', html, re.S)# 房源其它优势housetag = re.findall(r'<divclass="tag">(.*?)</span></div><divclass="priceInfo">', html, re.S)self.parse_mysql(title, href, houseinfo, starIcon, houseprice, unitPrice, housetag)return title, href, houseinfo, starIcon, houseprice, unitPrice, housetagdef parse_csv_excel(self,title,href,houseinfo,starIcon,houseprice,unitPrice,housetag):# 创建一个字典来表示数据data = {'itle': title,'href': href,'houseinfo': houseinfo,'starIcon':starIcon,'houseprice':houseprice,'unitPrice': unitPrice,'housetag':housetag}# 使用字典创建DataFramedf = pd.DataFrame(data)# 保存到csv文件里面df.to_csv(self.csvlj, index=False)# 保存到excel文件里面df.to_excel(self.excellj, index=False)def parse_mysql(self,title,href,houseinfo,starIcon,houseprice,unitPrice,housetag):# 连接到 MySQL 数据库conn = mysql.connector.connect(host="localhost",user="root",password="123456",database="beike")# 创建游标对象cursor = conn.cursor()# 创建表cursor.execute("""CREATE TABLE IF NOT EXISTS bk (id INT AUTO_INCREMENT PRIMARY KEY,title VARCHAR(500) NOT NULL,href VARCHAR(500) NOT NULL,houseinfo VARCHAR(500) NOT NULL,starIcon VARCHAR(500) NOT NULL,houseprice VARCHAR(500) NOT NULL,unitPrice VARCHAR(500) NOT NULL,housetag VARCHAR(1000) NOT NULL)""")# 执行插入数据操作for i in range(len(title)):sql_select = " insert into bk (title,href,houseinfo,starIcon,houseprice,unitPrice,housetag) values" + \"('{}','{}','{}','{}','{}','{}','{}')".format(title[i],href[i],houseinfo[i],starIcon[i],houseprice[i],unitPrice[i],housetag[i])try:cursor.execute(sql_select)except Exception as e:print(e)conn.rollback()conn.commit()cursor.close()conn.close()def main(self,):title, href, houseinfo, starIcon, houseprice, unitPrice, housetag = [],[],[],[],[],[],[]for i in range(1, 3):  # 爬取前20页的数据,构建不同的页数urlurl = 'https://cd.ke.com/ershoufang/pg{}/'.format(i)spider1 = self.get_html(url)spider2 = self.parse_html(spider1)title = title + spider2[0]href = href + spider2[1]houseinfo = houseinfo + spider2[2]starIcon = starIcon + spider2[3]houseprice = houseprice + spider2[4]unitPrice = unitPrice + spider2[5]housetag = housetag + spider2[6]print(f"第{i}页爬取结束!")time.sleep(10)self.parse_csv_excel(title, href, houseinfo, starIcon, houseprice, unitPrice, housetag)if __name__ == '__main__':spider = RenrenLogin()spider.main()
结果如下:

2、某博数据的热门话题:
# coding:utf-8
import requests,time,os,openpyxl
from openpyxl import Workbook,load_workbookclass RenrenLogin(object):def __init__(self):# 设置存储数据文件路径self.csvlj = r"C:\Users\xxx\xxx\wb.csv"self.excellj = r"C:\Users\xxx\xxx\wb.xlsx"# 设置请求头self.headers = {'Accept': 'XXXXX','Accept-Encoding': 'XXXXX','Accept-Language': 'XXXXX','Client-Version': 'XXXXX','Cookie': 'XXXXXXXXXXXXXXXXX','User-Agent': 'XXXXXXXXXXXXXXXXX'}def get_html(self, url):# 因此f12查看时,数据为json格式data1 = requests.get(url=url, headers=self.headers).json()return data1def parse_html(self, data1):for i in range(len(data1["statuses"])):alldata = []alldata.append(data1["statuses"][i]["user"]["screen_name"])  # User_title(发布用户的title)alldata.append(data1["statuses"][i]["source"])               # Info_Source(发布来源)alldata.append(data1["statuses"][i]["text_raw"])             # 发布内容alldata.append(data1["statuses"][i]["attitudes_count"])      # 点赞数量alldata.append(data1["statuses"][i]["comments_count"])       # 评论数量alldata.append(data1["statuses"][i]["reposts_count"])        # 转发数量self.parse_excel(alldata)return Truedef parse_excel(self, alldata):if not os.path.exists(self.excellj):workbook = Workbook()workbook.save(self.excellj)wb = openpyxl.load_workbook(self.excellj)wa = wb.activewa.append(['User_title', 'Info_Source', 'text_raw', 'attitudes_count', 'comments_count', 'reposts_count'])wa.append(alldata)wb.save(self.excellj)else:wb = openpyxl.load_workbook(self.excellj)wa = wb.activewa.append(alldata)wb.save(self.excellj)return Truedef main(self, ):for i in range(3):  # 爬取前3页的数据,构建不同的页数urlurl = 'https://weibo.com/ajax/feed/hottimeline?refresh=2&group_id=102803&containerid=102803&extparam=discover%7Cnew_feed&max_id={}&count=10'.format(i)spider1 = self.get_html(url)spider2 = self.parse_html(spider1)print(f"第{i+1}页爬取结束!")time.sleep(10)if __name__ == '__main__':spider = RenrenLogin()spider.main()

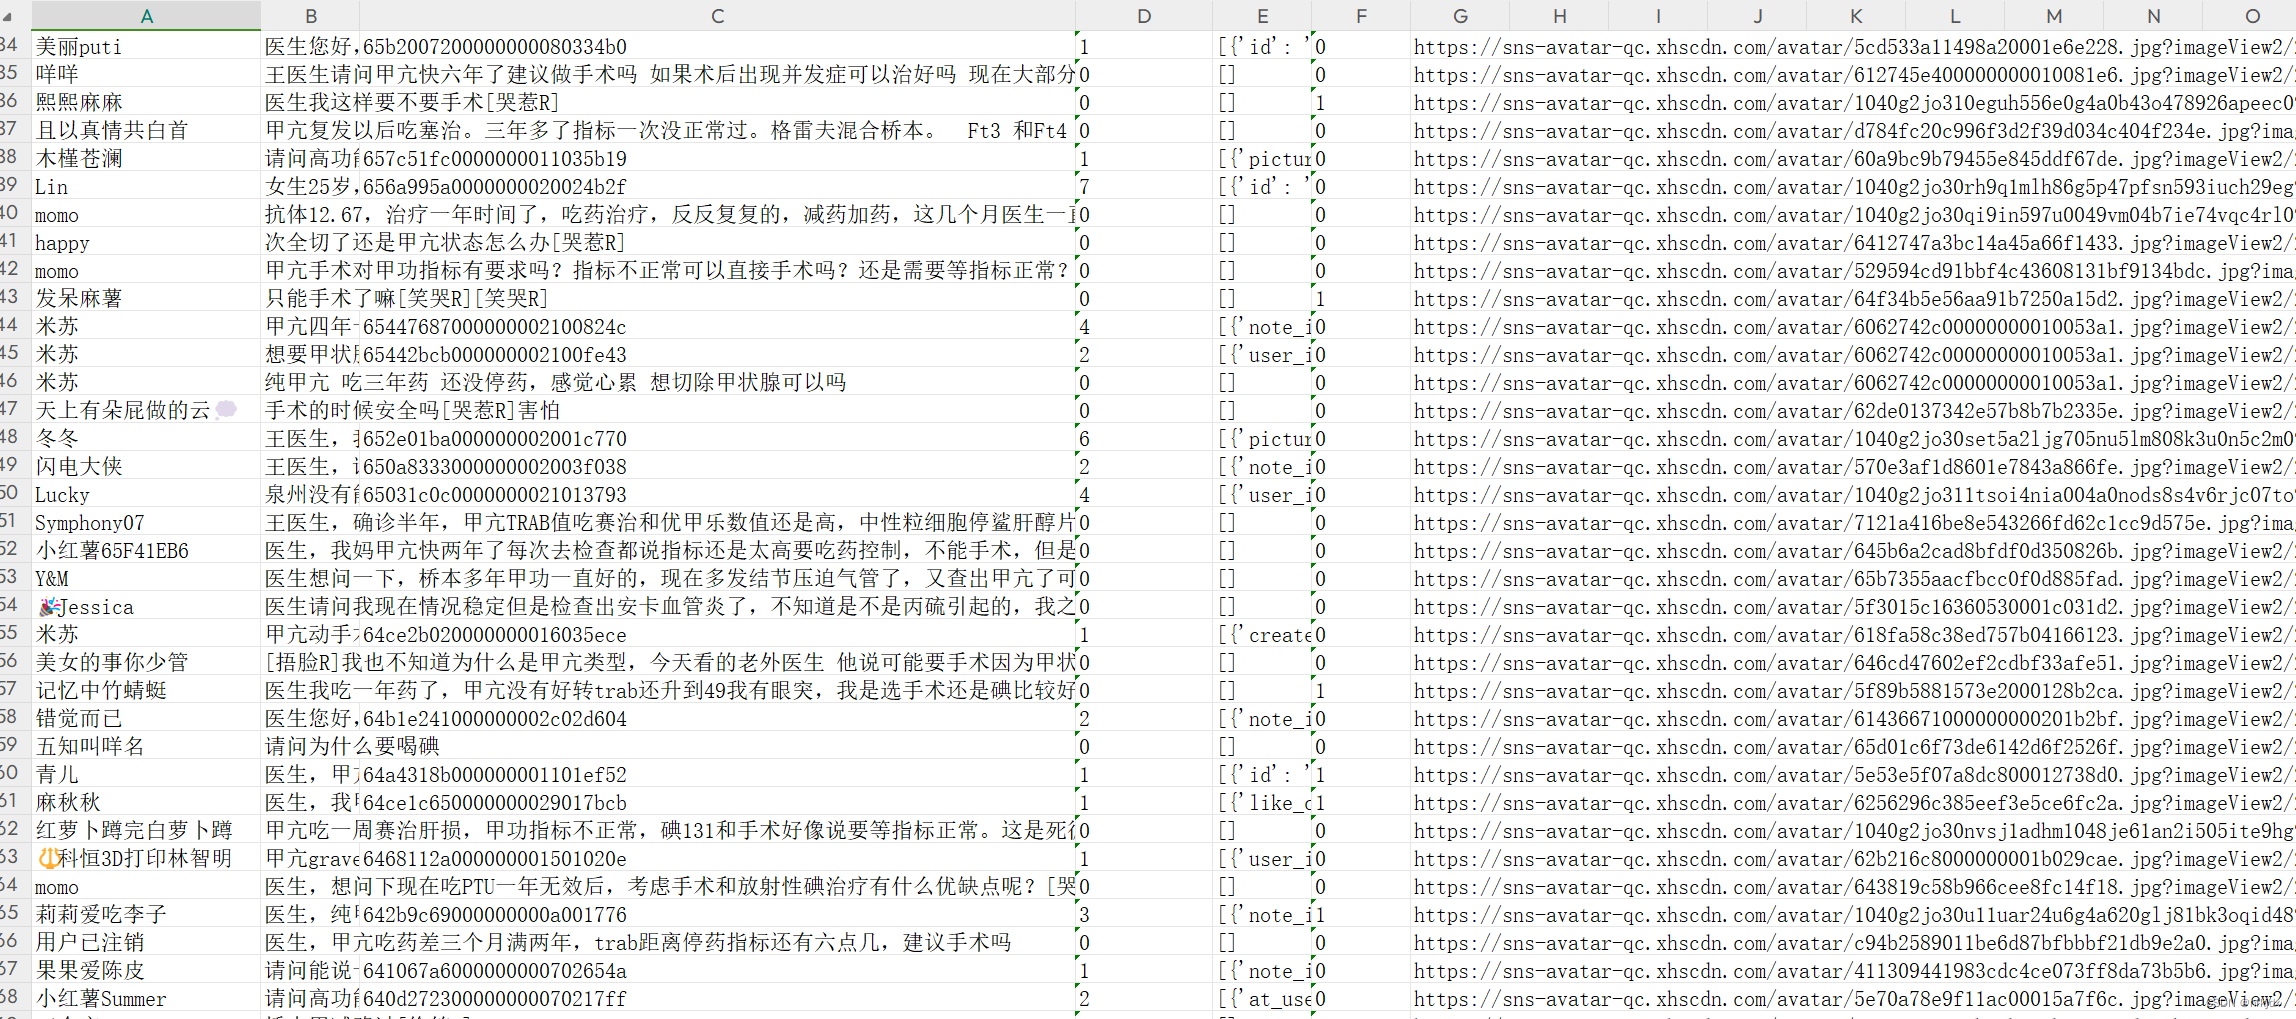
3、某红薯(书)数据爬取:
# coding:utf-8
import requests,time,os,openpyxl
from openpyxl import Workbook,load_workbookclass RenrenLogin(object):def __init__(self):# 设置存储数据文件路径self.excellj = r"C:\XXXXXXXXXXXXX\xhs.xlsx"self.headers = {'Cookie': 'XXXXXXXXXXXXX','User-Agent': 'XXXXXXXXXXXXX','X-S': 'XXXXXXXXXXXXX'}def get_html(self, url):data1 = requests.get(url=url, headers=self.headers).json()self.parse_html(data1)def parse_html(self, data1):for i in range(len(data1["data"]["comments"])):alldata = []alldata.append(data1["data"]["comments"][i]['user_info']['nickname'])alldata.append(data1["data"]["comments"][i]['content'])alldata.append(data1["data"]["comments"][i]['sub_comment_cursor'])alldata.append(data1["data"]["comments"][i]['sub_comment_count'])alldata.append(str(data1["data"]["comments"][i]['sub_comments']))alldata.append(data1["data"]["comments"][i]['like_count'])alldata.append(data1["data"]["comments"][i]['user_info']['image'])print(alldata)self.parse_excel(alldata)return Truedef parse_excel(self, alldata):if not os.path.exists(self.excellj):workbook = Workbook()workbook.save(self.excellj)wb = openpyxl.load_workbook(self.excellj)wa = wb.activewa.append(['nickname', 'content', 'sub_comment_cursor', 'sub_comment_count', 'sub_comments', 'like_count' ,'image'])wa.append(alldata)wb.save(self.excellj)else:wb = openpyxl.load_workbook(self.excellj)wa = wb.activewa.append(alldata)wb.save(self.excellj)return Truedef main(self, ):note_id = 'XXXXXXXXXXXXX'# 一级评论cursorcursor = ['','XXXXXXXXXXXXX','XXXXXXXXXXXXX','XXXXXXXXXXXXX','XXXXXXXXXXXXX','XXXXXXXXXXXXX']for i in range(len(cursor)):if i == 0:url = f"https://edith.xiaohongshu.com/api/sns/web/v2/comment/page?note_id={note_id}&cursor=&top_comment_id=&image_formats=jpg,webp,avif"else:url = f'https://edith.xiaohongshu.com/api/sns/web/v2/comment/page?note_id={note_id}&cursor={cursor[i]}&top_comment_id=&image_formats=jpg,webp,avif'self.get_html(url)print(f"第{i+1}页爬取结束!")time.sleep(10)if __name__ == '__main__':spider = RenrenLogin()spider.main()
