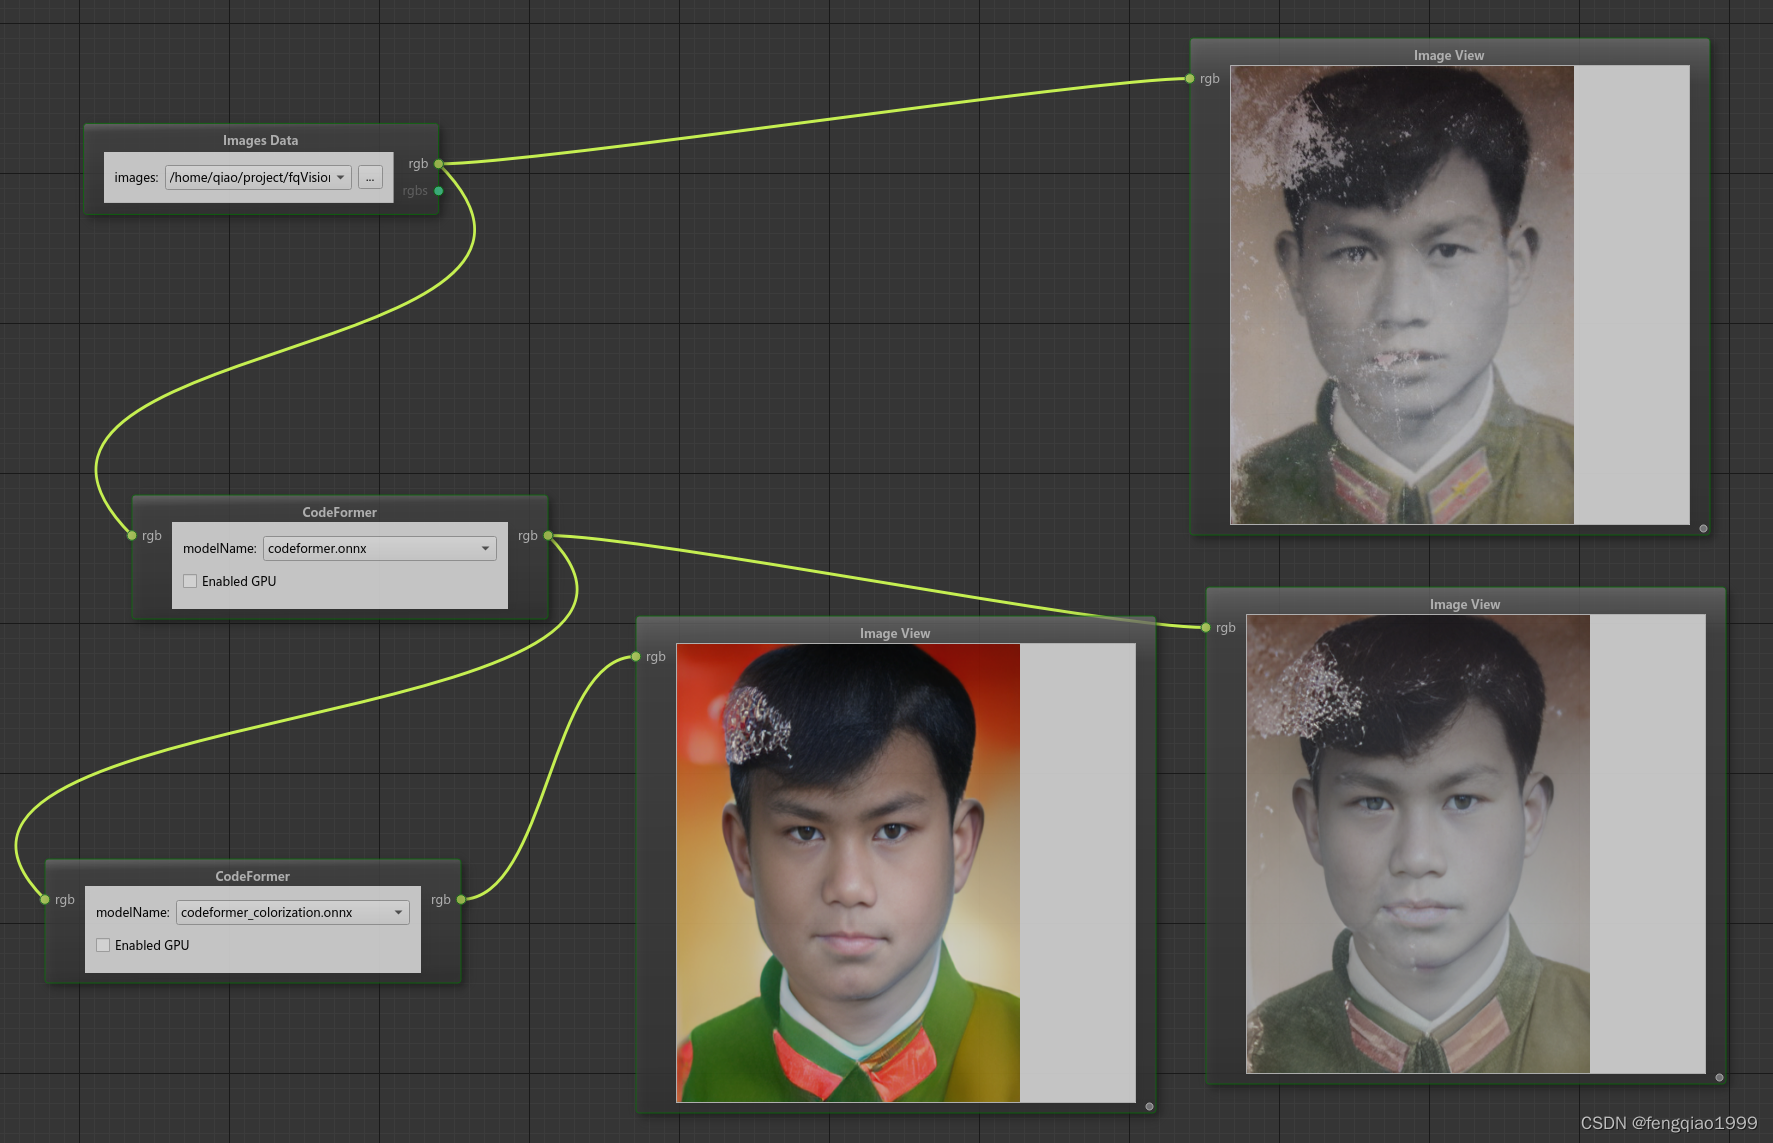
算法简介
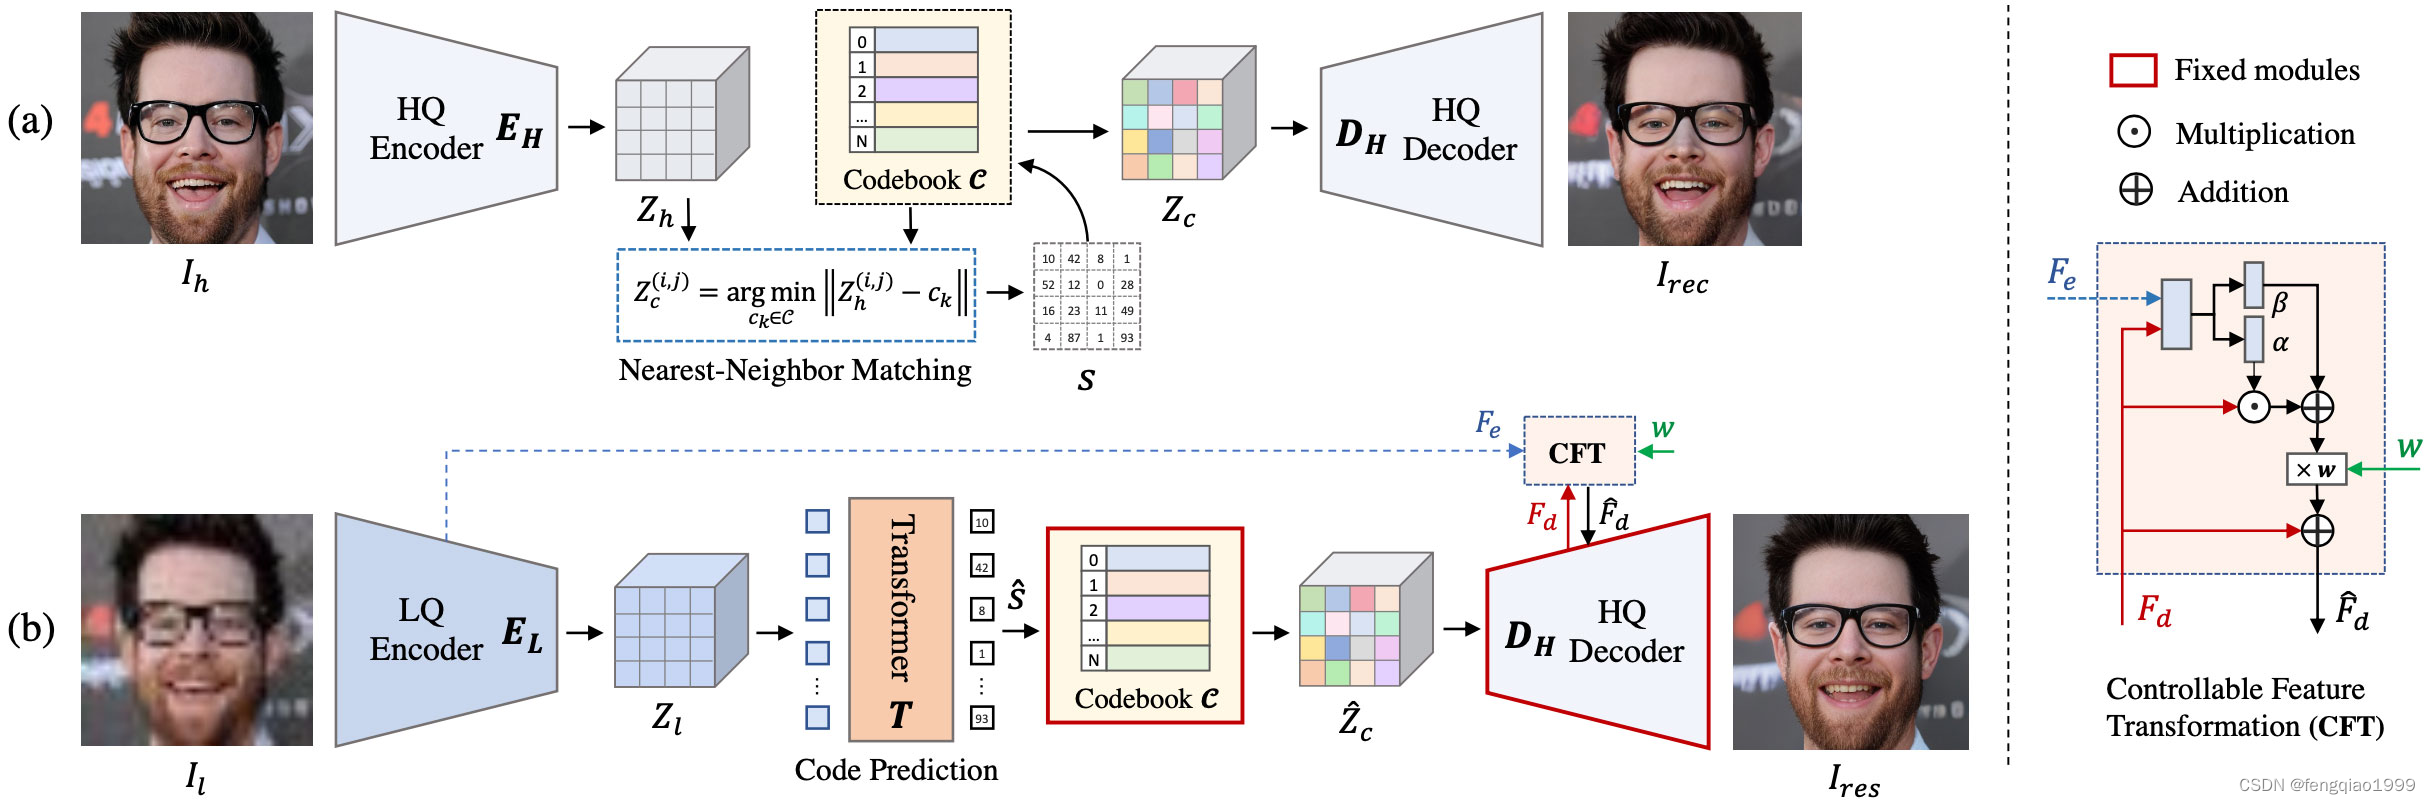
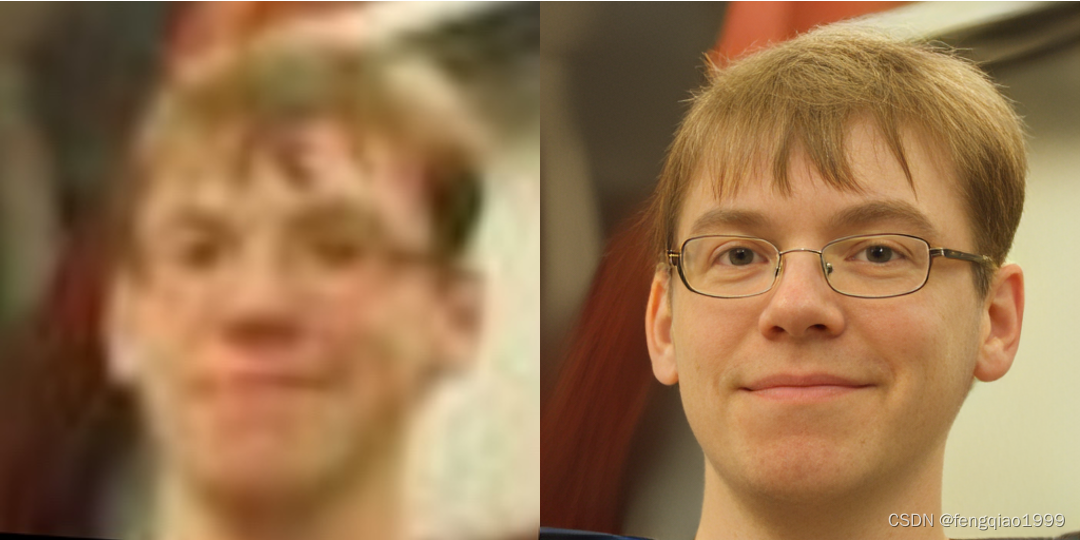
CodeFormer是一种基于AI技术深度学习的人脸复原模型,由南洋理工大学和商汤科技联合研究中心联合开发,它能够接收模糊或马赛克图像作为输入,并生成更清晰的原始图像。算法源码地址:https://github.com/sczhou/CodeFormer
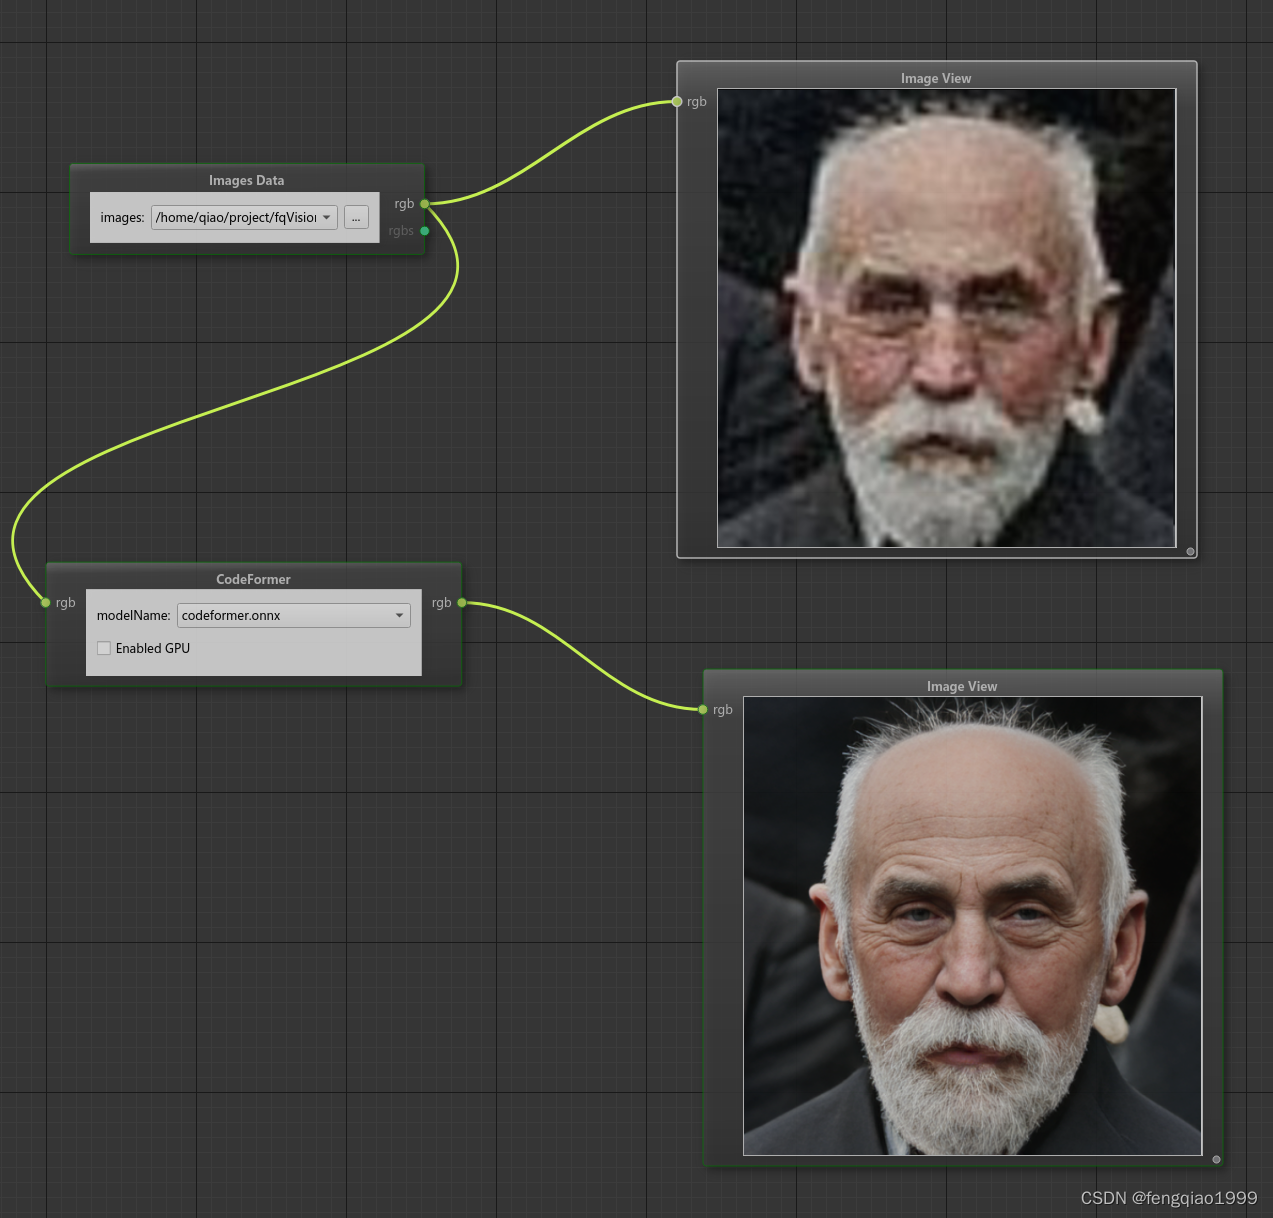
Face Restoration
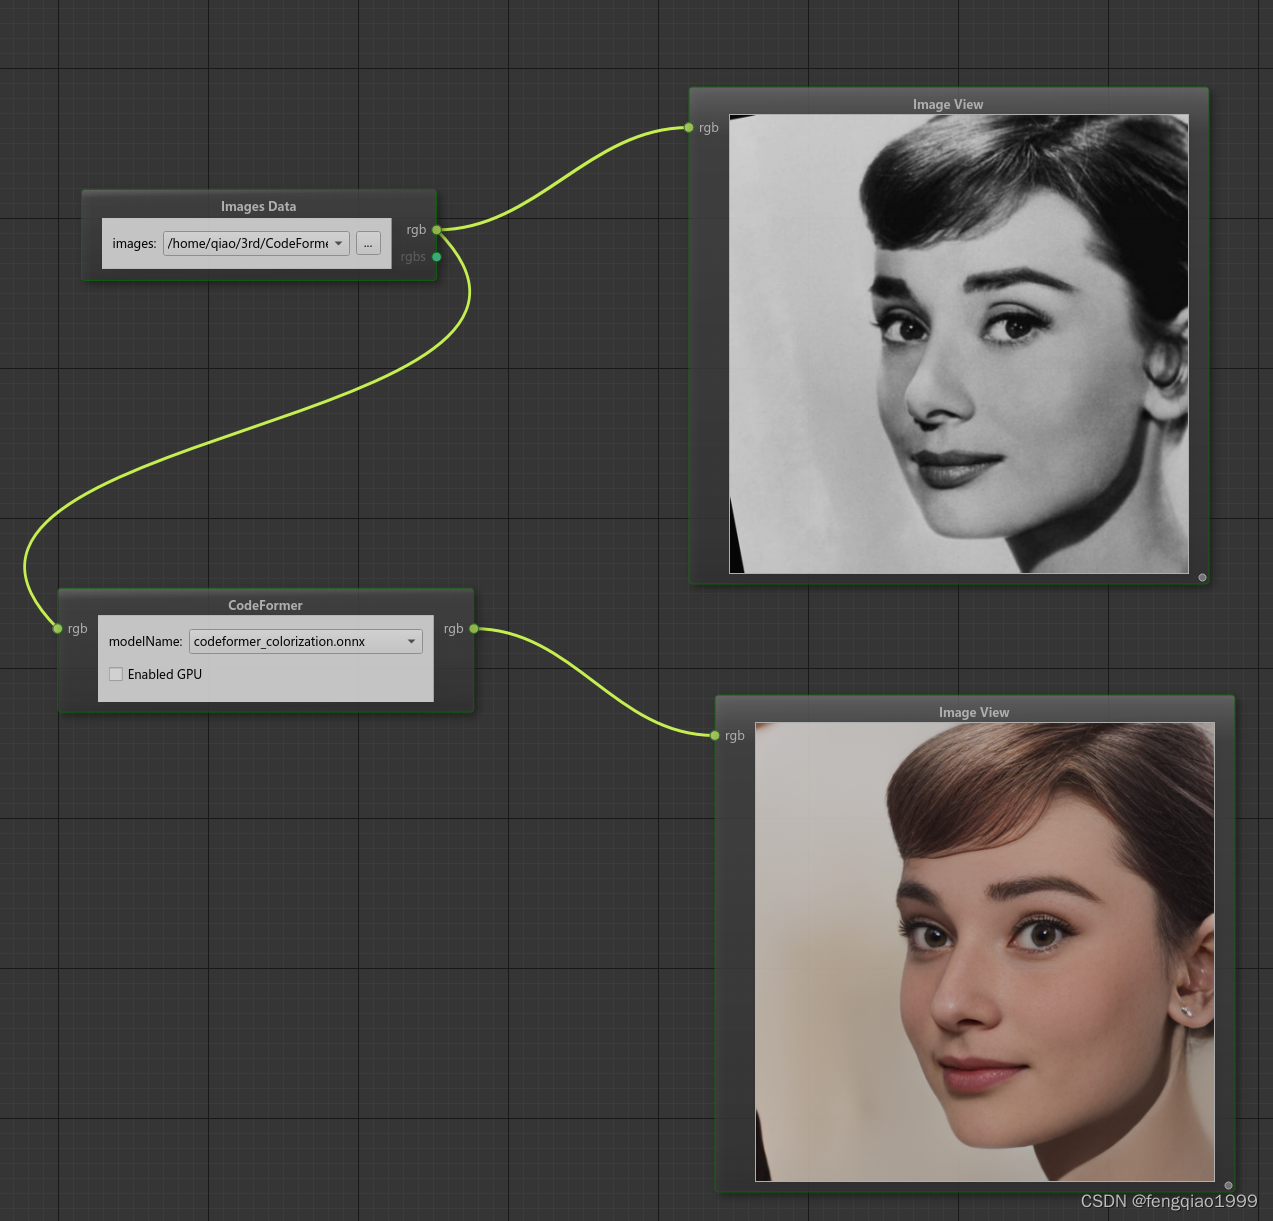
Face Color Enhancement and Restoration

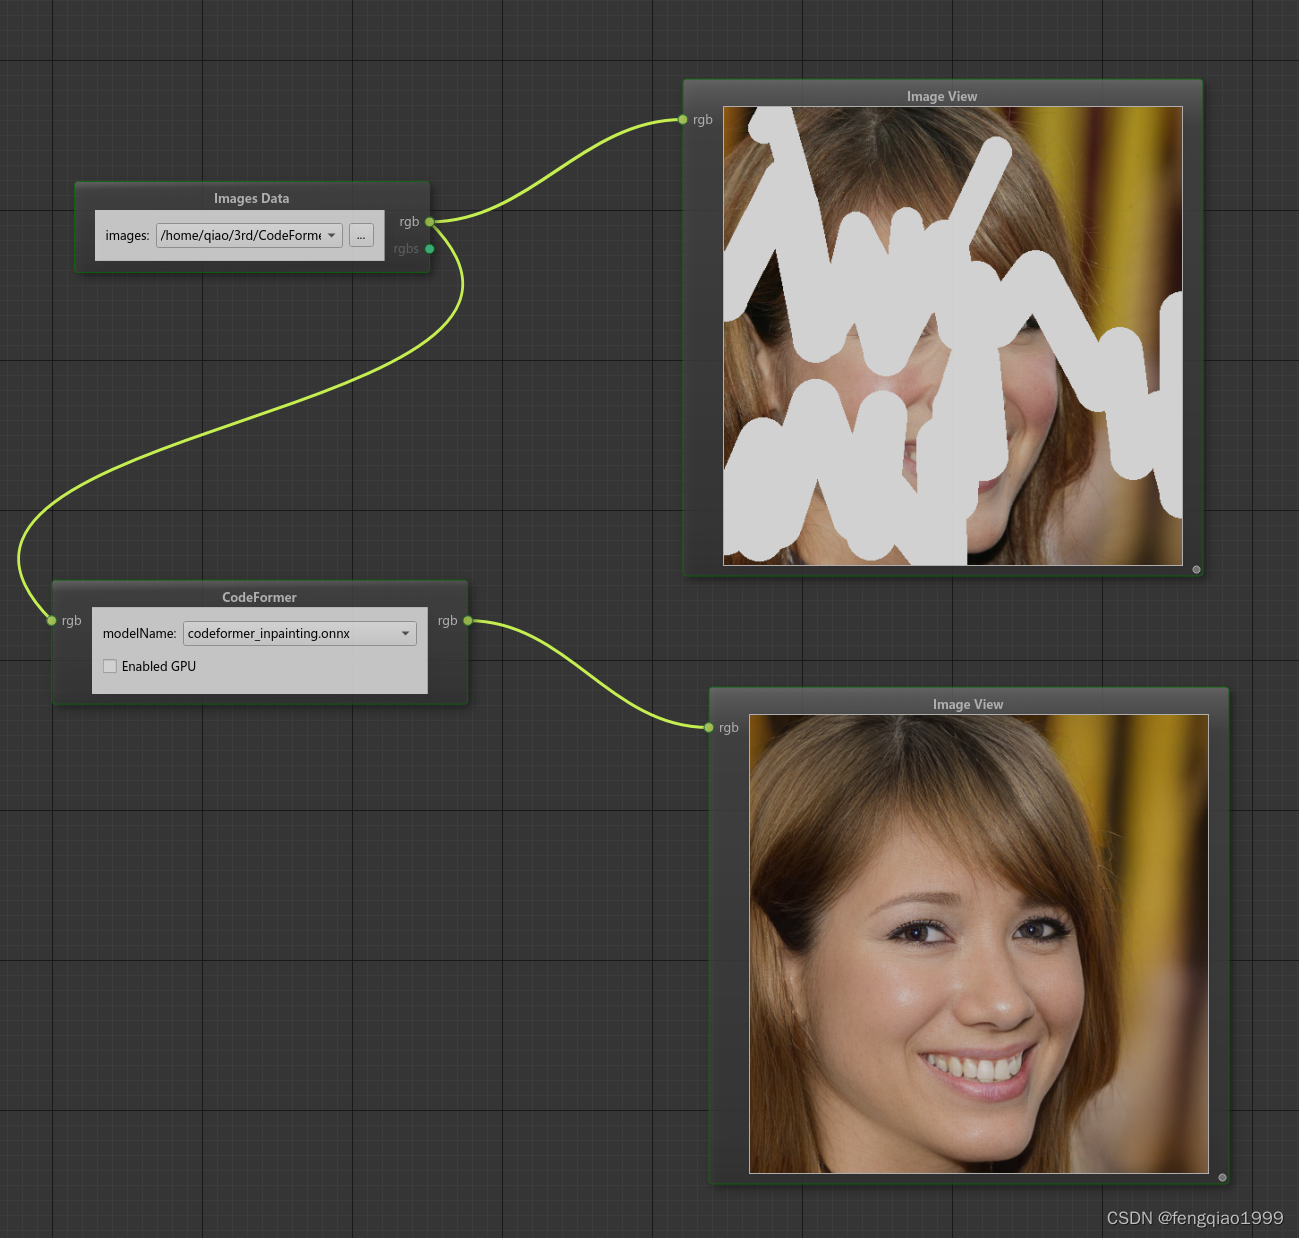
Face Inpainting

模型部署
如果想用C++进行模型推理部署,首先要把模型转换成onnx,转成onnx就可以使用onnxruntime c++库进行部署,或者使用OpenCV的DNN也可以。
1、可在以下地址下载模型:https://github.com/sczhou/CodeFormer/releases/tag/v0.1.0
2、下载CodeFormer源码,在工程目录下添加onnx转换python代码
import torch
from basicsr.utils.registry import ARCH_REGISTRYif __name__ == '__main__':device = torch.device('cuda:0' if torch.cuda.is_available() else 'cpu')net = ARCH_REGISTRY.get('CodeFormer')(dim_embd=512, codebook_size=1024, n_head=8, n_layers=9, connect_list=['32', '64', '128', '256']).to(device)# ckpt_path = 'weights/CodeFormer/codeformer.pth'ckpt_path = './codeformer.pth'checkpoint = torch.load(ckpt_path)['params_ema']net.load_state_dict(checkpoint)net.eval()input_tensor = torch.zeros((1, 3, 512, 512)).to(device)torch.onnx.export(net,  # 模型实例input_tensor,  # 输入张量"./codeformer.onnx",  # 输出的ONNX模型路径export_params=True,  # 是否包含模型参数opset_version=11,  # ONNX操作集版本do_constant_folding=True,  # 是否进行常量折叠优化input_names=['input'],  # 输入名称output_names=['output'],  # 输出名称dynamic_axes={'input': {0: 'batch_size'}, 'output': {0: 'batch_size'}}  # 声明动态轴)
3、采用onnxruntime加载模型,示例代码如下
#define _CRT_SECURE_NO_WARNINGS
#include <iostream>
#include <fstream>
#include <numeric>
#include <opencv2/imgproc.hpp>
#include <opencv2/highgui.hpp>
//#include <cuda_provider_factory.h>  ///nvidia-cuda加速
#include <onnxruntime_cxx_api.h>using namespace cv;
using namespace std;
using namespace Ort;class CodeFormer
{
public:CodeFormer(string modelpath);Mat detect(Mat cv_image);
private:void preprocess(Mat srcimg);vector<float> input_image_;vector<double> input2_tensor;int inpWidth;int inpHeight;int outWidth;int outHeight;float min_max[2] = { -1,1 };//存储初始化获得的可执行网络Env env = Env(ORT_LOGGING_LEVEL_ERROR, "CodeFormer");Ort::Session *ort_session = nullptr;SessionOptions sessionOptions = SessionOptions();vector<char*> input_names;vector<char*> output_names;vector<vector<int64_t>> input_node_dims; // >=1 outputsvector<vector<int64_t>> output_node_dims; // >=1 outputs
};CodeFormer::CodeFormer(string model_path)
{//OrtStatus* status = OrtSessionOptionsAppendExecutionProvider_CUDA(sessionOptions, 0);  ///nvidia-cuda加速sessionOptions.SetGraphOptimizationLevel(ORT_ENABLE_BASIC);std::wstring widestr = std::wstring(model_path.begin(), model_path.end());   ///如果在windows系统就这么写ort_session = new Session(env, widestr.c_str(), sessionOptions);   ///如果在windows系统就这么写///ort_session = new Session(env, model_path.c_str(), sessionOptions);  ///如果在linux系统,就这么写size_t numInputNodes = ort_session->GetInputCount();size_t numOutputNodes = ort_session->GetOutputCount();AllocatorWithDefaultOptions allocator;for (int i = 0; i < numInputNodes; i++){input_names.push_back(ort_session->GetInputName(i, allocator));Ort::TypeInfo input_type_info = ort_session->GetInputTypeInfo(i);auto input_tensor_info = input_type_info.GetTensorTypeAndShapeInfo();auto input_dims = input_tensor_info.GetShape();input_node_dims.push_back(input_dims);}for (int i = 0; i < numOutputNodes; i++){output_names.push_back(ort_session->GetOutputName(i, allocator));Ort::TypeInfo output_type_info = ort_session->GetOutputTypeInfo(i);auto output_tensor_info = output_type_info.GetTensorTypeAndShapeInfo();auto output_dims = output_tensor_info.GetShape();output_node_dims.push_back(output_dims);}this->inpHeight = input_node_dims[0][2];this->inpWidth = input_node_dims[0][3];this->outHeight = output_node_dims[0][2];this->outWidth = output_node_dims[0][3];input2_tensor.push_back(0.5);
}void CodeFormer::preprocess(Mat srcimg)
{Mat dstimg;cvtColor(srcimg, dstimg, COLOR_BGR2RGB);resize(dstimg, dstimg, Size(this->inpWidth, this->inpHeight), INTER_LINEAR);this->input_image_.resize(this->inpWidth * this->inpHeight * dstimg.channels());int k = 0;for (int c = 0; c < 3; c++){for (int i = 0; i < this->inpHeight; i++){for (int j = 0; j < this->inpWidth; j++){float pix = dstimg.ptr<uchar>(i)[j * 3 + c];this->input_image_[k] = (pix / 255.0 - 0.5) / 0.5;k++;}}}
}Mat CodeFormer::detect(Mat srcimg)
{int im_h = srcimg.rows;int im_w = srcimg.cols;this->preprocess(srcimg);array<int64_t, 4> input_shape_{ 1, 3, this->inpHeight, this->inpWidth };vector<int64_t> input2_shape_ = { 1 };auto allocator_info = MemoryInfo::CreateCpu(OrtDeviceAllocator, OrtMemTypeCPU);vector<Value> ort_inputs;ort_inputs.push_back(Value::CreateTensor<float>(allocator_info, input_image_.data(), input_image_.size(), input_shape_.data(), input_shape_.size()));ort_inputs.push_back(Value::CreateTensor<double>(allocator_info, input2_tensor.data(), input2_tensor.size(), input2_shape_.data(), input2_shape_.size()));vector<Value> ort_outputs = ort_session->Run(RunOptions{ nullptr }, input_names.data(), ort_inputs.data(), ort_inputs.size(), output_names.data(), output_names.size());post_processfloat* pred = ort_outputs[0].GetTensorMutableData<float>();//Mat mask(outHeight, outWidth, CV_32FC3, pred); /经过试验,直接这样赋值,是不行的const unsigned int channel_step = outHeight * outWidth;vector<Mat> channel_mats;Mat rmat(outHeight, outWidth, CV_32FC1, pred); // RMat gmat(outHeight, outWidth, CV_32FC1, pred + channel_step); // GMat bmat(outHeight, outWidth, CV_32FC1, pred + 2 * channel_step); // Bchannel_mats.push_back(rmat);channel_mats.push_back(gmat);channel_mats.push_back(bmat);Mat mask;merge(channel_mats, mask); // CV_32FC3 allocated///不用for循环遍历Mat里的每个像素值,实现numpy.clip函数mask.setTo(this->min_max[0], mask < this->min_max[0]);mask.setTo(this->min_max[1], mask > this->min_max[1]);   也可以用threshold函数,阈值类型THRESH_TOZERO_INVmask = (mask - this->min_max[0]) / (this->min_max[1] - this->min_max[0]);mask *= 255.0;mask.convertTo(mask, CV_8UC3);cvtColor(mask, mask, COLOR_BGR2RGB);return mask;
}int main()
{CodeFormer mynet("codeformer.onnx");string imgpath = "input.png";Mat srcimg = imread(imgpath);Mat dstimg = mynet.detect(srcimg);resize(dstimg, dstimg, Size(srcimg.cols, srcimg.rows), INTER_LINEAR);//imwrite("result.jpg", dstimg)namedWindow("srcimg", WINDOW_NORMAL);imshow("srcimg", srcimg);namedWindow("dstimg", WINDOW_NORMAL);imshow("dstimg", dstimg);waitKey(0);destroyAllWindows();
}
效果展示
面部恢复
面部色彩增强与恢复
面部修复
破旧照片修复效果