据说这个布局是为了解决各种布局过度前套导致代码复杂的问题的。
我想按照自己想实现的各种效果来逐步学习,那么直接拿微信主页来练手,用约束性布局实现微信首页吧。
先上图

先实现顶部搜索框+加号按钮
先实现 在布局中添加一个组件,然后摆放到屏幕的任意位置!!!!!!
1、放个文本标签TextView在布局组开始的位置:
<?xml version="1.0" encoding="utf-8"?>
<androidx.constraintlayout.widget.ConstraintLayout xmlns:android="http://schemas.android.com/apk/res/android"xmlns:app="http://schemas.android.com/apk/res-auto"xmlns:tools="http://schemas.android.com/tools"android:layout_width="match_parent"android:layout_height="match_parent"tools:context=".MainActivity"><TextViewandroid:id="@+id/textView1"android:layout_width="100dp"android:layout_height="60dp"android:background="#D6E1AA"android:text="textview1"android:textColor="@color/black"android:textSize="25sp"android:textStyle="bold"app:layout_constraintTop_toTopOf="parent"app:layout_constraintLeft_toLeftOf="parent"tools:ignore="HardcodedText" /></androidx.constraintlayout.widget.ConstraintLayout>
效果:
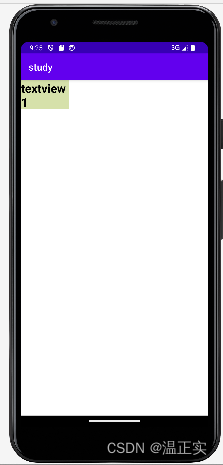
要理解这句代码:
app:layout_constraintTop_toTopOf="parent"
只要理解了这句话,你就一定可以很自信的往下学习了,这句代码的意思:
子控件的顶部与父容器的顶部对齐
理解了上面这句代码,那么后面的那句:
app:layout_constraintLeft_toLeftOf="parent"
很显然就是:子控件本身的左边与父容器的左边对其。
那么我们好奇,假如是控件与控件之间是不是也可以用这种办法呢?
那么我们实践一下,我们在控件下方新增一个控件,那么代码是不是应该是
新控件的顶部和控件的底部对其,然后新控件的左边和控件的左边对其,我们试试:
<?xml version="1.0" encoding="utf-8"?>
<androidx.constraintlayout.widget.ConstraintLayout xmlns:android="http://schemas.android.com/apk/res/android"xmlns:app="http://schemas.android.com/apk/res-auto"xmlns:tools="http://schemas.android.com/tools"android:layout_width="match_parent"android:layout_height="match_parent"tools:context=".MainActivity"><TextViewandroid:id="@+id/textView1"android:layout_width="100dp"android:layout_height="60dp"android:background="#D6E1AA"android:text="textview1"android:textColor="@color/black"android:textSize="25sp"android:textStyle="bold"app:layout_constraintTop_toTopOf="parent"app:layout_constraintLeft_toLeftOf="parent"tools:ignore="HardcodedText" /><TextViewandroid:layout_width="100dp"android:layout_height="60dp"android:background="#D6E1AA"android:text="textview1"android:textColor="@color/black"android:textSize="25sp"android:textStyle="bold"app:layout_constraintTop_toBottomOf="@id/textView1"app:layout_constraintLeft_toLeftOf="@id/textView1"tools:ignore="HardcodedText" /></androidx.constraintlayout.widget.ConstraintLayout>
代码写好,运行看效果:
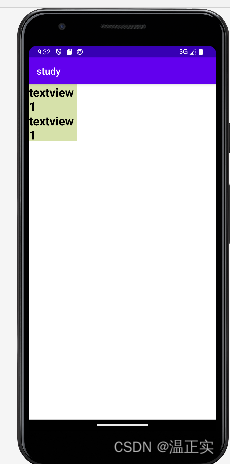
我们太厉害了,真的实现了!!!!!!!
那我们又🈶️新问题了:怎么让两个控件相交呢?有趣的问题!
嗯.......用外边距来控制怎么样?
试试:
<?xml version="1.0" encoding="utf-8"?>
<androidx.constraintlayout.widget.ConstraintLayout xmlns:android="http://schemas.android.com/apk/res/android"xmlns:app="http://schemas.android.com/apk/res-auto"xmlns:tools="http://schemas.android.com/tools"android:layout_width="match_parent"android:layout_height="match_parent"tools:context=".MainActivity"><TextViewandroid:id="@+id/textView1"android:layout_width="100dp"android:layout_height="60dp"android:background="#D6E1AA"android:text="textview1"android:textColor="@color/black"android:textSize="25sp"android:textStyle="bold"app:layout_constraintTop_toTopOf="parent"app:layout_constraintLeft_toLeftOf="parent"tools:ignore="HardcodedText" /><TextViewandroid:layout_width="100dp"android:layout_height="60dp"android:background="#F44336"android:text="textview1"android:textColor="@color/black"android:textSize="25sp"android:textStyle="bold"app:layout_constraintTop_toBottomOf="@id/textView1"app:layout_constraintLeft_toLeftOf="@id/textView1"android:layout_marginBottom="40dp"tools:ignore="HardcodedText" /></androidx.constraintlayout.widget.ConstraintLayout>
看看效果:
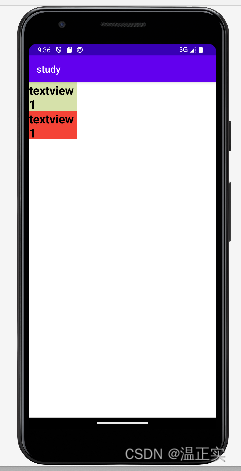
捂脸....没用!!那两句限制住了!这就是约束性布局啊,牛!
再想想:
要两个控件相交,我们拖动试试代码是啥!!
哈哈哈,拖动没办法让他们相交,哈哈哈哈哈哈,笑死了。
看看AI怎么说:
<androidx.constraintlayout.widget.ConstraintLayoutxmlns:android="http://schemas.android.com/apk/res/android"xmlns:app="http://schemas.android.com/apk/res-auto"xmlns:tools="http://schemas.android.com/tools"android:layout_width="match_parent"android:layout_height="match_parent"tools:context=".MainActivity"><TextViewandroid:id="@+id/textView1"android:layout_width="wrap_content"android:layout_height="wrap_content"android:text="First TextView"app:layout_constraintTop_toTopOf="parent"app:layout_constraintStart_toStartOf="parent"android:padding="16dp" /><Buttonandroid:id="@+id/button1"android:layout_width="wrap_content"android:layout_height="wrap_content"android:text="Button Overlapping"app:layout_constraintTop_toTopOf="@id/textView1"app:layout_constraintStart_toStartOf="@id/textView1"android:padding="16dp" /></androidx.constraintlayout.widget.ConstraintLayout>
试试Ai的代码:可以!!还是那两句起的作用,就是新控件跑到控件内部去了(相对于约束),然后用外边距调整相交的位置就ok了。
以上看完希望你能很清楚的了解约束性布局的基本用法。
上面我们实现了将一个控件放置在开始位置,那加入放在开始位置的往后移动一段距离呢?
刚好,用控件的外边距:
<?xml version="1.0" encoding="utf-8"?>
<androidx.constraintlayout.widget.ConstraintLayout xmlns:android="http://schemas.android.com/apk/res/android"xmlns:app="http://schemas.android.com/apk/res-auto"xmlns:tools="http://schemas.android.com/tools"android:layout_width="match_parent"android:layout_height="match_parent"tools:context=".MainActivity"><TextViewandroid:layout_marginLeft="60dp"android:id="@+id/textView1"android:layout_width="100dp"android:layout_height="60dp"android:background="#D6E1AA"android:text="textview1"android:textColor="@color/black"android:textSize="25sp"android:textStyle="bold"app:layout_constraintTop_toTopOf="parent"app:layout_constraintLeft_toLeftOf="parent"tools:ignore="HardcodedText" /></androidx.constraintlayout.widget.ConstraintLayout>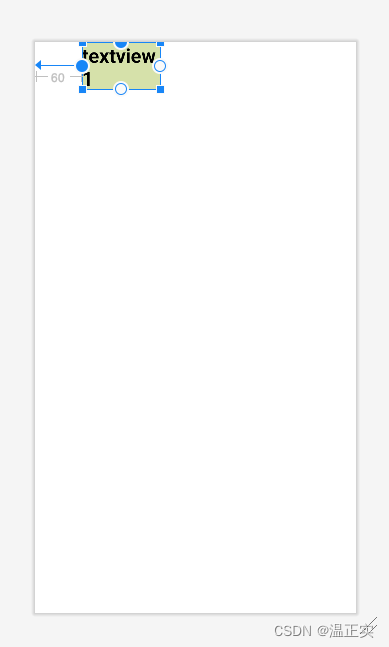
嘿嘿,这张图看得出来吗,不是模拟器,是design 视图,这样省时间!!!
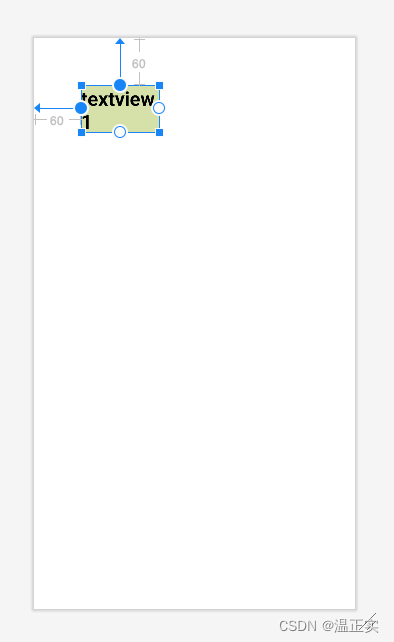
同样的,我们要实现控件在顶部下方一丢丢呢,那就:
<?xml version="1.0" encoding="utf-8"?>
<androidx.constraintlayout.widget.ConstraintLayout xmlns:android="http://schemas.android.com/apk/res/android"xmlns:app="http://schemas.android.com/apk/res-auto"xmlns:tools="http://schemas.android.com/tools"android:layout_width="match_parent"android:layout_height="match_parent"tools:context=".MainActivity"><TextViewandroid:layout_marginTop="60dp"android:layout_marginLeft="60dp"android:id="@+id/textView1"android:layout_width="100dp"android:layout_height="60dp"android:background="#D6E1AA"android:text="textview1"android:textColor="@color/black"android:textSize="25sp"android:textStyle="bold"app:layout_constraintTop_toTopOf="parent"app:layout_constraintLeft_toLeftOf="parent"tools:ignore="HardcodedText" /></androidx.constraintlayout.widget.ConstraintLayout>
看效果:
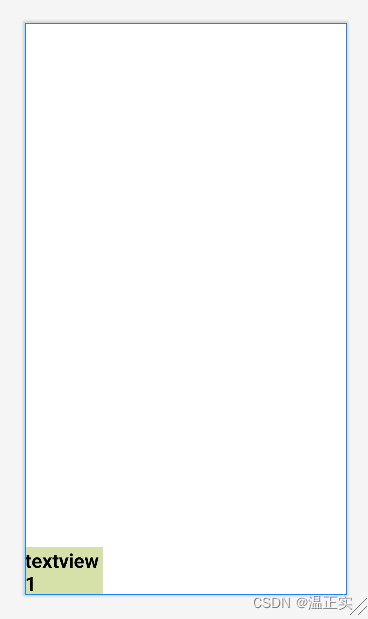
嘿嘿,那么要把控件放到底部呢?那就是这样的控件底部和控件底部对齐了:
<?xml version="1.0" encoding="utf-8"?>
<androidx.constraintlayout.widget.ConstraintLayout xmlns:android="http://schemas.android.com/apk/res/android"xmlns:app="http://schemas.android.com/apk/res-auto"xmlns:tools="http://schemas.android.com/tools"android:layout_width="match_parent"android:layout_height="match_parent"tools:context=".MainActivity"><TextViewandroid:id="@+id/textView1"android:layout_width="100dp"android:layout_height="60dp"android:background="#D6E1AA"android:text="textview1"android:textColor="@color/black"android:textSize="25sp"android:textStyle="bold"app:layout_constraintBottom_toBottomOf="parent"app:layout_constraintLeft_toLeftOf="parent"tools:ignore="HardcodedText" /></androidx.constraintlayout.widget.ConstraintLayout>
看效果:
要让它在左边垂直居中怎么办呢?这样:
<?xml version="1.0" encoding="utf-8"?>
<androidx.constraintlayout.widget.ConstraintLayout xmlns:android="http://schemas.android.com/apk/res/android"xmlns:app="http://schemas.android.com/apk/res-auto"xmlns:tools="http://schemas.android.com/tools"android:layout_width="match_parent"android:layout_height="match_parent"tools:context=".MainActivity"><TextViewandroid:id="@+id/textView1"android:layout_width="100dp"android:layout_height="60dp"android:background="#D6E1AA"android:text="textview1"android:textColor="@color/black"android:textSize="25sp"android:textStyle="bold"app:layout_constraintTop_toTopOf="parent"app:layout_constraintBottom_toBottomOf="parent"app:layout_constraintLeft_toLeftOf="parent"tools:ignore="HardcodedText" /></androidx.constraintlayout.widget.ConstraintLayout>
看效果:
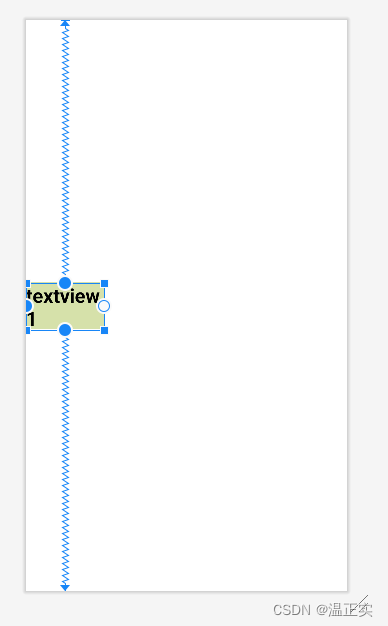
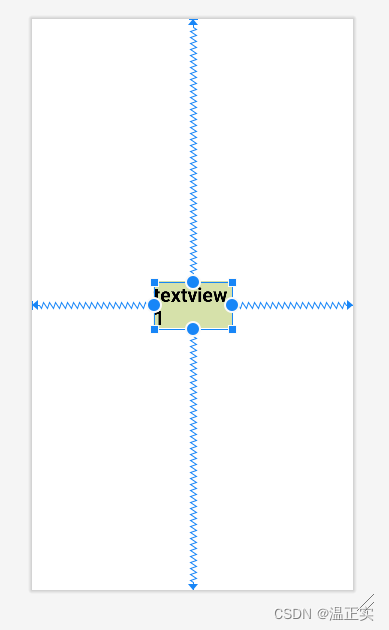
加了句底部和底部对其就实现了。
那么还要水平居中是不是价格表右边和右边也对齐就行了?试试吧:
<?xml version="1.0" encoding="utf-8"?>
<androidx.constraintlayout.widget.ConstraintLayout xmlns:android="http://schemas.android.com/apk/res/android"xmlns:app="http://schemas.android.com/apk/res-auto"xmlns:tools="http://schemas.android.com/tools"android:layout_width="match_parent"android:layout_height="match_parent"tools:context=".MainActivity"><TextViewandroid:id="@+id/textView1"android:layout_width="100dp"android:layout_height="60dp"android:background="#D6E1AA"android:text="textview1"android:textColor="@color/black"android:textSize="25sp"android:textStyle="bold"app:layout_constraintTop_toTopOf="parent"app:layout_constraintLeft_toLeftOf="parent"app:layout_constraintBottom_toBottomOf="parent"app:layout_constraintRight_toRightOf="parent"tools:ignore="HardcodedText" /></androidx.constraintlayout.widget.ConstraintLayout>
真的真的!!!,看效果:
不错不错,学会了好多,基本就这样了呗,咱们学会了!!快去动手实践吧!!!
学会的点个赞???哈哈哈哈哈哈,下课!!!
等一下,忘了实现微信首页了,😂。
来,上图:

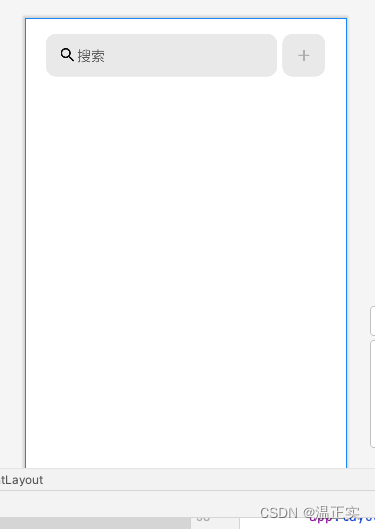
step 1:实现顶部搜索框 和 加号按钮:

这部分看似简单,其实一点也不难!!!!😄
上代码:
<?xml version="1.0" encoding="utf-8"?>
<androidx.constraintlayout.widget.ConstraintLayoutxmlns:android="http://schemas.android.com/apk/res/android"xmlns:app="http://schemas.android.com/apk/res-auto"xmlns:tools="http://schemas.android.com/tools"android:layout_width="match_parent"android:paddingRight="20dp"android:paddingLeft="20dp"android:paddingTop="20dp"android:layout_height="match_parent"tools:context=".MainActivity"><EditTextandroid:drawableStart="@drawable/search"  android:paddingStart="16dp" android:id="@+id/input"android:layout_width="0dp"android:layout_height="55dp"android:hint="搜索"android:inputType="text"android:background="@drawable/rounded_edittext"app:layout_constraintTop_toTopOf="parent"app:layout_constraintStart_toStartOf="parent"app:layout_constraintEnd_toStartOf="@+id/button"app:layout_constraintWidth_percent="0.8"tools:ignore="MissingConstraints" /><androidx.appcompat.widget.LinearLayoutCompatandroid:id="@+id/button"android:layout_width="55dp"android:layout_height="55dp"android:background="@drawable/rounded_edittext"android:gravity="center"app:layout_constraintTop_toTopOf="@id/input"app:layout_constraintStart_toEndOf="@id/input"app:layout_constraintEnd_toEndOf="parent"app:layout_constraintWidth_percent="0.2"tools:ignore="MissingConstraints"><ImageButtonandroid:background="@color/my_gray"android:src="@drawable/add"android:layout_width="48dp"android:layout_height="48dp"/></androidx.appcompat.widget.LinearLayoutCompat></androidx.constraintlayout.widget.ConstraintLayout>
看效果:
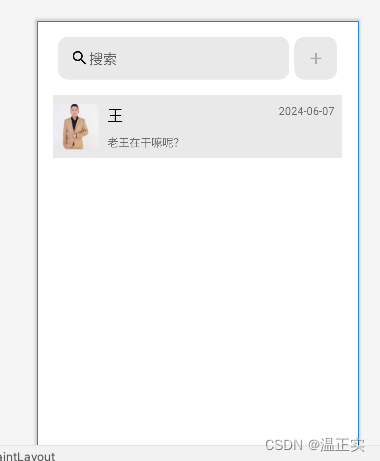
下面的就是聊天列表了,我们来实现一个item就行了,关于列表怎么实现今天就不学了。

这个看似简单,其实一点也不难:
<?xml version="1.0" encoding="utf-8"?>
<androidx.constraintlayout.widget.ConstraintLayoutxmlns:android="http://schemas.android.com/apk/res/android"xmlns:app="http://schemas.android.com/apk/res-auto"xmlns:tools="http://schemas.android.com/tools"android:layout_width="match_parent"android:paddingRight="20dp"android:paddingLeft="20dp"android:paddingTop="20dp"android:layout_height="match_parent"tools:context=".MainActivity"><EditTextandroid:drawableStart="@drawable/search"android:paddingStart="16dp"android:id="@+id/input"android:layout_width="0dp"android:layout_height="55dp"android:hint="搜索"android:inputType="text"android:background="@drawable/rounded_edittext"app:layout_constraintTop_toTopOf="parent"app:layout_constraintStart_toStartOf="parent"app:layout_constraintEnd_toStartOf="@+id/button"app:layout_constraintWidth_percent="0.8"tools:ignore="MissingConstraints" /><androidx.appcompat.widget.LinearLayoutCompatandroid:id="@+id/button"android:layout_width="55dp"android:layout_height="55dp"android:background="@drawable/rounded_edittext"android:gravity="center"app:layout_constraintTop_toTopOf="@id/input"app:layout_constraintStart_toEndOf="@id/input"app:layout_constraintEnd_toEndOf="parent"app:layout_constraintWidth_percent="0.2"tools:ignore="MissingConstraints"><ImageButtonandroid:background="@color/my_gray"android:src="@drawable/add"android:layout_width="48dp"android:layout_height="48dp"/></androidx.appcompat.widget.LinearLayoutCompat><androidx.constraintlayout.widget.ConstraintLayoutandroid:layout_width="match_parent"android:layout_marginTop="20dp"android:layout_height="80dp"android:background="@color/my_gray"app:layout_constraintTop_toBottomOf="@+id/input"app:layout_constraintLeft_toLeftOf="@id/input"><!--头像--><ImageViewandroid:id="@+id/head_image"app:layout_constraintTop_toTopOf="parent"app:layout_constraintLeft_toLeftOf="parent"app:layout_constraintBottom_toBottomOf="parent"android:src="@drawable/head_image"android:layout_width="60dp"android:layout_height="60dp"/><!--昵称--><TextViewandroid:id="@+id/nickname"app:layout_constraintLeft_toRightOf="@+id/head_image"android:layout_width="wrap_content"android:text="王"android:textColor="@color/black"android:textSize="20sp"android:layout_marginLeft="10dp"app:layout_constraintTop_toTopOf="@+id/head_image"android:layout_height="wrap_content"/><!--聊天记录--><TextViewapp:layout_constraintLeft_toRightOf="@+id/head_image"android:layout_width="wrap_content"android:text="老王在干嘛呢?"android:layout_marginLeft="10dp"app:layout_constraintBottom_toBottomOf="@id/head_image"android:layout_height="wrap_content"/><!--时间--><TextViewandroid:layout_marginTop="10dp"app:layout_constraintTop_toTopOf="parent"app:layout_constraintRight_toRightOf="parent"android:text="2024-06-07"android:layout_marginRight="10dp"android:layout_width="wrap_content"android:layout_height="wrap_content"/></androidx.constraintlayout.widget.ConstraintLayout></androidx.constraintlayout.widget.ConstraintLayout>
ok,结束,这么带劲的文章怎么也得有10个赞吧?



![[线程与网络] 网络编程与通信原理(六):深入理解应用层http与https协议(网络编程与通信原理完结)](https://img-blog.csdnimg.cn/direct/519f50271879474fb021cf132b45fd23.png)

