项目代码
gson/spring-security-demo
简介
Spring Security 是 Spring 家族中的一个安全管理框架。相比与另外一个安全框架Shiro,它提供了更丰富的功能,社区资源也比Shiro丰富。
一般来说中大型的项目都是使用SpringSecurity来做安全框架。小项目有Shiro的比较多,因为相比与SpringSecurity,Shiro的上手更加的简单。
一般Web应用的需要进行认证和授权。
认证:验证当前访问系统的是不是本系统的用户,并且要确认具体是哪个用户
授权:经过认证后判断当前用户是否有权限进行某个操作
而认证和授权也是SpringSecurity作为安全框架的核心功能。
搭建基础项目
1、我们先搭建一个简单的SpringBoot工程,并添加相关依赖
<parent><groupId>org.springframework.boot</groupId><artifactId>spring-boot-starter-parent</artifactId><version>2.5.0</version></parent><dependencies><dependency><groupId>org.springframework.boot</groupId><artifactId>spring-boot-starter-web</artifactId></dependency><dependency><groupId>org.projectlombok</groupId><artifactId>lombok</artifactId><optional>true</optional></dependency></dependencies>2、创建启动类
@SpringBootApplication
public class SecurityApplication {public static void main(String[] args) {SpringApplication.run(SecurityApplication.class,args);}
}
3、创建Controller
@RestController
@RequestMapping("/book")
public class BookController {@GetMapping("/list")public String list() {return "book-list";}}
4、创建配置文件application.yml
server:port: 8000然后启动项目,输入地址进行访问测试

引入SpringSecurity
在SpringBoot项目中使用SpringSecurity我们只需要引入依赖即可实现入门案例。
<dependency><groupId>org.springframework.boot</groupId><artifactId>spring-boot-starter-security</artifactId></dependency>引入依赖后我们在尝试去访问之前的接口就会自动跳转到一个SpringSecurity的默认登陆页面,默认用户名是user,密码会输出在控制台。
必须登陆之后才能对接口进行访问。


认证
登陆校验流程
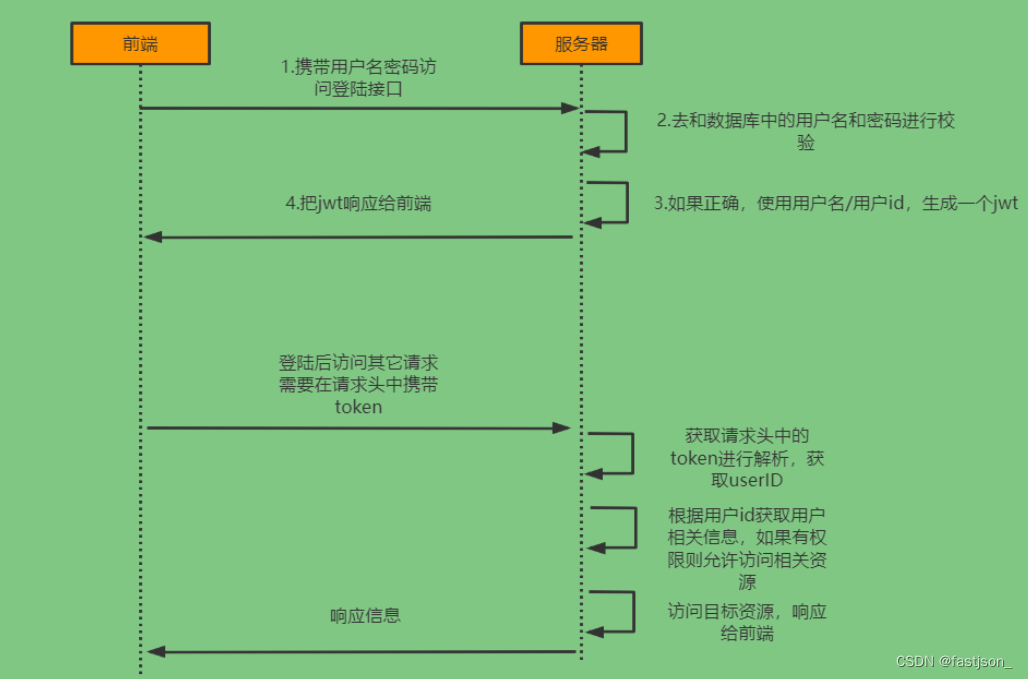
SpringSecurity完整流程
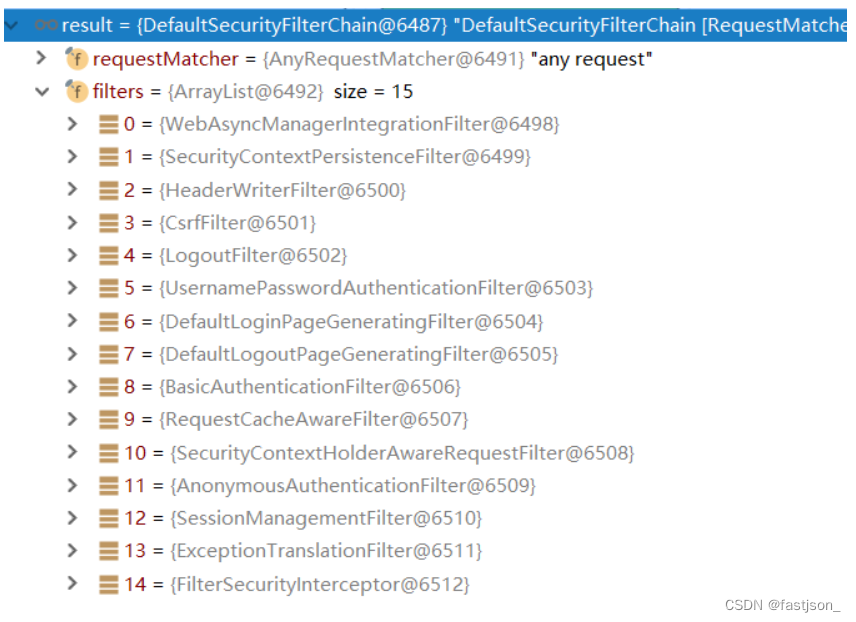
SpringSecurity的原理其实就是一个过滤器链,内部包含了提供各种功能的过滤器。这里我们可以看看入门案例中的过滤器。

图中只展示了核心过滤器,其它的非核心过滤器并没有在图中展示。
UsernamePasswordAuthenticationFilter:负责处理我们在登陆页面填写了用户名密码后的登陆请求。入门案例的认证工作主要有它负责。
ExceptionTranslationFilter:处理过滤器链中抛出的任何AccessDeniedException和AuthenticationException 。
FilterSecurityInterceptor:负责权限校验的过滤器。
我们可以通过Debug查看当前系统中SpringSecurity过滤器链中有哪些过滤器及它们的顺序。
认证流程详解
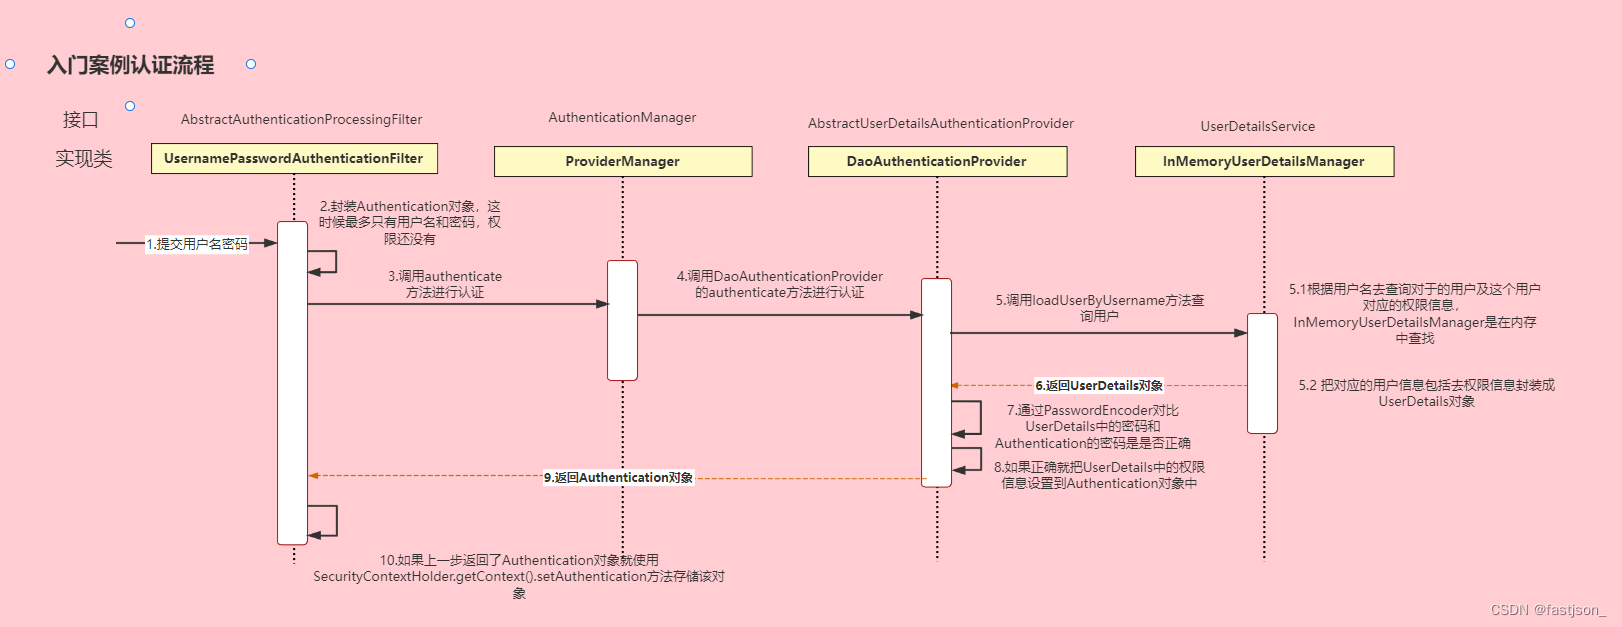
概念速查:
- Authentication接口: 它的实现类,表示当前访问系统的用户,封装了用户相关信息。
- AuthenticationManager接口:定义了认证Authentication的方法
- UserDetailsService接口:加载用户特定数据的核心接口。里面定义了一个根据用户名查询用户信息的方法。
- UserDetails接口:提供核心用户信息。通过UserDetailsService根据用户名获取处理的用户信息要封装成UserDetails对象返回。然后将这些信息封装到Authentication对象中。
登录过程分析
登录
①自定义登录接口
- 调用ProviderManager的方法进行认证 如果认证通过生成jwt,
- 把用户信息存入redis中
②自定义UserDetailsService
- 在这个实现类中去查询数据库
校验:
①定义Jwt认证过滤器
- 获取token
- 解析token获取其中的userid
- 从redis中获取用户信息
- 存入SecurityContextHolder
代码准备工作
1、添加依赖
<!--redis依赖--><dependency><groupId>org.springframework.boot</groupId><artifactId>spring-boot-starter-data-redis</artifactId></dependency><!--fastjson依赖--><dependency><groupId>com.alibaba</groupId><artifactId>fastjson</artifactId><version>1.2.33</version></dependency><!--jwt依赖--><dependency><groupId>io.jsonwebtoken</groupId><artifactId>jjwt</artifactId><version>0.9.0</version></dependency><!-- 引入MybatisPuls和mysql驱动的依赖--><dependency><groupId>com.baomidou</groupId><artifactId>mybatis-plus-boot-starter</artifactId><version>3.4.3</version></dependency><dependency><groupId>mysql</groupId><artifactId>mysql-connector-java</artifactId></dependency><!-- 单元测试的依赖--><dependency><groupId>org.springframework.boot</groupId><artifactId>spring-boot-starter-test</artifactId></dependency>2、添加Redis相关配置
/*** Redis使用FastJson序列化** @author sg*/
public class FastJsonRedisSerializer<T> implements RedisSerializer<T>
{public static final Charset DEFAULT_CHARSET = Charset.forName("UTF-8");private Class<T> clazz;static{ParserConfig.getGlobalInstance().setAutoTypeSupport(true);}public FastJsonRedisSerializer(Class<T> clazz){super();this.clazz = clazz;}@Overridepublic byte[] serialize(T t) throws SerializationException{if (t == null){return new byte[0];}return JSON.toJSONString(t, SerializerFeature.WriteClassName).getBytes(DEFAULT_CHARSET);}@Overridepublic T deserialize(byte[] bytes) throws SerializationException{if (bytes == null || bytes.length <= 0){return null;}String str






![[SAP ABAP] 数据类型](https://img-blog.csdnimg.cn/direct/eb21ebc108ec4c82b370150f64ece423.png)


