distance delayed sound
在本章中,我们将讨论在游戏音频中使用距离延迟的重要性。我们将首先通过一个常见的例子——闪电和雷鸣,来展示这种重要性并解释距离延迟音频的基础知识。我们将讨论计算速度、距离和时间的数学和方程式,以确定距离延迟。这将最终给我们一个以秒为单位的距离延迟值,用于确定延迟声音的时间长度以创建逼真的声音距离效果。然后,我们将进入几个代码示例,以演示一个示例声音调度器,并基于虚幻引擎4创建一个实际的游戏引擎项目。让我们开始吧!
基本理论
闪电
每个人都见过闪电,几秒钟后伴随着雷鸣。孩子们从小就学到,每三秒钟声音大约传播一公里(或五秒钟传播一英里)。他们被告知从看到闪电到听到雷鸣的时间间隔,用这个信息可以确定他们与闪电之间的距离。
雷鸣声比闪电的光到达我们需要更多的时间,所以我们知道声音传播比光慢得多。光也需要时间到达我们,但它的速度非常快(299,792,458米/秒或186,282英里/秒)。换句话说,当你看到闪电闪烁时,它发生在你看到它的几微秒之前。
为什么声音比光慢这么多?这是因为它们必须通过的介质(在这种情况下是空气)来到达我们。科学家们通过改变光传播的介质,已经能够将光速减慢到每秒17米以下。光和声音在水中的传播速度与在空气中不同。光在水中减慢,这使得水看起来比实际更浅。另一方面,声音在水中的传播速度更快,因为水比空气密度大得多。通过钢传播的声音比在水中更快,因为钢是固体且密度很高。
在空气中声音的平均公认速度是340米/秒。实际上,空气中的声音速度取决于许多因素,如气压、温度、湿度等。如果你的游戏在水下进行,那么声音传播速度比在空气中快得多,大约是四到五倍(1400-1500米/秒)。如果你的游戏发生在高山上,你可能想用320米/秒。对于我们的目的,我们将围绕空气中声音传播的标准速度340米/秒设计和实施我们的系统。
声音距离方程
本节将包含一些基本代数,以便我们计算出声音到达我们所需的时间。速度的定义是每传播时间所传播的距离。例如,闪电电光已经被我们看见而雷声在 5.2 秒后才传到我们耳中,那么我们就可以利用这一信息计算出闪电离我们有多远。
v = d / t;
其中v是速度,d是距离,t是时间。
我们知道 v = 340m/s 和 t = 5.2 s的时间,但我们不知道距离d是什么,这是我们需要找到的。
使用上面的公式,用上面的值替换v和t,我们得到以下结果:
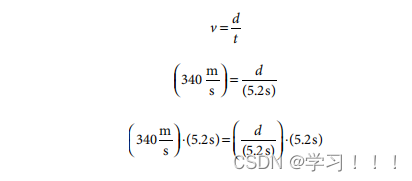
右边的两个5.2 s抵消,留下以下:

交换2边:

所以,在340米/秒的速度下,闪电需要5.2秒才能到达我们只有1768米远。
如果我们只知道速度v和距离d,我们现在也可以用类似的方式来计算时间t。所以,使用上面相同的例子,但是使用时间,t,作为我们的未知:

这给了我们之前相同的方程,但我们必须更进一步,用两边除以速度v:

插入我们之前已知的值,用距离d=1768m,和速度v = 340m/s,我们得到:

最后一个方程,t = d / v ,是我们将在游戏中使用的方程。虽然我们一直在使用340m/s来表示v的值,但如果你使用不同的音速,你可以替换一个不同的值。
为了模拟远处的声音,我们延迟播放声音,以模拟它需要额外的时间才能到达我们。我们可以使用t = d / v 方程来确定我们应该延迟我们的声音来模拟它随距离传播的影响。这种效果对于那些跨越很远距离且声音非常响亮的游戏非常有用,比如在远处可以听到的爆炸声或枪声。这种效果对于拥有短距离、远距离安静声音的游戏,或者不需要模拟远距离声音所提供的现实性的游戏来说,都是不值得的。中程比赛(100-300米以内)的比赛将受益于这种效果,因为100米的声音会延迟大约三分之一秒,300米的声音会延迟近1秒。
设计和需求
需求
要使用距离延迟声音,你的游戏音频系统必须具备以下能力:
- 支持基于位置的声音;
- 具备安排声音的机制;
- 能够标记某些声音不参与距离延迟机制。
基于位置的声音要求你的游戏音频系统知道声音的生成位置或其附属的角色或物体的位置。大多数现代游戏引擎具备这些信息并且知道声音的生成位置,所以这通常不是问题。如果你编写了自己的游戏音频引擎,并且希望使用距离延迟声音,那么你的系统必须知道声音的播放或生成位置。
另一个重要的考虑因素是你的游戏音频系统必须具备安排声音或为这些声音设置开始时间的手段。并不是所有的游戏引擎都支持这一点,因此你可能需要实施一些变通方法来支持这个功能。你甚至可能需要在将声音输入游戏音频引擎之前实现你自己的基于时间的调度器。
最后的需求是你的游戏音频系统必须考虑有些声音永远不应该应用距离延迟,例如音乐、角色对话、用户界面声音和近距离声音。有些系统可能需要你在近距离声音上禁用延迟,因为计算延迟并将其放入队列的开销可能比直接播放声音更昂贵。
考虑那些在玩家一米范围内播放的声音,例如全自动武器射击后抛出的黄铜弹壳的声音。发生在玩家一米范围内的声音有大约3毫秒的延迟,而大多数游戏以60帧每秒运行,这意味着每帧16毫秒。通常情况下,你可以安全地忽略单帧内的距离延迟。对于运行在60帧每秒的游戏,并且使用标准的340米/秒的声音速度,这意味着任何距离听者大约5米的声音。如果你有一个实时音频系统并且希望完全实现距离延迟声音的效果,那么你可能仍然选择对短距离声音应用距离延迟。
10.3.2 声音调度器和数据结构
声音调度器本质上是一个按升序开始时间排序的优先级队列。这个示例声音调度器适用于慢速移动的场景角色和玩家。如果本地听者玩家快速向某个声音移动或远离某个声音,那么除非你不断检查并更新距离和计算的开始时间,否则计算距离和声音的开始时间将不准确,以适应快速移动的听者或发声者。基本上,如果听者玩家快速向发声者移动,那么根据距离延迟,声音会播放得太晚,因为听者玩家会在计算时间之前截获发出的声音波。如果听者玩家快速远离发声者,那么情况相反,声音会播放得太早。请参见图10.1了解问题。如果你的使用场景需要快速移动的角色和玩家,并且你需要高度准确的声音时机,那么最好在每帧检查和更新声音的距离和开始时间。对于这个例子,我们将忽略这个特殊的使用场景,并假设我们的角色移动缓慢到时间差异无关紧要,并且距离延迟效果足够好。

为了使声音调度器易于阅读和理解,我使用了一个MIT许可下的C# SimplePriorityQueue,它包括对Unity的支持。这段代码,包括SimplePriorityQueue,作为本书的补充材料。使用优先级队列,我们现在可以用以下代码在C#中创建我们的声音调度器:
namespace SoundScheduler
{class GAPVector{public double X = 0.0f, Y = 0.0f, Z = 0.0f;public GAPVector(){}public GAPVector(Random inRandom, double inMaxDistanceInMeters){X = inRandom.NextDouble();Y = inRandom.NextDouble();Z = inRandom.NextDouble();double dist = inRandom.NextDouble() * inMaxDistanceInMeters;double distFromOrigin = GetDistanceToOrigin();X = X / distFromOrigin * dist;Y = Y / distFromOrigin * dist;Z = Z / distFromOrigin * dist;}public double GetDistanceToOrigin(){return Math.Sqrt(X * X + Y * Y + Z * Z);}public double GetDistanceToVector(GAPVector inVector){double deltaX = (inVector.X - X);double deltaY = (inVector.Y - Y);double deltaZ = (inVector.Z - Z);return Math.Sqrt(deltaX * deltaX + deltaY * deltaY + deltaZ * deltaZ);}}class Sound{public string SoundFileName;public double StartTime;public GAPVector Location;public Sound(string inSoundFileName, GAPVector inLocation){SoundFileName = inSoundFileName;Location = inLocation;long milliseconds =DateTime.Now.Ticks / TimeSpan.TicksPerMillisecond;double seconds = milliseconds / 1000.0;SetStartTimeBasedOnDistanceDelay(seconds);}public void SetStartTimeBasedOnDistanceDelay(double inCurrentTimeInSeconds){SetStartTimeBasedOnDistanceDelay(inCurrentTimeInSeconds, new GAPVector());}public void SetStartTimeBasedOnDistanceDelay(double inCurrentTimeInSeconds, GAPVector inListenerLocation){double dist =Location.GetDistanceToVector(inListenerLocation);//340 m/s is the approximate speed of sound on Earth near//sea-leveldouble speedOfSound = 340.0;StartTime = inCurrentTimeInSeconds + dist / speedOfSound;}public void Play(){//NOTE: To simulate playing the sound we will just print//a string to the consolelong milliseconds =DateTime.Now.Ticks / TimeSpan.TicksPerMillisecond;double seconds = milliseconds / 1000.0;string soundStr =string.Format("{0:0.000}: Sound \"{1}\" @ {2:0.000}s with dist: {3:0.00}m",seconds, SoundFileName, StartTime,Location.GetDistanceToOrigin());Console.WriteLine(soundStr);}}class Program{static void Main(string[] args){//First, we create the priority queue.//By default, priority-values are of type 'float'SimplePriorityQueue<Sound, double> priorityQueue =new SimplePriorityQueue<Sound, double>();Random random = new Random();//Create the Sounds - this could be done in various ticks,//but for simplicity we'll do them all at onceSound sound1 = new Sound("Lrg_Exp",new GAPVector(random, 900));Sound sound2 = new Sound("Gunshots",new GAPVector(random, 100));Sound sound3 = new Sound("Footstep",new GAPVector(random, 50));Sound sound4 = new Sound("Med_Exp",new GAPVector(random, 600));Sound sound5 = new Sound("Sm_Exp",new GAPVector(random, 300));//Enqueue all of the sounds based on when they should//start playingpriorityQueue.Enqueue(sound1, sound1.StartTime);priorityQueue.Enqueue(sound2, sound2.StartTime);priorityQueue.Enqueue(sound3, sound3.StartTime);priorityQueue.Enqueue(sound4, sound4.StartTime);priorityQueue.Enqueue(sound5, sound5.StartTime);long milliseconds =DateTime.Now.Ticks / TimeSpan.TicksPerMillisecond;double seconds = milliseconds / 1000.0;Console.WriteLine("Scheduler Start Time: " + seconds + "s");//Dequeue each Sound from the Priority Queue and print out//the relevant Sound information.while (priorityQueue.Count != 0){milliseconds =DateTime.Now.Ticks / TimeSpan.TicksPerMillisecond;seconds = milliseconds / 1000.0;Sound peekSound = priorityQueue.First();if (peekSound.StartTime <= seconds){Sound nextSound = priorityQueue.Dequeue();//NOTE: This is where you would send the sound to your//audio engine and play itnextSound.Play();}}milliseconds =DateTime.Now.Ticks / TimeSpan.TicksPerMillisecond;seconds = milliseconds / 1000.0;Console.WriteLine("Scheduler End Time: " + seconds + "s");Console.Write("Please press Enter/Return to exit...");Console.ReadLine();}}
}
这个声音调度器的简单测试程序会检查每一帧的时间,并在应该播放声音时通过打印一条消息来模拟播放声音。在这种情况下,所有五个声音都在完全相同的时间被触发。在游戏过程中,声音会在不同的时间触发,但优先队列能够准确且高效地根据声音应该开始播放的时间重新排序。以下是一次测试程序运行的输出:
Scheduler Start Time: 63648662051.762s
63648662051.860: Sound "Footstep" @ 63648662051.858s with dist: 33.39m
63648662051.958: Sound "Gunshots" @ 63648662051.958s with dist: 67.24m
63648662052.045: Sound "Med_Exp" @ 63648662052.045s with dist: 96.86m
63648662052.516: Sound "Sm_Exp" @ 63648662052.515s with dist: 256.73m
63648662054.254: Sound "Lrg_Exp" @ 63648662054.254s with dist: 849.16m
Scheduler End Time: 63648662054.254s
10.4 真实世界中的虚幻引擎4示例
对于一个真实世界的示例,我们将使用Offworld Industries公司开发的《Squad》游戏中使用的距离延迟声音节点方法,该方法利用了虚幻引擎4和距离延迟技术。我们将演示如何在一个真实的虚幻引擎4演示项目中创建同样的效果,使用距离延迟声音节点来延迟在游戏中任何地方播放的声音提示的开始时间。我们将展示如何使用蓝图将其连接到声音提示,并如何与粒子效果一起重复播放,以便您可以体验距离延迟效果并试验各种设置对延迟的影响。在这个示例中,我们将使用Windows,但您可以为Mac或Linux遵循类似的步骤。
10.4.1 启动
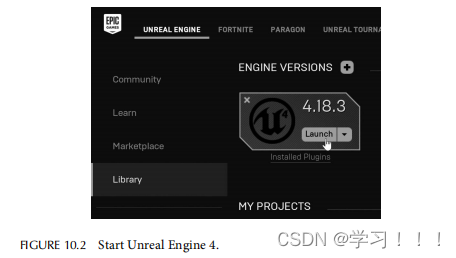
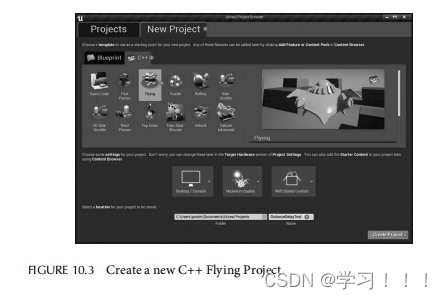
首先,您需要获取虚幻引擎4,可以在 unrealengine.com 免费下载。打开Epic Games启动器并安装一个版本的虚幻引擎4到您的计算机上。您还需要Visual Studio来编译C++代码。对于本示例,我们使用的是虚幻引擎4.18.3版和Visual Studio 2017,这是写作时的最新版本。后来的虚幻引擎4版本可能有一些API更改,但概念应该相当直接地转换。安装完成后,打开虚幻引擎4启动器,如图10.2所示,并创建一个新的C++飞行项目,我们将其命名为DistanceDelayTest,如图10.3所示。确保选择了“新项目”选项卡(步骤1),然后选择C++选项卡(步骤2)。创建此项目时,请务必保持包含入门内容的默认设置。如果您在上述步骤中遇到任何问题,可以通过UE4的AnswerHub或其论坛寻求帮助。我们也在本书的网站上包括了此项目,以防您在自行复制项目时遇到任何问题。
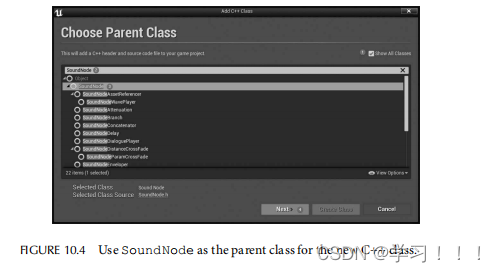
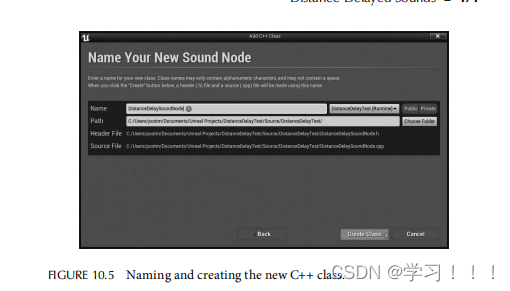
创建此新项目后,编辑器将打开一个名为FlyingExampleMap的选项卡。点击文件 -> 新建C++类...,在对话框中选择显示所有类的复选框。在搜索框中输入SoundNode并选择它作为父类,然后点击下一步,如图10.4所示。将此类命名为DistanceDelaySoundNode并点击创建类,如图10.5所示。这将在您的项目中的Source文件夹下创建两个新文件,分别是DistanceDelaySoundNode.h和DistanceDelaySoundNode.cpp。
10.4.2 实现距离延迟节点
在DistanceDelaySoundNode.h源文件中,我们将需要三个UPROPERTY变量来控制行为。第一个是用于设置声音速度的变量,我们将其称为SpeedOfSound。在本示例中,我们将其设为可配置属性,但您可以将其硬编码,从物理体积中提取,或通过其他任何方法进行数据驱动。第二个属性是该节点允许的最大延迟,我们将其称为DelayMax。最后一个属性在编辑器中测试距离延迟功能时很有用,我们将其称为TestDistance。我们还需要添加一个构造函数,几个USoundNode所需的函数重载,最后是我们的自定义GetSoundDelay()函数,该函数接受两个基于位置的向量来计算延迟量。您的头文件现在应该如下所示:
#pragma once
#include "CoreMinimal.h"
#include "Sound/SoundNode.h"
#include "DistanceDelaySoundNode.generated.h"
/*** Defines a delay for sounds that contain this based upon the* distance to the listener.*/
UCLASS()
class DISTANCEDELAYTEST_API UDistanceDelaySoundNode :public USoundNode
{GENERATED_BODY()
protected:/** This is the speed of sound in meters per second (m/s) to usefor this delay. */UPROPERTY(EditAnywhere, Category = Physics)float SpeedOfSound;/** The upper bound of delay time in seconds, used in GetDurationcalculation and as an upper bounds for sound effects, 3.0 isprobably a good setting for this. */UPROPERTY(EditAnywhere, Category = Delay)float DelayMax;/** Used to test distance in the editor (in meters). */UPROPERTY(EditAnywhere, Category = Testing)float TestDistance;
public:UDistanceDelaySoundNode(const FObjectInitializer& ObjectInitializer);// Begin USoundNode interface.virtual void ParseNodes(FAudioDevice* AudioDevice,const UPTRINT NodeWaveInstanceHash,FActiveSound& ActiveSound,const FSoundParseParameters& ParseParams,TArray<FWaveInstance*>& WaveInstances) override;virtual float GetDuration() override;// End USoundNode interface.virtual float GetSoundDelay(const FVector& ListenerLocation, const FVector& Location,const float SpeedOfSoundInUU) const;
};
现在,我们需要在DistanceDelaySoundNode.cpp中实现这些函数。以下代码有详细注释,但我特别想强调ParseNodes()函数,这是USoundNode的重载函数。当声音提示实例处于活动状态时,每个tick都会调用此函数。第一次调用此函数时,我们将初始化距离延迟,然后阻止此节点的子节点播放,直到达到延迟时间。一旦达到该时间,我们将调用父函数继续解析子节点。GetSoundDelay()函数用于确定我们应该延迟此声音的时间,基于声音发射器的位置、声音监听器的位置以及声音速度等各种参数。
#include "DistanceDelaySoundNode.h"
// Required for FActiveSound, FAudioDevice, FSoundParseParameters,
// etc.
#include "SoundDefinitions.h"
/*----------------------------------------------------------------
UDistanceDelaySoundNode implementation.
------------------------------------------------------------------*/
// Constructor used to set the SpeedOfSound to 340 m/s and the
// DelayMax to 3 seconds, or about 1 km.
UDistanceDelaySoundNode::UDistanceDelaySoundNode(const FObjectInitializer& ObjectInitializer): Super(ObjectInitializer)
{SpeedOfSound = 340.0f;DelayMax = 3.0f;
}
// ParseNodes is used to initialize and update the sound per tick.
// Other effects like pitch bending can be applied here as well.
// Initial call to this function per instance will have
// RequiresInitialization set to true, subsequent calls will be
// false.
void UDistanceDelaySoundNode::ParseNodes(FAudioDevice* AudioDevice, const UPTRINT NodeWaveInstanceHash,FActiveSound& ActiveSound,const FSoundParseParameters& ParseParams,TArray<FWaveInstance*>& WaveInstances)
{// Define the data that is stored with this instance as the size// of a single float value.RETRIEVE_SOUNDNODE_PAYLOAD(sizeof(float));// Declare the data that is stored with this instance as the// EndOfDelay, this is the time when the sound should start playing.DECLARE_SOUNDNODE_ELEMENT(float, EndOfDelay);// Check to see if this is the first time through.if (*RequiresInitialization){// Make sure we do not go through this initialization more// than once.// NOTE: for actors that are fast moving you may consider// updating EndOfDelay more often, but here we only do it the// first time.*RequiresInitialization = false;// Get the default unreal unit conversion and store it// statically in this class, this value will not change during// gameplaystatic const float WorldToMeters =(ActiveSound.GetWorld() != nullptr) ?(IsValid(ActiveSound.GetWorld()->GetWorldSettings()) ?ActiveSound.GetWorld()->GetWorldSettings()->WorldToMeters :100.0f) :100.0f;// The WITH_EDITOR tag is used to only compile this section for// editor builds, the else clause is for live/shipping builds.
#if WITH_EDITOR// This is where we determine the actual delay of the sound// based upon sound emitter and sound listener locations.// The transform stores location, rotation, and scaling// information but this function only requires the
// location / translation.float ActualDelay =GetSoundDelay(AudioDevice->GetListeners()[0].Transform.GetTranslation(),ParseParams.Transform.GetTranslation(),SpeedOfSound * WorldToMeters);// If we are testing this sound inside of the editor's SoundCue// window then the World will be nullptr and we will use our// TestDistance value defined for this node instead of the// in-game calculated distance.// This is very useful for testing that the delay is working// according to your design.if (ActiveSound.GetWorld() == nullptr){ActualDelay = GetSoundDelay(FVector(),FVector(TestDistance * WorldToMeters, 0.0f, 0.0f),SpeedOfSound * WorldToMeters);}
#else// This is the calculation used for shipping and other// non-editor builds.const float ActualDelay =GetSoundDelay(AudioDevice->GetListeners()[0].Transform.GetTranslation(),ParseParams.Transform.GetTranslation(),SpeedOfSound * WorldToMeters);
#endif// Check if there is any need to delay this sound, if not// then just start playing it.if (ParseParams.StartTime > ActualDelay){FSoundParseParameters UpdatedParams = ParseParams;UpdatedParams.StartTime -= ActualDelay;EndOfDelay = -1.0f;Super::ParseNodes(AudioDevice, NodeWaveInstanceHash,ActiveSound, UpdatedParams, WaveInstances);return;}// Set the EndOfDelay value to the offset time when this sound// should start playing.else{EndOfDelay =ActiveSound.PlaybackTime + ActualDelay- ParseParams.StartTime;}}// If we have not waited long enough then just keep waiting.if (EndOfDelay > ActiveSound.PlaybackTime){// We're not finished even though we might not have any wave
// instances in flight.ActiveSound.bFinished = false;}// Go ahead and play the sound.else{Super::ParseNodes(AudioDevice, NodeWaveInstanceHash,ActiveSound, ParseParams, WaveInstances);}
}
// This is used in the editor and engine to determine maximum
// duration for this sound cue. This is used for culling out sounds
// when too many are playing at once and for other engine purposes.
float UDistanceDelaySoundNode::GetDuration()
{// Get length of child node, if it exists.float ChildDuration = 0.0f;if (ChildNodes[0]){ChildDuration = ChildNodes[0]->GetDuration();}// And return the two together.return (ChildDuration + DelayMax);
}
// This is the bread and butter of the distance delay custom sound
// node. Pass in both the listener location and the sound emitter
// location along with the speed of sound (in unreal units (cm)) to
// get the amount of delay to use.
float UDistanceDelaySoundNode::GetSoundDelay(const FVector& ListenerLocation, const FVector& Location,const float SpeedOfSoundInUU) const
{// Calculate the distance from the listener to the emitter and// get the size of the vector, which is the length / distance.const float DistanceToSource =(ListenerLocation - Location).Size();// Calculate the amount of delay required to simulate the sound// traveling over the distance to reach the listener.const float TimeDelayFromSoundSource =DistanceToSource / SpeedOfSoundInUU;// Useful to verify the values during testing and development,// should be commented out during production.UE_LOG(LogAudio, Log,TEXT("UDistanceDelaySoundNode::GetSoundDelay: %f cm => %f s"),DistanceToSource, TimeDelayFromSoundSource);// Returns the distance delay after making sure it is between 0// and the maximum delay.return FMath::Clamp(TimeDelayFromSoundSource, 0.0f, DelayMax);
}
构建音效提示
写好代码后,返回 UE4 编辑器并点击编译,如图 10.6 所示。如果一切顺利,你就可以创建一个使用这个新节点的新音效提示。如果遇到问题,最好关闭编辑器,在 Visual Studio 中编译代码,然后重新打开编辑器。

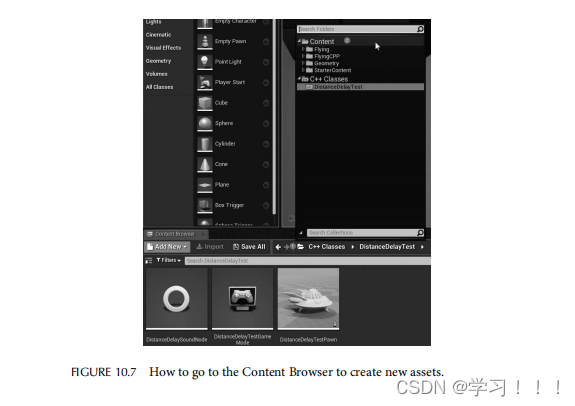
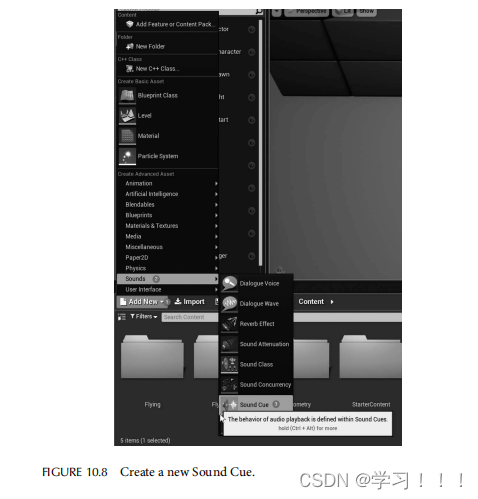
要创建一个新的 Sound Cue,导航到内容浏览器选项卡,点击 C++ Classes 旁边的文件夹图标,然后选择名为 Content 的文件夹,如图 10.7 所示。在内容浏览器中,点击 +Add New,在 Create Advanced Asset 标题下,悬停在 Sounds 菜单上,然后点击 Sound Cue,如图 10.8 所示。给它命名,例如 DistanceDelayedExplosion,然后双击打开它。
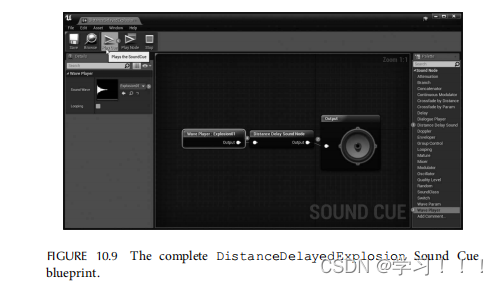
你现在应该能在右侧的调色板选项卡的声音节点类别下看到 Distance Delay Sound Node。要使用你的新声音节点,只需将其拖出并连接到输出扬声器旁边,然后拖出一个 Wave Player 节点并将其连接到 Distance Delay Sound Node。在 Wave Player 节点中,将 Sound Wave 变量选择为 Explosion01 音效。点击 Distance Delay Sound Node 并根据需要调整参数,然后按下 Play Cue 按钮测试实现,如图 10.9 所示。点击 Save 按钮保存你的工作。
10.4.4 创建一个 Actor 蓝图
返回内容浏览器,再次点击 +Add New 创建一个新的蓝图类,在 Create Basic Asset 标题下选择 Actor 作为此类的父类,并将其命名为 DistanceDelayActor。双击新建的演员以打开蓝图编辑器。
在组件选项卡下,点击绿色的 +Add Component 按钮,添加两个组件:一个音频组件和一个粒子系统组件。点击音频组件,并在详情选项卡的声音类别中将 Sound 变量设置为 DistanceDelayedExplosion。
现在音频已设置好,我们需要设置一个粒子系统,以便在延迟开始时有一个视觉效果。点击粒子系统组件,并在详情选项卡的粒子类别中将 Template 变量设置为 P_Explosion。第一次选择此项时,可能需要等待着色器编译,但在着色器编译完成后,你现在应该能够在点击模拟按钮时看到爆炸粒子效果,但听不到声音。要继续编辑你的蓝图,需确保模拟按钮未激活。
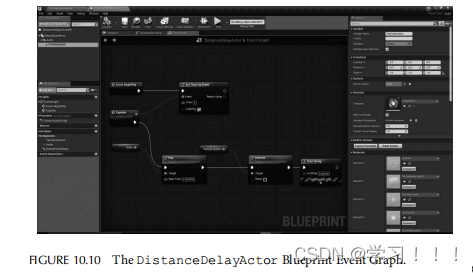
最后一部分是设置蓝图脚本。转到事件图表选项卡,访问此演员的蓝图代码。可以删除 Event ActorBeginOverlap 和 Event Tick 节点。点击 Event Begin Play 节点的执行引脚并拖出,创建一个新的 Set Timer by Event 节点,将该节点的时间设置为 5 秒以实现五秒延迟,并选中循环复选框。拖出事件引脚,在添加事件类别下有一个 Add Custom Event… 菜单项。选择它并将这个新自定义事件命名为 Explode。
对于 Explode 自定义事件,拖出执行引脚并输入 Play (Audio)。该节点将播放我们之前添加的音频组件关联的声音。拖出播放节点的执行引脚并选择 Activate (ParticleSystem)。你可能还希望在触发 Explode 自定义事件时包括一个 Print String 节点以进行测试。你的完整蓝图图表应该如图 10.10 所示。点击编译,然后点击保存按钮保存你的工作。
10.4.5 测试 Distance Delay Actor
每次在世界中生成 DistanceDelayActor 时,它都会播放带有距离延迟效果的爆炸粒子系统和爆炸声音,循环计时器将每五秒触发一次。如果你希望首次生成演员时禁用自动触发粒子和声音效果,可以取消选中音频和粒子系统组件上的 Auto Activate 变量。类似地,如果你不希望这个演员每五秒循环一次并希望在游戏事件期间自己生成演员,那么你可以修改蓝图,通过直接将 Event Begin Play 连接到播放和激活节点并删除 Set Timer by Event 和 Explode 自定义事件节点来实现。
现在一切设置完毕,关闭 DistanceDelayActor 蓝图,返回内容浏览器,然后将你的新 DistanceDelayActor 拖入世界中,然后点击播放按钮在编辑器中测试爆炸效果。你将看到粒子效果,然后根据你与演员的距离和声音速度设置(尝试将声音提示的距离延迟声音节点中的声音速度设置为 34m/s 以更快体验效果)听到声音。
你可以将演员拖到不同的位置,在世界中放置多个,设置关卡蓝图在计时器上随机生成它们,或设置导弹从你的飞船发射并在撞击时生成这个演员。不管你如何使用它们,只要在你的声音提示中使用 Distance Delay Sound Node,距离延迟效果将始终被尊重。
10.5 问题和考虑事项
在使用距离延迟声音时,应考虑一些问题和事项。
10.5.1 快速移动的Actor或玩家需要更新的延迟开始时间
快速移动的Actor或物体会显著影响距离引起的延迟,使其变短或变长,应更频繁地更新这种延迟。如果两者快速靠近,应缩短延迟;如果快速远离,则应延长延迟。有多种方法可以处理这种情况,但对于需要这种用例的游戏来说,这是一个需要考虑的问题。
10.5.2 循环音频需要时间延迟参数
循环播放的音频仅延迟其开始时间效果不好。你需要考虑处理循环声音的其他方法,特别是对于具有与声音协调的粒子效果的移动演员。例如,如果你有一个带有控制参数的声音,你需要延迟设置这些参数,但不能对粒子系统延迟设置。一个可能出现的例子是远处一辆车爬上山坡时:你会看到发动机努力爬坡时产生的额外排气粒子效果。影响发动机转速的声音参数应该与车辆和听者之间的距离延迟相对应,并与排气的粒子效果同步。
10.5.3 平台延迟
一些音频系统具有非常高的音频延迟,对于某些移动设备可高达 200–500 毫秒。在基于平台延迟距离声音时应考虑这些延迟。你可能需要从延迟中减去这个时间以抵消效果以获得更准确的时间。例如,如果计算出的距离延迟为 150 毫秒,但平台延迟为 200 毫秒,则应该立即播放声音,因为延迟高于距离延迟。如果距离延迟为 300 毫秒,平台延迟为 200 毫秒,则可以将距离延迟偏移设置为 100 毫秒,这将在 300 毫秒时准时播放。
10.6 结论
在本章中,我们讨论了使用距离延迟对游戏音频的重要性。我们展示了如何确定声音到达听者的时间,基于他们的距离。这为我们提供了需要延迟声音的时间,以创建真实的声音距离效果。最后,我们学习了如何将其应用于示例声音调度器以及基于虚幻引擎 4 的实际游戏引擎项目,并提供了两个示例代码。
REFERENCE
1. BlueRaja. 2013. A C# priority queue optimized for pathfinding applications.
GitHub - BlueRaja/High-Speed-Priority-Queue-for-C-Sharp: A C# priority queue optimized for pathfinding applications
