首先找到阿里语音开发平台:

用自己的淘宝号登录,进入控制台:

添加新技能:

这里以智能家居接入为例,填写以下信息,填完点击下一步:

填写服务配置:

到此为止,语音开发平台的配置就差不多了,接下来是自己的项目的配置(基于Springboot)。
主要是编写一个Controller类(基于OAuth2认证流程,需引入相关依赖包,代码已经测过,自己按照官方文档,修改返回的JSONObject数据即可,这里的AligenieCommand类是我自己按照官网封装的,代码里面有些参数,不方便放出来,不懂的可以留言):
package com.zlkj.appiot.controller;import com.alibaba.fastjson.JSONObject;
import com.zlkj.appiot.entity.AligenieCommandAttribute;
import com.zlkj.appiot.service.AligenieDeviceService;
import com.zlkj.appiot.service.IotCommandService;
import com.zlkj.appiot.util.JsonUtil;
import com.zlkj.appiot.util.PropertiesUtil;
import org.apache.commons.lang3.StringUtils;
import org.apache.log4j.Logger;
import org.apache.oltu.oauth2.as.issuer.MD5Generator;
import org.apache.oltu.oauth2.as.issuer.OAuthIssuer;
import org.apache.oltu.oauth2.as.issuer.OAuthIssuerImpl;
import org.apache.oltu.oauth2.as.request.OAuthAuthzRequest;
import org.apache.oltu.oauth2.as.request.OAuthTokenRequest;
import org.apache.oltu.oauth2.as.response.OAuthASResponse;
import org.apache.oltu.oauth2.common.OAuth;
import org.apache.oltu.oauth2.common.exception.OAuthProblemException;
import org.apache.oltu.oauth2.common.exception.OAuthSystemException;
import org.apache.oltu.oauth2.common.message.OAuthResponse;
import org.springframework.beans.factory.annotation.Autowired;
import org.springframework.beans.factory.annotation.Qualifier;
import org.springframework.http.HttpHeaders;
import org.springframework.http.HttpStatus;
import org.springframework.http.ResponseEntity;
import org.springframework.stereotype.Controller;
import org.springframework.web.bind.annotation.RequestMapping;
import org.springframework.web.bind.annotation.ResponseBody;import javax.servlet.http.HttpServletRequest;
import javax.servlet.http.HttpServletResponse;
import java.io.BufferedReader;
import java.io.IOException;
import java.io.InputStreamReader;
import java.io.UnsupportedEncodingException;
import java.net.URI;
import java.net.URISyntaxException;
import java.util.Enumeration;
import java.util.HashMap;
import java.util.concurrent.ConcurrentHashMap;
import java.util.concurrent.ConcurrentMap;
import java.util.concurrent.ExecutionException;/*** @Classname AligenieController* @Description  语音开发平台对接* @Date 2019/7/3 0003 14:07* @Created by zlkj*/@Controller
@RequestMapping(value = "aligenie")
public class AligenieController {private static final Logger log = Logger.getLogger(AligenieController.class);/*** OAuth2授权服务器发布的ip地址 或 域名*/private String baseURL = PropertiesUtil.getValue("local_ip");/*** 天猫精灵请求授权接口*/private String cutURL = baseURL + "/aligenie/OAuth2Page";/*** 登录成功后将code通过天猫回调地址返回给天猫*/private String oauthURL = baseURL + "/aligenie/responseCode";private static String username = "123456";private static String password = "123456";/*** 绑定 token令牌 与对应的 用户标识*/private static ConcurrentMap<String,String> token_username = new ConcurrentHashMap<>();/*** 截去参数的时候需要*/private int cutlength = cutURL.length();/*** 设置授权码*/private String authorizationCode = PropertiesUtil.getValue("authorizationCode");/*** 保存指令*/private HashMap<String,Object> cmdParams = new HashMap<>();@Autowired@Qualifier("IotCommandServiceImpl")private IotCommandService iotCommandService;@Autowired@Qualifier("DefaultAligenieDeviceService")private AligenieDeviceService deviceService;/*** OAuth2认证页面(第三方登录界面)* @param request* @return* @throws OAuthProblemException* @throws OAuthSystemException*/@RequestMapping("/OAuth2Page")public String getOAuthPage(HttpServletRequest request) {log.info("获取授权界面!");// AliGenie平台的回调地址,需要将参数补全,并进行进行urlEncode------https://open.bot.tmall.com/oauth/callback?skillId=36251&token=MjY0NjQ2NDM0OUFGRUhJTkZEVlE=return "/login.html";}/*** 登录操作* @param request* @return* @throws UnsupportedEncodingException*/@RequestMapping("/login")public void login(HttpServletRequest request, HttpServletResponse response) throws IOException {String outURL = request.getHeader("referer");outURL = java.net.URLDecoder.decode(outURL, "GBK");log.info("登錄login的referer地址:" + outURL);String username1 = request.getParameter("username");String password1 = request.getParameter("password");//获取用户标识,保存用作以后获取该用户下面绑定的设备if (username1.equalsIgnoreCase(username) && password1.equalsIgnoreCase(password)) {// 登录成功就重定向到获取授权码 拼接地址 解密后的请求参数长度int outlength = outURL.length();String responseURL = outURL.substring(cutlength, outlength);log.info("截取login的referer地址的参数:" + responseURL);String responseCodeUrl = oauthURL + responseURL;log.info("登錄成功,重定向到:" + responseCodeUrl);response.sendRedirect(responseCodeUrl);} else {//重新登录response.sendRedirect(cutURL);}}/*** 返回授权码* @param request* @return* @throws OAuthSystemException* @throws OAuthProblemException*/@RequestMapping("/responseCode")public String responeseCode(HttpServletRequest request) throws OAuthSystemException, OAuthProblemException {log.info("响应授权码......");String url = request.getHeader("referer");log.info("responseCode請求的referer地址:" + url);// 构建OAuth 授权请求OAuthAuthzRequest oauthRequest = new OAuthAuthzRequest(request);log.info("oauthRequest信息 :" + JSONObject.toJSONString(oauthRequest));//需要调用App后台的登录功能,暂时写死用户名和密码log.info("oauthRequest.getClientId():"+oauthRequest.getClientId());if (PropertiesUtil.getValue("clientId").equalsIgnoreCase(oauthRequest.getClientId())) {// 进行OAuth响应构建OAuthASResponse.OAuthAuthorizationResponseBuilder builder = OAuthASResponse.authorizationResponse(request,HttpServletResponse.SC_FOUND);// 设置授权码builder.setCode(authorizationCode);builder.setParam("token", oauthRequest.getParam("token"));log.info("設置 token......");// 得到到客户端重定向地址String redirectURI = oauthRequest.getParam(OAuth.OAUTH_REDIRECT_URI);log.info("客户端重定向地址:"+redirectURI);// 构建响应final OAuthResponse response = builder.location(redirectURI).buildQueryMessage();log.info("服务端/responseCode内,返回的回调路径:" + response.getLocationUri());log.info("----------------------------------服务端/responseCode---------------------------------------");String responceUri = response.getLocationUri();// 根据OAuthResponse返回ResponseEntity响应HttpHeaders headers = new HttpHeaders();try {headers.setLocation(new URI(response.getLocationUri()));} catch (URISyntaxException e) {e.printStackTrace();}return "redirect:" + responceUri;}log.error("客戶端id或密碼不正確!");return null;}/*** Aligenie语音开发平台用之前获取的code来获取放行token* @param request* @return* @throws OAuthSystemException*/@RequestMapping("/getToken")public Object getToken(HttpServletRequest request) throws OAuthSystemException {OAuthIssuer oauthIssuerImpl = null;OAuthResponse response = null;// 构建OAuth请求try {OAuthTokenRequest oauthRequest = new OAuthTokenRequest(request);String authCode = oauthRequest.getParam(OAuth.OAUTH_CODE);String clientSecret = oauthRequest.getClientSecret();log.info("authCode:" + authCode);if (!StringUtils.isEmpty(clientSecret)) {// 生成Access TokenoauthIssuerImpl = new OAuthIssuerImpl(new MD5Generator());final String accessToken = oauthIssuerImpl.accessToken();final String refreshToken = oauthIssuerImpl.refreshToken();// 生成OAuth响应response = OAuthASResponse.tokenResponse(HttpServletResponse.SC_OK).setAccessToken(accessToken).setRefreshToken(refreshToken).setParam("expires_in", "17600000").buildJSONMessage();try {// 这里可以将用户名和token绑定起来 ,在控制设备的时候,可以识别token对应的用户token_username.put(username,accessToken);} catch (Exception e) {log.info(e.getMessage());}}log.info("response.getBody:" + response.getBody());// 根据OAuthResponse生成ResponseEntityreturn new ResponseEntity(response.getBody(), HttpStatus.valueOf(response.getResponseStatus()));} catch (OAuthSystemException e) {response = OAuthASResponse.tokenResponse(HttpServletResponse.SC_OK).setParam("error", "101").setParam("error_description", "内部错误").buildJSONMessage();log.info("错误" + response.getBody());return new ResponseEntity(response.getBody(), HttpStatus.valueOf(response.getResponseStatus()));} catch (OAuthProblemException e) {response = OAuthASResponse.tokenResponse(HttpServletResponse.SC_OK).setParam("error", "102").setParam("error_description", "参数错误").buildJSONMessage();log.info("错误" + response.getBody());log.info(oauthURL);return new ResponseEntity(response.getBody(), HttpStatus.valueOf(response.getResponseStatus()));}}/*** 语音指令下发平台* @param request* @return*/@RequestMapping("/controlAction")@ResponseBodypublic JSONObject controlAction(HttpServletRequest request) throws ExecutionException, InterruptedException {log.info("准备进入开发者网关地址,先解析指令......");Enumeration<?> enum1 = request.getHeaderNames();while (enum1.hasMoreElements()) {String key = (String) enum1.nextElement();String value = request.getHeader(key);log.info(key + "\t" + value);}// body部分String inputLine;StringBuffer str = new StringBuffer();try {BufferedReader br = new BufferedReader(new InputStreamReader(request.getInputStream()));while ((inputLine = br.readLine()) != null) {str.append(inputLine);}br.close();} catch (IOException e) {log.error("IOException: " + e);}log.info("接受来自天猫精灵的消息:" + str.toString());JSONObject recieveMsg = JsonUtil.str2Object(str.toString());String headStr = recieveMsg.getString("header");String payLoadStr = recieveMsg.getString("payload");//将header转化为对象JSONObject headerMsg = JsonUtil.str2Object(headStr);JSONObject payLoadMsg = JsonUtil.str2Object(payLoadStr);//设备发现 AliGenie.Iot.Device.Discoveryif(headerMsg.getString("namespace").trim().endsWith("Discovery")){log.info("编号为1用户 :绑定的设备列表信息......");Integer userId = 1;//返回设备列表return deviceService.getDeviceList(userId,headerMsg.getString("messageId"));}//设备控制指令  AliGenie.Iot.Device.Controlif(headerMsg.getString("namespace").trim().endsWith("Control")){String optionName = headerMsg.getString("name");//详细控制操作指令   开灯if(AligenieCommandAttribute.TurnOn.getOptionName().equalsIgnoreCase(optionName)){log.info(">>>>>>>>>>>>>>>>>>准备打开灯具>>>>>>>>>>>>>>>>");//需要打开的设备编号,和一开始上报的设备id一致//cmdParams.put("dev",payloadMsg.getString("deviceId"));//这里先将设备id写死cmdParams.put("dev",new int[]{0});//onoff:1-开 0-关cmdParams.put("onoff",0);JSONObject result = iotCommandService.query("TestLight",0,6,cmdParams);if(result.getString("ret").equalsIgnoreCase("0")){log.info(">>>>>>>>>>>>>>>>>>已成功打开灯具>>>>>>>>>>>>>>>>");}else if(result.getString("ret").equalsIgnoreCase("1")){log.info(">>>>>>>>>>>>>>>>>>灯具打开失败>>>>>>>>>>>>>>>>");}}else if(AligenieCommandAttribute.TurnOff.getOptionName().equalsIgnoreCase(optionName)){//需要打开的设备编号,和一开始上报的设备id一致//cmdParams.put("dev",payloadMsg.getString("deviceId"));cmdParams.put("dev",new int[]{0});//onoff:1-开 0-关cmdParams.put("onoff",1);JSONObject result = iotCommandService.query("TestLight",0,6,cmdParams);if(result.getString("ret").equalsIgnoreCase("0")){log.info(">>>>>>>>>>>>>>>>>>已成功打开灯具>>>>>>>>>>>>>>>>");}else if(result.getString("ret").equalsIgnoreCase("1")){log.info(">>>>>>>>>>>>>>>>>>灯具打开失败>>>>>>>>>>>>>>>>");}}else if(AligenieCommandAttribute.SetColorTemperature.getOptionName().equalsIgnoreCase(optionName)){log.info(">>>>>>>>>>>>>>>>>>>>>设置颜色>>>>>>>>>>>>>>>>>>>>>>>");//需要打开的设备编号,和一开始上报的设备id一致//cmdParams.put("dev",payloadMsg.getString("deviceId"));cmdParams.put("dev",new int[]{0});//W:亮度 Y:色温cmdParams.put("Y",80);JSONObject result = iotCommandService.query("TestLight",0, 5,cmdParams);return result;}else if(AligenieCommandAttribute.SetBrightness.getOptionName().equalsIgnoreCase(optionName)){log.info(">>>>>>>>>>>>>>>>>>>>>设置亮度>>>>>>>>>>>>>>>>>>>>>>>");//需要打开的设备编号,和一开始上报的设备id一致//cmdParams.put("dev",payloadMsg.getString("deviceId"));//需要传入设备id的list集合cmdParams.put("dev",new int[]{0});//W:亮度 Y:色温cmdParams.put("Y",80);JSONObject result = iotCommandService.query("TestLight",0, 5,cmdParams);//判断结果,组织天猫精灵响应消息}else{log.info("暂未支持该操作:" + headStr);}}//设备属性查询指令 AliGenie.Iot.Device.Queryif(headerMsg.getString("namespace").trim().endsWith("Query")){}return null;}
}
测试流程:返回语音开发平台,去测试:

点击新窗打开,再点击账户配置跳转到授权页面(即用户的登录页面)


输入自己定义的账户名密码,登录,开始获取token,通过token拿到授权码,开始获取该用户下的绑定的设备信息,后台返回按照协议返回设备信息,最后获取成功,呈现到页面上面:


在获取设备列表的时候,后台收到了来自天猫精灵的一条发现设备的指令:

然后按照协议返回对应的信息就好了,我这里是模拟一个假的设备数据返回了,封装类如下,可用作参考,主要是看官方文档:
/*** @Classname AligenieCommand* @Description TODO 语音开发指令* @Date 2019/7/10 0010 10:49* @Created by jtj*/
public class AligenieCommand {private JSONObject AliData = new JSONObject();private JSONObject headerData = new JSONObject();private JSONObject payLoadData = new JSONObject();//设备数组private JSONArray devicesArray = new JSONArray();public AligenieCommand(){}/*** 构建返回语音开发平台的消息体* @param messageId 接受消息的messageId,原封不动返回* @param objects 设备信息*/public AligenieCommand(String messageId, List<JSONObject> objects){//头信息headerData.put("namespace", "AliGenie.Iot.Device.Discovery");headerData.put("name", "DiscoveryDevicesResponse");headerData.put("messageId", messageId);headerData.put("payLoadVersion", "1");for(int i=0;i<objects.size();i++){Object deviceInfo = objects.get(i);//组织设备信息JSONObject deviceJson = new JSONObject();deviceJson.put("deviceId",i); //设备IddeviceJson.put("deviceName","灯"); //名称deviceJson.put("deviceType","light"); //设备类型,具体参考AliGenie支持的品类列表deviceJson.put("zone","门口"); //位置 可选deviceJson.put("brand","RGB_LED_ZLKJ"); //牌子deviceJson.put("model","KongKong"); //型号deviceJson.put("icon","http://img0.imgtn.bdimg.com/it/u=1357034633,1383263005&fm=26&gp=0.jpg"); //产品icon(https协议的url链接),像素最好160*160 以免在app显示模糊JSONArray prop = new JSONArray();//电源属性JSONObject propVal1 = new JSONObject();propVal1.put("name", "powerstate");propVal1.put("name", "off");//颜色属性JSONObject propVal2 = new JSONObject();propVal2.put("name", "color");propVal2.put("name", "Red");deviceJson.put("properties",prop);//返回当前设备支持的属性状态列表,产品支持的属性列表参考deviceJson.put("actions",new String[]{"TurnOn","TurnOff","SetBrightness","AdjustBrightness","SetTemperature","Query"}); //产品支持的操作(注:包括支持的查询操作)deviceJson.put("extensions",null); //产品扩展属性,为空返回null或者不返回该字段devicesArray.add(deviceJson);}payLoadData.put("devices",devicesArray);AliData.put("header",headerData);AliData.put("payload",payLoadData);}//返回该对象的JSON字符串@Overridepublic String toString() {return AliData.toJSONString();}//返回该构建对象的JSONObjectpublic JSONObject getAliData() {return AliData;}//测试入口public static void main(String[] args) {List<JSONObject> objects = new ArrayList<>();for(int i = 0;i<5;i++){objects.add(new JSONObject());}String result = new AligenieCommand(UUID.randomUUID().toString().replaceAll("-",""), objects).toString();System.out.println(result);}
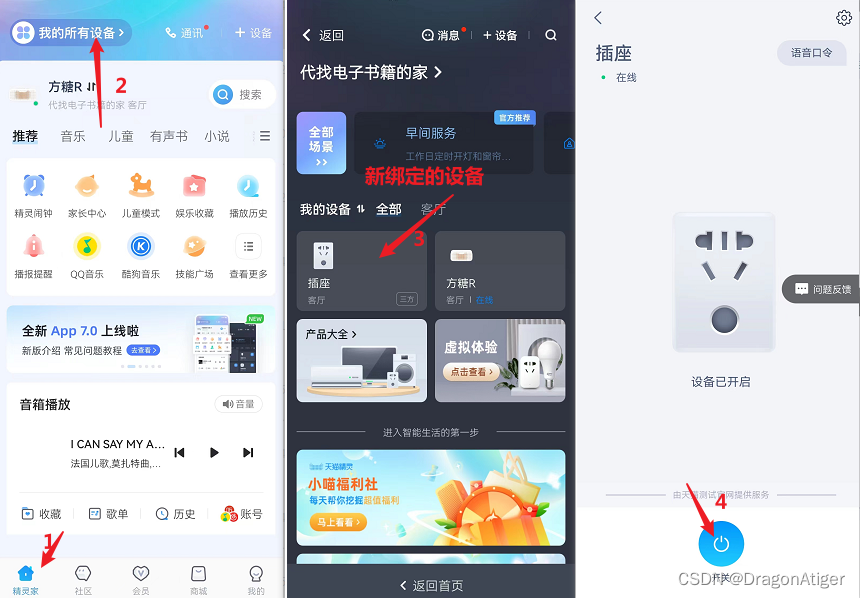
}也可以在天猫精灵APP上面,登录自己的淘宝号,也可以看见返回的设备信息。
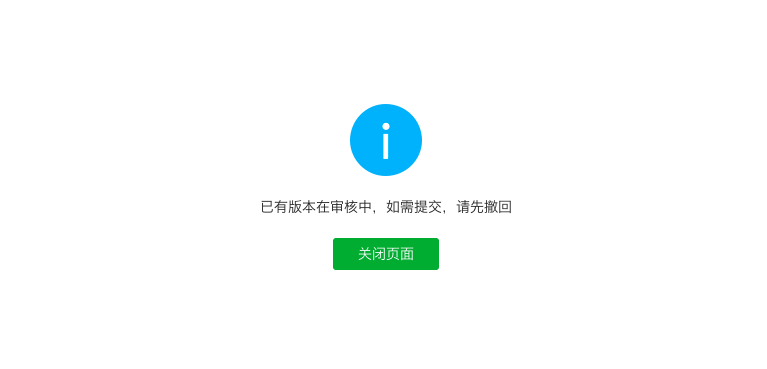
最后就是将信息填写完整,把创建的技能发布,通过审核就好了,大概流程是这样。
程序员接单平台 :https://www.yungong.com/user/promote/eyJpdiI6IjVZekxGc2hGRExoUHo3ek1DbDd1VFE9PSIsInZhbHVlIjoiXC9VckY5VDN3QTVzYlBxK2p4anF0c2c9PSIsIm1hYyI6ImE3Mjc4MzYxMzJmMGZhZTFiMzA1ZjQ0OTg2MTlkNThlM2RlODliNTg0ZTNkZTZiMDhkZTM4ODljMjVkY2M3MjYifQ==