本文基于transformers中BLOOM模型代码来解析BLOOM的原理及实现。
相关博客
【自然语言处理】【大模型】ChatGLM-6B模型结构代码解析(单机版)
【自然语言处理】【大模型】BLOOM模型结构源码解析(单机版)
【自然语言处理】【大模型】极低资源微调大模型方法LoRA以及BLOOM-LORA实现代码
【深度学习】【分布式训练】Collective通信操作及Pytorch示例
【自然语言处理】【大模型】Chinchilla:训练计算利用率最优的大语言模型
【自然语言处理】【大模型】大语言模型BLOOM推理工具测试
【自然语言处理】【大模型】GLM-130B:一个开源双语预训练语言模型
【自然语言处理】【大模型】用于大型Transformer的8-bit矩阵乘法介绍
【自然语言处理】【大模型】BLOOM:一个176B参数且可开放获取的多语言模型
【自然语言处理】【ChatGPT系列】FLAN:微调语言模型是Zero-Shot学习器
【自然语言处理】【ChatGPT系列】ChatGPT的智能来自哪里?
【自然语言处理】【ChatGPT系列】大模型的涌现能力
一、掩码(Mask)
1.1 原理
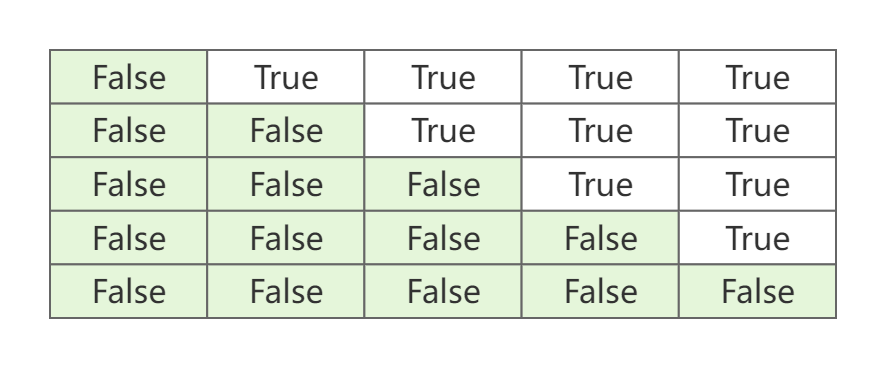
BLOOM使用的是Transformer中的Decoder,其使用到的Mask有两个:(1) 构建batch时的padding需要被mask;(2) Decoder中,当前token只能见到其左侧的token,因此需要对注意力进行mask。称前一种为Padding Mask,后一种为Causal Mask。
Causal Mask。给定一个长度为 n n n的序列,其注意力分数矩阵为 A ∈ R n × n A\in\mathbb{R}^{n\times n} A∈Rn×n。 A i , j A_{i,j} Ai,j表示query q i \textbf{q}_i qi和key k j \textbf{k}_j kj的注意力分数。但是,生成任务是从左到右的,其在生成过程中没有办法看到其右侧的tokens。为了在训练时也保证"仅左侧tokne可见",可以通过Causal Mask来实现。具体来说,就是mask掉注意力矩阵 A A A的上三角。下图就是 n = 5 n=5 n=5情况下的Causal Mask。
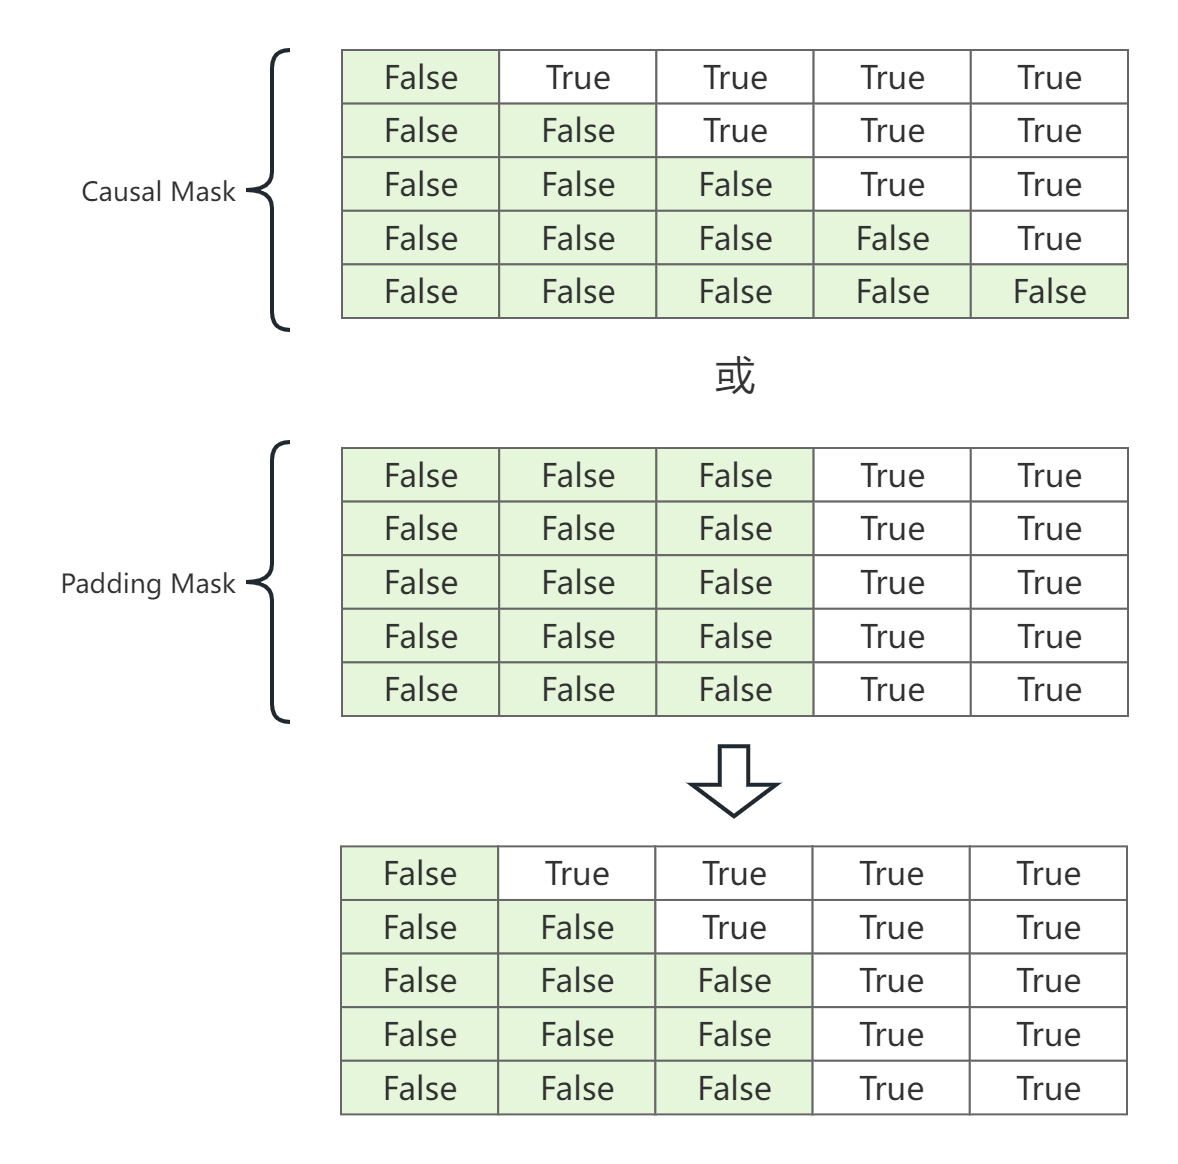
Padding Mask。模型训练时,由于输入样本的长度不等,因此需要padding到相等长度。但是,在模型前后向传播时需要忽略掉padding的部分,因此需要Padding Mask。Padding Mask也是针对注意力分数矩阵 A A A的,因此其形状下也要与 A A A相同。下图是长度为3,但被padding至5的Padding Mask例子。

注意力分数矩阵的完整Mask就是"Causal Mask或Padding Mask",过程如下图。
1.2 代码
Causal Mask
def _make_causal_mask(input_ids_shape: torch.Size, device: torch.device, past_key_values_length: int
) -> torch.BoolTensor:"""input_ids_shape:(batch_size, seq_length)"""batch_size, target_length = input_ids_shapemask = torch.empty((target_length, target_length + past_key_values_length), dtype=torch.bool, device=device)# ONNX doesn't support `torch.Tensor.triu` properly, thus we use this workaroundseq_ids = torch.arange(target_length, device=device)mask[:, past_key_values_length:] = seq_ids[:, None] < seq_ids[None, :]if past_key_values_length > 0:mask[:, :past_key_values_length] = Falseexpanded_mask = mask[None, None, :, :].expand(batch_size, 1, target_length, target_length + past_key_values_length)return expanded_mask
Padding Mask
def _expand_mask(mask: torch.Tensor, tgt_length: int) -> torch.BoolTensor:"""mask: (batch_size, seq_length)"""batch_size, src_length = mask.shapetgt_length = tgt_length if tgt_length is not None else src_lengthexpanded_mask = ~(mask[:, None, None, :].to(torch.bool))return expanded_mask.expand(batch_size, 1, tgt_length, src_length)
二、激活函数
bloom的激活函数采用 GELU \text{GELU} GELU, GELU \text{GELU} GELU在实现时可以近似为
GELU ( x ) ≈ 0.5 x ( 1 + tanh ( 2 π ( x + 0.044715 x 3 ) ) ) \text{GELU}(x)\approx 0.5x(1+\tanh(\sqrt{\frac{2}{\pi}}(x+0.044715x^3))) GELU(x)≈0.5x(1+tanh(π2(x+0.044715x3)))
def bloom_gelu_forward(x: torch.Tensor) -> torch.Tensor:"""GELLU前向"""return x * 0.5 * (1.0 + torch.tanh(0.79788456 * x * (1 + 0.044715 * x * x)))def bloom_gelu_back(g: torch.Tensor, x: torch.Tensor) -> torch.Tensor:"""GELU后向"""x = x[0] # x is a tuple of 1 element, needs to unpack it firsttanh_out = torch.tanh(0.79788456 * x * (1 + 0.044715 * x * x))# sqrt(2/pi) * 3 * 0.044715 -> 0.1070322243ff = 0.5 * x * ((1 - tanh_out * tanh_out) * (0.79788456 + 0.1070322243 * x * x)) + 0.5 * (1 + tanh_out)return ff * gclass GeLUFunction(torch.autograd.Function):"""完整的GeLU激活函数"""@staticmethoddef forward(ctx, input: torch.Tensor) -> torch.Tensor:ctx.save_for_backward(input)return bloom_gelu_forward(input)@staticmethoddef backward(ctx, grad_output: torch.Tensor) -> torch.Tensor:input = ctx.saved_tensorstmp = bloom_gelu_back(grad_output, input)return tmpclass BloomGelu(nn.Module):def __init__(self):super().__init__()def forward(self, x: torch.Tensor) -> torch.Tensor:if self.training:return GeLUFunction.apply(x)else:# 非训练时,只执行前向传播return bloom_gelu_forward(x)
三、MLP层
MLP ( X , R ) = dropout ( GELU ( X W 1 ) W 2 ) + R ; X 是输入、 R 是残差 \text{MLP}(X, R) = \text{dropout}(\text{GELU}(XW_1)W_2)+R; \quad X是输入、R是残差 MLP(X,R)=dropout(GELU(XW1)W2)+R;X是输入、R是残差
class BloomMLP(nn.Module):def __init__(self, config: BloomConfig):super().__init__()hidden_size = config.hidden_size# 预训练时的张量并行度self.pretraining_tp = config.pretraining_tpself.slow_but_exact = config.slow_but_exact# h至4h的全链接层self.dense_h_to_4h = nn.Linear(hidden_size, 4 * hidden_size)self.gelu_impl = BloomGelu()# 4h到h的全链接层self.dense_4h_to_h = nn.Linear(4 * hidden_size, hidden_size)# dorpoutself.hidden_dropout = config.hidden_dropoutdef forward(self, hidden_states: torch.Tensor, residual: torch.Tensor) -> torch.Tensor:"""hidden_states: (batch_size, seq_length, hidden_size)residual与hidden_states形状相同"""# 全链接层+GLUEhidden_states = self.gelu_impl(self.dense_h_to_4h(hidden_states))# 将hidden_states从4h在映射会h# intermediate_output的形状同hidden_statesif self.pretraining_tp > 1 and self.slow_but_exact:# 判断预训练时是否使用了张量并行,且要采用慢且精确的前向传播intermediate_output = torch.zeros_like(residual)slices = self.dense_4h_to_h.weight.shape[-1] / self.pretraining_tpfor i in range(self.pretraining_tp):intermediate_output = intermediate_output + F.linear(hidden_states[:, :, int(i * slices) : int((i + 1) * slices)],self.dense_4h_to_h.weight[:, int(i * slices) : int((i + 1) * slices)],)else:intermediate_output = self.dense_4h_to_h(hidden_states)# 对intermediate_output执行dropout后,加上残差residualoutput = dropout_add(intermediate_output, residual, self.hidden_dropout, self.training)return output
四、ALiBi:注入位置信息
1. 原理
BLOOM使用ALiBi来向模型注入位置信息。给定一个长度为 L L L的输入序列, 那么每个注意力头的第 i i i个query q i ∈ R 1 × d ( 1 ≤ i ≤ L ) \textbf{q}_i\in\mathbb{R}^{1\times d}(1\leq i\leq L) qi∈R1×d(1≤i≤L)针对前 i i i个key K ∈ R i × d \textbf{K}\in\mathbb{R}^{i\times d} K∈Ri×d的注意力分数为
softmax ( q i K ⊤ ) \text{softmax}(\textbf{q}_i\textbf{K}^\top) softmax(qiK⊤)
在使用ALiBi时,不需要向网络添加位置嵌入。仅需要在query-key点积中添加静态偏差即可。
softmax ( q i K ⊤ + m ⋅ [ − ( i − 1 ) , … , − 2 , − 1 , 0 ] ) \text{softmax}(\textbf{q}_i\textbf{K}^\top+m\cdot[-(i-1),\dots,-2,-1,0]) softmax(qiK⊤+m⋅[−(i−1),…,−2,−1,0])
其中 m m m是与注意力头相关的斜率(slope),也就是超参; [ − ( i − 1 ) , … , − 2 , − 1 , 0 ] [-(i-1),\dots,-2,-1,0] [−(i−1),…,−2,−1,0]其实就是 q i \textbf{q}_i qi与各个key的相对距离。
对于8个注意力头, m m m是等比序列: 1 2 1 , 1 2 2 , … , 1 2 8 \frac{1}{2^1},\frac{1}{2^2},\dots,\frac{1}{2^8} 211,221,…,281。对于16个注意力头的模型, m m m则是等比序列: 1 2 0.5 , 1 2 1 , 1 2 1.5 , … , 1 8 \frac{1}{2^{0.5}},\frac{1}{2^1},\frac{1}{2^{1.5}},\dots,\frac{1}{8} 20.51,211,21.51,…,81。
2. 实现
def build_alibi_tensor(attention_mask: torch.Tensor, num_heads: int, dtype: torch.dtype) -> torch.Tensor:batch_size, seq_length = attention_mask.shape# closet_power_of_2是与num_head接近的2的次方# 例如:num_heads为5/6/7时,closest_power_of_2为4closest_power_of_2 = 2 ** math.floor(math.log2(num_heads))# 计算斜率base = torch.tensor(2 ** (-(2 ** -(math.log2(closest_power_of_2) - 3))), device=attention_mask.device, dtype=torch.float32)powers = torch.arange(1, 1 + closest_power_of_2, device=attention_mask.device, dtype=torch.int32)slopes = torch.pow(base, powers)# 注意力头数量不是2的次方if closest_power_of_2 != num_heads:extra_base = torch.tensor(2 ** (-(2 ** -(math.log2(2 * closest_power_of_2) - 3))), device=attention_mask.device, dtype=torch.float32)num_remaining_heads = min(closest_power_of_2, num_heads - closest_power_of_2)extra_powers = torch.arange(1, 1 + 2 * num_remaining_heads, 2, device=attention_mask.device, dtype=torch.int32)slopes = torch.cat([slopes, torch.pow(extra_base, extra_powers)], dim=0)# 相对距离arange_tensor = ((attention_mask.cumsum(dim=-1) - 1) * attention_mask)[:, None, :]# alibi会与query和key的乘积相加# alibi的形状为[batch_size, num_heads, query_length, key_length]alibi = slopes[..., None] * arange_tensorreturn alibi.reshape(batch_size * num_heads, 1, seq_length).to(dtype)
实现时,为了避免斜率计算中的除法操作,按如下的方式计算斜率:
base = 2 − ( 2 − ( log 2 n − 3 ) ) = 1 2 8 / n = 1 2 8 n power = [ 1 , … , n ] \begin{align} &\text{base} = 2^{-(2^{-(\log_2 n-3)})}=\frac{1}{2^{8/n}}=\frac{1}{\sqrt[n]{2^8}} \\ &\text{power} = [1,\dots, n] \\ \end{align} base=2−(2−(log2n−3))=28/n1=n281power=[1,…,n]
函数的返回值就是 m ⋅ [ − ( i − 1 ) , … , − 2 , − 1 , 0 ] m\cdot[-(i-1),\dots,-2,-1,0] m⋅[−(i−1),…,−2,−1,0]。
五、多头注意力层
1. 原理
BLOOM多头注意力就是在标准多头注意力上添加ALiBi。
单头注意力:
Q = W q X K = W k X V = W v X Attention ( Q , K , V , A ) = softmax ( Q K T d k + A ) V \begin{align} Q &= W_q X \\ K &= W_k X \\ V &= W_v X \\ \text{Attention}(Q,K,V,A) &= \text{softmax}(\frac{QK^T}{\sqrt{d_k}}+A)V \end{align} QKVAttention(Q,K,V,A)=WqX=WkX=WvX=softmax(dkQKT+A)V
其中, X X X是输入, W q , W k , W v W_q,W_k,W_v Wq,Wk,Wv分别是query、key、value的投影矩阵, A A A是ALiBi偏差矩阵。
多头注意力:
多头注意力就是将多个单头注意力的结果拼接起来。
head i = Attention ( Q i , K i , V i , A i ) MultiHead ( Q , K , V , A ) = Concat ( head 1 , … , head h ) W o \begin{align} \text{head}_i&=\text{Attention}(Q_i,K_i,V_i,A_i) \\ \text{MultiHead}(Q,K,V,A)&=\text{Concat}(\text{head}_1,\dots,\text{head}_h)W_o \end{align} headiMultiHead(Q,K,V,A)=Attention(Qi,Ki,Vi,Ai)=Concat(head1,…,headh)Wo
2. 实现
class BloomAttention(nn.Module):def __init__(self, config: BloomConfig):super().__init__()# 预训练时,张量并行相关的参数(这里不需要关注)self.pretraining_tp = config.pretraining_tpself.slow_but_exact = config.slow_but_exactself.hidden_size = config.hidden_sizeself.num_heads = config.n_headself.head_dim = self.hidden_size // self.num_headsself.split_size = self.hidden_sizeself.hidden_dropout = config.hidden_dropoutif self.head_dim * self.num_heads != self.hidden_size:raise ValueError(f"`hidden_size` must be divisible by num_heads (got `hidden_size`: {self.hidden_size} and `num_heads`:"f" {self.num_heads}).")# Layer-wise attention scalingself.inv_norm_factor = 1.0 / math.sqrt(self.head_dim)self.beta = 1.0# query、key、value的投影层self.query_key_value = nn.Linear(self.hidden_size, 3 * self.hidden_size, bias=True)# 输出投影层self.dense = nn.Linear(self.hidden_size, self.hidden_size)self.attention_dropout = nn.Dropout(config.attention_dropout)def _split_heads(self, fused_qkv: torch.Tensor) -> Tuple[torch.Tensor, torch.Tensor, torch.Tensor]:"""fused_qkv: [batch_size, seq_length, 3*hidden_size]"""batch_size, seq_length, three_times_hidden_size = fused_qkv.shape# 1. 将Q、K、V拆分出来;2. 拆分出多个头fused_qkv = fused_qkv.view(batch_size, seq_length, self.num_heads, 3, self.head_dim)return fused_qkv[..., 0, :], fused_qkv[..., 1, :], fused_qkv[..., 2, :]def _merge_heads(self, x: torch.Tensor) -> torch.Tensor:# 目标:batch_size * num_heads, seq_length, head_dim -> batch_size, seq_length, num_heads * head_dimbatch_size_and_num_heads, seq_length, _ = x.shapebatch_size = batch_size_and_num_heads // self.num_heads# 将batch_size拆分出来:batch_size * num_heads, seq_length, head_dim -> batch_size, num_heads, seq_length, head_dimx = x.view(batch_size, self.num_heads, seq_length, self.head_dim)# batch_size, num_heads, seq_length, head_dim -> batch_size, seq_length, num_heads, head_dimx = x.permute(0, 2, 1, 3)# batch_size, seq_length, num_heads, head_dim -> batch_size, seq_length, num_heads * head_dimreturn x.reshape(batch_size, seq_length, self.num_heads * self.head_dim)def forward(self,hidden_states: torch.Tensor,residual: torch.Tensor,alibi: torch.Tensor,attention_mask: torch.Tensor,layer_past: Optional[Tuple[torch.Tensor, torch.Tensor]] = None,head_mask: Optional[torch.Tensor] = None,use_cache: bool = False,output_attentions: bool = False,):# [batch_size, seq_length, 3 x hidden_size]# 一次性得到投影的Q、K、V,减少执行矩阵乘法的次数fused_qkv = self.query_key_value(hidden_states)# 多头拆分# 3 x [batch_size, seq_length, num_heads, head_dim](query_layer, key_layer, value_layer) = self._split_heads(fused_qkv)batch_size, q_length, _, _ = query_layer.shapequery_layer = query_layer.transpose(1, 2).reshape(batch_size * self.num_heads, q_length, self.head_dim)key_layer = key_layer.permute(0, 2, 3, 1).reshape(batch_size * self.num_heads, self.head_dim, q_length)value_layer = value_layer.transpose(1, 2).reshape(batch_size * self.num_heads, q_length, self.head_dim)# 处理传入的key和value(忽略)if layer_past is not None:past_key, past_value = layer_pastkey_layer = torch.cat((past_key, key_layer), dim=2)value_layer = torch.cat((past_value, value_layer), dim=1)_, _, kv_length = key_layer.shape# 忽略if use_cache is True:present = (key_layer, value_layer)else:present = None# [batch_size * num_heads, q_length, kv_length]# inv_norm_factor*(query_layer*key_layer) + beta*alibimatmul_result = alibi.baddbmm(batch1=query_layer,batch2=key_layer,beta=self.beta,alpha=self.inv_norm_factor,)# [batch_size, num_heads, q_length, kv_length]attention_scores = matmul_result.view(batch_size, self.num_heads, q_length, kv_length)# 若输入类型是float16,则将注意力分数转换为float32# 注意力分数的精度会显著影响模型的效果input_dtype = attention_scores.dtypeif input_dtype == torch.float16:attention_scores = attention_scores.to(torch.float)# maskattn_weights = torch.masked_fill(attention_scores, attention_mask, torch.finfo(attention_scores.dtype).min)# softmaxattention_probs = F.softmax(attn_weights, dim=-1, dtype=torch.float32).to(input_dtype)# [batch_size, num_heads, q_length, kv_length]# dropoutattention_probs = self.attention_dropout(attention_probs)# 若传入注意力头的maskif head_mask is not None:attention_probs = attention_probs * head_mask# attention_probs_reshaped:[batch_size x num_heads, q_length, kv_length]attention_probs_reshaped = attention_probs.view(batch_size * self.num_heads, q_length, kv_length)# context_layer: [batch_size * num_heads, q_length, head_dim]# 乘以valuecontext_layer = torch.bmm(attention_probs_reshaped, value_layer)# context_layer: batch_size, seq_length, num_heads * head_dim# 合并多头context_layer = self._merge_heads(context_layer)# 输出投影if self.pretraining_tp > 1 and self.slow_but_exact:slices = self.hidden_size / self.pretraining_tpoutput_tensor = torch.zeros_like(context_layer)for i in range(self.pretraining_tp):output_tensor = output_tensor + F.linear(context_layer[:, :, int(i * slices) : int((i + 1) * slices)],self.dense.weight[:, int(i * slices) : int((i + 1) * slices)],)else:output_tensor = self.dense(context_layer)# dropout+残差output_tensor = dropout_add(output_tensor, residual, self.hidden_dropout, self.training)outputs = (output_tensor, present)if output_attentions:outputs += (attention_probs,)return outputs
六、BloomBlock
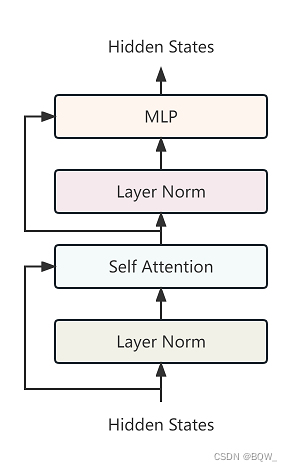
class BloomBlock(nn.Module):def __init__(self, config: BloomConfig):super().__init__()hidden_size = config.hidden_sizeself.input_layernorm = LayerNorm(hidden_size, eps=config.layer_norm_epsilon)self.num_heads = config.n_headself.self_attention = BloomAttention(config)self.post_attention_layernorm = LayerNorm(hidden_size, eps=config.layer_norm_epsilon)self.mlp = BloomMLP(config)self.apply_residual_connection_post_layernorm = config.apply_residual_connection_post_layernormself.hidden_dropout = config.hidden_dropoutdef forward(self,hidden_states: torch.Tensor,alibi: torch.Tensor,attention_mask: torch.Tensor,layer_past: Optional[Tuple[torch.Tensor, torch.Tensor]] = None,head_mask: Optional[torch.Tensor] = None,use_cache: bool = False,output_attentions: bool = False,):# hidden_states: [batch_size, seq_length, hidden_size]# 先对hidden_states进行Layer Normlayernorm_output = self.input_layernorm(hidden_states)# 残差if self.apply_residual_connection_post_layernorm:residual = layernorm_outputelse:residual = hidden_states# Self attention.attn_outputs = self.self_attention(layernorm_output,residual,layer_past=layer_past,attention_mask=attention_mask,alibi=alibi,head_mask=head_mask,use_cache=use_cache,output_attentions=output_attentions,)attention_output = attn_outputs[0]outputs = attn_outputs[1:]layernorm_output = self.post_attention_layernorm(attention_output)# Get residualif self.apply_residual_connection_post_layernorm:residual = layernorm_outputelse:residual = attention_output# MLP.output = self.mlp(layernorm_output, residual)if use_cache:outputs = (output,) + outputselse:outputs = (output,) + outputs[1:]return outputs # hidden_states, present, attentions
七、BloomModel
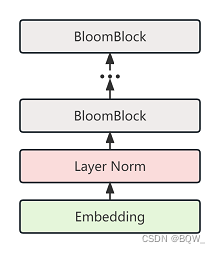
class BloomModel(BloomPreTrainedModel):def __init__(self, config: BloomConfig):super().__init__(config)self.embed_dim = config.hidden_sizeself.num_heads = config.n_head# Embedding + LN Embeddingself.word_embeddings = nn.Embedding(config.vocab_size, self.embed_dim)self.word_embeddings_layernorm = LayerNorm(self.embed_dim, eps=config.layer_norm_epsilon)# BloomBlocksself.h = nn.ModuleList([BloomBlock(config) for _ in range(config.num_hidden_layers)])# 最终Layer Normself.ln_f = LayerNorm(self.embed_dim, eps=config.layer_norm_epsilon)self.gradient_checkpointing = Falseself.post_init()def build_alibi_tensor(self, attention_mask: torch.Tensor, num_heads: int, dtype: torch.dtype) -> torch.Tensor:"""封装build_alibi_tensor函数"""return build_alibi_tensor(attention_mask, num_heads, dtype)def get_input_embeddings(self):return self.word_embeddingsdef _prepare_attn_mask(self, attention_mask: torch.Tensor, input_shape: Tuple[int, int], past_key_values_length: int) -> torch.BoolTensor:# 构建注意力分数的mask句子,见文章第一节的掩码(Mask)部分combined_attention_mask = Nonedevice = attention_mask.device_, src_length = input_shapeif src_length > 1:# 构建causal maskcombined_attention_mask = _make_causal_mask(input_shape, device=device, past_key_values_length=past_key_values_length)# [batch_size, seq_length] -> [batch_size, 1, tgt_length, src_length]# 构建padding maskexpanded_attn_mask = _expand_mask(attention_mask, tgt_length=src_length)# 两种mask合并combined_attention_mask = (expanded_attn_mask if combined_attention_mask is None else expanded_attn_mask | combined_attention_mask)return combined_attention_maskdef set_input_embeddings(self, new_embeddings: torch.Tensor):self.word_embeddings = new_embeddings@add_start_docstrings_to_model_forward(BLOOM_INPUTS_DOCSTRING)@add_code_sample_docstrings(checkpoint=_CHECKPOINT_FOR_DOC,output_type=BaseModelOutputWithPastAndCrossAttentions,config_class=_CONFIG_FOR_DOC,)def forward(self,input_ids: Optional[torch.LongTensor] = None,past_key_values: Optional[Tuple[Tuple[torch.Tensor, torch.Tensor], ...]] = None,attention_mask: Optional[torch.Tensor] = None,head_mask: Optional[torch.LongTensor] = None,inputs_embeds: Optional[torch.LongTensor] = None,use_cache: Optional[bool] = None,output_attentions: Optional[bool] = None,output_hidden_states: Optional[bool] = None,return_dict: Optional[bool] = None,**deprecated_arguments,) -> Union[Tuple[torch.Tensor, ...], BaseModelOutputWithPastAndCrossAttentions]:### (开始)一些输入输出和参数设置,可以忽略if deprecated_arguments.pop("position_ids", False) is not False:# `position_ids` could have been `torch.Tensor` or `None` so defaulting pop to `False` allows to detect if users were passing explicitly `None`warnings.warn("`position_ids` have no functionality in BLOOM and will be removed in v5.0.0. You can safely ignore"" passing `position_ids`.",FutureWarning,)if len(deprecated_arguments) > 0:raise ValueError(f"Got unexpected arguments: {deprecated_arguments}")output_attentions = output_attentions if output_attentions is not None else self.config.output_attentionsoutput_hidden_states = (output_hidden_states if output_hidden_states is not None else self.config.output_hidden_states)use_cache = use_cache if use_cache is not None else self.config.use_cachereturn_dict = return_dict if return_dict is not None else self.config.use_return_dictif input_ids is not None and inputs_embeds is not None:raise ValueError("You cannot specify both input_ids and inputs_embeds at the same time")elif input_ids is not None:batch_size, seq_length = input_ids.shapeelif inputs_embeds is not None:batch_size, seq_length, _ = inputs_embeds.shapeelse:raise ValueError("You have to specify either input_ids or inputs_embeds")if past_key_values is None:past_key_values = tuple([None] * len(self.h))### (结束)一些输入输出和参数设置,可以忽略# 准备head mask,1.0表示保留注意力头head_mask = self.get_head_mask(head_mask, self.config.n_layer)if inputs_embeds is None:inputs_embeds = self.word_embeddings(input_ids)# 在embedding后添加了layernormhidden_states = self.word_embeddings_layernorm(inputs_embeds)presents = () if use_cache else Noneall_self_attentions = () if output_attentions else Noneall_hidden_states = () if output_hidden_states else None### (开始) gradient checkpointing和past_key_values处理,忽略if self.gradient_checkpointing and self.training:if use_cache:logger.warning_once("`use_cache=True` is incompatible with gradient checkpointing. Setting `use_cache=False`...")use_cache = False# Compute alibi tensor: check build_alibi_tensor documentationseq_length_with_past = seq_lengthpast_key_values_length = 0if past_key_values[0] is not None:past_key_values_length = past_key_values[0][0].shape[2]seq_length_with_past = seq_length_with_past + past_key_values_length### (结束) gradient checkpointing和past_key_values处理,忽略# 构建注意力分数掩码if attention_mask is None:attention_mask = torch.ones((batch_size, seq_length_with_past), device=hidden_states.device)else:attention_mask = attention_mask.to(hidden_states.device)alibi = self.build_alibi_tensor(attention_mask, self.num_heads, dtype=hidden_states.dtype)causal_mask = self._prepare_attn_mask(attention_mask,input_shape=(batch_size, seq_length),past_key_values_length=past_key_values_length,)# BloomBlock前向传播for i, (block, layer_past) in enumerate(zip(self.h, past_key_values)):if output_hidden_states:all_hidden_states = all_hidden_states + (hidden_states,)if self.gradient_checkpointing and self.training:def create_custom_forward(module):def custom_forward(*inputs):# None for past_key_valuereturn module(*inputs, use_cache=use_cache, output_attentions=output_attentions)return custom_forwardoutputs = torch.utils.checkpoint.checkpoint(create_custom_forward(block),hidden_states,alibi,causal_mask,layer_past,head_mask[i],)else:outputs = block(hidden_states,layer_past=layer_past,attention_mask=causal_mask,head_mask=head_mask[i],use_cache=use_cache,output_attentions=output_attentions,alibi=alibi,)hidden_states = outputs[0]if use_cache is True:presents = presents + (outputs[1],)if output_attentions:all_self_attentions = all_self_attentions + (outputs[2 if use_cache else 1],)# Add last hidden statehidden_states = self.ln_f(hidden_states)if output_hidden_states:all_hidden_states = all_hidden_states + (hidden_states,)if not return_dict:return tuple(v for v in [hidden_states, presents, all_hidden_states, all_self_attentions] if v is not None)return BaseModelOutputWithPastAndCrossAttentions(last_hidden_state=hidden_states,past_key_values=presents,hidden_states=all_hidden_states,attentions=all_self_attentions,)