0 前言
Unity作为一款生态成熟、扩展性强、学习成本较低的三维引擎,近年来受到各领域研究者的青睐。具体到行人仿真领域,相较于传统的C++/Python平台,Unity在效果呈现及数据交互方面具备无可比拟的优势,国外开发者基于Unity已经实现了诸多惊艳的行人仿真项目。然而,将仿真过程的运算层与展示层全部置于Unity环境中可能并不是最完备的解决方案,研究者可能会面临以下难点:
(1)同时计算轨迹并渲染场景,性能开销巨大;
(2)将既有的仿真程序改写为C#脚本耗费时间且面临风险,尤其是在不熟悉Unity开发环境的情况下;
(3)Unity Editor本身就是一个十分耗资源的“重应用”,若在Editor中进行编译、调试,耗时长效率低;
(4)运算层与展示层之间数据不能解耦,一错则全错。
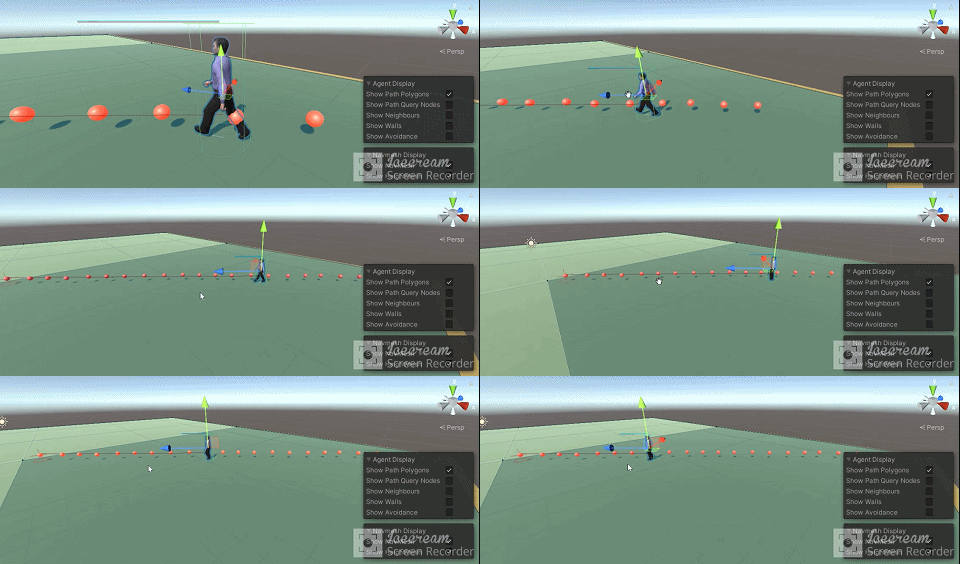
因此,如何将外部仿真数据批量、稳定地在Unity中进行呈现,是一个值得探究的问题。本文最终实现效果如下所示。
1 数据来源
仅仅考虑行人轨迹点数据,建议输出为csv、json等文件为佳,字符格式不易出错,同时可读性较好。由于仅仅是考虑实现方法,没必要太严谨,这里先用Python脚本随机生成一下轨迹点凑合用。注:生成行人的数量、轨迹点的数量在脚本开头处可以自己调,默认为生成10个行人,每个行人20个轨迹点;此外,x/y/z三个方向上的随机增量也可以根据自己喜好来,我这里暂且都用的正增量。
import os
import randomnum_of_pedestrian = 10
num_of_path_point = 20
x_location_list = []
y_location_list = []
z_location_list = []
output_file_type = "csv"def generate_output_path():cur_dir = os.path.dirname(os.path.abspath(__file__))i = 1while i <= num_of_pedestrian:output_path = cur_dir + "\PedestrianPath\Path-" + str(i) + "." + output_file_typeprint(output_path)x_location = 0y_location = 0z_location = 0k = 0while k < num_of_path_point:delta_x = random.uniform(0.8,1.2)delta_y = random.uniform(0.8,1.2)delta_z = random.uniform(0.8,1.2)x_location = x_location + delta_xy_location = y_location + delta_yz_location = z_location + delta_zx_location_list.append(x_location)y_location_list.append(y_location)z_location_list.append(z_location)k += 1title_content = "坐标点编号,X坐标,Y坐标,Z坐标" + "\n"file = open(output_path, "w")file.write(title_content)n = 0while n <num_of_path_point:line_content = str(n+1) + "," + str(x_location_list[n]) +","+ str(y_location_list[n]) + "," + str(z_location_list[n]) + "\n"file.write(line_content)n += 1file.close()x_location_list.clear()y_location_list.clear()z_location_list.clear()i += 1if __name__ == '__main__':print("<<<<<<<<<<<<<<<<<开始生成行人路径坐标点>>>>>>>>>>>>>>>>")generate_output_path()print("<<<<<<<<<<<<<<<<已将生成坐标点输出至文件>>>>>>>>>>>>>>>>")
2 在Unity环境中读取轨迹点坐标
将生成的轨迹点文件导入到Unity工程文件夹中,规范一点的做法是相应新建一个Folder专门储存轨迹点文件。Unity引擎/C#解析csv文件的相关脚本墙内外都有很多现成的,按自己的需求改改就能用。
新建一个脚本挂到行人(随便什么物体,你觉得是行人就行)上,首先声明类名称ReadCSV,同时在类开头部分定义需要用到的列表,平面运动就先不考虑Y轴增量了,因此只定义了两个float list。下一步,在void start()中,即第一帧开始运行时加入读取csv文件相关代码。
using System;
using UnityEngine;
using System.IO;
using System.Collections.Generic;
using UnityEngine.AI;public class ReadCSV : MonoBehaviour
{List<float> lstXLocation = new List<float>();List<float> lstZlocation = new List<float>();public string CSVPath = "J:/Unity Projects/Import-And-Generate-Path/Assets/Path-1.csv";//应与轨迹点文件路径保持一致↑↑↑ //后续严谨起见,也应把路径放到string list中
void Start(){//实例化StreamReader用于指定路径,后续路径也要编成表,或是规范化存于一个表中FileStream fs = new FileStream(CSVPath, FileMode.Open);StreamReader sr = new StreamReader(fs);//读取参数设置string[] read;char[] seperators = { ',' };string data = sr.ReadLine();int LineCount = 1;//开始读取while ((data = sr.ReadLine()) != null){read = data.Split(seperators, StringSplitOptions.RemoveEmptyEntries);float ValueX = float.Parse(read[1]);float ValueZ = float.Parse(read[3]);//Debug.Log("第" + LineCount + "个路径点的X坐标为:" + ValueX + ",Z坐标为:" + ValueZ + "。");//必要时开启↑lstXLocation.Add(ValueX);lstZlocation.Add(ValueZ);LineCount++;}}
}
3 制作轨迹点预制体
在场景中新建一个三维物体(sphere/cube/capsule随便什么劳什子),大小适中,顺便上个色;最后拖到Asset资源面板中,便可生成一个预制体。此外,为了使轨迹点在场景中更加醒目,可以为其增添闪烁效果,推荐用这个手搓脚本,不依赖外部库非常稳定。打开预制体,把这个脚本挂到轨迹点物体上就行了,可以自行对亮度/周期/颜色/是否循环等参数进行设置。
using System.Collections;
using UnityEngine;public class Skode_Glinting : MonoBehaviour
{/// <summary>/// 闪烁颜色/// </summary>public Color color = new Color(61 / 255f, 226 / 255f, 131 / 255, 1);/// <summary>/// 最低发光亮度,取值范围[0,1],需小于最高发光亮度。/// </summary>[Tooltip("最低发光亮度,取值范围[0,1],需小于最高发光亮度。")][Range(0.0f, 1.0f)]public float minBrightness = 0.0f;/// <summary>/// 最高发光亮度,取值范围[0,1],需大于最低发光亮度。/// </summary>[Tooltip("最高发光亮度,取值范围[0,1],需大于最低发光亮度。")][Range(0.0f, 1)]public float maxBrightness = 0.5f;/// <summary>/// 闪烁频率,取值范围[0.2,30.0]。/// </summary>[Tooltip("闪烁频率,取值范围[0.2,30.0]。")][Range(0.2f, 30.0f)]public float rate = 1;//是否闪烁[HideInInspector]public bool isGlinting = false;[Tooltip("勾选此项则启动时自动开始闪烁")][SerializeField]private bool _autoStart = false;private float _h, _s, _v;           // 色调,饱和度,亮度private float _deltaBrightness;     // 最低最高亮度差private Renderer _renderer;//private Material _material;private Material[] _materials;private readonly string _keyword = "_EMISSION";private readonly string _colorName = "_EmissionColor";private Coroutine _glinting;private void OnEnable(){_renderer = gameObject.GetComponent<Renderer>();//_material = _renderer.material;_materials = _renderer.materials;if (_autoStart){StartGlinting();}}/// <summary>/// 校验数据,并保证运行时的修改能够得到应用。/// 该方法只在编辑器模式中生效!!!/// </summary>private void OnValidate(){// 限制亮度范围if (minBrightness < 0 || minBrightness > 1){minBrightness = 0.0f;Debug.LogError("最低亮度超出取值范围[0, 1],已重置为0。");}if (maxBrightness < 0 || maxBrightness > 1){maxBrightness = 1.0f;Debug.LogError("最高亮度超出取值范围[0, 1],已重置为1。");}if (minBrightness >= maxBrightness){minBrightness = 0.0f;maxBrightness = 1.0f;Debug.LogError("最低亮度[MinBrightness]必须低于最高亮度[MaxBrightness],已分别重置为0/1!");}// 限制闪烁频率if (rate < 0.2f || rate > 30.0f){rate = 1;Debug.LogError("闪烁频率超出取值范围[0.2, 30.0],已重置为1.0。");}// 更新亮度差_deltaBrightness = maxBrightness - minBrightness;// 更新颜色// 注意不能使用 _v ,否则在运行时修改参数会导致亮度突变float tempV = 0;Color.RGBToHSV(color, out _h, out _s, out tempV);}/// <summary>/// 开始闪烁。/// </summary>public void StartGlinting(){isGlinting = true;if (_materials != null){if (_materials.Length > 0){//_material.EnableKeyword(_keyword);for (int i = 0; i < _materials.Length; i++){_materials[i].EnableKeyword(_keyword);}if (_glinting != null){StopCoroutine(_glinting);}_glinting = StartCoroutine(IEGlinting());}}}/// <summary>/// 停止闪烁。/// </summary>public void StopGlinting(){isGlinting = false;//_material.DisableKeyword(_keyword);for (int i = 0; i < _materials.Length; i++){_materials[i].DisableKeyword(_keyword);}if (_glinting != null){StopCoroutine(_glinting);}}/// <summary>/// 控制自发光强度。/// </summary>/// <returns></returns>private IEnumerator IEGlinting(){Color.RGBToHSV(color, out _h, out _s, out _v);_v = minBrightness;_deltaBrightness = maxBrightness - minBrightness;bool increase = true;while (true){if (increase){_v += _deltaBrightness * Time.deltaTime * rate;increase = _v <= maxBrightness;}else{_v -= _deltaBrightness * Time.deltaTime * rate;increase = _v <= minBrightness;}//_material.SetColor(_colorName, Color.HSVToRGB(_h, _s, _v));for (int i = 0; i < _materials.Length; i++){_materials[i].SetColor(_colorName, Color.HSVToRGB(_h, _s, _v));}//_renderer.UpdateGIMaterials();yield return null;}}
}
在完成上述设置后,我们的路径点应该跟下面图中的差不多。当然,严谨起见,我们应当在项目中新建Resources文件夹,并将所有场景中可能用的到预制体放入其中。此外,为了方便我们后续在场景中查询、获取所有的轨迹点集合,应为轨迹点新建一个Tag,比如“PathPoint”,Tag Name跟场景中或是资源中其他物体重名也没关系。

4 导入行人模型,设置行走动画
4.1 模型设置
行人仿真总得有行人模型,无论通过何种方式获(bai)取(piao)模型,首先需要将我们的行人模型(FBX文件)放入Asset文件夹中,将Rig设为Humanoid,并点击Apply。随后人物模型在资源面板中会出现一个小绿人,点开它,执行Configure Avatar选项。至此,我们导入的行人模型就可以用了。

4.2 动画设置
由于是简单实现功能,不需要成套动画,推荐从Mixamo(Mixamo)上下载自己想要的动画。从Mixamo上下载的都是绑定动画的FBX文件,我们可以将其导入到Unity中后,复用绑定在其上的动画。

如同本地的人物模型一样,我们需要将来自Mixamo的模型的Rig设置为Humanoid。随后打开FBX文件,选中图中这个三角形(anim文件),Ctrl + D后再重命名(我下的是一个行走动画,为了好区分直接命名Walking),我们就可以将人物动画拿来用到别处了。须注意的是,动画应勾选Loop Time以允许循环播放。
随后在Asset面板中新建一个Animation Controller,并将Entry后的默认状态设为Walking(需要在面板中单击右键新建状态),为该状态分配动画(.anim),也就是我们之前提到过的三角形。

4.3 场景设置
将4.1中调整过的本地人物模型拖到场景中,为其添加Animator组件,如果之前人形动画配置正确,应该可以看到模型已经被分配默认的Avatar组件,就是我们刚刚生成的。确认无误后,为人物模型分配刚刚新建的Animation组件。此外,我们还需要将刚刚建立的ReadCSV脚本挂载到人物模型上,该脚本将作为模型的组件来实现数据读取、运动控制的功能。
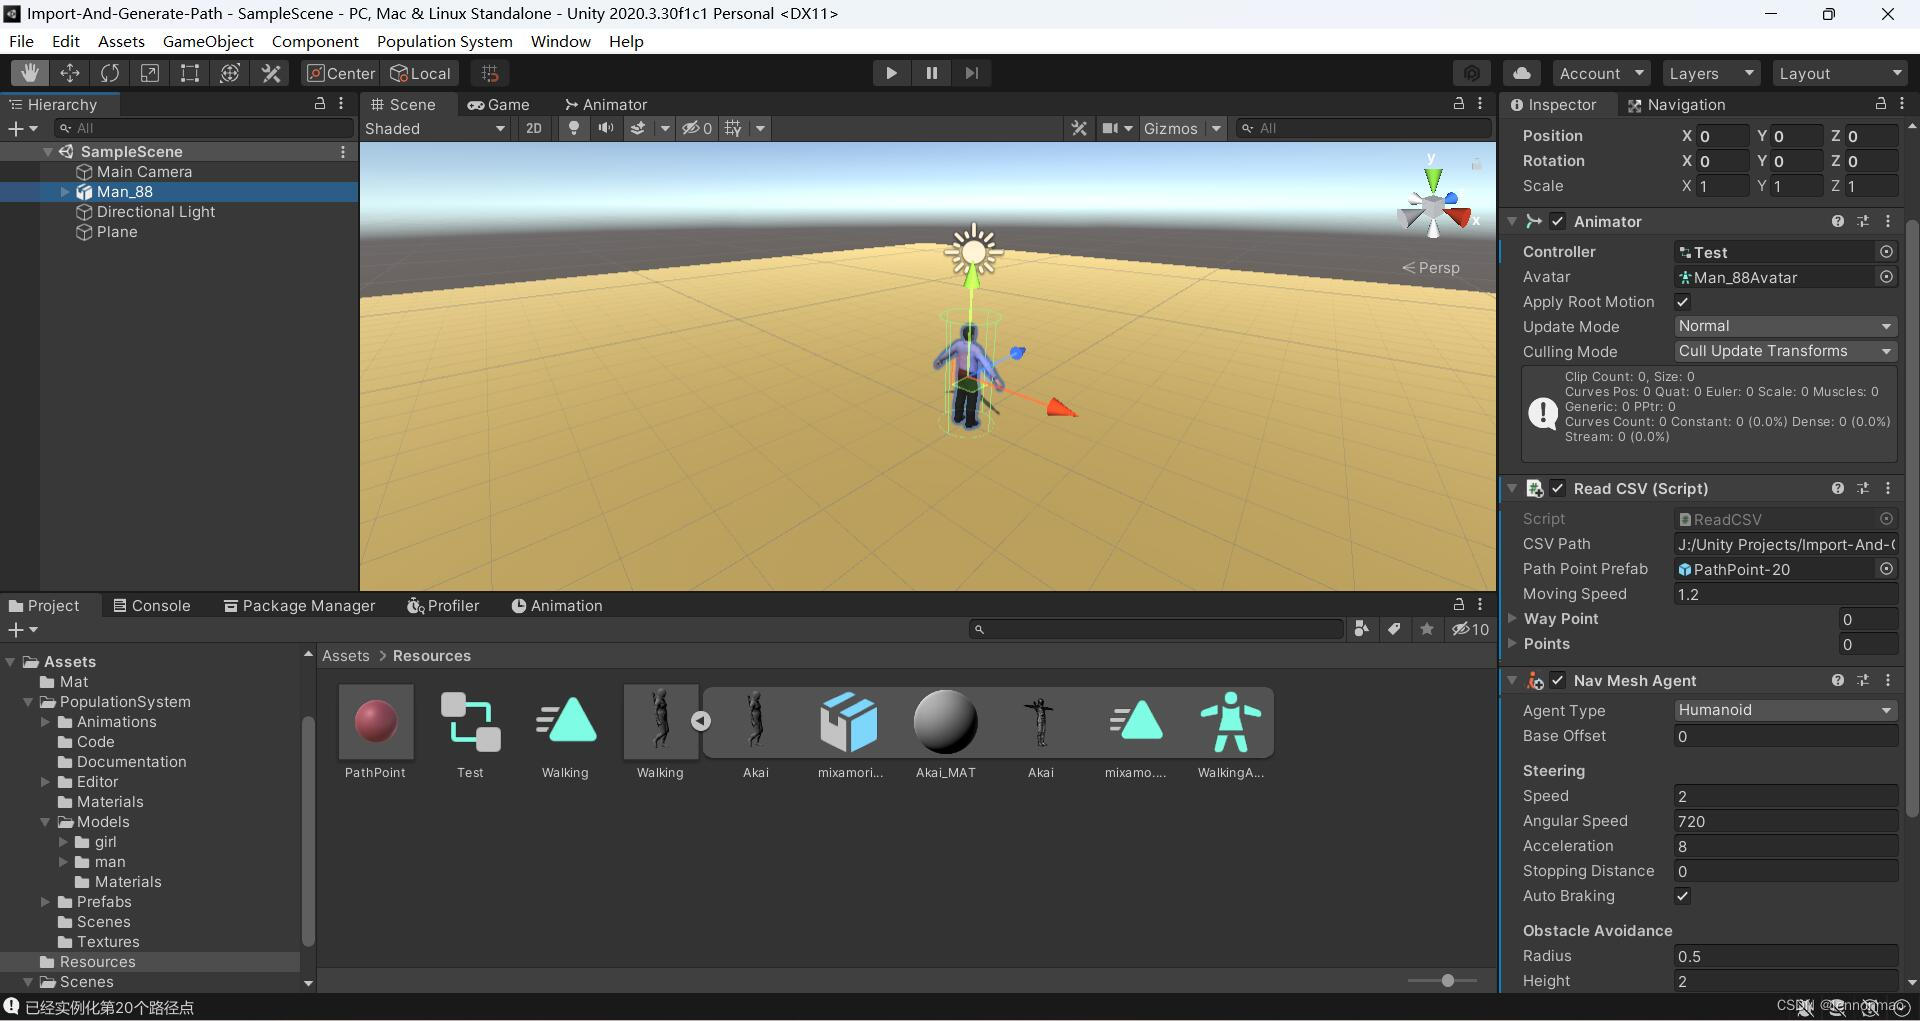
5 实例化轨迹点
public void GeneratePathPoint(int LineCount){GameObject Container = new GameObject("PathPointContainer");int NumOfLine = LineCount;int i = 1;while (i < NumOfLine){//为每个实例化的路径点命名string Name = "PathPoint-" + i.ToString();GameObject PathPoint = PathPointPrefab;PathPoint.transform.name = Name;//定义实例化位置,生成路径点,并设为Container的子物体Vector3 Position = new Vector3(lstXLocation[i-1], 0.5f, lstZlocation[i-1]);Instantiate(PathPoint);PathPoint.transform.localPosition = Position;Debug.Log("已经实例化第" + i + "个路径点");i++;}}这里把实例化路径点的相关代码单独抽出来写,放在ReadCSV的类中就可以。最后需要在void start()中调用一次,由于该方法依赖读取csv文件的结果,因此需要放在读取路径点的相关代码之后调用。
void Start()
{GeneratePathPoint(LineCount);
}
6 依次向各个轨迹点运动
6.1 实现方法1——基于Navmesh Agent
该方法需要为行人模型添加Navmesh Agent组件,并烘焙导航网格,具体步骤如下:
(1)新建平面Plane,选择Window>AI>Navigation,打开导航界面,选择既有的Plane并进行烘焙。
(2)为行人模型添加Navmesh Agent Component,尺寸参数/寻路参数自己设一下就行。
(3)在ReadCSV脚本中添加如下代码,最终如下所示:
using System;
using UnityEngine;
using System.IO;
using System.Data;
using System.Collections;
using System.Collections.Generic;
using UnityEditor;
using UnityEngine.AI;public class ReadCSV : MonoBehaviour
{// Start is called before the first frame updateList<float> lstXLocation = new List<float>();List<float> lstZlocation = new List<float>();public string CSVPath = "J:/Unity Projects/Import-And-Generate-Path/Assets/Path-1.csv";public GameObject PathPointPrefab;public GameObject[] points;private int destPoint = 0;private NavMeshAgent agent;void Start(){//实例化StreamReader用于指定路径,后续路径也要编成表,或是规范化存于一个表中FileStream fs = new FileStream(CSVPath, FileMode.Open);StreamReader sr = new StreamReader(fs);//读取参数设置string[] read;char[] seperators = { ',' };string data = sr.ReadLine();int LineCount = 1;//开始读取while ((data = sr.ReadLine()) != null){read = data.Split(seperators, StringSplitOptions.RemoveEmptyEntries);float ValueX = float.Parse(read[1]);float ValueZ = float.Parse(read[3]);//Debug.Log("第" + LineCount + "个路径点的X坐标为:" + ValueX + ",Z坐标为:" + ValueZ + "。");//必要时开启↑lstXLocation.Add(ValueX);lstZlocation.Add(ValueZ);LineCount++;}GeneratePathPoint(LineCount);points = GameObject.FindGameObjectsWithTag("PathPoint");agent = GetComponent<NavMeshAgent>();agent.autoBraking = false;GotoNextPoint();}// Update is called once per framevoid Update(){if (!agent.pathPending && agent.remainingDistance < 0.5f)GotoNextPoint();}public void GeneratePathPoint(int LineCount){GameObject Container = new GameObject("PathPointContainer");int NumOfLine = LineCount;int i = 1;while (i < NumOfLine){//为每个实例化的路径点命名string Name = "PathPoint-" + i.ToString();GameObject PathPoint = PathPointPrefab;PathPoint.transform.name = Name;//定义实例化位置,生成路径点,并设为Container的子物体Vector3 Position = new Vector3(lstXLocation[i-1], 0.5f, lstZlocation[i-1]);Instantiate(PathPoint);PathPoint.transform.localPosition = Position;Debug.Log("已经实例化第" + i + "个路径点");i++;}}void GotoNextPoint(){if (points.Length == 0)return;agent.destination = points[destPoint].transform.position;destPoint = (destPoint + 1) % points.Length;}
}
6.2 实现方法2——基于Transform
该方法比较简单朴素,依靠Transform类中的相关功能,不需要额外添加组件,在ReadCSV脚本中添加如下代码即可实现,最终如下所示:
using System;
using UnityEngine;
using System.IO;
using System.Data;
using System.Collections;
using System.Collections.Generic;
using UnityEditor;
using UnityEngine.AI;public class ReadCSV : MonoBehaviour
{// Start is called before the first frame updateList<float> lstXLocation = new List<float>();List<float> lstZlocation = new List<float>();public string CSVPath = "J:/Unity Projects/Import-And-Generate-Path/Assets/Path-1.csv";public GameObject PathPointPrefab;public GameObject[] wayPoint;int nextPointIndex;void Start(){//实例化StreamReader用于指定路径,后续路径也要编成表,或是规范化存于一个表中FileStream fs = new FileStream(CSVPath, FileMode.Open);StreamReader sr = new StreamReader(fs);//读取参数设置string[] read;char[] seperators = { ',' };string data = sr.ReadLine();int LineCount = 1;//开始读取while ((data = sr.ReadLine()) != null){read = data.Split(seperators, StringSplitOptions.RemoveEmptyEntries);float ValueX = float.Parse(read[1]);float ValueZ = float.Parse(read[3]);//Debug.Log("第" + LineCount + "个路径点的X坐标为:" + ValueX + ",Z坐标为:" + ValueZ + "。");//必要时开启↑lstXLocation.Add(ValueX);lstZlocation.Add(ValueZ);LineCount++;}GeneratePathPoint(LineCount);wayPoint = GameObject.FindGameObjectsWithTag("PathPoint");//排序 Array.Sort(wayPoint, (x, y) => { return x.gameObject.name.CompareTo(y.gameObject.name); });//设置初始位置transform.position = wayPoint[0].transform.position;//设置初始角度transform.forward = wayPoint[nextPointIndex].transform.position - transform.position;}// Update is called once per framevoid Update(){//判断自身距离下一个路径点的位置if (Vector3.Distance(wayPoint[nextPointIndex].transform.position, transform.position) < 0.1f){//如果下一个路径点不是最后一个则加一if (nextPointIndex != wayPoint.Length - 1){nextPointIndex++;}//当自己的位置到达最后一个位置的时候 直接将自己的位置固定防止本体颤抖if (Vector3.Distance(wayPoint[wayPoint.Length - 1].transform.position, transform.position) < 0.1f){transform.position = wayPoint[wayPoint.Length - 1].transform.position;return;}//设置每一个点的转向transform.forward = wayPoint[nextPointIndex].transform.position - transform.position;}//前进transform.Translate(Vector3.forward * 0.5f * Time.deltaTime, Space.Self);}public void GeneratePathPoint(int LineCount){GameObject Container = new GameObject("PathPointContainer");int NumOfLine = LineCount;int i = 1;while (i < NumOfLine){//为每个实例化的路径点命名string Name = "PathPoint-" + i.ToString();GameObject PathPoint = PathPointPrefab;PathPoint.transform.name = Name;//定义实例化位置,生成路径点,并设为Container的子物体Vector3 Position = new Vector3(lstXLocation[i-1], 0.5f, lstZlocation[i-1]);Instantiate(PathPoint);PathPoint.transform.localPosition = Position;Debug.Log("已经实例化第" + i + "个路径点");i++;}}
}
