目录
一、实例需求 ❗
二、 实现 🎯
三、代码优化 💂 + 💻 = 👴🏽
四、继续优化和总结 🌕👍
五、需要注意的 ❌
一、实例需求 ❗
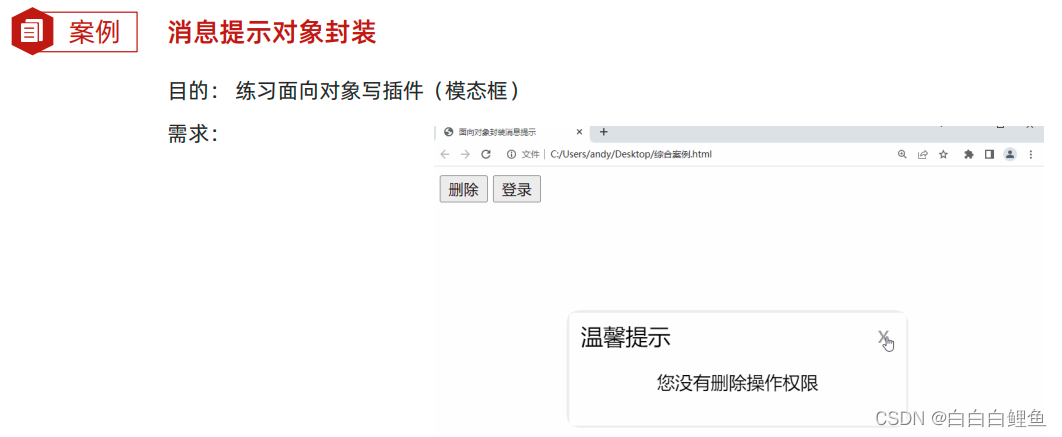
JS进阶-day3-184-综合案例-模态框构造函数写法


二、 实现 🎯
<!DOCTYPE html>
<html lang="en"><head><meta charset="UTF-8" /><meta http-equiv="X-UA-Compatible" content="IE=edge" /><meta name="viewport" content="width=device-width, initial-scale=1.0" /><title>面向对象封装消息提示</title><style>.modal {width: 300px;min-height: 100px;box-shadow: 0 0 10px rgba(0, 0, 0, 0.2);border-radius: 4px;position: fixed;z-index: 999;left: 50%;top: 50%;transform: translate3d(-50%, -50%, 0);background-color: #fff;}.modal .header {line-height: 40px;padding: 0 10px;position: relative;font-size: 20px;}.modal .header i {font-style: normal;color: #999;position: absolute;right: 15px;top: -2px;cursor: pointer;}.modal .body {text-align: center;padding: 10px;}.modal .footer {display: flex;justify-content: flex-end;padding: 10px;}.modal .footer a {padding: 3px 8px;background: #ccc;text-decoration: none;color: #fff;border-radius: 2px;margin-right: 10px;font-size: 14px;}.modal .footer a.submit {background-color: #369;}</style>
</head><body>
<button id="delete">删除</button>
<button id="login">登录</button><!-- <div class="modal"><div class="header">温馨提示 <i>x</i></div><div class="body">您没有删除权限操作</div>
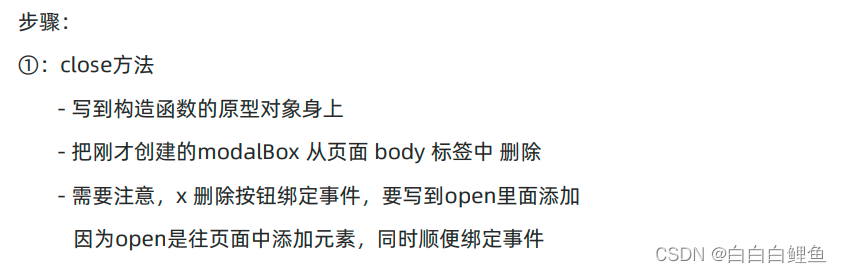
</div> --><script>// 1. 模态框的构造函数function Modal(title = '', message = '') {// 公共的属性部分this.title = titlethis.message = message// 因为盒子是公共的// 1. 创建 一定不要忘了加 thisthis.modalBox = document.createElement('div')// 2. 添加类名this.modalBox.className = 'modal'// 3. 填充内容 更换数据this.modalBox.innerHTML = `<div class="header">${this.title} <i>x</i></div><div class="body">${this.message}</div>`// console.log(this.modalBox)}// 2. 打开方法 挂载 到 模态框的构造函数原型身上Modal.prototype.open = function () {if (!document.querySelector('.modal')) {// 把刚才创建的盒子 modalBox 渲染到 页面中 父元素.appendChild(子元素)document.body.appendChild(this.modalBox)// 获取 x 调用关闭方法this.modalBox.querySelector('i').addEventListener('click', () => {// 箭头函数没有this 上一级作用域的this// 这个this 指向 mthis.close()})}}// 3. 关闭方法 挂载 到 模态框的构造函数原型身上Modal.prototype.close = function () {document.body.removeChild(this.modalBox)}// 4. 按钮点击document.querySelector('#delete').addEventListener('click', () => {const m = new Modal('温馨提示', '您没有权限删除')// 调用 打开方法m.open()})// 5. 按钮点击document.querySelector('#login').addEventListener('click', () => {const m = new Modal('友情提示', '您还么有注册账号')// 调用 打开方法m.open()})</script>
</body></html>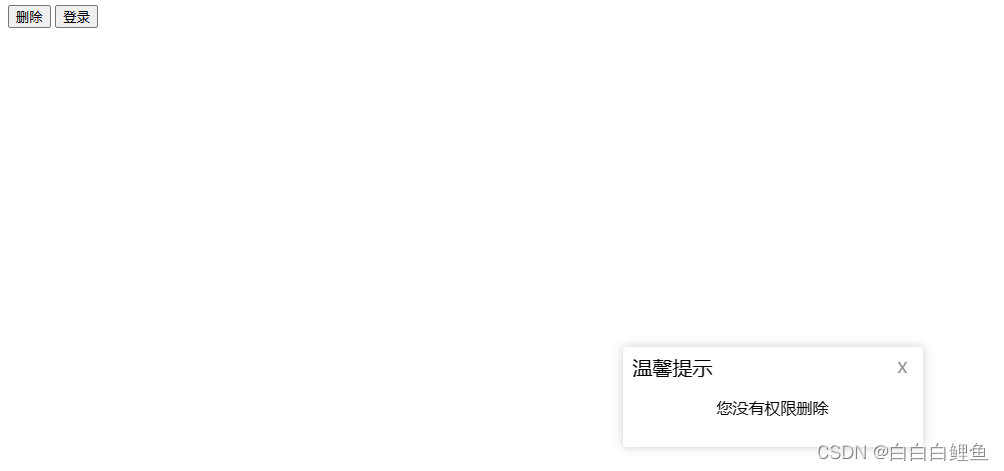
三、代码优化 💂 + 💻 = 👴🏽
实现了注册、登录和删除按钮的事件监听器,并在点击按钮时弹出相应的模态框。对源代码进行了扩展,并且利用面相对象的思想进行了封装。
<!DOCTYPE html>
<html lang="en">
<head><meta charset="UTF-8"/><meta http-equiv="X-UA-Compatible" content="IE=edge"/><meta name="viewport" content="width=device-width, initial-scale=1.0"/><title>面向对象封装消息提示</title><style>/* 按钮容器样式定义 */.button-container {display: flex; /* 设置容器为弹性布局 */justify-content: center; /* 将按钮水平居中对齐 */align-items: flex-start; /* 将按钮垂直顶部对齐 */margin-top: 20px; /* 设置容器与上方元素的垂直间距 */}/* 按钮样式定义 */button {background-color: #f3e330; /* 设置按钮背景颜色 */color: #090000; /* 设置按钮文字颜色 */margin-right: 10px; /* 设置按钮的右边距 */padding: 10px 20px; /* 设置按钮内边距 */border: 2px solid #efa75a; /* 设置按钮边框样式及颜色 */cursor: pointer; /* 设置鼠标悬停样式为手型 */border-radius: 5px; /* 设置按钮圆角 */font-size: 16px; /* 设置按钮文字大小 */}button:hover {background-color: #9668dc; /* 设置鼠标悬停时的按钮背景颜色 */}/* 模态框样式定义 */.modal {width: 300px;/* 模态框最小高度 */min-height: 100px;/* x 和 y 设置为 0,表示阴影不产生偏移,即在元素的中心位置。blur 设置为 10px,增加阴影的模糊程度,使其看起来更加柔和。color 使用 RGBA 格式,其中 rgba(0, 0, 0, 0.2) 表示黑色阴影,透明度为 0.2,使得阴影呈现半透明效果。*/box-shadow: 0 0 10px rgba(0, 0, 0, 0.2);border-radius: 4px;position: fixed;z-index: 999;left: 50%;top: 50%;transform: translate3d(-50%, -50%, 0);background-color: #fff;display: flex;flex-direction: column;}.modal .header {line-height: 40px;padding: 0 10px;position: relative;font-size: 20px;background-color: #9668dc;color: #fff;border-top-left-radius: 4px;border-top-right-radius: 4px;}.modal .header i {font-style: normal;color: #fff;position: absolute;right: 15px;top: -2px;cursor: pointer;}.modal .body {text-align: center;padding: 10px;}.modal .footer {display: flex;justify-content: flex-end;padding: 10px;border-top: 1px solid #ccc;}.modal .footer a {padding: 3px 8px;background: #ccc;text-decoration: none;color: #fff;border-radius: 2px;margin-right: 10px;font-size: 14px;}.modal .footer a.submit {background-color: #369;}/* 输入框样式定义 */input[type="text"],input[type="password"] {width: 100%;padding: 5px;margin-top: 10px;}</style>
</head><body>
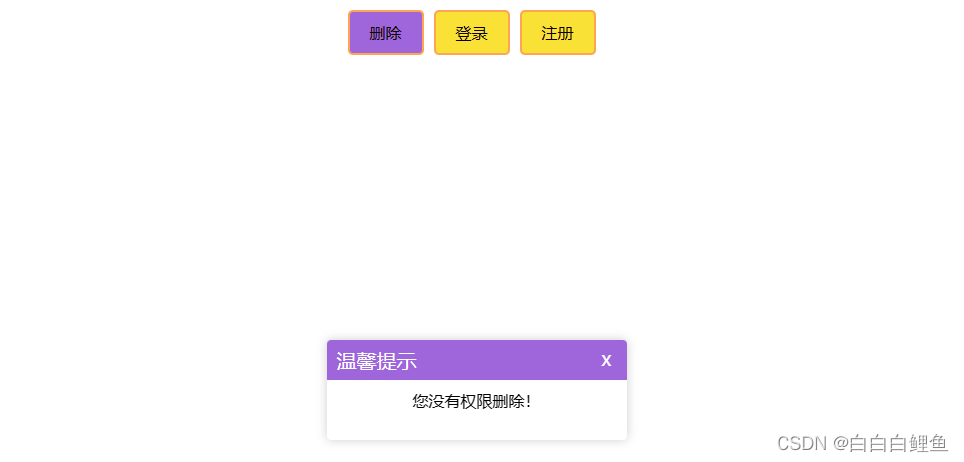
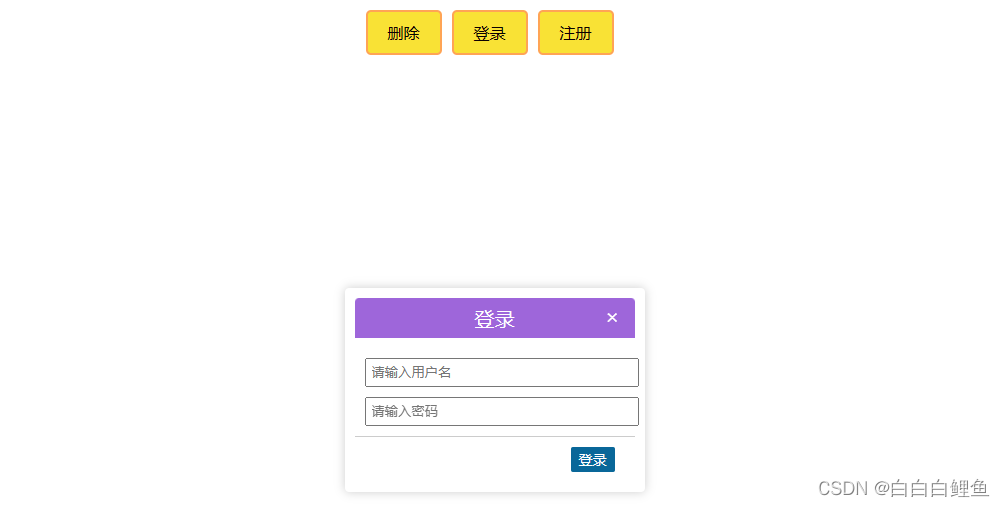
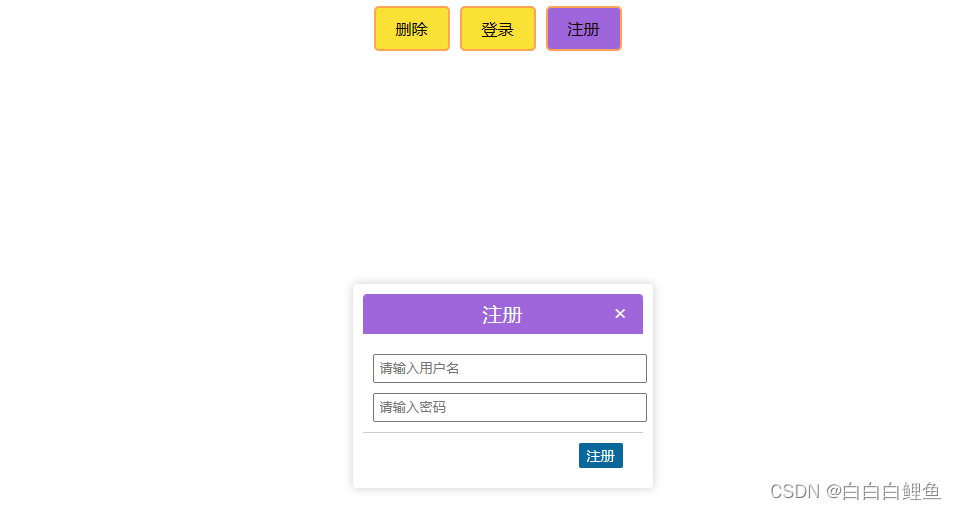
<div class="button-container"><button id="delete">删除</button><button id="login">登录</button><button id="register">注册</button>
</div><script>// 定义了一个构造函数 Modal,用于创建模态框对象。构造函数接受两个参数 title 和 message,并将它们作为模态框的标题和消息内容。function Modal(title = '', message = '') {// 公共的属性部分this.title = titlethis.message = message// 创建 modalBox 元素 因为盒子是公共的this.modalBox = document.createElement('div')this.modalBox.className = 'modal'// 通过 innerHTML 属性设置 modalBox 的内部 HTML 内容,其中包含了标题和消息内容this.modalBox.innerHTML = `<div class="header">${this.title} <i>x</i></div><div class="body">${this.message}</div>`}// 打开方法 挂载到模态框的构造函数原型身上Modal.prototype.open = function () {//在 Modal 的原型上定义了一个 open 方法,用于打开模态框。该方法会将 modalBox 添加到文档中,并添加一个关闭按钮的事件监听器。if (!document.querySelector('.modal')) {document.body.appendChild(this.modalBox)const closeButton = this.modalBox.querySelector('i')closeButton.addEventListener('click', () => {this.close()})}}// 在 Modal 的原型上定义了一个 close 方法,用于关闭模态框。该方法会将 modalBox 从文档中移除Modal.prototype.close = function () {document.body.removeChild(this.modalBox)}// 注册按钮点击处理函数document.querySelector('#register').addEventListener('click', () => {const modalContent = `<div class="header">注册 <i id="closeBtn">×</i></div><div class="body"><input type="text" id="username" placeholder="请输入用户名" /><input type="password" id="password" placeholder="请输入密码" /></div><div class="footer"><a class="submit" href="#">注册</a></div>`const m = new Modal('', modalContent)m.open()const closeBtn = m.modalBox.querySelector('#closeBtn')closeBtn.addEventListener('click', () => {m.close()})const submitBtn = m.modalBox.querySelector('.submit')submitBtn.addEventListener('click', () => {const usernameInput = m.modalBox.querySelector('#username')const passwordInput = m.modalBox.querySelector('#password')const username = usernameInput.value.trim()const password = passwordInput.value.trim()if (username && password) {// 在此处判断注册逻辑// 假设已注册alert('注册成功!请登录')m.close()} else {alert('请输入用户名和密码')}})})// 登录按钮点击处理函数document.querySelector('#login').addEventListener('click', () => {const modalContent = `<div class="header">登录 <i id="closeBtn">×</i></div><div class="body"><input type="text" id="username" placeholder="请输入用户名" /><input type="password" id="password" placeholder="请输入密码" /></div><div class="footer"><a class="submit" href="#">登录</a></div>`const m = new Modal('', modalContent)m.open()const closeBtn = m.modalBox.querySelector('#closeBtn')closeBtn.addEventListener('click', () => {m.close()})const submitBtn = m.modalBox.querySelector('.submit')submitBtn.addEventListener('click', () => {const usernameInput = m.modalBox.querySelector('#username')const passwordInput = m.modalBox.querySelector('#password')const username = usernameInput.value.trim()const password = passwordInput.value.trim()if (username && password) {// 在此处判断登录逻辑// 假设已注册且用户名密码匹配alert('登录通过')m.close()} else {alert('请输入用户名和密码')}})})// 删除按钮点击处理函数document.querySelector('#delete').addEventListener('click', () => {const m = new Modal('温馨提示', '您没有权限删除!')m.open()})
</script>
</body>
</html>注意:
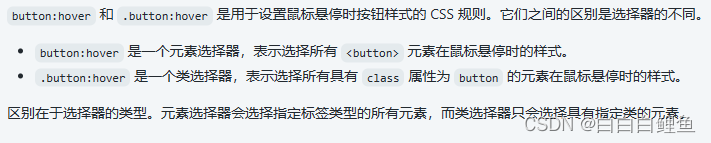
button:hover 的样式将应用于 <button> 元素,而 .button:hover 的样式将应用于具有 class="button" 的 <div> 元素。
四、继续优化和总结 🌕👍
当然,这段代码还可以继续优化,可以考虑以下几点:
-
使用模块化的方式组织代码:将样式和脚本分离成独立的文件,并使用模块化的方式加载和管理它们(就是不要写到一个HTML中)。
-
使用事件委托:将按钮点击事件委托给父元素,减少事件监听器的数量,提高性能。
-
简化代码逻辑:去除重复的代码段,优化逻辑判断,使代码更简洁易读。
-
使用常量替代魔法数字:将重复出现的数字定义为常量,提高代码可维护性。
于是,拆开优化后的代码如下(原功能不变):
HTML:
<!DOCTYPE html>
<html lang="en">
<head><meta charset="UTF-8"/><meta http-equiv="X-UA-Compatible" content="IE=edge"/><meta name="viewport" content="width=device-width, initial-scale=1.0"/><title>面向对象封装消息提示</title><link rel="stylesheet" href="css/styles.css">
</head><body>
<div class="button-container"><button id="delete">删除</button><button id="login">登录</button><button id="register">注册</button>
</div>
<script src="js/main.js" type="module"></script>
</body>
</html>
CSS:
@charset "UTF-8";
/* 按钮容器样式定义 */
.button-container {display: flex;justify-content: center;align-items: flex-start;margin-top: 20px;
}/* 按钮样式定义 */
button {background-color: #f3e330;color: #090000;margin-right: 10px;padding: 10px 20px;border: 2px solid #efa75a;cursor: pointer;border-radius: 5px;font-size: 16px;
}button:hover {background-color: #9668dc;
}/* 模态框样式定义 */
.modal {width: 300px;min-height: 100px;box-shadow: 0 0 10px rgba(0, 0, 0, 0.2);border-radius: 4px;position: fixed;z-index: 999;left: 50%;top: 50%;transform: translate3d(-50%, -50%, 0);background-color: #fff;display: flex;flex-direction: column;
}.modal .header {line-height: 40px;padding: 0 10px;position: relative;font-size: 20px;background-color: #9668dc;color: #fff;border-top-left-radius: 4px;border-top-right-radius: 4px;
}.modal .header i {font-style: normal;color: #fff;position: absolute;right: 15px;top: -2px;cursor: pointer;
}.modal .body {text-align: center;padding: 10px;
}.modal .footer {display: flex;justify-content: flex-end;padding: 10px;border-top: 1px solid #ccc;
}.modal .footer a {padding: 3px 8px;background: #ccc;text-decoration: none;color: #fff;border-radius: 2px;margin-right: 10px;font-size: 14px;
}.modal .footer a.submit {background-color: #369;
}input[type="text"],
input[type="password"] {width: 100%;padding: 5px;margin-top: 10px;
}
JS:
// 定义了一个构造函数 Modal,用于创建模态框对象
class Modal {constructor(title = '', message = '') {this.title = title;this.message = message;this.modalBox = document.createElement('div');this.modalBox.className = 'modal';this.modalBox.innerHTML = `<div class="header">${this.title} <i>x</i></div><div class="body">${this.message}</div>`;}open() {if (!document.querySelector('.modal')) {document.body.appendChild(this.modalBox);const closeButton = this.modalBox.querySelector('i');closeButton.addEventListener('click', () => {this.close();});}}close() {document.body.removeChild(this.modalBox);}
}// 注册、登录和删除按钮的事件监听器
const buttonContainer = document.querySelector('.button-container');buttonContainer.addEventListener('click', (event) => {const targetId = event.target.id;if (targetId === 'register') {showRegisterModal();} else if (targetId === 'login') {showLoginModal();} else if (targetId === 'delete') {showDeleteModal();}
});function showRegisterModal() {const modalContent = `<div class="header">注册 <i id="closeBtn">×</i></div><div class="body"><input type="text" id="username" placeholder="请输入用户名" /><input type="password" id="password" placeholder="请输入密码" /></div><div class="footer"><a class="submit" href="#">注册</a></div>`;const modal = new Modal('', modalContent);modal.open();const closeButton = modal.modalBox.querySelector('#closeBtn');closeButton.addEventListener('click', () => {modal.close();});const submitButton = modal.modalBox.querySelector('.submit');submitButton.addEventListener('click', () => {const usernameInput = modal.modalBox.querySelector('#username');const passwordInput = modal.modalBox.querySelector('#password');const username = usernameInput.value.trim();const password = passwordInput.value.trim();if (username && password) {// 在此处判断注册逻辑// 假设已注册alert('注册成功!请登录');modal.close();} else {alert('请输入用户名和密码');}});
}function showLoginModal() {const modalContent = `<div class="header">登录 <i id="closeBtn">×</i></div><div class="body"><input type="text" id="username" placeholder="请输入用户名" /><input type="password" id="password" placeholder="请输入密码" /></div><div class="footer"><a class="submit" href="#">登录</a></div>`;const modal = new Modal('', modalContent);modal.open();const closeButton = modal.modalBox.querySelector('#closeBtn');closeButton.addEventListener('click', () => {modal.close();});const submitButton = modal.modalBox.querySelector('.submit');submitButton.addEventListener('click', () => {const usernameInput = modal.modalBox.querySelector('#username');const passwordInput = modal.modalBox.querySelector('#password');const username = usernameInput.value.trim();const password = passwordInput.value.trim();if (username && password) {// 在此处判断登录逻辑// 假设已注册且用户名密码匹配alert('登录通过');modal.close();} else {alert('请输入用户名和密码');}});
}function showDeleteModal() {const modal = new Modal('温馨提示', '您没有权限删除!');modal.open();
}
关于这段 JavaScript 代码优化后的逻辑总体上是一个模态框(Modal)的实现。
Modal是一个构造函数,用于创建模态框对象。构造函数接受两个参数:title(标题,默认为空字符串)和message(消息,默认为空字符串)。- 构造函数中,首先创建了一个
div元素作为模态框的容器,并设置其类名为'modal',然后通过设置innerHTML属性来定义模态框的内容,包括标题和消息。 open方法用于打开模态框。如果页面上没有其他模态框存在,则将当前模态框添加到body元素中。同时,该方法会添加一个点击事件监听器到关闭按钮上,点击关闭按钮时调用close方法关闭模态框。close方法用于关闭模态框。它通过从body元素中移除模态框元素来实现。
接下来是注册、登录和删除按钮的事件监听器:
- 首先,通过
querySelector方法获取到按钮容器元素buttonContainer。 - 然后,给
buttonContainer添加一个 click 事件监听器,在点击事件发生时执行对应的函数。 - 在点击事件处理函数中,根据点击的按钮的 id 执行相应的函数。
以下是各个函数的功能:
showRegisterModal函数用于显示注册模态框。首先,定义了模态框的内容modalContent,其中包含了输入框和注册按钮。然后,创建了一个新的模态框对象modal,并调用open方法打开模态框。同时,给关闭按钮和注册按钮添加了点击事件监听器。在注册按钮的点击事件处理函数中,获取到用户名和密码输入框的值,并进行判断。如果用户名和密码都不为空,则假设注册成功,并弹出提示框,然后关闭模态框;否则,弹出请填写用户名和密码的提示框。showLoginModal函数用于显示登录模态框,逻辑与showRegisterModal函数类似。showDeleteModal函数用于显示删除模态框。它创建了一个新的模态框对象modal,并调用open方法打开模态框。但是该模态框的内容固定为 "您没有权限删除!",无需添加关闭按钮和其他功能。
总体来说,这段代码实现了一个基本的模态框组件,并通过事件监听器实现了打开不同类型模态框的功能。
五、需要注意的 ❌
在上面的JS代码中,document.body.appendChild(this.modalBox) 用于将模态框元素 this.modalBox 添加到文档的 <body> 元素中作为子节点。
而 document.body.append(this.modalBox) 是 Element 接口中的方法,可以将一个或多个节点或文本追加至父节点的子节点列表的末尾。它与 appendChild 方法功能类似,但可以同时添加多个节点。
在这个特定的情况下,因为只有一个模态框元素需要被添加到 <body> 元素中,所以使用 appendChild 或 append 都是可以的。它们的区别在于 append 方法可以一次性添加多个节点,而 appendChild 只能添加单个节点。
所以,完全可以将 document.body.appendChild(this.modalBox) 替换为 document.body.append(this.modalBox),效果是一样的。