Mybatis 知识点
1.1 Mybatis 简介
1.1.1 什么是 Mybatis
- Mybatis 是一款优秀的持久层框架
- 支持定制化 SQL、存储过程及高级映射
- Mybatis 几乎避免了所有的 JDBC 代码和手动设置参数以及获取结果集
- MyBatis 可以使用简单的 XML 或注解来配置和映射原生类型、接口和 Java 的 POJO 为数据库中的记录
1.1.2 为什么需要 Mybatis
- 更方便的将数据存入到数据库中
- 传统的 JDBC 代码太复杂。简化,自动化
- 减少了50%以上的代码量,比JDBC更简洁
- Mybatis 的优点
- 简单易学
- 灵活
- sql 和代码分离,提高了可维护性
- 提供映射标签,支持对象与数据库的 orm 字段关系映射
- 提供对象关系映射标签,支持对象关系组建维护
- 提供 xml 标签,支持编写动态 sql
1.1.3 如何获取 Mybatis
maven 仓库获取
- 可直接用以下代码引入自己的 maven 仓库中
<!-- https://mvnrepository.com/artifact/org.mybatis/mybatis -->
<dependency><groupId>org.mybatis</groupId><artifactId>mybatis</artifactId><version>3.5.13</version>
</dependency>
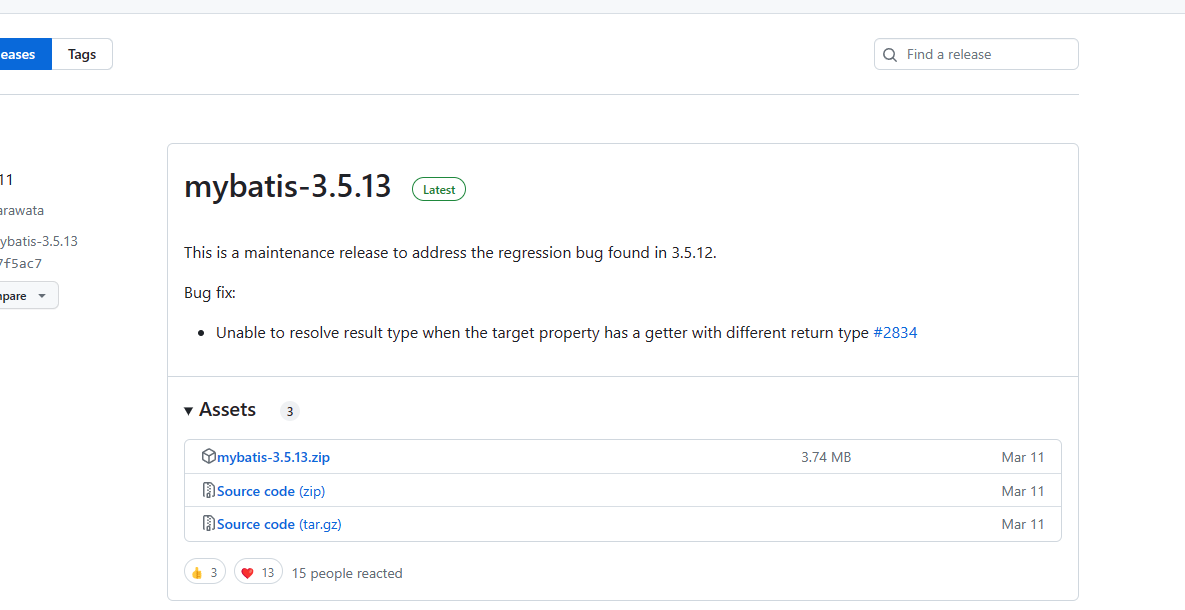
Github 获取源码
- 下载地址:Releases · mybatis/mybatis-3 (github.com)
中文文档
- 可以帮助你更好的了解 Mybatis
- 文档地址:mybatis – MyBatis 3 | 入门
1.2 第一个 Mybatis 程序
编写第一个 Mybatis 程序首先需要有一个具体步骤:
搭建环境–> 导入 Mybatis–>编写代码–>测试
1.2.1 搭建环境
- 新建数据库,随便添加一张表,添加一些数据,便于测试
SET NAMES utf8mb4;
SET FOREIGN_KEY_CHECKS = 0;-- ----------------------------
-- Table structure for user
-- ----------------------------
DROP TABLE IF EXISTS `user`;
CREATE TABLE `user`  (`userId` int(11) NOT NULL AUTO_INCREMENT COMMENT '用户id',`userName` varchar(255) CHARACTER SET utf8 COLLATE utf8_general_ci NOT NULL COMMENT '用户名称',`userAge` varchar(255) CHARACTER SET utf8 COLLATE utf8_general_ci NOT NULL COMMENT '用户年龄',PRIMARY KEY (`userId`) USING BTREE
) ENGINE = InnoDB AUTO_INCREMENT = 4 CHARACTER SET = utf8 COLLATE = utf8_general_ci ROW_FORMAT = Dynamic;-- ----------------------------
-- Records of user
-- ----------------------------
INSERT INTO `user` VALUES (1, '张三', '12');
INSERT INTO `user` VALUES (2, '李四', '15');
INSERT INTO `user` VALUES (3, '王五', '18');SET FOREIGN_KEY_CHECKS = 1;- 创建一个 maven 项目
- 导入三个 maven依赖
- mysql驱动
- mybatis
- junit
<dependencies><!-- mybatis --><dependency><groupId>org.mybatis</groupId><artifactId>mybatis</artifactId><version>3.5.13</version></dependency><!-- mysql 驱动 --><dependency><groupId>mysql</groupId><artifactId>mysql-connector-java</artifactId><version>8.0.33</version></dependency><!-- junit --><dependency><groupId>junit</groupId><artifactId>junit</artifactId><version>4.13.2</version><scope>test</scope></dependency></dependencies>
1.2.2 编写 mybatis 的核心配置文件
- 在 resources 文件夹新建一个名为
mybatis-config.xml的 xml 文件

- 将以下代码粘贴进核心配置文件
<?xml version="1.0" encoding="UTF-8" ?>
<!DOCTYPE configurationPUBLIC "-//mybatis.org//DTD Config 3.0//EN""https://mybatis.org/dtd/mybatis-3-config.dtd">
<configuration><environments default="development"><environment id="development"><transactionManager type="JDBC"/><dataSource type="POOLED"><property name="driver" value="${driver}"/><property name="url" value="${url}"/><property name="username" value="${username}"/><property name="password" value="${password}"/></dataSource></environment></environments><mappers><mapper resource="org/mybatis/example/BlogMapper.xml"/></mappers>
</configuration>
- 以上
property标签中的 value 值,就是我们在 JDBC 中编写配置文件对应的 - 例如 driver 代表驱动类的位置等等
- 下面按照我自己的项目中的写法,示例
<?xml version="1.0" encoding="UTF-8" ?>
<!DOCTYPE configurationPUBLIC "-//mybatis.org//DTD Config 3.0//EN""https://mybatis.org/dtd/mybatis-3-config.dtd">
<configuration><environments default="development"><environment id="development"><transactionManager type="JDBC"/><dataSource type="POOLED"><property name="driver" value="com.mysql.cj.jdbc.Driver"/><property name="url" value="jdbc:mysql://localhost:3306/mybatis?TRUE&useUnicode=TRUE&characterEncoding=UTF-8&serverTimezone=GMT%2B8"/><property name="username" value="root"/><property name="password" value="root"/></dataSource></environment></environments><mappers><mapper resource="org/mybatis/example/BlogMapper.xml"/></mappers>
</configuration>
1.2.3 编写 Mybatis 工具类
每个 Mybatis 的应用都是一个以 SqlSessionFactory 的实例为核心的
SqlSessionFactory 可以通过 SqlSessionFactoryBuilder 来获取
**而 SqlSessionFactoryBuilder 可以从 XML 配置文件来构建出 SqlSessionFactory **
从 SqlSessionFactory 可以获取 SqlSession 实例
通过 SqlSession 可以直接执行已经映射的 SQL 语句
- 创建一个 dao 包和 utils 工具包
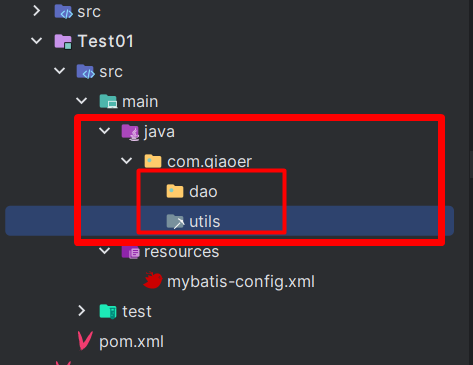
-
在 utils 包下创建一个工具类 MybatisUtils
-
编写 MybatisUtils 类,获取 SqlSessionFactory 实例
package com.qiaoer.utils;import org.apache.ibatis.io.Resources;
import org.apache.ibatis.session.SqlSessionFactory;
import org.apache.ibatis.session.SqlSessionFactoryBuilder;import java.io.IOException;
import java.io.InputStream;public class MybatisUtils {private static SqlSessionFactory sqlSessionFactory;static {//获取资源String resource = "mybatis-config.xml";InputStream inputStream = null;try {inputStream = Resources.getResourceAsStream(resource);sqlSessionFactory = new SqlSessionFactoryBuilder().build(inputStream);} catch (IOException e) {throw new RuntimeException(e);}}
}
-
String resource的值是刚刚编写的 resource 文件夹下的 xml 文件路径 -
通过已经获取的 SqlSessionFactory 实例,来获取 SqlSession 实例
-
编写 getSqlSession() 方法,来获取 SqlSession 实例
package com.qiaoer.utils;import org.apache.ibatis.io.Resources;
import org.apache.ibatis.session.SqlSession;
import org.apache.ibatis.session.SqlSessionFactory;
import org.apache.ibatis.session.SqlSessionFactoryBuilder;import java.io.IOException;
import java.io.InputStream;public class MybatisUtils {private static SqlSessionFactory sqlSessionFactory;static {//获取资源String resource = "mybatis-config.xml";InputStream inputStream = null;try {inputStream = Resources.getResourceAsStream(resource);sqlSessionFactory = new SqlSessionFactoryBuilder().build(inputStream);} catch (IOException e) {throw new RuntimeException(e);}}//获取 SqlSession 实例public static SqlSession getSqlSession(){return sqlSessionFactory.openSession();}
}
- 获取 SqlSession 实例后,可以使用 SqlSession 中的很多方法来对数据库进行操作
1.2.4 测试,编写代码
- 编写实体类
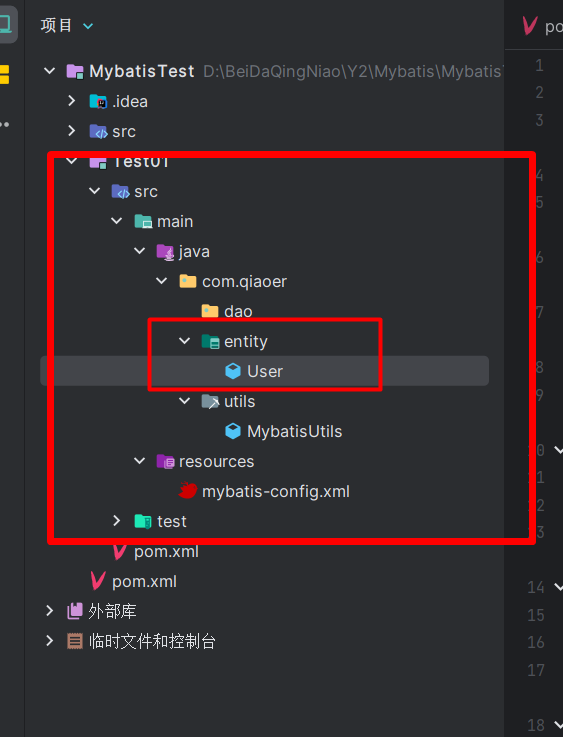
- User 实体类代码
package com.qiaoer.entity;public class User {private int userId;private String userName;private String userAge;public int getUserId() {return userId;}public void setUserId(int userId) {this.userId = userId;}public String getUserName() {return userName;}public void setUserName(String userName) {this.userName = userName;}public String getUserAge() {return userAge;}public void setUserAge(String userAge) {this.userAge = userAge;}public User() {}public User(int userId, String userName, String userAge) {this.userId = userId;this.userName = userName;this.userAge = userAge;}@Overridepublic String toString() {return "User{" +"userId=" + userId +", userName='" + userName + '\'' +", userAge='" + userAge + '\'' +'}';}
}- 编写 dao 接口
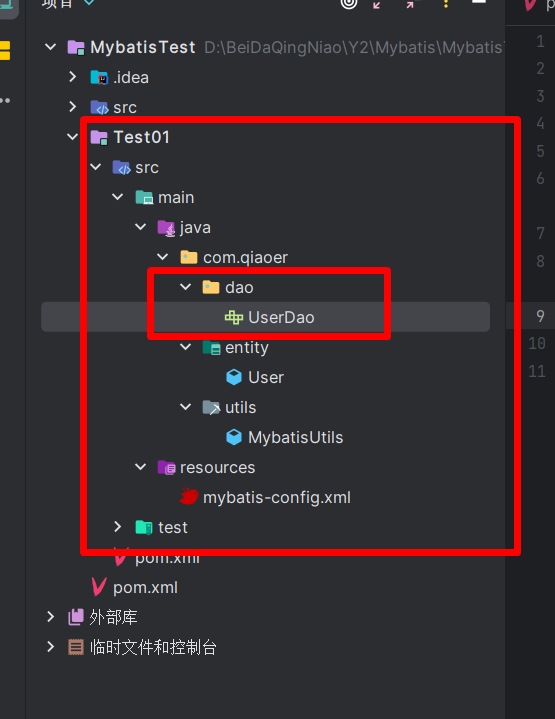
- UserDao 接口代码
package com.qiaoer.dao;import com.qiaoer.entity.User;import java.util.List;public interface UserDao {//获取所有用户List<User> getUsers();
}- 编写 dao 的接口实现类
- 在 Mybatis 中,不需要在编写接口的实现类,只需要编写一个 xml 文档即可
- 由原来的 UserDaoImpl 转换为一个 UserMapper.xml 文件
<?xml version="1.0" encoding="UTF-8" ?>
<!DOCTYPE mapperPUBLIC "-//mybatis.org//DTD Mapper 3.0//EN""https://mybatis.org/dtd/mybatis-3-mapper.dtd">
<mapper namespace="com.qiaoer.dao.UserDao">
<!-- SQL 语句查询--><select id="selectBlog" resultType="com.qiaoer.entity.User">select * from user</select>
</mapper>
-
其中
<mapper namespace="com.qiaoer.dao.UserDao">中的namespace的值对应的是要实现的接口类 -
<select id="selectBlog" resultType="com.qiaoer.entity.User">中id的值为对应的方法名 -
resultType属性表示返回一个结果 -
resultType的值为返回值类型的返回类型对应的实体类 -
编写完 UserMapper.xml 后,需要在 Mybatis 的核心配置文件
mybatis-config.xml进行 Mapper 注册
<?xml version="1.0" encoding="UTF-8" ?>
<!DOCTYPE configurationPUBLIC "-//mybatis.org//DTD Config 3.0//EN""https://mybatis.org/dtd/mybatis-3-config.dtd">
<configuration><environments default="development"><environment id="development"><transactionManager type="JDBC"/><dataSource type="POOLED"><property name="driver" value="com.mysql.cj.jdbc.Driver"/><property name="url" value="jdbc:mysql://localhost:3306/mybatis?TRUE&useUnicode=TRUE&characterEncoding=UTF-8&serverTimezone=GMT%2B8"/><property name="username" value="root"/><property name="password" value="root"/></dataSource></environment></environments><mappers><mapper resource="com/qiaoer/dao/UserMapper.xml"/></mappers>
</configuration>
- 这段代码中
<mappers>则表现 Mapper 注册 - 每一个 Mapper.xml 文件都需要进行注册
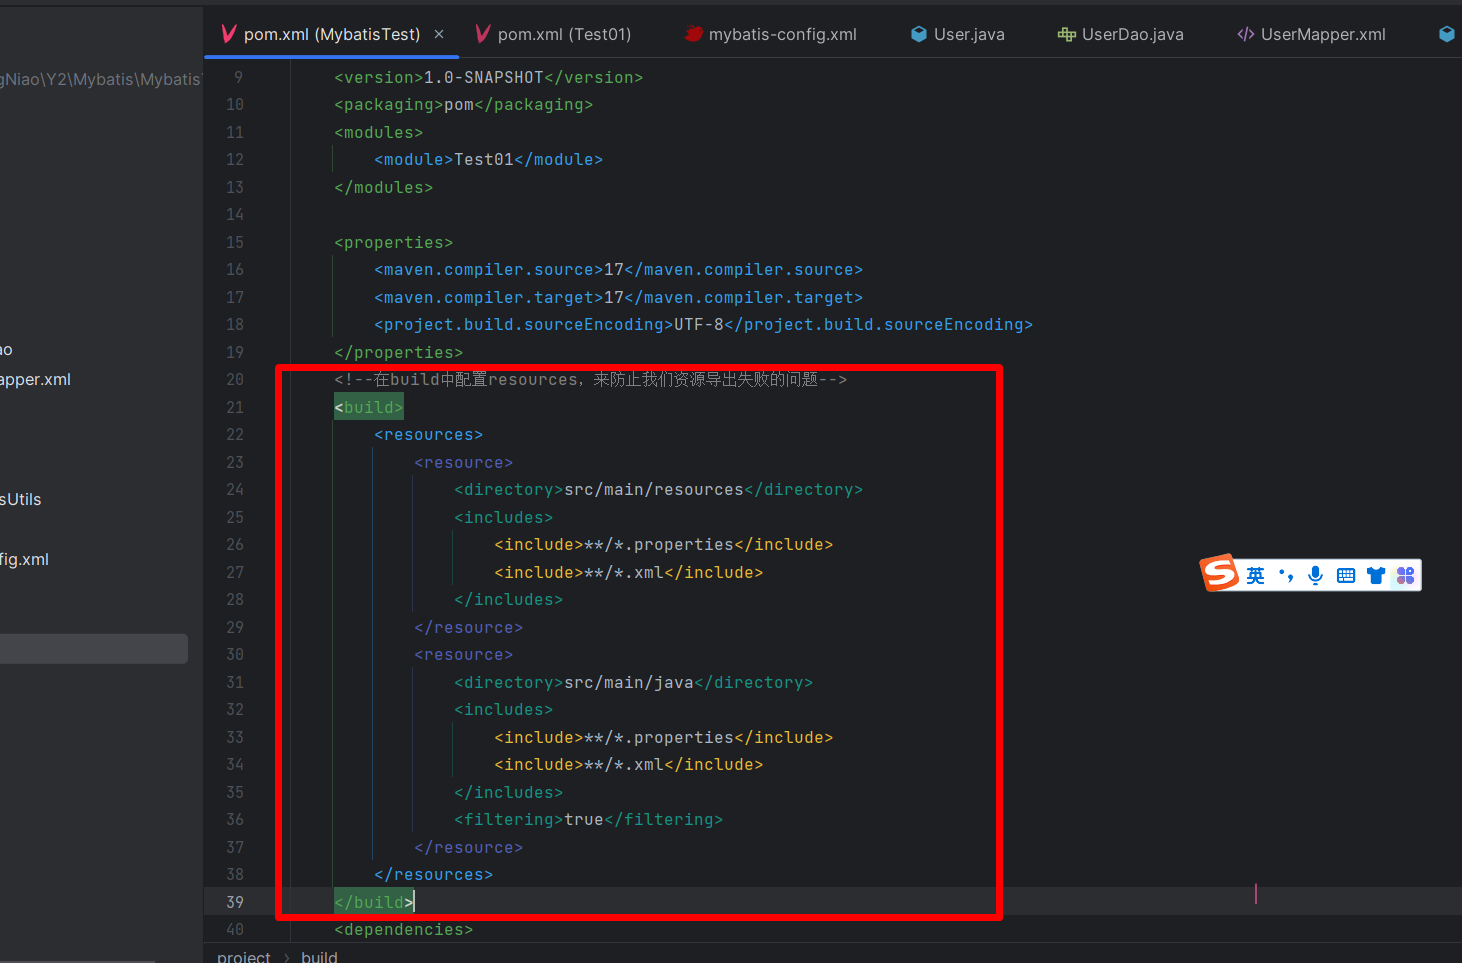
resource属性的值就是对应的 Mapper.xml 文件路径- 但是这样也存在一定的 资源过滤问题,可能会导致你填写的 Mapper.xml 路径找不到
- **因此需要在我们的 maven 中的 build 中配置 resources 来防止资源导出失败的问题 **
- 将以下代码赋值到自己的 maven 中即可
<!--在build中配置resources,来防止我们资源导出失败的问题--><build><resources><resource><directory>src/main/resources</directory><includes><include>**/*.properties</include><include>**/*.xml</include></includes></resource><resource><directory>src/main/java</directory><includes><include>**/*.properties</include><include>**/*.xml</include></includes><filtering>true</filtering></resource></resources></build>
- 测试代码
import com.qiaoer.dao.UserDao;
import com.qiaoer.entity.User;
import com.qiaoer.utils.MybatisUtils;
import org.apache.ibatis.session.SqlSession;
import java.util.List;public class Test01 {public static void main(String[] args) {//第一步,获取 SqlSession 对象SqlSession sqlSession= MybatisUtils.getSqlSession();//方法一:通过 SqlSession 对象获取实现类System.out.println("=====方法1=====");UserDao mapper = sqlSession.getMapper(UserDao.class);List<User> users = mapper.getUsers();for (User user:users) {System.out.println(user);}//直接获取结果List<User> UserLists = sqlSession.selectList("com.qiaoer.dao.UserDao.getUsers");System.out.println("=====方法2=====");for (User user:UserLists) {System.out.println(user);}//关闭 SqlSessionsqlSession.close();}
}
1.3 Mybatis 中 CRUD (增删改查)的标签介绍
在 Mybatis 中编写dao层的实现类的 Mapper.xml 文件中,对增删改查的标签进行介绍
1.3.1 select 标签
- select 标签主要作用域 sql 语句的查询
- select 标签语法
<select id="对应方法" resultType="方法的返回值类型" parameterType="方法的参数类型">查询的 SQL 语句</select>
- **id:**对应的 namespace 所对应的 dao 层接口类中的方法名
- **resultType:**Sql 语句执行的返回值
- **parameterType:**参数类型
- 若 sql 语句中的条件需要参数来进行判读,则使用 #{参数名}
- 示例如下,若需要通过方法传递过来的参数 id,来查询数据
<mapper namespace="com.qiaoer.dao.UserDao">
<!-- SQL 语句查询--><select id="selectBlog" resultType="com.qiaoer.entity.User" parameterType="int">select * from user where userId=#{id}</select>
</mapper>
1.3.2 insert 标签
- insert 标签主要作用域 sql 语句的增加数据
- insert 标签语法
<insert id="对应方法" parameterType="方法的参数类型">增加的 SQL 语句</insert>
- 当我们的参数是一个对象时,在 #{} 当中直接写对象的属性名即可
- 示例
<insert id="addUser" parameterType="com.qiaoer.entity.User">insert into user (userName, userAge) values (#{userName},#{userAge});
</insert>
-
其中
#{userName},#{userAge}两个均是 User 对象的属性名 -
==注意:==当我们执行 SQL 语句的增删改时,都需要开启 SQL 的提交事务,否则并不会实际添加
-
开启提交事务使用 SqlSession 中的 commit() 方法
-
代码示例
import com.qiaoer.dao.UserDao;
import com.qiaoer.entity.User;
import com.qiaoer.utils.MybatisUtils;
import org.apache.ibatis.session.SqlSession;
import java.util.List;public class Test01 {public static void main(String[] args) {//第一步,获取 SqlSession 对象SqlSession sqlSession= MybatisUtils.getSqlSession();UserDao mapper = sqlSession.getMapper(UserDao.class);//执行增加用户mapper.addUser(new User(-1,"你好","15"));//查询所有用户List<User> users = mapper.getUsers();for (User user : users) {System.out.println(user);}//提交事务sqlSession.commit();//关闭 SqlSessionsqlSession.close();}
}
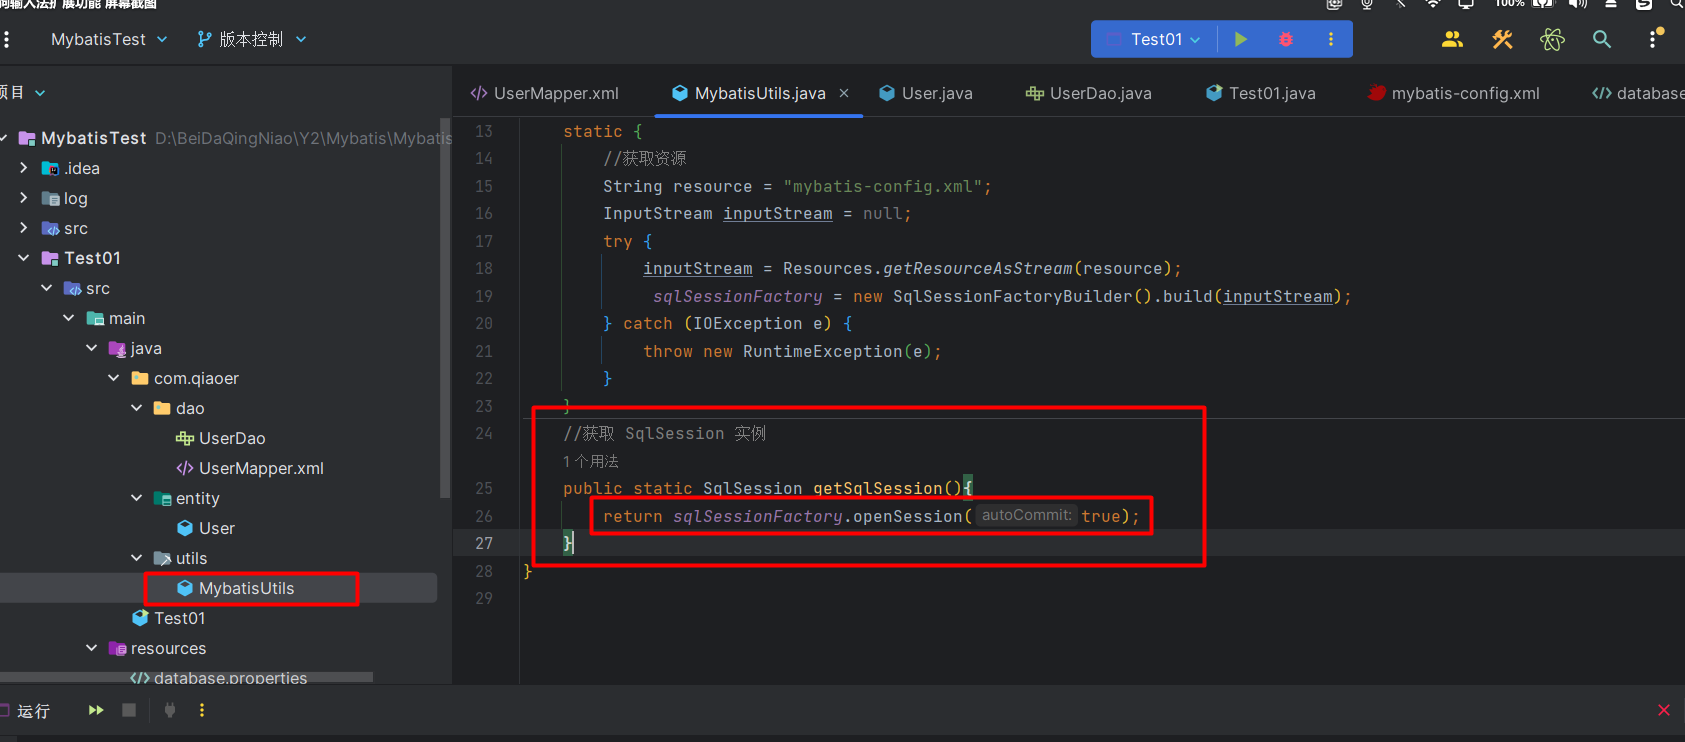
-
也可以使用自动提交事务
-
将我们工具类当中,获取 SqlSession 实例的 openSession() 方法,给个 true 参数即可开启自动提交事务
1.3.3 update 标签
- update 标签主要作用域 sql 语句的修改数据
- update 标签语法
<insert id="对应方法" parameterType="方法的参数类型">修改的 SQL 语句</insert>
- 它的参数设置与增加一样
- 执行完毕也需要进行 SQL 的提交事务
- Mapper.xml 示例
<?xml version="1.0" encoding="UTF-8" ?>
<!DOCTYPE mapperPUBLIC "-//mybatis.org//DTD Mapper 3.0//EN""https://mybatis.org/dtd/mybatis-3-mapper.dtd">
<mapper namespace="com.qiaoer.dao.UserDao"><update id="updateUser" parameterType="com.qiaoer.entity.User">update user set  userName=#{userName}  where userId=#{userId};</update>
</mapper>
- 代码示例
import com.qiaoer.dao.UserDao;
import com.qiaoer.entity.User;
import com.qiaoer.utils.MybatisUtils;
import org.apache.ibatis.session.SqlSession;
import java.util.List;public class Test01 {public static void main(String[] args) {//第一步,获取 SqlSession 对象SqlSession sqlSession= MybatisUtils.getSqlSession();UserDao mapper = sqlSession.getMapper(UserDao.class);//执行修改 id为1的用户mapper.updateUser(new User(1,"Qiaoer","15"));//查询所有用户List<User> users = mapper.getUsers();for (User user : users) {System.out.println(user);}//提交事务sqlSession.commit();//关闭 SqlSessionsqlSession.close();}
}
1.3.3 delete 标签
- delete标签主要作用域 sql 语句的修改数据
- delete标签语法
<delete id="对应方法" parameterType="方法的参数类型">删除的 SQL 语句</delete>
- 增删改的操作基本一致
1.3.4 多参数传递 Map
- 当我们的 sql 需要多个参数时,而这些参数并不只单单包含某个实体类,可以使用 Map 来传递参数
- Map 传递参数,取值时直接使用 key 值来取出 value 值
- 示例,在 dao 层接口类中,编写方法,通过用户年龄及用户姓名,查询用户
package com.qiaoer.dao;import com.qiaoer.entity.User;import java.util.List;
import java.util.Map;
import java.util.Objects;public interface UserDao {//通过用户年龄,用户姓名,查询用户List<User> getUserByUserAgeAndUserName(Map<String, Object> map);
}- 在 Mapper.xml 中编写对应的生成实现类标签
<?xml version="1.0" encoding="UTF-8" ?>
<!DOCTYPE mapperPUBLIC "-//mybatis.org//DTD Mapper 3.0//EN""https://mybatis.org/dtd/mybatis-3-mapper.dtd">
<mapper namespace="com.qiaoer.dao.UserDao"><select id="getUserByUserAgeAndUserName" resultType="com.qiaoer.entity.User" parameterType="map">select * from user where userAge=#{userAge} and userName=#{userName}</select>
</mapper>
- 其中
#{userAge}和#{userName}都属于 map 的 key 值 - 编写测试类,调用方法
import com.qiaoer.dao.UserDao;
import com.qiaoer.entity.User;
import com.qiaoer.utils.MybatisUtils;
import org.apache.ibatis.session.SqlSession;import java.util.HashMap;
import java.util.List;
import java.util.Map;
import java.util.Objects;public class Test01 {public static void main(String[] args) {//获取 SqlSession 对象SqlSession sqlSession=MybatisUtils.getSqlSession();//获取实现类UserDao userDao=sqlSession.getMapper(UserDao.class);//创建参数 mapMap<String, Object> map=new HashMap<String, Object>();map.put("userAge",15);map.put("userName","Qiaoer");//调用查询方法List<User> userByUserAgeAndUserName = userDao.getUserByUserAgeAndUserName(map);//输出结果for (User user : userByUserAgeAndUserName) {System.out.println(user);}//提交事务sqlSession.commit();//关闭 SqlSessionsqlSession.close();}
}
1.4 配置解析
1.4.1 核心配置文件
- 核心配置文件一般官方命名为:
mybatis-config.xml - MyBatis 的配置文件包含了会深深影响 MyBatis 行为的设置和属性信息
- 核心配置文件的主要结构
- configuration(配置)
- properties(属性)
- settings(设置)
- typeAliases(类型别名)
- typeHandlers(类型处理器)
- objectFactory(对象工厂)
- plugins(插件)
- environments(环境配置)
- environment(环境变量)
- transactionManager(事务管理器)
- dataSource(数据源)
- databaseIdProvider(数据库厂商标识)
- mappers(映射器)
1.4.2 environments(环境配置)
- MyBatis 可以配置成适应多种环境
- 但是一次只可以选择一种环境
- 示例
<?xml version="1.0" encoding="UTF-8" ?>
<!DOCTYPE configurationPUBLIC "-//mybatis.org//DTD Config 3.0//EN""https://mybatis.org/dtd/mybatis-3-config.dtd">
<configuration><environments default="test"><environment id="development"><transactionManager type="JDBC"/><dataSource type="POOLED"><property name="driver" value="com.mysql.cj.jdbc.Driver"/><property name="url" value="jdbc:mysql://localhost:3306/mybatis?TRUE&useUnicode=TRUE&characterEncoding=UTF-8&serverTimezone=GMT%2B8"/><property name="username" value="root"/><property name="password" value="root"/></dataSource></environment><environment id="test"><transactionManager type="JDBC"/><dataSource type="POOLED"><property name="driver" value="com.mysql.cj.jdbc.Driver"/><property name="url" value="jdbc:mysql://localhost:3306/mybatis?TRUE&useUnicode=TRUE&characterEncoding=UTF-8&serverTimezone=GMT%2B8"/><property name="username" value="root"/><property name="password" value="root"/></dataSource></environment></environments><mappers><mapper resource="com/qiaoer/dao/UserMapper.xml"/></mappers>
</configuration>
-
在上方的
<environments></environments>标签内,<environment></environment>标签代表不同的环境 -
environment标签的属性 id,则对应的是自己的环境名称 -
environments标签的 属性 default,则表示用户要选择哪个环境,与environment标签的属性 id 的值对应 -
例如,上方示例中,我的
environments标签的属性 default 的值为 test ,则代表我选择了 环境<environment id="test"> -
<transactionManager/>标签为事务管理器- 在 MyBatis 中有两种类型的事务管理器(也就是 type=“[JDBC|MANAGED]”)
- 只需记住 MyBatis 的默认的事务管理器为 JDBC 即可
-
<dataSource></dataSource>标签为数据源- 大多数 MyBatis 应用程序会按示例中的例子来配置数据源。虽然数据源配置是可选的,但如果要启用延迟加载特性,就必须配置数据源
- 有三种内建的数据源类型(也就是 type=“[UNPOOLED|POOLED|JNDI]”)
- MyBatis 的默认的数据源类型为 POOLED
1.4.3 属性(properties)
- 可以通过 properties 标签来应用外部的配置文件
- 这些属性可以在外部进行配置,并可以进行动态替换
- 示例,编写一个 配置文件,放入 resources 资源文件下
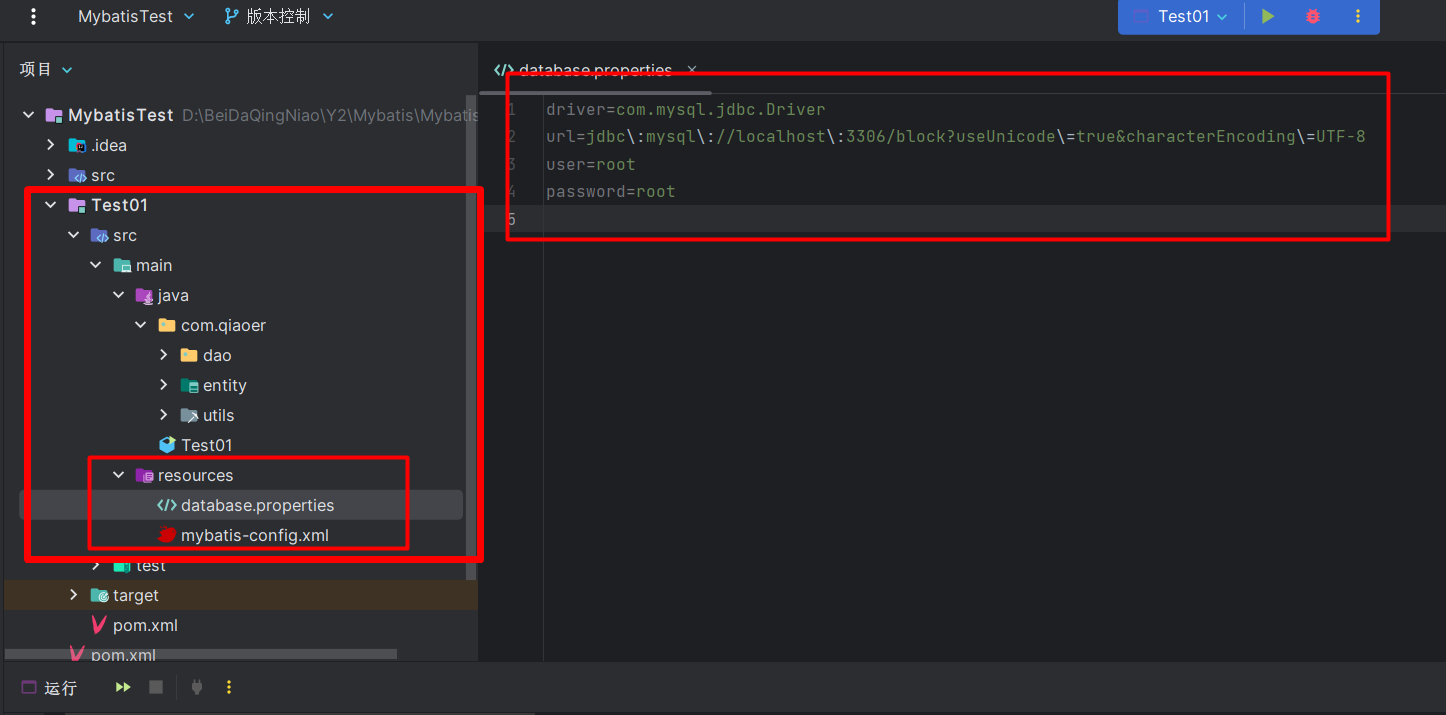
- 在 核心配置文件中引入外部配置文件
- 通过
<properties></properties>标签引入 <properties></properties>必须放在<configuration></configuration>标签内部的最顶部- 示例
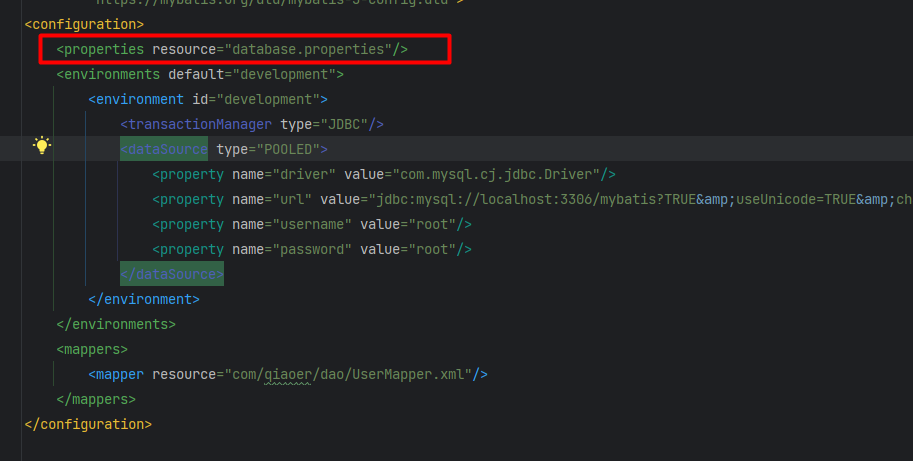
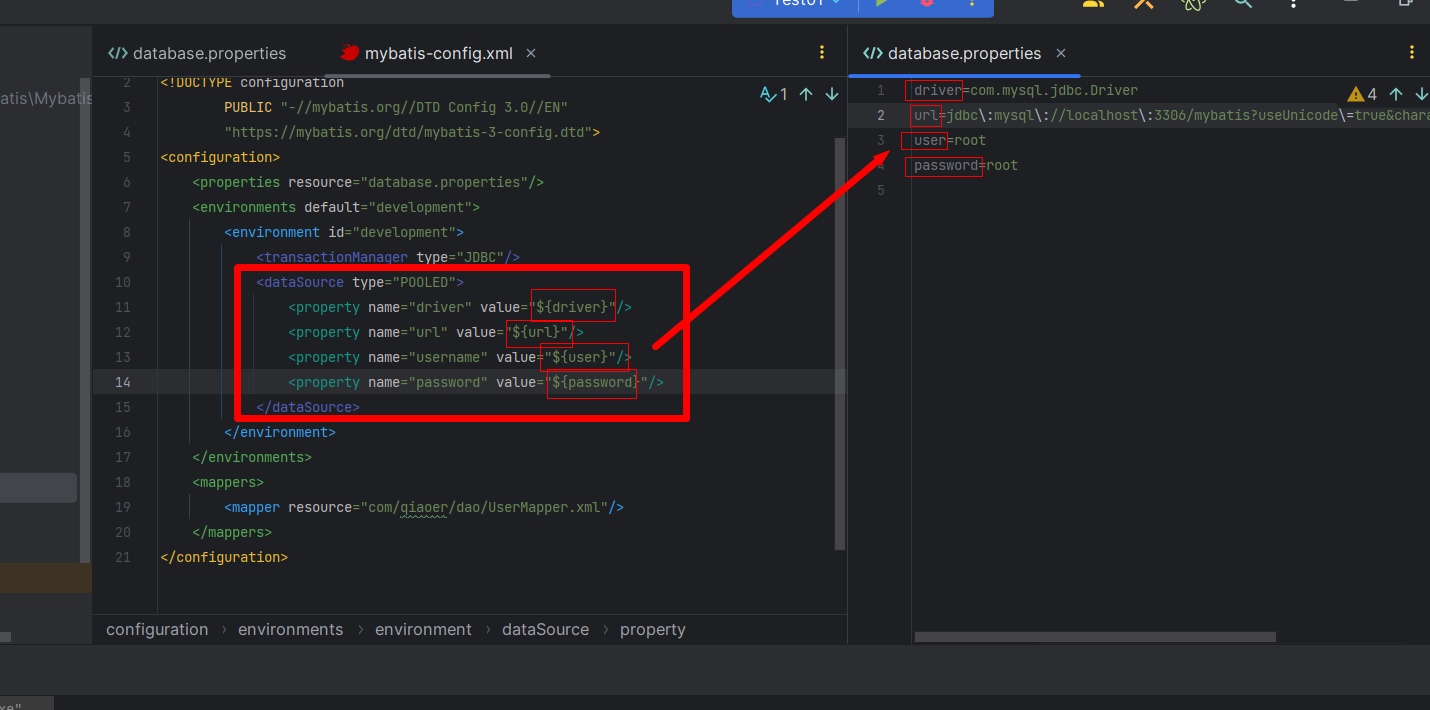
<properties></properties>标签的 resource 属性则代表配置文件的路径- 因为引入了外部配置文件,所以在下方的
<dataSource>标签中,可以使用配置文件中的键来调用 - 设置好的属性可以在整个配置文件中用来替换需要动态配置的属性值,示例
<properties></properties>标签内也可以写入配置信息- 示例
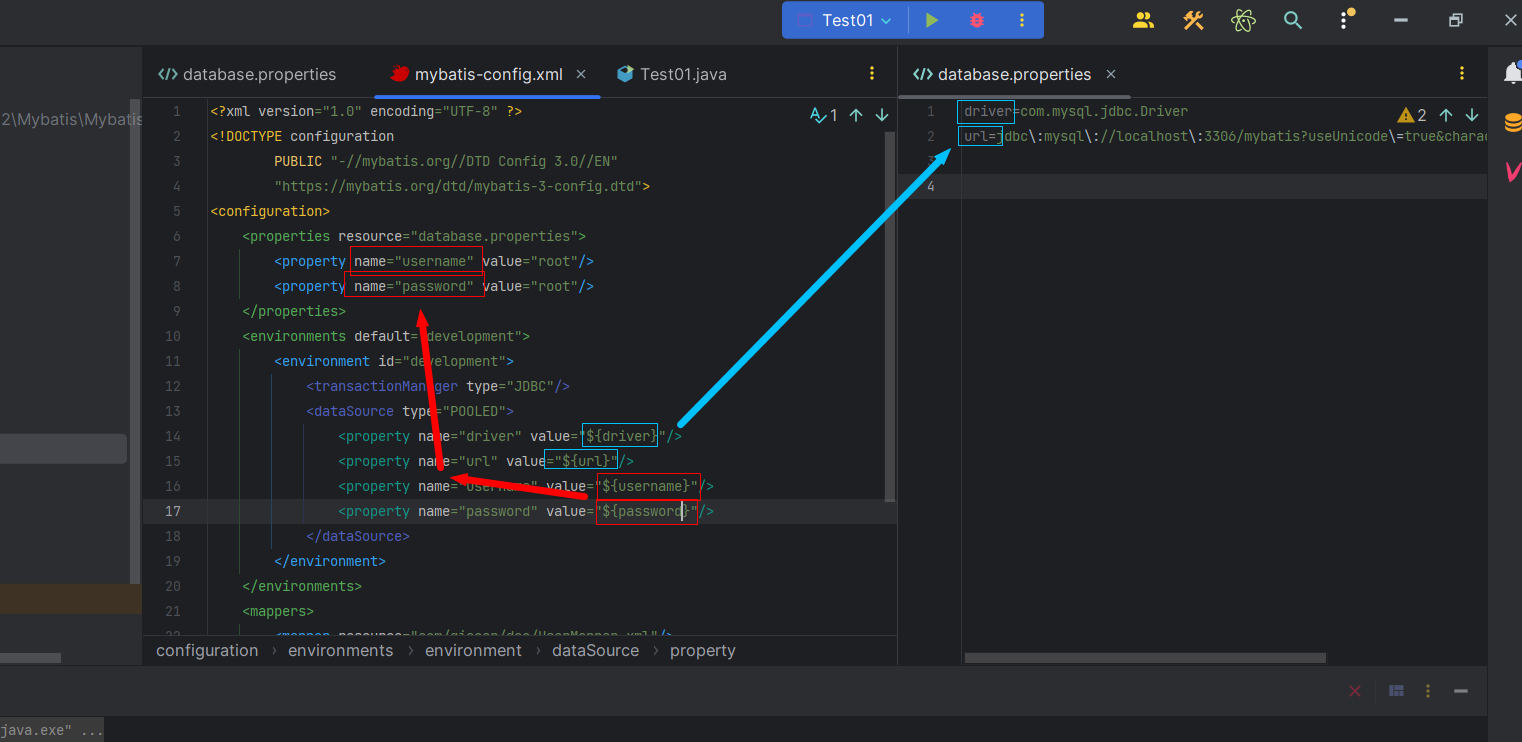
<properties></properties>标签内的子元素和外部配置文件 之间的顺序存在一个优先级顺序- 如果两个都存在同样的键,那么会使用外部的配置文件当中的键对应的值
1.4.4 类型别名 typeAliases
- 类型别名可为 Java 类型设置一个缩写名字。 它仅用于 XML 配置,意在降低冗余的全限定类名书写
- 当我们引用其他类的时候,需要写很长的包名
- 而预先为他设置好别名,直接填写别名也是可以的
- 别名在
<typeAliases/typeAliases>标签中的<typeAlias/>标签设置 <typeAliases></typeAliases>标签位于<configuration></configuration>标签的第三位- 示例
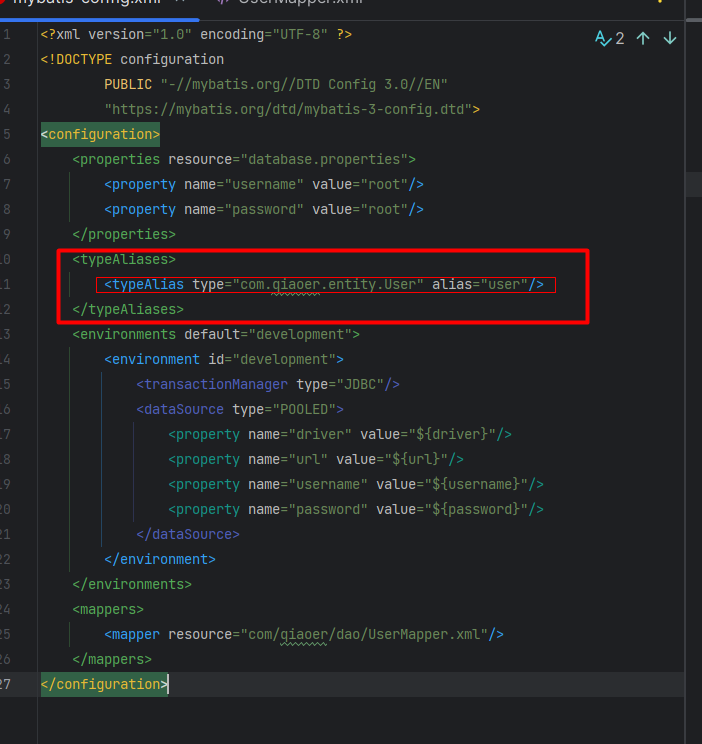
- type 属性为类的位置
- alias 为别名
- 在 Mapper 中引用时可以直接使用别名,例如
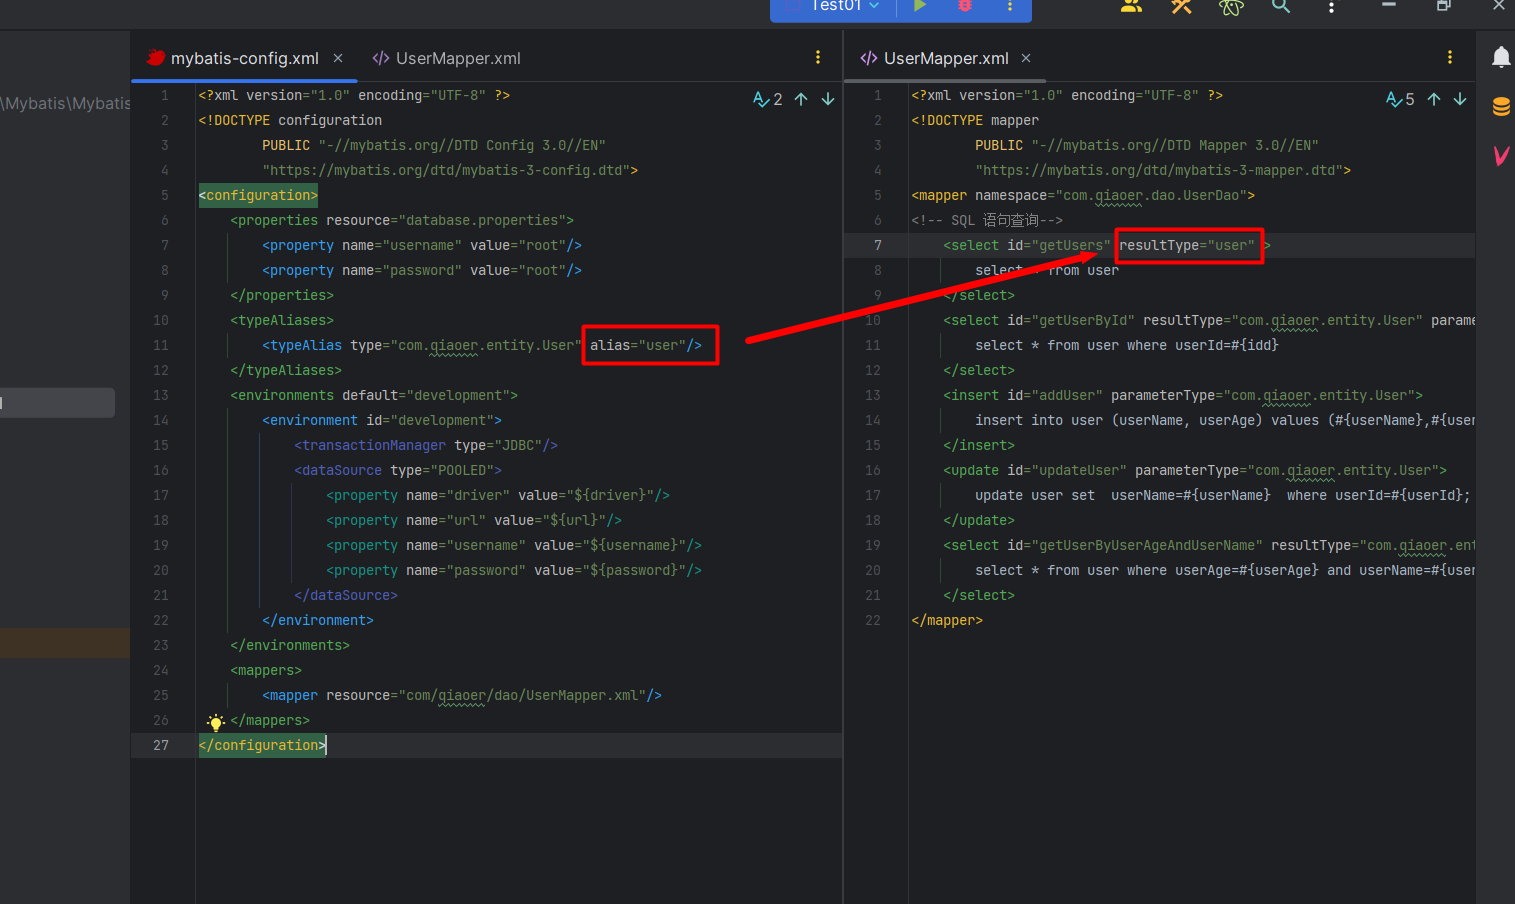
- 也可以指定一个包名,MyBatis 会在包名下面搜索需要的 Java Bean
- 使用
<typeAliases></typeAliases>标签中的<package />标签设置 - 扫描实体类的包,它的默认别名就为这个类的类名,首字母小写!
- 简单的说,就是把引入的包下的所有类都自动起别名,别名为自己的类名,首字母小写
- 示例
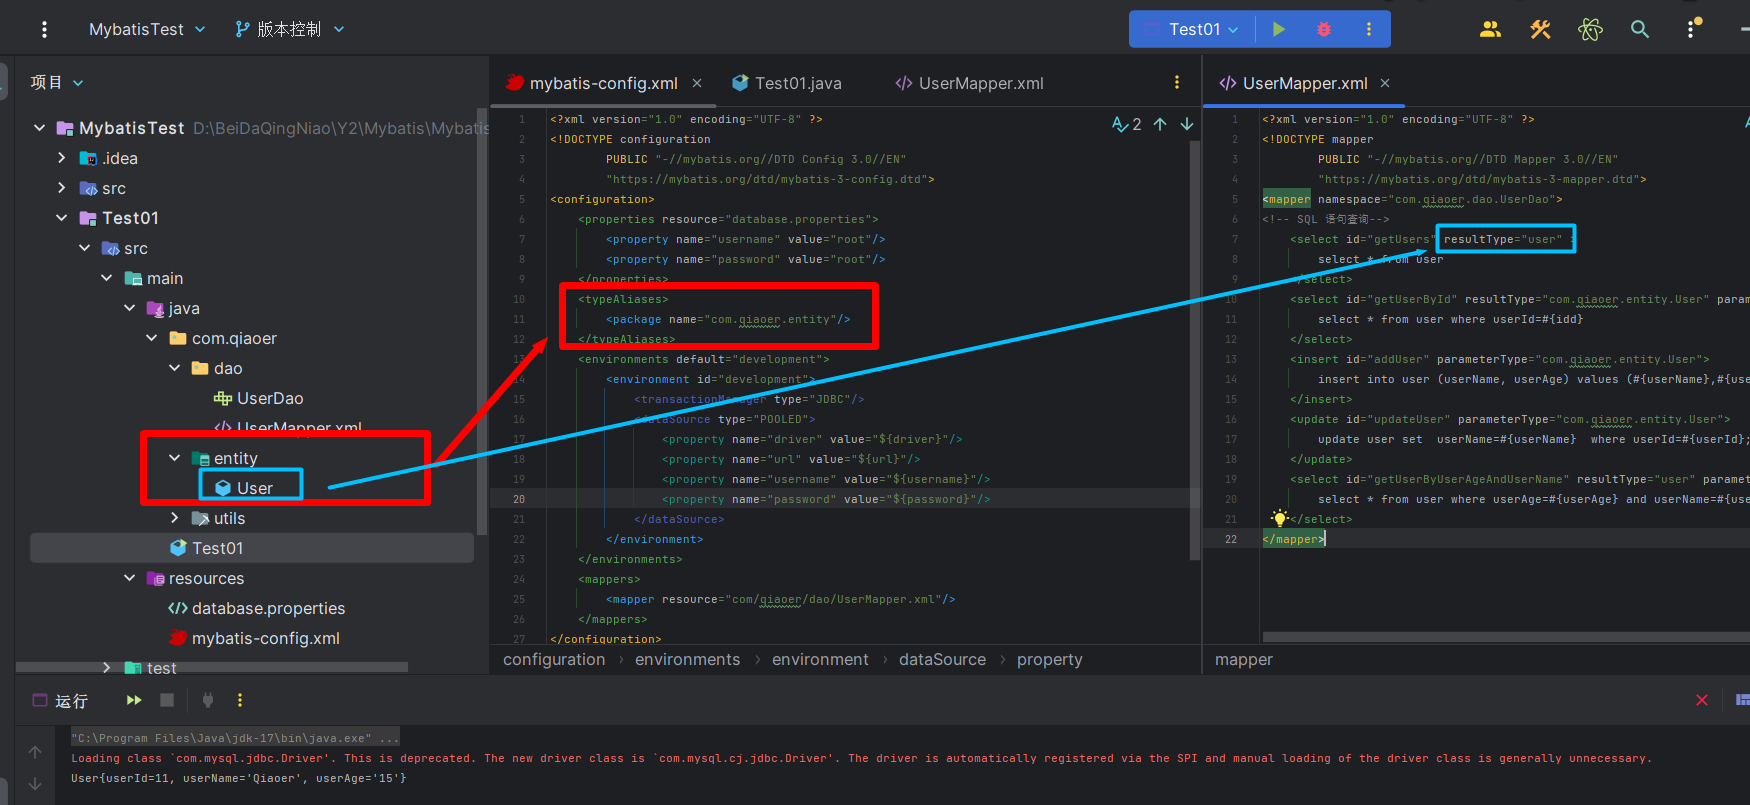
- 每一个在包
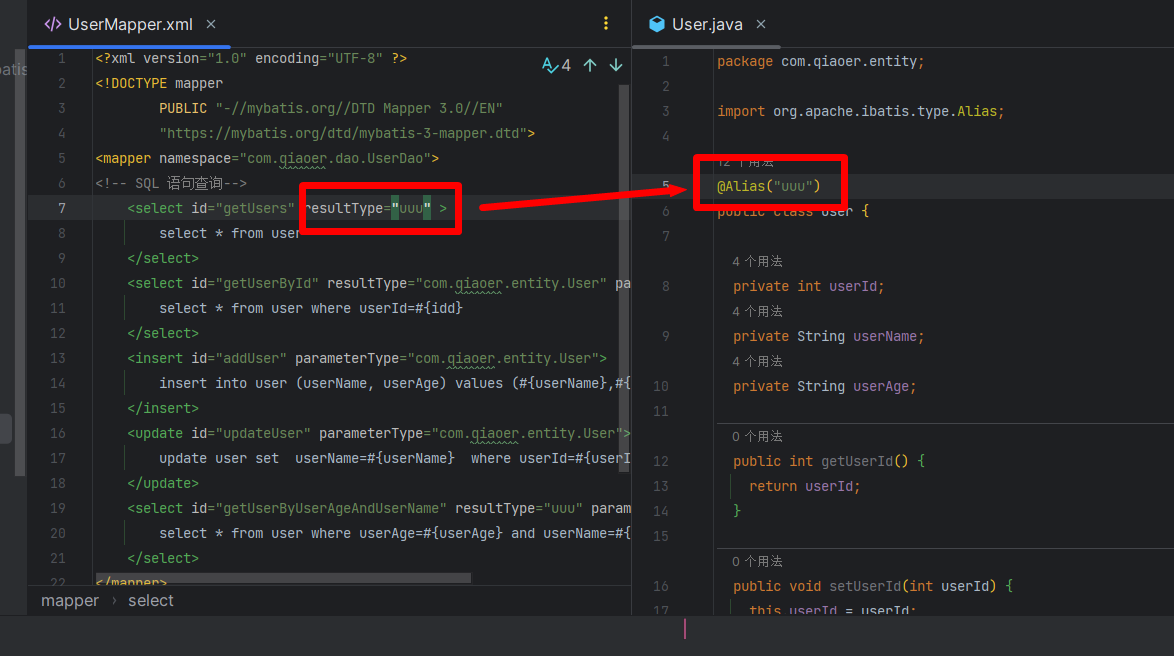
com.qiaoer.entity中的 Java Bean,在没有注解的情况下,会使用 Bean 的首字母小写的非限定类名来作为它的别名 - 比如
com.qiaoer.entity.User的别名为user - 若有注解,则别名为其注解值
- 示例
1.5 结果集映射
1.5.1 resultMap 结果集映射
主要用来解决字段与属性名不相同的问题
resultMap元素是 MyBatis 中最重要最强大的元素- 当查询出结果时,类型处理器会根据字段名查找相对于的实体类内的属性
- MyBatis 会在幕后自动创建一个
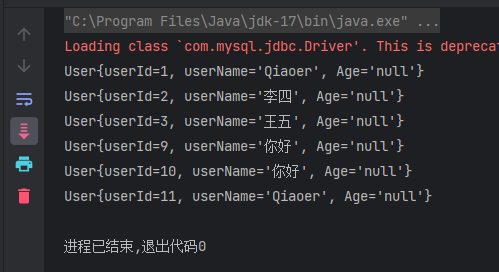
ResultMap,再根据属性名来映射列到 JavaBean 的属性上。如果列名和属性名不能匹配上,则会导致赋值为空 - 字段名与属性名不同,示例

- 这样不相同的名称则会导致 Age 的结果为空
- 可以在 Mapper.xml 中使用
<resultMap></resultMap>标签来解决 - 语法如下
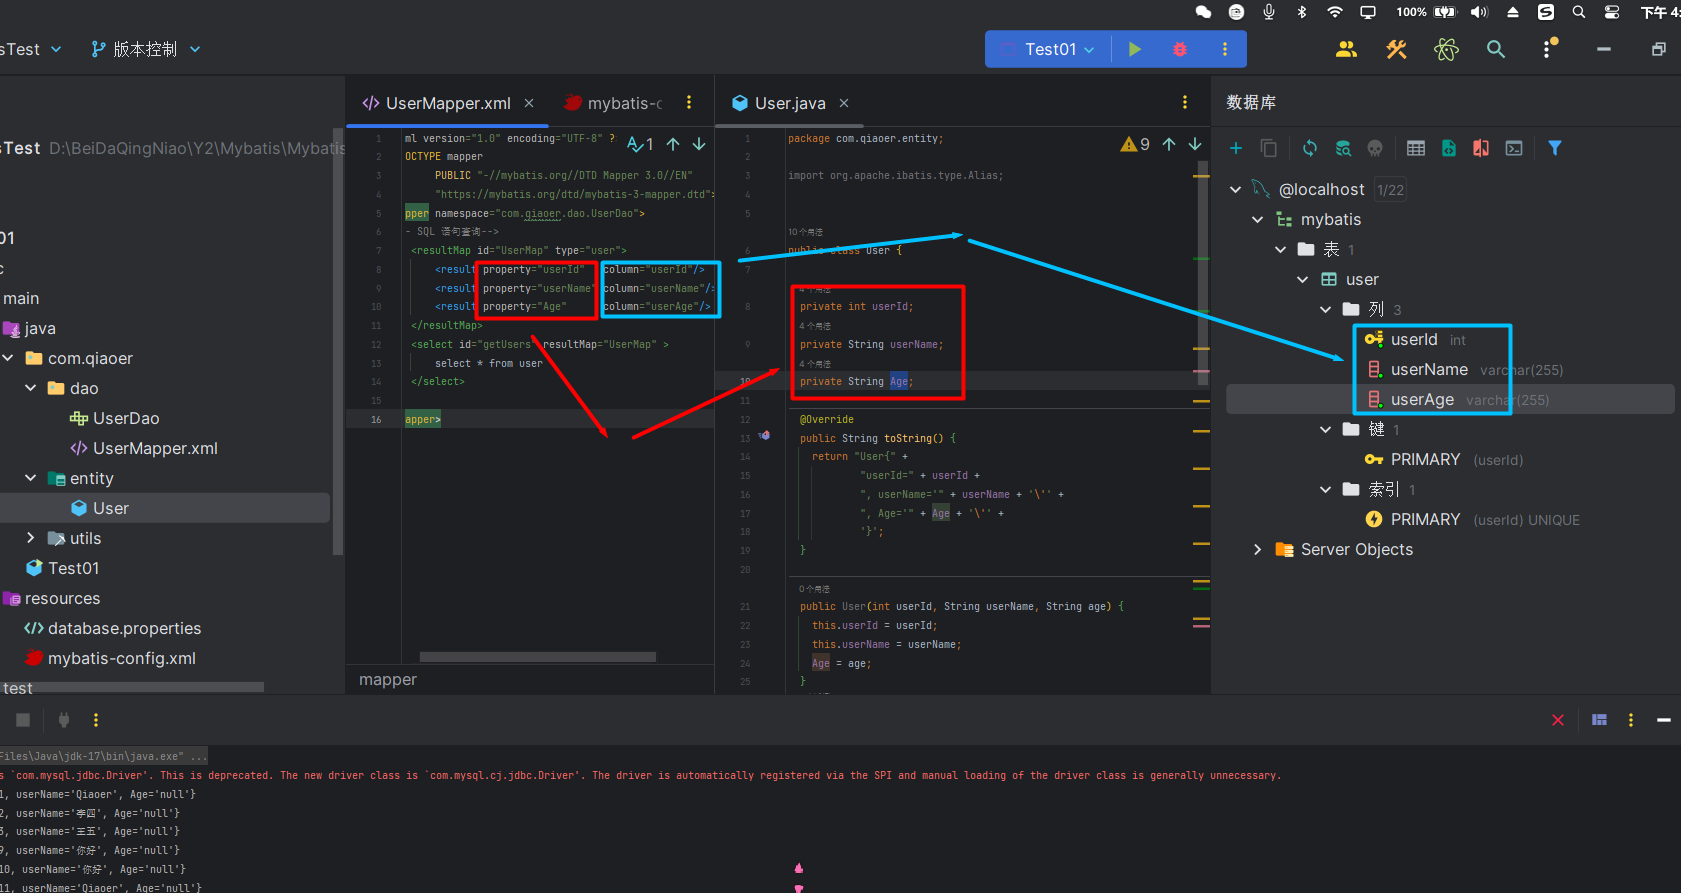
<resultMap id="" type=""><result property="" column=""/><result property="" column=""/></resultMap><select id="getUsers" resultMap="" >select * from user</select>
<resultMap></resultMap>标签中的属性- id 为唯一值,相对于给 resultMap 起个名,在下方关联时使用
- type 为要映射的实体类
<result/>标签中的属性- property 为实体类当中的属性名
- column 为数据库当中的字段名
<select></select>标签中的属性- 当需要进行映射时,则不需要在使用 resultType
- 而是使用 resultMap 进行映射,他的值为
<resultMap></resultMap>的属性 id 的值
- 代码演示
1.6 日志
1.6.1 日志工厂
- 当我们的数据库操作出现了异常,可以使用日志来拍错
- 日志会输出我们项目的一些信息
- 例如 SQL 语句,查询数据的数据等待
- 设置日志工作应使用在 MyBatis 核心配置文件中使用
<settings></settings>标签 - 这是 MyBatis 中极为重要的调整设置,它们会改变 MyBatis 的运行时行为
<settings></settings>位于<configuration></configuration>标签的第二位<settings></settings>标签语法
<settings><setting name="设置名" value="有效值"/></settings>
-
logImpl 是指定 MyBatis 所用日志的具体实现,未指定时将自动查找,即设置名
-
logImpl 的有效值为
- SLF4J
- LOG4J(3.5.9 起废弃)
- LOG4J2 | JDK_LOGGING
- COMMONS_LOGGING
- STDOUT_LOGGING
- NO_LOGGING
-
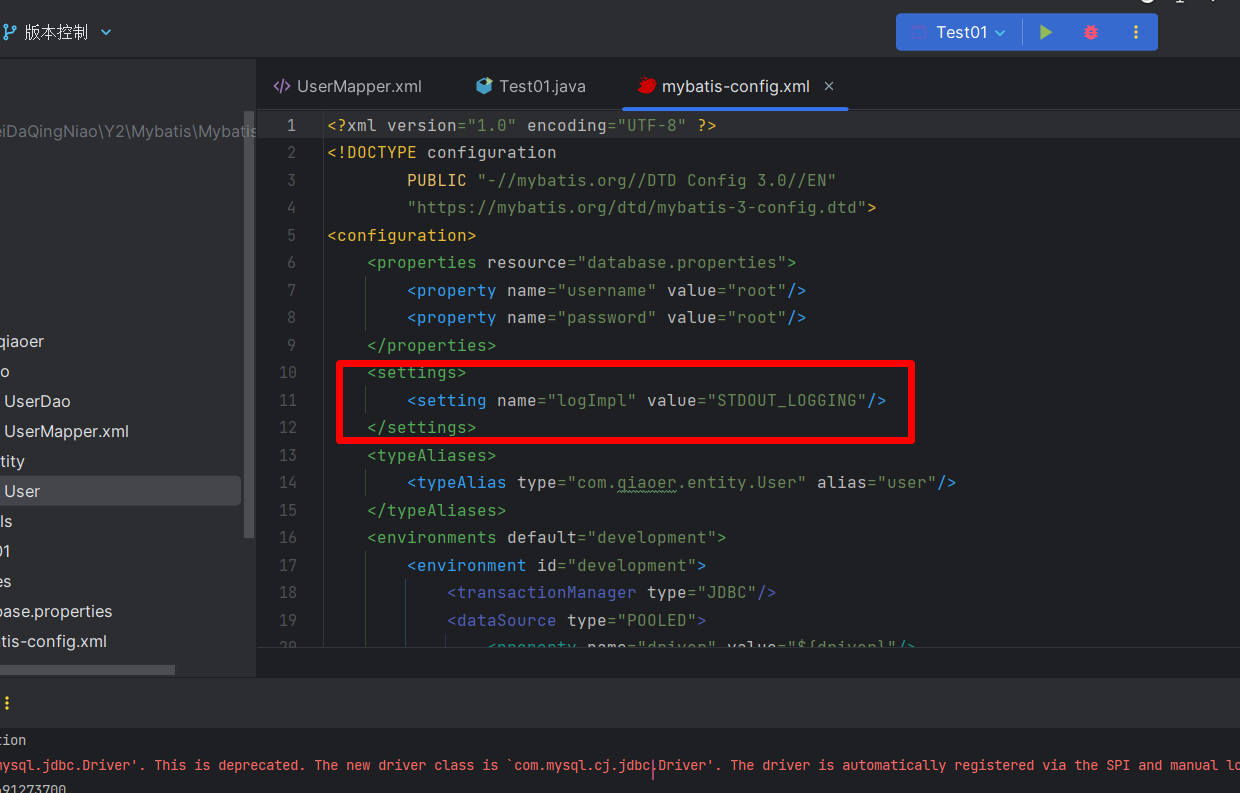
在核心配置文件中设置一个标准日志
-
标准日志的值为 STDOUT_LOGGING
- 运行结果
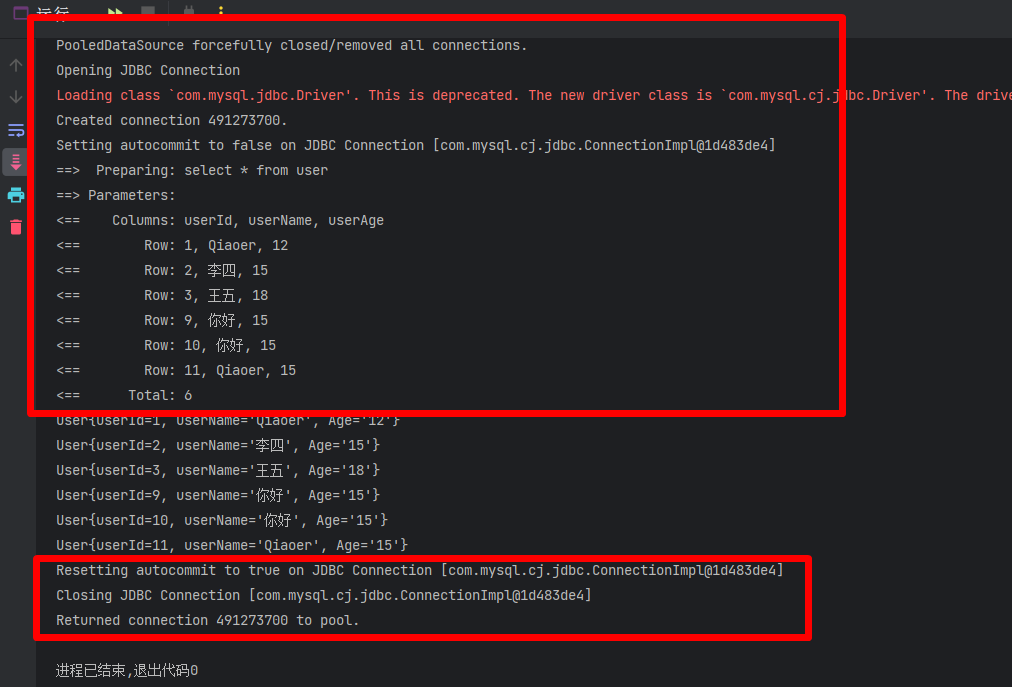
- 红框内的则是标准日志输出的结果
1.6.2 Log4j
什么是 Log4j
- 通过 Log4j 我们可以控制日志信息输出的目的地是控制台、文件、GUI组件
- 我们可以控制每一条日志的输出格式
- 通过定义每一条日志信息的级别,我们能够更加细致地控制日志的生成过程。
- 通过一个配置文件来灵活地进行配置,而不需要修改应用的代码。
1、导入 Log4j 的包
- 在使用 Log4j 前,需要先导入 Log4j 的包
- 将以下代码导入 maven 即可
<!-- https://mvnrepository.com/artifact/log4j/log4j -->
<dependency><groupId>log4j</groupId><artifactId>log4j</artifactId><version>1.2.17</version>
</dependency>
2、创建配置文件 log4j.properties
- Log4j 配置文件主要是来创建 log4j 的运行环境
- 可以设置 Log4j 输出信息的各种格式
- 创建配置文件

- 配置文件内容如下
#将等级为DEBUG的日志信息输出到console和file这两个目的地,console和file的定义在下面的代码
log4j.rootLogger=DEBUG,console,file#控制台输出的相关设置
log4j.appender.console = org.apache.log4j.ConsoleAppender
log4j.appender.console.Target = System.out
log4j.appender.console.Threshold=DEBUG
log4j.appender.console.layout = org.apache.log4j.PatternLayout
log4j.appender.console.layout.ConversionPattern=[%c]-%m%n#文件输出的相关设置
log4j.appender.file = org.apache.log4j.RollingFileAppender
log4j.appender.file.File=./log/qiaoer.log
log4j.appender.file.MaxFileSize=10mb
log4j.appender.file.Threshold=DEBUG
log4j.appender.file.layout=org.apache.log4j.PatternLayout
log4j.appender.file.layout.ConversionPattern=[%p][%d{yy-MM-dd}][%c]%m%n#日志输出级别
log4j.logger.org.mybatis=DEBUG
log4j.logger.java.sql=DEBUG
log4j.logger.java.sql.Statement=DEBUG
log4j.logger.java.sql.ResultSet=DEBUG
log4j.logger.java.sql.PreparedStatement=DEBUG
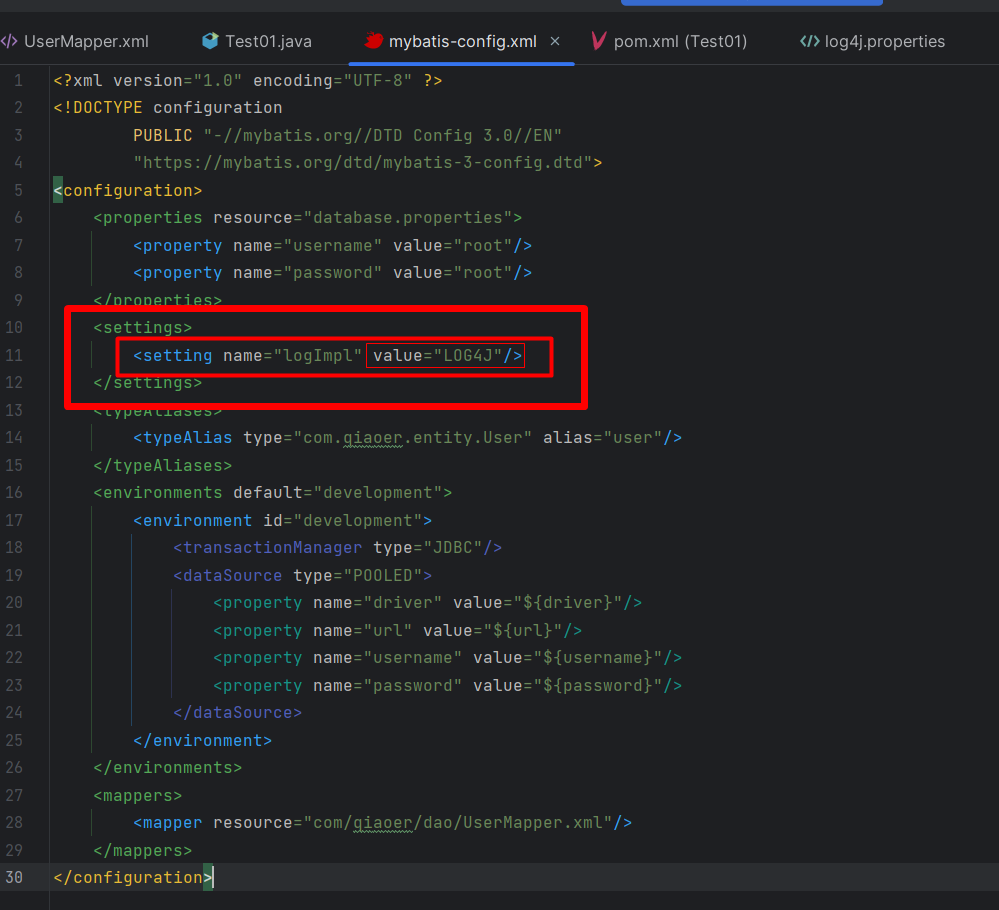
3、配置 Log4j 为日志的实现
- Log4j 的值为 LOG4J
- 示例
4、Log4j 的简单使用
- 使用 org.apache.log4j 的 Logger 类获取当前类的日志信息
- 示例
//获取当前类的日志信息
Logger logger = Logger.getLogger(Test01.class);
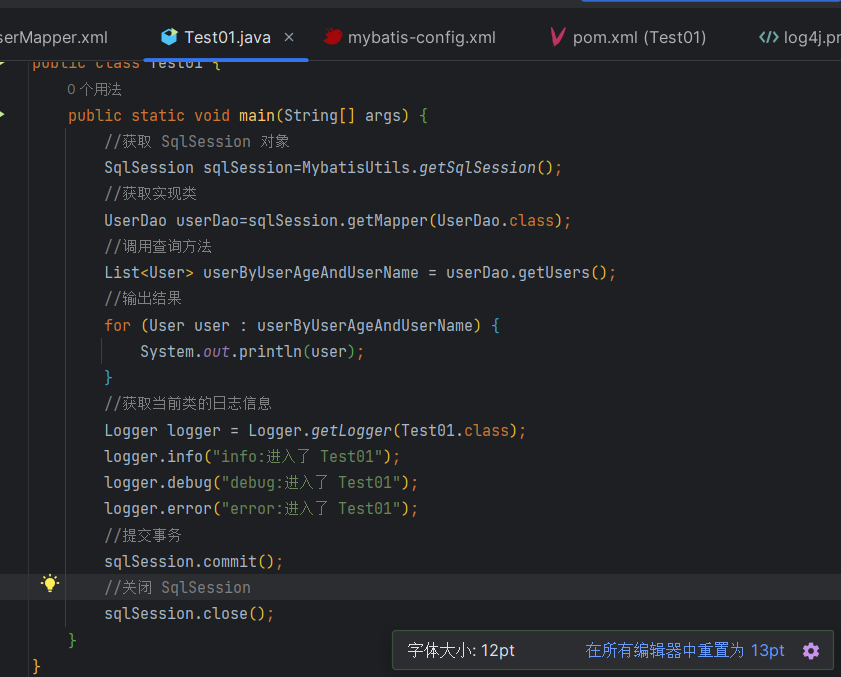
Test01.class为当前类的反射对象- 输出不同日记级别的日志信息
//获取当前类的日志信息
Logger logger = Logger.getLogger(Test01.class);
logger.info("info:进入了 Test01");
logger.debug("debug:进入了 Test01");
logger.error("error:进入了 Test01");
- 示例
1.7 分页
实现分页的好处:减少数据的处理量
1.7.1 Limit 实现分页
- SQL 语句
SELECT * from user limit startIndex,pagesize;
- startIndex 为当前页数
- pagesize 为每页有几条数据
使用 MyBatis 实现分页
- 接口
package com.qiaoer.dao;import com.qiaoer.entity.User;import java.util.List;
import java.util.Map;
public interface UserDao {//获取所有用户List<User> getUsers();//分页查询用户List<User> getUserLimits(Map<String,Object> map);
}
- 实现类 Mpper.xml
<?xml version="1.0" encoding="UTF-8" ?>
<!DOCTYPE mapperPUBLIC "-//mybatis.org//DTD Mapper 3.0//EN""https://mybatis.org/dtd/mybatis-3-mapper.dtd">
<mapper namespace="com.qiaoer.dao.UserDao"><resultMap id="UserMap" type="user"><result property="userId"   column="userId"/><result property="userName" column="userName"/><result property="Age"      column="userAge"/></resultMap><!-- 查询所有用户 --><select id="getUsers" resultMap="UserMap" >select * from user</select><!-- 分页查询用户 --><select id="getUserLimits" resultMap="UserMap">SELECT * from user limit #{startIndex},#{pagesize};</select>
</mapper>
- 测试类
import com.qiaoer.dao.UserDao;
import com.qiaoer.entity.User;
import com.qiaoer.utils.MybatisUtils;
import org.apache.ibatis.session.SqlSession;
import org.apache.log4j.Logger;import java.util.HashMap;
import java.util.List;
import java.util.Map;
import java.util.Objects;public class Test01 {public static void main(String[] args) {//获取 SqlSession 对象SqlSession sqlSession = MybatisUtils.getSqlSession();//获取实现类UserDao mapper = sqlSession.getMapper(UserDao.class);//获设置参数Map<String,Object> map=new HashMap<String,Object>();map.put("startIndex",2);map.put("pagesize",2);List<User> userLimits = mapper.getUserLimits(map);//输出结果for (User user : userLimits) {System.out.println(user);}//提交事务sqlSession.commit();//关闭 SqlSessionsqlSession.close();}
}
1.7.2 RowBounds 实现分页
- RowBounds 是在 Java 层面进行分页的
- 不使用 SQL 语句的 Limit,将所有结果查询出来,然后再 Java代码中进行分页
- 具体代码
import com.qiaoer.dao.UserDao;
import com.qiaoer.entity.User;
import com.qiaoer.utils.MybatisUtils;
import org.apache.ibatis.session.RowBounds;
import org.apache.ibatis.session.SqlSession;
import org.apache.log4j.Logger;import java.util.HashMap;
import java.util.List;
import java.util.Map;
import java.util.Objects;public class Test01 {public static void main(String[] args) {//获取 SqlSession 对象SqlSession sqlSession = MybatisUtils.getSqlSession();//分层RowBounds rowBounds=new RowBounds(2,2);//获取查询所有用户方法List<User> userRowBounds = sqlSession.selectList("com.qiaoer.dao.UserDao.getUsers", null, rowBounds);//输出结果for (User user : userRowBounds) {System.out.println(user);}//提交事务sqlSession.commit();//关闭 SqlSessionsqlSession.close();}
}
- RowBounds 对象的构造方法的两个参数即对应的就是
- 第一个参数对应当前页数
- 第二个参数对应每页有几条数据
- 这里不在需要获取实现类,而是直接获取要查询的方法
- 将所有用户查询出来,然后通过 RowBounds 的参数在 Java 代码中进行分页
1.8 使用注解开发
使用注解则不需要在写实现类
直接在接口上使用注解开发
1.8.1 使用注解进行简单的开发
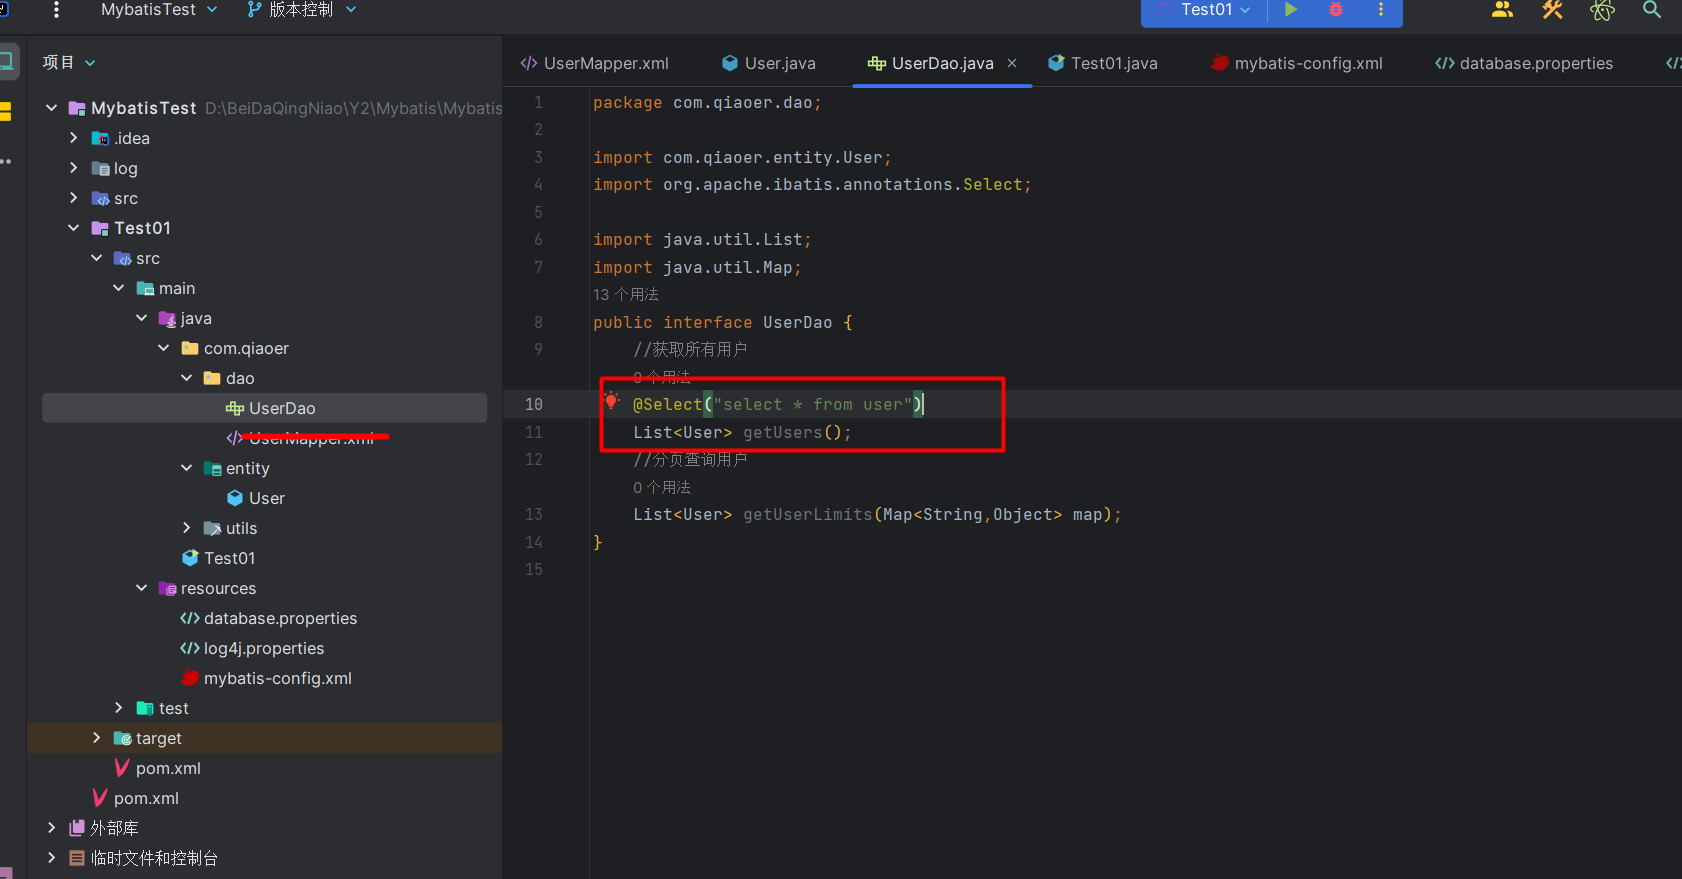
- 在接口上使用注解,不需要在使用 Mapper.xml
//获取所有用户
@Select("select * from user")
List<User> getUsers();
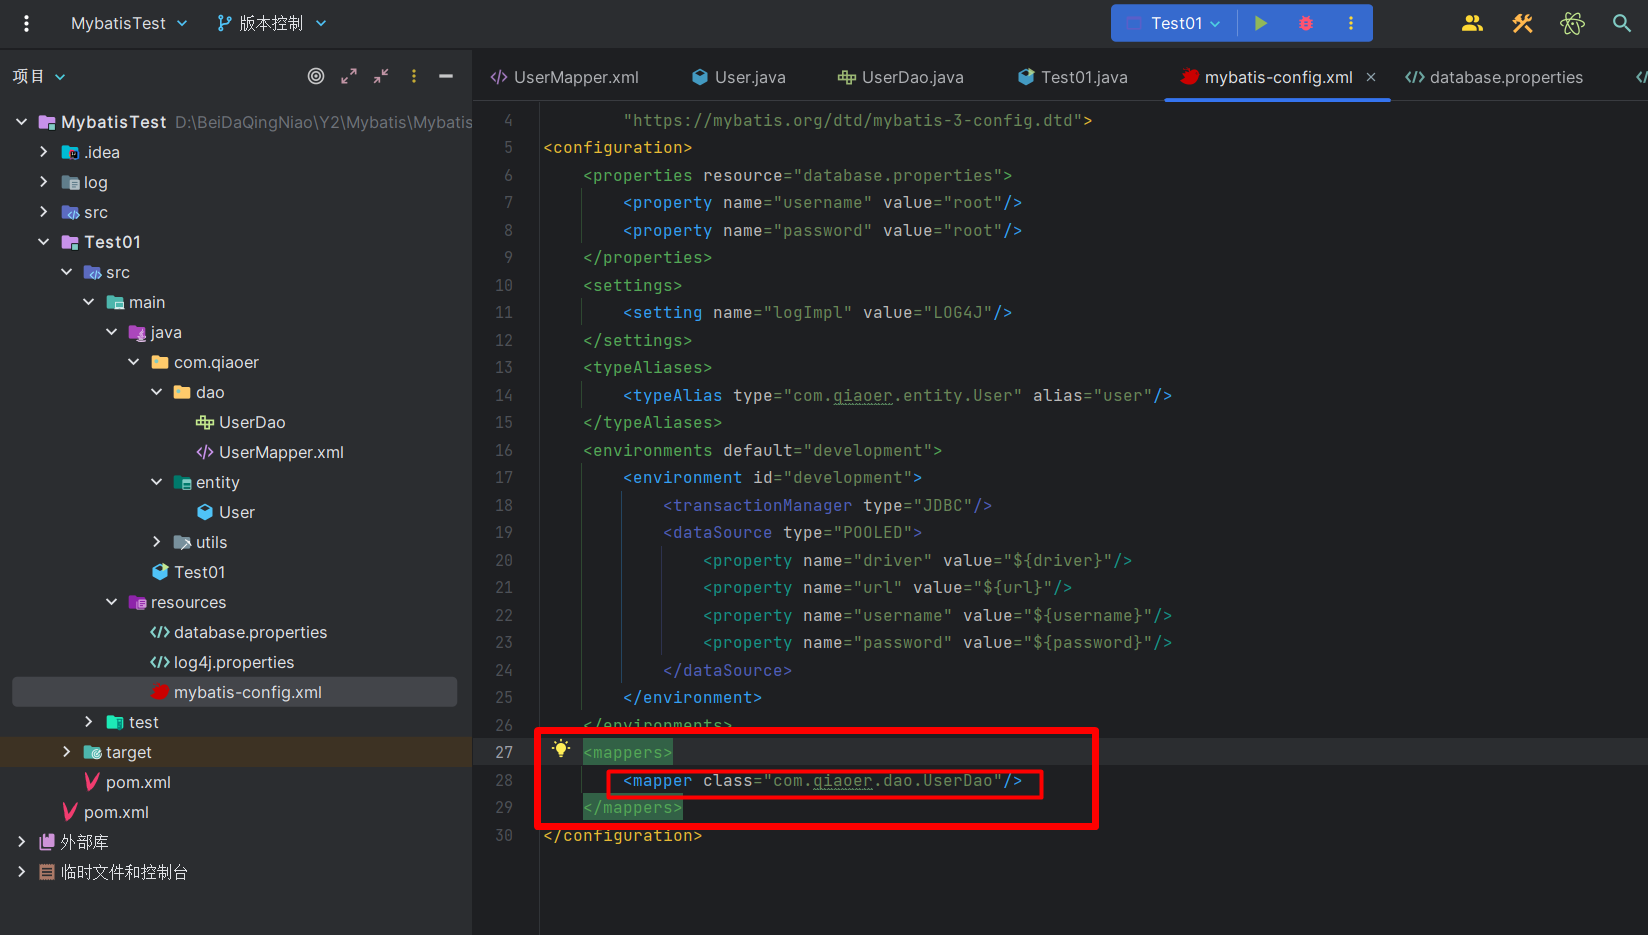
- 需要在核心配置文件中绑定接口
<mappers><mapper class="com.qiaoer.dao.UserDao"/></mappers>
- 测试数据,向以前一样正常运行即可
import com.qiaoer.dao.UserDao;
import com.qiaoer.entity.User;
import com.qiaoer.utils.MybatisUtils;
import org.apache.ibatis.session.RowBounds;
import org.apache.ibatis.session.SqlSession;
import org.apache.log4j.Logger;import java.util.HashMap;
import java.util.List;
import java.util.Map;
import java.util.Objects;public class Test01 {public static void main(String[] args) {//获取 SqlSession 对象SqlSession sqlSession = MybatisUtils.getSqlSession();UserDao mapper = sqlSession.getMapper(UserDao.class);List<User> users = mapper.getUsers();//输出结果for (User user : users) {System.out.println(user);}//提交事务sqlSession.commit();//关闭 SqlSessionsqlSession.close();}
}
- 运行结果
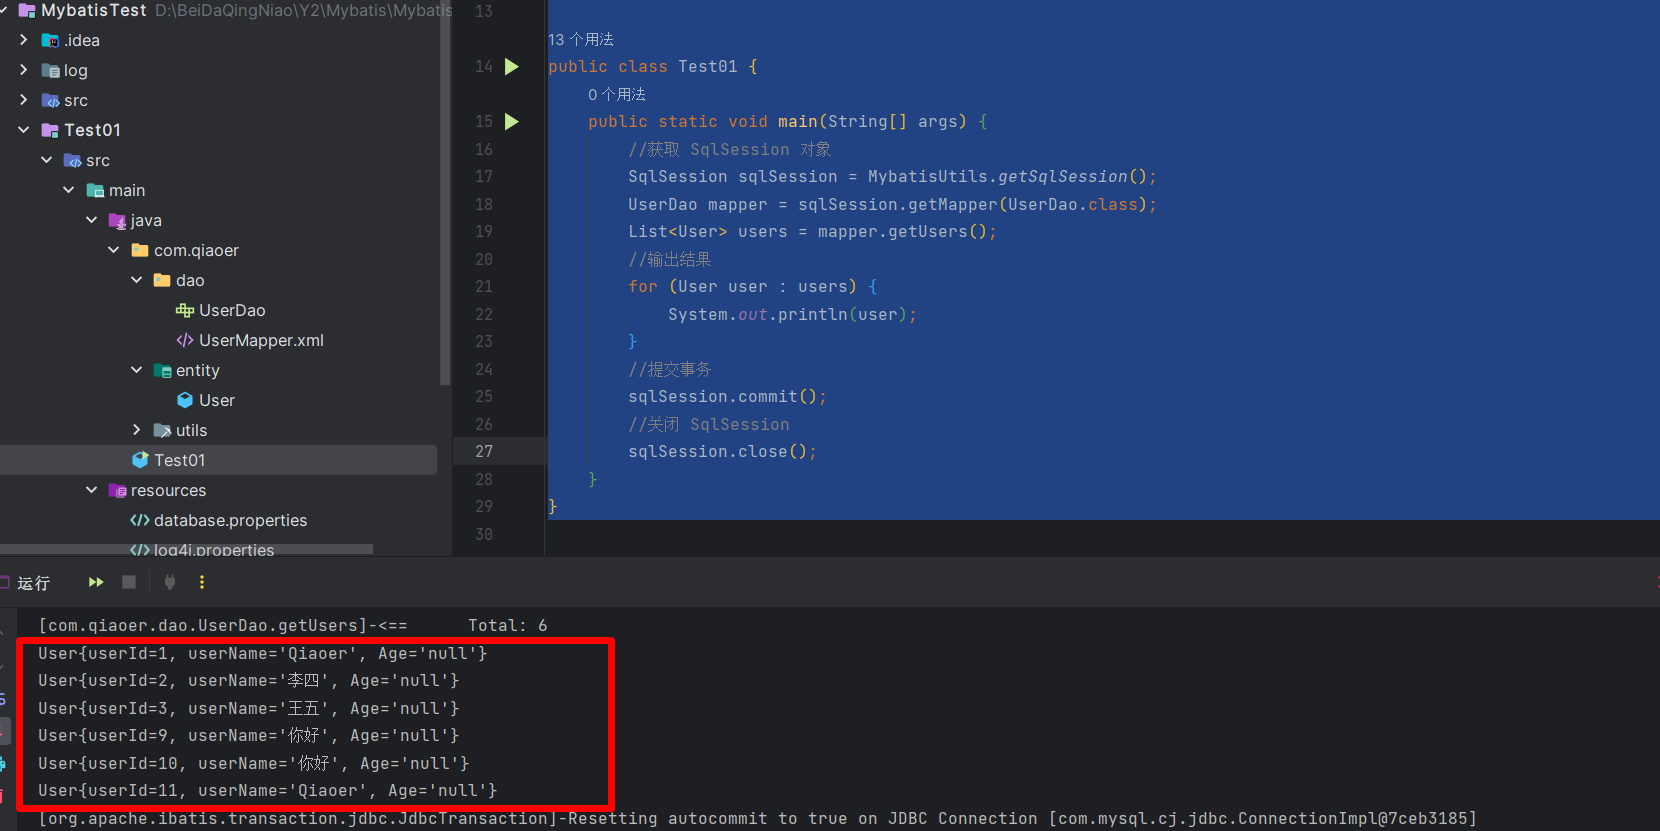
- 可以发现 Age 的值为空,所以简单的注解开发无法使用结果集映射
- 推荐使用注解开发只进行简单的操作,复杂的操作还是使用 Mapper.xml 比较好
1.8.2 使用注解进行 CRUD(增删改查)
-
**在使用注解进行开发时,如果需要参数,需要在接口的参数前面加上 **
-
如果有多个参数,则每个参数前都需要添加注解
-
在 SQL 语句当中,获取参数时,则填写的时以注解命名的参数
//根据 年龄和名字查询用户
@Select("select * from user where userName=#{ParamUserName} and userAge=#{ParamUserAge}")
List<User> getUsersByuserAgeAnduserName(@Param("ParamUserAge") int UserAge, @Param("ParamUserName") String UserName);
- 如果参数为一个对象,则在 SQL 语句当中,需要使用以实体类内的属性名
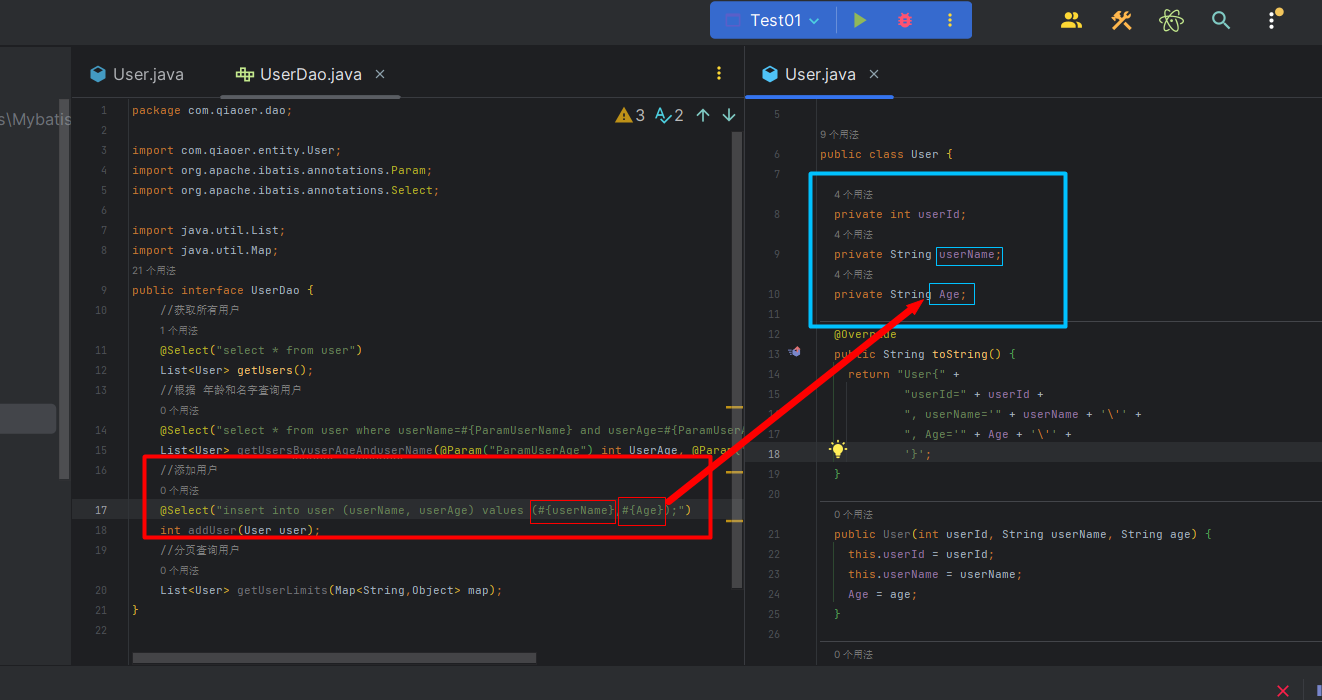
- 使用注解实现 CURD
- 接口内
package com.qiaoer.dao;import com.qiaoer.entity.User;
import org.apache.ibatis.annotations.*;import java.util.List;
import java.util.Map;
public interface UserDao {//获取所有用户@Select("select * from user")List<User> getUsers();//根据用户 姓名和 年龄查询//根据 年龄和名字查询用户@Select("select * from user where userName=#{ParamUserName} and userAge=#{ParamUserAge}")List<User> getUsersByuserAgeAnduserName(@Param("ParamUserAge") int UserAge, @Param("ParamUserName") String UserName);//增加用户@Insert("insert into user (userName, userAge) values (#{userName},#{Age})")int addUser(User user);//修改用户@Update("update user set  userName=#{userName} where userId=#{userId}")int updateUser(User user);//删除用户@Delete("delete from user where userId=#{UserId}")int delUser(@Param("UserId") int userId);
}
- 测试类
import com.qiaoer.dao.UserDao;
import com.qiaoer.entity.User;
import com.qiaoer.utils.MybatisUtils;
import org.apache.ibatis.session.RowBounds;
import org.apache.ibatis.session.SqlSession;
import org.apache.log4j.Logger;import java.util.HashMap;
import java.util.List;
import java.util.Map;
import java.util.Objects;public class Test01 {public static void main(String[] args) {//获取 SqlSession 对象SqlSession sqlSession = MybatisUtils.getSqlSession();UserDao mapper = sqlSession.getMapper(UserDao.class);List<User> users=null;System.out.println("=================添加用户=================");//添加用户mapper.addUser(new User(-1,"abcd","13"));//输出所有用户users = mapper.getUsers();for (User user : users) {System.out.println(user);}System.out.println("=================修改用户=================");//修改 id 为 3 的用户mapper.updateUser(new User(3,"修改了","15"));//输出所有用户users= mapper.getUsers();for (User user : users) {System.out.println(user);}System.out.println("=================删除用户=================");//删除 id 为 3 的用户mapper.delUser(3);//输出所有用户users= mapper.getUsers();for (User user : users) {System.out.println(user);}//关闭 SqlSessionsqlSession.close();}
}
- 一定不要忘记将接口绑定在核心配置文件当中
1.8.3 关于 @Param(“”) 注解
- 基本类型的参数或者 String 类型,需要加上
- 引用类型不需要加
- 如果只有一个基本类型的话,可以忽略,但是建议大家都加上!
- 我们在SQL中引用的就是我们这里的
@Param("uid“)中设定的属性名!
1.9 Lombok
1.9.1 Lombok 简介
- Lombok 是一款 Java 开发插件
- 可以通过一定的注解来消除业务工程中冗长和繁琐的代码
- 尤其对于简单的 Java 模型对象(POJO)
- 使用 Lombok 可以省出重复构建,例如 hascode 和 equals 等方法
1.9.2 Lombok 的优缺点
优点
- 能通过注解的形式自动生成构造器、getter/setter、equals、hashcode、toString等方法,提高了一定的开发效率
- 让代码变得简洁,不用过多的去关注相应的方法
- 属性做修改时,也简化了维护为这些属性所生成的getter/setter方法等
缺点
- 不支持多种参数构造器的重载
- 虽然省去了手动创建 getter/setter 方法的麻烦,但大大降低了源代码的可读性和完整性,降低了阅读源代码的舒适度
1.9.3 Lombok 的使用
- 在 IDEA 中安装 Lombok 插件
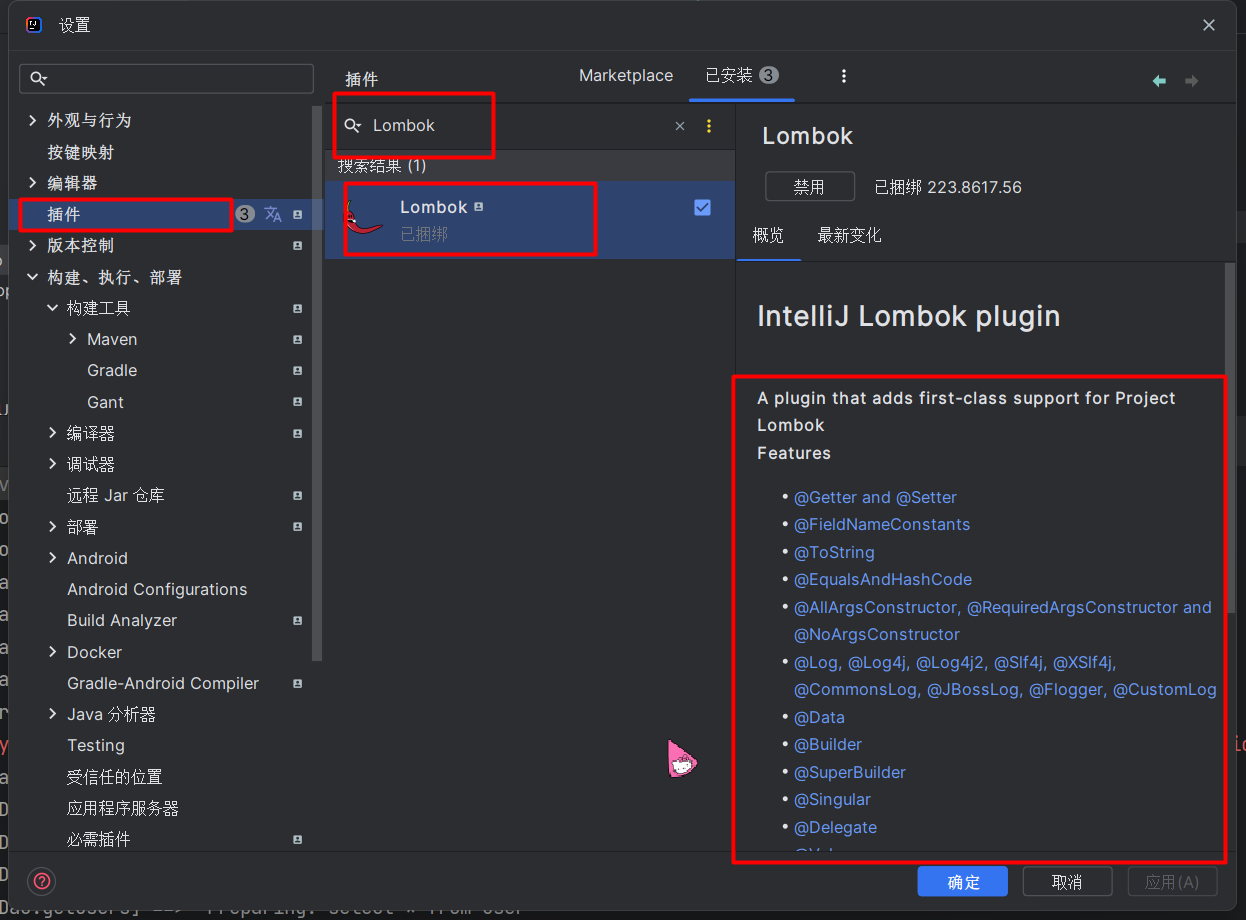
-
使用 右下角这些注解就可以自动生成一些对应的方法
-
导入 Lombok 的 jar 包,将以下代码导入 maven 仓库即可
<!-- https://mvnrepository.com/artifact/org.projectlombok/lombok -->
<dependency><groupId>org.projectlombok</groupId><artifactId>lombok</artifactId><version>1.18.28</version>
</dependency>
- Lombok 常用注解介绍
| 注解 | 说明 |
|---|---|
| @Data | 自动生成 getter、setter、toString 等方法 |
| @NoArgsConstructor | 自动生成无参构造函数 |
| @AllArgsConstructor | 自动生成全参构造函数 |
| @Builder | 自动生成 Builder 模式相关代码 |
| @EqualsAndHashCode | 自动生成 equals 和 hashCode 方法 |
| @Setter | 自动生成 setter 方法 |
| @Getter | 自动生成 getter 方法 |
| @ToString | 自动生成 toString 方法 |
| @Slf4j | 自动生成日志变量 |
| @NonNull | 标记字段为非空,生成空值检查 |
| @RequiredArgsConstructor | 自动生成带有 final 字段的构造函数 |
| @Value | 类似 @Data,不可变对象,自动生成方法 |
| @Cleanup | 自动生成资源关闭代码 |
| @SneakyThrows | 在方法中抛出异常,无需显示声明 |
- 在我们的项目中一般只使用前三种注解
- 示例,在 User 实体类中使用
package com.qiaoer.entity;
import lombok.AllArgsConstructor;
import lombok.Data;
import lombok.NoArgsConstructor;@Data
@AllArgsConstructor
@NoArgsConstructor
public class User {private int userId;private String userName;private String Age;
}
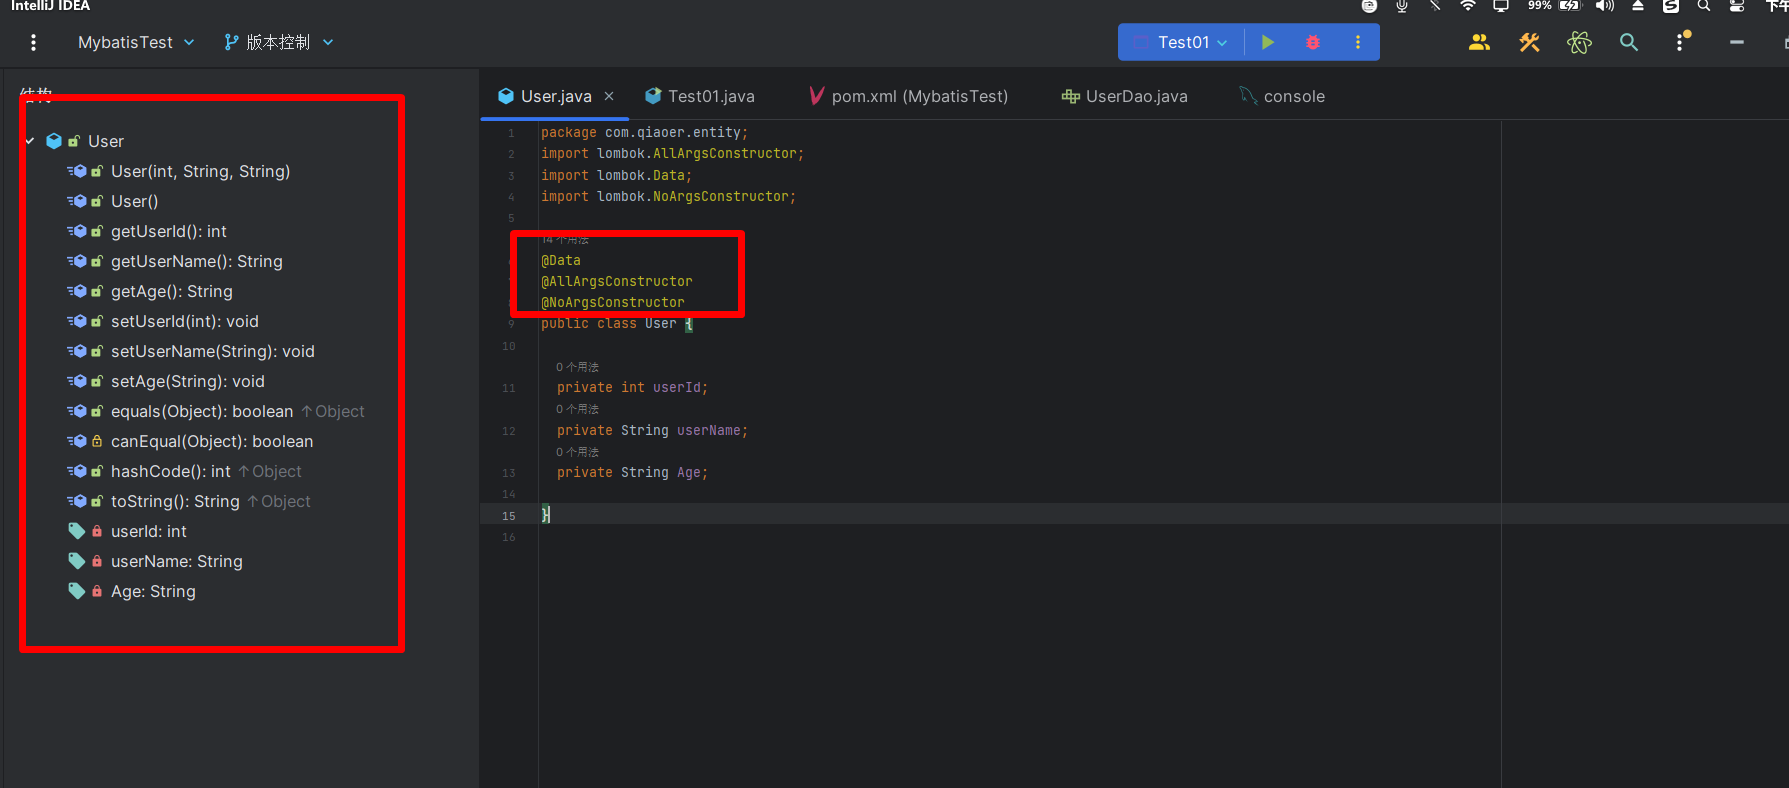
1.10 多对一处理
1.10.1 复杂查询测试环境搭建
在进行测试之前,需要先搭建一个测试的环境
- 导入 lombox
- 在 myBatis 数据库当中新建两个表: teacher 和 student
- 关联两张表并添加一些数据
DROP TABLE IF EXISTS `student`;
CREATE TABLE `student`  (`studentId` int(11) NOT NULL AUTO_INCREMENT COMMENT '学生id',`studentName` varchar(255) CHARACTER SET utf8 COLLATE utf8_general_ci NOT NULL COMMENT '学生姓名',`tId` int(11) NOT NULL COMMENT '学生关联的老师id',PRIMARY KEY (`studentId`) USING BTREE,INDEX `tId`(`tId`) USING BTREE,CONSTRAINT `student_ibfk_1` FOREIGN KEY (`tId`) REFERENCES `teacher` (`teacherId`) ON DELETE RESTRICT ON UPDATE RESTRICT
) ENGINE = InnoDB AUTO_INCREMENT = 6 CHARACTER SET = utf8 COLLATE = utf8_general_ci ROW_FORMAT = Dynamic;-- ----------------------------
-- Records of student
-- ----------------------------
INSERT INTO `student` VALUES (1, '1号学生', 1);
INSERT INTO `student` VALUES (2, '2号学生', 1);
INSERT INTO `student` VALUES (3, '3号学生', 1);
INSERT INTO `student` VALUES (4, '4号学生', 1);
INSERT INTO `student` VALUES (5, '5号学生', 1);-- ----------------------------
-- Table structure for teacher
-- ----------------------------
DROP TABLE IF EXISTS `teacher`;
CREATE TABLE `teacher`  (`teacherId` int(11) NOT NULL AUTO_INCREMENT COMMENT '教师id',`teacherName` varchar(255) CHARACTER SET utf8 COLLATE utf8_general_ci NOT NULL COMMENT '教师姓名',PRIMARY KEY (`teacherId`) USING BTREE
) ENGINE = InnoDB AUTO_INCREMENT = 2 CHARACTER SET = utf8 COLLATE = utf8_general_ci ROW_FORMAT = Dynamic;-- ----------------------------
-- Records of teacher
-- ----------------------------
INSERT INTO `teacher` VALUES (1, '刘老师');
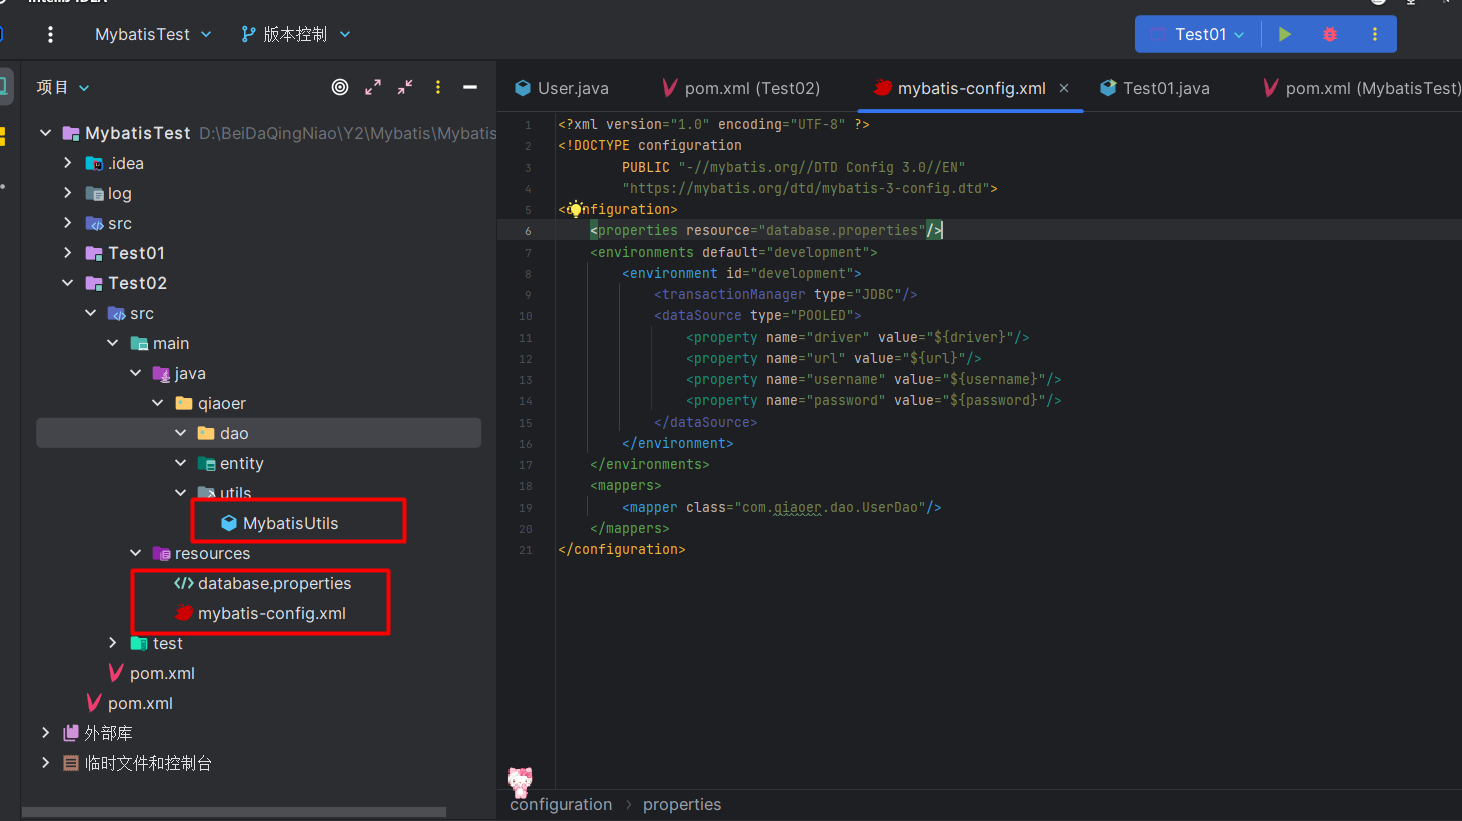
- 新建一个项目,将 核心配置文件,即 MyBatis 工具类拷过来
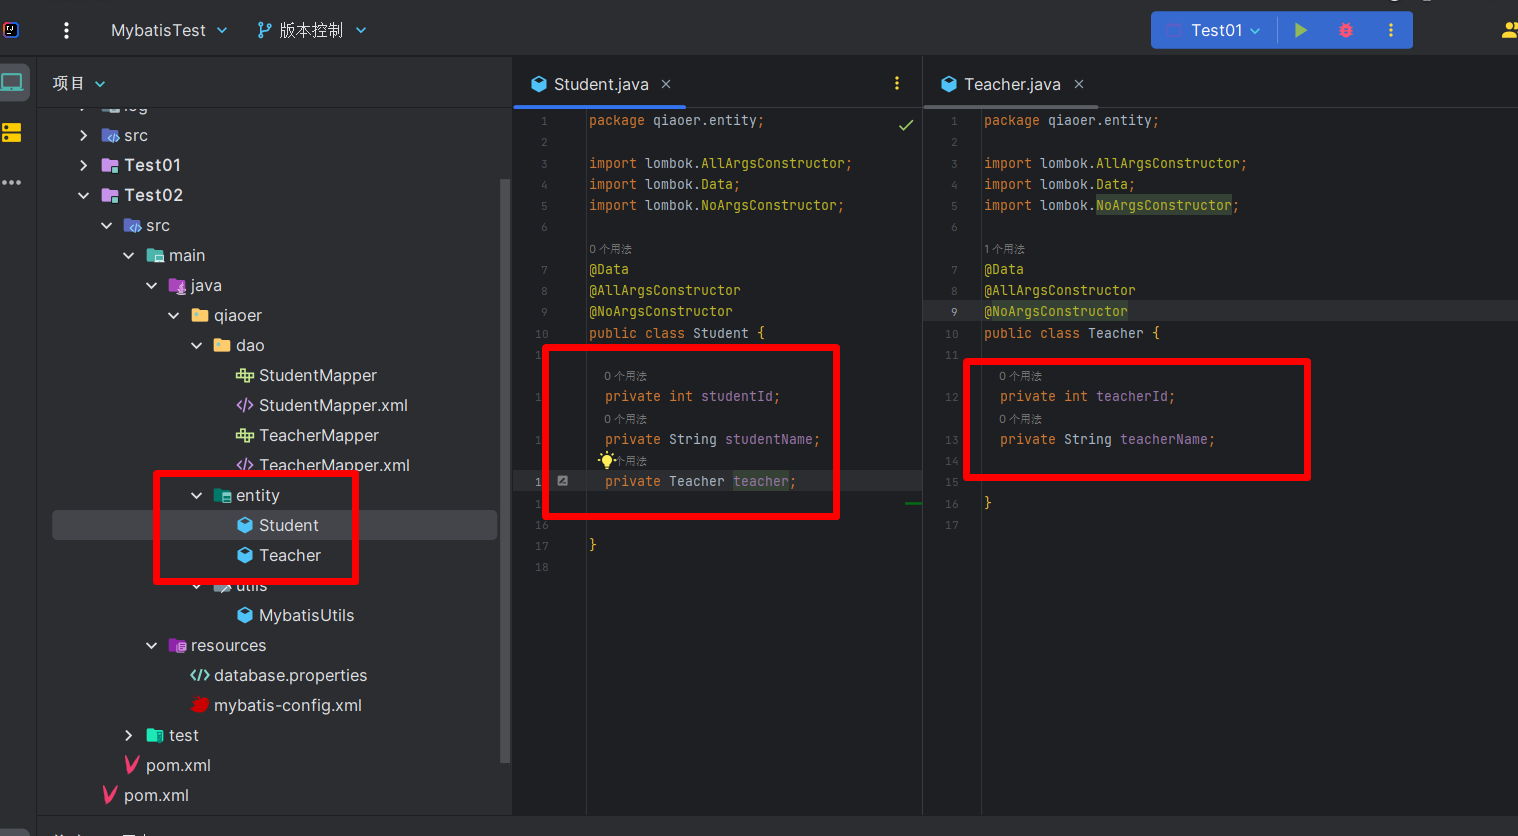
- 新建两个表的实体类
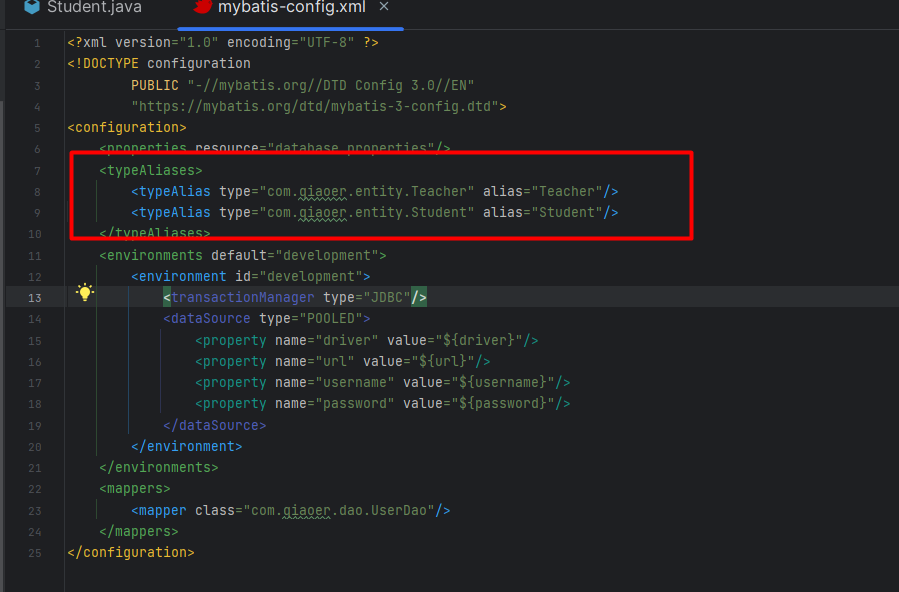
- 在核心配置文件设置实体类的别名,方便访问
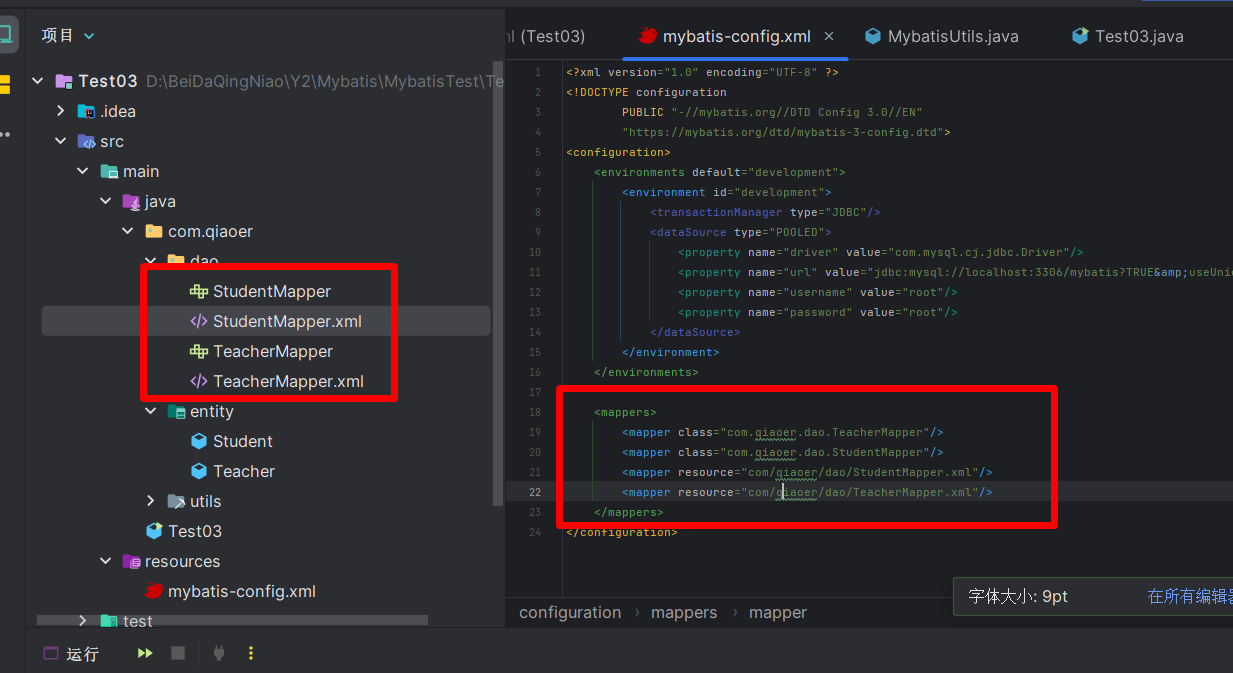
- 新建 Mapper 接口和 Mapper.xml

- 在核心配置文件注册接口和 xml 文件
- 测试是否可以成功运行
- 编写一个查询所有教师的方法,并执行
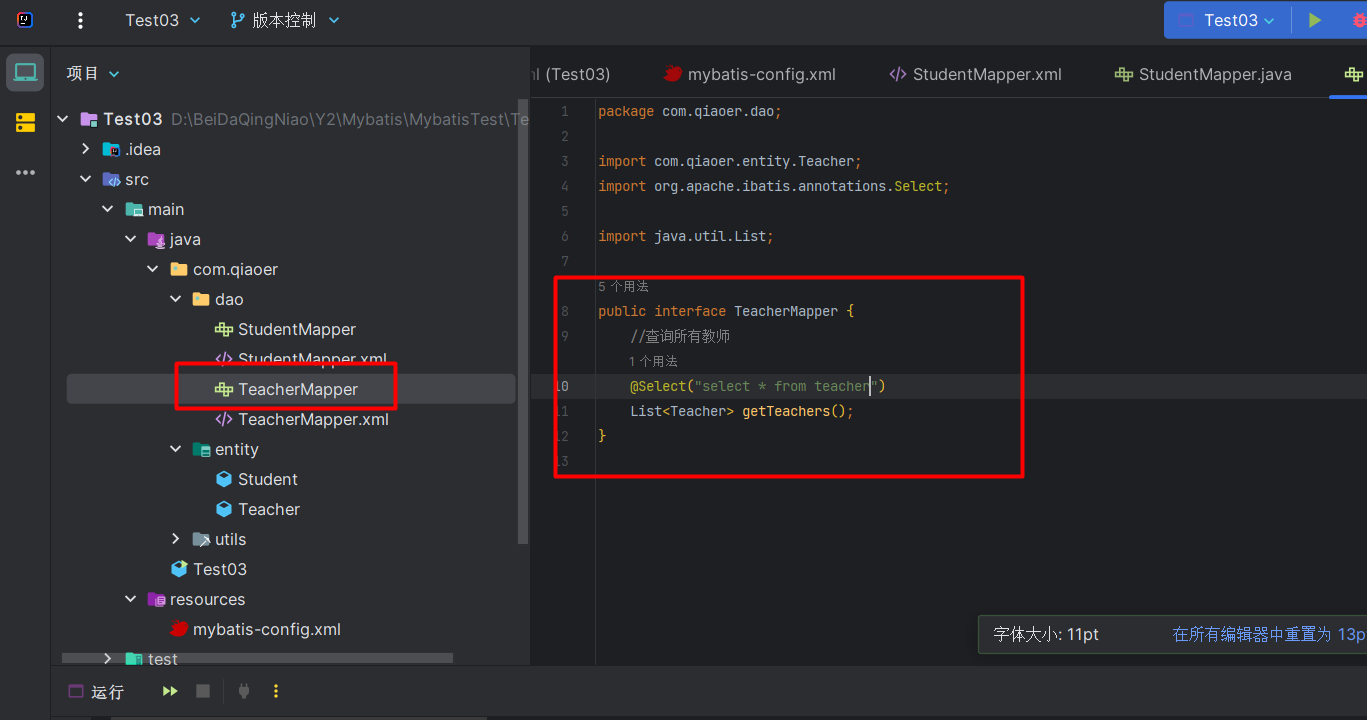
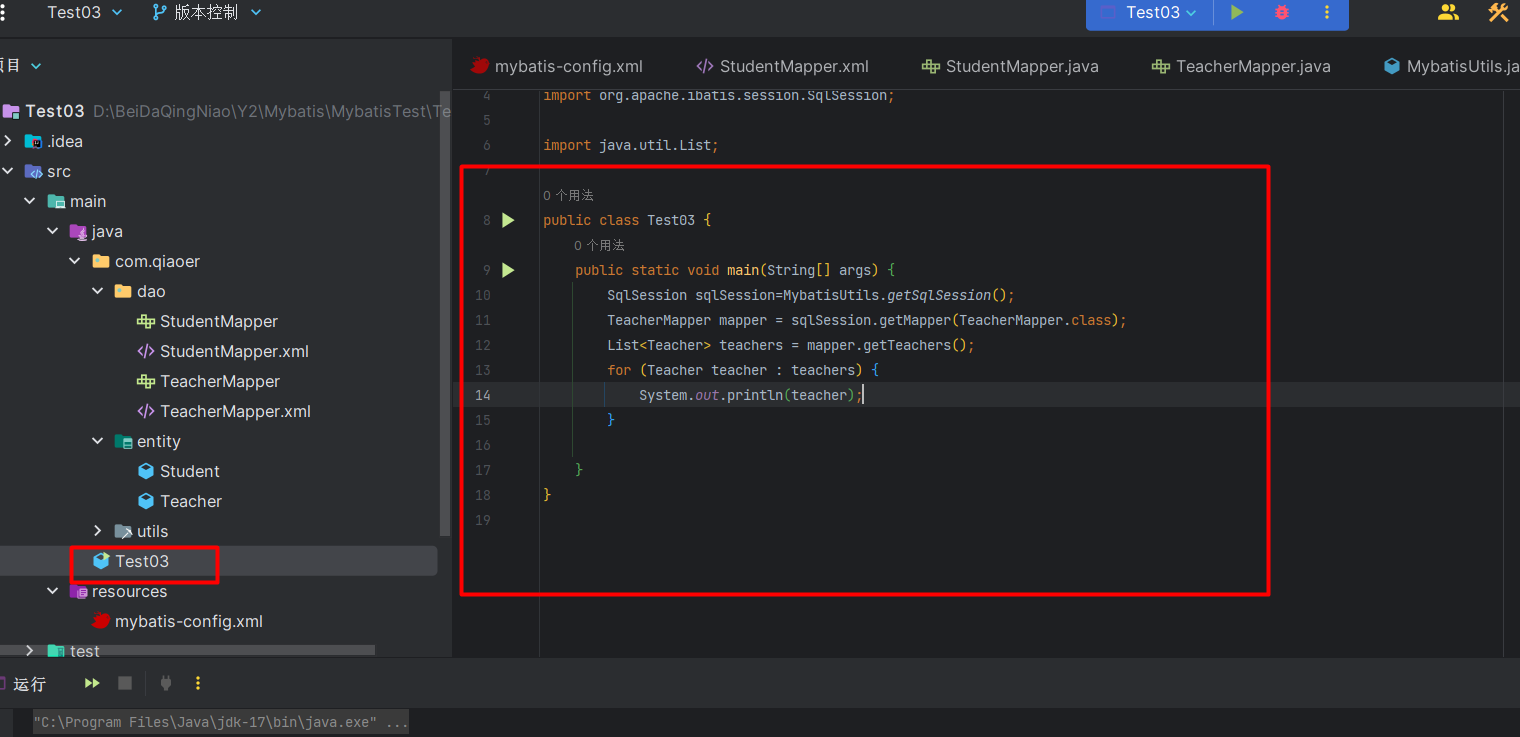
1.10.2 按照查询嵌套处理(多对一)
-
与 SQL 的子查询道理类似
-
主要实现,根据查询出来的学生 tid,寻找对应的教师信息
-
首先编写接口内的查询方法
package com.qiaoer.dao;import com.qiaoer.entity.Student;import java.util.List;public interface StudentMapper {//查询所有学生信息List<Student> getSudent();
}
-
编写 StudentMapper.xml
-
先查询所有的学生信息
<?xml version="1.0" encoding="UTF-8" ?>
<!DOCTYPE mapperPUBLIC "-//mybatis.org//DTD Mapper 3.0//EN""https://mybatis.org/dtd/mybatis-3-mapper.dtd">
<mapper namespace="com.qiaoer.dao.StudentMapper">
<!--    1、查询所有的学生--><select id="getSudent" resultType="student">select * from student</select>
</mapper>
- 在根据学生信息内的 tid 查询出老师的信息
<?xml version="1.0" encoding="UTF-8" ?>
<!DOCTYPE mapperPUBLIC "-//mybatis.org//DTD Mapper 3.0//EN""https://mybatis.org/dtd/mybatis-3-mapper.dtd">
<mapper namespace="com.qiaoer.dao.StudentMapper">
<!--    1、查询所有的学生--><select id="getSudent" resultType="student">select * from student</select>
<!--    2、根据学生信息的 tid 查询老师的信息--><select id="getTeacher" resultType="teacher">Select * from teacher where teacher.teacherId=#{id}</select>
</mapper>
- 将两个查询语句关联起来
- 使用结果集映射
resultMap属性,将结果关联起来 - 复杂的结果,比如对象,集合这类的,我们需要单独进行处理
- 处理对象需要在
<resultMap></resultMap>标签内使用<association></association>进行处理 - 处理集合需要在
<resultMap></resultMap>标签内使用<collection></collection>进行处理 - 在这里处理对象,应使用
<association property="teacher" column="tId" javaType="teacher" select="getTeacher"/>标签property: 指定将关联结果映射到的属性名,这里是学生实体中与老师关联的属性名。column: 指定用于关联的字段名,这里是学生表中用来和老师表关联的字段名。javaType: 指定关联的实体类型,这里是老师实体的类型。select: 指定一个查询,用于根据关联条件获取关联的实体。这个查询会根据指定的关联条件(通常是字段值)去获取关联实体的信息
- 关联两个查询 示例
<?xml version="1.0" encoding="UTF-8" ?>
<!DOCTYPE mapperPUBLIC "-//mybatis.org//DTD Mapper 3.0//EN""https://mybatis.org/dtd/mybatis-3-mapper.dtd">
<mapper namespace="com.qiaoer.dao.StudentMapper">
<!--    1、查询所有的学生--><select id="getSudent"  resultMap="StuTeacher">select * from student</select><resultMap id="StuTeacher" type="student"><result property="studentId" column="studentId"/><result property="studentName" column="studentName"/><association property="teacher" column="tId" javaType="teacher"  select="getTeacher"/></resultMap>
<!--    2、根据学生信息的 tid 查询老师的信息--><select id="getTeacher" resultType="teacher">Select * from teacher where teacher.teacherId=#{id}</select>
</mapper>
- 这里的
id="getTeacher"名字随意命名即可,不要关联某些方法 - **相对于是将
getTeacher的查询结果赋予了 Student 类的属性 teacher ** - 这里的参数
#{id}本质就是将<association property="teacher" column="tId" javaType="teacher" select="getTeacher"/>中 column 的tid也就是数据库查询出来的结果,当做参数来查询的
1.10.3 按照结果嵌套处理(多对一)
- 与 SQL 的关联查询类似
- 先编写接口内的查询方法
package com.qiaoer.dao;import com.qiaoer.entity.Student;import java.util.List;public interface StudentMapper {//查询所有学生信息List<Student> getSudent();//查询所有学生信息List<Student> getSudent2();
}
- 编写 StudentMapper.xml
- 使用连表查将学生与老师信息全部查询出来,结果依旧需要使用结果集映射
<?xml version="1.0" encoding="UTF-8" ?>
<!DOCTYPE mapperPUBLIC "-//mybatis.org//DTD Mapper 3.0//EN""https://mybatis.org/dtd/mybatis-3-mapper.dtd">
<mapper namespace="com.qiaoer.dao.StudentMapper">
<!--    使用连表查询学生信息以及对应的老师信息--><select id="getSudent2" resultMap="">select student.studentId as stuId,student.studentName as stuName,teacher.teacherId as teaId,teacher.teacherName as teaName from student INNER JOIN teacher ON student.tId=teacher.teacherId</select>
</mapper>
- 使用结果集映射
resultMap属性,将结果关联起来 - 对象我们依旧使用
<association></association>处理,只不过这次与上次略微不同
<?xml version="1.0" encoding="UTF-8" ?>
<!DOCTYPE mapperPUBLIC "-//mybatis.org//DTD Mapper 3.0//EN""https://mybatis.org/dtd/mybatis-3-mapper.dtd">
<mapper namespace="com.qiaoer.dao.StudentMapper">
<!--    使用连表查询学生信息以及对应的老师信息--><select id="getSudent2" resultMap="StuTeacher2">select student.studentId as stuId,student.studentName as stuName,teacher.teacherId as teaId,teacher.teacherName as teaName from student INNER JOIN teacher ON student.tId=teacher.teacherId</select><resultMap id="StuTeacher2" type="student"><result property="studentId" column="studentId"/><result property="studentName" column="studentName"/><association property="teacher" javaType="teacher"><result property="teacherId" column="teaId"/><result property="teacherName" column="teaName"/></association></resultMap>
</mapper>
- 这里的
<association></association>标签只有两个属性- property 属性值对应的是 Student 实体类内的对象属性 teacher
- javaType 属性值则对应的是 Teacher 实体类
<association></association>标签内的<result/>标签则是将 teacher 属性对象内的属性关联起来- property 属性对于的是 teacher 属性对象内的属性
- column 则是与之关联的数据库内查询出来的数据
1.11 一对多处理
1.11.1 环境搭建
- 和刚才一样,只是实体类有所不同
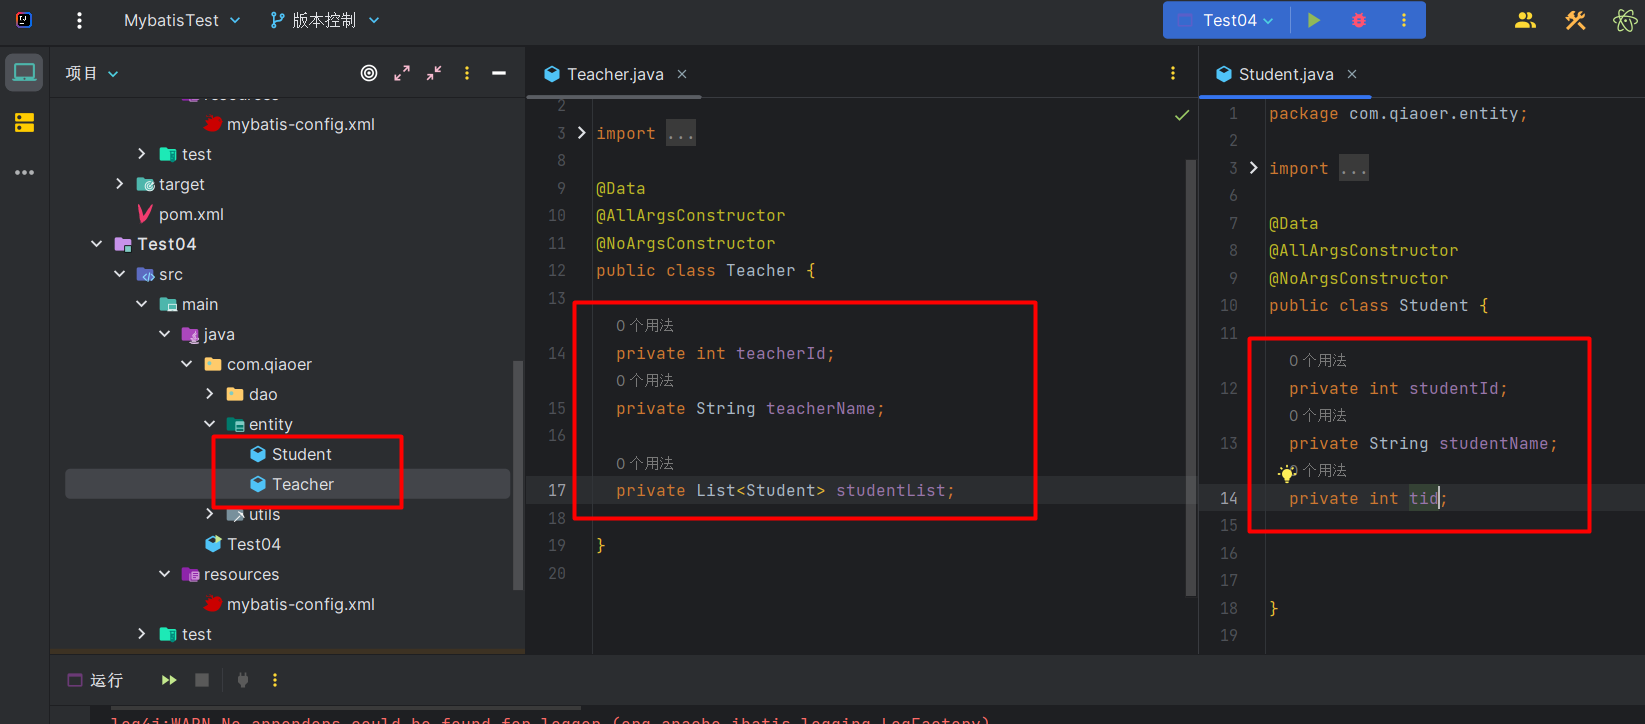
1.11.2 按照结果嵌套处理(一对多)
- 编写,查询所有教师方法
package com.qiaoer.dao;import com.qiaoer.entity.Teacher;
import org.apache.ibatis.annotations.Select;import java.util.List;public interface TeacherMapper {//查询所有教师List<Teacher> getTeachers();
}
-
**编写 TeacherMapper.xml **
-
与多对一时非常相似,也需要结果集映射
-
处理集合需要用到
<collection></collection>标签
<?xml version="1.0" encoding="UTF-8" ?>
<!DOCTYPE mapperPUBLIC "-//mybatis.org//DTD Mapper 3.0//EN""https://mybatis.org/dtd/mybatis-3-mapper.dtd">
<mapper namespace="com.qiaoer.dao.TeacherMapper"><select id="getTeachers" resultMap="TeaStudent">select student.studentId as stuId,student.studentName as stuName,teacher.teacherId as teaId,teacher.teacherName as teaName from student INNER JOIN teacher ON student.tId=teacher.teacherId</select><resultMap id="TeaStudent" type="teacher"><result property="teacherId" column="teaId"/><result property="teacherName" column="teaName"/><collection property="studentList" ofType="student"><result property="studentId" column="stuId"/><result property="studentName" column="stuName"/></collection></resultMap>
</mapper>
-
<collection></collection>标签的属性- property 则表示 实体类内对应的集合属性的属性名
- ofType 的本质与 javaType 类似,表示集合的泛型对应的实体类
-
<collection></collection>标签内<result/>标签的属性- property 表示集合的泛型对应的实体类内的属性
- column 则表示数据库查询的数据
-
他的本质与多对一大差不差
1.11.3 按照查询嵌套处理(一对多)
- 与多对一的本质其实大差不差
- 唯一有区别的就是 Mapper.xml 的地方
<?xml version="1.0" encoding="UTF-8" ?>
<!DOCTYPE mapperPUBLIC "-//mybatis.org//DTD Mapper 3.0//EN""https://mybatis.org/dtd/mybatis-3-mapper.dtd">
<mapper namespace="com.qiaoer.dao.TeacherMapper"><select id="getTeachers" resultMap="TeaStudent">select * from teacher</select><resultMap id="TeaStudent" type="teacher"><result property="teacherId" column="teacherId"/><result property="teacherName" column="teacherName"/><collection property="studentList" javaType="ArrayList" ofType="student" select="getStudent" column="teacherId"/></resultMap><select id="getStudent" resultType="student">select * from student where tId=#{id}</select>
</mapper>
<collection></collection>标签内的属性- property 对应的是实体类内的集合
- javaType 表示那个集合的类型,这里为 ArrayList
- ofType 表示集合对应的泛型,需要些实体类的位置
- select 指定一个查询,用于根据关联条件获取关联的实体。这个查询会根据指定的关联条件(通常是字段值)去获取关联实体的信息
- column 则相当于一个参数,与下方的
<select id="getStudent" resultType="student">标签内的的#{id}的参数是一致的
1.12 动态 SQL
根据不同的条件生成不同的 SQL 语句
1.12.1 动态 SQL 环境搭建
- 创建用于测试的 blog 数据表
/*Navicat Premium Data TransferSource Server         : LanQiaoerSource Server Type    : MySQLSource Server Version : 50740 (5.7.40)Source Host           : localhost:3306Source Schema         : mybatisTarget Server Type    : MySQLTarget Server Version : 50740 (5.7.40)File Encoding         : 65001Date: 05/08/2023 20:19:07
*/SET NAMES utf8mb4;
SET FOREIGN_KEY_CHECKS = 0;-- ----------------------------
-- Table structure for blog
-- ----------------------------
DROP TABLE IF EXISTS `blog`;
CREATE TABLE `blog`  (`id` int(11) NOT NULL AUTO_INCREMENT COMMENT '博客id',`title` varchar(255) CHARACTER SET utf8 COLLATE utf8_general_ci NOT NULL COMMENT '博客标题',`author` varchar(255) CHARACTER SET utf8 COLLATE utf8_general_ci NOT NULL COMMENT '博客作者',`create_time` datetime NOT NULL COMMENT '创建时间',`views` int(11) NOT NULL COMMENT '浏览量',PRIMARY KEY (`id`) USING BTREE
) ENGINE = InnoDB AUTO_INCREMENT = 5 CHARACTER SET = utf8 COLLATE = utf8_general_ci ROW_FORMAT = Dynamic;-- ----------------------------
-- Records of blog
-- ----------------------------
INSERT INTO `blog` VALUES (1, 'mybatis如此简单', '兰巧儿', '2023-08-05 20:14:13', 9999);
INSERT INTO `blog` VALUES (2, 'Java如此简单', '兰巧儿', '2023-08-05 20:14:38', 1000);
INSERT INTO `blog` VALUES (3, 'html是一门编程语言', '云朵', '2023-08-05 20:14:50', 9999);
INSERT INTO `blog` VALUES (4, 'spring如此简单', '云朵', '2023-08-05 20:15:03', 9999);SET FOREIGN_KEY_CHECKS = 1;-
创建一个基础工程
- 1.导包
- 2.编写配置文件
- 3.编写实体类
package com.qiaoer.entity;import lombok.AllArgsConstructor; import lombok.Data; import lombok.NoArgsConstructor;@Data @AllArgsConstructor @NoArgsConstructor public class Blog {private int id;private String title;private String author;private String createTime;private int views;}- 4.编写实体类对应 Mapper 接口和 Mapper.XML 文件

1.12.2 动态 SQL 之 IF 语句
<if></if>标签位于 Mapper.xml 的 SQL 语句标签内- 例如
<?xml version="1.0" encoding="UTF-8" ?>
<!DOCTYPE mapper PUBLIC "-//mybatis.org//DTD Mapper 3.0//EN" "https://mybatis.org/dtd/mybatis-3-mapper.dtd">
<mapper namespace="com.qiaoer.dao.BlogMapper"><select id="getBlogListIF" resultType="blog"><if test=""></if></select>
</mapper>
- 如果 if 标签中 test 中的表达式成立,则会拼接 if 标签内的 SQL 语句
- 示例,编写一个方法,根据传递过来的参数,来拼接 SQL 语句
- 编写接口中的方法
package com.qiaoer.dao;import com.qiaoer.entity.Blog;
import org.apache.ibatis.annotations.Select;import java.util.List;
import java.util.Map;public interface BlogMapper {//查询所有List<Blog> getBlogListIF(Map<String,Object> map);
}
- 编写 Mapper.xml
<?xml version="1.0" encoding="UTF-8" ?>
<!DOCTYPE mapper PUBLIC "-//mybatis.org//DTD Mapper 3.0//EN" "https://mybatis.org/dtd/mybatis-3-mapper.dtd">
<mapper namespace="com.qiaoer.dao.BlogMapper"><select id="getBlogListIF" parameterType="map" resultType="blog">select * from blog where 1=1<if test="title != null">and title=#{title}</if><if test="author !=null">and author=#{author}</if></select>
</mapper>-
如果传递过来的参数 title 或 author 不为空,那么则会拼接if 标签内的 SQL 语句
-
if 标签中的 test 属性用于比较的 title 或 author 必须与你传过来的参数名相同
-
并且传递的参数数量,必须与你写的 if 内做判断的参数数量相同
-
如果使用
@Param注解设置了参数,那必须与注解的相同 -
所以推荐将 Map 当作参数传递
-
测试
import com.qiaoer.dao.BlogMapper;
import com.qiaoer.entity.Blog;
import com.qiaoer.utils.MybatisUtils;
import org.apache.ibatis.session.SqlSession;import java.util.HashMap;
import java.util.List;
import java.util.Map;public class Test05 {public static void main(String[] args) {SqlSession sqlSession = MybatisUtils.getSqlSession();BlogMapper mapper = sqlSession.getMapper(BlogMapper.class);List<Blog> blogListNoParam = mapper.getBlogListIF(null);System.out.println("=====没有参数=====");for (Blog blog : blogListNoParam) {System.out.println(blog);}System.out.println("=====有一个参数 title=====");Map<String,Object> mapOneTitleParam =new HashMap<String,Object>();mapOneTitleParam.put("title","html是一门编程语言");List<Blog> blogListOneTitleParam = mapper.getBlogListIF(mapOneTitleParam);for (Blog blog : blogListOneTitleParam) {System.out.println(blog);}System.out.println("=====有一个参数 author=====");Map<String,Object> mapOneAuthorParam =new HashMap<String,Object>();mapOneAuthorParam.put("author","云朵");List<Blog> blogListOneAuthorParam = mapper.getBlogListIF(mapOneAuthorParam);for (Blog blog : blogListOneAuthorParam) {System.out.println(blog);}System.out.println("=====有两个参数 Title author=====");Map<String,Object> mapTwoParam =new HashMap<String,Object>();mapTwoParam.put("author","云朵");mapTwoParam.put("title","html是一门编程语言");List<Blog> blogListTwoParam = mapper.getBlogListIF(mapTwoParam);for (Blog blog : blogListTwoParam) {System.out.println(blog);}}
}
1.12.3 动态 SQL 常用标签
-
基本语法与 JSTL 相似
-
直接去官网参考学习
-
https://mybatis.org/mybatis-3/zh/getting-started.html
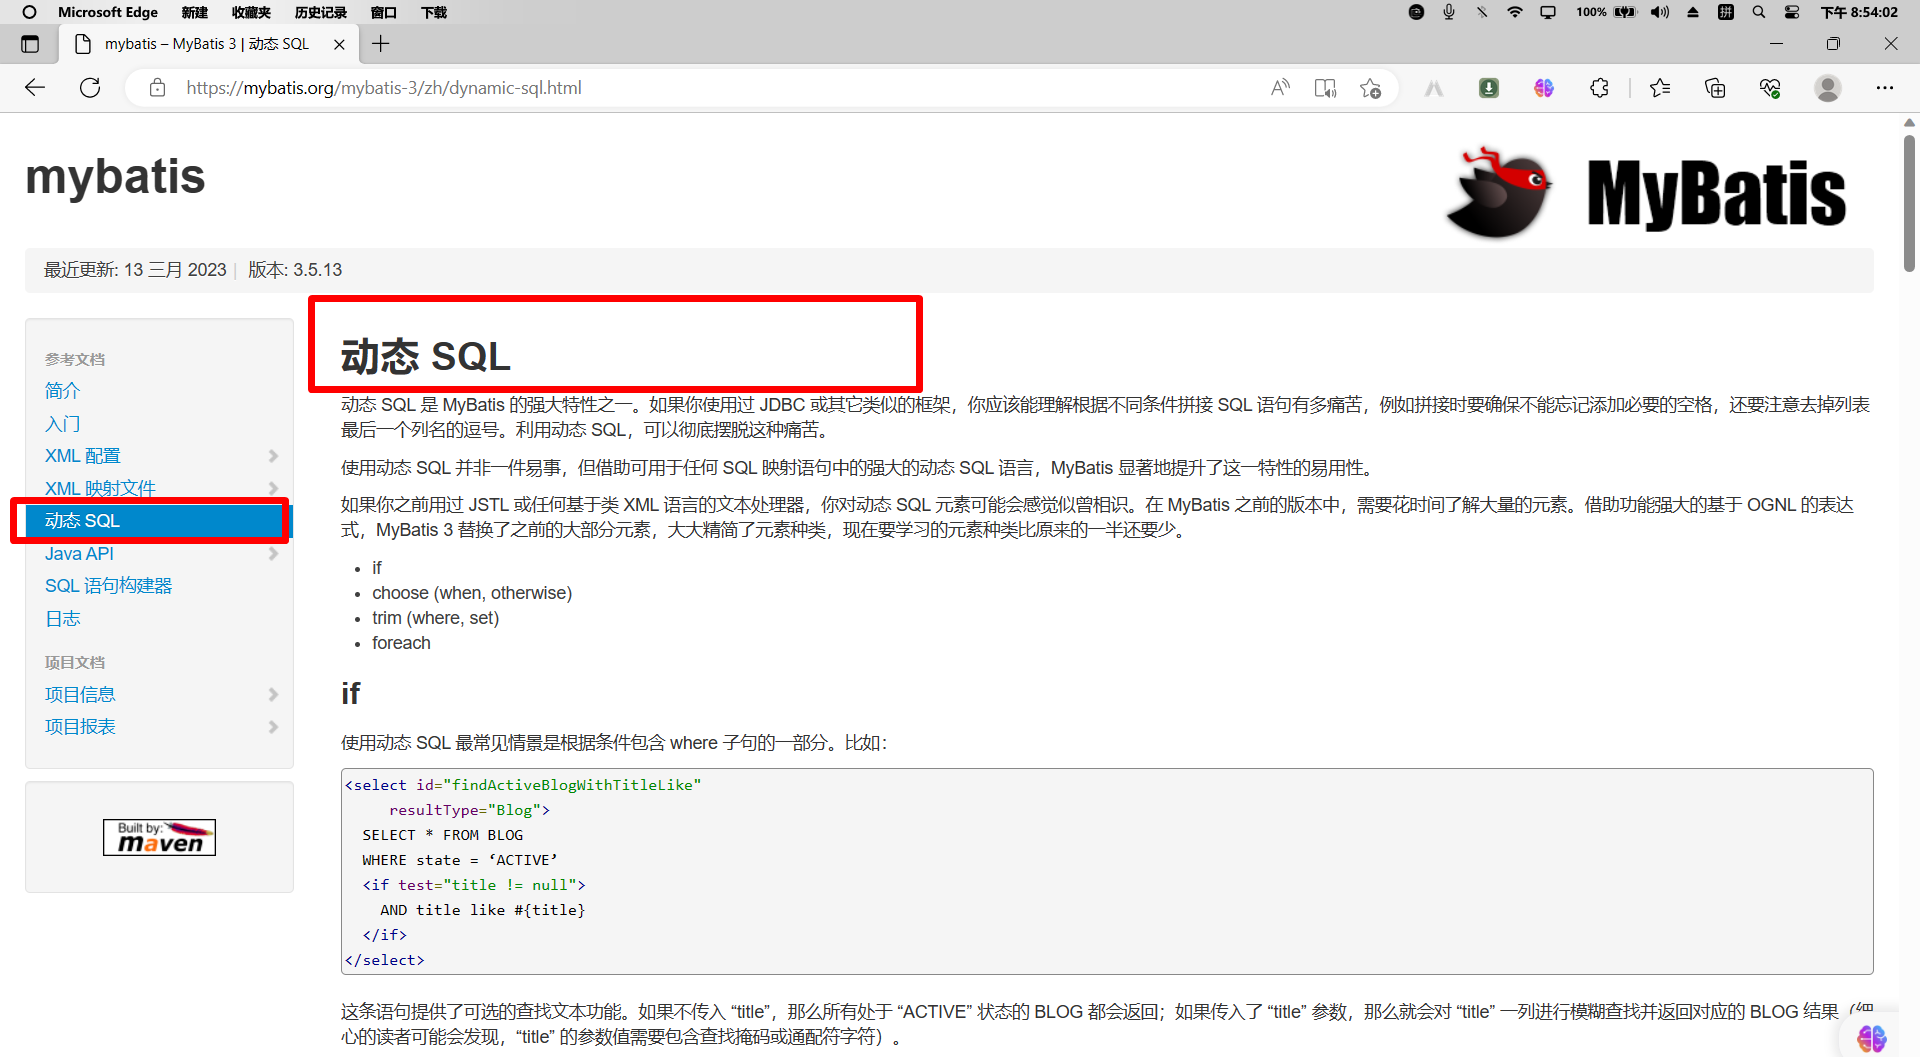
1.12.4 choose (when, otherwise)
<select id="selecPatientInfo" resultType="Patient" parameterType="map">select * from patient<where><choose><when test="password != null">and password=#{password}</when><when test="gender != null">and  gender=#{gender}</when><otherwise>identityNum=#{identityNum}</otherwise></choose></where>
</select>
- choose:类似于 java 中的 switch 关键字
- when:类似 java 中的 case 关键字
- otherwise:类似于 java 中的 default 关键字
- 如果 when 均不成立 才执行 otherwise
- when 自带 brea 机制,一个成立就直接结束后面的判断
1.12.5 trim (where, set)
<select id="selecPatientInfo" resultType="Patient" parameterType="map">select * from patient<where><if test="password != null">and password=#{password}</if><if test="gender != null">and gender=#{gender}</if></where>
</select>
- where:只有在有参数的时候才会执行
- 若子句的开头为
AND或OR,where会自动去除(保险最好都写上)
//    动态 sql Map 限定传参 set 判断
int updatePatientInfo(Map<String, Object> patientMap);
//  Main 执行 sqlSqlSession sqlSession = MybatisUtil.getSqlSession();PatientMapper patientMapper = sqlSession.getMapper(PatientMapper.class);Map<String, Object> patientMap = new HashMap<>();patientMap.put("password", "312314");patientMap.put("gender", "男");patientMap.put("identityNum", "3223123");int patientList = patientMapper.updatePatientInfo(patientMap);System.out.println(patientList + ":行受影响");
<update id="updatePatientInfo" parameterType="map">update patient<set><if test="password != null">password=#{password},</if><if test="gender != null">gender=#{gender},</if></set><where>identityNum=#{identityNum}</where>
</update>
- set:只有在有参数的时候才会执行
- 会自动删掉 sql 结尾额外的逗号(保险最好都写上)
<trim prefix="WHERE" prefixOverrides="AND |OR ">...
</trim><trim prefix="SET" suffixOverrides=",">...
</trim>
- trim:定制条件
- prefix:设置前缀
prefixOverrides忽略通过|分隔的内容(AND |OR中的空格是必要的)- 移除所有
prefixOverrides属性中指定的内容,并且插入prefix属性中指定的内容
1.12.6 foreach
select * from patient where (patientID=1 and patientID=2 and patientID=3)
-- 这里也可以用  where patientID IN(1,2,3) 只是为了练习拼接 sql
// 动态 sql foreach 便利
List<Patient> selecPatientInfoForeach(Map<String, Object> patientMap);
// Main 执行 sqlSqlSession sqlSession = MybatisUtil.getSqlSession();PatientMapper patientMapper = sqlSession.getMapper(PatientMapper.class);Map<String, Object> patientMap = new HashMap<>();ArrayList<Integer> patientIdList = new ArrayList<>();patientIdList.add(1);patientIdList.add(2);patientIdList.add(5);patientMap.put("ids", patientIdList);List<Patient> patientList = patientMapper.selecPatientInfoForeach(patientMap);for (Patient patient : patientList) {System.out.println(patient);}
<select id="selecPatientInfoForeach" resultType="Patient" parameterType="map">select *from patient<where><foreach item="patientID" collection="ids" open="and (" separator="or" close=")">patientID=#{patientID}</foreach></where>
</select>
- foreach:遍历
- collection:集合名称,对应 map 的 key
- item:集合的每一项,对应 list 的每一项
- open:sql 以什么开头
- close:sql 以什么结尾
- separator: sql 以什么分隔
- 里面写拼接的 sql
在写这类复杂的拼接 可以先在数据库中写好 正确的完整 sql 在来替换拆分
1.12.7 sql 片段
在使用 sql 的时候 会有一些重复性的 判断,例如上面的案例,都判断了title与gender类似于这样的 sql 就可以抽离成 sql 片段,以复用
 <update id="updatePatientInfo" parameterType="map">update patient<set><include refid="if-password-gender"/></set><where>identityNum=#{identityNum}</where>
</update><sql id="if-password-gender"><if test="password != null">password=#{password},</if><if test="gender != null">gender=#{gender},</if>
</sql>
- sql:抽离出来的 sql 片段
- id:片段名称(见名知意)
- include:在需要使用片段的地方,导入片段
- refid:sql 片段名称
- sql 片段不要包含 where 语句
- 尽量提取简单的 sql 片段以提高,复用性
1.12.8 script
要在带注解的映射器接口类中使用动态 SQL,可以使用script元素。
@Update({"<script>","update Author"," <set>"," <if test='username != null'>username=#{username},</if>"," <if test='password != null'>password=#{password},</if>"," <if test='email != null'>email=#{email},</if>"," <if test='bio != null'>bio=#{bio}</if>"," </set>","where id=#{id}","</script>"})void updateAuthorValues(Author author);
1.12.9 bind
bind 元素允许你在 OGNL 表达式以外创建一个变量,并将其绑定到当前的上下文。
<select id="selectBlogsLike" resultType="Blog"><bind name="pattern" value="'%' + _parameter.getTitle() + '%'" />SELECT * FROM BLOGWHERE title LIKE #{pattern}
</select>
add(5);
patientMap.put(“ids”, patientIdList);
List patientList = patientMapper.selecPatientInfoForeach(patientMap);
for (Patient patient : patientList) {
System.out.println(patient);
}
```xml
<select id="selecPatientInfoForeach" resultType="Patient" parameterType="map">select *from patient<where><foreach item="patientID" collection="ids" open="and (" separator="or" close=")">patientID=#{patientID}</foreach></where>
</select>
- foreach:遍历
- collection:集合名称,对应 map 的 key
- item:集合的每一项,对应 list 的每一项
- open:sql 以什么开头
- close:sql 以什么结尾
- separator: sql 以什么分隔
- 里面写拼接的 sql
在写这类复杂的拼接 可以先在数据库中写好 正确的完整 sql 在来替换拆分
1.12.7 sql 片段
在使用 sql 的时候 会有一些重复性的 判断,例如上面的案例,都判断了title与gender类似于这样的 sql 就可以抽离成 sql 片段,以复用
 <update id="updatePatientInfo" parameterType="map">update patient<set><include refid="if-password-gender"/></set><where>identityNum=#{identityNum}</where>
</update><sql id="if-password-gender"><if test="password != null">password=#{password},</if><if test="gender != null">gender=#{gender},</if>
</sql>
- sql:抽离出来的 sql 片段
- id:片段名称(见名知意)
- include:在需要使用片段的地方,导入片段
- refid:sql 片段名称
- sql 片段不要包含 where 语句
- 尽量提取简单的 sql 片段以提高,复用性
1.12.8 script
要在带注解的映射器接口类中使用动态 SQL,可以使用script元素。
@Update({"<script>","update Author"," <set>"," <if test='username != null'>username=#{username},</if>"," <if test='password != null'>password=#{password},</if>"," <if test='email != null'>email=#{email},</if>"," <if test='bio != null'>bio=#{bio}</if>"," </set>","where id=#{id}","</script>"})void updateAuthorValues(Author author);
1.12.9 bind
bind 元素允许你在 OGNL 表达式以外创建一个变量,并将其绑定到当前的上下文。
<select id="selectBlogsLike" resultType="Blog"><bind name="pattern" value="'%' + _parameter.getTitle() + '%'" />SELECT * FROM BLOGWHERE title LIKE #{pattern}
</select>


![[threejs]相机与坐标](https://img-blog.csdnimg.cn/27ae5ed4c134464093ba8240d06ba411.png)
