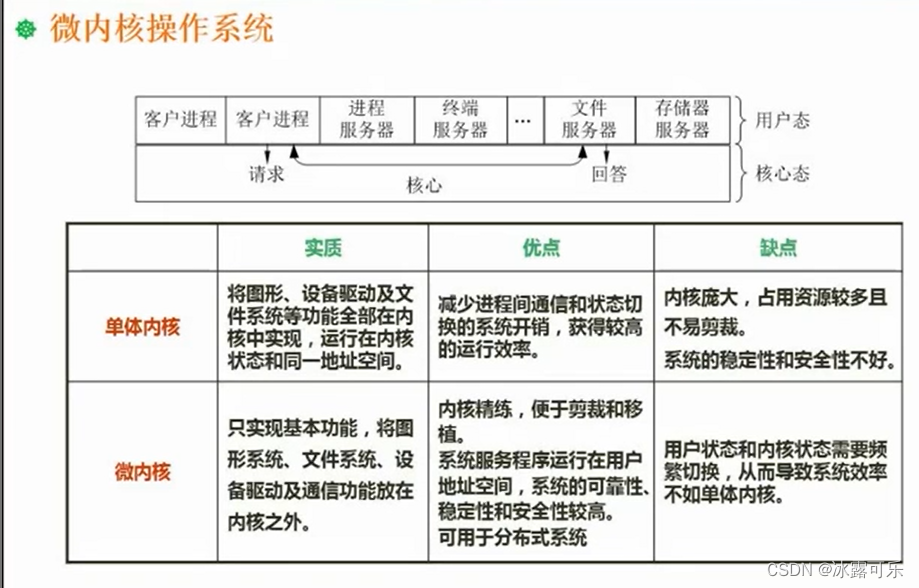
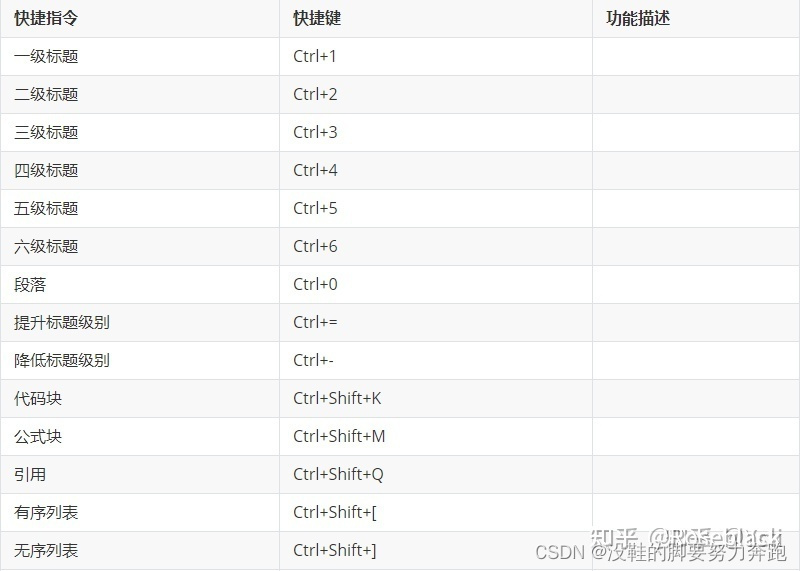
原图:
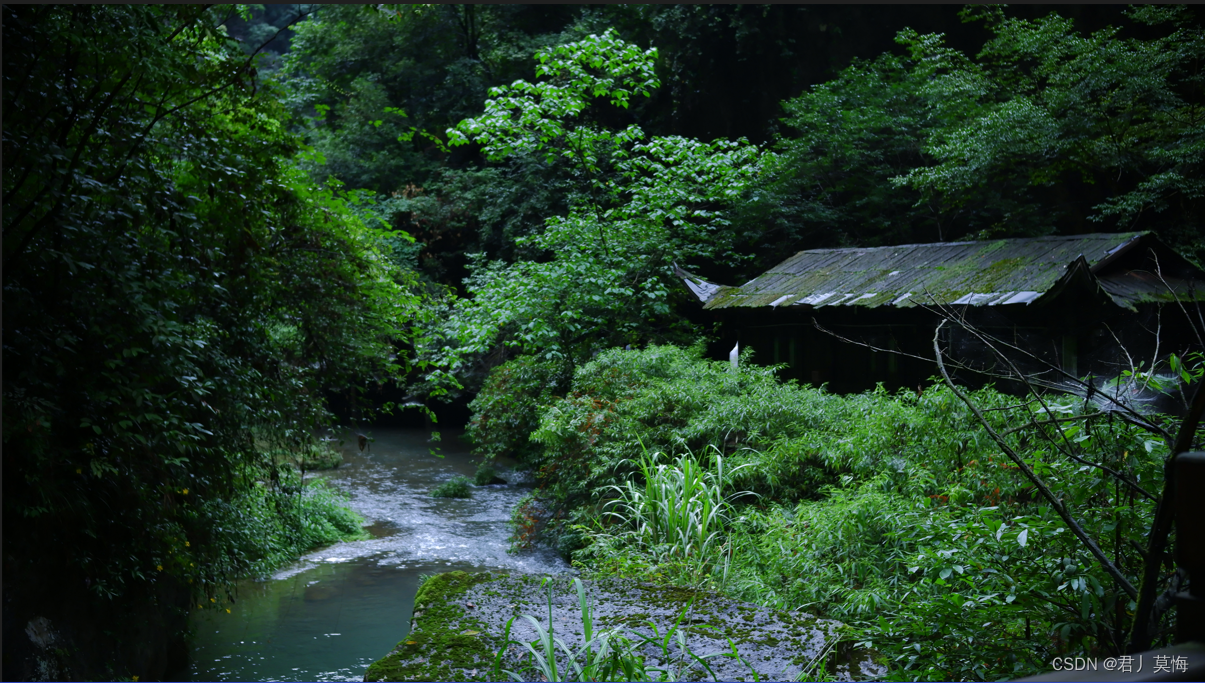
添加边框后:
 添加边框会读取照片的exif信息如时间、相机型号、品牌以及快门焦段等信息,将他们显示在下面的边框中。
获取当前py文件路径
import os
#get path that py file located
def Get_Currentpath():file_path = os.path.abspath(__file__)dir_path = os.path.dirname(file_path)return dir_path
弹窗获取所选择文件路径
如下图使用tkinter库掉出弹窗选择指定图片,并获取所选择图片的绝对路径
import tkinter
#get file path that choosed
def Get_FilePath():root = tkinter.Tk()root.withdraw()f_path = filedialog.askopenfilename()return f_path
弹窗获取用户所选择的保存路径
将处理后的图片存储到所选的路径并指定文件名

def save_filePath():# 创建文件对话框root = tkinter.Tk()root.withdraw()# 弹出保存文件对话框file_path = filedialog.asksaveasfilename(defaultextension=".jpg", filetypes=[("JPG File", "*.jpg"), ("PNG file","*.png"),("All Files", "*.*")])print(file_path)# 如果用户选择了文件路径,则返回路径if file_path:return file_pathelse:pass
创建文字图片
def createfond(size=160,str=' ',color=(0,0,0)):lopath = Get_Currentpath()fondpath = lopath+r'\material\方正楷体简体.TTF'dignum=0alphanum=0othernum=0for i in str:if i.isdigit():dignum+=1elif i.isalpha():alphanum+=1else:othernum+=1`在这里插入代码片`othernum = len(str)-dignumx=int(dignum*size*0.6)+int(alphanum*size*0.6)+int(othernum*size*0.5)y=int(size*1.2)img = Image.new("RGBA",(x,y),'white')draw = ImageDraw.Draw(img)#创建一个绘画对象fnt = ImageFont.truetype(fondpath,size)draw.text((0,0),str,fill=color,font=fnt)#img.show()return img,x,y
获取字体ttf文件路径
fondpath = lopath+r'\material\方正楷体简体.TTF'
计算文字所占用的空间大小从而生成合适大小的image图像
x=int(dignum*size*0.6)+int(alphanum*size*0.6)+int(othernum*size*0.5)y=int(size*1.2)img = Image.new("RGBA",(x,y),'white')
使用imageDraw 和 ImageFont方法在image图像上写文本
from PIL import Image
from PIL import ImageFont
from PIL import ImageDraw    draw = ImageDraw.Draw(img)#创建一个绘画对象
fnt = ImageFont.truetype(fondpath,size)
draw.text((0,0),str,fill=color,font=fnt)
生成文字图片如下

最后返回的是处理好的文本图像变量和图像的长和高
return img,x,y
创建边框
#creat the border
def CreateBorder(logopath,color = (255,255,255)):Src_path = Get_FilePath()pictype = picturetype.picturesize.size_16_9img = Image.open(Src_path)#get exif dataexif_dict = piexif.load(Src_path)exif_bytes = piexif.dump(exif_dict)exif_mes = img._getexif()# 获取时间信息if "Exif" in exif_dict:exif_data = exif_dict["Exif"]#拍摄日期if piexif.ExifIFD.DateTimeOriginal in exif_data:datetime_original_0 = str(exif_data[piexif.ExifIFD.DateTimeOriginal].decode("utf-8"))#print("DateTimeOriginal:", datetime_original)datetime_original = datetime_original_0.replace(':','.',2)datetime_original = datetime_original[0:10]print(datetime_original)else:   datetime_original = ' '#焦距if piexif.ExifIFD.FocalLength in exif_data:FocalLength = str(int(exif_data[piexif.ExifIFD.FocalLength][0]/100))+"mm"#print("focal length:",FocalLength)else:FocalLength = ' '#ISOif piexif.ExifIFD.ISOSpeedRatings in exif_data:ISO = 'ISO'+str(exif_data[piexif.ExifIFD.ISOSpeedRatings])#print("ISO:",ISO)else:ISO = ' '#快门时间if piexif.ExifIFD.ExposureTime in exif_data:exposure_time = exif_data[piexif.ExifIFD.ExposureTime]shutter_speed = exposure_time[0] / exposure_time[1]shutter_speed = int(1/shutter_speed)shutter_speed = '1/'+str(shutter_speed)+'s'else:shutter_speed = ' '#光圈if piexif.ExifIFD.FNumber in exif_data:f_number = exif_data[piexif.ExifIFD.FNumber]fnumber = 'f/'+str(int(f_number[0] / f_number[1]))#print("光圈",fnumber)else:fnumber = ' '#镜头品牌if piexif.ExifIFD.LensMake in exif_data:lensmaker = exif_data[piexif.ExifIFD.LensMake].decode("utf-8")#print('镜头品牌:',lensmaker)else:lensmaker = ' '#镜头型号if piexif.ExifIFD.LensModel in exif_data:lensmodel = exif_data[piexif.ExifIFD.LensModel].decode("utf-8")#print("镜头型号",lensmodel)else:lensmodel = ' 'camera_model = str(exif_dict["0th"].get(piexif.ImageIFD.Model).decode("utf-8"))camera_make = str(exif_dict["0th"].get(piexif.ImageIFD.Make).decode("utf-8"))print(camera_make,camera_model)signature = "Photo by mohuijun"else:pass#get width and highPicWidth = img.size[0]PicHigh = img.size[1]#picture is 16:9if int(PicWidth/16)==int(PicHigh/9):pictype = picturetype.picturesize.size_16_9lowwidth = int(PicWidth/3*2-PicHigh)Highwidth = 0letfWidth = 0rightwidth = 0borderhigh = lowwidthborderwide = PicWidthlogoimg = Image.open(logopath)logowidth = int(PicWidth/7)logohigh = int(logowidth/4.3)logoimg.thumbnail((logowidth,logohigh))#create new picNewPicWidth = PicWidth + letfWidth + rightwidthNewPicHigh = PicHigh + Highwidth + lowwidth#logo locationlogo_x = int(borderwide/20*11)logo_y = int((borderhigh-logohigh)/2)+PicHigh#create new pictureimg_new = Image.new('RGB', (NewPicWidth, NewPicHigh), color)#create exif messageimg_focallength,focallengthwid,focallengthhigh = createfond(size=120,str=FocalLength)img_data,datawid,datahigh = createfond(size=90,str=signature+' on '+datetime_original,color=(120,120,120))img_ISO,ISOwid,ISOhigh = createfond(size=120,str=ISO)img_shuttime,shutwid,shuthigh = createfond(size=120,str=shutter_speed)img_FNnumber,FNnumberwid,FNnumberhigh = createfond(size=120,str=fnumber)img_Lens,lenwid,lenhigh = createfond(size=90,str=(lensmaker+'·'+lensmodel),color=(120,120,120))# create '|'img_symbal,symbalwid,symbalhigh = createfond(size=350,str='|',color=(180,180,180))#create camera modeimg_camera,camerawid,camerahigh = createfond(150,str = camera_make+' '+camera_model)#create signature#img_signature,signaturewid,signaturehigh = createfond(size = 100,str = signature,color=(120,120,120))symbal_x = logo_x+logowidthsymbal_y = int((borderhigh-symbalhigh)/2)+PicHigh#exif message locationfocallength_x = symbal_x+symbalwidfocallength_y = symbal_y+int(symbalhigh/10)FNnumber_x = focallength_x+focallengthwidFNnumber_y = symbal_y+int(symbalhigh/10)shuttime_x = FNnumber_x+FNnumberwidshuttime_y = symbal_y+int(symbalhigh/10)ISO_x = shuttime_x+shutwidISO_y = symbal_y+int(symbalhigh/10)data_x = focallength_xdata_y = symbal_y+int(symbalhigh/3*2)Lens_x = 100Lens_y = symbal_y+int(symbalhigh/3*2)camera_x = 100camera_y = symbal_y+int(symbalhigh/5)img_new.paste(img, (letfWidth, Highwidth))#paste logoimg_new.paste(logoimg,(logo_x,logo_y))#paste exif messageimg_new.paste(img_focallength,(focallength_x,focallength_y))#img_new.paste(img_data,(data_x,data_y))img_new.paste(img_FNnumber,(FNnumber_x,FNnumber_y))img_new.paste(img_ISO,(ISO_x,ISO_y))img_new.paste(img_shuttime,(shuttime_x,shuttime_y))img_new.paste(img_Lens,(Lens_x,Lens_y))img_new.paste(img_data,(data_x,data_y))img_new.paste(img_symbal,(symbal_x,symbal_y))img_new.paste(img_camera,(camera_x,camera_y))Des_path = save_filePath()try:img_new.save(Des_path,exif=exif_bytes)except:print("地址无效")
获取所选图像绝对路径并打开
Src_path = Get_FilePath()pictype = picturetype.picturesize.size_16_9img = Image.open(Src_path)
使用piexif库获取图片的exif信息,得到拍摄时间、相机型号、光圈、快门等数据信息
import piexif#get exif data
exif_dict = piexif.load(Src_path)
exif_bytes = piexif.dump(exif_dict)
exif_mes = img._getexif()
# 获取时间信息
if "Exif" in exif_dict:exif_data = exif_dict["Exif"]#拍摄日期if piexif.ExifIFD.DateTimeOriginal in exif_data:datetime_original_0 = str(exif_data[piexif.ExifIFD.DateTimeOriginal].decode("utf-8"))#print("DateTimeOriginal:", datetime_original)datetime_original = datetime_original_0.replace(':','.',2)datetime_original = datetime_original[0:10]print(datetime_original)else:   datetime_original = ' '#焦距if piexif.ExifIFD.FocalLength in exif_data:FocalLength = str(int(exif_data[piexif.ExifIFD.FocalLength][0]/100))+"mm"#print("focal length:",FocalLength)else:FocalLength = ' '#ISOif piexif.ExifIFD.ISOSpeedRatings in exif_data:ISO = 'ISO'+str(exif_data[piexif.ExifIFD.ISOSpeedRatings])#print("ISO:",ISO)else:ISO = ' '#快门时间if piexif.ExifIFD.ExposureTime in exif_data:exposure_time = exif_data[piexif.ExifIFD.ExposureTime]shutter_speed = exposure_time[0] / exposure_time[1]shutter_speed = int(1/shutter_speed)shutter_speed = '1/'+str(shutter_speed)+'s'else:shutter_speed = ' '#光圈if piexif.ExifIFD.FNumber in exif_data:f_number = exif_data[piexif.ExifIFD.FNumber]fnumber = 'f/'+str(int(f_number[0] / f_number[1]))#print("光圈",fnumber)else:fnumber = ' '#镜头品牌if piexif.ExifIFD.LensMake in exif_data:lensmaker = exif_data[piexif.ExifIFD.LensMake].decode("utf-8")#print('镜头品牌:',lensmaker)else:lensmaker = ' '#镜头型号if piexif.ExifIFD.LensModel in exif_data:lensmodel = exif_data[piexif.ExifIFD.LensModel].decode("utf-8")#print("镜头型号",lensmodel)else:lensmodel = ' 'camera_model = str(exif_dict["0th"].get(piexif.ImageIFD.Model).decode("utf-8"))camera_make = str(exif_dict["0th"].get(piexif.ImageIFD.Make).decode("utf-8"))print(camera_make,camera_model)signature = "Photo by mohuijun"
else:pass
获取图片的高和宽度,计算照片比例,如果原图为16:9则填充边框变成3:2
#get width and highPicWidth = img.size[0]PicHigh = img.size[1]#picture is 16:9if int(PicWidth/16)==int(PicHigh/9):pictype = picturetype.picturesize.size_16_9lowwidth = int(PicWidth/3*2-PicHigh)Highwidth = 0letfWidth = 0rightwidth = 0borderhigh = lowwidthborderwide = PicWidth
依据相机品牌logo的路径获取相机品牌logo图像
#get logo piclogoimg = Image.open(logopath)logowidth = int(PicWidth/7)logohigh = int(logowidth/4.3)logoimg.thumbnail((logowidth,logohigh))#create new picNewPicWidth = PicWidth + letfWidth + rightwidthNewPicHigh = PicHigh + Highwidth + lowwidth#logo locationlogo_x = int(borderwide/20*11)logo_y = int((borderhigh-logohigh)/2)+PicHigh
创建一个信息图片image作为处理后的图片
#create new pictureimg_new = Image.new('RGB', (NewPicWidth, NewPicHigh), color)
使用上面所述的创建文字图像方法依次创建相机信息的图像
#create exif messageimg_focallength,focallengthwid,focallengthhigh = createfond(size=120,str=FocalLength)img_data,datawid,datahigh = createfond(size=90,str=signature+' on '+datetime_original,color=(120,120,120))img_ISO,ISOwid,ISOhigh = createfond(size=120,str=ISO)img_shuttime,shutwid,shuthigh = createfond(size=120,str=shutter_speed)img_FNnumber,FNnumberwid,FNnumberhigh = createfond(size=120,str=fnumber)img_Lens,lenwid,lenhigh = createfond(size=90,str=(lensmaker+'·'+lensmodel),color=(120,120,120))# create '|'img_symbal,symbalwid,symbalhigh = createfond(size=350,str='|',color=(180,180,180))#create camera modeimg_camera,camerawid,camerahigh = createfond(150,str = camera_make+' '+camera_model)
计算文字图像需要摆放的位置
symbal_x = logo_x+logowidthsymbal_y = int((borderhigh-symbalhigh)/2)+PicHigh#exif message locationfocallength_x = symbal_x+symbalwidfocallength_y = symbal_y+int(symbalhigh/10)FNnumber_x = focallength_x+focallengthwidFNnumber_y = symbal_y+int(symbalhigh/10)shuttime_x = FNnumber_x+FNnumberwidshuttime_y = symbal_y+int(symbalhigh/10)ISO_x = shuttime_x+shutwidISO_y = symbal_y+int(symbalhigh/10)data_x = focallength_xdata_y = symbal_y+int(symbalhigh/3*2)Lens_x = 100Lens_y = symbal_y+int(symbalhigh/3*2)camera_x = 100camera_y = symbal_y+int(symbalhigh/5)
效果图下

将所有文字图像和原图按照指定位置和大小复制到新的图像中
#paste orignial pictureimg_new.paste(img, (letfWidth, Highwidth))#paste logoimg_new.paste(logoimg,(logo_x,logo_y))#paste exif messageimg_new.paste(img_focallength,(focallength_x,focallength_y))#img_new.paste(img_data,(data_x,data_y))img_new.paste(img_FNnumber,(FNnumber_x,FNnumber_y))img_new.paste(img_ISO,(ISO_x,ISO_y))img_new.paste(img_shuttime,(shuttime_x,shuttime_y))img_new.paste(img_Lens,(Lens_x,Lens_y))img_new.paste(img_data,(data_x,data_y))img_new.paste(img_symbal,(symbal_x,symbal_y))img_new.paste(img_camera,(camera_x,camera_y))
获取保存路径并保存
Des_path = save_filePath()try:img_new.save(Des_path,exif=exif_bytes)except:print("地址无效")
主函数 创建图片边框
Local_path = Get_Currentpath()
LOGOPATH = Local_path+r'\material\fujifilmlogo.jpg'
CreateBorder(logopath=LOGOPATH)
附全部代码
import tkinter
import os
from tkinter import filedialog
from PIL import Image
from PIL import ImageFont
from PIL import ImageDraw
import exifread
import piexif
#get path that py file located
def Get_Currentpath():file_path = os.path.abspath(__file__)dir_path = os.path.dirname(file_path)return dir_path
#get file path that choosed
def Get_FilePath():root = tkinter.Tk()root.withdraw()f_path = filedialog.askopenfilename()return f_path
#set path to  save
def save_filePath():# 创建文件对话框root = tkinter.Tk()root.withdraw()# 弹出保存文件对话框file_path = filedialog.asksaveasfilename(defaultextension=".jpg", filetypes=[("JPG File", "*.jpg"), ("PNG file","*.png"),("All Files", "*.*")])print(file_path)# 如果用户选择了文件路径,则返回路径if file_path:return file_pathelse:pass
#create font
def createfond(size=160,str=' ',color=(0,0,0)):lopath = Get_Currentpath()fondpath = lopath+r'\material\方正楷体简体.TTF'dignum=0alphanum=0othernum=0for i in str:if i.isdigit():dignum+=1elif i.isalpha():alphanum+=1else:othernum+=1othernum = len(str)-dignumx=int(dignum*size*0.6)+int(alphanum*size*0.6)+int(othernum*size*0.5)y=int(size*1.2)img = Image.new("RGBA",(x,y),'white')draw = ImageDraw.Draw(img)#创建一个绘画对象fnt = ImageFont.truetype(fondpath,size)draw.text((0,0),str,fill=color,font=fnt)#img.show()return img,x,y
#creat the border
def CreateBorder(logopath,color = (255,255,255)):Src_path = Get_FilePath()pictype = picturetype.picturesize.size_16_9img = Image.open(Src_path)#get exif dataexif_dict = piexif.load(Src_path)exif_bytes = piexif.dump(exif_dict)exif_mes = img._getexif()# if exif_mes is not None:#         camera_info = exif_mes.get(0x010F)  # 0x010F表示相机品牌和型号的标记#         print(camera_info)# 获取时间信息if "Exif" in exif_dict:exif_data = exif_dict["Exif"]#拍摄日期if piexif.ExifIFD.DateTimeOriginal in exif_data:datetime_original_0 = str(exif_data[piexif.ExifIFD.DateTimeOriginal].decode("utf-8"))#print("DateTimeOriginal:", datetime_original)datetime_original = datetime_original_0.replace(':','.',2)datetime_original = datetime_original[0:10]print(datetime_original)else:   datetime_original = ' '#焦距if piexif.ExifIFD.FocalLength in exif_data:FocalLength = str(int(exif_data[piexif.ExifIFD.FocalLength][0]/100))+"mm"#print("focal length:",FocalLength)else:FocalLength = ' '#ISOif piexif.ExifIFD.ISOSpeedRatings in exif_data:ISO = 'ISO'+str(exif_data[piexif.ExifIFD.ISOSpeedRatings])#print("ISO:",ISO)else:ISO = ' '#快门时间if piexif.ExifIFD.ExposureTime in exif_data:exposure_time = exif_data[piexif.ExifIFD.ExposureTime]shutter_speed = exposure_time[0] / exposure_time[1]shutter_speed = int(1/shutter_speed)shutter_speed = '1/'+str(shutter_speed)+'s'else:shutter_speed = ' '#光圈if piexif.ExifIFD.FNumber in exif_data:f_number = exif_data[piexif.ExifIFD.FNumber]fnumber = 'f/'+str(int(f_number[0] / f_number[1]))#print("光圈",fnumber)else:fnumber = ' '#镜头品牌if piexif.ExifIFD.LensMake in exif_data:lensmaker = exif_data[piexif.ExifIFD.LensMake].decode("utf-8")#print('镜头品牌:',lensmaker)else:lensmaker = ' '#镜头型号if piexif.ExifIFD.LensModel in exif_data:lensmodel = exif_data[piexif.ExifIFD.LensModel].decode("utf-8")#print("镜头型号",lensmodel)else:lensmodel = ' '# if  piexif.ExifIFD. in exif_data:#     makernote = exif_data[piexif.ExifIFD.DeviceSettingDescription].decode("utf-8")#     print("相机:",makernote)#get camera modecamera_model = str(exif_dict["0th"].get(piexif.ImageIFD.Model).decode("utf-8"))#camera_model = camera_model[2:-1]camera_make = str(exif_dict["0th"].get(piexif.ImageIFD.Make).decode("utf-8"))#camera_make = camera_make[2:-1]print(camera_make,camera_model)#get camera maker#print("camera:",camera_model)signature = "Photo by mohuijun"else:pass#get width and highPicWidth = img.size[0]PicHigh = img.size[1]#picture is 16:9if int(PicWidth/16)==int(PicHigh/9):lowwidth = int(PicWidth/3*2-PicHigh)Highwidth = 0letfWidth = 0rightwidth = 0borderhigh = lowwidthborderwide = PicWidth#create border#get logo piclogoimg = Image.open(logopath)logowidth = int(PicWidth/7)logohigh = int(logowidth/4.3)logoimg.thumbnail((logowidth,logohigh))#create new picNewPicWidth = PicWidth + letfWidth + rightwidthNewPicHigh = PicHigh + Highwidth + lowwidth#logo locationlogo_x = int(borderwide/20*11)logo_y = int((borderhigh-logohigh)/2)+PicHigh#create new pictureimg_new = Image.new('RGB', (NewPicWidth, NewPicHigh), color)#create exif messageimg_focallength,focallengthwid,focallengthhigh = createfond(size=120,str=FocalLength)img_data,datawid,datahigh = createfond(size=90,str=signature+' on '+datetime_original,color=(120,120,120))img_ISO,ISOwid,ISOhigh = createfond(size=120,str=ISO)img_shuttime,shutwid,shuthigh = createfond(size=120,str=shutter_speed)img_FNnumber,FNnumberwid,FNnumberhigh = createfond(size=120,str=fnumber)img_Lens,lenwid,lenhigh = createfond(size=90,str=(lensmaker+'·'+lensmodel),color=(120,120,120))# create '|'img_symbal,symbalwid,symbalhigh = createfond(size=350,str='|',color=(180,180,180))#create camera modeimg_camera,camerawid,camerahigh = createfond(150,str = camera_make+' '+camera_model)#create signature#img_signature,signaturewid,signaturehigh = createfond(size = 100,str = signature,color=(120,120,120))symbal_x = logo_x+logowidthsymbal_y = int((borderhigh-symbalhigh)/2)+PicHigh#exif message locationfocallength_x = symbal_x+symbalwidfocallength_y = symbal_y+int(symbalhigh/10)FNnumber_x = focallength_x+focallengthwidFNnumber_y = symbal_y+int(symbalhigh/10)shuttime_x = FNnumber_x+FNnumberwidshuttime_y = symbal_y+int(symbalhigh/10)ISO_x = shuttime_x+shutwidISO_y = symbal_y+int(symbalhigh/10)data_x = focallength_xdata_y = symbal_y+int(symbalhigh/3*2)Lens_x = 100Lens_y = symbal_y+int(symbalhigh/3*2)# signature_x = 100# signature_y = Lens_ycamera_x = 100camera_y = symbal_y+int(symbalhigh/5)#paste singnature picture#img_new.paste(img_signature,(signature_x,signature_y))#paste orignial pictureimg_new.paste(img, (letfWidth, Highwidth))#paste logoimg_new.paste(logoimg,(logo_x,logo_y))#paste exif messageimg_new.paste(img_focallength,(focallength_x,focallength_y))#img_new.paste(img_data,(data_x,data_y))img_new.paste(img_FNnumber,(FNnumber_x,FNnumber_y))img_new.paste(img_ISO,(ISO_x,ISO_y))img_new.paste(img_shuttime,(shuttime_x,shuttime_y))img_new.paste(img_Lens,(Lens_x,Lens_y))img_new.paste(img_data,(data_x,data_y))img_new.paste(img_symbal,(symbal_x,symbal_y))img_new.paste(img_camera,(camera_x,camera_y))Des_path = save_filePath()try:img_new.save(Des_path,exif=exif_bytes)except:print("地址无效")Local_path = Get_Currentpath()
LOGOPATH = Local_path+r'\material\fujifilmlogo.jpg'
CreateBorder(logopath=LOGOPATH)