目录
一、使用设备树
1.1 修改设备树流程
二、手动创建平台设备
三、总结(附驱动程序)
前情提要:【IMX6ULL驱动开发学习】07.驱动程序分离的思想之平台总线设备驱动模型和设备树_阿龙还在写代码的博客-CSDN博客
手动注册平台设备和设备树的目的都是为了构造platform_device结构体
一、使用设备树
之前的驱动编写方式,引脚信息在驱动程序里写死了,移植性差。而使用设备树,这样的程序编写方式便于在换了板子或引脚之后,只要修改设备树的节点信息即可,不需要看复杂的驱动程序,前提是有完备的驱动程序。
在驱动程序的入口函数里注册了gpio_platform_driver,
module_init(gpio_drv_init);
static int __init gpio_drv_init(void)
{/* 注册platform_driver */return platform_driver_register(&gpio_platform_driver);
}gpio_platform_driver结构体中probe函数被调用,需要在设备树中找到与之匹配的设备节点信息,即设备节点信息也要含有这个语句.compatible = "100ask,gpiodemo"
static const struct of_device_id gpio_dt_ids[] = {{ .compatible = "100ask,gpiodemo", },{ /* sentinel */ }
};static struct platform_driver gpio_platform_driver = {.driver		= {.name	= "100ask_gpio_plat_drv",.of_match_table = gpio_dt_ids,},.probe		= gpio_drv_probe,.remove		= gpio_drv_remove,
};
1.1 修改设备树流程
在内核目录下找到设备树文件,以我的路径为例,这里给出绝对路径
- 修改设备树:vi /home/book/100ask_imx6ull-sdk/Linux-4.9.88/arch/arm/boot/dts/100ask_imx6ull-14x14.dts
- 增加节点信息如下:
motor {compatible = "100ask,gpiodemo";gpios = <&gpio4 19 GPIO_ACTIVE_HIGH>, <&gpio4 20 GPIO_ACTIVE_HIGH>,<&gpio4 21 GPIO_ACTIVE_HIGH>,<&gpio4 22 GPIO_ACTIVE_HIGH>;
};- 一定要在/home/book/100ask_imx6ull-sdk/Linux-4.9.88目录下编译设备树:make dtbs
- 复制到单板上,如下:
PC:
cp arch/arm/boot/dts/100ask_imx6ull-14x14.dtb ~/nfs_rootfs/开发板:
mount -t nfs -o nolock,vers=3 192.168.5.11:/home/book/nfs_rootfs /mnt
cp /mnt/100ask_imx6ull-14x14.dtb  /boot
reboot- 查看设备树节点信息:ls /sys/firmware/devicetree/base/
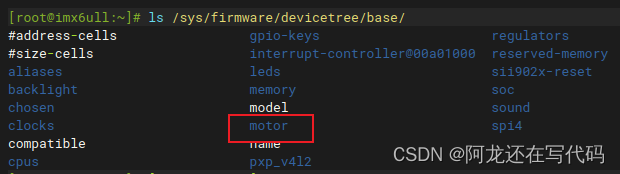
- 查看马达节点有没有被转换成平台设备(platform_device):ls /sys/bus/platform/devices/
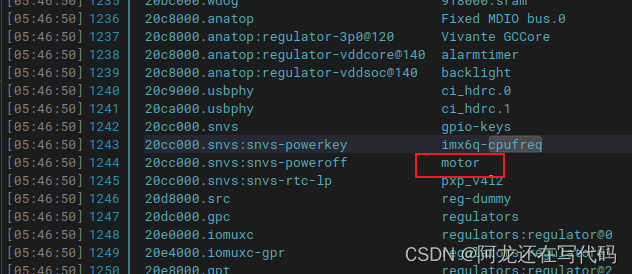
有这个motor文件表示有了对应的平台设备。
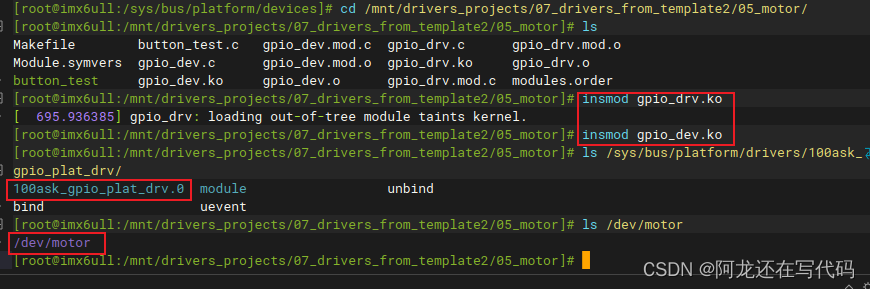
- 进入motor文件查看,因为还没装驱动,所以没有显示驱动程序

- 装载驱动后,查看motor文件: 说明驱动和设备都匹配上了

- 最后就编写测试程序进行测试即可:
./button_test /dev/motor ...二、手动创建平台设备
- 编写dev.c文件
#include <linux/module.h>
#include <linux/poll.h>
#include <linux/delay.h>
#include <linux/fs.h>
#include <linux/errno.h>
#include <linux/miscdevice.h>
#include <linux/kernel.h>
#include <linux/major.h>
#include <linux/mutex.h>
#include <linux/proc_fs.h>
#include <linux/seq_file.h>
#include <linux/stat.h>
#include <linux/init.h>
#include <linux/device.h>
#include <linux/tty.h>
#include <linux/kmod.h>
#include <linux/gfp.h>
#include <linux/gpio/consumer.h>
#include <linux/platform_device.h>
#include <linux/of_gpio.h>
#include <linux/of_irq.h>
#include <linux/interrupt.h>
#include <linux/irq.h>
#include <linux/slab.h>
#include <linux/fcntl.h>
#include <linux/timer.h>static struct resource my_drv_resource[] = {{.start          = 115,.end            = 115,.flags          = IORESOURCE_IRQ,},{.start          = 116,.end            = 116,.flags          = IORESOURCE_IRQ,},{.start          = 117,.end            = 117,.flags          = IORESOURCE_IRQ,},{.start          = 118,.end            = 118,.flags          = IORESOURCE_IRQ,},
};static struct platform_device gpio_platform_device = {.name           = "100ask_gpio_plat_drv",.id             = 0,.num_resources  = ARRAY_SIZE(my_drv_resource),// =4 宏来计算数组大小.resource       = my_drv_resource,
};static int __init gpio_dev_init(void)
{/* 注册platform_driver */return platform_device_register(&gpio_platform_device);
}static void __exit gpio_dev_exit(void)
{/* 反注册platform_driver */platform_device_unregister(&gpio_platform_device);
}/* 7. 其他完善:提供设备信息,自动创建设备节点                                     */module_init(gpio_dev_init);
module_exit(gpio_dev_exit);MODULE_LICENSE("GPL");
其中,由这个名字"100ask_gpio_plat_drv"找到与之匹配的平台驱动(platform_driver)
static struct platform_device gpio_platform_device = {.name           = "100ask_gpio_plat_drv",.id             = 0,.num_resources  = ARRAY_SIZE(my_drv_resource),// =4 宏来计算数组大小.resource       = my_drv_resource,
};- 修改Makefile文件
KERN_DIR =  /home/book/100ask_imx6ull-sdk/Linux-4.9.88 # 板子所用内核源码的目录all:make -C $(KERN_DIR) M=`pwd` modules $(CROSS_COMPILE)gcc -o button_test button_test.c
clean:make -C $(KERN_DIR) M=`pwd` modules cleanrm -rf modules.order  button_test# 参考内核源码drivers/char/ipmi/Makefile
# 要想把a.c, b.c编译成ab.ko, 可以这样指定:
# ab-y := a.o b.o
# obj-m += ab.oobj-m += gpio_drv.o
obj-m += gpio_dev.o- 编译:make
- 设备树节点信息取消:因为内核里有了设备树节点信息,需要改回去或者添加disabled状态
motor {compatible = "100ask,gpiodemo";gpios = <&gpio4 19 GPIO_ACTIVE_HIGH>, <&gpio4 20 GPIO_ACTIVE_HIGH>,<&gpio4 21 GPIO_ACTIVE_HIGH>,<&gpio4 22 GPIO_ACTIVE_HIGH>;status = "disabled";
};- 编译:make dtbs
- 更新设备树:
PC:
cp arch/arm/boot/dts/100ask_imx6ull-14x14.dtb ~/nfs_rootfs/开发板:
mount -t nfs -o nolock,vers=3 192.168.5.11:/home/book/nfs_rootfs /mnt
cp /mnt/100ask_imx6ull-14x14.dtb  /boot
reboot- 查看设备树节点信息:ls /sys/firmware/devicetree/base/
状态为禁止状态,设备树节点信息被我们禁用了

- 查看马达节点有没有被转换成平台设备(platform_device):ls /sys/bus/platform/devices/,这里肯定也是没有的

- 装载驱动程序、查看是否匹配上、查看设备节点
这个平台驱动支持名为"100ask_gpio_plat_drv"的设备,设备节点也出来了
三、总结(附驱动程序)
这个驱动程序,在入口函数里注册了平台驱动,这个平台驱动可以支持来自设备树的平台设备.compatible = "100ask,gpiodemo",和来自自己手动创建的平台设备.name = "100ask_gpio_plat_drv"。匹配规则有4种,这里用的是最简单的。当平台driver匹配到平台device时,驱动程序里的probe函数就被调用,probe函数里可以从设备树里得到引脚信息,也可以从手动注册的平台device里得到所谓的资源。
static const struct of_device_id gpio_dt_ids[] = {{ .compatible = "100ask,gpiodemo", },{ /* sentinel */ }
};static struct platform_driver gpio_platform_driver = {.driver		= {.name	= "100ask_gpio_plat_drv",.of_match_table = gpio_dt_ids,//设备树信息},.probe		= gpio_drv_probe,.remove		= gpio_drv_remove,
};
驱动程序:
#include <linux/module.h>
#include <linux/poll.h>
#include <linux/delay.h>
#include <linux/fs.h>
#include <linux/errno.h>
#include <linux/miscdevice.h>
#include <linux/kernel.h>
#include <linux/major.h>
#include <linux/mutex.h>
#include <linux/proc_fs.h>
#include <linux/seq_file.h>
#include <linux/stat.h>
#include <linux/init.h>
#include <linux/device.h>
#include <linux/tty.h>
#include <linux/kmod.h>
#include <linux/gfp.h>
#include <linux/gpio/consumer.h>
#include <linux/platform_device.h>
#include <linux/of_gpio.h>
#include <linux/of_irq.h>
#include <linux/interrupt.h>
#include <linux/irq.h>
#include <linux/slab.h>
#include <linux/fcntl.h>
#include <linux/timer.h>struct gpio_desc{int gpio;int irq;char name[128];int key;struct timer_list key_timer;
} ;static struct gpio_desc *gpios;
static int count;/* 主设备号                                                                 */
static int major = 0;
static struct class *gpio_class;/* 马达引脚设置数字 */
static int g_motor_pin_ctrl[8]= {0x2,0x3,0x1,0x9,0x8,0xc,0x4,0x6};
static int g_motor_index = 0;void set_pins_for_motor(int index)
{int i;for (i = 0; i < 4; i++){gpio_set_value(gpios[i].gpio, g_motor_pin_ctrl[index] & (1<<i) ? 1 : 0);}
}void disable_motor(void)
{int i;for (i = 0; i < 4; i++){gpio_set_value(gpios[i].gpio, 0);}
}/* int buf[2];* buf[0] = 步进的次数, > 0 : 逆时针步进; < 0 : 顺时针步进* buf[1] = mdelay的时间*/
static ssize_t motor_write(struct file *file, const char __user *buf, size_t size, loff_t *offset)
{int ker_buf[2];int err;int step;if (size != 8)return -EINVAL;err = copy_from_user(ker_buf, buf, size);if (ker_buf[0] > 0){/* 逆时针旋转 */for (step = 0; step < ker_buf[0]; step++)
{set_pins_for_motor(g_motor_index);mdelay(ker_buf[1]);g_motor_index--;if (g_motor_index == -1)g_motor_index = 7;}}else{/* 顺时针旋转 */ker_buf[0] = 0 - ker_buf[0];for (step = 0; step < ker_buf[0]; step++)
{set_pins_for_motor(g_motor_index);mdelay(ker_buf[1]);g_motor_index++;if (g_motor_index == 8)g_motor_index = 0;}
}/* 改进:旋转到位后让马达不再消耗电源 */disable_motor();return 8;
}/* 定义自己的file_operations结构体                                              */
static struct file_operations gpio_key_drv = {.owner	 = THIS_MODULE,.write   = motor_write,
};/* 在入口函数 */
static int gpio_drv_probe(struct platform_device *pdev)
{int err = 0;int i;struct device_node *np = pdev->dev.of_node;struct resource *res;printk("%s %s line %d\n", __FILE__, __FUNCTION__, __LINE__);/* 从platfrom_device获得引脚信息 * 1. pdev来自c文件* 2. pdev来自设备树*/if (np){/* pdev来自设备树 : 示例reg_usb_ltemodule: regulator@1 {compatible = "100ask,gpiodemo";gpios = <&gpio5 5 GPIO_ACTIVE_HIGH>, <&gpio5 3 GPIO_ACTIVE_HIGH>;};*/count = of_gpio_count(np);if (!count)return -EINVAL;gpios = kmalloc(count * sizeof(struct gpio_desc), GFP_KERNEL);for (i = 0; i < count; i++){gpios[i].gpio = of_get_gpio(np, i);sprintf(gpios[i].name, "%s_pin_%d", np->name, i);}}else{/* pdev来自c文件 static struct resource omap16xx_gpio3_resources[] = {{.start  = 115,.end    = 115,.flags  = IORESOURCE_IRQ,},{.start  = 118,.end    = 118,.flags  = IORESOURCE_IRQ,},		};		*/count = 0;while (1){res = platform_get_resource(pdev, IORESOURCE_IRQ, count);if (res){count++;}else{break;}}if (!count)return -EINVAL;gpios = kmalloc(count * sizeof(struct gpio_desc), GFP_KERNEL);for (i = 0; i < count; i++){res = platform_get_resource(pdev, IORESOURCE_IRQ, i);gpios[i].gpio = res->start;sprintf(gpios[i].name, "%s_pin_%d", pdev->name, i);}}for (i = 0; i < count; i++){err = gpio_request(gpios[i].gpio, gpios[i].name);gpio_direction_output(gpios[i].gpio, 0);}/* 注册file_operations 	*/major = register_chrdev(0, "100ask_gpio_key", &gpio_key_drv);  /* /dev/gpio_desc */gpio_class = class_create(THIS_MODULE, "100ask_gpio_key_class");if (IS_ERR(gpio_class)) {printk("%s %s line %d\n", __FILE__, __FUNCTION__, __LINE__);unregister_chrdev(major, "100ask_gpio_key");return PTR_ERR(gpio_class);}device_create(gpio_class, NULL, MKDEV(major, 0), NULL, "motor"); /* /dev/motor */return err;
}/* 有入口函数就应该有出口函数:卸载驱动程序时,就会去调用这个出口函数*/
static int gpio_drv_remove(struct platform_device *pdev)
{int i;printk("%s %s line %d\n", __FILE__, __FUNCTION__, __LINE__);device_destroy(gpio_class, MKDEV(major, 0));class_destroy(gpio_class);unregister_chrdev(major, "100ask_gpio_key");for (i = 0; i < count; i++){gpio_free(gpios[i].gpio);}return 0;
}static const struct of_device_id gpio_dt_ids[] = {{ .compatible = "100ask,gpiodemo", },{ /* sentinel */ }
};static struct platform_driver gpio_platform_driver = {.driver		= {.name	= "100ask_gpio_plat_drv",.of_match_table = gpio_dt_ids,//设备树信息},.probe		= gpio_drv_probe,.remove		= gpio_drv_remove,
};static int __init gpio_drv_init(void)
{/* 注册platform_driver */return platform_driver_register(&gpio_platform_driver);
}static void __exit gpio_drv_exit(void)
{/* 反注册platform_driver */platform_driver_unregister(&gpio_platform_driver);
}/* 7. 其他完善:提供设备信息,自动创建设备节点                                     */module_init(gpio_drv_init);
module_exit(gpio_drv_exit);MODULE_LICENSE("GPL");