前言
最近事情比较多,只能抽时间看了,放几天就把之前弄的都忘了,现在只挑着核心的部分看。现在铺垫了这么久,终于可以看前端最基本的登录了😂。
1、views\login\index.vue
由于代码比较长,这里将vue和js代码分开展示。
1.1、login的vue代码
<template><div class="login-container"><!-- 使用`loginForm`作为表单的数据模型,`loginRules`作为表单字段的验证规则,`ref`属性为`loginForm`用于在代码中引用该表单组件,`class`属性添加了`login-form`样式类名,`auto-complete`设置为`on`表示浏览器会自动完成输入,`label-position`设置为`left`表示标签位于输入框左侧--><el-form ref="loginForm" :model="loginForm" :rules="loginRules" class="login-form" auto-complete="on" label-position="left"><!--标题--><div class="title-container"><h3 class="title">Login Form</h3></div><!--一个表单项组件,用于包裹一个字段。`prop`属性设置为"username",用于表单验证。--><el-form-item prop="username"><span class="svg-container"><svg-icon icon-class="user" /></span><!--一个Element UI的输入框组件`ref="username"`:给输入框组件添加一个引用,用于在代码中引用该输入框组件`v-model="loginForm.username"`:利用双向绑定,将输入框的值与`loginForm`对象中的`username`属性进行绑定`placeholder="输入框的占位文字Username"`:设置输入框的占位文字"`type="text"`:设置输入框的类型为文本输入`tabindex="1"`:设置输入框的tab索引为1,用于设置键盘焦点的顺序`auto-complete="on"`:设置浏览器自动完成输入--><el-inputref="username"v-model="loginForm.username"placeholder="输入框的占位文字Username"name="username"type="text"tabindex="1"auto-complete="on"/></el-form-item><!--一个Element UI的工具提示组件,用于显示大写锁定键(Caps lock)的状态提示信息--><el-tooltip v-model="capsTooltip" content="Caps lock is On" placement="right" manual><el-form-item prop="password"><span class="svg-container"><svg-icon icon-class="password" /></span><!--`@keyup.native="checkCapslock"`:当键盘按键弹起时触发`checkCapslock`方法,用于检查大写锁定键的状态`@blur="capsTooltip = false"`:当输入框失去焦点时,隐藏大写锁定键提示`@keyup.enter.native="handleLogin"`:当按下Enter键时触发`handleLogin`方法,完成登录操作--><el-input:key="passwordType"ref="password"v-model="loginForm.password":type="passwordType"placeholder="输入框的占位文字Password"name="password"tabindex="2"auto-complete="on"@keyup.native="checkCapslock"@blur="capsTooltip = false"@keyup.enter.native="handleLogin"/><span class="show-pwd" @click="showPwd"><svg-icon :icon-class="passwordType === 'password' ? 'eye' : 'eye-open'" /></span></el-form-item></el-tooltip><!--`@click`是Vue的事件绑定语法,`.native`修饰符用于监听组件根元素的原生(非自定义)事件。`.prevent`修饰符用于阻止事件的默认行为,例如阻止表单的提交行为--><el-button :loading="loading" type="primary" style="width:100%;margin-bottom:30px;" @click.native.prevent="handleLogin">Login</el-button><div style="position:relative"><div class="tips"><span>Username : admin</span><span>Password : any</span></div><div class="tips"><span style="margin-right:18px;">Username : editor</span><span>Password : any</span></div><el-button class="thirdparty-button" type="primary" @click="showDialog=true">Or connect with</el-button></div></el-form><el-dialog title="Or connect with" :visible.sync="showDialog">Can not be simulated on local, so please combine you own business simulation! ! !<br><br><br><social-sign /></el-dialog></div>
</template>
1.2、login的js代码
<script>
import { validUsername } from '@/utils/validate'
import SocialSign from './components/SocialSignin'export default {name: 'Login',// 这个引入`SocialSign`中export default中所有的东西;SocialSign是第三方登录的内容components: { SocialSign },data() {// callback:函数变量,传入函数名称,可以复用,动态传入不同的函数使用// 定义验证方式const validateUsername = (rule, value, callback) => {// 验证用户名是否符合规则if (!validUsername(value)) {callback(new Error('Please enter the correct user name'))} else {callback()}}const validatePassword = (rule, value, callback) => {if (value.length < 6) {callback(new Error('The password can not be less than 6 digits'))} else {callback()}}// 一般变量的定义,都是在data()下的return中写return {// 用来记录前端交互的用户名和密码loginForm: {username: 'admin',password: '111111'},loginRules: {username: [{ required: true, trigger: 'blur', validator: validateUsername }],password: [{ required: true, trigger: 'blur', validator: validatePassword }]},passwordType: 'password',capsTooltip: false,loading: false,showDialog: false,redirect: undefined,otherQuery: {}}},watch: {$route: {handler: function(route) {const query = route.queryif (query) {this.redirect = query.redirectthis.otherQuery = this.getOtherQuery(query)}},immediate: true}},created() {// window.addEventListener('storage', this.afterQRScan)},// `mounted()`,在组件挂载后被调用mounted() {// `this.$refs`来访问已经挂载的`username`输入框组件,并调用其`focus()`方法来设置该输入框组件获取焦点if (this.loginForm.username === '') {this.$refs.username.focus()} else if (this.loginForm.password === '') {this.$refs.password.focus()}},destroyed() {// window.removeEventListener('storage', this.afterQRScan)},methods: {// 检查大写锁定键的方法checkCapslock({ shiftKey, key } = {}) {if (key && key.length === 1) {if (shiftKey && (key >= 'a' && key <= 'z') || !shiftKey && (key >= 'A' && key <= 'Z')) {this.capsTooltip = true} else {this.capsTooltip = false}}if (key === 'CapsLock' && this.capsTooltip === true) {this.capsTooltip = false}},// 是否显示具体密码showPwd() {if (this.passwordType === 'password') {this.passwordType = ''} else {this.passwordType = 'password'}this.$nextTick(() => {this.$refs.password.focus()})},// 实际登录的方法handleLogin() {// `validate`是`this.$refs.loginForm`访问到的登录表单组件的方法,// 这个方法会根据组件的表单验证规则进行验证,并将验证结果以参数的形式传递给回调函数this.$refs.loginForm.validate(valid => {if (valid) {this.loading = true// 访问store/modules/user.js中action下的方法loginthis.$store.dispatch('user/login', this.loginForm).then(() => {// `this.$router`全局路由,通过`push({path:'路径',query:{id:参数}})`进行路由跳转this.$router.push({ path: this.redirect || '/', query: this.otherQuery })this.loading = false}).catch(() => {this.loading = false})} else {console.log('error submit!!')return false}})},getOtherQuery(query) {return Object.keys(query).reduce((acc, cur) => {if (cur !== 'redirect') {acc[cur] = query[cur]}return acc}, {})}// afterQRScan() {//   if (e.key === 'x-admin-oauth-code') {//     const code = getQueryObject(e.newValue)//     const codeMap = {//       wechat: 'code',//       tencent: 'code'//     }//     const type = codeMap[this.auth_type]//     const codeName = code[type]//     if (codeName) {//       this.$store.dispatch('LoginByThirdparty', codeName).then(() => {//         this.$router.push({ path: this.redirect || '/' })//       })//     } else {//       alert('第三方登录失败')//     }//   }// }}
}
</script>
上面的内容涉及到callback和this.$router的内容,具体可以参考以下链接了解:
- callback的使用
- vue this.$router.push 实现路由跳转
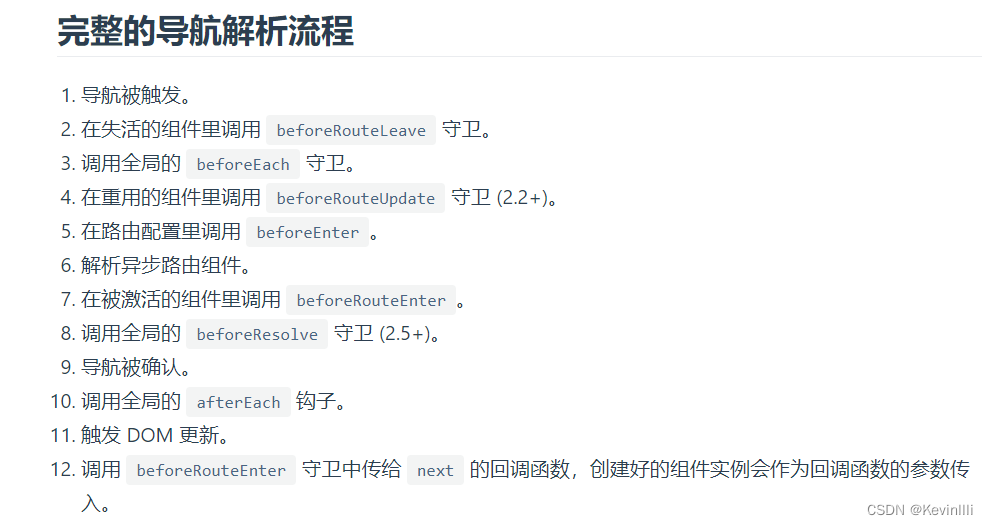
2、前端登录的执行流程图
根据views\login\index.vue的代码和【Vue框架】用户和请求的内容,整理得到他们的执行流程图,如下:
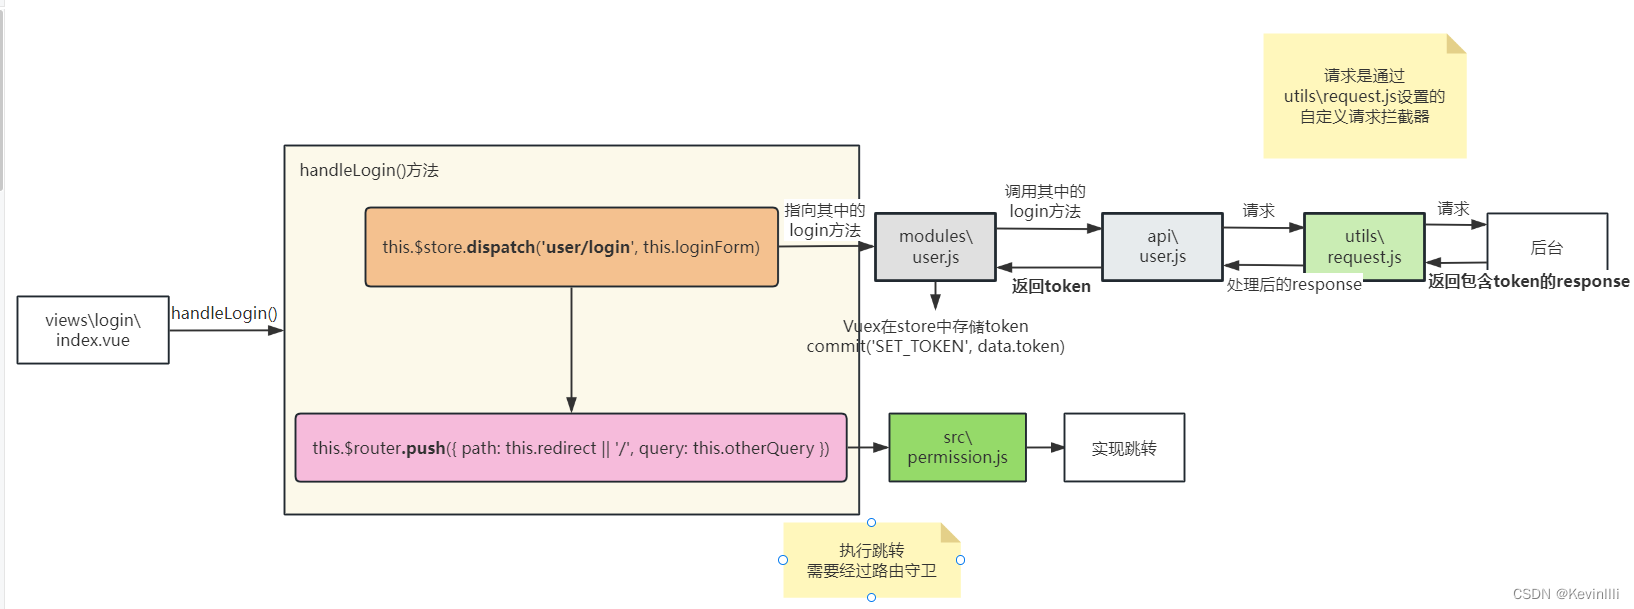
PS:前后端response内容关系不清楚的,可以看【Vue框架】用户和请求中的第5节。
3、src\permission.js
3.1 代码
import router from './router'
import store from './store'
import { Message } from 'element-ui'
import NProgress from 'nprogress' // progress bar 用于显示进度条,NProgress显示页面加载或异步操作进度的JavaScript库
import 'nprogress/nprogress.css' // progress bar style
import { getToken } from '@/utils/auth' // get token from cookie
import getPageTitle from '@/utils/get-page-title' // 用于获取页面标题// showSpinner: false不会显示旋转的加载图标,只会显示进度的条形动画
NProgress.configure({ showSpinner: false }) // NProgress Configuration// 定义了一些不需要进行路由重定向的白名单路径,例如`/login`和`/auth-redirect`。这些路径将被认为是无需进行重定向或权限检查的安全路径
const whiteList = ['/login', '/auth-redirect'] // no redirect whitelist/*** 在 Vue Router 中,全局前置守卫(Global before Guards)是一种用于拦截导航的机制,* 允许在路由切换之前对导航进行一些操作,比如进行身份验证、权限检查等。* 全局前置守卫是在 Vue Router 实例中注册的一组函数(constantRoutes和asyncRoutes),会在每次导航发生之前按照顺序执行。* 过调用 `router.beforeEach` 方法来注册全局前置守卫* 1. `to`:即将进入的路由。* 2. `from`:当前导航正要离开的路由。* 3. `next`:一个函数,用于控制导航的行为。需要在回调函数最后调用 `next` 方法来确认导航是否继续。*/
router.beforeEach(async(to, from, next) => {// start progress barNProgress.start()// set page titledocument.title = getPageTitle(to.meta.title)// determine whether the user has logged inconst hasToken = getToken()if (hasToken) {if (to.path === '/login') {// if is logged in, redirect to the home page 如果用户已经登录并且正在访问登录页面// 【用户从新打开页面,应该默认访问首页,然后这里来判断用户是否登录,如果登录就可以直接访问首页】// 重定向到主页next({ path: '/' })// 结束进度条NProgress.done()} else {// 如果用户已经登录,但不是在访问登录页面// determine whether the user has obtained his permission roles through getInfoconst hasRoles = store.getters.roles && store.getters.roles.length > 0if (hasRoles) {// 进行管道中的下一个钩子。如果全部钩子执行完了,则导航的状态就是 confirmed (确认的)。next()} else {try {// get user info// note: roles must be a object array! such as: ['admin'] or ,['developer','editor']// store是Vuex的实例,dispatch访问到里面action定义的方法('user/getInfo')const { roles } = await store.dispatch('user/getInfo')// generate accessible routes map based on rolesconst accessRoutes = await store.dispatch('permission/generateRoutes', roles)// dynamically add accessible routes// `addRoutes`方法只能在实例化Vue Router之后才能调用,且只能调用一次。否则会导致路由异常router.addRoutes(accessRoutes)// hack method to ensure that addRoutes is complete// set the replace: true, so the navigation will not leave a history recordnext({ ...to, replace: true })} catch (error) {// remove token and go to login page to re-loginawait store.dispatch('user/resetToken')Message.error(error || 'Has Error')next(`/login?redirect=${to.path}`) // 重定向到登录页面,并附带返回地址NProgress.done()}}}} else {/* has no token*/if (whiteList.indexOf(to.path) !== -1) {// in the free login whitelist, go directlynext()} else {// other pages that do not have permission to access are redirected to the login page.next(`/login?redirect=${to.path}`)NProgress.done()}}
})router.afterEach(() => {// finish progress barNProgress.done()
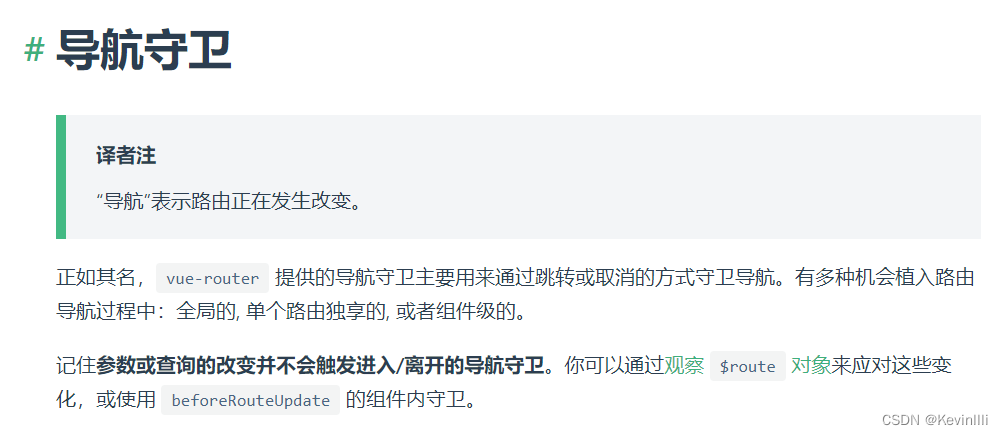
})3.2 什么是路由守卫(导航守卫)
- 个人理解:
作用:从一个Vue文件(路由)跳转到另一个Vue文件(另一个路由),就会通过路由守卫来判断是否有权限正常跳转。
补充:
this.$router全局路由,通过push({path:'路径',query:{id:参数}})进行路由跳转,如下代码:
this.$router.push({ path: this.redirect || '/', query: this.otherQuery })
个人理解:
push这里应该像是把route(路由)进栈,然后再根据路由守卫的next()指向要跳转的路由。
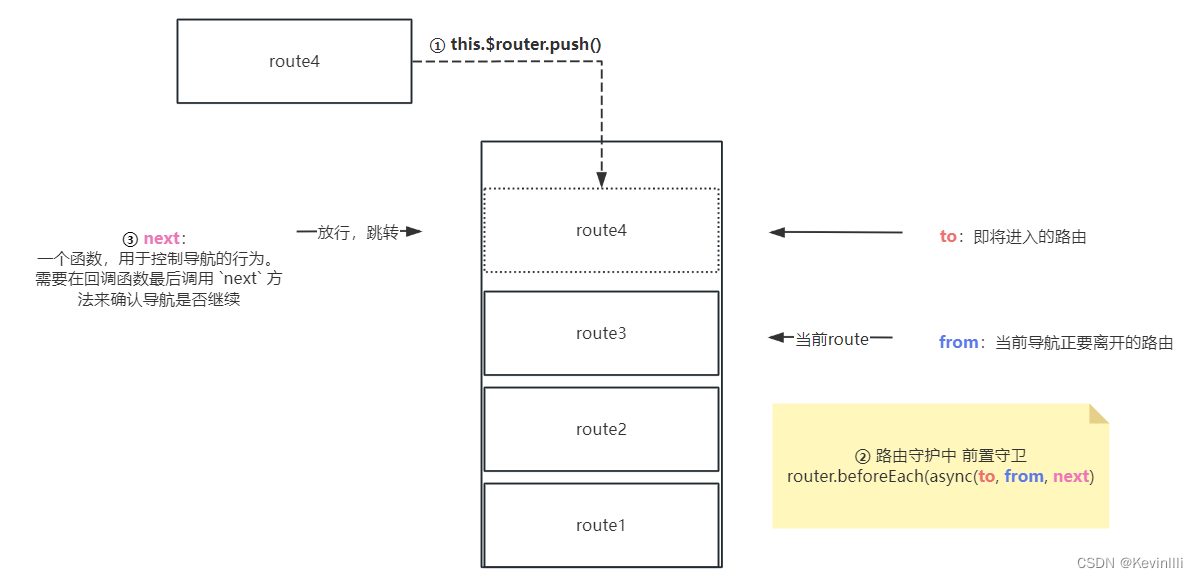
PS:理解能力有限,我画的这个是非常浅显的理解,如果大佬们想深入理解可以看下官方文档Vue Router
- route是什么?
3.3 代码中的主要逻辑
在3.2中提到,路由守卫是用来判断是否有权限正常跳转的,admin代码给出的判断逻辑如下图:
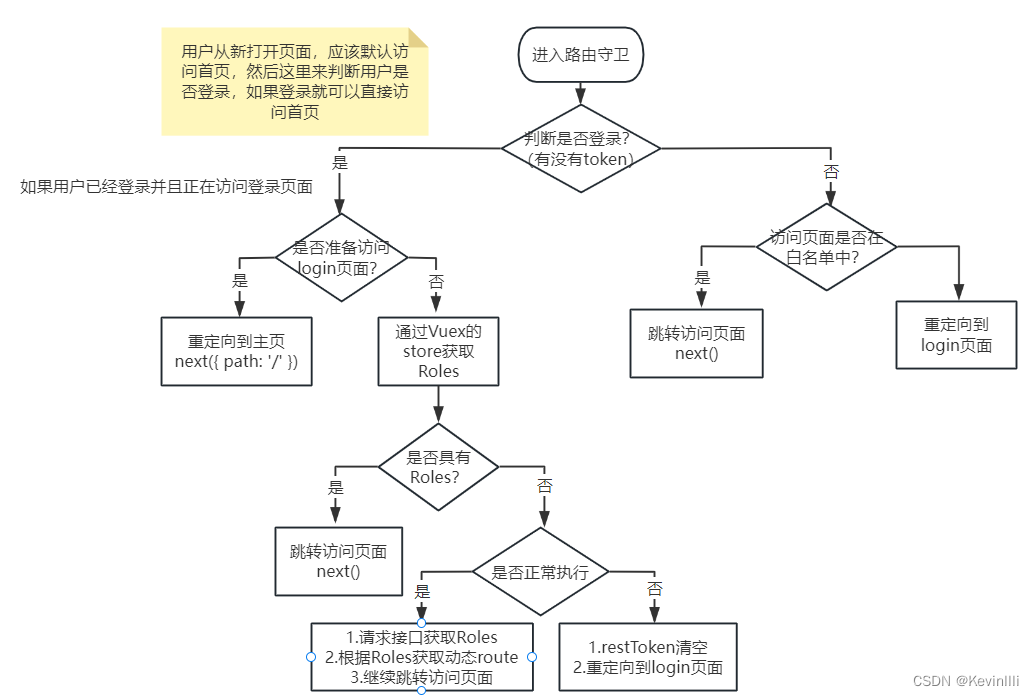
PS:一般好像也就是这样的逻辑