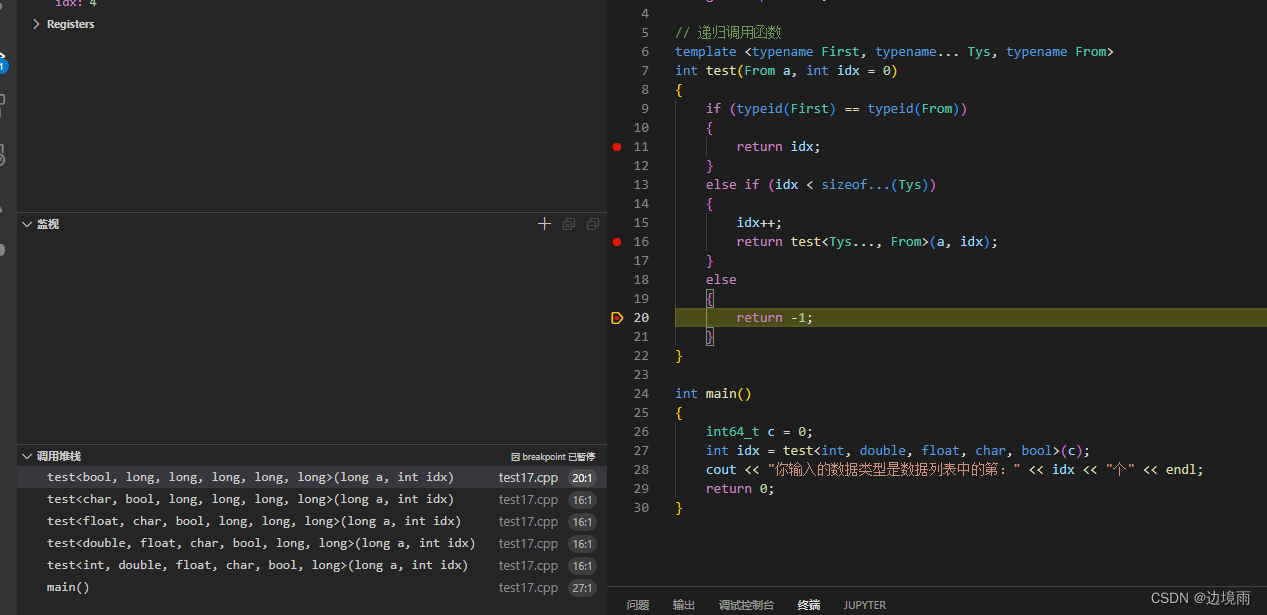
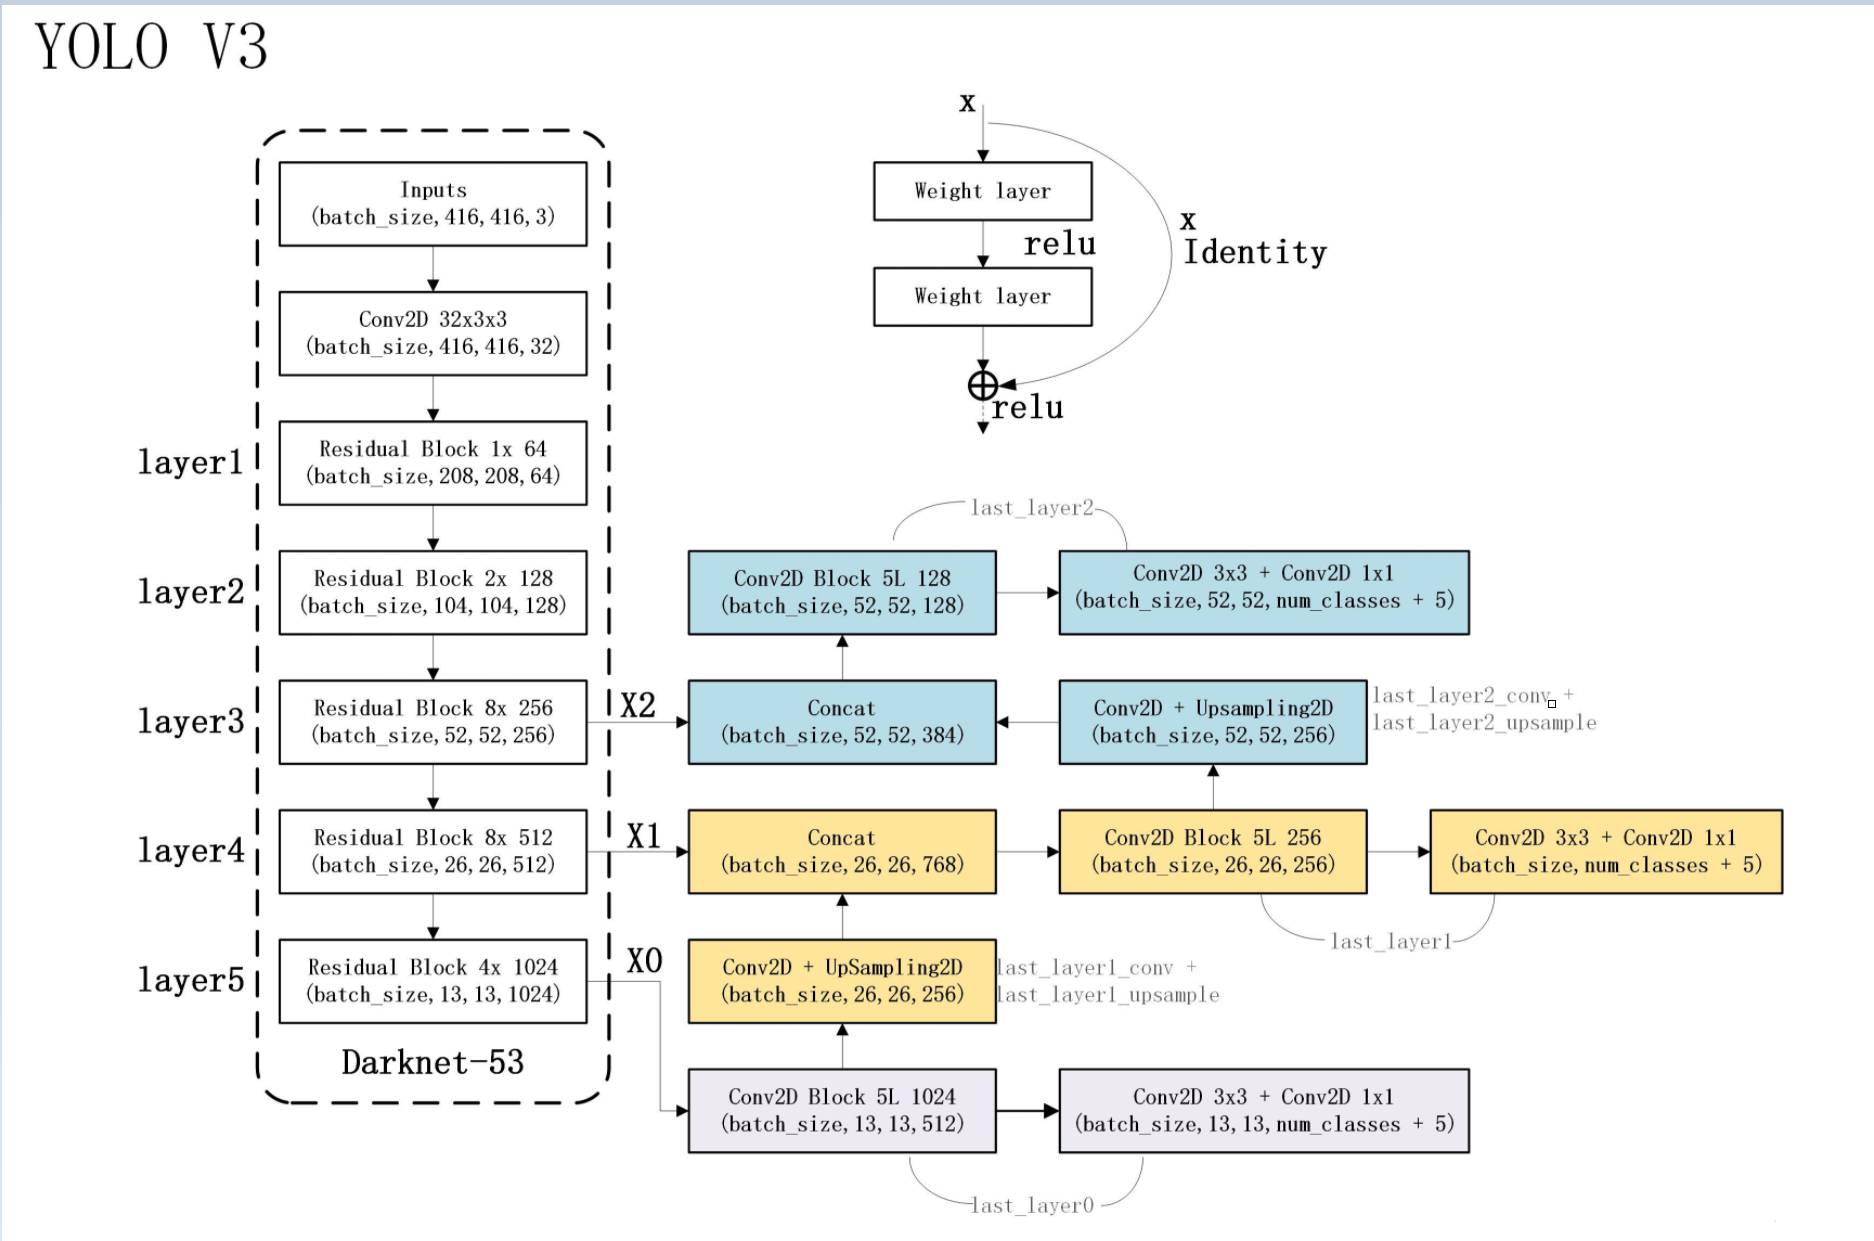
网络构架图:

代码实现:
import math
from collections import OrderedDictimport torch.nn as nn#---------------------------------------------------------------------#
#   残差结构
#   利用一个1x1卷积下降通道数,然后利用一个3x3卷积提取特征并且上升通道数
#   最后接上一个残差边
#---------------------------------------------------------------------#
class BasicBlock(nn.Module):def __init__(self, inplanes, planes):super(BasicBlock, self).__init__()self.conv1  = nn.Conv2d(inplanes, planes[0], kernel_size=1, stride=1, padding=0, bias=False)self.bn1    = nn.BatchNorm2d(planes[0])self.relu1  = nn.LeakyReLU(0.1)self.conv2  = nn.Conv2d(planes[0], planes[1], kernel_size=3, stride=1, padding=1, bias=False)self.bn2    = nn.BatchNorm2d(planes[1])self.relu2  = nn.LeakyReLU(0.1)def forward(self, x):residual = xout = self.conv1(x)out = self.bn1(out)out = self.relu1(out)out = self.conv2(out)out = self.bn2(out)out = self.relu2(out)out += residualreturn outclass DarkNet(nn.Module):def __init__(self, layers):super(DarkNet, self).__init__()self.inplanes = 32# 416,416,3 -> 416,416,32self.conv1  = nn.Conv2d(3, self.inplanes, kernel_size=3, stride=1, padding=1, bias=False)self.bn1    = nn.BatchNorm2d(self.inplanes)self.relu1  = nn.LeakyReLU(0.1)# 416,416,32 -> 208,208,64self.layer1 = self._make_layer([32, 64], layers[0])# 208,208,64 -> 104,104,128self.layer2 = self._make_layer([64, 128], layers[1])# 104,104,128 -> 52,52,256self.layer3 = self._make_layer([128, 256], layers[2])# 52,52,256 -> 26,26,512self.layer4 = self._make_layer([256, 512], layers[3])# 26,26,512 -> 13,13,1024self.layer5 = self._make_layer([512, 1024], layers[4])self.layers_out_filters = [64, 128, 256, 512, 1024]# 进行权值初始化for m in self.modules():if isinstance(m, nn.Conv2d):n = m.kernel_size[0] * m.kernel_size[1] * m.out_channelsm.weight.data.normal_(0, math.sqrt(2. / n))elif isinstance(m, nn.BatchNorm2d):m.weight.data.fill_(1)m.bias.data.zero_()#---------------------------------------------------------------------##   在每一个layer里面,首先利用一个步长为2的3x3卷积进行下采样#   然后进行残差结构的堆叠#---------------------------------------------------------------------#def _make_layer(self, planes, blocks):layers = []# 下采样,步长为2,卷积核大小为3layers.append(("ds_conv", nn.Conv2d(self.inplanes, planes[1], kernel_size=3, stride=2, padding=1, bias=False)))layers.append(("ds_bn", nn.BatchNorm2d(planes[1])))layers.append(("ds_relu", nn.LeakyReLU(0.1)))# 加入残差结构self.inplanes = planes[1]for i in range(0, blocks):layers.append(("residual_{}".format(i), BasicBlock(self.inplanes, planes)))return nn.Sequential(OrderedDict(layers))def forward(self, x):x = self.conv1(x)x = self.bn1(x)x = self.relu1(x)x = self.layer1(x)x = self.layer2(x)out3 = self.layer3(x)out4 = self.layer4(out3)out5 = self.layer5(out4)return out3, out4, out5def darknet53():model = DarkNet([1, 2, 8, 8, 4])return modelfrom collections import OrderedDictimport torch
import torch.nn as nnfrom nets.darknet import darknet53def conv2d(filter_in, filter_out, kernel_size):pad = (kernel_size - 1) // 2 if kernel_size else 0return nn.Sequential(OrderedDict([("conv", nn.Conv2d(filter_in, filter_out, kernel_size=kernel_size, stride=1, padding=pad, bias=False)),("bn", nn.BatchNorm2d(filter_out)),("relu", nn.LeakyReLU(0.1)),]))#------------------------------------------------------------------------#
#   make_last_layers里面一共有七个卷积,前五个用于提取特征。
#   后两个用于获得yolo网络的预测结果
#------------------------------------------------------------------------#
def make_last_layers(filters_list, in_filters, out_filter):m = nn.Sequential(conv2d(in_filters, filters_list[0], 1),conv2d(filters_list[0], filters_list[1], 3),conv2d(filters_list[1], filters_list[0], 1),conv2d(filters_list[0], filters_list[1], 3),conv2d(filters_list[1], filters_list[0], 1),conv2d(filters_list[0], filters_list[1], 3),nn.Conv2d(filters_list[1], out_filter, kernel_size=1, stride=1, padding=0, bias=True))return mclass YoloBody(nn.Module):def __init__(self, anchors_mask, num_classes):super(YoloBody, self).__init__()#---------------------------------------------------#   #   生成darknet53的主干模型#   获得三个有效特征层,他们的shape分别是:#   52,52,256#   26,26,512#   13,13,1024#---------------------------------------------------#self.backbone = darknet53()#---------------------------------------------------##   out_filters : [64, 128, 256, 512, 1024]#---------------------------------------------------#out_filters = self.backbone.layers_out_filters#------------------------------------------------------------------------##   计算yolo_head的输出通道数,对于voc数据集而言#   final_out_filter0 = final_out_filter1 = final_out_filter2 = 75#------------------------------------------------------------------------#self.last_layer0            = make_last_layers([512, 1024], out_filters[-1], len(anchors_mask[0]) * (num_classes + 5))self.last_layer1_conv       = conv2d(512, 256, 1)self.last_layer1_upsample   = nn.Upsample(scale_factor=2, mode='nearest')self.last_layer1            = make_last_layers([256, 512], out_filters[-2] + 256, len(anchors_mask[1]) * (num_classes + 5))self.last_layer2_conv       = conv2d(256, 128, 1)self.last_layer2_upsample   = nn.Upsample(scale_factor=2, mode='nearest')self.last_layer2            = make_last_layers([128, 256], out_filters[-3] + 128, len(anchors_mask[2]) * (num_classes + 5))def forward(self, x):#---------------------------------------------------#   #   获得三个有效特征层,他们的shape分别是:#   52,52,256;26,26,512;13,13,1024#---------------------------------------------------#x2, x1, x0 = self.backbone(x)#---------------------------------------------------##   第一个特征层#   out0 = (batch_size,255,13,13)#---------------------------------------------------## 13,13,1024 -> 13,13,512 -> 13,13,1024 -> 13,13,512 -> 13,13,1024 -> 13,13,512out0_branch = self.last_layer0[:5](x0)out0        = self.last_layer0[5:](out0_branch)# 13,13,512 -> 13,13,256 -> 26,26,256x1_in = self.last_layer1_conv(out0_branch)x1_in = self.last_layer1_upsample(x1_in)# 26,26,256 + 26,26,512 -> 26,26,768x1_in = torch.cat([x1_in, x1], 1)#---------------------------------------------------##   第二个特征层#   out1 = (batch_size,255,26,26)#---------------------------------------------------## 26,26,768 -> 26,26,256 -> 26,26,512 -> 26,26,256 -> 26,26,512 -> 26,26,256out1_branch = self.last_layer1[:5](x1_in)out1        = self.last_layer1[5:](out1_branch)# 26,26,256 -> 26,26,128 -> 52,52,128x2_in = self.last_layer2_conv(out1_branch)x2_in = self.last_layer2_upsample(x2_in)# 52,52,128 + 52,52,256 -> 52,52,384x2_in = torch.cat([x2_in, x2], 1)#---------------------------------------------------##   第三个特征层#   out3 = (batch_size,255,52,52)#---------------------------------------------------## 52,52,384 -> 52,52,128 -> 52,52,256 -> 52,52,128 -> 52,52,256 -> 52,52,128out2 = self.last_layer2(x2_in)return out0, out1, out2