文章目录
- 一、从传统I/O到Java NIO
- 二、NIO 三大组件
- 1. Channel(通道)
- 1.1. FileChannel
- 1.1.1. 获取 FileChannel
- 1.1.2. FileChannel 读取 文件
- 1.1.3. FileChannel写⽂件
- 1.1.4. 通道之前传输数据-transferFrom
- 1.1.5. 通道之前传输数据-transferTo
- 1.2. SocketChannel
- 1.3. ServerSocketChannel
- 1.4. DatagramChannel
- 2. Buffer(缓冲区)
- 2.1. ByteBuffer 正确使用姿势
- 2.2. 分配空间
- 2.3. 向 buffer 写入数据
- 2.4. 从 buffer 读数据
- 2.5. 常见方法
- 2.6. 字符串与 ByteBuffer 相互转换
- 3. Selector(选择器)
- 1、绑定 channel 事件
- 2、监听 channel 事件
- 3、SelectionKey 选择键
- 4、使用示例
- 三、NIO 实现网络编程
- 1. 服务端实现
- 2. 客户端实现
- 四、NIO 包中其他类
- 1. Pipe
- 2. FileLock
- 3. Path
- 4. Files
一、从传统I/O到Java NIO
Blocking IO也称为BIO,即同步阻塞IO。Java的io包基于流模型实现,提供了File、FileInputStream、FileOutputStream等输⼊输出流的功能。Java的io包下提供的流操作,交互⽅式是同步且阻塞的⽅式,在输⼊输出流的操作进⾏读、写动作完成之前,线程会⼀直阻塞。因此io包中对流的操作容易造成性能的瓶颈。
而 NIO是一种基于缓冲区、非阻塞的 I/O 操作方式,首先Java NIO提供管道channel,同时自身提供了一个缓冲区buffer。比如读数据时,数据先进入缓冲区,然后再用 Channel 从缓冲区读出数据,数据处理后放入任意的介质。其次 NIO为了实现非阻塞设计了组件Selector,Selector的具体工作是负责网络连接、网络读和网络写事件的注册和监测。网络连接、网络读、网络写这三类网络事件先要注册到 Selector上,然后由Selector监控这三类网络事件的发生。当网络事件发生时线程再处理,如果没发生,那么线程也不会阻塞,这样就可以充分地利用 CPU 资源了。
由此可见,NIO 充分利用了 CPU,所以在性能上有明显的提升。
NIO,全拼是 non-blocking io,即 非阻塞IO。(网络上也有很多将NIO的N翻译成New,这是因为NIO是在Java 1.4版本中新增加的一种I/O模型。)与传统的I/O模型不同,NIO提供了一种基于缓冲区(Buffer)和通道(Channel)的I/O操作方式。
NIO的主要优势在于它可以实现非阻塞式I/O操作,从而提高了系统的并发处理能力。在传统的I/O模型中,当一个线程在进行I/O操作时,其他线程会被阻塞,直到I/O操作完成。而在NIO模型中,线程可以继续执行其他的任务,而不必等待I/O操作完成。这种非阻塞式的I/O操作方式可以提高系统的吞吐量和响应速度,特别是在高并发的情况下。
(Netty-01-快速掌握Java NIO.assets/image-20230823193756735.png)]
二、NIO 三大组件
根据上面讲述的,我们知道 Java NIO 主要有三个模块:Buffer 、Channel和 Selector。
buffer好比是一个蓄水池(它可以存储数据,以便在需要时进行处理),channel就是水管(用于传递数据),selector管理着多个水管,并根据一定的条件选择数据传递给相应的蓄水池(Buffer)进行处理。
1. Channel(通道)
channel 有一点类似于 stream,它就是读写数据的双向通道,可以从 channel 将数据读入 buffer,也可以将 buffer 的数据写入 channel,而之前的 stream 要么是输入,要么是输出,channel 比 stream 更为底层。
Channel即通道,表示打开IO设备的连接,⽐如打开到⽂件、Socket套接字的连接。在使⽤NIO时,必须要获取⽤于连接IO设备的通道以及⽤于容纳数据的缓冲区。通过操作缓冲区,实现对数据的处理。也就是说数据是保存在buffer缓冲区中的,需要通过Channel来操作缓冲区中的数据。
[外链图片转存失败,源站可能有防盗链机制,建议将图片保存下来直接上传(img-0t8y1Kag-1692957566929)(Netty-01-快速掌握Java NIO.assets/image-20230822200734031.png)]
Channel的主要实现类有以下⼏个:
- FileChannel:读写⽂件的通道
- SocketChannel:读写TCP⽹络数据的通道
- ServerSocketChannel:像web服务器⼀样,监听新进来的TCP连接,为连接创建SocketChannel
- DatagramChannel:读写UDP⽹络数据的通道
1.1. FileChannel
FileChannel是Java NIO中用于对文件进行读写、映射和操作的通道(Channel)。它是连接应用程序与文件之间的桥梁,提供了更高效和灵活的文件操作方式。
注意:FileChannel只能工作在阻塞模式下
⽂件通道是连接到⽂件的可搜索字节通道。它在其⽂件中有⼀个当前位置,可以查询和修改。
⽂件本身包含可变⻓度的字节序列,可以读取和写⼊,并且可以查询其当前⼤⼩。当写⼊的字节超过其当前⼤⼩时,⽂件的⼤⼩增加;⽂件被截断时,其⼤⼩会减⼩。⽂件还可能具有⼀些相关联的元数据,如访问权限、内容类型和上次修改时间;此类不定义元数据访问的⽅法。
多个并发线程使⽤⽂件通道是安全的。根据通道接⼝的指定,可以随时调⽤
close⽅法。在任何给定时间,只有⼀个涉及通道位置或可以改变其⽂件⼤⼩的操作正在进⾏;在第⼀个操作仍在进⾏时尝试发起第⼆个这样的操作将被阻⽌,直到第⼀个操作完成。其他⾏动,特别是采取明确⽴场的⾏动,可以同时进⾏;它们是否真的这样做取决于底层实现,因此没有具体说明。
1.1.1. 获取 FileChannel
不能直接打开 FileChannel,必须通过 FileInputStream、FileOutputStream 或者 RandomAccessFile 来获取 FileChannel,它们都有 getChannel 方法
- 通过 FileInputStream 获取的 channel 只能读
- 通过 FileOutputStream 获取的 channel 只能写
- 通过 RandomAccessFile 是否能读写根据构造 RandomAccessFile 时的读写模式决定
1.1.2. FileChannel 读取 文件
会从 channel 读取数据填充 ByteBuffer,返回值表示读到了多少字节,-1 表示到达了文件的末尾
int readBytes = channel.read(buffer);
如下~
public class FileChannelDemo01 {public static void main(String[] args) throws IOException {// 创建随机访问流RandomAccessFile file = new RandomAccessFile("1.txt", "rw");// 获取FileChannelFileChannel fileChannel = file.getChannel();// 创建BufferByteBuffer buffer = ByteBuffer.allocate(1024);// 读取数据到buffer中while ((fileChannel.read(buffer)) != -1) {// 将写模式切换成读模式buffer.flip();while (buffer.hasRemaining()) {System.out.print((char) buffer.get());}buffer.clear();}file.close();System.out.println("\n" + "读取完毕");}
}
1.1.3. FileChannel写⽂件
写入的正确姿势如下,在 while 中调用 channel.write 是因为 write 方法并不能保证一次将 buffer 中的内容全部写入 channel
ByteBuffer buffer = ...;
buffer.put(...); // 存入数据
buffer.flip();   // 切换读模式while(buffer.hasRemaining()) {channel.write(buffer);
}
如下~
public class FileChannelDemo02 {public static void main(String[] args) throws IOException {// 创建随机访问流RandomAccessFile file = new RandomAccessFile("2.txt", "rw");// 获取FileChannelFileChannel fileChannel = file.getChannel();// 创建BufferByteBuffer buffer = ByteBuffer.allocate(1024);String data = "hello file channel";// 存入bufferbuffer.put(data.getBytes(StandardCharsets.UTF_8));// 读写模式转换buffer.flip();// 把buffer中的数据写入文件fileChannel.write(buffer);// 关闭file.close();}
}
1.1.4. 通道之前传输数据-transferFrom
public class FileChannelDemo03 {public static void main(String[] args) throws IOException {// 获取两个文件的FileChannelRandomAccessFile srcFile = new RandomAccessFile("1.txt", "rw");FileChannel srcFileChannel = srcFile.getChannel();RandomAccessFile descFile = new RandomAccessFile("2.txt", "rw");FileChannel descFileChannel = descFile.getChannel();// src->destdescFileChannel.transferFrom(srcFileChannel, 0, srcFileChannel.size());// 关闭srcFileChannel.close();descFileChannel.close();System.out.println("传输完成");}
}
1.1.5. 通道之前传输数据-transferTo
效率高,底层会利用操作系统的零拷贝进行优化,有个上限是 2G
public class FileChannelDemo04 {public static void main(String[] args) throws IOException {// 获取两个文件的FileChannelRandomAccessFile srcFile = new RandomAccessFile("1.txt", "rw");FileChannel srcFileChannel = srcFile.getChannel();RandomAccessFile descFile = new RandomAccessFile("2.txt", "rw");FileChannel descFileChannel = descFile.getChannel();// src->destsrcFileChannel.transferTo(0, srcFileChannel.size(), descFileChannel);// 关闭srcFileChannel.close();descFileChannel.close();System.out.println("传输完成");}
}
1.2. SocketChannel
SocketChannel是连接到TCP网络套接字的通道,主要用于处理网络IO操作。它代表了客户端与服务器之间的通信通道,通过Socket套接字实现双向的数据传输。SocketChannel可以被选择器(Selector)多路复用,使得单个线程可以同时管理多个通道的事件。它基于TCP连接传输数据,提供高性能、可靠的网络通信功能。SocketChannel在Java NIO中扮演着重要的角色,被广泛应用于构建网络客户端和其他需要进行网络IO操作的应用程序。
注意:
- 不能在已经存在的Socket上再创建SocketChannel
- SocketChannel需要指明关联的服务器地址及端⼝后才能使⽤
- 未进⾏连接的SocketChannel进⾏IO操作时将抛出NotYetConnectedException异常
- SocketChannel⽀持阻塞和⾮阻塞两种模式
- SocketChannel⽀持异步关闭
- SocketChannel⽀持设定参数
SO_SNDBUF:Socket发送缓冲区的⼤⼩SO_RCVBUF:Socket接受缓冲区的⼤⼩SO_KEEPALIVE:保活连接SO_REUSEADDR:复⽤地址SO_LINGER:有数据传输时延缓关闭Channel (只在⾮阻塞模式下使⽤)TCP_NODELAY:禁⽤Nagle算法
可以通过以下方式创建SocketChannel:
SocketChannel socketChannel = SocketChannel.open(new InetSocketAddress("127.0.0.1", 8080));
// 或者
SocketChannel socketChannel = SocketChannel.open();
socketChannel.connect(new InetSocketAddress("127.0.0.1", 8080));
SocketChannel⽀持阻塞和⾮阻塞两种模式
// 设置非阻塞
socketChannel.configureBlocking(false);
读取操作:
public class SocketChannelDemo02 {public static void main(String[] args) throws IOException {SocketChannel socketChannel = SocketChannel.open();socketChannel.connect(new InetSocketAddress("127.0.0.1", 8080));socketChannel.configureBlocking(true);if (socketChannel.isConnectionPending()) {socketChannel.finishConnect();}ByteBuffer byteBuffer = ByteBuffer.allocate(1024);socketChannel.read(byteBuffer);System.out.println("读取到的内容:" + new String(byteBuffer.array()));socketChannel.close();}
}
通过以下方法进行判断连接状态~
-
socketChannel.isOpen(): 判断SocketChannel是否为open状态
-
socketChannel.isConnected(): 判断SocketChannel是否已连接
-
socketChannel.isConnectionPending(): 判断SocketChannel是否正在进⾏连接
-
socketChannel.finishConnect(): 完成连接,如果此通道已连接,则此⽅法将不会阻塞,并将⽴即返回true。如果此通道处于⾮阻塞模式,则如果连接过程尚未完成,则此⽅法将返回false。如果此通道处于阻塞模式,则此⽅法将阻塞,直到连接完成或失败,并且将始终返回true或抛出⼀个描述失败的检查异常。
1.3. ServerSocketChannel
ServerSocketChannel是⼀个基于通道的Socket监听器,能够实现⾮阻塞模式。ServerSocketChannel的主要作⽤是⽤来监听端⼝的连接,来创建SocketChannel。也就是说,可以调⽤ServerSocketChannel的accept⽅法,来创建SocketChannel对象。
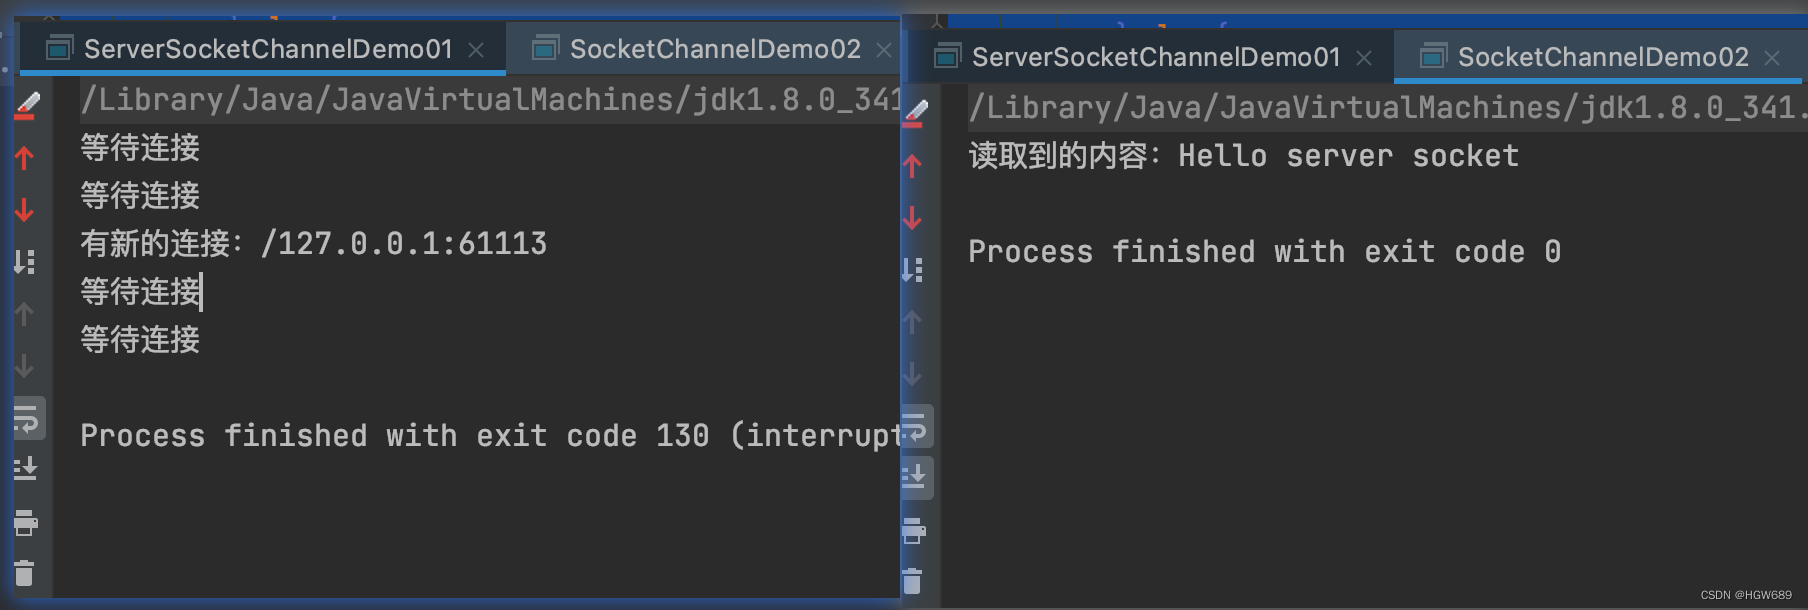
public class ServerSocketChannelDemo01 {public static void main(String[] args) throws IOException {ByteBuffer byteBuffer = ByteBuffer.wrap("Hello server socket".getBytes());ServerSocketChannel serverSocketChannel = ServerSocketChannel.open();serverSocketChannel.socket().bind(new InetSocketAddress(8080));serverSocketChannel.configureBlocking(false);while (true) {System.out.println("等待连接");SocketChannel socketChannel = serverSocketChannel.accept();if (socketChannel != null) {System.out.println("有新的连接:" + socketChannel.socket().getRemoteSocketAddress());socketChannel.write(byteBuffer);} else {try {Thread.sleep(5000);} catch (InterruptedException e) {e.printStackTrace();}}}}
}
1.4. DatagramChannel
DatagramChannel对象关联着⼀个DatagramSocket对象。DatagramChannel基于UDP⽆连接协议,每个数据报都是⼀个⾃包含的实体,拥有它⾃⼰的⽬的地址及数据负载。DatagramChannel可以发送单独的数据报给不同的⽬的地,同样也可以接受来⾃于任意地址的数据报。
接收方
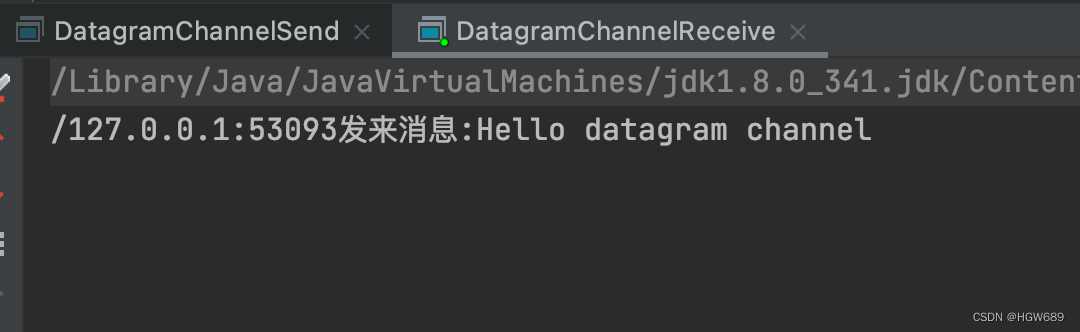
public class DatagramChannelReceive {public static void main(String[] args) throws IOException {// 获得channelDatagramChannel datagramChannel = DatagramChannel.open();// 绑定端口datagramChannel.bind(new InetSocketAddress(8080));// 接收消息ByteBuffer byteBuffer = ByteBuffer.allocate(1024);while (true) {SocketAddress address = datagramChannel.receive(byteBuffer);if (address == null) {try {Thread.sleep(1000);} catch (InterruptedException e) {e.printStackTrace();}} else {byteBuffer.flip();System.out.println(address.toString() + "发来消息:" + new String(byteBuffer.array()));byteBuffer.clear();}}}
}
发送方
public class DatagramChannelSend {public static void main(String[] args) throws IOException {DatagramChannel datagramChannel = DatagramChannel.open();InetSocketAddress socketAddress = new InetSocketAddress("127.0.0.1", 8080);ByteBuffer byteBuffer = ByteBuffer.wrap("Hello datagram channel".getBytes());datagramChannel.send(byteBuffer, socketAddress);}
}
2. Buffer(缓冲区)
Buffer 在读写的过程中起到的是数据缓冲的作用。首先,我们可以通过内存把数据写入我们事先定义的一个 Buffer 中(当然,Buffer 也是内存的一部分),然后把 Buffer 的数据读出来再写入磁盘保存起来,或者通过网卡发送出去。也就是说,Buffer 是用来读写的缓冲区。
![[外链图片转存失败,源站可能有防盗链机制,建议将图片保存下来直接上传(img-MXUTdTHD-1692957715232)(Netty-01-快速掌握Java NIO.assets/image-20230605202258742.png)]](https://img-blog.csdnimg.cn/1068c90d4a5c4bf2b452bdc92abe8ec2.png)
Buffer(缓冲区)本质上是一个内存块,既可以写入数据,也可以读取数据。代表缓冲区的 Buffer 类是一个抽象类,位于 java.nio 包中。类与普通的内存块(Java 数组)不同的是: Buffer 类对象提供了一组比较有效的方法,用来进行写入和读取。
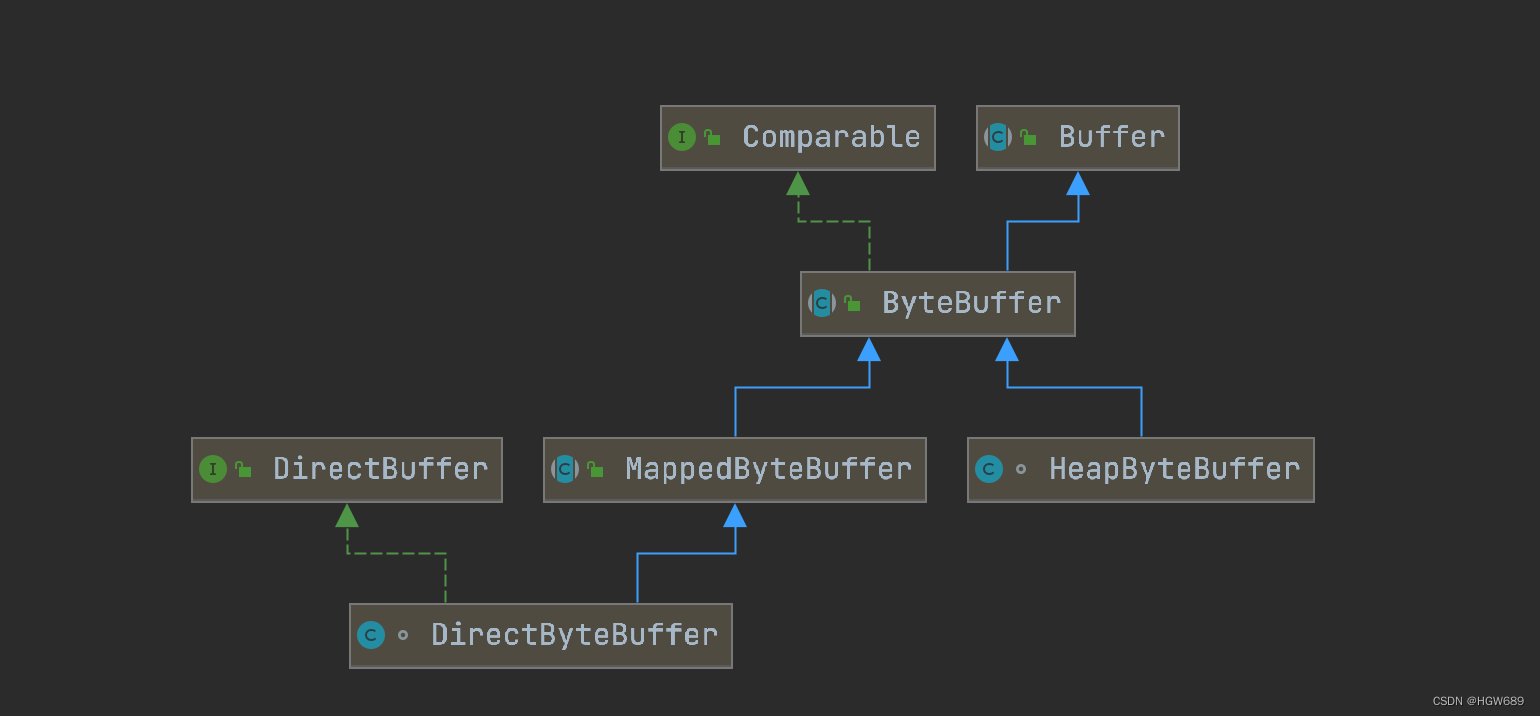
Buffer 类同时也是一个非线程安全类,对应于 Java 的主要数据类型,在 NIO 中有 8 种缓冲区类,分别如下:ByteBuffer、CharBuffer、DoubleBuffer、FloatBuffer、IntBuffer、LongBuffer、 ShortBuffer 和 MappedByteBuffer。
其中,我们用得最普遍的是 ByteBuffer,其他数据类型的 Buffer 很少用。
ByteBuffer 内部维护的是一个字节数组(byte array),内部维护了以下几个重要参数:
capacity:表示ByteBuffer内部缓冲区的容量大小,即它最多能够存放多少字节数据。limit:表示ByteBuffer中当前有效数据的大小,即缓冲区中存放的字节数据的数量。
- 写数据时:limit与capacity相同
- 读数据时:limit表示可读的数据位置,因此在上次写操作后需要通过flip⽅法,将position值赋给limit。
position:表示当前读写位置的索引,即下一个要读写的字节数据的位置。mark:一个标记,用于记录某一个位置,以便稍后回到该位置。
2.1. ByteBuffer 正确使用姿势
- 向 buffer 写入数据,例如调用 channel.read(buffer)
- 调用 flip() 切换至读模式
- 从 buffer 读取数据,例如调用 buffer.get()
- 调用 clear() 或 compact() 切换至写模式
- 重复 1~4 步骤
2.2. 分配空间
// class java.nio.HeapByteBuffer —— java堆内存,读写效率低,受到GC影响
// 数据的拷贝路径是这样的:JVM 空间-->操作系统控制的直接内存-->磁盘
ByteBuffer heapByteBuffer = ByteBuffer.allocate(10);
// class java.nio.DirectByteBuffer —— 直接内存,读写效率高(少了一次数据拷贝)
// 操作系统控制的直接内存-->磁盘
ByteBuffer directByteBuffer = ByteBuffer.allocateDirect(10);
下图展示了 Buffer 分配在直接内存的功能和作用:
![[外链图片转存失败,源站可能有防盗链机制,建议将图片保存下来直接上传(img-CyAVxBmX-1692957715233)(Netty-01-快速掌握Java NIO.assets/image-20230606100908123.png)]](https://img-blog.csdnimg.cn/d1f5b082b40a4ed189a53e1e0d82ac13.png)
2.3. 向 buffer 写入数据
有三种办法:
- 调用 buffer 的 put(数据) 方法,将数据存⼊到buffer,此时position随之变化。
- 调用 buffer 的 wrap(数据) 方法,将数据存⼊数据并返回buffer,此时position为0,limit为数据的⻓度
- 调用 channel 的 channel.read(buffer) 方法:将数据读⼊到buffer中。
// 调用 buffer 自己的 put方法
ByteBuffer byteBuffer = ByteBuffer.allocate(10);
byteBuffer.put((byte) 127);
// 调用 buffer 的 wrap(数据) 方法,将数据存⼊数据并返回buffer
ByteBuffer byteBuffer = ByteBuffer.wrap("hello".getBytes());
// 调用 channel 的 read方法
ByteBuffer byteBuffer = ByteBuffer.allocate(10);
RandomAccessFile file = new RandomAccessFile("1.txt", "rw");
FileChannel fileChannel = file.getChannel();
fileChannel.read(byteBuffer);
2.4. 从 buffer 读数据
从Buffer中读取数据有以下⼏种⽅式:
- 调用 buffer 的 get相关的⽅法,获得当前position或指定position的数据
- 调用 buffer 的 array() 方法,返回整个数组内容
- 调用 channel 的 channel.write(buffer) 方法,使⽤channel获得buffer中的内容并写⼊到指定⽬标
ByteBuffer byteBuffer = ByteBuffer.wrap(new byte[]{'A', 'B', 'C', 'D', 'E'});
// 获得当前position位置
System.out.println(Character.toChars(byteBuffer.get()));
// 返回整个数组内容
System.out.println(new String(byteBuffer.array()));
// channel获得buffer中的内容并写⼊到指定⽬标
RandomAccessFile file = new RandomAccessFile("1.txt", "rw");
FileChannel fileChannel = file.getChannel();
fileChannel.write(byteBuffer);
byteBuffer.clear();
![[外链图片转存失败,源站可能有防盗链机制,建议将图片保存下来直接上传(img-bCWtGOCg-1692957766784)(Netty-01-快速掌握Java NIO.assets/image-20230823201850572.png)]](https://img-blog.csdnimg.cn/159eed75d64340e48a8d97ab7c6e5f71.png)
大家可以思考一下为什么最终写入文件的内容是"BCDE",而不是"ABCDE"呢?
![[外链图片转存失败,源站可能有防盗链机制,建议将图片保存下来直接上传(img-cR7umfZE-1692957766784)(Netty-01-快速掌握Java NIO.assets/image-20230823202046517.png)]](https://img-blog.csdnimg.cn/38e28873c8eb4c13b259872e1a5d9a8c.png)
如果不需要移动指针,可以使用 get(int i) 方法获取索引 i 的内容,它不会移动读指针!
2.5. 常见方法
rewind从头开始
public final Buffer rewind() {position = 0;mark = -1;return this;
}
我们查看该方法将position至为0,从而达到从头开始读的效果。
mark标记、reset回到标记处
mark 是在读取时,做一个标记,即使 position 改变,只要调用 reset 就能回到 mark 的位置
注意:rewind 和 flip 都会清除 mark 位置
/*** Sets this buffer's mark at its position.** @return  This buffer*/
public final Buffer mark() {mark = position;return this;
}
/*** Resets this buffer's position to the previously-marked position.** <p> Invoking this method neither changes nor discards the mark's* value. </p>** @return  This buffer** @throws  InvalidMarkException*          If the mark has not been set*/
public final Buffer reset() {int m = mark;if (m < 0)throw new InvalidMarkException();position = m;return this;
}
mark 函数将当前当前读写位置的索引赋值给mack,在reset 函数中将当前读写位置设置为mack。从而实现标记和恢复标记位。
2.6. 字符串与 ByteBuffer 相互转换
ByteBuffer buffer1 = StandardCharsets.UTF_8.encode("你好");
ByteBuffer buffer2 = Charset.forName("utf-8").encode("你好");
CharBuffer buffer3 = StandardCharsets.UTF_8.decode(buffer1);
System.out.println(buffer3.getClass());
System.out.println(buffer3.toString());
3. Selector(选择器)
Selector选择器,也可以称为多路复⽤器。它是Java NIO的核⼼组件之⼀,⽤于检查⼀个或多个Channel的状态是否处于可读、可写、可连接、可接收等。通过⼀个Selector选择器管理多个Channel,可以实现⼀个线程管理多个Channel对应的⽹络连接。使⽤单线程管理多个Channel可以避免多线程的线程上下⽂切换带来的额外开销。
selector 单从字面意思不好理解,需要结合服务器的设计演化来理解它的用途
1、多线程版本,它具有以下缺点⚠️
- 线程上下文切换成本高
- 只适合连接数少的场景
2、线程池版本,它具有以下缺点⚠️
- 阻塞模式下,线程仅能处理一个 socket 连接
- 仅适合短连接场景
3、selector版本,selector 的作用就是配合一个线程来管理多个 channel,获取这些 channel 上发生的事件,这些 channel 工作在非阻塞模式下,不会让线程吊死在一个 channel 上。适合连接数特别多,但流量低的场景(low traffic)
调用 selector 的 select() 会阻塞直到 channel 发生了读写就绪事件,这些事件发生,select 方法就会返回这些事件交给 thread 来处理
注意:
只有SelectableChannel才能被Selector管理,⽐如所有的SocketChannel。⽽FileChannel并没有继承SelectableChannel,因此不能被Selector管理。
1、绑定 channel 事件
也称之为注册事件,绑定的事件 selector 才会关心。⼀个Channel可以注册到多个Selector上,但在某⼀个Selector上只能注册⼀次。注册时需要告知Selector,Selector需要对通道的哪个操作感兴趣。
channel.configureBlocking(false);
SelectionKey key = channel.register(selector, 绑定事件);
注意:
- channel必须处于⾮阻塞模式才能注册到Selector上。 FileChannel并没有继承SelectableChannel,没有非阻塞模式,因此不能配合 selector 一起使用
- 绑定的事件类型操作枚举类
java.nio.channels.SelectionKey
OP_READ: 可读,数据可读入时触发,有因为接收能力弱,数据暂不能读入的情况OP_WRITE:可写,数据可写出时触发,有因为发送能力弱,数据暂不能写出的情况OP_CONNECT:可连接,客户端连接成功时触发OP_ACCEPT:可接收,服务器端成功接受连接时触发
⽐如channel调⽤register⽅法进⾏注册到Selector,并告知Selector对哪个操作感兴趣
channel.register(selector, SelectionKey.OP_READ);
也可以同时注册多个操作
channel.register(selector, SelectionKey.OP_READ | SelectionKey.OP_WRITE);
选择器会查询每个⼀个channel的操作事件,如果是该channel注册的操作已就绪,则进⾏响应。注意,这⾥channel的操作指的是channel完成某个操作的条件,表示该channel对于该操作已处于就绪状态。⽐如ServerSocketChannel已准备好接收新的连接,那么它注册的 SelectionKey.OP_ACCEPT 操作就处于就绪状态。⼜⽐如SocketChannel已准备好去连接Server服务器,那么它注册的SelectionKey.OP_CONNECT 操作就处于就绪状态。于是Selector就可以触发之后的动作。
2、监听 channel 事件
可以通过下面三种方法来监听是否有事件发生,方法的返回值代表有多少 channel 发生了事件
方法1,阻塞直到绑定事件发生
int count = selector.select();
方法2,阻塞直到绑定事件发生,或是超时(时间单位为 ms)
int count = selector.select(long timeout);
方法3,不会阻塞,也就是不管有没有事件,立刻返回,自己根据返回值检查是否有事件
int count = selector.selectNow();
select 何时不阻塞呢?
- 事件发生时
- 客户端发起连接请求,会触发 accept 事件
- 客户端发送数据过来,客户端正常、异常关闭时,都会触发 read 事件,另外如果发送的数据大于 buffer 缓冲区,会触发多次读取事件
- channel 可写,会触发 write 事件
- 在 linux 下 nio bug 发生时
- 调用 selector.wakeup()
- 调用 selector.close()
- selector 所在线程 interrupt
3、SelectionKey 选择键
SelectionKey封装了channel和注册的操作。当selector调用select()方法时,会轮训所有注册在它身上的channel,查看是否有处于某个操作(已注册到selector上的)就绪状态的channel,把这些channel放入到selectionKey的集合中。
4、使用示例
首先,通过Selector的open⽅法创建Selector对象。
// 创建Selector
Selector selector = Selector.open();
其次,将Channel注册到Selector上
public class SelectorDemo01 {public static void main(String[] args) throws IOException {// 创建SelectorSelector selector = Selector.open();// 创建ServerSocketChannelServerSocketChannel serverSocketChannel = ServerSocketChannel.open();serverSocketChannel.configureBlocking(false);serverSocketChannel.bind(new InetSocketAddress(8080));// 注册channel并指明注册的操作SelectionKey selectionKey = serverSocketChannel.register(selector, SelectionKey.OP_ACCEPT);}
}
Selector通过调⽤select⽅法轮询已就绪的通道操作。select⽅法是阻塞的,直到⾄少有⼀个通道的注册操作已就绪。当完成select⽅法调⽤后,被选中的已就绪的所有channel通过Selector的selectedKeys()⽅法获得,该⽅法获得的是⼀个SelectionKey集合,其中每⼀个SelectionKey都表示⼀个Channel。于是可以根据SelectionKey的注册操作来做具体的业务处理。
public class SelectorDemo01 {public static void main(String[] args) throws IOException {// 创建SelectorSelector selector = Selector.open();// 创建ServerSocketChannelServerSocketChannel serverSocketChannel = ServerSocketChannel.open();serverSocketChannel.configureBlocking(false);serverSocketChannel.bind(new InetSocketAddress(8080));// 注册channel并指明注册的操作SelectionKey selectionKey = serverSocketChannel.register(selector, SelectionKey.OP_ACCEPT);while (true) {// 阻塞等待某个操作就绪状态的channelselector.select();// 获得这次阻塞等待发生操作的多个channel集合Set<SelectionKey> selectionKeys = selector.selectedKeys();// 获取集合迭代器Iterator<SelectionKey> iterator = selectionKeys.iterator();while (iterator.hasNext()) {SelectionKey key = iterator.next();if (key.isAcceptable()) {// 处理连接状态的业务} else if (key.isConnectable()) {// 处理接受状态的业务} else if (key.isReadable()) {// 处理读状态的业务} else if (key.isWritable()) {// 处理写状态的业务}// 保证下次channel就绪可以再被选中iterator.remove();}}}
}
为何要 iterator.remove()?
因为 select 在事件发生后,就会将相关的 key 放入 selectedKeys 集合,但不会在处理完后从 selectedKeys 集合中移除,需要我们自己编码删除。例如
- 第一次触发了 ssckey 上的 accept 事件,没有移除 ssckey
- 第二次触发了 sckey 上的 read 事件,但这时 selectedKeys 中还有上次的 ssckey ,在处理时因为没有真正的 serverSocket 连上了,就会导致空指针异常
事件发生后能否不处理?
事件发生后,要么处理,要么取消(cancel),不能什么都不做,否则下次该事件仍会触发,这是因为 nio 底层使用的是水平触发。
cancel 会取消注册在 selector 上的 channel,并从 keys 集合中删除 key 后续不会再监听事件
三、NIO 实现网络编程
1. 服务端实现
/*** Description: NIO服务端** @author LinHuiBa-YanAn* @date 2023/5/9 14:26*/
public class NIOServer {public static void main(String[] args) throws IOException {// 创建服务端的Socket通道,ServerSocketChannelServerSocketChannel serverSocketChannel = ServerSocketChannel.open();// 设置为非阻塞serverSocketChannel.configureBlocking(false);// 设置端口号为9090serverSocketChannel.socket().bind(new InetSocketAddress(8080));// 创建Selector多路复用器Selector selector = Selector.open();// 把ServerSocketChannel注册到Selector上,并且监听客户端的连接时间操作serverSocketChannel.register(selector, SelectionKey.OP_ACCEPT);while (true) {System.out.println("等待事件发生...");// 轮训监听所有注册到selector上的channel的SelectionKey,此方法是阻塞的int count = selector.select();System.out.print("触发事件:");// 获得所有发生事件的channel的key,遍历key的集合并处理每一个key的channelIterator<SelectionKey> iterator = selector.selectedKeys().iterator();while (iterator.hasNext()) {SelectionKey key = iterator.next();handle(key);// 删除本次处理的key,防止重复处理iterator.remove();}}}public static void handle(SelectionKey selectionKey) throws IOException {// 判断channel发生的是什么事件if (selectionKey.isAcceptable()) {System.out.println("客户端请求连接");// 服务端处理客户端的连接,得到ServerSocketChannel,代表着服务端ServerSocketChannel serverSocketChannel = (ServerSocketChannel) selectionKey.channel();// 服务端处理连接请求,建立SocketChannel(建立起了服务端和客户端的连接通道)。该方法是阻塞的,但该阻塞是在连接事件发生后马上执行的,相当于是非阻塞。且接收完后不需要阻塞等待客户端的读写操作SocketChannel socketChannel = serverSocketChannel.accept();// 把socketChannel设置成非阻塞socketChannel.configureBlocking(false);// 把socketChannel注册读事件到Selector上,当读时间发生时(针对于服务端),触发事件socketChannel.register(selectionKey.selector(), SelectionKey.OP_READ);} else if (selectionKey.isReadable()) {System.out.println("客户端向服务端发送数据");// 获取服务端和客户端之间的通道SocketChannel socketChannel = (SocketChannel) selectionKey.channel();// 创建BufferByteBuffer buffer = ByteBuffer.allocate(1024);// NIO非阻塞的体现,read本身就是非阻塞的int len = socketChannel.read(buffer);if (len != -1) {System.out.println("读取客户端的数据:" + new String(buffer.array(), 0, len));}// 服务端返回数据给客户端ByteBuffer byteBuffer = ByteBuffer.wrap("hello nio".getBytes(StandardCharsets.UTF_8));socketChannel.write(byteBuffer);System.out.println("向客户端发送数据:" + new String(buffer.array()));// 监听下一次事件,读或者写selectionKey.interestOps(SelectionKey.OP_READ);}}
}
2. 客户端实现
/*** Description: NIO客户端1** @author LinHuiBa-YanAn* @date 2023/5/10 19:30*/
public class NIOClient1 {public static void main(String[] args) throws IOException {// 获得Channel通道SocketChannel socketChannel = SocketChannel.open();// 设置成非阻塞socketChannel.configureBlocking(false);// 获得多路复用器 SelectorSelector selector = Selector.open();// 将channel注册到Selector上,并且监听连接事件socketChannel.register(selector, SelectionKey.OP_CONNECT);// 客户端连接服务器,需要在监听方法中调用channel的finishConnect()才能完成连接socketChannel.connect(new InetSocketAddress("127.0.0.1", 8080));System.out.println("向客户端请求链接");// 轮询访问Selectorwhile (true) {// 阻塞等待,实际上selector只对应着客户端这一个channelint count = selector.select();Iterator<SelectionKey> iterator = selector.selectedKeys().iterator();// 遍历所有的事件while (iterator.hasNext()) {handle(iterator.next());// 删除本次处理的key,防止重复处理iterator.remove();}}}private static void handle(SelectionKey key) throws IOException {if (key.isConnectable()) {// 如果是连接SocketChannel channel = (SocketChannel) key.channel();// 如果是正在连接,则完成连接if (channel.isConnectionPending()) {channel.finishConnect();// 设置成非阻塞channel.configureBlocking(false);// 给服务端发送消息ByteBuffer buffer = ByteBuffer.wrap("hello, client".getBytes(StandardCharsets.UTF_8));// 缓存区中的数据写到通道里channel.write(buffer);System.out.println("向客户端发送数据:" + new String(buffer.array()));// 监听读事件,可以获取服务器返回的数据channel.register(key.selector(), SelectionKey.OP_READ);}} else if (key.isReadable()) {// 读服务端返回的数据SocketChannel channel = (SocketChannel) key.channel();// 创建缓冲区ByteBuffer buffer = ByteBuffer.allocate(1024);// 读取缓冲区中的数据int len = channel.read(buffer);if (len != -1) {System.out.println("服务端返回的数据:" + new String(buffer.array(), 0, len));}}}
}
服务端运行结果~
等待事件发生...
触发事件:客户端请求连接
等待事件发生...
触发事件:客户端向服务端发送数据
读取客户端的数据:hello, client
向客户端发送数据:hello, client
等待事件发生...
客户端运行结果~
向客户端请求链接
向客户端发送数据:hello, client
服务端返回的数据:hello nio
四、NIO 包中其他类
1. Pipe
Java NIO包中提供了Pipe类,⽤来实现两个线程之间的单向数据连接。Pipe包含了一个输入流和一个输出流,其中,输出流被连接到输入流的另一端,通过输出流写入的数据可以在输入流中读取到。Pipe的输入流和输出流是线程安全的,多个线程可以同时读写,因此可以用来实现线程间的数据传输和同步。分别是Sink Channel和Source Channel
- Sink Channel:线程将数据写⼊到Sink Channel
- Source Channel:线程从Source Channel中获取数据
具体的两个线程通过Pipe管道实现数据传输的例⼦如下:
public class PipeDemo {public static void main(String[] args) throws IOException {// 获取PipePipe pipe = Pipe.open();// 创建写数据的线程Thread1 t1 = new Thread1(pipe);// 创建读数据的线程Thread2 t2 = new Thread2(pipe);t1.start();t2.start();}
}/*** 向pipe写数据*/
class Thread1 extends Thread {private Pipe pipe;public Thread1(Pipe pipe) {this.pipe = pipe;}/*** 向pipe写数据*/@Overridepublic void run() {Pipe.SinkChannel sinkChannel = pipe.sink();try {System.out.println(Thread.currentThread().getName()+":写数据");ByteBuffer buffer = ByteBuffer.allocate(1024);buffer.put("hello pipe".getBytes());buffer.flip();sinkChannel.write(buffer);} catch (IOException e) {e.printStackTrace();} finally {try {sinkChannel.close();} catch (IOException e) {e.printStackTrace();}}}
}/*** 从pipe读数据*/
class Thread2 extends Thread {private Pipe pipe;public Thread2(Pipe pipe) {this.pipe = pipe;}@Overridepublic void run() {Pipe.SourceChannel sourceChannel = pipe.source();try {ByteBuffer buffer = ByteBuffer.allocate(1024);int len = 0;while ((len = sourceChannel.read(buffer))> 0) {buffer.flip();System.out.println(Thread.currentThread().getName()+":"+new String(buffer.array(), 0, len));}} catch (IOException e) {e.printStackTrace();} finally {try {sourceChannel.close();} catch (IOException e) {e.printStackTrace();}}}
}
2. FileLock
FileLock表示⽂件锁,通过JVM进程对要操作的⽂件上锁,在同⼀时间只允许⼀个进程访问上锁的⽂件。FileLock⽂件锁是进程级别,在同⼀个进程中的多个线程可以同时对⽂件进⾏操作。
FileLock⽂件锁⼜分成了排它锁和共享锁。
- 排它锁,只有获得锁的进程能读写文件
//获得排它锁⽅式⼀:阻塞⽅式获得锁,如果锁被其他进程持有则阻塞
FileLock fileLock = fisChannel.lock();
//获得排它锁⽅式⼆:参数1:锁⽂件的具体哪⼀部分内容的起始位置,参数2:⻓度,参数3:是否共享
fisChannel.lock(0, file.length(), false);
//获得排它锁⽅式三:⾮阻塞的⽅式获得锁,如果锁被其他进程持有则直接返回null,不阻塞
FileLock fileLock = fisChannel.tryLock();
//获得排它锁⽅式四:⾮阻塞的⽅式获得锁
FileLock fileLock = fisChannel.tryLock(0, file.length(), false);
- 共享锁,获得锁的线程可以读文件,但不能写文件
//获得共享锁方式一,参数1:锁⽂件的具体哪⼀部分内容的起始位置,参数2:⻓度,参数3:是否共享
fisChannel.lock(0,file.length(),true)
//获得共享锁方式二:⾮阻塞的⽅式获得锁,如果锁被其他进程持有则直接返回null,不阻塞
FileLock fileLock = fisChannel.tryLock(0,file.length(),true);
示例
首先,进程一获得锁后阻塞
public class FileLockDemo1 {public static void main(String[] args) throws IOException, InterruptedException {File file = new File("1.txt");FileOutputStream fis = new FileOutputStream(file);FileChannel fisChannel = fis.getChannel();// 获得排他锁FileLock fileLock = fisChannel.lock(0, file.length(), false);fisChannel.write(ByteBuffer.wrap("hello,lock!进程1".getBytes()));Thread.sleep(5000);fileLock.release();}
}
然后,编写进程二尝试获得锁并写数据
public class FileLockDemo2 {public static void main(String[] args) throws IOException {File file = new File("1.txt");FileOutputStream fis = new FileOutputStream(file);FileChannel fisChannel = fis.getChannel();FileLock fileLock = fisChannel.lock();fisChannel.write(ByteBuffer.wrap("hello,lock!进程2".getBytes()));System.out.println("写入完毕");fileLock.close();fisChannel.close();}
}
3. Path
Path类在JDK7中已经加⼊到NIO包内,Path表示⽂件系统中的路径,和java的io包下的File类⼗分相似。
Path可以表示绝对路径,即盘符在内的完整路径。Path也可以表示相对路径,即相对于其他路径的⽂件或⽬录的路径。
public class PathDemo {public static void main(String[] args) {//创建相对路径Path path = Paths.get("1.txt");//判断是否是绝对路径System.out.println(path.isAbsolute());Path path1 = Paths.get("/Users/gwh/Documents/yanAn/学习资料/Netty/code/io-demo/1.txt");System.out.println(path1.isAbsolute());//创建Path的另⼀种⽅式Path path2 = Paths.get("/Users/gwh/Documents/yanAn/学习资料/Netty/code/io-demo/", "1.txt");System.out.println(path2.isAbsolute());//获得父文件夹路径System.out.println(path2.getParent());//获得文件名System.out.println(path2.getFileName());}
}
4. Files
NIO包中的Files类提供了操作⽂件及⽬录的⼀些常⽤⽅法。Files需要和Path⼀起使⽤。
1、创建⽬录的⽅法: createDirectory(),根据Path对象创建⼀个新⽬录
try {Path path = Paths.get("myDir");// 创建目录Files.createDirectory(path);
} catch (IOException e) {e.printStackTrace();
}
2、拷贝文件 copy()
实现拷⻉⽂件的功能,可以通过可选的参数实现⽂件的覆盖。
try {Path srcPath = Paths.get("1.txt");Path destPath = Paths.get("3.txt");Files.copy(srcPath, destPath, StandardCopyOption.REPLACE_EXISTING);
} catch (IOException e) {e.printStackTrace();
}
3、删除文件 delete()
try {Path path = Paths.get("11.txt");Files.delete(path);
} catch (IOException e) {e.printStackTrace();
}
4、遍历⽬录 walkFileTree()
通过 walkFileTree(Path path,FileVisitor fv) ⽅法可以实现⽬录的遍历,通过提供FileVisitor接⼝的实现类对象来告知遍历⽂件的具体措施。其中通过返回的FileVisitResult告知遍历每⼀个⽂件时的具体下⼀步动作是什么,⽐如:继续(CONTINUE)、终⽌(TERMINATE)、跳过同级(SKIP_SIBLING)、跳过⼦级(SKIP_SUBTREE)。
Path path = Files.walkFileTree(Paths.get("/Users/gwh/Documents/yanAn/hgw/大学"), new SimpleFileVisitor<Path>() {/*** 访问目录前* @param dir* @param attrs* @return* @throws IOException*/@Overridepublic FileVisitResult preVisitDirectory(Path dir, BasicFileAttributes attrs) throws IOException {System.out.println("访问文件夹:" + dir);return super.preVisitDirectory(dir, attrs);}/*** 访问文件* @param file* @param attrs* @return* @throws IOException*/@Overridepublic FileVisitResult visitFile(Path file, BasicFileAttributes attrs) throws IOException {System.out.println("访问文件:" + file);return super.visitFile(file, attrs);}
});


![河湖长制综合管理信息平台建设项目总体设计方案[507页Word]](https://img-blog.csdnimg.cn/img_convert/c641e5913afe69b78c320bed32186689.jpeg)

![[Linux]进程地址空间](https://img-blog.csdnimg.cn/img_convert/ed51984a4e3fa0f90d2c3d939a4b6291.png)