基本概念
| 概念 | 定义 |
|---|---|
| 认证 | 判断一个用户身份是否合法的过程(登录过程) |
| 会话 | 为了避免用户的每次操作都进行认证, 将用户的信息保存在会话中. 常见的会话有基于session的模式和基于token的模式 |
| 授权 | 校验用户是否有权限访问某个资源 认证是为了验证用户的身份; 授权是为了验证用户是否有权限访问某个资源 |
会话
基于Session的模式
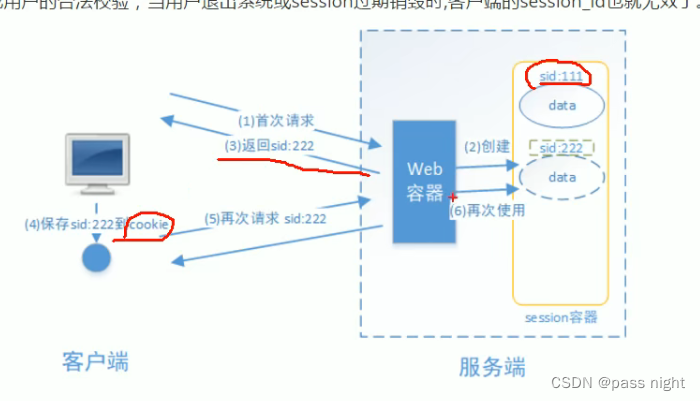
- 用户登录后服务端产生一个
SessionId返回给用户 - 用户每次请求都携带该
SessionId; 服务端据此判断客服端是否认证过
基于Token的模式
- 服务端产生一个
Token返回给用户 - 用户请求携带
Token, 服务端校验该Token判断客户端是否认证过 - 相比于
Session模式, 服务端无需存储Token例如JWT令牌
授权
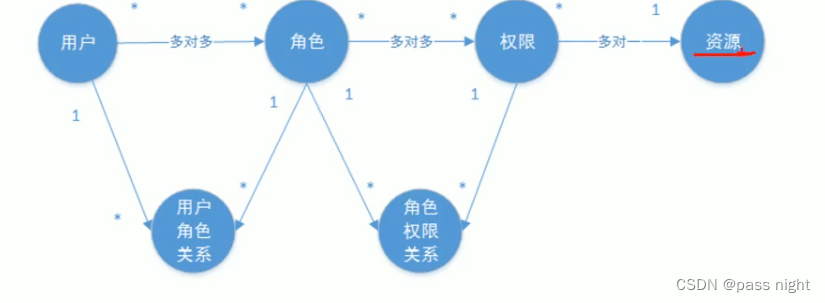
- 用户对应角色; 角色对应权限; 权限限定资源的访问
RBAC (Role(Resource)-Based Access Control)
- RBAC分为基于角色的权限控制和基于资源的权限控制
基于Session的认证方式
注: 基于Session的认证机制由Servlet规范定制, Servlet容器已实现
项目依赖
<!-->pom.xml</-->
<?xml version="1.0" encoding="UTF-8"?>
<project xmlns="http://maven.apache.org/POM/4.0.0"xmlns:xsi="http://www.w3.org/2001/XMLSchema-instance"xsi:schemaLocation="http://maven.apache.org/POM/4.0.0 https://maven.apache.org/xsd/maven-4.0.0.xsd"><modelVersion>4.0.0</modelVersion><packaging>jar</packaging><parent><groupId>org.springframework.boot</groupId><artifactId>spring-boot-starter-parent</artifactId><version>2.3.12.RELEASE</version><relativePath/> <!-- lookup parent from repository --></parent><groupId>com.passnight</groupId><artifactId>spring-note</artifactId><version>0.0.1-SNAPSHOT</version><name>spring-note</name><description>spring-note</description><properties><java.version>11</java.version><spring-cloud.version>Hoxton.SR12</spring-cloud.version></properties><dependencyManagement><dependencies><dependency><groupId>org.springframework.cloud</groupId><artifactId>spring-cloud-dependencies</artifactId><version>${spring-cloud.version}</version><type>pom</type><scope>import</scope></dependency></dependencies></dependencyManagement><dependencies><!--https://mvnrepository.com/artifact/org.springframework.boot/spring-boot-starter-actuator --><dependency><groupId>org.springframework.boot</groupId><artifactId>spring-boot-starter-actuator</artifactId></dependency><dependency><groupId>org.springframework.boot</groupId><artifactId>spring-boot-starter</artifactId></dependency><dependency><groupId>org.projectlombok</groupId><artifactId>lombok</artifactId><optional>true</optional></dependency><dependency><groupId>org.springframework.boot</groupId><artifactId>spring-boot-starter-test</artifactId><scope>test</scope></dependency><dependency><groupId>junit</groupId><artifactId>junit</artifactId><scope>test</scope></dependency><dependency><groupId>org.springframework.boot</groupId><artifactId>spring-boot-starter-web</artifactId></dependency></dependencies><build><plugins><plugin><groupId>org.springframework.boot</groupId><artifactId>spring-boot-maven-plugin</artifactId><configuration><excludes><exclude><groupId>org.projectlombok</groupId><artifactId>lombok</artifactId></exclude></excludes></configuration></plugin></plugins></build></project>
实现验证
Controller
package com.passnight.springboot.security.controller;import com.passnight.springboot.security.service.AuthenticationService;
import lombok.NoArgsConstructor;
import org.springframework.beans.factory.annotation.Autowired;
import org.springframework.web.bind.annotation.GetMapping;
import org.springframework.web.bind.annotation.RequestMapping;
import org.springframework.web.bind.annotation.RequestParam;
import org.springframework.web.bind.annotation.RestController;@RestController
@RequestMapping("/login")
@NoArgsConstructor
public class LoginController {AuthenticationService authenticationService;@GetMapping("/login")public String login(@RequestParam String username, @RequestParam String password) {return String.valueOf(authenticationService.login(username, password));}@GetMapping("/version")public String version() {return "version";}@Autowiredpublic LoginController(AuthenticationService authenticationService) {this.authenticationService = authenticationService;}
}
Service
package com.passnight.springboot.security.service;import lombok.AllArgsConstructor;
import lombok.NonNull;
import org.springframework.stereotype.Service;@Service
@AllArgsConstructor
public class AuthenticationService {public boolean login(@NonNull String username, @NonNull String password) {return username.equals("user") && password.equals("123456");}
}
Test
package com.passnight.springboot.security.web;import org.junit.jupiter.api.Assertions;
import org.junit.jupiter.api.Test;
import org.springframework.boot.test.context.SpringBootTest;
import org.springframework.web.client.RestTemplate;
import org.springframework.web.util.DefaultUriBuilderFactory;import java.util.Map;@SpringBootTest
public class LoginWebTest {DefaultUriBuilderFactory uriBuilderFactory = new DefaultUriBuilderFactory("http://localhost:8080");RestTemplate restTemplate = new RestTemplate();@Testpublic void version() {String result = restTemplate.getForObject("/login/version", String.class);Assertions.assertEquals("version", result);}@Testpublic void failedToLogin() {Map<String, String> param = Map.of("username", "user", "password", "wrong password");String result = restTemplate.getForObject(uriBuilderFactory.uriString("/login/login").queryParam("username", "user").queryParam("password", "wrong password").build(),String.class);Assertions.assertEquals("false", result);}@Testpublic void login() {String result = restTemplate.getForObject(uriBuilderFactory.uriString("/login/login").queryParam("username", "user").queryParam("password", "123456").build(),String.class);Assertions.assertEquals("true", result);}
}
实现Session
@GetMapping("/login-with-session")public String loginWithSession(@RequestParam String username, @RequestParam String password, HttpSession session) {if (authenticationService.login(username, password)) {session.setAttribute(PROTECTED_RESOURCE_TOKEN, true);return "login success";} else {return "failed to login";}}@GetMapping("/resource-protected-by-session")public String resourceProtectedBySession(HttpSession session) {if (session.getAttribute(PROTECTED_RESOURCE_TOKEN) != null) {return "resource protected by session";} else {return "you are not allowed to request this resource";}}@GetMapping("/logout")public String logout(HttpSession session) {session.invalidate();return "logout success";}
直接访问受保护资源
    @Testpublic void requestResourceProtectedBySession() {String result = restTemplate.getForObject(uriBuilderFactory.uriString("/login/resource-protected-by-session").build(),String.class);System.out.println(result);}
// you are not allowed to request  this resource
先登录再访问受保护资源1
# 使用浏览器访问; RestTemplate不会共享Session; 如果想共享资源可以在cookie中添加jssion
http://localhost:8080/login/login-with-session?username=user&password=123456
# login success
http://localhost:8080/login/resource-protected-by-session
# resource protected by session
http://localhost:8080/login/logout
# logout success
http://localhost:8080/login/resource-protected-by-session?username=user
# you are not allowed to request this resource
基于SpringSecurity实现
配置
依赖
<!-- 在pom.xml中添加该依赖 --><!-- https://mvnrepository.com/artifact/org.springframework.boot/spring-boot-starter-security --><dependency><groupId>org.springframework.boot</groupId><artifactId>spring-boot-starter-security</artifactId></dependency>
配置
package com.passnight.springboot.security.config;import org.springframework.context.annotation.Bean;
import org.springframework.security.config.annotation.web.builders.HttpSecurity;
import org.springframework.security.config.annotation.web.configuration.EnableWebSecurity;
import org.springframework.security.config.annotation.web.configuration.WebSecurityConfigurerAdapter;
import org.springframework.security.core.userdetails.User;
import org.springframework.security.core.userdetails.UserDetailsService;
import org.springframework.security.crypto.password.NoOpPasswordEncoder;
import org.springframework.security.crypto.password.PasswordEncoder;
import org.springframework.security.provisioning.InMemoryUserDetailsManager;@EnableWebSecurity
public class WebSecurityConfig extends WebSecurityConfigurerAdapter {// 定义用户信息@Override@Beanprotected UserDetailsService userDetailsService() {InMemoryUserDetailsManager manager = new InMemoryUserDetailsManager();// 创建两个默认用户manager.createUser(User.withUsername("user1").password("123456").authorities("r3").build());manager.createUser(User.withUsername("user2").password("654321").authorities("r4").build());return manager;}// 密码编辑器@Beanpublic PasswordEncoder passwordEncoder() {return NoOpPasswordEncoder.getInstance();}// 安全拦截器@Overrideprotected void configure(HttpSecurity http) throws Exception {http.authorizeRequests()// 限制资源的访问.antMatchers("/resource/**").authenticated().anyRequest().permitAll().and().formLogin().successForwardUrl("/index");}
}
资源
package com.passnight.springboot.security.controller;import org.springframework.web.bind.annotation.GetMapping;
import org.springframework.web.bind.annotation.RequestMapping;
import org.springframework.web.bind.annotation.RestController;@RestController
@RequestMapping("/resource")
public class ResourceController {@GetMapping("/r1")public String r1() {return "r1";}@GetMapping("/r2")public String r2() {return "r2";}@GetMapping("/r3")public String r3() {return "r3";}@GetMapping("/r4")public String r4() {return "r4";}
}
结果
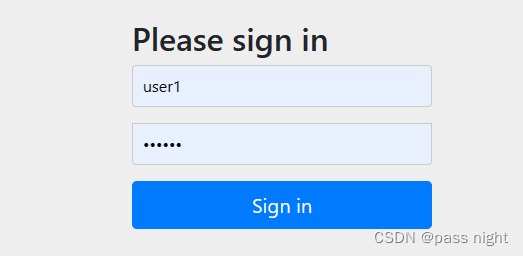
- 访问资源自动调转到登录界面: Please sign in
授权
@Override
@Bean
protected UserDetailsService userDetailsService() {InMemoryUserDetailsManager manager = new InMemoryUserDetailsManager();// 创建两个默认用户; user1只有r3授权, user2只有r4授权manager.createUser(User.withUsername("user1").password("123456").authorities("r3").build());manager.createUser(User.withUsername("user2").password("654321").authorities("r4").build());return manager;
}@Overrideprotected void configure(HttpSecurity http) throws Exception {http.authorizeRequests()// 为r3添加鉴权.antMatchers("/resource/r3").hasAnyAuthority("r3")// 为r4添加鉴权.antMatchers("/resource/r4").hasAnyAuthority("r4")// 其他的只需要登录即可.antMatchers("/resource/**").authenticated().anyRequest().permitAll().and().formLogin().successForwardUrl("/index");}
user1访问r1结果

user1访问r3结果

user1访问r4结果
基于注解实现
@EnableGlobalMethodSecurity(securedEnabled = true, prePostEnabled = true) // 开启基于注解的实现
@Security // 指定安全性, 如资源权限或角色等; 不支持EL表达式
@PreAuthority // 在方法前执行鉴权
@PostAuthority // 方法后执行鉴权
测试用例
// 只有拥有"p1"权限才能访问
@GetMapping("r5")
@PreAuthorize("hasAuthority('p1')")
public String r5() {return "r5";
}// 只有同时拥有"p1", p2"权限才能访问
@GetMapping("r6")
@PostAuthorize("hasAuthority('p1') and hasAuthority('p2')")
public String r6() {return "r6";
}
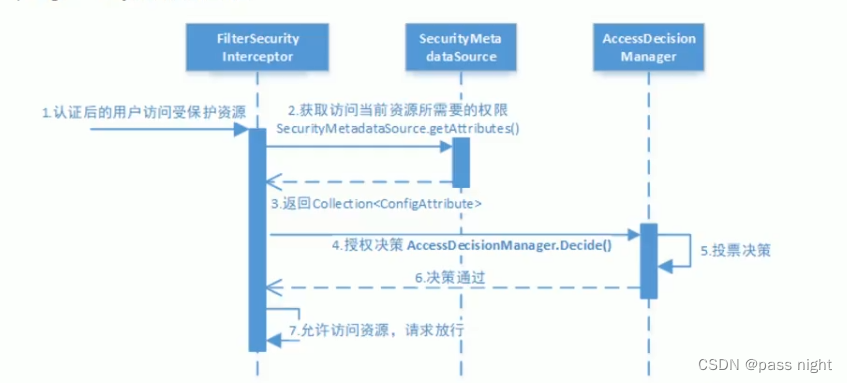
SpringSecurity结构

SpringSecurity主要解决的问题是安全访问控制SpringSecurity对Web资源的限制主要是通过Filter实现的
认证流程

授权流程
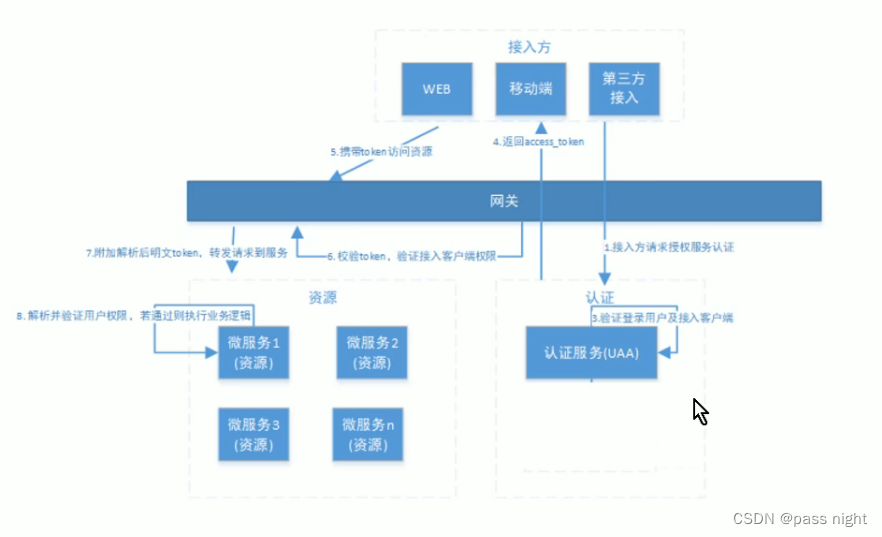
分布式系统认证方案
分布式系统的认证方案
需求:
- 尽管不同服务之间相互独立, 考虑到分布式系统开放性的特点, 不仅需要对服务的内部提供认证, 还要对第三方接口进行认证
- 统一授权认证: 提供独立的认证服务, 统一处理认证授权
- 应用接入认证: 提供扩展和开发机制, 提供安全的系统对接机制, 并可开放部分API给第三方使用
基于Session的认证
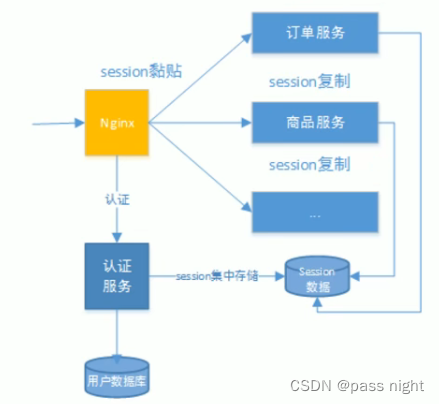
- 使用认证服务统一认证, 对
Session有以下做法 - Session复制: 多台应用服务器之间同步Session, 使Session保持一致, 对外透明
- Session黏贴: 当用户访问集群中某台服务器之后, 强制指定后续所有请求均落到该机器上
- Session集中存储: 将所有的Session集中存储到某分布式缓存中, 所有应用实例统一从分布式缓存中取Session
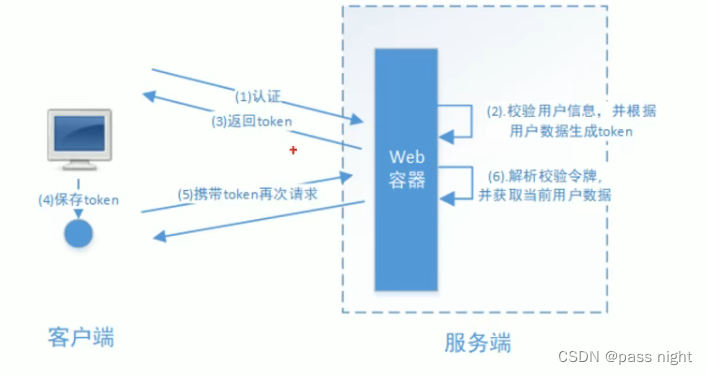
基于Token的认证
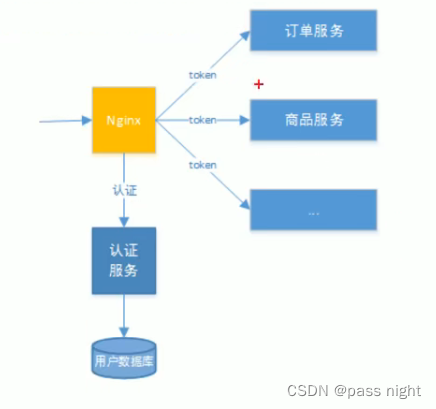
- 认证完成之后, 服务端向客户端返回Token, 客户端请求携带Token, 服务端使用算法认证是否可以访问
- 缺点
- Token包含的信息较Session大,
- 且需要消耗服务器的计算资源
- 优点:
- Token对于各种系统统一一致的认证机制
- 更加适用于第三方接入的场合 主流协议有Oauth2.0, JWT
- 无需服务端存储会话信息, 减轻了服务端的存储压力
- 实现:
OAuth2.0
介绍
OAuth是一个
- 开放标准
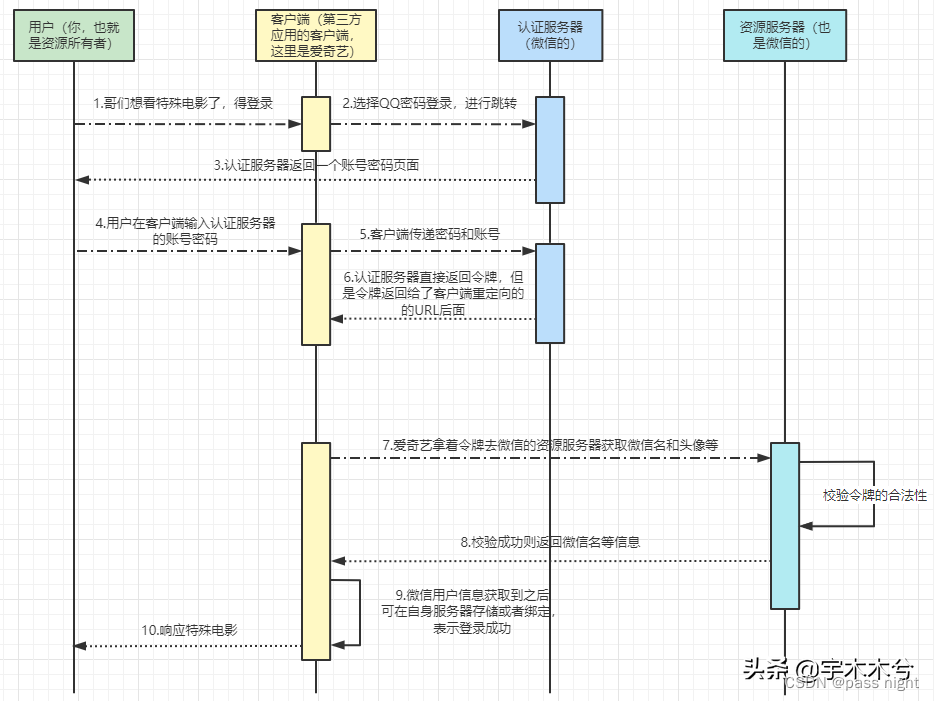
- 允许用户授权第三方应用访问他们存储在其他服务提供者上面的信息, 而不需要将用户名和密码提供给第三方应用或分享他们的数据内容 例如微信扫码后, 微信给某网站发送一个令牌, 该网站收到令牌后即获取微信中的信息, 即可登录成功

特点
- 优点:
- 更安全, 客户端不接触用户密码, 服务端更容易集中维护
- 广泛使用
- Token短寿命
- 集中授权, 资源服务器和授权服务器解耦
- 缺点
- 协议框架宽泛, 造成各种实现的兼容性和互操作性差
- 不是一个认证协议, 本身不能告诉你任何用户信息
SpringCloud Security OAuth2
OAuth2主要分为两个服务, 授权服务和资源服务:
- Authorization server: 认证请求, 默认URL为
/oauth/authorize - TokenEndpoint: 令牌请求, 默认URL为
/oauth/token
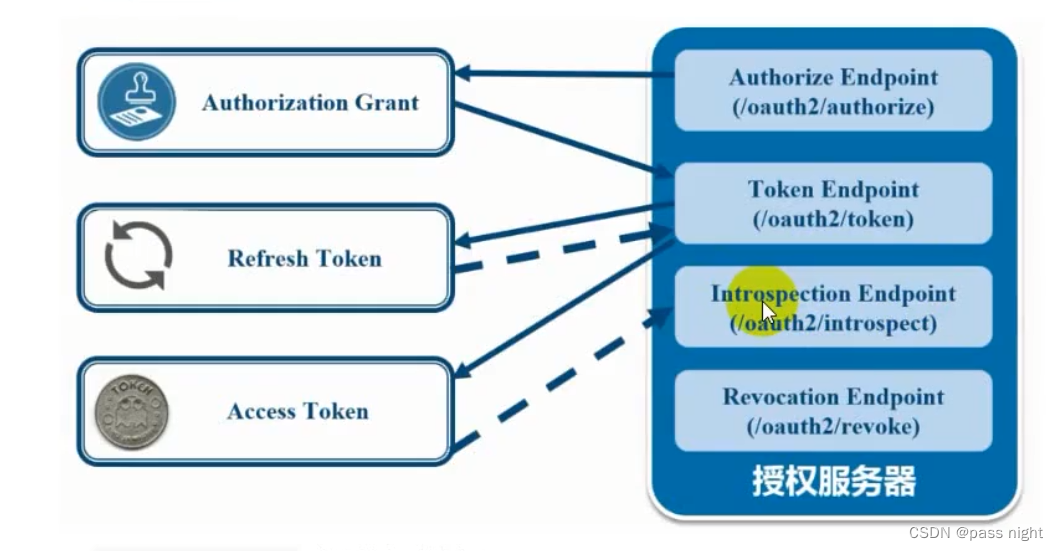
相关概念
- 参与角色
- 授权服务器(AuthorizationServer): 在成功验证资源所有者且获得授权后颁发访问令牌给客户端的服务器,使得授权客户端应用能够访问资源拥有者所拥有的资源。
- .资源服务器(ResourceServer):托管受保护资源的服务器,能够接收和响应使用访问令牌对受保护资源的请求。需要注意的是授权服务器和资源服务器可以是同一个服务器,也可以不是同一个服务器。
- 资源所有者(ResourceOwner):指拥有共享数据的人或应用。比如微信的用户或者淘宝的用户就是是资源拥有者,他们拥有的资源就是他们的数据。需要注意的是资源拥有者也可以是一个应用,不一定必须是人。
- 客户端应用(client):指请求访问存储在资源服务器的资源的应用。 记住, 不是用户
- 认证角色
- 客户凭证(client credentials): 客户端的
clientId和密码用于认证客户 - 令牌(token): 授权服务器在接收到客户请求和, 颁发的令牌
- 作用域(scope): 客户请求访问令牌时, 由资源拥有额外指定的细分权限
- 客户凭证(client credentials): 客户端的
- 令牌类型
- 授权码: 仅用于授权码类型, 用于交换获取访问令牌和刷新令牌
- 访问令牌: 用于代表一个用户或服务直接去访问受保护的资源
- 刷新令牌: 用于去授权服务器获取一个刷新访问令牌
- BearerToken: 不管谁拿到该
Token, 都可以访问资源 - Proof of Permission (Pop) Token: 可以校验client是否对Token由明确的拥有权
模式
授权码模式2

简化授权码模式

密码模式
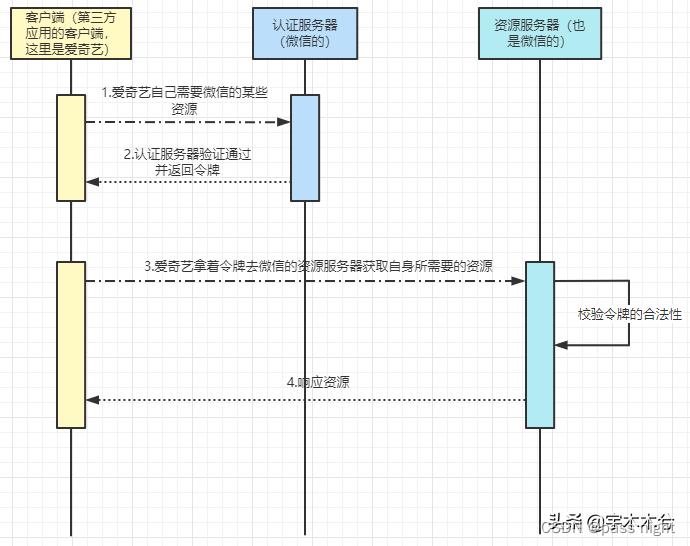
客户端凭证模式
刷新令牌
+--------+ +---------------+| |--(A)------- Authorization Grant --------->| || | | || |<-(B)----------- Access Token -------------| || | & Refresh Token | || | | || | +----------+ | || |--(C)---- Access Token ---->| | | || | | | | || |<-(D)- Protected Resource --| Resource | | Authorization || Client | | Server | | Server || |--(E)---- Access Token ---->| | | || | | | | || |<-(F)- Invalid Token Error -| | | || | +----------+ | || | | || |--(G)----------- Refresh Token ----------->| || | | || |<-(H)----------- Access Token -------------| |+--------+ & Optional Refresh Token +---------------+
授权码模式实现
依赖
<dependency><groupId>org.springframework.cloud</groupId><artifactId>spring-cloud-starter-security</artifactId></dependency><dependency><groupId>org.springframework.cloud</groupId><artifactId>spring-cloud-starter-oauth2</artifactId></dependency>
授权服务器配置
package com.passnight.cloud.security.authserver.config;import org.springframework.context.annotation.Configuration;
import org.springframework.security.oauth2.config.annotation.configurers.ClientDetailsServiceConfigurer;
import org.springframework.security.oauth2.config.annotation.web.configuration.AuthorizationServerConfigurerAdapter;
import org.springframework.security.oauth2.config.annotation.web.configuration.EnableAuthorizationServer;@Configuration
@EnableAuthorizationServer
public class AuthorizationServerConfig extends AuthorizationServerConfigurerAdapter {@Overridepublic void configure(ClientDetailsServiceConfigurer clients) throws Exception {clients.inMemory().withClient("client") // 客户端Id.secret("654321") // 秘钥.redirectUris("https://www.baidu.com") // 重定向地址.scopes("all") // 授权范围.authorizedGrantTypes("authorization_code"); // 授权类型(授权码)}
}
资源服务器配置
package com.passnight.cloud.security.authserver.config;import org.springframework.context.annotation.Configuration;
import org.springframework.security.config.annotation.web.builders.HttpSecurity;
import org.springframework.security.oauth2.config.annotation.web.configuration.EnableResourceServer;
import org.springframework.security.oauth2.config.annotation.web.configuration.ResourceServerConfigurerAdapter;@Configuration
@EnableResourceServer
public class ResourceServerConfig extends ResourceServerConfigurerAdapter {@Overridepublic void configure(HttpSecurity http) throws Exception {http.authorizeRequests().anyRequest().authenticated().and().requestMatchers().antMatchers("/user/**").and().csrf().disable();}
}
权限配置
package com.passnight.cloud.security.authserver.config;import org.springframework.context.annotation.Bean;
import org.springframework.context.annotation.Configuration;
import org.springframework.security.config.annotation.web.builders.HttpSecurity;
import org.springframework.security.config.annotation.web.configuration.EnableWebSecurity;
import org.springframework.security.config.annotation.web.configuration.WebSecurityConfigurerAdapter;
import org.springframework.security.crypto.bcrypt.BCryptPasswordEncoder;
import org.springframework.security.crypto.password.PasswordEncoder;@Configuration
@EnableWebSecurity
public class SecurityConfig extends WebSecurityConfigurerAdapter {@Overrideprotected void configure(HttpSecurity http) throws Exception {http.authorizeRequests().antMatchers("/oauth/**", "/login/**", "logout/**").permitAll().anyRequest().authenticated().and().formLogin().and().csrf().disable();}@Beanpublic PasswordEncoder passwordEncoder() {return new BCryptPasswordEncoder();}
}
鉴权服务
package com.passnight.cloud.security.authserver.service;import com.passnight.cloud.security.authserver.config.SecurityConfig;
import lombok.AllArgsConstructor;
import org.springframework.security.core.authority.AuthorityUtils;
import org.springframework.security.core.userdetails.User;
import org.springframework.security.core.userdetails.UserDetails;
import org.springframework.security.core.userdetails.UserDetailsService;
import org.springframework.security.core.userdetails.UsernameNotFoundException;
import org.springframework.security.crypto.password.PasswordEncoder;
import org.springframework.stereotype.Service;import java.util.ArrayList;
import java.util.List;@Service
@AllArgsConstructor
public class UserService implements UserDetailsService {private final List<UserDetails> users = new ArrayList<>();{PasswordEncoder passwordEncoder = new SecurityConfig().passwordEncoder();users.add(User.builder().username("user1").password(passwordEncoder.encode("123456")).authorities(AuthorityUtils.commaSeparatedStringToAuthorityList("admin")).build());users.add(User.builder().username("user2").password(passwordEncoder.encode("123456")).authorities(AuthorityUtils.commaSeparatedStringToAuthorityList("user")).build());}@Overridepublic UserDetails loadUserByUsername(String username) throws UsernameNotFoundException {return users.stream().filter(user -> user.getUsername().equals(username)).findAny().orElseThrow(() -> new UsernameNotFoundException(String.format("Can't find user: %s", username)));}
}
资源配置
package com.passnight.cloud.security.authserver.controller;import org.springframework.security.core.Authentication;
import org.springframework.web.bind.annotation.RequestMapping;
import org.springframework.web.bind.annotation.RestController;@RestController
@RequestMapping("/user")
public class UserController {@RequestMapping("getCurrentUser")public Object getCurrentUser(Authentication authentication) {return authentication.getPrincipal();}
}
访问
http://server.passnight.local:8101/oauth/authorize?client_id=client&response_type=code
询问你是否授权客户端权限访问受保护的资源

并拿到授权码

# 请求, 并获得token
passnight@passnight-s600:~$ curl --location 'http://server.passnight.local:8101/oauth/token' --header 'Content-Type: application/x-www-form-urlencoded' --header 'Authorization: Basic Y2xpZW50OjY1NDMyMQ==' --header 'Cookie: JSESSIONID=DE362C8D16D0FA00EB979D1D8D4D9A7B' --data-urlencode 'grant_type=authorization_code' --data-urlencode 'client_id=client' --data-urlencode 'redirect_uri=https://www.baidu.com' --data-urlencode 'code=iT2Zzx' --data-urlencode 'scope=all'
{"access_token":"ae37e184-ec54-422f-ad40-17d0e420f03a","token_type":"bearer","expires_in":43155,"scope":"all"}
密码模式
    @Bean@SneakyThrowspublic AuthenticationManager authenticationManager() {return super.authenticationManager();}
// 添加密码模式配置@Overridepublic void configure(AuthorizationServerEndpointsConfigurer endpoints) throws Exception {endpoints.authenticationManager(authenticationManager).userDetailsService(userService);}
// 显示声明@Overridepublic void configure(ClientDetailsServiceConfigurer clients) throws Exception {clients.inMemory().withClient("client") .secret(passwordEncoder.encode("654321")) .redirectUris("https://www.baidu.com") .scopes("all").authorizedGrantTypes("authorization_code", "password"); // 添加密码模式}
访问
passnight@passnight-s600:~$ curl --location 'http://server.passnight.local:8101/oauth/token' \
--header 'Content-Type: application/x-www-form-urlencoded' \
--header 'Authorization: Basic Y2xpZW50OjY1NDMyMQ==' \ # username=client & password=654321 (请求去掉注释)
--data-urlencode 'grant_type=password' \
--data-urlencode 'scope=all' \
--data-urlencode 'username=user1' \
--data-urlencode 'password=123456'
{"access_token":"3a354527-d25e-4940-9dc0-4ccedbe9f0a8","token_type":"bearer","expires_in":43199,"scope":"all"}
JWT
常见的认证机制
Http Basic Auth
每次请求的时候都要携带用户名和密码
Cookie Auth
- 客户端创建
Cookie对象 - 服务端创建
Session对象 - 比对
Cookie和Session来鉴权 - 一般来说, 关闭浏览器的时候
Cookie也会被删除
OAuth
- 允许用户让第三方应用访问某一服务器上存储的私密资源
Token Auth
- 客户端使用用户名和密码登录
- 幅度按验证用户名密码, 并返回一个
Token给客户端 - 客户端存储
Token, 请求携带该Token, 服务端通过验证Token鉴权
JWT
JSON Web Tokens - jwt.io
特点
- 优点
- 基于
JSON, 抑郁解析 - 可以在令牌中自定义内容, 易扩展
- 通过非对称加密算法及数字签名技术, 可防止篡改, 安全性高
- 资源服务使用
JWT可以不依赖认证服务完成授权
- 基于
- 缺点
JWT令牌较长, 占用存储空间较大
组成
// 头部; 可以使用base64进行编码
{"alg": "HS265","typ": "JWT"
}
// 负载(payload), 即存放有效信息的地方
// 可以分类为: 标准中注册的声明, 公共的声明, 私有的声明; 私有的声明需要通知验证规则, 公有声明不需要
// 一般不添加敏感信息, 因为不加密
{"sub": "123456", // 标准声明"name": "User name", // 公共声明"iat": 123456 // 私有声明
}// 签证, 签名(signature): 由头部, 负载, 和盐(保密)组成
JJWT
JJWT是一个提供对JWT端到端验证的Java库
集成到Oauth中
<dependency><groupId>io.jsonwebtoken</groupId><artifactId>jjwt</artifactId><version>0.9.1</version></dependency>
配置Jwt
package com.passnight.cloud.security.authserver.config;import org.springframework.context.annotation.Bean;
import org.springframework.context.annotation.Configuration;
import org.springframework.security.oauth2.provider.token.TokenStore;
import org.springframework.security.oauth2.provider.token.store.JwtAccessTokenConverter;
import org.springframework.security.oauth2.provider.token.store.JwtTokenStore;@Configuration
public class JwtConfig {@Beanpublic TokenStore jwtTokenStore() {return new JwtTokenStore(jwtAccessTokenConverter());}@Beanpublic JwtAccessTokenConverter jwtAccessTokenConverter() {final JwtAccessTokenConverter jwtAccessTokenConverter = new JwtAccessTokenConverter();jwtAccessTokenConverter.setSigningKey("secret_key");return jwtAccessTokenConverter;}
}
集成到OAuth中
package com.passnight.cloud.security.authserver.config;import com.passnight.cloud.security.authserver.service.UserService;
import lombok.AllArgsConstructor;
import org.springframework.context.annotation.Configuration;
import org.springframework.security.authentication.AuthenticationManager;
import org.springframework.security.crypto.password.PasswordEncoder;
import org.springframework.security.oauth2.config.annotation.configurers.ClientDetailsServiceConfigurer;
import org.springframework.security.oauth2.config.annotation.web.configuration.AuthorizationServerConfigurerAdapter;
import org.springframework.security.oauth2.config.annotation.web.configuration.EnableAuthorizationServer;
import org.springframework.security.oauth2.config.annotation.web.configurers.AuthorizationServerEndpointsConfigurer;
import org.springframework.security.oauth2.provider.token.TokenStore;@Configuration
@EnableAuthorizationServer
@AllArgsConstructor
public class AuthorizationServerConfig extends AuthorizationServerConfigurerAdapter {private PasswordEncoder passwordEncoder;private AuthenticationManager authenticationManager;private UserService userService;private TokenStore tokenStore;@Overridepublic void configure(AuthorizationServerEndpointsConfigurer endpoints) {endpoints.authenticationManager(authenticationManager).userDetailsService(userService).tokenStore(tokenStore); // 设置tokenStore为JWT TokenStore}@Overridepublic void configure(ClientDetailsServiceConfigurer clients) throws Exception {clients.inMemory().withClient("client") // 客户端Id.secret(passwordEncoder.encode("654321")) // 秘钥.redirectUris("https://www.baidu.com") // 重定向地址.scopes("all") // 授权范围.authorizedGrantTypes("authorization_code", "password"); // 授权类型(授权码)}
}
测试
passnight@passnight-s600:~$ curl --location 'http://server.passnight.local:8101/oauth/token' \
--header 'Content-Type: application/x-www-form-urlencoded' \
--header 'Authorization: Basic Y2xpZW50OjY1NDMyMQ==' \ # username=client & password=654321 (请求去掉注释)
--data-urlencode 'grant_type=password' \
--data-urlencode 'scope=all' \
--data-urlencode 'username=user1' \
--data-urlencode 'password=123456'
{"access_token":"eyJhbGciOiJIUzI1NiIsInR5cCI6IkpXVCJ9.eyJleHAiOjE2OTEyNjU0NzQsInVzZXJfbmFtZSI6InVzZXIxIiwiYXV0aG9yaXRpZXMiOlsiYWRtaW4iXSwianRpIjoiYWNlZTViYTYtMDU2My00ZjliLTgwMTEtZWVhYWQzZGI0YzZiIiwiY2xpZW50X2lkIjoiY2xpZW50Iiwic2NvcGUiOlsiYWxsIl19.avWqGdBfclj5wPkNOjSMmUBY3h0NCc1EkxAPAjhWZms","token_type":"bearer","expires_in":43199,"scope":"all","jti":"acee5ba6-0563-4f9b-8011-eeaad3db4c6b"}
添加自定义声明
声明Enhancer
package com.passnight.cloud.security.authserver.config;import org.springframework.context.annotation.Bean;
import org.springframework.context.annotation.Configuration;
import org.springframework.security.oauth2.common.DefaultOAuth2AccessToken;
import org.springframework.security.oauth2.common.OAuth2AccessToken;
import org.springframework.security.oauth2.provider.OAuth2Authentication;
import org.springframework.security.oauth2.provider.token.TokenEnhancer;
import org.springframework.security.oauth2.provider.token.TokenStore;
import org.springframework.security.oauth2.provider.token.store.JwtAccessTokenConverter;
import org.springframework.security.oauth2.provider.token.store.JwtTokenStore;import java.util.HashMap;
import java.util.Map;@Configuration
public class JwtConfig {@Beanpublic TokenStore jwtTokenStore() {return new JwtTokenStore(jwtAccessTokenConverter());}@Beanpublic JwtAccessTokenConverter jwtAccessTokenConverter() {JwtAccessTokenConverter jwtAccessTokenConverter = new JwtAccessTokenConverter();jwtAccessTokenConverter.setSigningKey("secret_key");return jwtAccessTokenConverter;}
// 注入Enhancer@Beanpublic TokenEnhancer jwtTokenEnhancer() {return new JwtTokenEnhancer();}}
// 实现TokenEnhancer
class JwtTokenEnhancer implements TokenEnhancer {@Overridepublic OAuth2AccessToken enhance(OAuth2AccessToken accessToken, OAuth2Authentication authentication) {Map<String, Object> map = new HashMap<>();map.put("enhance", "enhance info");((DefaultOAuth2AccessToken) accessToken).setAdditionalInformation(map);return accessToken;}
}
配置到鉴权服务器中
package com.passnight.cloud.security.authserver.config;import com.passnight.cloud.security.authserver.service.UserService;
import lombok.AllArgsConstructor;
import org.springframework.context.annotation.Configuration;
import org.springframework.security.authentication.AuthenticationManager;
import org.springframework.security.crypto.password.PasswordEncoder;
import org.springframework.security.oauth2.config.annotation.configurers.ClientDetailsServiceConfigurer;
import org.springframework.security.oauth2.config.annotation.web.configuration.AuthorizationServerConfigurerAdapter;
import org.springframework.security.oauth2.config.annotation.web.configuration.EnableAuthorizationServer;
import org.springframework.security.oauth2.config.annotation.web.configurers.AuthorizationServerEndpointsConfigurer;
import org.springframework.security.oauth2.provider.token.TokenEnhancer;
import org.springframework.security.oauth2.provider.token.TokenEnhancerChain;
import org.springframework.security.oauth2.provider.token.TokenStore;
import org.springframework.security.oauth2.provider.token.store.JwtAccessTokenConverter;import java.util.ArrayList;
import java.util.List;@Configuration
@EnableAuthorizationServer
@AllArgsConstructor
public class AuthorizationServerConfig extends AuthorizationServerConfigurerAdapter {private PasswordEncoder passwordEncoder;private AuthenticationManager authenticationManager;private UserService userService;private TokenStore tokenStore;private JwtAccessTokenConverter jwtAccessTokenConverter;private TokenEnhancer jwtTokenEnhancer;@Overridepublic void configure(AuthorizationServerEndpointsConfigurer endpoints) {// 设置增强内容TokenEnhancerChain tokenEnhancerChain = new TokenEnhancerChain();List<TokenEnhancer> tokenEnhancerDelegates = new ArrayList<>();tokenEnhancerDelegates.add(jwtTokenEnhancer);tokenEnhancerDelegates.add(jwtAccessTokenConverter);tokenEnhancerChain.setTokenEnhancers(tokenEnhancerDelegates);endpoints.authenticationManager(authenticationManager).userDetailsService(userService).tokenStore(tokenStore).accessTokenConverter(jwtAccessTokenConverter)// 添加TokenEnhancer.tokenEnhancer(tokenEnhancerChain);}@Overridepublic void configure(ClientDetailsServiceConfigurer clients) throws Exception {clients.inMemory().withClient("client") // 客户端Id.secret(passwordEncoder.encode("654321")) // 秘钥.redirectUris("https://www.baidu.com") // 重定向地址.scopes("all") // 授权范围.authorizedGrantTypes("authorization_code", "password"); // 授权类型(授权码)}
}
测试
passnight@passnight-s600:~$ curl --location 'http://server.passnight.local:8101/oauth/token' \
--header 'Content-Type: application/x-www-form-urlencoded' \
--header 'Authorization: Basic Y2xpZW50OjY1NDMyMQ==' \
--data-urlencode 'grant_type=password' \
--data-urlencode 'scope=all' \
--data-urlencode 'username=user1' \
--data-urlencode 'password=123456'
{"access_token":"eyJhbGciOiJIUzI1NiIsInR5cCI6IkpXVCJ9.eyJ1c2VyX25hbWUiOiJ1c2VyMSIsInNjb3BlIjpbImFsbCJdLCJleHAiOjE2OTEyNjc3ODMsImF1dGhvcml0aWVzIjpbImFkbWluIl0sImp0aSI6ImYzNWQ3ZjQwLWM2NjgtNGY5Yi1hZDhjLWExNTRmNDA5Mjc5MyIsImNsaWVudF9pZCI6ImNsaWVudCIsImVuaGFuY2UiOiJlbmhhbmNlIGluZm8ifQ.k6lhmr1VTvKxAPO8As9u1popZKpUiexUXTaK884XELc","token_type":"bearer","expires_in":43199,"scope":"all","enhance":"enhance info","jti":"f35d7f40-c668-4f9b-ad8c-a154f4092793"}

设置过期时间
@Override
public void configure(ClientDetailsServiceConfigurer clients) throws Exception {clients.inMemory().withClient("client").secret(passwordEncoder.encode("654321")).redirectUris("https://www.baidu.com".scopes("all").accessTokenValiditySeconds(5) // 添加失效时间.refreshTokenValiditySeconds(86400) // 刷新令牌的失效时间.authorizedGrantTypes("authorization_code", "password", "refresh_token"); // 添加刷新令牌
}
passnight@passnight-s600:~$ curl --location 'http://server.passnight.local:8101/oauth/token' \
--header 'Content-Type: application/x-www-form-urlencoded' \
--header 'Authorization: Basic Y2xpZW50OjY1NDMyMQ==' \
--header 'Cookie: JSESSIONID=3BC47F5E2D70C4204D5CCE8F522E58F7' \
--data-urlencode 'grant_type=password' \
--data-urlencode 'scope=all' \
--data-urlencode 'username=user1' \
--data-urlencode 'password=123456'
{"access_token":"eyJhbGciOiJIUzI1NiIsInR5cCI6IkpXVCJ9.eyJ1c2VyX25hbWUiOiJ1c2VyMSIsInNjb3BlIjpbImFsbCJdLCJleHAiOjE2OTEyMjYwNTgsImF1dGhvcml0aWVzIjpbImFkbWluIl0sImp0aSI6ImZkYjQwNjIxLTg1YzktNDU4NS1iNDQ0LTRiMDc3YTNiZGE1YSIsImNsaWVudF9pZCI6ImNsaWVudCIsImVuaGFuY2UiOiJlbmhhbmNlIGluZm8ifQ.ZTJStxlFuTdH8hjNyVG0OofQc6Fcv-pgQVSqVoTMQ5g","token_type":"bearer","refresh_token":"eyJhbGciOiJIUzI1NiIsInR5cCI6IkpXVCJ9.eyJ1c2VyX25hbWUiOiJ1c2VyMSIsInNjb3BlIjpbImFsbCJdLCJhdGkiOiJmZGI0MDYyMS04NWM5LTQ1ODUtYjQ0NC00YjA3N2EzYmRhNWEiLCJleHAiOjE2OTEzMTI0NTMsImF1dGhvcml0aWVzIjpbImFkbWluIl0sImp0aSI6IjRmMGUyZTZiLTY3YzUtNGYyZi1hYTZmLWMyYWEwNWI5NzI0OSIsImNsaWVudF9pZCI6ImNsaWVudCIsImVuaGFuY2UiOiJlbmhhbmNlIGluZm8ifQ.SHMe8Mc3YfYA94D2t3vY7bHXSpN26FKlrWNAzxxANo4","expires_in":4,"scope":"all","enhance":"enhance info","jti":"fdb40621-85c9-4585-b444-4b077a3bda5a"}# 刷新令牌passnight@passnight-s600:~$ curl --curl --location 'http://server.passnight.local:8101/oauth/token' \
--header 'Content-Type: application/x-www-form-urlencoded' \
--header 'Authorization: Basic Y2xpZW50OjY1NDMyMQ==' \
--header 'Cookie: JSESSIONID=3BC47F5E2D70C4204D5CCE8F522E58F7' \
--data-urlencode 'grant_type=refresh_token' \
--data-urlencode 'refresh_token=eyJhbGciOiJIUzI1NiIsInR5cCI6IkpXVCJ9.eyJ1c2VyX25hbWUiOiJ1c2VyMSIsInNjb3BlIjpbImFsbCJdLCJhdGkiOiI2MDU0ZmJlMi1mMWRiLTQ0ZmYtODE5Ni1iNThkYjM5ZmRhOWIiLCJleHAiOjE2OTEzMTI0NDMsImF1dGhvcml0aWVzIjpbImFkbWluIl0sImp0aSI6ImVjODQyNjcxLTNmYmYtNDk1Yy04Njg5LWQxYjJlMmZjZGRkMiIsImNsaWVudF9pZCI6ImNsaWVudCIsImVuaGFuY2UiOiJlbmhhbmNlIGluZm8ifQ.2jUBXVniKeQ77KjxWy_kzqX9FtfZrd9efDod8jT6jNU'
{"access_token":"eyJhbGciOiJIUzI1NiIsInR5cCI6IkpXVCJ9.eyJ1c2VyX25hbWUiOiJ1c2VyMSIsInNjb3BlIjpbImFsbCJdLCJleHAiOjE2OTEyMjYxNjksImF1dGhvcml0aWVzIjpbImFkbWluIl0sImp0aSI6IjhiZWM5NDUyLThkMDktNDRhYy05ZmI3LWMyODcxYmZiNmIxMyIsImNsaWVudF9pZCI6ImNsaWVudCIsImVuaGFuY2UiOiJlbmhhbmNlIGluZm8ifQ.MOwEWrOfwif7BGYgtJqDk1OEh7_HKny-eQo5hScX97w","token_type":"bearer","refresh_token":"eyJhbGciOiJIUzI1NiIsInR5cCI6IkpXVCJ9.eyJ1c2VyX25hbWUiOiJ1c2VyMSIsInNjb3BlIjpbImFsbCJdLCJhdGkiOiI4YmVjOTQ1Mi04ZDA5LTQ0YWMtOWZiNy1jMjg3MWJmYjZiMTMiLCJleHAiOjE2OTEzMTI0NDMsImF1dGhvcml0aWVzIjpbImFkbWluIl0sImp0aSI6ImVjODQyNjcxLTNmYmYtNDk1Yy04Njg5LWQxYjJlMmZjZGRkMiIsImNsaWVudF9pZCI6ImNsaWVudCIsImVuaGFuY2UiOiJlbmhhbmNlIGluZm8ifQ.RMLjKFrYGhPsSSXT1TroLx3jRMSZyz7duVv4_63B590","expires_in":4,"scope":"all","enhance":"enhance info","jti":"8bec9452-8d09-44ac-9fb7-c2871bfb6b13"}
引用
关于JSESSIONID - 简书 (jianshu.com) ↩︎
SpringCloud系列—Spring Cloud 开放认证Oauth2.0应用-开源基础软件社区-51CTO.COM ↩︎