文章目录
- 1. Xml 和 JavaConfig
- 1.1 什么是 JavaConfig
- 1.2 JavaConfig 配置容器
- 1.3 @ImportResource
- 1.4 @PropertyResource
- 2. 注解@SpringBootApplication
- 3.Spring Boot 核心配置文件
- 3.1 yaml格式
- 3.2 .yml 文件
- 3.3 多环境配置
- 3.4 Spring Boot 自定义配置
- 3.4.1 @Value 注解
- 3.5 注解@ConfigurationProperties
- 3.6 中文乱码
- 4.Spring Boot 中使用容器
- 5. ComnandLineRunner接口,ApplcationRunner接口
- 6.Spring Boot 和 web 组件
- 6.1 SpringBoot 中拦截器
- 6.2 Spring Boot 中使用Servlet
- 6.3 Spring Boot 中使用 Filter
- 6.3.1 字符集过滤器的应用
- 7. ORM 操作 MySQL
- 8.接口架构风格—RESTful
- 8.1 认识 REST
- 8.2 RESTful 的注解
- 8.3 RESTful 优点
- 9.Spring Boot 打包
- 9.1 Spring Boot 打包为 war
- 9.2打包为jar
1. Xml 和 JavaConfig
Spring 使用 Xml 作为容器配置文件, 在 3.0 以后加入了 JavaConfig. 使用 java 类做配 置文件使用。
1.1 什么是 JavaConfig
(1)JavaConfig: 是 Spring 提供的使用 java 类配置容器。 配置 Spring IOC 容器的纯 Java 方法。
(2)优点:
①可以使用面像对象的方式, 一个配置类可以继承配置类,可以重写方法
②避免繁琐的 xml 配置
1.2 JavaConfig 配置容器
(1)JavaConfig 主要使用的注解
①@Configuration:放在类的上面, 这个类相当于 xml 配置文件,可以在其中声明 bean
②@Bean:放在方法的上面, 方法的返回值是对象类型,将这个对象注入到 spring ioc 容器
(2)创建配置类(等同于 xml 配置文件)
/**
- @Configuration:表示当前类是 xml 配置文件的作用
- 在这个类中有很多方法, 方法的返回值是对象。
- 在这个方法的上面加入@Bean, 表示方法返回值的对象放入到容器中。
- @Bean ==
<bean></bean> - @Bean 没有使用属性,默认对象名称是方法名
*/
@Configuration
public class SpringConfig { @Bean public Student createStudent(){ Student student = new Student(); student.setId(1002); student.setName("周仓"); student.setAge(29); return student; } // name :指定对象的名称 @Bean(name = "myStudent2") public Student makeStudent(){ Student student = new Student(); student.setId(1003); student.setName("诸葛亮"); student.setAge(30); return student; }
(3)测试方法:
//使用 JavaConfig
@Test
public void test02(){ //没有 xml 配置文件,使用 java 类代替 xml 配置文件 的作用 ApplicationContext ctx = new AnnotationConfigApplicationContext(SpringConfig.class); Student student = (Student) ctx.getBean("createStudent"); System.out.println("student==="+student);
}
@Test
public void test03(){ //没有 xml 配置文件,使用 java 类代替 xml 配置文件 的作用 ApplicationContext ctx = new AnnotationConfigApplicationContext(SpringConfig.class); Student student = (Student) ctx.getBean("myStudent2"); System.out.println("myStudent2==="+student); Object myDate = ctx.getBean("myDate"); System.out.println("myDate = " + myDate);
}
1.3 @ImportResource
@ImportResource 是导入 xml 配置,等同于 xml 文件的 resources
(1)创建数据类:
public class Cat { private String cardId; private String name; private Integer age; // set、get
}
(2)创建配置文件 beans.xml
<?xml version="1.0" encoding="UTF-8"?>
<beans xmlns="http://www.springframework.org/schema/beans" xmlns:xsi="http://www.w3.org/2001/XMLSchema-instance" xsi:schemaLocation="http://www.springframework.org/schema/beans http://www.springframework.org/schema/beans/spring-beans.xsd"> <bean id="myCat" class="com.bjpowernode.vo.Cat"> <property name="cardId" value="XSET29001" /> <property name="name" value="tom 猫"/> <property name="age" value="3" /> </bean>
</beans>
(3)创建配置类:
@Configuration
@ImportResource(value = {"classpath:beans.xml","classpath:applicationContext.xml"})public class SystemConfig { //使用@Bean 声明 bean
}
(4)创建测试方法:
@Test
public void test04(){ //没有 xml 配置文件,使用 java 类代替 xml 配置文件 的作用 ApplicationContext ctx = new AnnotationConfigApplicationContext(SystemConfig.class); Cat cat = (Cat) ctx.getBean("myCat"); System.out.println("cat==="+cat);
}
1.4 @PropertyResource
@PropertyResource 作用是读取 properties 属性配置文件 ,使用属性配置文件可以外部化配置,在程序代码之外提供数据
<context:property-placeholder location="classpath:jdbc.properties"/>
(1)在 resources 目录下创建 config.properties
tiger.name=东北老虎
tiger.age=6
(2)修改 SystemConfig 文件
@Configuration
// @PropertySource注解相当于在xm中引入外部properties属性文件
@PropertySource(value = "classpath:config.properties")
@ComponentScan(value = "com.bjpowernode.vo")public class SystemConfig { //使用@Bean 声明 bean
}
(3)创建数据类 Tiger
@Component("tiger")
public class Tiger { @Value("${tiger.name}") private String name; @Value("${tiger.age}") private Integer age; @Override public String toString() { return "Tiger{" + "name='" + name + '\'' + ", age=" + age + '}'; }
}
2. 注解@SpringBootApplication
@SpringBootApplication 是 一 个 复 合 注 解,是 由@SpringBootConfiguration+@EnableAutoConfiguration +@ComponentScan 联合在一起组成的。
(1)@SpringBootConfiguration:就是@Configuration 这个注解的功能,使用@SpringBootConfiguration
这个注解的类就是配置文件的作用。
(2)@EnableAutoConfiguration:开启自动配置, 把一些对象加入到 spring 容器中。
(3)@ComponentScan:组件扫描器, 扫描注解,根据注解的功能,创建 java bean,给属性赋值 等等。组件扫描器默认扫描的是 @ComponentScan 注解所在的类, 类所在的包和子包。
3.Spring Boot 核心配置文件
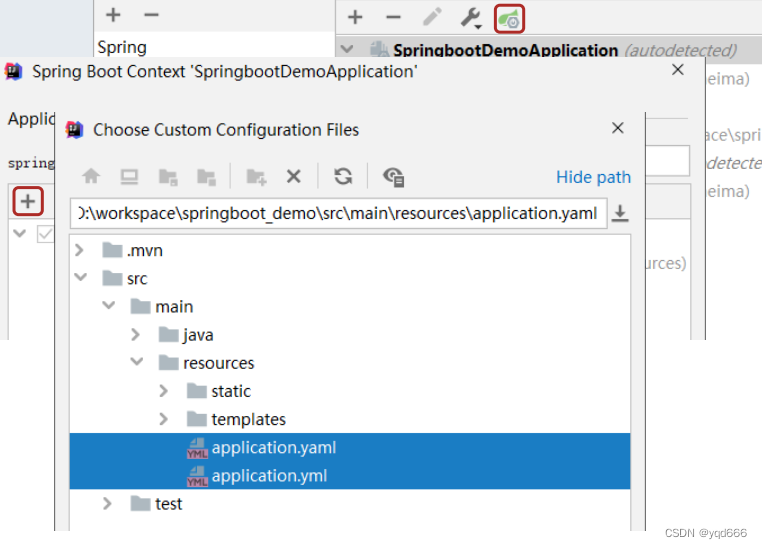
(1)Spring Boot 的核心配置文件用于配置 Spring Boot 程序,名字必须以 application 开始;SpringBoot提供了多种属性配置方式,默认采用.properties 文件
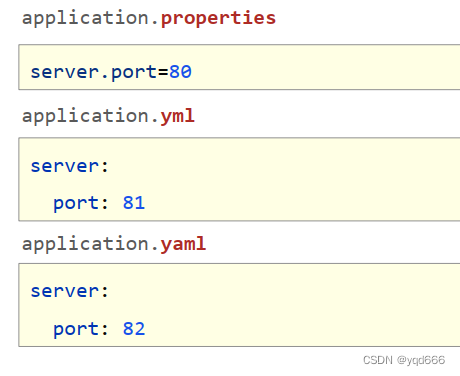
(2)SpringBoot配置文件加载顺序
application.properties > application.yml(常用) > application.yaml
(3)自动提示功能消失解决方案
(4)yml 是一种 yaml 格式的配置文件,主要采用一定的空格、换行等格式排版进行配置。 yaml 是一种直观的能够被计算机识别的的数据序列化格式,容易被人类阅读,yaml 类 似于 xml,但是语法比 xml 简洁很多,值与前面的冒号配置项必须要有一个空格, yml 缀也可以使用 yaml 后缀
3.1 yaml格式
YAML(YAML Ain’t Markup Language), 一种数据序列化格式
(1)优点:
①容易阅读
②容易与脚本语言交互
③以数据为核心,重数据轻格式
(2)YAML文件扩展名
①.yml(主流)
②.yaml
(3)yaml语法规则
①大小写敏感
②属性层级关系使用多行描述,每行结尾使用冒号结束
③使用缩进表示层级关系,同层级左侧对齐,只允许使用空格(不允许使用Tab键)
④属性值前面添加空格(属性名与属性值之间使用冒号+空格作为分隔)
⑤# 表示注释
⑥核心规则: 数据前面要加空格与冒号隔开
(4)字面值表示方式

(5)数组表示方式:在属性名书写位置的下方使用减号作为数据开始符号,每行书写一个数据,减号与数据间空格分隔
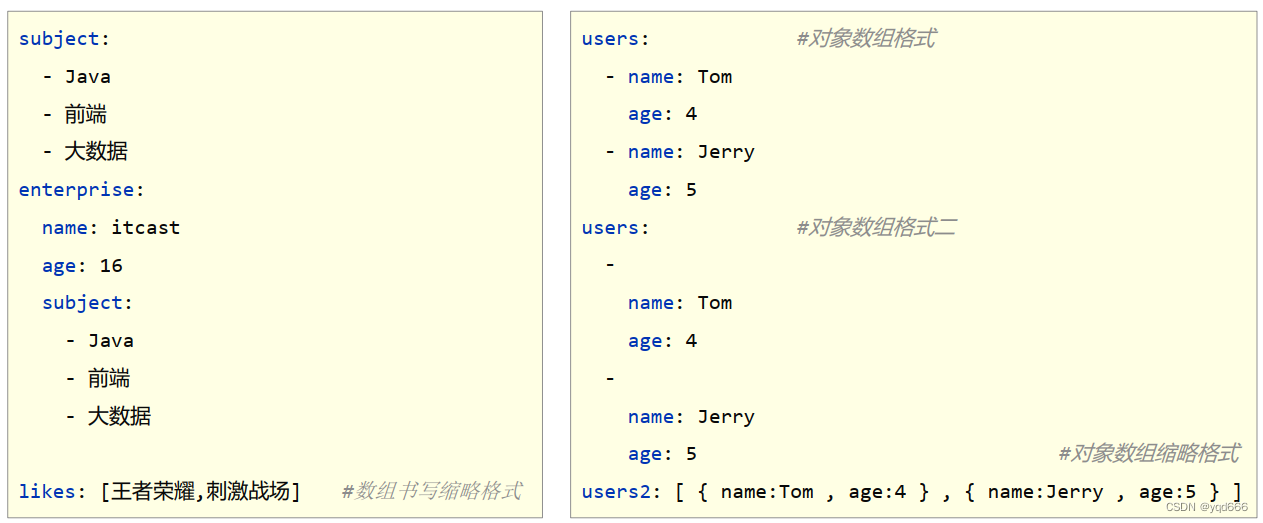
(6)使用@Value读取单个数据,属性名引用方式: ${一级属性名.二级属性名……}
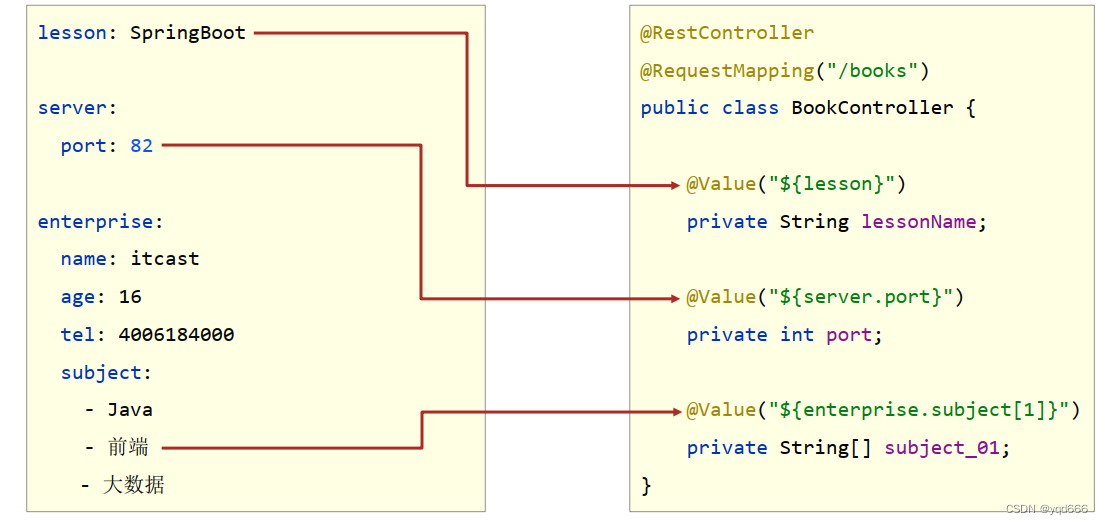
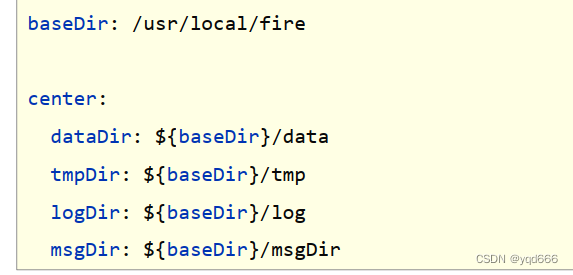
(7)在配置文件中可以使用属性名引用方式引用属性
(8)属性值中如果出现转移字符,需要使用双引号包裹
lesson: "Spring\tboot\nlesson"(9)封装全部数据到Environment对象
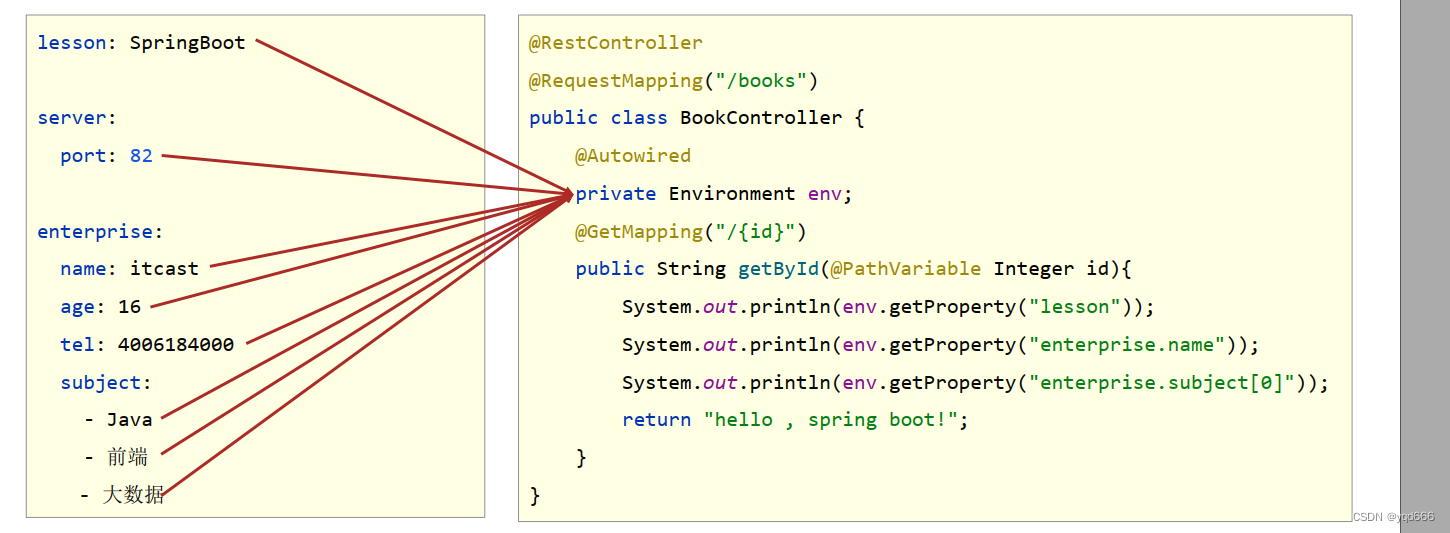
(10)自定义对象封装指定数据
①使用@ConfigurationProperties注解绑定配置信息到封装类中
②封装类需要定义为Spring管理的bean,否则无法进行属性注入
3.2 .yml 文件
(1)yml 是一种 yaml 格式的配置文件,主要采用一定的空格、换行等格式排版进行配置。 yaml 是一种直观的能够被计算机识别的的数据序列化格式,容易被人类阅读,yaml 类 似于 xml,但是语法比 xml 简洁很多,值与前面的冒号配置项必须要有一个空格, yml 缀也可以使用 yaml 后缀
(2)注意 : 当两种格式配置文件同时存在 ,在 SpringBoot2.4 开始, 使用的是 yml 配置文件,推荐使用 yml 格式配置文件
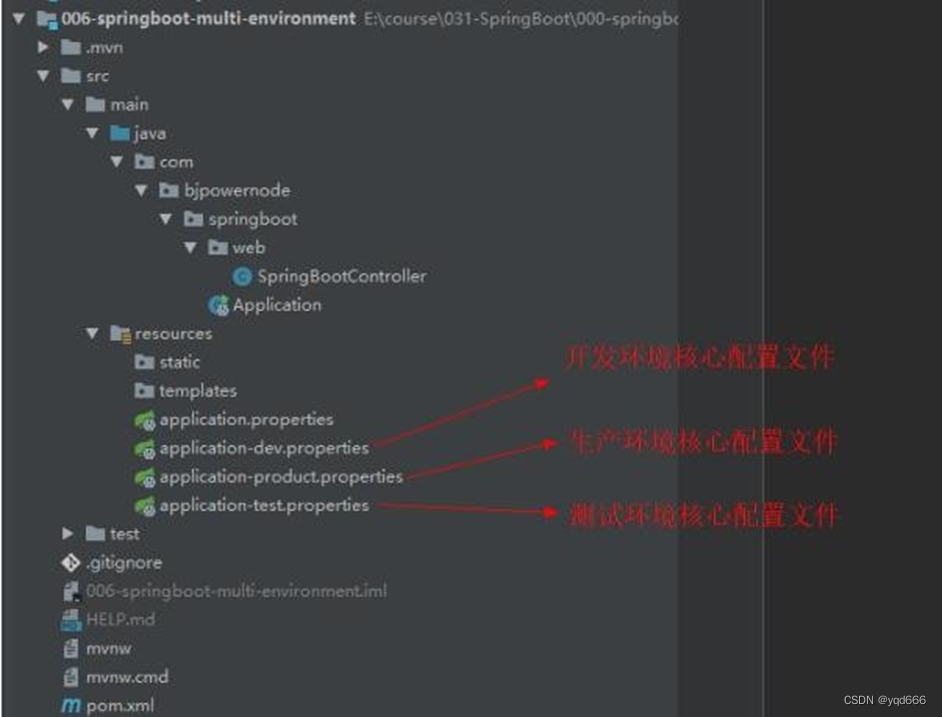
3.3 多环境配置
在实际开发的过程中,我们的项目会经历很多的阶段(开发->测试->上线),每个阶段的配置也会不同,例如:端口、上下
文根、数据库等,那么这个时候为了方便在不同的环境 之间切换,SpringBoot 提供了多环境配置,具体步骤如下
(1)为每个环境创建一个配置文件,命名必须以 application-环境标识.properties|yml。例如:
①开发环境:application-dev.properties
②生产环境:application-product.properties
③测试环境:application-test.properties
(2)在application.properties中 指定使用的环境文件
#指定使用的环境文件
#spring.profiles.active=dev
spring.profiles.active=test
3.4 Spring Boot 自定义配置
SpringBoot 的核心配置文件中,除了使用内置的配置项之外,我们还可以在自定义配置,然后采用如下注解去读取配置
的属性值
3.4.1 @Value 注解
(1)@Value(“${key}”) , key 来自 application.properties(yml)
(2)application.properties:
添加两个自定义配置项 school.name和school.address。
school.name=XXX
school.address=XXX
(3)读取配置文件数据
@Controller
public class HelloController { @Value("${school.name}") private String name; @Value("${address}") private String address;
}
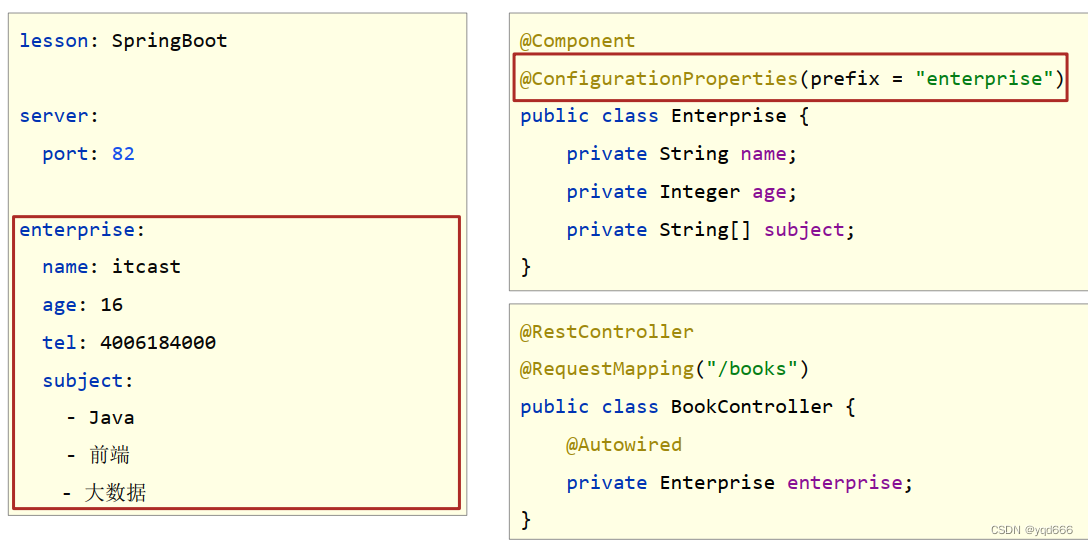
3.5 注解@ConfigurationProperties
(1)ConfigurationProperties注解将整个配置文件映射成一个对象,用于自定义配置项比较多的情况;
(2)prefix 的作用可以区分同名配置;prefix 可以不指定,如果不指定,那么会去配置文件中寻找与该类的属性名一致
的配置
(3)创建 SchoolController
@Component
@ConfigurationProperties(prefix = "school")public class SchoolInfo {  private String name; // 会去配置文件中找school.name的值
}
(4)警告解决
①在 SchoolInfo 类中使用了 ConfigurationProperties 注解,IDEA 会出现一个警告,不影响程序的执行

②点击 open documentnation 跳转到网页,在网页中提示需要加一个依赖,我们将这个依赖拷贝,粘贴到pom.xml文件中 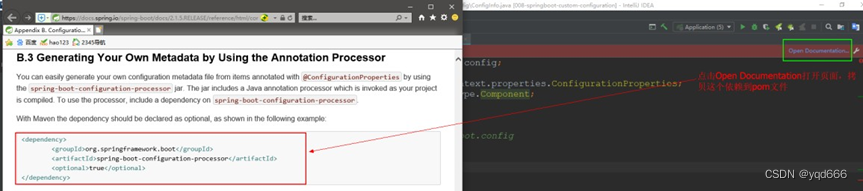
③解决使用@ConfigurationProperties注解出现警告问题
<dependency> <groupId>org.springframework.boot</groupId> <artifactId>spring-boot-configuration-processor</artifactId> <optional>true</optional>
</dependency>
3.6 中文乱码
(1)如果在 SpringBoot 核心配置文件中有中文信息,会出现乱码:
①一般在配置文件中,不建议出现中文(注释除外)
②如果有,可以先转化为 ASCII 码

(2)注意:大家如果是从其它地方拷贝的配置文件,一定要将里面的空格删干净
4.Spring Boot 中使用容器
通过SpringApplication.run(Application.class, args); 返回值获取容器
public static ConfigurableApplicationContext run(Class<?> primarySource, String... args) {return run(new Class[]{primarySource}, args);
}// ConfigurableApplicationContext接口,是ApplicationContext的子接口
public interface ConfigurableApplicationContext extends ApplicationContext
5. ComnandLineRunner接口,ApplcationRunner接口
(1)开发中可能会有这样的情景。需要在容器启动后执行一些内容。比如读取配置文件,数 据库连接之类的。SpringBoot 给我们提供了两个接口来帮助我们实现这种需求。这两个接口分别为 CommandLineRunner 和 ApplicationRunner。他们的执行时机为容器启动完成的时 候。 这两个接口中有一个 run 方法,我们只需要实现这个方法即可。
(2)这两个接口的不同之处在于:ApplicationRunner 中 run 方 法 的 参 数 为 ApplicationArguments , 而 CommandLineRunner
接口中 run 方法的参数为 String 数组
(3)示例
@SpringBootApplication
public class Application implements CommandLineRunner { public static void main(String[] args) { //run 方法返回值是容器对象 //1.创建容器对象 ConfigurableApplicationContext ctx = SpringApplication.run(Application.class, args); SomeService service = (SomeService) ctx.getBean("someService"); service.sayHello("李四"); } @Override public void run(String... args) throws Exception { //2. 容器对象创建好,执行 run System.out.println("输出, 在容器对象创建好后执行的代码"); }
}
6.Spring Boot 和 web 组件
6.1 SpringBoot 中拦截器
拦截器是SpringMVC中一种对象,能拦截器对Controller的请求。拦截器框架中有系统的拦截器, 还可以自定义
拦截器。 实现对请求预先处理。
(1)实现自定义拦截器:创建类实现SpringMVC框架的HandlerInterceptor接口
①HandlerInterceptor接口源码如下:
public interface HandlerInterceptor {default boolean preHandle(HttpServletRequest request, HttpServletResponse response, Object handler) throws Exception {return true;}default void postHandle(HttpServletRequest request, HttpServletResponse response, Object handler, @Nullable ModelAndView modelAndView) throws Exception {}default void afterCompletion(HttpServletRequest request, HttpServletResponse response, Object handler, @Nullable Exception ex) throws Exception {}
}
②创建类实现 HandlerInterceptor 接口
public class LoginInterceptor implements HandlerInterceptor { @Override public boolean preHandle(HttpServletRequest request, HttpServletResponse response, Object handler) throws Exception { System.out.println("执行了 LoginInterceptor,preHandle()"); return true; } } (2)SpringBoot中注册拦截器:
//相当于 springmvc 配置文件
@Configuration
public class MyAppConfig implements WebMvcConfigurer {//添加拦截器对象, 注入到容器中@Override public void addInterceptors(InterceptorRegistry registry) {// 指定拦截的地址 String path [] = {"/user/**"}; //指定不拦截的地址String excludePath [] = {"/user/login"}; registry.addInterceptor(new LoginInterceptor()) //创建拦截器对象.addPathPatterns(path).excludePathPatterns(excludePath); }
}
6.2 Spring Boot 中使用Servlet
(1)创建Servlet类。 自定义类继承HttpServlet
//创建Servlet类
public class MyServlet extends HttpServlet {@Overrideprotected void doGet(HttpServletRequest req, HttpServletResponse resp) throws ServletException, IOException {doPost(req,resp);}@Overrideprotected void doPost(HttpServletRequest req, HttpServletResponse resp) throws ServletException, IOException {//使用HttpServletResponse输出数据,应答结果resp.setContentType("text/html;charset=utf-8");PrintWriter out  = resp.getWriter();out.println("===执行的是Servlet==");out.flush();out.close();}
}
(2)注册Servlet ,让框架能找到Servlet
@Configuration
public class WebApplictionConfig {//定义方法, 注册Servlet对象@Beanpublic ServletRegistrationBean servletRegistrationBean(){//public ServletRegistrationBean(T servlet, String... urlMappings)//第一个参数是 Servlet对象, 第二个是url地址//ServletRegistrationBean bean =//new ServletRegistrationBean( new MyServlet(),"/myservlet");ServletRegistrationBean bean = new ServletRegistrationBean();bean.setServlet( new MyServlet());bean.addUrlMappings("/login","/test"); // <url-pattern>return bean;}
}
6.3 Spring Boot 中使用 Filter
Filter是Servlet规范中的过滤器,可以处理请求, 对请求的参数, 属性进行调整。 常常在过滤器中处理字符编码
(1)创建自定义过滤器类
// 自定义过滤器
public class MyFilter implements Filter {@Overridepublic void doFilter(ServletRequest servletRequest, ServletResponse servletResponse, FilterChain filterChain) throws IOException, ServletException {System.out.println("执行了MyFilter,doFilter ");filterChain.doFilter(servletRequest,servletResponse);}
}
(2)注册 Filter
@Configuration
public class WebApplicationConfig {@Beanpublic FilterRegistrationBean filterRegistrationBean(){FilterRegistrationBean bean  = new FilterRegistrationBean();bean.setFilter( new MyFilter());bean.addUrlPatterns("/user/*");return bean;}
}
6.3.1 字符集过滤器的应用
CharacterEncodingFilter : 解决post请求中乱码的问题
在SpringMVC框架, 在web.xml 注册过滤器。 配置他的属性。
- 方式一:
(1)配置字符集过滤器
@Configuration
public class WebSystemConfig {//注册Servlet@Beanpublic ServletRegistrationBean servletRegistrationBean(){MyServlet myServlet = new MyServlet();ServletRegistrationBean reg = new ServletRegistrationBean(myServlet,"/myservlet");return reg;}//注册Filter@Beanpublic FilterRegistrationBean filterRegistrationBean(){FilterRegistrationBean reg = new FilterRegistrationBean();//使用框架中的过滤器类CharacterEncodingFilter filter  = new CharacterEncodingFilter();//指定使用的编码方式filter.setEncoding("utf-8");//指定request , response都使用encoding的值filter.setForceEncoding(true);reg.setFilter(filter);//指定 过滤的url地址reg.addUrlPatterns("/*");return reg;}
}
(2)修改application.properties文件, 让自定义的过滤器起作用
# SpringBoot中默认已经配置了CharacterEncodingFilter。 编码默认ISO-8859-1
# 设置enabled=false 作用是关闭系统中配置好的过滤器, 使用自定义的CharacterEncodingFilter
server.servlet.encoding.enabled=false
- 方式二:修改application.properties文件
server.port=9001
server.servlet.context-path=/myboot#让系统的CharacterEncdoingFilter生效
server.servlet.encoding.enabled=true
#指定使用的编码方式
server.servlet.encoding.charset=utf-8
#强制request,response都使用charset属性的值
server.servlet.encoding.force=true
7. ORM 操作 MySQL
使用MyBatis框架操作数据, 在SpringBoot框架集成MyBatis
- 第一种方式 :@Mapper
@Mapper:放在dao接口的上面, 每个接口都需要使用这个注解。
/*** @Mapper:告诉MyBatis这是dao接口,创建此接口的代理对象。*     位置:在类的上面*/
@Mapper
public interface StudentDao { Student selectById(@Param("stuId") Integer id);
}
- 第二种方式 @MapperScan
在 Dao 接口上面加入@Mapper,需要在每个接口都加入注解。 当 Dao 接口多的时候不方便。可以使用如下的方式解决。 主类上添加注解包扫描:@MapperScan(“com.bjpowernode.dao”)
/** * @MapperScan: 扫描所有的 mybatis 的 dao 接口 * 位置:在主类的上面 *  属性:basePackages:指定 dao 接口的所在的包名。 *     dao 接口和 mapper文件依然在同一目录 */ @SpringBootApplication
@MapperScan(basePackages = "com.bjpowernode.dao")
public class MyBatisApplication2 { public static void main(String[] args) { SpringApplication.run(MyBatisApplication2.class,args); }
}
- 第三种方式:Mapper文件和Dao接口分开管理
现在把Mapper文件放在resources目录下
1)在resources目录中创建子目录 (自定义的) , 例如mapper
2)把mapper文件放到 mapper目录中
3)在application.properties文件中,指定mapper文件的目录
#指定mapper文件的位置
mybatis.mapper-locations=classpath:mapper/*.xml
#指定mybatis的日志
mybatis.configuration.log-impl=org.apache.ibatis.logging.stdout.StdOutImpl
4) 在pom.xml中指定 把resources目录中的文件 , 编译到目标目录中
<!--resources插件-->
<resources><resource><directory>src/main/resources</directory><includes><include>**/*.*</include></includes></resource>
</resources>
8.接口架构风格—RESTful
8.1 认识 REST
(1)接口: API(Application Programming Interface,应用程序接口)是一些预先定义的接口(如函数、HTTP接口),或指[软件系统]不同组成部分衔接的约定。 用来提供[应用程序]与开发人员基于某[软件]或硬件得以访问的一组[例程],而又无需访问源码,或理解内部[工作机制]的细节。
接口(API): 可以指访问servlet, controller的url, 调用其他程序的 函数
(2)REST(英文:Representational State Transfer,简称 REST)
一种互联网软件架构设计的风格,但它并不是标准,它只是提出了一组客户端和服务器交 互时的架构理念和设计原则,基于这种理念和原则设计的接口可以更简洁,更有层次,REST 这个词,是 Roy Thomas Fielding 在他 2000 年的博士论文中提出的。
(3)任何的技术都可以实现这种理念,如果一个架构符合 REST 原则,就称它为 RESTFul 架构
(4)比如我们要访问一个 http 接口:http://localhost:8080/boot/order?id=1021&status=1 采用 RESTFul 风格
则 http 地址为:http://localhost:8080/boot/order/1021/1
8.2 RESTful 的注解
Spring Boot 开发 RESTful 主要是几个注解实现
(1)@PathVariable:获取 url 中的数据
(2)@PostMapping:接收和处理 Post 方式的请求
(3)@DeleteMapping:接收 delete 方式的请求,可以使用 GetMapping 代替
(4) @PutMapping:接收 put 方式的请求,可以用 PostMapping 代替
(5) @GetMapping:接收 get 方式的请求
(6) @RestController: 符合注解, 是@Controller 和@ResponseBody组合。
在类的上面使用@RestController , 表示当前类者的所有方法都加入了 @ResponseBody
8.3 RESTful 优点
(1)轻量,直接基于 http,不再需要任何别的诸如消息协议 get/post/put/delete 为 CRUD 操作
(2)面向资源,一目了然,具有自解释性。
(3)数据描述简单,一般以 xml,json 做数据交换。
(4)无状态,在调用一个接口(访问、操作资源)的时候,可以不用考虑上下文,不用考虑当前状态, 极大的降低了复杂度。
(5)简单、低耦合
9.Spring Boot 打包
Spring Boot 可以打包为 war 或 jar 文件。 以两种方式发布应用
9.1 Spring Boot 打包为 war
创建 Spring Boot web 项目: 024-springboot-war
(1)指定打包后的文件名称
<build><!--打包后的文件名称--><finalName>myboot</finalName>
</build>
(2)指定jsp编译目录
<!--resources插件, 把jsp编译到指定的目录-->
<resources><resource><directory>src/main/webapp</directory><targetPath>META-INF/resources</targetPath><includes><include>**/*.*</include></includes></resource><!--使用了mybatis ,而且mapper文件放在src/main/java目录--><resource><directory>src/main/java</directory><includes><include>**/*.xml</include></includes></resource><!--把src/main/resources下面的所有文件,都包含到classes目录--><resource><directory>src/main/resources</directory><includes><include>**/*.*</include></includes></resource>
</resources>
(3)指定打包方式是war
<!--打包类型-->
<packaging>war</packaging>
(4)主启动类继承SpringBootServletInitializer
/*** SpringBootServletInitializer: 继承这个类, 才能使用独立tomcat服务器*/
@SpringBootApplication
public class JspApplication  extends SpringBootServletInitializer  {public static void main(String[] args) {SpringApplication.run(JspApplication.class, args);}@Overrideprotected SpringApplicationBuilder configure(SpringApplicationBuilder builder) {return builder.sources(JspApplication.class);}
}
(5)部署war
把war放到tomcat等服务器的发布目录中。 tomcat为例, myboot.war放到tomcat/webapps目录。启动tomcat后就会自动生成war包对应的webapp目录
9.2打包为jar
创建了一个包含了jsp的项目,修改pom.xml文件
(1)指定打包后的文件名称
<build><!--打包后的文件名称--><finalName>myboot</finalName>
</build>
(2)指定springboot-maven-plugin版本
<plugins><plugin><groupId>org.springframework.boot</groupId><artifactId>spring-boot-maven-plugin</artifactId><!--打包jar, 有jsp文件时,必须指定maven-plugin插件的版本是 1.4.2.RELEASE--><version>1.4.2.RELEASE</version></plugin>
</plugins>
(3)执行独立的springboot项目 在cmd中 java -jar myboot.jar
在target目录中,生成jar 文件, 例子是myboot.jar