背景:
我的最初应用场景,就是要在表格上用进度条显示数据,以及放一个按钮。
qt-creator中有自带的delegate示例可以参考,但终归自己动手还是需要理解细节,否则不能随心所欲。
自认没那个天赋,于是记录下来以便日后参考。
qt自带示例:
打开qt-creator首页,点击左侧示例,搜索那里输入delegate就列出来几个,常见的也就是spinbox输入数值。
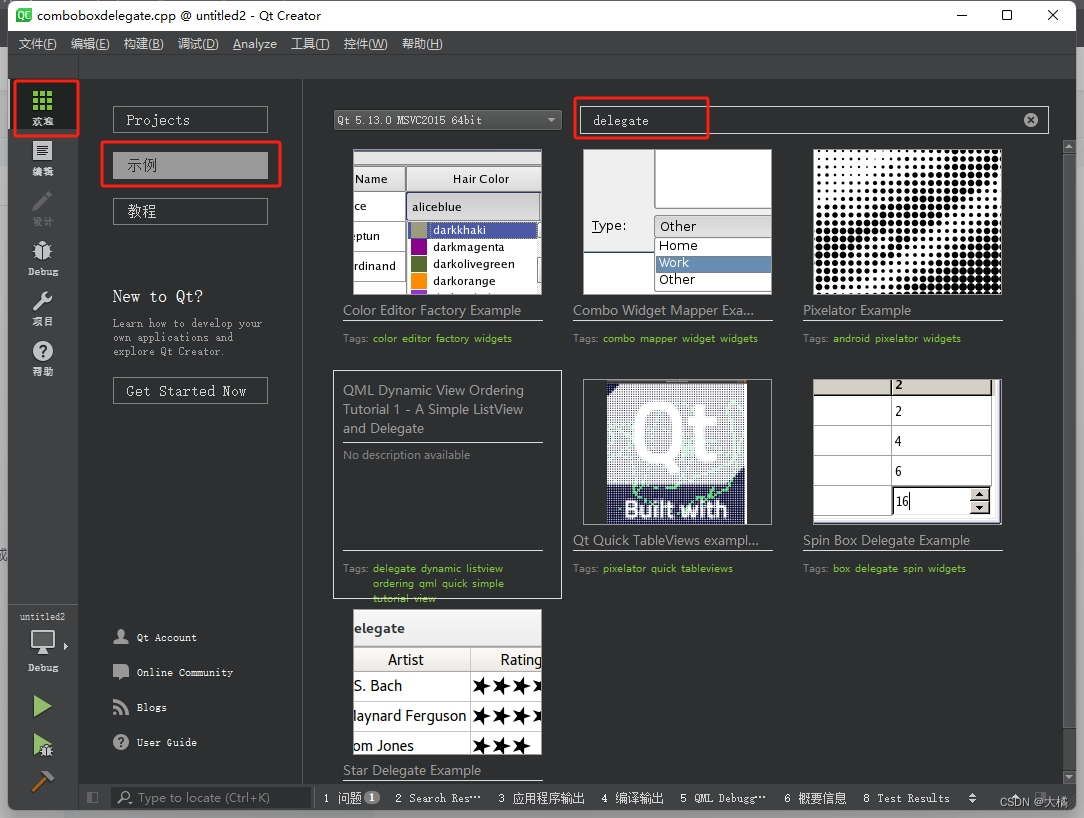
上图中的第一个例子是个意外,我觉得挺好玩的,关于QItemEditorFactory和QItemEditorCreatorBase的用法,可以设置item的编辑方式,和代理有异曲同工之妙。也许本质上有某种联系,但我没有深究,本次只想记录代理的用法。
用法宗旨:
按照资料以及网上的说法,无非就是继承QStyledItemDelegate,重写几个函数,然后设置为QTableView/QTableWidget的代理即可。但关键是,QStyledItemDelegate咋用。
我认为还是始终贯彻MVC模式的应用,比如一个view绑定了一个model,则model的数据是和view同步的。前后端分离的本质是:view是躯壳,model是灵魂。肉体感受可以影响灵魂,灵魂变化也会反应到肉体。打住!再分析就可以感悟人性了。
主要是继承QStyledItemDelegate之后,重写那几个函数的意义。我认为常用的几个:paint,createEditor,editorEvent,setEditorData,setModelData,updateEditorGeometry。看名字就知道,凡是带editor的都是需要编辑view时才用。
paint函数:
绘制代理区域,如果希望表格一显示,马上就要看到代理控件的时候用,比如我要显示进度条或者按钮,我希望界面一出来它就有。而不是编辑这个单元格的时候才出来。
至于paint调用的时机,如果要代码控制,就控制model好了,view同步显示数据时,会重绘界面。
延伸题外话:
我试过其它方式修改数据,然后总想别的方法来调用主动调用paint函数,没戏的。比如this->repaint(),不行的。除非把界面最小化再恢复,或者点一下单元格。反正这个paint别想着自己控制它,就用model的item间接更新就行了。所以,都说tableview比widget优化显示速度之类的说法,实际上是mvc内部优化的意思。
很早以前,大约十多年了,我用vs做了一个超大的电子表格,因为单元格太多,业务上又必须这样,所以ui更新效率很低。最后也是让grid绑定了datatable,然后通过更新datatable来间接更新grid才解决。其实所谓的mvc别说多先进,早期vb6.0时代就有这样的雏形了。隐约记得,那时候叫控件绑定数据源,道理类似。
另外,现在的扁平化风格,有时候看起来特别别扭,直接绘制出来的控件就是死的,例如按钮,看不到按下去的感觉。也许通过style能实现,但我没尝试。
通常paint函数重写的内容主要是定义QStyleOption和drawControl。比如:
void Debug_Delegate_Button::paint(QPainter *painter, const QStyleOptionViewItem &option, const QModelIndex &index) const
{Q_UNUSED(index);QStyleOptionButton btnStyle;btnStyle.text = "exec";btnStyle.rect = option.rect;btnStyle.state = QStyle::State_Active;QPushButton btn;btn.setEnabled(m_bEnabled);btn.style()->drawControl(QStyle::CE_PushButton, &btnStyle, painter, &btn);
}
我亲测的感受是,QStyleOption是用于定义显示效果的,drawControl只是画出来。
上面的代码定义了一个按钮,下面我写了个setEnable,但我感觉意义不大,主要看上面的Style。
createEditor函数:
qt手册说是返回用于编辑item的控件指针。也就是编辑单元格时显示的控件实例,需要在这个函数里new出来并return。亦即,你得告诉代理,要用什么控件来编辑。
我的理解是,其它凡是带有editor入参的函数,都依赖这个函数,否则editor就是空指针,会报错的。这一点手册里我没看到哪里有提到,但亲测就是如此。
editorEvent函数:
相当于一个eventFilter。被代理的那个区域,如果发生事件,从这里写响应。
比如,我做了一个发送命令的界面:

首先那个exec按钮是使用paint函数画上去的,但就是死的一匹。然后使用editorEvent函数捕获了鼠标点击事件。cpp代码如下:
void Debug_Delegate_Button::paint(QPainter *painter, const QStyleOptionViewItem &option, const QModelIndex &index) const
{Q_UNUSED(index);QStyleOptionButton btnStyle;btnStyle.text = "exec";btnStyle.rect = option.rect;btnStyle.state = QStyle::State_Active;QPushButton btn;btn.setEnabled(m_bEnabled);btn.style()->drawControl(QStyle::CE_PushButton, &btnStyle, painter, &btn);
}
bool Debug_Delegate_Button::editorEvent(QEvent *event, QAbstractItemModel *model,const QStyleOptionViewItem &option, const QModelIndex &index)
{Q_UNUSED(model);QMouseEvent *mouseEvent = static_cast<QMouseEvent *>(event);if(option.rect.contains(mouseEvent->pos())){//Two signals will be send. Select one of them.//event->type() == QEvent::MouseButtonPress//event->type() == QEvent::MouseButtonReleaseif (event->type() == QEvent::MouseButtonPress && m_bEnabled){emit sigClicked(index.row());}}return true;
}
当捕获鼠标点击事件时,发送一个信号给外界,外界再处理这个信号,就知道是点击了哪一行的按钮。
setEditorData函数:
还是要提MVC模式的应用,比如一个view绑定了一个model,则model的数据是和view同步的。当编辑某个view对应的item时,如果使用了代理控件编辑它,控件就叫editor,用户操作editor,editor会把数据写入item。反之,用户更新item,editor也会同步更新。
所以,这个函数就是通过item更新editor。因为有editor入参,需要配合重写createEditor函数并返回editor。
setModelData函数:
通过操作editor更新item。因为有editor入参,需要配合重写createEditor函数并返回editor。
updateEditorGeometry函数:
手册提到:
Updates the geometry of the editor for the item with the given index, according to the rectangle specified in the option. If the item has an internal layout, the editor will be laid out accordingly. Note that the index contains information about the model being used.
我认为就是字面意思,用于更新区域显示布局效果,通常写一句editor->setGeometry(option.rect);即可。
官方实例spinbox:
如果要通过编辑view来更新model,也就是示例中spinbox用法,则看一段官方实例:
delegate.h
#ifndef DELEGATE_H
#define DELEGATE_H#include <QStyledItemDelegate>//! [0]
class SpinBoxDelegate : public QStyledItemDelegate
{Q_OBJECTpublic:SpinBoxDelegate(QObject *parent = nullptr);QWidget *createEditor(QWidget *parent, const QStyleOptionViewItem &option,const QModelIndex &index) const override;void setEditorData(QWidget *editor, const QModelIndex &index) const override;void setModelData(QWidget *editor, QAbstractItemModel *model,const QModelIndex &index) const override;void updateEditorGeometry(QWidget *editor, const QStyleOptionViewItem &option,const QModelIndex &index) const override;
};
//! [0]
delegate.cpp
#include "delegate.h"#include <QSpinBox>//! [0]
SpinBoxDelegate::SpinBoxDelegate(QObject *parent): QStyledItemDelegate(parent)
{
}
//! [0]//! [1]
QWidget *SpinBoxDelegate::createEditor(QWidget *parent,const QStyleOptionViewItem &/* option */,const QModelIndex &/* index */) const
{QSpinBox *editor = new QSpinBox(parent);editor->setFrame(false);editor->setMinimum(0);editor->setMaximum(100);return editor;
}
//! [1]//! [2]
void SpinBoxDelegate::setEditorData(QWidget *editor,const QModelIndex &index) const
{int value = index.model()->data(index, Qt::EditRole).toInt();QSpinBox *spinBox = static_cast<QSpinBox*>(editor);spinBox->setValue(value);
}
//! [2]//! [3]
void SpinBoxDelegate::setModelData(QWidget *editor, QAbstractItemModel *model,const QModelIndex &index) const
{QSpinBox *spinBox = static_cast<QSpinBox*>(editor);spinBox->interpretText();int value = spinBox->value();model->setData(index, value, Qt::EditRole);
}
//! [3]//! [4]
void SpinBoxDelegate::updateEditorGeometry(QWidget *editor,const QStyleOptionViewItem &option,const QModelIndex &/* index */) const
{editor->setGeometry(option.rect);
}
//! [4]
createEditor函数定义了用于编辑单元格的spinbox控件,并返回editor控件指针,因为其它函数用到。
setEditorData函数把model中的item数据更新到spinbox。
setModelData函数把spinbox的操作结果更新到model的item。
updateEditorGeometry函数负责更新显示区域。
实践:
上面提到过放置button并可以响应点击的用法,只用到了paint和editorEvent函数。下面再记录进度条的用法。
因为进度条用于显示而不是编辑,需要界面一打开就能看到进度条,所以需要paint函数。而进度条又不像按钮那样需要用户操作,然后就没有然后了。
delegate_progressbar.h
#ifndef DELEGATE_PROGRESSBAR_H
#define DELEGATE_PROGRESSBAR_H#include <QStyledItemDelegate>
#include <QProgressBar>class Delegate_ProgressBar : public QStyledItemDelegate
{Q_OBJECT
public:Delegate_ProgressBar(QObject *parent = nullptr);enum EItemValue { eIV_Maxinum, eIV_Value };void paint(QPainter *painter, const QStyleOptionViewItem &option, const QModelIndex &index) const;
};#endif // DELEGATE_PROGRESSBAR_H
delegate_progressbar.cpp
#include "delegate_progressbar.h"Delegate_ProgressBar::Delegate_ProgressBar(QObject *parent): QStyledItemDelegate(parent)
{}
void Delegate_ProgressBar::paint(QPainter *painter, const QStyleOptionViewItem &option, const QModelIndex &index) const
{//这里控制显示效果QStyleOptionProgressBar pbarStyle;pbarStyle.rect = option.rect;pbarStyle.state = QStyle::State_Active;pbarStyle.maximum = index.data(Qt::UserRole + eIV_Maxinum).toInt();//设置进度条最大值pbarStyle.progress = index.data(Qt::UserRole + eIV_Value).toInt();//设置当前进度//这里把它绘制出来QProgressBar pbar;pbar.style()->drawControl(QStyle::CE_ProgressBar, &pbarStyle, painter, &pbar);
}
mainwindow.h
#ifndef MAINWINDOW_H
#define MAINWINDOW_H#include <QMainWindow>
#include <QStandardItemModel>
#include <QTimer>
#include "delegate_progressbar.h"namespace Ui {
class MainWindow;
}class MainWindow : public QMainWindow
{Q_OBJECTpublic:explicit MainWindow(QWidget *parent = nullptr);~MainWindow();private slots:void on_pushButton_clicked();void onTimerOut();private:Ui::MainWindow *ui;QStandardItemModel *m_model = nullptr;Delegate_ProgressBar *m_delegate = nullptr;QTimer *m_timer = nullptr;int m_i = 0;
};#endif // MAINWINDOW_H
mainwindow.cpp
#include "mainwindow.h"
#include "ui_mainwindow.h"
MainWindow::MainWindow(QWidget *parent) :QMainWindow(parent),ui(new Ui::MainWindow)
{ui->setupUi(this);m_model = new QStandardItemModel(2, 3, this);ui->tableView->setModel(m_model);m_delegate = new Delegate_ProgressBar;ui->tableView->setItemDelegateForColumn(2, m_delegate);QStandardItem *item = new QStandardItem;item->setData(100, Qt::UserRole + Delegate_ProgressBar::eIV_Maxinum);//这里给进度条设置最大值,相当于setMaximum。m_model->setItem(0, 2, item);//这是model的另一种用法,与直接操作item一样。
//    QModelIndex index = m_model->index(0, 2, QModelIndex());
//    m_model->setData(index, QVariant(50));m_timer = new QTimer(this);m_timer->setInterval(100);connect(m_timer, &QTimer::timeout, this, &MainWindow::onTimerOut);
}MainWindow::~MainWindow()
{delete ui;
}
void MainWindow::onTimerOut()
{m_model->item(0, 2)->setData(m_i++, Qt::UserRole + Delegate_ProgressBar::eIV_Value);//这里给进度条设置当前值,相当于setValue。if (m_i == 100){m_timer->stop();}
}
void MainWindow::on_pushButton_clicked()
{m_timer->start();
}
再提MVC模式。这里用到的tableview,当绑定model之后,即使model没有任何item,也可以设置行数和列数,运行效果依然能看到表格有行有列,但只能看不能操作。
给model添加item之后,每个item对应一个单元格,才能实现数据同步显示。
我这里需要单元格显示进度条,而进度条本质是max和value两个int数据,所以只要用代码控制响应item,让它存储的数据发生变化,则进度条就会响应变化了。
妥善起见,显示进度条的单元格设置为readonly。
item是个好东西,就像结构体一样,可以按角色字段划分,存储很多数据。而这些数据是QVariant类型,也就是任意类型,我还用它存过对象指针,基本上可以无限扩展,非常好用。
所以,如果要显示进度条的那个单元格能保存max和value两个int数据,非常简单,setData时,指定Qt:UserRole即可。比如:
item->setData(100, Qt:UserRole);
item->setData(50, Qt:UserRole + 1);
Qt:UserRole是枚举,后面加几都可以,那就根据需要定义成枚举,见名知意,比如:
item->setData(100, Qt:UserRole + eEnum_Max);
item->setData(50, Qt:UserRole + eEnum + Value);
就可以随便怎么玩了。
本文完。
