文章目录
- 车牌检测算法检测实现
- 1.环境布置
- 2.数据处理
- 2.1 CCPD数据集介绍
- 2.1.1 ccpd2019及2020
- 2.1.2 文件名字解析
- 2.2数据集处理
- 2.2.1 CCPD数据处理
- 2.2.2 CRPD数据集处理
- 2.3 检测算法
- 2.3.1 数据配置car_plate.yaml
- 2.3.2 模型配置
- 2.3.3 train.py
- 2.3.4 训练结果
- 2.4 部署
- 2.4.1 pth推理(detect.py)
- 2.4.2 onnx推理
- 2.4.3 trt推理
- 2.4.4 numpy版本trt推理
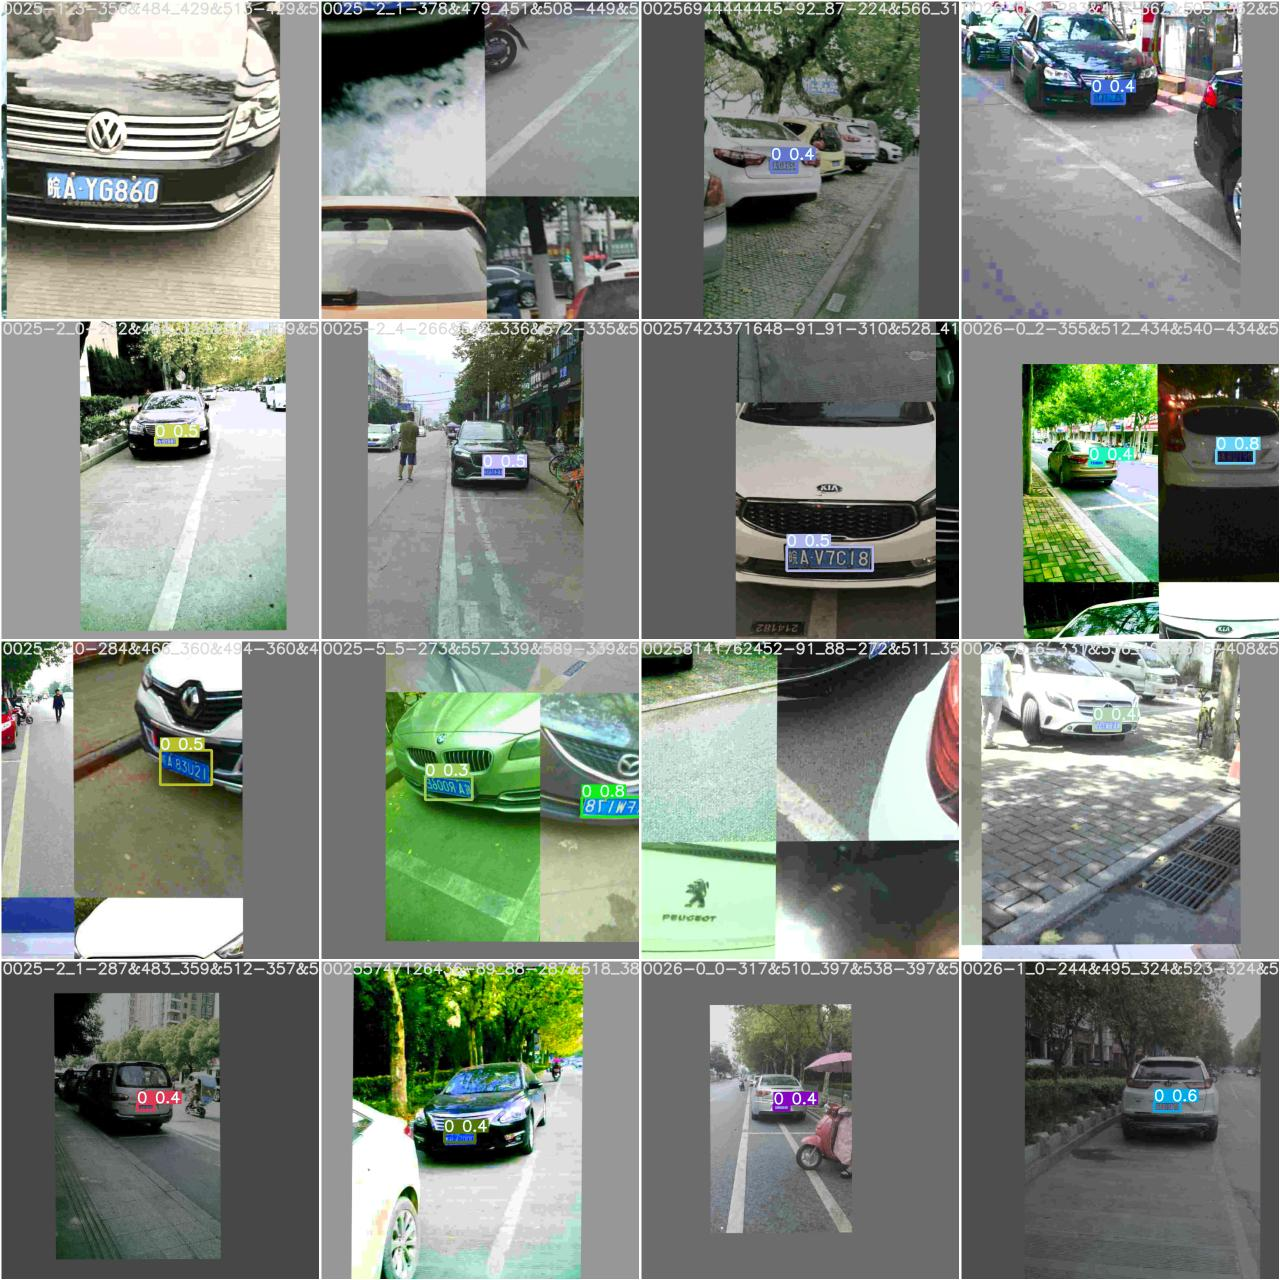
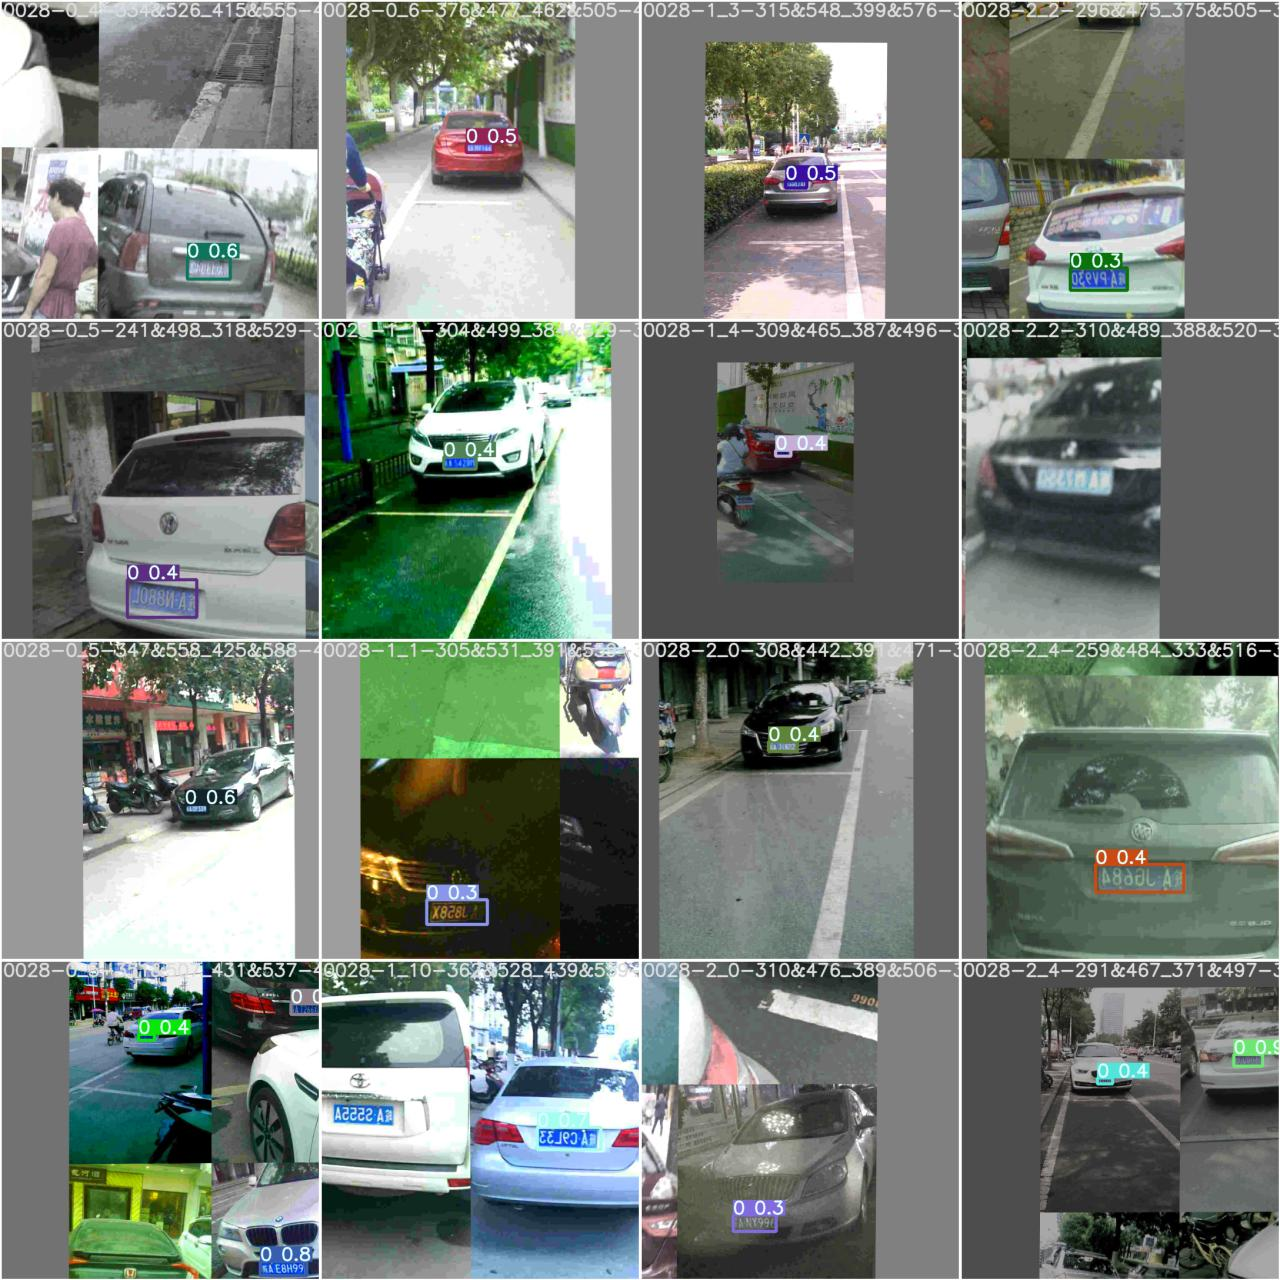
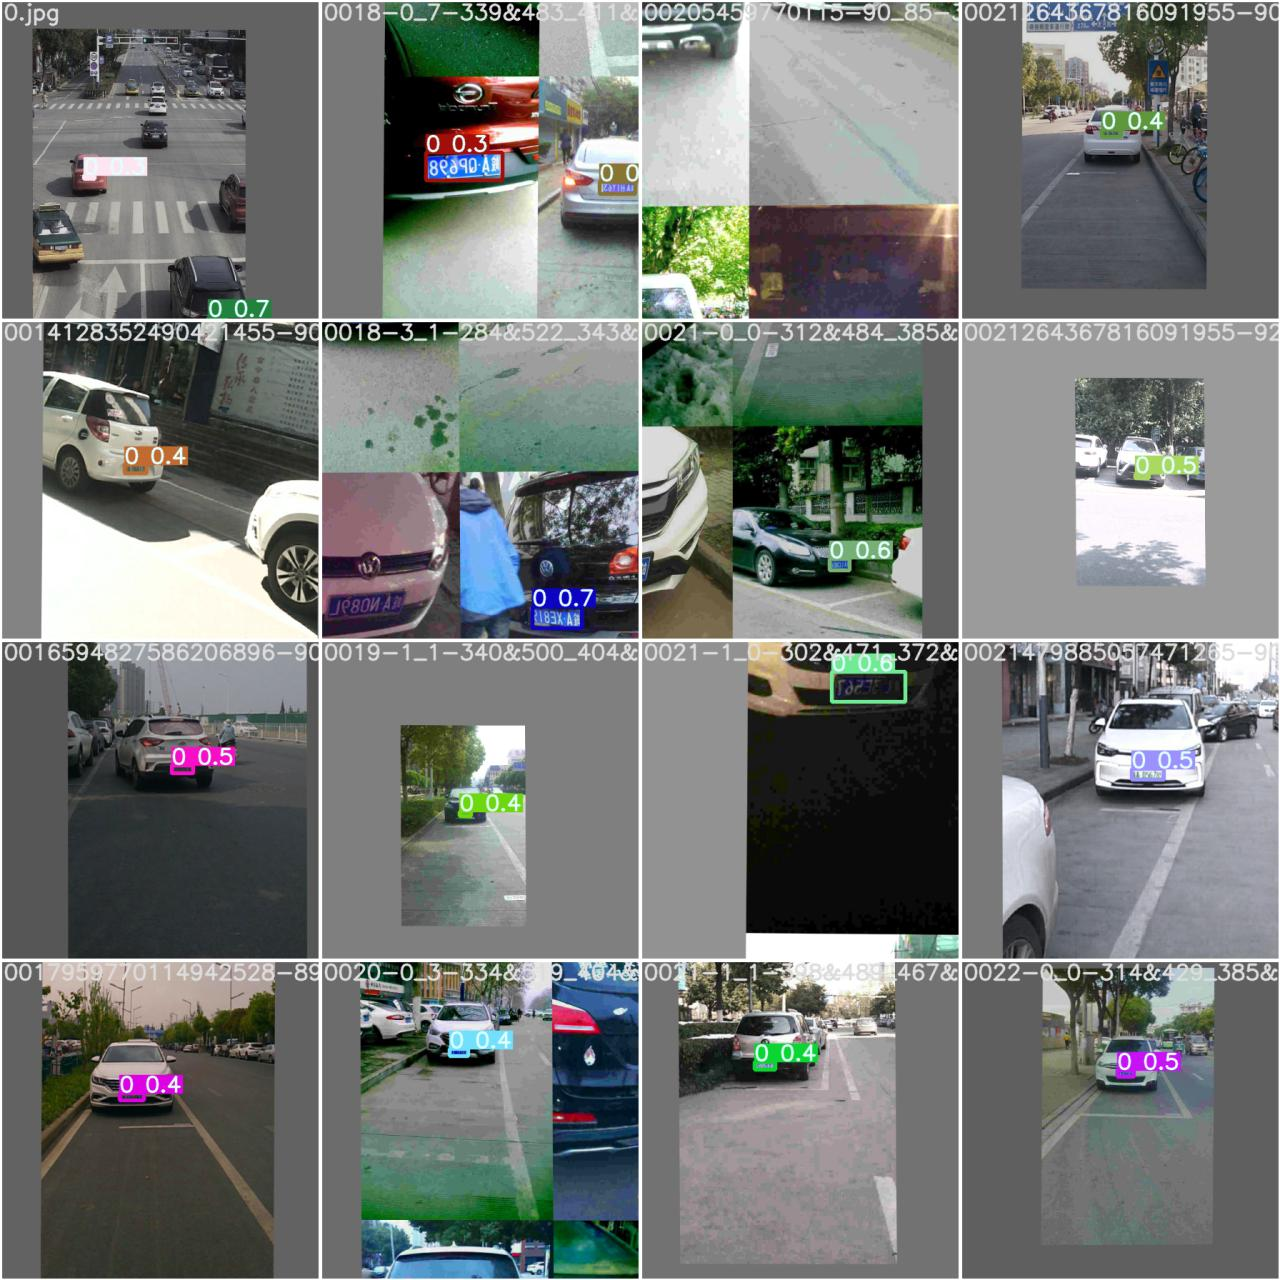
- 2.4.5 推理结果展示
- 参考开源
车牌检测算法检测实现
1.环境布置
- torch==1.8.1
- torchvision==0.9.1
pip install -r requirements.txt
2.数据处理
2.1 CCPD数据集介绍
2.1.1 ccpd2019及2020
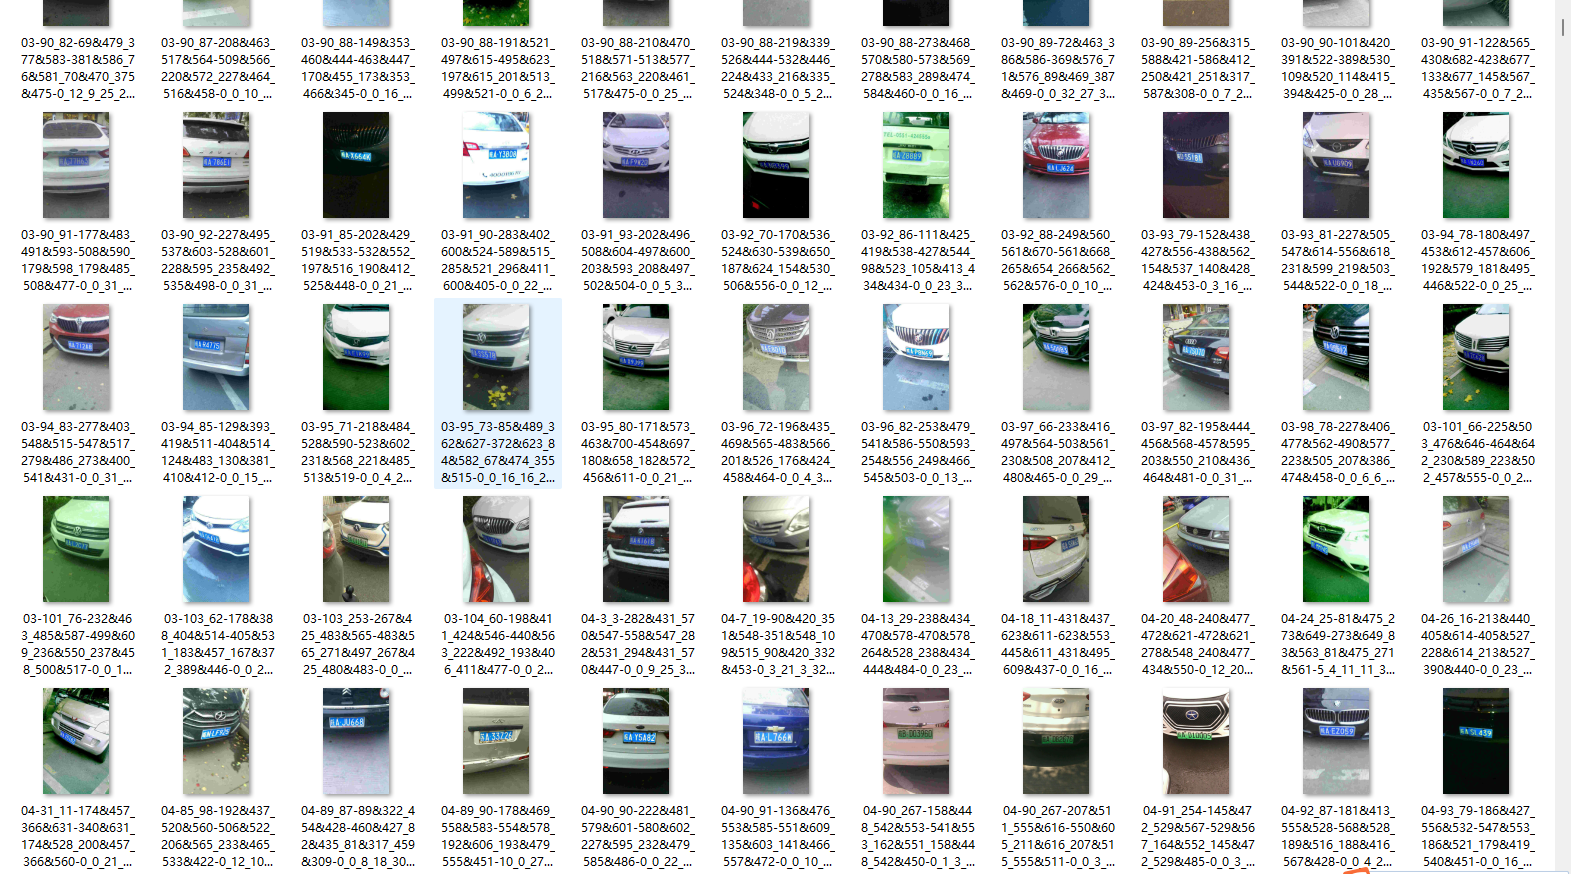
CCPD数据集主要采集于安徽某停车场一段时间内的数据,
所有图片尺寸固定为720×1160(w×h),
大约包含25w+的各种场景图片,如下图所示:
| 类别 | 描述 | 图片数 |
|---|---|---|
| CCPD-Base | 通用车牌图片 | 200k |
| CCPD-FN | 车牌离摄像头拍摄位置相对较近或较远 | 20k |
| CCPD-DB | 车牌区域亮度较亮、较暗或者不均匀 | 20k |
| CCPD-Rotate | 车牌水平倾斜 20 到 50 度,竖直倾斜-10到 10 度 | 10k |
| CCPD-Tilt | 车牌水平倾斜 15 到 45 度,竖直倾斜 15 到 45 度 | 10k |
| CCPD-Weather | 车牌在雨雪雾天气拍摄得到 | 10k |
| CCPD-Challenge | 在车牌检测识别任务中较有挑战性的图片 | 10k |
| CCPD-Blur | 由于摄像机镜头抖动导致的模楜车牌图片 | 5k |
| CCPD-NP | 没有安装车牌的新车图片 | 5k |
2.1.2 文件名字解析
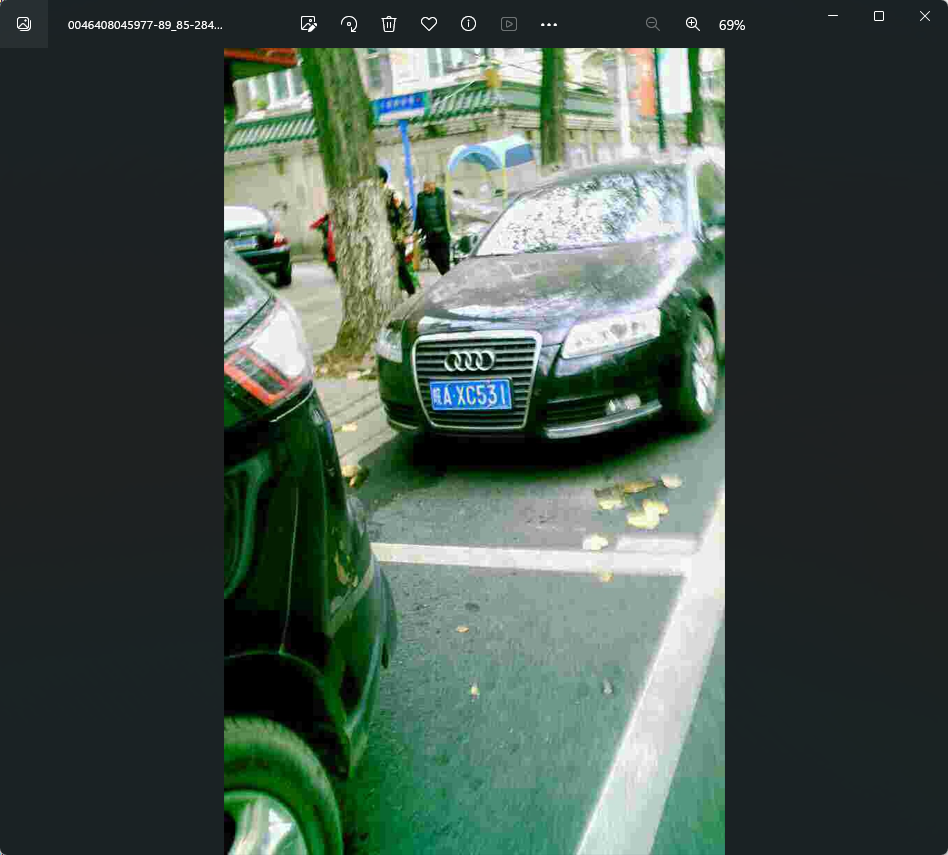
1、01:车牌占整个界面比例;(一般没用,可忽略)
2、86_91: 车牌的水平角度和垂直角度
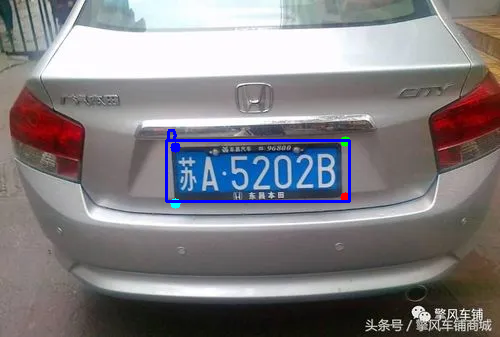
3、298\&341_449\&414: 车牌标注框左上角和右下角的坐标
4、458\&394_308\&410_304\&357_454\&341:车牌四个顶点的坐标,顺序为右下、左下、左上、右上
5、0_0_14_28_24_26_29: 这个代表着和省份 (第一位)、地市 (第二位)、车牌号 (剩余部分) 的映射关系
6、124: 亮度,值越大亮度越高(仅供参考)
7、24:模糊度,值越小越模糊(仅供参考)
2.2数据集处理
2.2.1 CCPD数据处理
1.解压ccpd,cprd数据集2019,ccpd文件太大,解压慢,利用程序进行解压
import tarfile
# 指定tar文件路径
tar_path = r".\CCPD2019\CCPD2019.tar"
# 打开tar文件
with tarfile.open(tar_path, "r") as tar:# 解压所有文件到指定目录tar.extractall(r".\ccpd")
# 解压完成
print("解压完成")
ccpd数据集处理方法
import os
import shutil
import cv2
import numpy as np
from tqdm import tqdmdef allFilePath(rootPath, allFIleList):'''获取指定目录下所有以.jpg结尾的文件的路径,并将这些路径存储在一个列表中。'''fileList = os.listdir(rootPath)for temp in fileList:if os.path.isfile(os.path.join(rootPath, temp)):if temp.endswith(".jpg"):allFIleList.append(os.path.join(rootPath, temp))else:allFilePath(os.path.join(rootPath, temp), allFIleList)def order_points(pts):'''对给定的坐标点进行排序,使得列表中的第一个点是左上角,第二个点是右上角,第三个点是右下角,第四个点是左下角。返回排序后的坐标点列表。'''# initialzie a list of coordinates that will be ordered# such that the first entry in the list is the top-left,# the second entry is the top-right, the third is the# bottom-right, and the fourth is the bottom-leftpts = pts[:4, :]rect = np.zeros((5, 2), dtype="float32")# the top-left point will have the smallest sum, whereas# the bottom-right point will have the largest sums = pts.sum(axis=1)rect[0] = pts[np.argmin(s)]rect[2] = pts[np.argmax(s)]# now, compute the difference between the points, the# top-right point will have the smallest difference,# whereas the bottom-left will have the largest differencediff = np.diff(pts, axis=1)rect[1] = pts[np.argmin(diff)]rect[3] = pts[np.argmax(diff)]# return the ordered coordinatesreturn rectdef get_rect_and_landmarks(img_path):'''该函数用于从图像文件路径中解析出矩形框和关键点的坐标,并返回解析后的结果。'''file_name = img_path.split("/")[-1].split("-")landmarks_np = np.zeros((5, 2))rect = file_name[2].split("_")landmarks = file_name[3].split("_")rect_str = "&".join(rect)landmarks_str = "&".join(landmarks)rect = rect_str.split("&")landmarks = landmarks_str.split("&")rect = [int(x) for x in rect]landmarks = [int(x) for x in landmarks]for i in range(4):landmarks_np[i][0] = landmarks[2 * i]landmarks_np[i][1] = landmarks[2 * i + 1]#    middle_landmark_w =int((landmarks[4]+landmarks[6])/2)#    middle_landmark_h =int((landmarks[5]+landmarks[7])/2)#    landmarks.append(middle_landmark_w)#    landmarks.append(middle_landmark_h)landmarks_np_new = order_points(landmarks_np)#    landmarks_np_new[4]=np.array([middle_landmark_w,middle_landmark_h])return rect, landmarks, landmarks_np_newdef x1x2y1y2_yolo(rect, landmarks, img):h, w, c = img.shaperect[0] = max(0, rect[0])rect[1] = max(0, rect[1])rect[2] = min(w - 1, rect[2] - rect[0])rect[3] = min(h - 1, rect[3] - rect[1])annotation = np.zeros((1, 14))annotation[0, 0] = (rect[0] + rect[2] / 2) / w  # cxannotation[0, 1] = (rect[1] + rect[3] / 2) / h  # cyannotation[0, 2] = rect[2] / w  # wannotation[0, 3] = rect[3] / h  # hannotation[0, 4] = landmarks[0] / w  # l0_xannotation[0, 5] = landmarks[1] / h  # l0_yannotation[0, 6] = landmarks[2] / w  # l1_xannotation[0, 7] = landmarks[3] / h  # l1_yannotation[0, 8] = landmarks[4] / w  # l2_xannotation[0, 9] = landmarks[5] / h  # l2_yannotation[0, 10] = landmarks[6] / w  # l3_xannotation[0, 11] = landmarks[7] / h  # l3_y# annotation[0, 12] = landmarks[8] / w  # l4_x# annotation[0, 13] = landmarks[9] / h  # l4_yreturn annotationdef xywh2yolo(rect, landmarks_sort, img):h, w, c = img.shaperect[0] = max(0, rect[0])rect[1] = max(0, rect[1])rect[2] = min(w - 1, rect[2] - rect[0])rect[3] = min(h - 1, rect[3] - rect[1])annotation = np.zeros((1, 12))annotation[0, 0] = (rect[0] + rect[2] / 2) / w  # cxannotation[0, 1] = (rect[1] + rect[3] / 2) / h  # cyannotation[0, 2] = rect[2] / w  # wannotation[0, 3] = rect[3] / h  # hannotation[0, 4] = landmarks_sort[0][0] / w  # l0_xannotation[0, 5] = landmarks_sort[0][1] / h  # l0_yannotation[0, 6] = landmarks_sort[1][0] / w  # l1_xannotation[0, 7] = landmarks_sort[1][1] / h  # l1_yannotation[0, 8] = landmarks_sort[2][0] / w  # l2_xannotation[0, 9] = landmarks_sort[2][1] / h  # l2_yannotation[0, 10] = landmarks_sort[3][0] / w  # l3_xannotation[0, 11] = landmarks_sort[3][1] / h  # l3_y# annotation[0, 12] = landmarks_sort[4][0] / w  # l4_x# annotation[0, 13] = landmarks_sort[4][1] / h  # l4_yreturn annotation
def yolo2x1y1x2y2(annotation, img):h, w, c = img.shaperect = annotation[:, 0:4].squeeze().tolist()landmarks = annotation[:, 4:].squeeze().tolist()rect_w = w * rect[2]rect_h = h * rect[3]rect_x = int(rect[0] * w - rect_w / 2)rect_y = int(rect[1] * h - rect_h / 2)new_rect = [rect_x, rect_y, rect_x + rect_w, rect_y + rect_h]for i in range(5):landmarks[2 * i] = landmarks[2 * i] * wlandmarks[2 * i + 1] = landmarks[2 * i + 1] * hreturn new_rect, landmarksdef update_txt(file_root = r"I:/CCPD2019/ccpd",save_img_path=r"H:\data\images",save_txt_path="H:\data\labels"):print(file_root, "start!!!!!")file_list = []count = 0allFilePath(file_root, file_list)# print(file_list)# exit()for img_path in file_list:count += 1# img_path = r"ccpd_yolo_test/02-90_85-173&466_452&541-452&553_176&556_178&463_454&460-0_0_6_26_15_26_32-68-53.jpg"text_path = img_path.replace(".jpg", ".txt")# 读取图片img = cv2.imread(img_path)rect, landmarks, landmarks_sort = get_rect_and_landmarks(img_path)# annotation=x1x2y1y2_yolo(rect,landmarks,img)annotation = xywh2yolo(rect, landmarks_sort, img)str_label = "0 "for i in range(len(annotation[0])):str_label = str_label + " " + str(annotation[0][i])str_label = str_label.replace('[', '').replace(']', '')str_label = str_label.replace(',', '') + '\n'# if os.path.exists(text_path):#     continue# else:shutil.move(img_path,os.path.join(os.path.join(save_img_path,os.path.basename(img_path))))text_path_save = os.path.join(save_txt_path,os.path.basename(text_path))# print(text_path_save)# exit()with open(text_path_save, "w") as f:f.write(str_label)print(text_path,"finished!")# print(count, img_path)print(os.getpid(),"end!!!")def delete_non_jpg_images(image_folder):for filename in os.listdir(image_folder):if not filename.endswith(".jpg"):file_path = os.path.join(image_folder, filename)os.remove(file_path)print("删除完毕")def move_files_to_folders(images_folder, folders_folder, labels_folder):for filename in os.listdir(images_folder):if filename.endswith(".jpg"):image_path = os.path.join(images_folder, filename)label_path = os.path.join(images_folder, os.path.splitext(filename)[0] + ".txt")folder_path = os.path.join(folders_folder, filename)labels_folder_path = os.path.join(labels_folder, os.path.splitext(filename)[0] + ".txt")if not os.path.exists(folder_path) and not os.path.exists(labels_folder_path) and os.path.exists(label_path):# 不存在同名shutil.move(image_path, folder_path)shutil.move(label_path, labels_folder_path)if __name__ == '__main__':# 1. 处理ccpd文件夹import multiprocessingpool = multiprocessing.Pool(processes=14)  # 这里使用4个进程files = []for dir in os.listdir(r"I:/CCPD2019/ccpd"):files.append(os.path.join(r"I:/CCPD2019/ccpd",dir))# 使用进程池执行任务results = pool.map(update_txt,files)# 关闭进程池,防止新任务被提交pool.close()# 等待所有任务完成pool.join()# 2. 清理异常文件夹# 调用删除非jpg图像的函数image_folder = r"H:\data\images"# 删除文件delete_non_jpg_images(image_folder)# 3.加入一些新增文件夹文件# 指定文件夹路径# images_folder = r"single_yellow_val"# folders_folder = r"H:\data\images"# labels_folder = r"H:\data\labels"# # 调用移动文件的函数# move_files_to_folders(images_folder, folders_folder, labels_folder)
处理后文件,共计329499个文件
处理后为类别+左上角+右下角+4个角点
2.2.2 CRPD数据集处理
Unified Chinese License Plate Detection and Recognition with High Efficiency(Arxiv 2022)
这段话描述了标签文件夹中的txt文件的注释格式。每个txt文件的文件名与相应图像的名称相同。
在txt文件中,每一行表示图像中的一个车牌(LP)的注释。
一个LP的注释格式如下:
x1,y1,x2,y2,x3,y3,x4,y4,type,content
前八个数字表示边界四边形的坐标。
"type"注释表示LP的类型,0表示蓝色车牌,1表示黄色单线车牌,2表示黄色双线车牌,3表示白色车牌。
"content"注释表示LP的内容。
2.3 检测算法
YOLOv5-Face是YOLOv5的一个改进版本,特别针对人脸检测任务。它添加了一个5-Point Landmark Regression Head(关键点回归),并对Landmark Regression Head使用了Wing loss进行约束。此外,YOLOv5-Face还设计了不同模型尺寸的检测器,从大模型到超小模型,以实现在嵌入式或移动设备上的实时检测。在WiderFace数据集上的实验结果表明,YOLOv5-Face在几乎所有的Easy、Medium和Hard子集上都能达到最先进的性能,超过了特定设计的人脸检测器。与许多其他的人脸检测器不同,YOLOv5-Face把人脸检测作为一个一般的目标检测任务来看待。
这里将yolov5-face 修改为四个关键点,做目标检测任务
2.3.1 数据配置car_plate.yaml
# PASCAL VOC dataset http://host.robots.ox.ac.uk/pascal/VOC/
# Train command: python train.py --data voc.yaml
# Default dataset location is next to /yolov5:
#   /parent_folder
#     /VOC
#     /yolov5# download command/URL (optional)
download: bash data/scripts/get_voc.sh# train and val data as 1) directory: path/images/, 2) file: path/images.txt, or 3) list: [path1/images/, path2/images/]
train: E:/data/train/images
val: E:/data/val_detect/val
# number of classes
nc: 2# class names
names: [ 'single_plate','double_plate']
2.3.2 模型配置
# parameters
nc: 2  # number of classes
depth_multiple: 1.0  # model depth multiple
width_multiple: 0.5  # layer channel multiple# anchors
anchors:- [4,5,  8,10,  13,16]  # P3/8- [23,29,  43,55,  73,105]  # P4/16- [146,217,  231,300,  335,433]  # P5/32# YOLOv5 backbone
backbone:# [from, number, module, args][[-1, 1, StemBlock, [32, 3, 2]],    # 0-P2/4[-1, 1, ShuffleV2Block, [128, 2]], # 1-P3/8[-1, 3, ShuffleV2Block, [128, 1]], # 2[-1, 1, ShuffleV2Block, [256, 2]], # 3-P4/16[-1, 7, ShuffleV2Block, [256, 1]], # 4[-1, 1, ShuffleV2Block, [512, 2]], # 5-P5/32[-1, 3, ShuffleV2Block, [512, 1]], # 6]# YOLOv5 head
head:[[-1, 1, Conv, [128, 1, 1]],[-1, 1, nn.Upsample, [None, 2, 'nearest']],[[-1, 4], 1, Concat, [1]],  # cat backbone P4[-1, 1, C3, [128, False]],  # 10[-1, 1, Conv, [128, 1, 1]],[-1, 1, nn.Upsample, [None, 2, 'nearest']],[[-1, 2], 1, Concat, [1]],  # cat backbone P3[-1, 1, C3, [128, False]],  # 14 (P3/8-small)[-1, 1, Conv, [128, 3, 2]],[[-1, 11], 1, Concat, [1]],  # cat head P4[-1, 1, C3, [128, False]],  # 17 (P4/16-medium)[-1, 1, Conv, [128, 3, 2]],[[-1, 7], 1, Concat, [1]],  # cat head P5[-1, 1, C3, [128, False]],  # 20 (P5/32-large)[[14, 17, 20], 1, Detect, [nc, anchors]],  # Detect(P3, P4, P5)]
2.3.3 train.py
parser = argparse.ArgumentParser()# 权重parser.add_argument('--weights', type=str, default='best.pt', help='initial weights path')# 默认配置文件parser.add_argument('--cfg', type=str, default='models/car_plate.yaml', help='model.yaml path')parser.add_argument('--data', type=str, default='data/car_plate.yaml', help='data.yaml path')parser.add_argument('--hyp', type=str, default='data/hyp.scratch.yaml', help='hyperparameters path')parser.add_argument('--epochs', type=int, default=10)parser.add_argument('--batch-size', type=int, default=64, help='total batch size for all GPUs')parser.add_argument('--img-size', nargs='+', type=int, default=[640, 640], help='[train, test] image sizes')parser.add_argument('--rect', action='store_true', help='rectangular training')parser.add_argument('--resume', nargs='?', const=True, default=False, help='resume most recent training')parser.add_argument('--nosave', action='store_true', help='only save final checkpoint')parser.add_argument('--notest', action='store_true', help='only test final epoch')parser.add_argument('--noautoanchor', action='store_true', help='disable autoanchor check')parser.add_argument('--evolve', action='store_true', help='evolve hyperparameters')parser.add_argument('--bucket', type=str, default='', help='gsutil bucket')parser.add_argument('--cache-images', action='store_true', help='cache images for faster training')parser.add_argument('--image-weights', action='store_true', help='use weighted image selection for training')parser.add_argument('--device', default='', help='cuda device, i.e. 0 or 0,1,2,3 or cpu')parser.add_argument('--multi-scale', action='store_true', default=True, help='vary img-size +/- 50%%')parser.add_argument('--single-cls', action='store_true', help='train multi-class data as single-class')parser.add_argument('--adam', action='store_true', help='use torch.optim.Adam() optimizer')parser.add_argument('--sync-bn', action='store_true', help='use SyncBatchNorm, only available in DDP mode')parser.add_argument('--local_rank', type=int, default=-1, help='DDP parameter, do not modify')parser.add_argument('--log-imgs', type=int, default=2, help='number of images for W&B logging, max 100')parser.add_argument('--log-artifacts', action='store_true', help='log artifacts, i.e. final trained model')parser.add_argument('--workers', type=int, default=4, help='maximum number of dataloader workers')parser.add_argument('--project', default='runs/train', help='save to project/name')parser.add_argument('--name', default='exp', help='save to project/name')parser.add_argument('--exist-ok', action='store_true', help='existing project/name ok, do not increment')
2.3.4 训练结果
2.4 部署
2.4.1 pth推理(detect.py)
#!/usr/bin/env python
import warnings
warnings.filterwarnings("ignore")
import os
import cv2
import numpy as np
import time
import torch
import copy
from models.experimental import attempt_load
from utils.datasets import letterbox
from utils.general import check_img_size, non_max_suppression_face, scale_coords
from utils.torch_utils import time_synchronizedclors = [(255, 0, 0), (0, 255, 0), (0, 0, 255), (255, 255, 0), (0, 255, 255)]def load_model(weights, device):model = attempt_load(weights, map_location=device)  # load FP32 modelreturn model
def scale_coords_landmarks(img1_shape, coords, img0_shape, ratio_pad=None):# Rescale coords (xyxy) from img1_shape to img0_shapeif ratio_pad is None:  # calculate from img0_shapegain = min(img1_shape[0] / img0_shape[0], img1_shape[1] / img0_shape[1])  # gain  = old / newpad = (img1_shape[1] - img0_shape[1] * gain) / 2, (img1_shape[0] - img0_shape[0] * gain) / 2  # wh paddingelse:gain = ratio_pad[0][0]pad = ratio_pad[1]coords[:, [0, 2, 4, 6]] -= pad[0]  # x paddingcoords[:, [1, 3, 5, 7]] -= pad[1]  # y paddingcoords[:, :10] /= gain# clip_coords(coords, img0_shape)coords[:, 0].clamp_(0, img0_shape[1])  # x1coords[:, 1].clamp_(0, img0_shape[0])  # y1coords[:, 2].clamp_(0, img0_shape[1])  # x2coords[:, 3].clamp_(0, img0_shape[0])  # y2coords[:, 4].clamp_(0, img0_shape[1])  # x3coords[:, 5].clamp_(0, img0_shape[0])  # y3coords[:, 6].clamp_(0, img0_shape[1])  # x4coords[:, 7].clamp_(0, img0_shape[0])  # y4# coords[:, 8].clamp_(0, img0_shape[1])  # x5# coords[:, 9].clamp_(0, img0_shape[0])  # y5return coords
def get_plate_rec_landmark(img, xyxy, conf, landmarks, class_num, device):h, w, c = img.shaperesult_dict = {}tl = 1 or round(0.002 * (h + w) / 2) + 1  # line/font thicknessx1 = int(xyxy[0])y1 = int(xyxy[1])x2 = int(xyxy[2])y2 = int(xyxy[3])landmarks_np = np.zeros((4, 2))rect = [x1, y1, x2, y2]for i in range(4):point_x = int(landmarks[2 * i])point_y = int(landmarks[2 * i + 1])landmarks_np[i] = np.array([point_x, point_y])class_label = int(class_num)  # 车牌的的类型0代表单牌,1代表双层车牌result_dict['box'] = rectresult_dict['landmarks'] = landmarks_np.tolist()result_dict['class'] = class_labelreturn result_dict
class Detect:def __init__(self, conf_thres=0.6, iou_thres=0.5, img_size=640):self.conf_thres = conf_thresself.iou_thres = iou_thresself.img_size = img_sizeself.device = "cuda" if torch.cuda.is_available() else "cpu"self.detect_model = load_model("weights/best.pt", self.device)def detect(self, orgimg):dict_list = []if orgimg is None:return []if orgimg.shape[-1] == 4:orgimg = cv2.cvtColor(orgimg, cv2.COLOR_BGRA2BGR)h0, w0 = orgimg.shape[:2]  # orig hwimg0 = copy.deepcopy(orgimg)r = self.img_size / max(h0, w0)  # resize image to img_sizeif r != 1:  # always resize down, only resize up if training with augmentationinterp = cv2.INTER_AREA if r < 1 else cv2.INTER_LINEARimg0 = cv2.resize(img0, (int(w0 * r), int(h0 * r)), interpolation=interp)imgsz = check_img_size(self.img_size, s=self.detect_model.stride.max())  # check img_sizeimg = letterbox(img0, new_shape=imgsz,auto=False)[0]# Convertimg = img[:, :, ::-1].transpose(2, 0, 1).copy()  # BGR to RGB, to 3x416x416# Run inferencet0 = time.time()img = torch.from_numpy(img).to(self.device)img = img.float()  # uint8 to fp16/32img /= 255.0  # 0 - 255 to 0.0 - 1.0if img.ndimension() == 3:img = img.unsqueeze(0)# Inferencet1 = time_synchronized()pred = self.detect_model(img)[0]print(pred.shape)t2 = time_synchronized()print(f"infer time is {(t2-t1)*1000} ms")# Apply NMSpred = non_max_suppression_face(pred, self.conf_thres, self.iou_thres)# print(pred.shape)# Process detectionsfor i, det in enumerate(pred):  # detections per imageif len(det):# Rescale boxes from img_size to im0 sizedet[:, :4] = scale_coords(img.shape[2:], det[:, :4], orgimg.shape).round()# Print resultsfor c in det[:, -1].unique():n = (det[:, -1] == c).sum()  # detections per classdet[:, 5:13] = scale_coords_landmarks(img.shape[2:], det[:, 5:13], orgimg.shape).round()for j in range(det.size()[0]):xyxy = det[j, :4].view(-1).tolist()conf = det[j, 4].cpu().numpy()landmarks = det[j, 5:13].view(-1).tolist()class_num = det[j, 13].cpu().numpy()result_dict = get_plate_rec_landmark(orgimg, xyxy, conf, landmarks, class_num, self.device)dict_list.append(result_dict)return dict_listdef draw_result(self, orgimg, dict_list):'''返回绘制之后的原图'''for result in dict_list:rect_area = result['box']x, y, w, h = rect_area[0], rect_area[1], rect_area[2] - rect_area[0], rect_area[3] - rect_area[1]padding_w = 0.05 * wpadding_h = 0.11 * hrect_area[0] = max(0, int(x - padding_w))rect_area[1] = max(0, int(y - padding_h))rect_area[2] = min(orgimg.shape[1], int(rect_area[2] + padding_w))rect_area[3] = min(orgimg.shape[0], int(rect_area[3] + padding_h))landmarks = result['landmarks']label = result['class']# result_str+=result+" "for i in range(4):  # 关键点cv2.circle(orgimg, (int(landmarks[i][0]), int(landmarks[i][1])), 5, clors[i], -1)cv2.rectangle(orgimg, (rect_area[0], rect_area[1]), (rect_area[2], rect_area[3]), clors[label], 2)  # 画框cv2.putText(img, str(label), (rect_area[0], rect_area[1]), cv2.FONT_HERSHEY_SIMPLEX, 0.5, clors[label], 2)return orgimg
if __name__ == '__main__':det = Detect()img_dir = "images"save_dir = "result"if not os.path.exists(save_dir):os.makedirs(save_dir)for file in os.listdir(img_dir):img_path = os.path.join(img_dir,file)img = cv2.imdecode(np.fromfile(img_path, dtype=np.uint8), -1)dict_list = det.detect(img)# print(dict_list)result_img = det.draw_result(img, dict_list)save_dir_path = os.path.join(save_dir,file)cv2.imwrite(save_dir_path,result_img)
2.4.2 onnx推理
import argparse
import time, os
import torch
from detect import scale_coords_landmarks, get_plate_rec_landmark
from torch2trt.trt_model import TrtModel
from utils.general import non_max_suppression_face, scale_coords, check_img_size
import cv2
import copy
from utils.torch_utils import time_synchronized
import numpy as npclors = [(255, 0, 0), (0, 255, 0), (0, 0, 255), (255, 255, 0), (0, 255, 255)]def letterbox(img, size=(640, 640)):h, w, c = img.shape# 缩放因子ratio = min(size[0] / h, size[1] / w)new_h, new_w = int(h * ratio), int(w * ratio)top = int((size[0] - new_h) / 2)left = int((size[1] - new_w) / 2)bottom = size[0] - new_h - topright = size[1] - new_w - leftimg_resize = cv2.resize(img, (new_w, new_h))img = cv2.copyMakeBorder(img_resize, top, bottom, left, right, borderType=cv2.BORDER_CONSTANT,value=(114, 114, 114))return img, ratio, left, topdef nms(boxes, iou_thresh):# numpy nmsindex = np.argsort(boxes[:, 4])[::-1]keep = []while index.size > 0:i = index[0]keep.append(i)x1 = np.maximum(boxes[i, 0], boxes[index[1:], 0])y1 = np.maximum(boxes[i, 1], boxes[index[1:], 1])x2 = np.minimum(boxes[i, 2], boxes[index[1:], 2])y2 = np.minimum(boxes[i, 3], boxes[index[1:], 3])w = np.maximum(0, x2 - x1)h = np.maximum(0, y2 - y1)inter_area = w * hunion_area = (boxes[i, 2] - boxes[i, 0]) * (boxes[i, 3] - boxes[i, 1]) + (boxes[index[1:], 2] - boxes[index[1:], 0]) * (boxes[index[1:], 3] - boxes[index[1:], 1])iou = inter_area / (union_area - inter_area)idx = np.where(iou <= iou_thresh)[0]index = index[idx + 1]return keepdef restore_box(boxes, r, left, top):  # 返回原图上面的坐标boxes[:, [0, 2, 5, 7, 9, 11]] -= leftboxes[:, [1, 3, 6, 8, 10, 12]] -= topboxes[:, [0, 2, 5, 7, 9, 11]] /= rboxes[:, [1, 3, 6, 8, 10, 12]] /= rreturn boxesdef post_precessing(dets, ratio, left, top, conf_thresh=0.3, iou_thresh=0.5):  # 检测后处理# 选取大于置信度的choice = dets[:, :, 4] > conf_threshdets = dets[choice]dets[:, 13:15] *= dets[:, 4:5]box = dets[:, :4]boxes = xywh2xyxy(box)score = np.max(dets[:, 13:15], axis=-1, keepdims=True)index = np.argmax(dets[:, 13:15], axis=-1).reshape(-1, 1)output = np.concatenate((boxes, score, dets[:, 5:13], index), axis=1)reserve_ = nms(output, iou_thresh)output = output[reserve_]output = restore_box(output, ratio, left, top)return outputdef xywh2xyxy(boxes):  # xywh坐标变为 左上 ,右下坐标 x1,y1  x2,y2xywh = copy.deepcopy(boxes)xywh[:, 0] = boxes[:, 0] - boxes[:, 2] / 2xywh[:, 1] = boxes[:, 1] - boxes[:, 3] / 2xywh[:, 2] = boxes[:, 0] + boxes[:, 2] / 2xywh[:, 3] = boxes[:, 1] + boxes[:, 3] / 2return xywhclass Detect:def __init__(self, conf_thres=0.6, iou_thres=0.5, img_size=640, trt_path="weights/best.trt"):self.conf_thres = conf_thresself.iou_thres = iou_thresself.img_size = img_sizeself.device = "cuda" if torch.cuda.is_available() else "cpu"self.detect_model = TrtModel(trt_path)def detect_processing(self, img, img_size=(640, 640)):img, ratio, left, top = letterbox(img, size=img_size)img = img[:, :, ::-1].transpose(2, 0, 1).copy().astype(np.float32)img = img / 255img = img.reshape(1, *img.shape)return img, ratio, left, topdef detect(self, orgimg):dict_list = []if orgimg is None:return []if orgimg.shape[-1] == 4:orgimg = cv2.cvtColor(orgimg, cv2.COLOR_BGRA2BGR)h0, w0 = orgimg.shape[:2]  # orig hwimg0 = copy.deepcopy(orgimg)# imgsz = check_img_size(self.img_size, s=32)  # check img_sizeimg, ratio, left, top = self.detect_processing(img0)if img.ndim == 3:img = img[None, ...]# Inferencet1 = time_synchronized()pred = self.detect_model(img).reshape([1, 25200, 15])output = post_precessing(pred, ratio, left, top, conf_thresh=self.conf_thres, iou_thresh=self.iou_thres)for output in output:result_dict = {}rect = output[:4].astype(int).tolist()land_marks = output[5:13].astype(int).reshape(4, 2)conf =  output[4].astype(int).tolist()result_dict['box'] = rectresult_dict['class'] = confresult_dict['landmarks'] = land_marks.tolist()dict_list.append(result_dict)return dict_listdef draw_result(self, orgimg, dict_list):'''返回绘制之后的原图'''for result in dict_list:rect_area = result['box']x, y, w, h = rect_area[0], rect_area[1], rect_area[2] - rect_area[0], rect_area[3] - rect_area[1]padding_w = 0.05 * wpadding_h = 0.11 * hrect_area[0] = max(0, int(x - padding_w))rect_area[1] = max(0, int(y - padding_h))rect_area[2] = min(orgimg.shape[1], int(rect_area[2] + padding_w))rect_area[3] = min(orgimg.shape[0], int(rect_area[3] + padding_h))landmarks = result['landmarks']label = result['class']# result_str+=result+" "for i in range(4):  # 关键点cv2.circle(orgimg, (int(landmarks[i][0]), int(landmarks[i][1])), 5, clors[i], -1)cv2.rectangle(orgimg, (rect_area[0], rect_area[1]), (rect_area[2], rect_area[3]), clors[label], 2)  # 画框cv2.putText(img, str(label), (rect_area[0], rect_area[1]), cv2.FONT_HERSHEY_SIMPLEX, 0.5, clors[label], 2)return orgimgdef __del__(self):self.detect_model.destroy()if __name__ == '__main__':# ============可视化================# img_vis(img, orgimg, pred)det = Detect()img_dir = "images"save_dir = "result"if not os.path.exists(save_dir):os.makedirs(save_dir)for file in os.listdir(img_dir):img_path = os.path.join(img_dir, file)img = cv2.imdecode(np.fromfile(img_path, dtype=np.uint8), -1)dict_list = det.detect(img)print(dict_list)result_img = det.draw_result(img, dict_list)save_dir_path = os.path.join(save_dir, file)cv2.imwrite(save_dir_path, result_img)
2.4.3 trt推理
import argparse
import time,os
import torch
from detect import scale_coords_landmarks, get_plate_rec_landmark
from torch2trt.trt_model import TrtModel
from utils.datasets import letterbox
from utils.general import non_max_suppression_face, scale_coords, check_img_size
import cv2
import copy
from utils.torch_utils import time_synchronized
import numpy as np
clors = [(255, 0, 0), (0, 255, 0), (0, 0, 255), (255, 255, 0), (0, 255, 255)]
def img_process(img_path,long_side=640,stride_max=32):'''图像预处理'''orgimg=cv2.imread(img_path)img0 = copy.deepcopy(orgimg)h0, w0 = orgimg.shape[:2]  # orig hwr = long_side/ max(h0, w0)  # resize image to img_sizeif r != 1:  # always resize down, only resize up if training with augmentationinterp = cv2.INTER_AREA if r < 1 else cv2.INTER_LINEARimg0 = cv2.resize(img0, (int(w0 * r), int(h0 * r)), interpolation=interp)imgsz = check_img_size(long_side, s=stride_max)  # check img_sizeimg = letterbox(img0, new_shape=imgsz,auto=False)[0] # auto True最小矩形   False固定尺度# Convertimg = img[:, :, ::-1].transpose(2, 0, 1).copy()  # BGR to RGB, to 3x416x416img = torch.from_numpy(img)img = img.float()  # uint8 to fp16/32img /= 255.0  # 0 - 255 to 0.0 - 1.0if img.ndimension() == 3:img = img.unsqueeze(0)return img,orgimgclass Detect:def __init__(self, conf_thres=0.6, iou_thres=0.5, img_size=640,trt_path="weights/best.trt"):self.conf_thres = conf_thresself.iou_thres = iou_thresself.img_size = img_sizeself.device = "cuda" if torch.cuda.is_available() else "cpu"self.detect_model = TrtModel(trt_path)def detect(self, orgimg):dict_list = []if orgimg is None:return []if orgimg.shape[-1] == 4:orgimg = cv2.cvtColor(orgimg, cv2.COLOR_BGRA2BGR)h0, w0 = orgimg.shape[:2]  # orig hwimg0 = copy.deepcopy(orgimg)r = self.img_size / max(h0, w0)  # resize image to img_sizeif r != 1:  # always resize down, only resize up if training with augmentationinterp = cv2.INTER_AREA if r < 1 else cv2.INTER_LINEARimg0 = cv2.resize(img0, (int(w0 * r), int(h0 * r)), interpolation=interp)imgsz = check_img_size(self.img_size, s=32)  # check img_sizeimg = letterbox(img0, new_shape=imgsz,auto=False)[0]# Convertimg = img[:, :, ::-1].transpose(2, 0, 1).copy()  # BGR to RGB, to 3x416x416# Run inferencet0 = time.time()# img = torch.from_numpy(img).to(self.device)img = img.astype(float)  # uint8 to fp16/32img /= 255.0  # 0 - 255 to 0.0 - 1.0if img.ndim == 3:img = img[None,...]# Inferencet1 = time_synchronized()pred = self.detect_model(img).reshape([1, 25200, 15])t2 = time_synchronized()print(f"infer time is {(t2-t1)*1000} ms")# Apply NMS# pred = torch.tensor(pred)pred = non_max_suppression_face(torch.tensor(pred), self.conf_thres, self.iou_thres)# print(type(pred))# Process detectionsfor i, det in enumerate(pred):  # detections per imageif len(det):# Rescale boxes from img_size to im0 size# print(type(det))det[:, :4] = scale_coords(img.shape[2:], det[:, :4], orgimg.shape).round()# Print resultsfor c in det[:, -1].unique():n = (det[:, -1] == c).sum()  # detections per classdet[:, 5:13] = scale_coords_landmarks(img.shape[2:], det[:, 5:13], orgimg.shape).round()for j in range(det.size()[0]):xyxy = det[j, :4].view(-1).tolist()conf = det[j, 4].cpu().numpy()landmarks = det[j, 5:13].view(-1).tolist()class_num = det[j, 13].cpu().numpy()result_dict = get_plate_rec_landmark(orgimg, xyxy, conf, landmarks, class_num, self.device)dict_list.append(result_dict)return dict_listdef draw_result(self, orgimg, dict_list):'''返回绘制之后的原图'''for result in dict_list:rect_area = result['box']x, y, w, h = rect_area[0], rect_area[1], rect_area[2] - rect_area[0], rect_area[3] - rect_area[1]padding_w = 0.05 * wpadding_h = 0.11 * hrect_area[0] = max(0, int(x - padding_w))rect_area[1] = max(0, int(y - padding_h))rect_area[2] = min(orgimg.shape[1], int(rect_area[2] + padding_w))rect_area[3] = min(orgimg.shape[0], int(rect_area[3] + padding_h))landmarks = result['landmarks']label = result['class']# result_str+=result+" "for i in range(4):  # 关键点cv2.circle(orgimg, (int(landmarks[i][0]), int(landmarks[i][1])), 5, clors[i], -1)cv2.rectangle(orgimg, (rect_area[0], rect_area[1]), (rect_area[2], rect_area[3]), clors[label], 2)  # 画框cv2.putText(img, str(label), (rect_area[0], rect_area[1]), cv2.FONT_HERSHEY_SIMPLEX, 0.5, clors[label], 2)return orgimgdef __del__(self):self.detect_model.destroy()if __name__ == '__main__':# ============可视化================# img_vis(img, orgimg, pred)det = Detect()img_dir = "images"save_dir = "result"if not os.path.exists(save_dir):os.makedirs(save_dir)for file in os.listdir(img_dir):img_path = os.path.join(img_dir, file)img = cv2.imdecode(np.fromfile(img_path, dtype=np.uint8), -1)dict_list = det.detect(img)print(dict_list)result_img = det.draw_result(img, dict_list)save_dir_path = os.path.join(save_dir, file)cv2.imwrite(save_dir_path, result_img)
2.4.4 numpy版本trt推理
import argparse
import time, os
import torch
from detect import scale_coords_landmarks, get_plate_rec_landmark
from torch2trt.trt_model import TrtModel
from utils.general import non_max_suppression_face, scale_coords, check_img_size
import cv2
import copy
from utils.torch_utils import time_synchronized
import numpy as np
clors = [(255, 0, 0), (0, 255, 0), (0, 0, 255), (255, 255, 0), (0, 255, 255)]
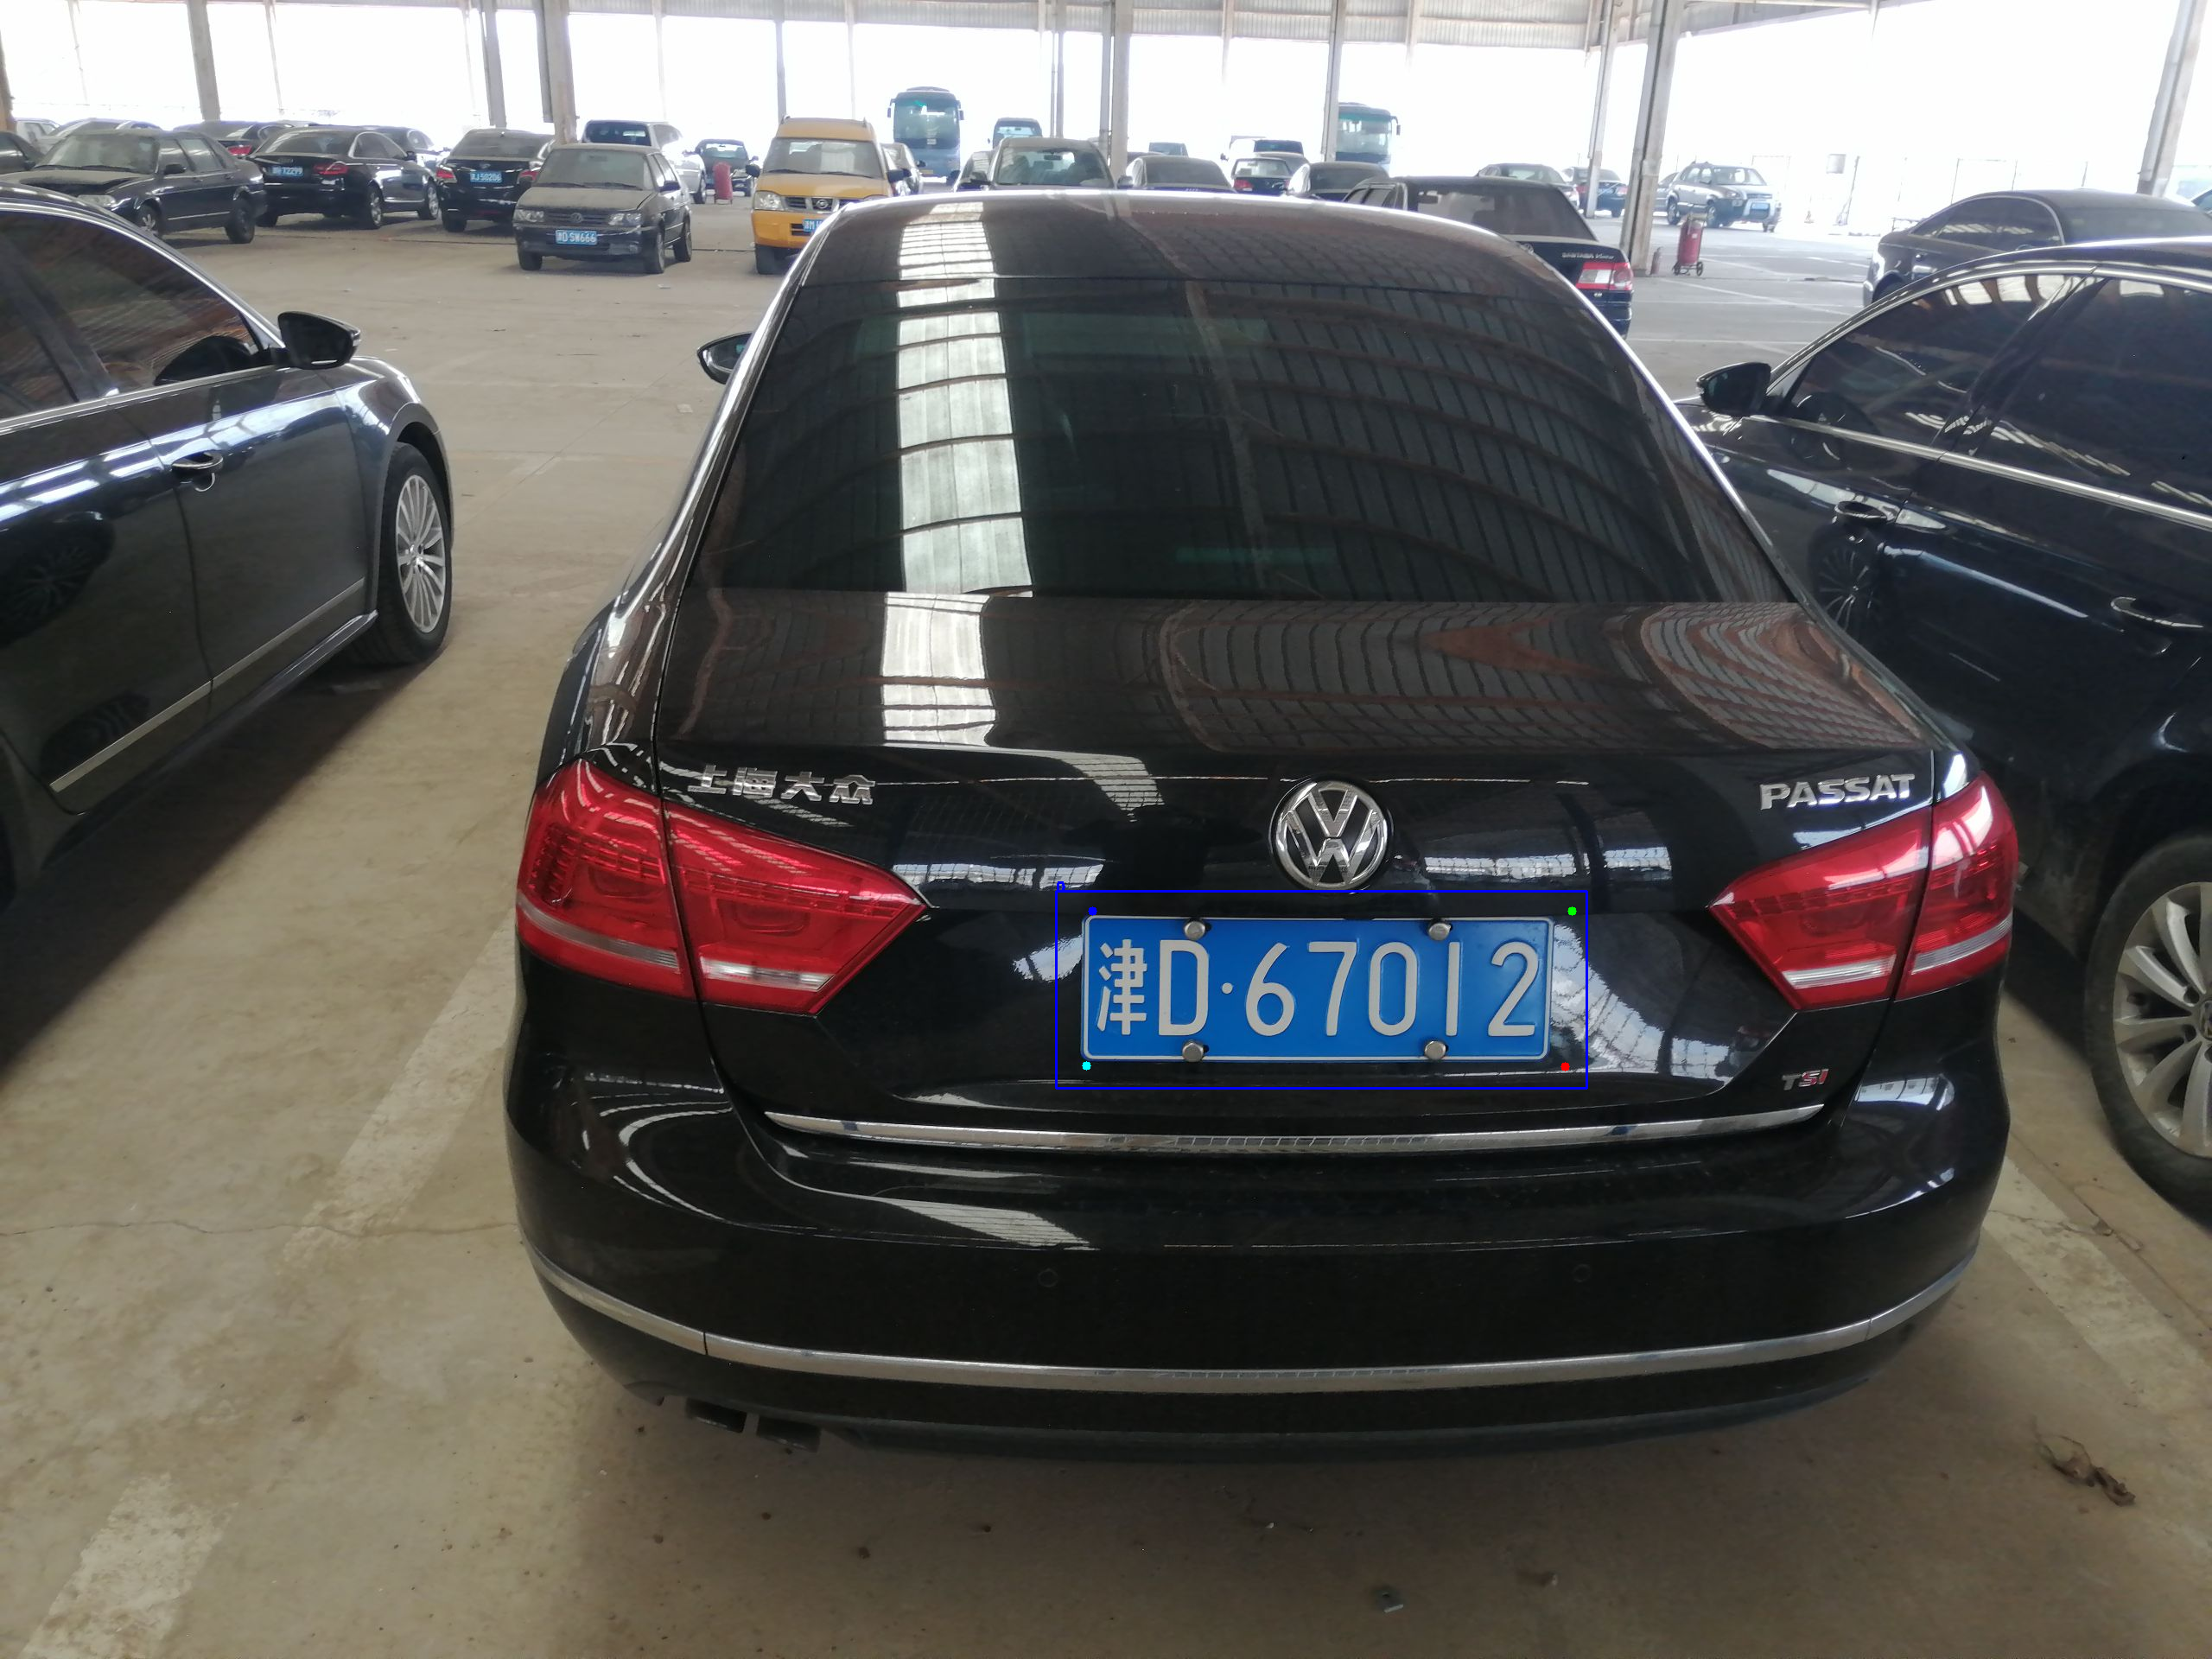
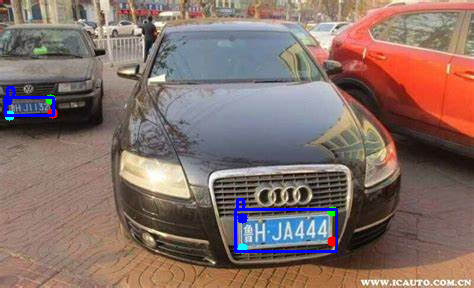
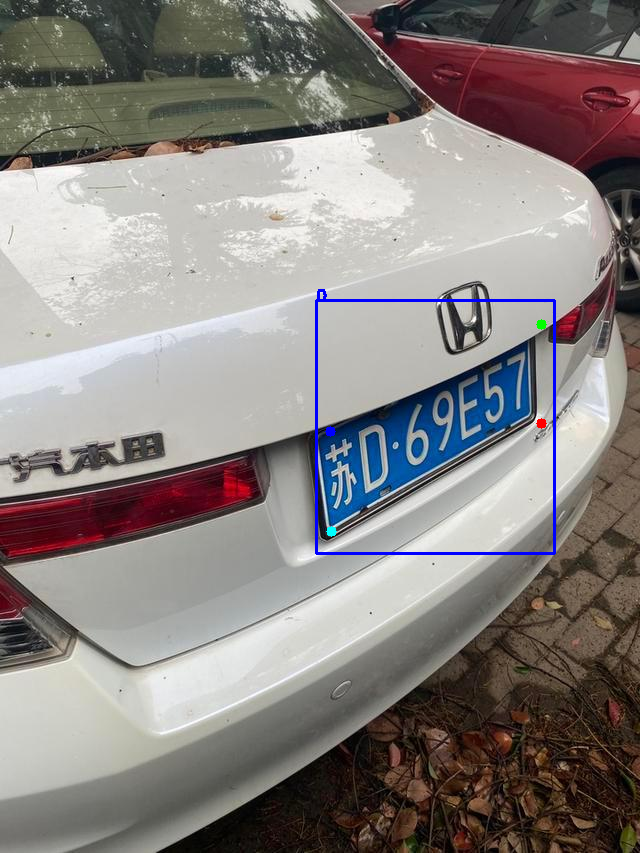
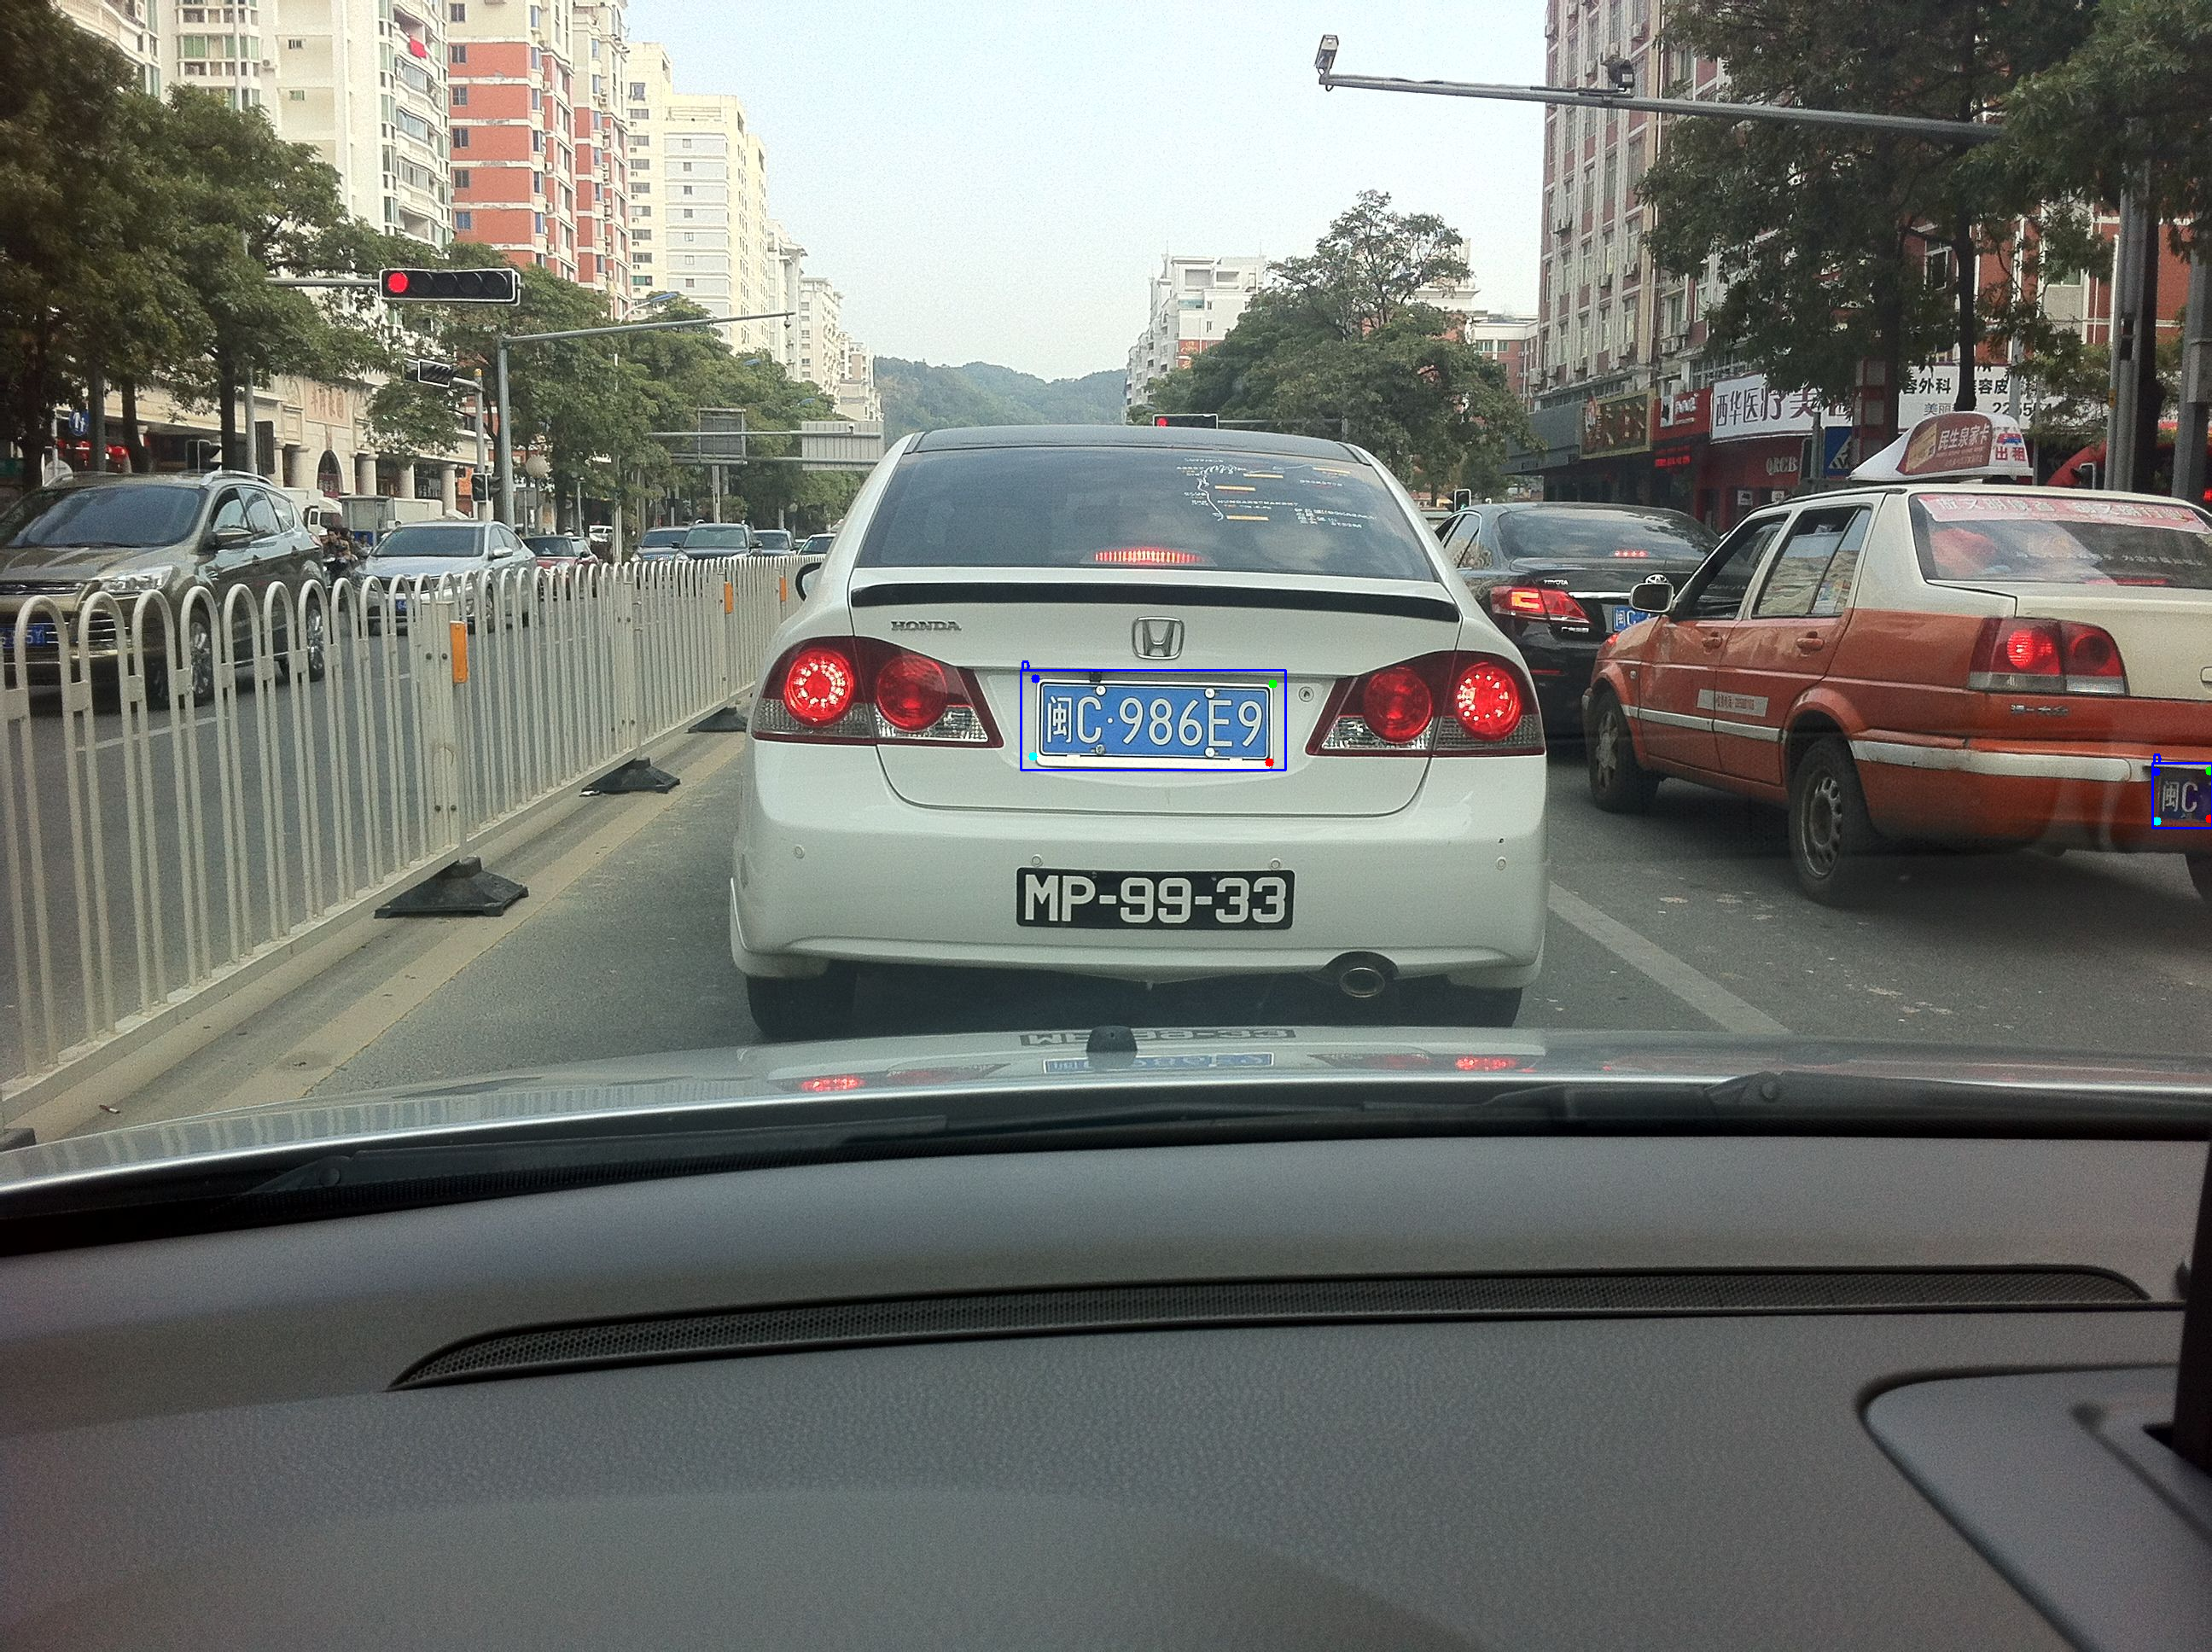
def letterbox(img, size=(640, 640)):h, w, c = img.shape# 缩放因子ratio = min(size[0] / h, size[1] / w)new_h, new_w = int(h * ratio), int(w * ratio)top = int((size[0] - new_h) / 2)left = int((size[1] - new_w) / 2)bottom = size[0] - new_h - topright = size[1] - new_w - leftimg_resize = cv2.resize(img, (new_w, new_h))img = cv2.copyMakeBorder(img_resize, top, bottom, left, right, borderType=cv2.BORDER_CONSTANT,value=(114, 114, 114))return img, ratio, left, topdef nms(boxes, iou_thresh):# numpy nmsindex = np.argsort(boxes[:, 4])[::-1]keep = []while index.size > 0:i = index[0]keep.append(i)x1 = np.maximum(boxes[i, 0], boxes[index[1:], 0])y1 = np.maximum(boxes[i, 1], boxes[index[1:], 1])x2 = np.minimum(boxes[i, 2], boxes[index[1:], 2])y2 = np.minimum(boxes[i, 3], boxes[index[1:], 3])w = np.maximum(0, x2 - x1)h = np.maximum(0, y2 - y1)inter_area = w * hunion_area = (boxes[i, 2] - boxes[i, 0]) * (boxes[i, 3] - boxes[i, 1]) + (boxes[index[1:], 2] - boxes[index[1:], 0]) * (boxes[index[1:], 3] - boxes[index[1:], 1])iou = inter_area / (union_area - inter_area)idx = np.where(iou <= iou_thresh)[0]index = index[idx + 1]return keepdef restore_box(boxes, r, left, top): # 返回原图上面的坐标boxes[:, [0, 2, 5, 7, 9, 11]] -= leftboxes[:, [1, 3, 6, 8, 10, 12]] -= topboxes[:, [0, 2, 5, 7, 9, 11]] /= rboxes[:, [1, 3, 6, 8, 10, 12]] /= rreturn boxesdef post_precessing(dets, ratio, left, top, conf_thresh=0.3, iou_thresh=0.5): # 检测后处理# 选取大于置信度的choice = dets[:, :, 4] > conf_threshdets = dets[choice]dets[:, 13:15] *= dets[:, 4:5]box = dets[:, :4]boxes = xywh2xyxy(box)score = np.max(dets[:, 13:15], axis=-1, keepdims=True)index = np.argmax(dets[:, 13:15], axis=-1).reshape(-1, 1)output = np.concatenate((boxes, score, dets[:, 5:13], index), axis=1)reserve_ = nms(output, iou_thresh)output = output[reserve_]output = restore_box(output, ratio, left, top)return outputdef xywh2xyxy(boxes): # xywh坐标变为 左上 ,右下坐标 x1,y1 x2,y2xywh = copy.deepcopy(boxes)xywh[:, 0] = boxes[:, 0] - boxes[:, 2] / 2xywh[:, 1] = boxes[:, 1] - boxes[:, 3] / 2xywh[:, 2] = boxes[:, 0] + boxes[:, 2] / 2xywh[:, 3] = boxes[:, 1] + boxes[:, 3] / 2return xywhclass Detect:def __init__(self, conf_thres=0.6, iou_thres=0.5, img_size=640, trt_path="weights/best.trt"):self.conf_thres = conf_thresself.iou_thres = iou_thresself.img_size = img_sizeself.device = "cuda" if torch.cuda.is_available() else "cpu"self.detect_model = TrtModel(trt_path)def detect_processing(self, img, img_size=(640, 640)):img, ratio, left, top = letterbox(img, size=img_size)img = img[:, :, ::-1].transpose(2, 0, 1).copy().astype(np.float32)img = img / 255img = img.reshape(1, *img.shape)return img, ratio, left, topdef detect(self, orgimg):dict_list = []if orgimg is None:return []if orgimg.shape[-1] == 4:orgimg = cv2.cvtColor(orgimg, cv2.COLOR_BGRA2BGR)h0, w0 = orgimg.shape[:2] # orig hwimg0 = copy.deepcopy(orgimg)# imgsz = check_img_size(self.img_size, s=32) # check img_sizeimg, ratio, left, top = self.detect_processing(img0)if img.ndim == 3:img = img[None, ...]# Inferencet1 = time_synchronized()pred = self.detect_model(img).reshape([1, 25200, 15])output = post_precessing(pred, ratio, left, top, conf_thresh=self.conf_thres, iou_thresh=self.iou_thres)for output in output:result_dict = {}rect = output[:4].astype(int).tolist()land_marks = output[5:13].astype(int).reshape(4, 2)conf = output[4].astype(int).tolist()result_dict['box'] = rectresult_dict['class'] = confresult_dict['landmarks'] = land_marks.tolist()dict_list.append(result_dict)return dict_listdef draw_result(self, orgimg, dict_list):'''返回绘制之后的原图'''for result in dict_list:rect_area = result['box']x, y, w, h = rect_area[0], rect_area[1], rect_area[2] - rect_area[0], rect_area[3] - rect_area[1]padding_w = 0.05 * wpadding_h = 0.11 * hrect_area[0] = max(0, int(x - padding_w))rect_area[1] = max(0, int(y - padding_h))rect_area[2] = min(orgimg.shape[1], int(rect_area[2] + padding_w))rect_area[3] = min(orgimg.shape[0], int(rect_area[3] + padding_h))landmarks = result['landmarks']label = result['class']# result_str+=result+" "for i in range(4): # 关键点cv2.circle(orgimg, (int(landmarks[i][0]), int(landmarks[i][1])), 5, clors[i], -1)cv2.rectangle(orgimg, (rect_area[0], rect_area[1]), (rect_area[2], rect_area[3]), clors[label], 2) # 画框cv2.putText(img, str(label), (rect_area[0], rect_area[1]), cv2.FONT_HERSHEY_SIMPLEX, 0.5, clors[label], 2)return orgimgdef __del__(self):self.detect_model.destroy()if __name__ == '__main__':# ============可视化================# img_vis(img, orgimg, pred)det = Detect()img_dir = "images"save_dir = "result"if not os.path.exists(save_dir):os.makedirs(save_dir)for file in os.listdir(img_dir):img_path = os.path.join(img_dir, file)img = cv2.imdecode(np.fromfile(img_path, dtype=np.uint8), -1)dict_list = det.detect(img)print(dict_list)result_img = det.draw_result(img, dict_list)save_dir_path = os.path.join(save_dir, file)cv2.imwrite(save_dir_path, result_img)2.4.5 推理结果展示

参考开源
Chinese_license_plate_detection_recognition