😏★,°:.☆( ̄▽ ̄)/$:.°★ 😏
这篇文章主要介绍Netty创建网络服务端客户端示例。
学其所用,用其所学。——梁启超
欢迎来到我的博客,一起学习,共同进步。
喜欢的朋友可以关注一下,下次更新不迷路🥞
文章目录
- :smirk:1. Netty介绍
- :blush:2. 环境安装与配置
- :satisfied:3. TCP应用示例
- :satisfied:4. UDP应用示例
😏1. Netty介绍
Netty官网:https://netty.io/
Netty是一个基于Java的异步事件驱动的网络应用程序框架,专门用于快速开发高性能、可扩展和可维护的网络服务器和客户端。它提供了简单而强大的API,使开发人员能够轻松地构建各种网络应用,包括TCP、UDP、HTTP、WebSocket等。
以下是一些关键特点和功能:
1.异步和事件驱动:Netty使用非阻塞I/O模型,通过异步事件驱动方式处理网络操作,提供了卓越的性能和可扩展性。
2.高性能:Netty通过有效地利用底层操作系统提供的机制(如选择器、零拷贝等)来实现高效的数据传输和处理,以满足对性能和吞吐量的要求。
3.安全:Netty提供了强大的加密和认证支持,包括SSL/TLS和各种认证机制,保护网络通信的安全性。
4.多协议支持:Netty支持多种主流的网络协议,如TCP、UDP、HTTP、WebSocket等,使开发人员可以方便地构建不同类型的网络应用。
5.灵活的处理程序模型:Netty采用了高度可扩展的处理程序(Handler)模型,使开发人员可以按需配置和组合处理程序来处理网络事件和数据,实现复杂的业务逻辑。
6.内置编解码器:Netty提供了丰富的内置编解码器,使开发人员能够轻松地处理各种协议和数据格式,简化了网络通信中的数据编解码工作。
7.完善的文档和社区支持:Netty拥有完善的官方文档、示例代码和教程,以及活跃的社区支持,使开发人员能够快速上手并解决问题。
😊2. 环境安装与配置
IDEA创建Netty工程,只要在pom.xml中引入如下依赖:
<dependencies><dependency><groupId>io.netty</groupId><artifactId>netty-all</artifactId><version>4.1.49.Final</version></dependency></dependencies>
😆3. TCP应用示例
创建TCP服务端客户端,需要先开启通道Channel,然后再有一个事件处理Handler,下面就创建这4个类:
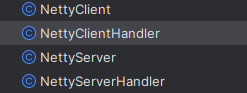
NettyServer.java
package org.example;import io.netty.bootstrap.ServerBootstrap;
import io.netty.channel.ChannelFuture;
import io.netty.channel.ChannelInitializer;
import io.netty.channel.ChannelOption;
import io.netty.channel.EventLoopGroup;
import io.netty.channel.nio.NioEventLoopGroup;
import io.netty.channel.socket.SocketChannel;
import io.netty.channel.socket.nio.NioServerSocketChannel;
import io.netty.handler.logging.LogLevel;
import io.netty.handler.logging.LoggingHandler;public class NettyServer {private final int port;public NettyServer(int port) {this.port = port; // server port}public void start() throws Exception {EventLoopGroup bossGroup = new NioEventLoopGroup();EventLoopGroup workerGroup = new NioEventLoopGroup();try {ServerBootstrap b = new ServerBootstrap();b.group(bossGroup, workerGroup).channel(NioServerSocketChannel.class).option(ChannelOption.SO_BACKLOG, 128).handler(new LoggingHandler(LogLevel.INFO)).childHandler(new ChannelInitializer<SocketChannel>() {@Overridepublic void initChannel(SocketChannel ch) throws Exception {ch.pipeline().addLast(new NettyServerHandler()); // channel to handler}});ChannelFuture f = b.bind(port).sync();System.out.println("Server started on port " + port);f.channel().closeFuture().sync();} finally {workerGroup.shutdownGracefully();bossGroup.shutdownGracefully();}}public static void main(String[] args) throws Exception {int port = 8080;NettyServer server = new NettyServer(port);server.start();}
}
NettyServerHandler.java
package org.example;import io.netty.buffer.ByteBuf;
import io.netty.buffer.Unpooled;
import io.netty.channel.*;
import io.netty.util.CharsetUtil;public class NettyServerHandler extends ChannelInboundHandlerAdapter {/*** 读取数据实际(这里我们可以读取客户端发送的消息)* @param ctx 上下文对象* @param msg 客户端发送的数据* @throws Exception*/@Overridepublic void channelRead(ChannelHandlerContext ctx, Object msg) throws Exception {System.out.println("server ctx =" + ctx);Channel channel = ctx.channel();// 将 msg 转成一个 ByteBuf// ByteBuf 是 Netty 提供的,不是 NIO 的 ByteBuffer.ByteBuf buf = (ByteBuf) msg;System.out.println("客户端发送的消息是: " + buf.toString(CharsetUtil.UTF_8));System.out.println("客户端地址: " + channel.remoteAddress());}/*** 读取完毕,回复* @param ctx* @throws Exception*/@Overridepublic void channelReadComplete(ChannelHandlerContext ctx) throws Exception {// writeAndFlush 是 write + flush 将数据写入到缓存,并刷新ctx.writeAndFlush(Unpooled.copiedBuffer("Hello, Client!", CharsetUtil.UTF_8));}/*** 处理异常, 一般是需要关闭通道* @param ctx* @param cause* @throws Exception*/@Overridepublic void exceptionCaught(ChannelHandlerContext ctx, Throwable cause) throws Exception {ctx.close();}
}
NettyClient.java
package org.example;import io.netty.bootstrap.Bootstrap;
import io.netty.channel.ChannelFuture;
import io.netty.channel.ChannelInitializer;
import io.netty.channel.ChannelOption;
import io.netty.channel.EventLoopGroup;
import io.netty.channel.nio.NioEventLoopGroup;
import io.netty.channel.socket.SocketChannel;
import io.netty.channel.socket.nio.NioSocketChannel;public class NettyClient {private final String host;private final int port;public NettyClient(String host, int port) {this.host = host; // ipthis.port = port; // port}public void start() throws Exception {EventLoopGroup group = new NioEventLoopGroup();try {Bootstrap b = new Bootstrap();b.group(group).channel(NioSocketChannel.class).option(ChannelOption.TCP_NODELAY, true).handler(new ChannelInitializer<SocketChannel>() {@Overridepublic void initChannel(SocketChannel ch) throws Exception {ch.pipeline().addLast(new NettyClientHandler());}});ChannelFuture f = b.connect(host, port).sync();System.out.println("Connected to " + host + ":" + port);f.channel().closeFuture().sync();} finally {group.shutdownGracefully();}}public static void main(String[] args) throws Exception {String host = "localhost";int port = 8080;NettyClient client = new NettyClient(host, port);client.start();}
}
NettyClientHandler.java
package org.example;import io.netty.buffer.ByteBuf;
import io.netty.buffer.Unpooled;
import io.netty.channel.ChannelHandlerContext;
import io.netty.channel.ChannelInboundHandlerAdapter;
import io.netty.util.CharsetUtil;public class NettyClientHandler extends ChannelInboundHandlerAdapter {/*** 通道创建就绪后触发* @param ctx* @throws Exception*/@Overridepublic void channelActive(ChannelHandlerContext ctx) throws Exception {System.out.println("client ctx =" + ctx);ctx.writeAndFlush(Unpooled.copiedBuffer("Hello, Server!", CharsetUtil.UTF_8));}/*** 当通道有读取事件时,会触发* @param ctx* @param msg* @throws Exception*/@Overridepublic void channelRead(ChannelHandlerContext ctx, Object msg) throws Exception {ByteBuf buf = (ByteBuf) msg;System.out.println("服务器回复的消息:" + buf.toString(CharsetUtil.UTF_8));System.out.println("服务器的地址: "+ ctx.channel().remoteAddress());}/*** 处理异常, 一般是需要关闭通道* @param ctx* @param cause* @throws Exception*/@Overridepublic void exceptionCaught(ChannelHandlerContext ctx, Throwable cause) throws Exception {cause.printStackTrace();ctx.close();}
}
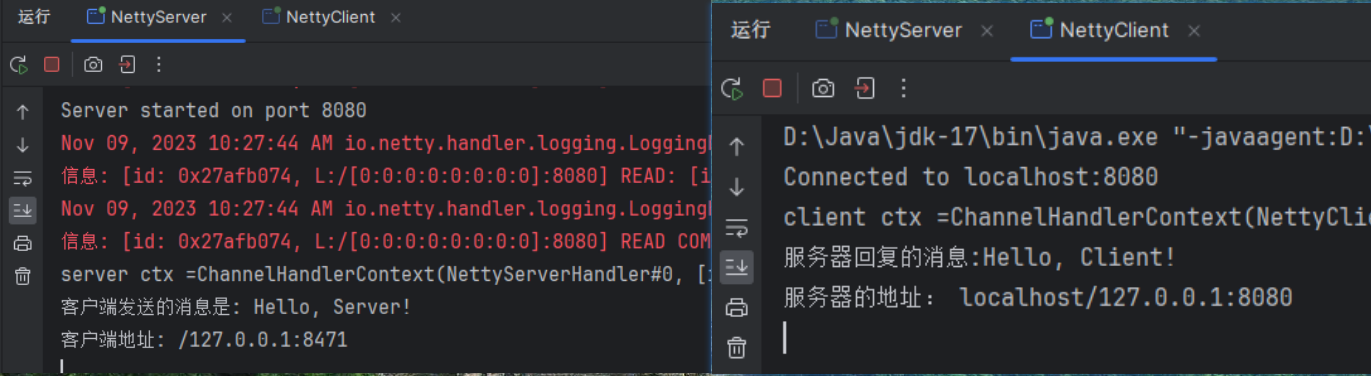
分别运行服务端和客户端类,结果如下:
😆4. UDP应用示例
跟上面TCP类似,UDP也是要创建Channel和Handler,下面创建这4个类:
UDPServer.java
package org.example;import io.netty.bootstrap.Bootstrap;
import io.netty.channel.ChannelFuture;
import io.netty.channel.ChannelInitializer;
import io.netty.channel.EventLoopGroup;
import io.netty.channel.nio.NioEventLoopGroup;
import io.netty.channel.socket.DatagramChannel;
import io.netty.channel.socket.nio.NioDatagramChannel;public class UDPServer {private final int port;public UDPServer(int port) {this.port = port;}public void start() throws Exception {EventLoopGroup group = new NioEventLoopGroup();try {Bootstrap b = new Bootstrap();b.group(group).channel(NioDatagramChannel.class).handler(new ChannelInitializer<DatagramChannel>() {@Overrideprotected void initChannel(DatagramChannel ch) throws Exception {ch.pipeline().addLast(new UDPServerHandler());}});ChannelFuture f = b.bind(port).sync();System.out.println("Server started on port " + port);f.channel().closeFuture().sync();} finally {group.shutdownGracefully();}}public static void main(String[] args) throws Exception {int port = 8888;UDPServer server = new UDPServer(port);server.start();}
}
UDPServerHandler.java
package org.example;import io.netty.buffer.Unpooled;
import io.netty.channel.ChannelHandlerContext;
import io.netty.channel.SimpleChannelInboundHandler;
import io.netty.channel.socket.DatagramPacket;
import io.netty.util.CharsetUtil;public class UDPServerHandler extends SimpleChannelInboundHandler<DatagramPacket> {@Overrideprotected void channelRead0(ChannelHandlerContext ctx, DatagramPacket msg) throws Exception {// 处理接收到的数据String receivedMessage = msg.content().toString(CharsetUtil.UTF_8);System.out.println("Received message: " + receivedMessage);// 响应客户端String responseMessage = "Hello, client!";DatagramPacket responsePacket = new DatagramPacket(Unpooled.copiedBuffer(responseMessage, CharsetUtil.UTF_8),msg.sender());ctx.writeAndFlush(responsePacket);}
}
UDPClient.java
package org.example;import io.netty.bootstrap.Bootstrap;
import io.netty.buffer.Unpooled;
import io.netty.channel.ChannelFuture;
import io.netty.channel.ChannelInitializer;
import io.netty.channel.EventLoopGroup;
import io.netty.channel.nio.NioEventLoopGroup;
import io.netty.channel.socket.DatagramChannel;
import io.netty.channel.socket.DatagramPacket;
import io.netty.channel.socket.nio.NioDatagramChannel;
import io.netty.util.CharsetUtil;import java.net.InetSocketAddress;public class UDPClient {private final String host;private final int port;public UDPClient(String host, int port) {this.host = host;this.port = port;}public void start() throws Exception {EventLoopGroup group = new NioEventLoopGroup();try {Bootstrap b = new Bootstrap();b.group(group).channel(NioDatagramChannel.class).handler(new ChannelInitializer<DatagramChannel>() {@Overrideprotected void initChannel(DatagramChannel ch) throws Exception {ch.pipeline().addLast(new UDPClientHandler());}});ChannelFuture f = b.bind(0).sync();System.out.println("Client started");// 发送消息给服务端String message = "Hello, server!";DatagramPacket packet = new DatagramPacket(Unpooled.copiedBuffer(message, CharsetUtil.UTF_8),new InetSocketAddress(host, port));f.channel().writeAndFlush(packet).sync();f.channel().closeFuture().sync();} finally {group.shutdownGracefully();}}public static void main(String[] args) throws Exception {String host = "localhost";int port = 8888;UDPClient client = new UDPClient(host, port);client.start();}
}
UDPClientHandler.java
package org.example;import io.netty.channel.ChannelHandlerContext;
import io.netty.channel.SimpleChannelInboundHandler;
import io.netty.channel.socket.DatagramPacket;
import io.netty.util.CharsetUtil;public class UDPClientHandler extends SimpleChannelInboundHandler<DatagramPacket> {@Overrideprotected void channelRead0(ChannelHandlerContext ctx, DatagramPacket msg) throws Exception {// 处理接收到的数据String receivedMessage = msg.content().toString(CharsetUtil.UTF_8);System.out.println("Received response from server: " + receivedMessage);}
}
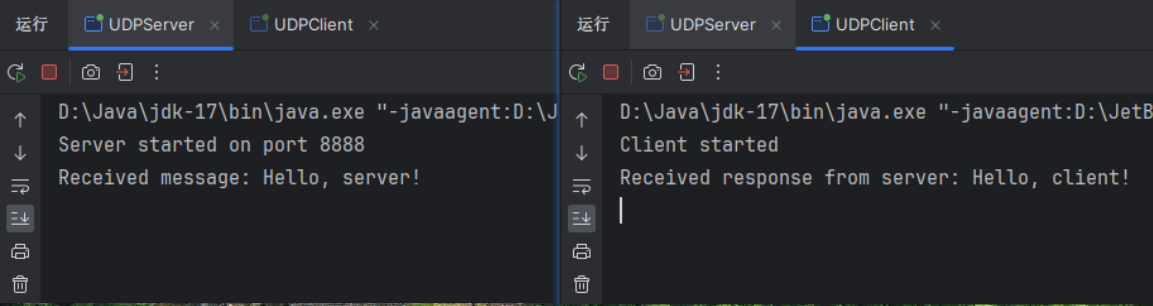
运行结果如下:

以上。