1、gc导致的cpu冲高
排查是否为gc导致,看如下两点:
-
gc频率和耗时
-
内存占用率
(1)gc频率和耗时有两种手段看:
第一种:根据gc日志的打印时间,可确定每次gc间隔的时间和耗时:
使用这种方式的前提是配置了gc日志的打印,参考jvm参数如下:
-XX:+PrintGCDetails -XX:+PrintGCDateStamps -XX:+PrintHeapAtGC -Xloggc:../../logs/gc.log
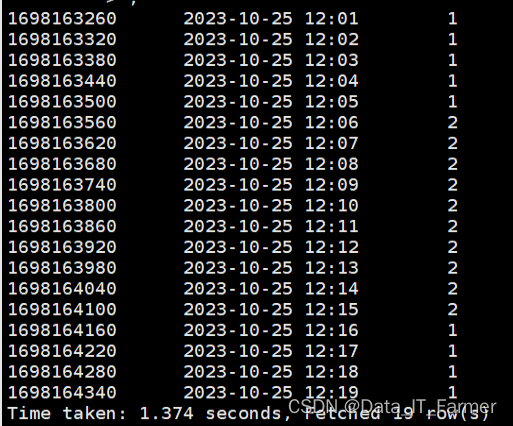
第二种:使用如下命令,可每隔5s打印一次gc情况,从打印结果可以判断gc频率,在通过YGCT/YGC和FGCT/FGC可以计算出每次gc的耗时。
jstat -gc <java_pid> 5000
Jstat是JDK自带的一个轻量级小工具。它位于java的bin目录下,主要利用JVM内建的指令对Java应用程序的资源和性能进行实时的命令行的监控,包括了对Heap size和垃圾回收状况的监控。
命令用法:jstat [-命令选项] [pid] [间隔时间/毫秒] [查询次数]
若gc频率低,且耗时短,则基本可以排除是gc导致的cpu冲高问题。
- S0C:年轻代中 To Survivor 的容量(单位 KB);
- S1C:年轻代中 From Survivor 的容量(单位 KB);
- S0U:年轻代中 To Survivor 目前已使用空间(单位 KB);
- S1U:年轻代中 From Survivor 目前已使用空间(单位 KB);
- EC:年轻代中 Eden 的容量(单位 KB);
- EU:年轻代中 Eden 目前已使用空间(单位 KB);
- OC:老年代的容量(单位 KB);
- OU:老年代目前已使用空间(单位 KB);
- MC:Metaspace 的容量(单位 KB);
- MU:Metaspace 目前已使用空间(单位 KB);
- CCSC:压缩类空间大小
- CCSU:压缩类空间使用大小
- YGC:从应用程序启动到采样时年轻代中 gc 次数;
- YGCT:从应用程序启动到采样时年轻代中 gc 所用时间 (s);
- FGC:从应用程序启动到采样时 old 代(全 gc)gc 次数;
- FGCT:从应用程序启动到采样时 old 代(全 gc)gc 所用时间 (s);
- GCT:从应用程序启动到采样时 gc 用的总时间 (s)
(2)jvm内存占用
使用jmap命令导出dump文件
jmap -dump:format=b,file=/tmp/1/dump.hprof 3618
也可以通过arthas工具,导出dump文件
heapdump /tmp/1/dump.hprof
通过堆栈信息分析占用内存的对象是哪些代码。
2、aqs
AbstractQueuedSynchronizer 抽象队列同步器。
抢到资源的线程直接使用处理业务逻辑,抢不到资源的必然涉及一种排队等候机制。抢占资源失败的线程继续去等待(类似银行业务办理窗口都满了,暂时没有受理窗口的顾客只能去候客区排队等候),但等候线程仍然保留获取锁的可能且获取锁流程仍在继续(候客区的顾客也在等着叫号,轮到了再去受理窗口办理业务)。
既然说到了排队等候机制,那么就一定会有某种队列形成,这样的队列是什么数据结构呢?
如果共享资源被占用,就需要一定的阻塞等待唤醒机制来保证锁分配。这个机制主要用的是CLH队列的变体实现的,将暂时获取不到锁的线程加入到队列中,这个队列就是AQS的抽象表现。它将请求共享资源的线程封装成队列的结点(Node),通过CAS、自旋以及LockSupportpark)的方式,维护state变量的状态,使并发达到同步的控制效果。
总结:state变量+CLH变种的双端队列(FIFO)
2.1、aqs是什么
AQS同步器是Java并发编程的基础,从资源共享的角度分成独占和共享两种模式,像ReentrantLock、ThreadPoolExecutor、CountDownLatch等都是基于AQS来实现的,如图:

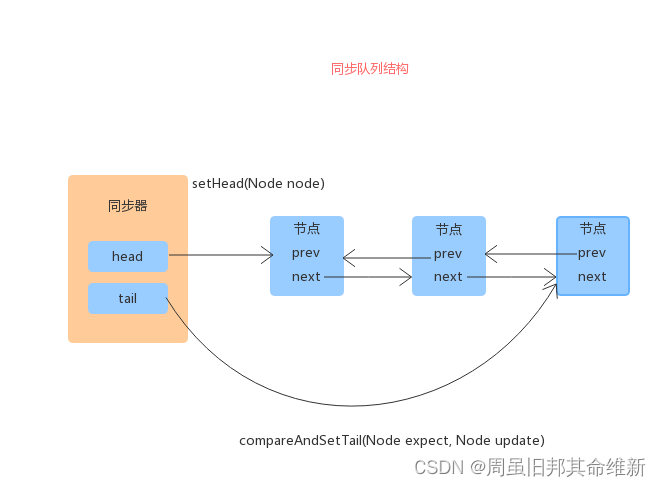
2.2、AQS同步队列的基本结构
AQS维护了一个头节点(head)和一个尾节点(tail)结构的双向链表,当一个线程获取锁失败时,会将该线程打包成一个Node节点,挂到同步队列尾节点
private transient volatile Node head;//同步队列头结点
private transient volatile Node tail;//同步队列尾结点
private volatile int state;//同步状态
2.3、从ReentrantLock开始
 * A reentrant mutual exclusion {@link Lock} with the same basic
public class ReentrantLock implements Lock, java.io.Serializable {private static final long serialVersionUID = 7373984872572414699L;/** Synchronizer providing all implementation mechanics */private final Sync sync;* Base of synchronization control for this lock. Subclassedabstract static class Sync extends AbstractQueuedSynchronizer {* Sync object for non-fair locksstatic final class NonfairSync extends Sync {* Sync object for fair locksstatic final class FairSync extends Sync {* Creates an instance of {@code ReentrantLock}.public ReentrantLock() {sync = new NonfairSync();}* Creates an instance of {@code ReentrantLock} with thepublic ReentrantLock(boolean fair) {sync = fair ? new FairSync() : new NonfairSync();}* Acquires the lock.public void lock() {sync.lock();//<------------------------注意,我们从这里入手}* Attempts to release this lock.public void unlock() {sync.release(1);}...
}
从最简单的lock方法开始看看公平和非公平,先浏览下AbstractQueuedSynchronizer,FairSync,NonfairSync类的源码。
public abstract class AbstractQueuedSynchronizerextends AbstractOwnableSynchronizerimplements java.io.Serializable {...* Acquires in exclusive mode, ignoring interrupts.  Implementedpublic final void acquire(int arg) {//公平锁或非公平锁都会调用这方法if (!tryAcquire(arg) &&//0.acquireQueued(addWaiter(Node.EXCLUSIVE), arg))//1. 2.selfInterrupt();//3.}//0.* Attempts to acquire in exclusive mode. This method should queryprotected boolean tryAcquire(int arg) {//取决于公平锁或非公平锁的实现throw new UnsupportedOperationException();}//1.* Acquires in exclusive uninterruptible mode for thread already infinal boolean acquireQueued(final Node node, int arg) {boolean failed = true;try {boolean interrupted = false;for (;;) {final Node p = node.predecessor();if (p == head && tryAcquire(arg)) {setHead(node);p.next = null; // help GCfailed = false;return interrupted;}if (shouldParkAfterFailedAcquire(p, node) &&parkAndCheckInterrupt())interrupted = true;}} finally {if (failed)cancelAcquire(node);}}//2.* Creates and enqueues node for current thread and given mode.private Node addWaiter(Node mode) {Node node = new Node(Thread.currentThread(), mode);// Try the fast path of enq; backup to full enq on failureNode pred = tail;if (pred != null) {node.prev = pred;if (compareAndSetTail(pred, node)) {pred.next = node;return node;}}enq(node);return node;}//3.static void selfInterrupt() {Thread.currentThread().interrupt();}//这个方法将会被公平锁的tryAcquire()调用* Queries whether any threads have been waiting to acquire longerpublic final boolean hasQueuedPredecessors() {// The correctness of this depends on head being initialized// before tail and on head.next being accurate if the current// thread is first in queue.Node t = tail; // Read fields in reverse initialization orderNode h = head;Node s;return h != t &&((s = h.next) == null || s.thread != Thread.currentThread());}...
}
public class ReentrantLock implements Lock, java.io.Serializable {...//非公平锁与公平锁的公共父类* Base of synchronization control for this lock. Subclassedabstract static class Sync extends AbstractQueuedSynchronizer {...final boolean nonfairTryAcquire(int acquires) {final Thread current = Thread.currentThread();int c = getState();if (c == 0) {if (compareAndSetState(0, acquires)) {setExclusiveOwnerThread(current);return true;}}else if (current == getExclusiveOwnerThread()) {int nextc = c + acquires;if (nextc < 0) // overflowthrow new Error("Maximum lock count exceeded");setState(nextc);return true;}return false;} ...}//非公平锁static final class NonfairSync extends Sync {private static final long serialVersionUID = 7316153563782823691L;/*** Performs lock. Try immediate barge, backing up to normal* acquire on failure.*/final void lock() {//<---ReentrantLock初始化为非公平锁时,ReentrantLock.lock()将会调用这if (compareAndSetState(0, 1))setExclusiveOwnerThread(Thread.currentThread());elseacquire(1);//调用父类AbstractQueuedSynchronizer的acquire()}//acquire()将会间接调用该方法protected final boolean tryAcquire(int acquires) {return nonfairTryAcquire(acquires);//调用父类Sync的nonfairTryAcquire()}}* Sync object for fair locksstatic final class FairSync extends Sync {private static final long serialVersionUID = -3000897897090466540L;final void lock() {//<---ReentrantLock初始化为非公平锁时,ReentrantLock.lock()将会调用这acquire(1);调用父类AbstractQueuedSynchronizer的acquire()}//acquire()将会间接调用该方法* Fair version of tryAcquire. Don't grant access unlessprotected final boolean tryAcquire(int acquires) {final Thread current = Thread.currentThread();int c = getState();if (c == 0) {if (!hasQueuedPredecessors() &&//<---公平锁与非公平锁的唯一区别,公平锁调用hasQueuedPredecessors(),而非公平锁没有调用//hasQueuedPredecessors()在父类AbstractQueuedSynchronizer定义compareAndSetState(0, acquires)) {setExclusiveOwnerThread(current);return true;}}else if (current == getExclusiveOwnerThread()) {int nextc = c + acquires;if (nextc < 0)throw new Error("Maximum lock count exceeded");setState(nextc);return true;}return false;}}...}
可以明显看出公平锁与非公平锁的lock()方法唯一的区别就在于公平锁在获取同步状态时多了一个限制条件:hasQueuedPredecessors()
hasQueuedPredecessors是公平锁加锁时判断等待队列中是否存在有效节点的方法
hasQueuedPredecessors()中判断了是否需要排队,导致公平锁和非公平锁的差异如下:
公平锁:公平锁讲究先来先到,线程在获取锁时,如果这个锁的等待队列中已经有线程在等待,那么当前线程就会进入等待队列中;
非公平锁:不管是否有等待队列,如果可以获取锁,则立刻占有锁对象。也就是说队列的第一个排队线程在unpark(),之后还是需要竞争锁(存在线程竞争的情况下)

接下来讲述非公平锁的lock()
整个ReentrantLock 的加锁过程,可以分为三个阶段:
- 尝试加锁;
- 加锁失败,线程入队列;
- 线程入队列后,进入阻赛状态。
ReentrantLock默认是选用非公平锁。
public class ReentrantLock implements Lock, java.io.Serializable {...* Acquires the lock.public void lock() {sync.lock();//<------------------------注意,我们从这里入手,线程A}abstract static class Sync extends AbstractQueuedSynchronizer {...//被NonfairSync的tryAcquire()调用final boolean nonfairTryAcquire(int acquires) {final Thread current = Thread.currentThread();int c = getState();if (c == 0) {if (compareAndSetState(0, acquires)) {setExclusiveOwnerThread(current);return true;}}else if (current == getExclusiveOwnerThread()) {int nextc = c + acquires;if (nextc < 0) // overflowthrow new Error("Maximum lock count exceeded");setState(nextc);return true;}return false;}...}//非公平锁static final class NonfairSync extends Sync {private static final long serialVersionUID = 7316153563782823691L;/*** Performs lock.  Try immediate barge, backing up to normal* acquire on failure.*/final void lock() {//<----线程A的lock.lock()调用该方法if (compareAndSetState(0, 1))//AbstractQueuedSynchronizer的方法,刚开始这方法返回truesetExclusiveOwnerThread(Thread.currentThread());//设置独占的所有者线程,显然一开始是线程Aelseacquire(1);//稍后紧接着的线程B将会调用该方法。}//acquire()将会间接调用该方法protected final boolean tryAcquire(int acquires) {return nonfairTryAcquire(acquires);//调用父类Sync的nonfairTryAcquire()}}...
}
public class ReentrantLock implements Lock, java.io.Serializable {...* Acquires the lock.public void lock() {sync.lock();//<------------------------注意,我们从这里入手,线程B}//非公平锁static final class NonfairSync extends Sync {private static final long serialVersionUID = 7316153563782823691L;/*** Performs lock.  Try immediate barge, backing up to normal* acquire on failure.*/final void lock() {//<-------------------------线程B的lock.lock()调用该方法if (compareAndSetState(0, 1))//这是预定线程A还在工作,这里返回falsesetExclusiveOwnerThread(Thread.currentThread());//elseacquire(1);//线程B将会调用该方法,该方法在AbstractQueuedSynchronizer,//它会调用本类的tryAcquire()方法}//acquire()将会间接调用该方法protected final boolean tryAcquire(int acquires) {return nonfairTryAcquire(acquires);//调用父类Sync的nonfairTryAcquire()}}//非公平锁与公平锁的公共父类* Base of synchronization control for this lock. Subclassedabstract static class Sync extends AbstractQueuedSynchronizer {//acquire()将会间接调用该方法...final boolean nonfairTryAcquire(int acquires) {final Thread current = Thread.currentThread();//这里是线程Bint c = getState();//线程A还在工作,c=>1if (c == 0) {//falseif (compareAndSetState(0, acquires)) {setExclusiveOwnerThread(current);return true;}}else if (current == getExclusiveOwnerThread()) {//(线程B == 线程A) => falseint nextc = c + acquires;//+1if (nextc < 0) // overflowthrow new Error("Maximum lock count exceeded");setState(nextc);return true;}return false;//最终返回false} ...}...
}
public abstract class AbstractQueuedSynchronizerextends AbstractOwnableSynchronizerimplements java.io.Serializable {...* Acquires in exclusive mode, ignoring interrupts.  Implementedpublic final void acquire(int arg) {if (!tryAcquire(arg) &&//线程B调用非公平锁的tryAcquire(), 最终返回false,加上!,也就是true,也就是还要执行下面两行语句acquireQueued(addWaiter(Node.EXCLUSIVE), arg))//下一节论述selfInterrupt();}...
}
public abstract class AbstractQueuedSynchronizerextends AbstractOwnableSynchronizerimplements java.io.Serializable {...* Acquires in exclusive mode, ignoring interrupts.  Implementedpublic final void acquire(int arg) {if (!tryAcquire(arg) &&//线程B调用非公平锁的tryAcquire(), 最终返回false,加上!,也就是true,也就是还要执行下面两行语句acquireQueued(addWaiter(Node.EXCLUSIVE), arg))//线程B加入等待队列selfInterrupt();//下一节论述}private Node addWaiter(Node mode) {Node node = new Node(Thread.currentThread(), mode);// Try the fast path of enq; backup to full enq on failureNode pred = tail;if (pred != null) {//根据上面一句注释,本语句块的意义是将新节点快速添加至队尾node.prev = pred;if (compareAndSetTail(pred, node)) {pred.next = node;return node;}}enq(node);//快速添加至队尾失败,则用这方法调用(可能链表为空,才调用该方法)return node;}//Inserts node into queue, initializing if necessary.private Node enq(final Node node) {for (;;) {Node t = tail;if (t == null) { // Must initializeif (compareAndSetHead(new Node()))//插入一个哨兵节点(或称傀儡节点)tail = head;} else {node.prev = t;if (compareAndSetTail(t, node)) {//真正插入我们需要的节点,也就是包含线程B引用的节点t.next = node;return t;}}}}//CAS head field. Used only by enq.private final boolean compareAndSetHead(Node update) {return unsafe.compareAndSwapObject(this, headOffset, null, update);}//CAS tail field. Used only by enq.private final boolean compareAndSetTail(Node expect, Node update) {return unsafe.compareAndSwapObject(this, tailOffset, expect, update);}...
}
另外
假设线程B,C还没启动,正在工作线程A重新尝试获得锁,也就是调用lock.lock()多一次
//非公平锁与公平锁的公共父类fa* Base of synchronization control for this lock. Subclassedabstract static class Sync extends AbstractQueuedSynchronizer {...final boolean nonfairTryAcquire(int acquires) {final Thread current = Thread.currentThread();//这里是线程Aint c = getState();//线程A还在工作,c=>1;如果线程A恰好运行到在这工作完了,c=>0,这时它又要申请锁的话if (c == 0) {//线程A正在工作为false;如果线程A恰好工作完,c=>0,这时它又要申请锁的话,则为trueif (compareAndSetState(0, acquires)) {//线程A重新获得锁setExclusiveOwnerThread(current);//这里相当于NonfairSync.lock()另一重设置吧!return true;}}else if (current == getExclusiveOwnerThread()) {//(线程A == 线程A) => trueint nextc = c + acquires;//1+1=>nextc=2if (nextc < 0) // overflowthrow new Error("Maximum lock count exceeded");setState(nextc);//state=2,说明要unlock多两次吧(现在盲猜)return true;//返回true}return false;} ...}
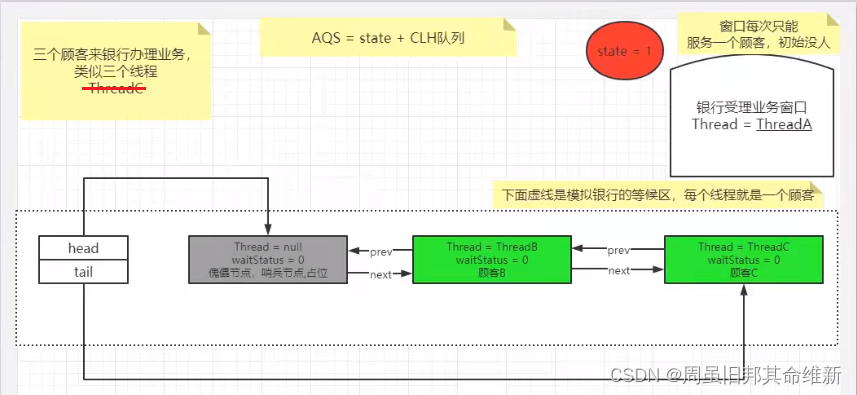
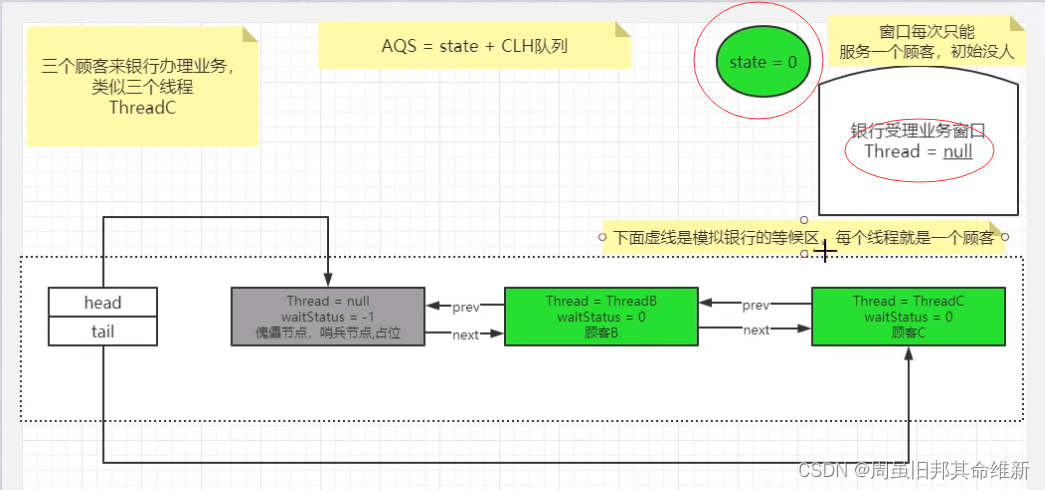
双向链表中,第一个节点为虚节点(也叫哨兵节点),其实并不存储任何信息,只是占位。真正的第一个有数据的节点,是从第二个节点开始的。
接下来讨论ReentrantLock.unLock()方法。假设线程A工作结束,调用unLock(),释放锁占用。
public class ReentrantLock implements Lock, java.io.Serializable {private final Sync sync;abstract static class Sync extends AbstractQueuedSynchronizer {...// unlock()间接调用本方法,releases传入1protected final boolean tryRelease(int releases) {int c = getState() - releases;//c为0if (Thread.currentThread() != getExclusiveOwnerThread())throw new IllegalMonitorStateException();boolean free = false;if (c == 0) {//c为0,条件为ture,执行if语句块free = true;// 设置当前占用锁线程为nullsetExclusiveOwnerThread(null);}setState(c);return free;//最后返回true}...}static final class NonfairSync extends Sync {...}public ReentrantLock() {sync = new NonfairSync();//我们使用的非公平锁}//注意!注意!注意!public void unlock() {//<----------从这开始,假设线程A工作结束,调用unLock(),释放锁占用sync.release(1);//在AbstractQueuedSynchronizer类定义}...}
public abstract class AbstractQueuedSynchronizerextends AbstractOwnableSynchronizerimplements java.io.Serializable {...//1.public final boolean release(int arg) {//2.if (tryRelease(arg)) {//该方法看子类NonfairSync实现,最后返回trueNode h = head;//返回傀儡节点if (h != null && h.waitStatus != 0)//傀儡节点非空,且状态为-1,条件为true,执行if语句//7.unparkSuccessor(h);return true;}return false;//返回true,false都无所谓了,unlock方法只是简单调用release方法,对返回结果没要求}/*** The synchronization state.*/private volatile int state;//3.protected final int getState() {return state;}//6.protected final void setState(int newState) {state = newState;}//7. Wakes up node's successor, if one exists.//传入傀儡节点private void unparkSuccessor(Node node) {/** If status is negative (i.e., possibly needing signal) try* to clear in anticipation of signalling. It is OK if this* fails or if status is changed by waiting thread.*/int ws = node.waitStatus;//傀儡节点waitStatus为-1if (ws < 0)//ws为-1,条件成立,执行if语块compareAndSetWaitStatus(node, ws, 0);//8.将傀儡节点waitStatus由-1变为0/** Thread to unpark is held in successor, which is normally* just the next node. But if cancelled or apparently null,* traverse backwards from tail to find the actual* non-cancelled successor.*/Node s = node.next;//傀儡节点的下一节点,也就是带有线程B的节点if (s == null || s.waitStatus > 0) {//s非空,s.waitStatus非0,条件为false,不执行if语块s = null;for (Node t = tail; t != null && t != node; t = t.prev)if (t.waitStatus <= 0)s = t;}if (s != null)//s非空,条件为true,不执行if语块LockSupport.unpark(s.thread);//唤醒线程B。运行到这里,线程A的工作基本告一段落了。}//8.private static final boolean compareAndSetWaitStatus(Node node,int expect,int update) {return unsafe.compareAndSwapInt(node, waitStatusOffset,expect, update);}}
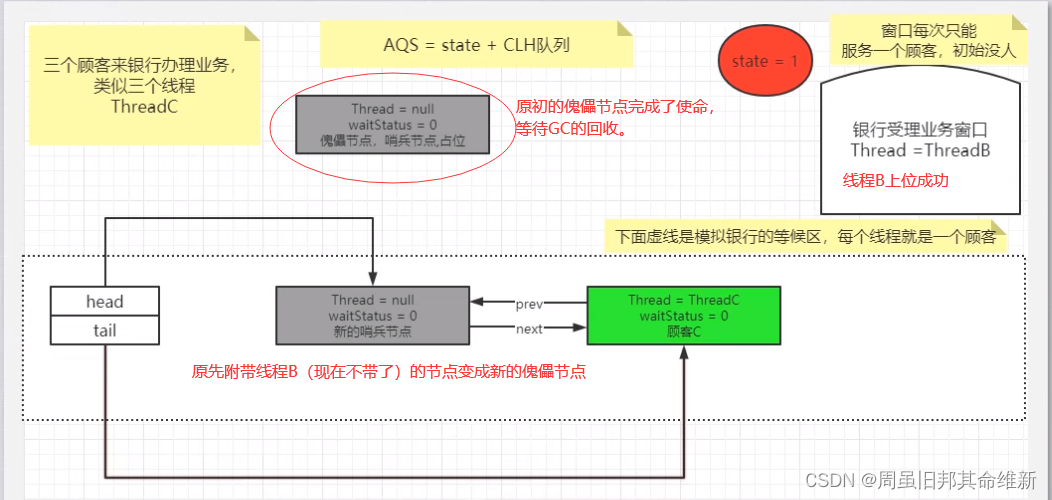
线程A结束工作,调用unlock()的tryRelease()后的状态,state由1变为0,exclusiveOwnerThread由线程A变为null。
线程B被唤醒,即从原先park()的方法继续运行
public abstract class AbstractQueuedSynchronizerextends AbstractOwnableSynchronizerimplements java.io.Serializable {private final boolean parkAndCheckInterrupt() {LockSupport.park(this);//线程B从阻塞到非阻塞,继续执行return Thread.interrupted();//线程B没有被中断,返回false}...//Acquires in exclusive uninterruptible mode for thread already inqueue. //Used by condition wait methods as well as acquire.////return true if interrupted while waitingfinal boolean acquireQueued(final Node node, int arg) {boolean failed = true;try {boolean interrupted = false;for (;;) {final Node p = node.predecessor();//线程B所在的节点的前一节点是傀儡节点//傀儡节点是头节点,tryAcquire()的说明请移步至#21_AQS源码深度解读03//tryAcquire()返回true,线程B成功上位if (p == head && tryAcquire(arg)) {setHead(node);//1.将附带线程B的节点的变成新的傀儡节点p.next = null; // help GC//置空原傀儡指针与新的傀儡节点之间的前后驱指针,方便GC回收failed = false;return interrupted;//返回false,跳到2.acquire()}if (shouldParkAfterFailedAcquire(p, node) && //唤醒线程B继续工作,parkAndCheckInterrupt()返回false//if语块不执行,跳到下一循环parkAndCheckInterrupt())//<---------------------------------唤醒线程在这里继续运行interrupted = true;}} finally {if (failed)cancelAcquire(node);}}//1. private void setHead(Node node) {head = node;node.thread = null;node.prev = null;}//2.* Acquires in exclusive mode, ignoring interrupts. Implementedpublic final void acquire(int arg) {if (!tryAcquire(arg) &&//acquireQueued()返回fasle,条件为false,if语块不执行,acquire()返回//也就是说,线程B成功获得锁,可以展开线程B自己的工作了。acquireQueued(addWaiter(Node.EXCLUSIVE), arg))selfInterrupt();//}}
最后,线程B上位成功。
3、spring AOP
springboot1和springboot分别使用了spring4、spring5,对比不同版本aop执行的顺序
3.1、spring4下的aop测试案例
pom文件
<?xml version="1.0" encoding="UTF-8"?>
<project xmlns="http://maven.apache.org/POM/4.0.0" xmlns:xsi="http://www.w3.org/2001/XMLSchema-instance"xsi:schemaLocation="http://maven.apache.org/POM/4.0.0 https://maven.apache.org/xsd/maven-4.0.0.xsd"><modelVersion>4.0.0</modelVersion><parent><groupId>org.springframework.boot</groupId><artifactId>spring-boot-starter-parent</artifactId><version>1.5.9.RELEASE</version><relativePath/> <!-- lookup parent from repository --></parent><groupId>com.example</groupId><artifactId>aoptest</artifactId><version>0.0.1-SNAPSHOT</version><name>aoptest</name><description>Demo project for Spring Boot</description><properties><java.version>8</java.version></properties><dependencies><dependency><groupId>org.springframework.boot</groupId><artifactId>spring-boot-starter</artifactId></dependency><dependency><groupId>org.springframework.boot</groupId><artifactId>spring-boot-starter-test</artifactId><scope>test</scope></dependency><dependency><groupId>org.aspectj</groupId><artifactId>aspectjrt</artifactId></dependency><dependency><groupId>org.aspectj</groupId><artifactId>aspectjweaver</artifactId></dependency></dependencies><build><plugins><plugin><groupId>org.springframework.boot</groupId><artifactId>spring-boot-maven-plugin</artifactId></plugin></plugins></build></project>
切面类
package com.example.aoptest.aspect;import org.aspectj.lang.ProceedingJoinPoint;
import org.aspectj.lang.annotation.*;
import org.springframework.stereotype.Component;@Aspect
@Component
public class MyAspect {@Before("execution(* com.example.aoptest..*ServiceImpl.*(..))")public void beforeNotify() {System.out.println("********@Before我是前置通知");}@After("execution(* com.example.aoptest..*ServiceImpl.*(..))")public void afterNotify() {System.out.println("********@After我是后置通知");}@AfterReturning("execution(* com.example.aoptest..*ServiceImpl.*(..))")public void afterReturningNotify() {System.out.println("********@AfterReturning我是返回后通知");}@AfterThrowing(" execution(* com.example.aoptest..*ServiceImpl.*(..))")public void afterThrowingNotify() {System.out.println("********@AfterThrowing我是异常通知");}@Around(" execution(* com.example.aoptest..*ServiceImpl.*(..))")public Object around(ProceedingJoinPoint proceedingJoinPoint) throws Throwable {Object retvalue = null;System.out.println("我是环绕通知之前AAA");retvalue = proceedingJoinPoint.proceed();System.out.println("我是环绕通知之后BBB");return retvalue ;}
}
业务service
package com.example.aoptest.service.impl;import com.example.aoptest.service.HelloService;
import org.springframework.stereotype.Component;@Component
public class HelloServiceImpl implements HelloService {@Overridepublic void helloWorld() {System.out.println("=========hello world");}
}
测试类
package com.example.aoptest;import com.example.aoptest.service.HelloService;
import org.junit.Test;
import org.junit.runner.RunWith;
import org.springframework.boot.test.context.SpringBootTest;
import org.springframework.test.context.junit4.SpringRunner;import javax.annotation.Resource;@SpringBootTest
@RunWith(SpringRunner.class)
public class AopTest {@Resourceprivate HelloService helloService;@Testpublic void testAop4() {helloService.helloWorld();}
}
aop执行顺序
我是环绕通知之前AAA
********@Before我是前置通知
=========hello world
我是环绕通知之后BBB
********@After我是后置通知
********@AfterReturning我是返回后通知
业务service发生异常的情况下aop执行顺序
我是环绕通知之前AAA
********@Before我是前置通知
********@After我是后置通知
********@AfterThrowing我是异常通知java.lang.ArithmeticException: / by zero
3.2、spring5下的aop测试案例
修改pom文件中springboot版本为2.4.4
修改单元测试类
package com.example.aoptest;import com.example.aoptest.service.HelloService;
import org.junit.jupiter.api.Test;
import org.springframework.boot.test.context.SpringBootTest;import javax.annotation.Resource;@SpringBootTest
public class AopTest {@Resourceprivate HelloService helloService;@Testpublic void testAop4() {helloService.helloWorld();}
}
aop执行顺序
我是环绕通知之前AAA
********@Before我是前置通知
=========hello world
********@AfterReturning我是返回后通知
********@After我是后置通知
我是环绕通知之后BBB
业务service发生异常的情况下aop执行顺序
我是环绕通知之前AAA
********@Before我是前置通知
********@AfterThrowing我是异常通知
********@After我是后置通知java.lang.ArithmeticException: / by zero
4、spring循环依赖
spring默认的单例(Singleton)的场景是支持循环依赖
spring内部通过3级缓存来解决循环依赖 - DefaultSingletonBeanRegistry
只有单例的bean会通过三级缓存提前暴露来解决循环依赖的问题,而非单例的bean,每次从容器中获取都是一个新的对象,都会重新创建,所以非单例的bean是没有缓存的,不会将其放到三级缓存中。
第一级缓存(也叫单例池)singletonObjects:存放已经经历了完整生命周期的Bean对象。
第二级缓存:earlySingletonObjects,存放早期暴露出来的Bean对象,Bean的生命周期未结束(属性还未填充完。
第三级缓存:Map<String, ObjectFactory<?>> singletonFactories,存放可以生成Bean的工厂。
4.1、哪些循环依赖Spring无法解决
- prototype 类型的循环依赖
- constructor 注入的循环依赖
- @Async 标记的类产生的代理 bean 发生循环依赖(@Async 标记产生的循环依赖本地可能正常,打包启动报错)
4.2、spring循环依赖debug前置知识
实例化 - 内存中申请一块内存空间,如同租赁好房子,自己的家当还未搬来。
初始化属性填充 - 完成属性的各种赋值,如同装修,家具,家电进场。
3个Map和四大方法,总体相关对象
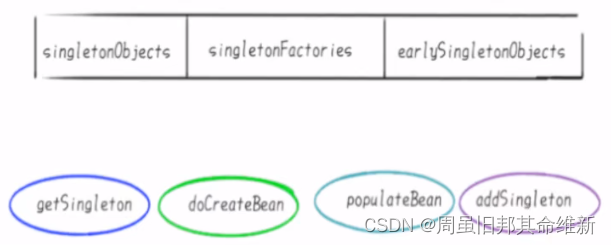
package org.springframework.beans.factory.support;...public class DefaultSingletonBeanRegistry extends SimpleAliasRegistry implements SingletonBeanRegistry {.../** 单例对象的缓存:bean名称—bean实例,即:所谓的单例池。表示已经经历了完整生命周期的Bean对象第一级缓存*/private final Map<String, Object> singletonObjects = new ConcurrentHashMap<>(256);/**早期的单例对象的高速缓存: bean名称—bean实例。表示 Bean的生命周期还没走完(Bean的属性还未填充)就把这个 Bean存入该缓存中也就是实例化但未初始化的 bean放入该缓存里第二级缓存*/private final Map<String, Object> earlySingletonObjects = new HashMap<>(16);/**单例工厂的高速缓存:bean名称—ObjectFactory表示存放生成 bean的工厂第三级缓存*/private final Map<String, ObjectFactory<?>> singletonFactories = new HashMap<>(16);...}
A / B两对象在三级缓存中的迁移说明
- A创建过程中需要B,于是A将自己放到三级缓里面,去实例化B。
- B实例化的时候发现需要A,于是B先查一级缓存,没有,再查二级缓存,还是没有,再查三级缓存,找到了A然后把三级缓存里面的这个A放到二级缓存里面,并删除三级缓存里面的A。
- B顺利初始化完毕,将自己放到一级缓存里面(此时B里面的A依然是创建中状态),然后回来接着创建A,此时B已经创建结束,直接从一级缓存里面拿到B,然后完成创建,并将A自己放到一级缓存里面。
Spring为了解决单例的循坏依赖问题,使用了三级缓存:
其中一级缓存为单例池(singletonObjects)。
二级缓存为提前曝光对象(earlySingletonObjects)。
三级级存为提前曝光对象工厂(singletonFactories) 。
假设A、B循环引用,实例化A的时候就将其放入三级缓存中,接着填充属性的时候,发现依赖了B,同样的流程也是实例化后放入三级缓存,接着去填充属性时又发现自己依赖A,这时候从缓存中查找到早期暴露的A,没有AOP代理的话,直接将A的原始对象注入B,完成B的初始化后,进行属性填充和初始化,这时候B完成后,就去完成剩下的A的步骤,如果有AOP代理,就进行AOP处理获取代理后的对象A,注入B,走剩下的流程。

4.3 debug循环依赖源码(注解)
4.3.1 源码跟踪
进入SpringApplication.run,源码一
/*** Run the Spring application, creating and refreshing a new* {@link ApplicationContext}.* @param args the application arguments (usually passed from a Java main method)* @return a running {@link ApplicationContext}*/public ConfigurableApplicationContext run(String... args) {StopWatch stopWatch = new StopWatch();stopWatch.start();DefaultBootstrapContext bootstrapContext = createBootstrapContext();ConfigurableApplicationContext context = null;configureHeadlessProperty();SpringApplicationRunListeners listeners = getRunListeners(args);listeners.starting(bootstrapContext, this.mainApplicationClass);try {ApplicationArguments applicationArguments = new DefaultApplicationArguments(args);ConfigurableEnvironment environment = prepareEnvironment(listeners, bootstrapContext, applicationArguments);configureIgnoreBeanInfo(environment);Banner printedBanner = printBanner(environment);context = createApplicationContext();context.setApplicationStartup(this.applicationStartup);prepareContext(bootstrapContext, context, environment, listeners, applicationArguments, printedBanner);refreshContext(context); // 这一步创建了循环依赖对象afterRefresh(context, applicationArguments);stopWatch.stop();if (this.logStartupInfo) {new StartupInfoLogger(this.mainApplicationClass).logStarted(getApplicationLog(), stopWatch);}listeners.started(context);callRunners(context, applicationArguments);}catch (Throwable ex) {handleRunFailure(context, ex, listeners);throw new IllegalStateException(ex);}try {listeners.running(context);}catch (Throwable ex) {handleRunFailure(context, ex, null);throw new IllegalStateException(ex);}return context;}
进入refreshContext(context),经过几次断点,最终进入refresh()方法,源码二
@Overridepublic void refresh() throws BeansException, IllegalStateException {synchronized (this.startupShutdownMonitor) {StartupStep contextRefresh = this.applicationStartup.start("spring.context.refresh");// Prepare this context for refreshing.prepareRefresh();// Tell the subclass to refresh the internal bean factory.ConfigurableListableBeanFactory beanFactory = obtainFreshBeanFactory();// Prepare the bean factory for use in this context.prepareBeanFactory(beanFactory);try {// Allows post-processing of the bean factory in context subclasses.postProcessBeanFactory(beanFactory);StartupStep beanPostProcess = this.applicationStartup.start("spring.context.beans.post-process");// Invoke factory processors registered as beans in the context.invokeBeanFactoryPostProcessors(beanFactory);// Register bean processors that intercept bean creation.registerBeanPostProcessors(beanFactory);beanPostProcess.end();// Initialize message source for this context.initMessageSource();// Initialize event multicaster for this context.initApplicationEventMulticaster();// Initialize other special beans in specific context subclasses.onRefresh();// Check for listener beans and register them.registerListeners();// 重点关注点是这里// Instantiate all remaining (non-lazy-init) singletons.finishBeanFactoryInitialization(beanFactory); // 这一步创建了循环依赖对象// Last step: publish corresponding event.finishRefresh();}catch (BeansException ex) {if (logger.isWarnEnabled()) {logger.warn("Exception encountered during context initialization - " +"cancelling refresh attempt: " + ex);}// Destroy already created singletons to avoid dangling resources.destroyBeans();// Reset 'active' flag.cancelRefresh(ex);// Propagate exception to caller.throw ex;}finally {// Reset common introspection caches in Spring's core, since we// might not ever need metadata for singleton beans anymore...resetCommonCaches();contextRefresh.end();}}}
finishBeanFactoryInitialization(beanFactory),源码三
/*** Finish the initialization of this context's bean factory,* initializing all remaining singleton beans.*/protected void finishBeanFactoryInitialization(ConfigurableListableBeanFactory beanFactory) {// Initialize conversion service for this context.if (beanFactory.containsBean(CONVERSION_SERVICE_BEAN_NAME) &&beanFactory.isTypeMatch(CONVERSION_SERVICE_BEAN_NAME, ConversionService.class)) {beanFactory.setConversionService(beanFactory.getBean(CONVERSION_SERVICE_BEAN_NAME, ConversionService.class));}// Register a default embedded value resolver if no BeanFactoryPostProcessor// (such as a PropertySourcesPlaceholderConfigurer bean) registered any before:// at this point, primarily for resolution in annotation attribute values.if (!beanFactory.hasEmbeddedValueResolver()) {beanFactory.addEmbeddedValueResolver(strVal -> getEnvironment().resolvePlaceholders(strVal));}// Initialize LoadTimeWeaverAware beans early to allow for registering their transformers early.String[] weaverAwareNames = beanFactory.getBeanNamesForType(LoadTimeWeaverAware.class, false, false);for (String weaverAwareName : weaverAwareNames) {getBean(weaverAwareName);}// Stop using the temporary ClassLoader for type matching.beanFactory.setTempClassLoader(null);// Allow for caching all bean definition metadata, not expecting further changes.beanFactory.freezeConfiguration();// Instantiate all remaining (non-lazy-init) singletons.beanFactory.preInstantiateSingletons(); // 这一步创建了循环依赖对象}
进入beanFactory.preInstantiateSingletons(),源码四
@Overridepublic void preInstantiateSingletons() throws BeansException {if (logger.isTraceEnabled()) {logger.trace("Pre-instantiating singletons in " + this);}// Iterate over a copy to allow for init methods which in turn register new bean definitions.// While this may not be part of the regular factory bootstrap, it does otherwise work fine.List<String> beanNames = new ArrayList<>(this.beanDefinitionNames);// 这里要注意beanNames有很多,找到创建a、b实例的循环,再继续向下debug// Trigger initialization of all non-lazy singleton beans...for (String beanName : beanNames) {RootBeanDefinition bd = getMergedLocalBeanDefinition(beanName);if (!bd.isAbstract() && bd.isSingleton() && !bd.isLazyInit()) {// 对象类型是不是FactoryBeanif (isFactoryBean(beanName)) {Object bean = getBean(FACTORY_BEAN_PREFIX + beanName);if (bean instanceof FactoryBean) {FactoryBean<?> factory = (FactoryBean<?>) bean;boolean isEagerInit;if (System.getSecurityManager() != null && factory instanceof SmartFactoryBean) {isEagerInit = AccessController.doPrivileged((PrivilegedAction<Boolean>) ((SmartFactoryBean<?>) factory)::isEagerInit,getAccessControlContext());}else {isEagerInit = (factory instanceof SmartFactoryBean &&((SmartFactoryBean<?>) factory).isEagerInit());}if (isEagerInit) {getBean(beanName);}}}else {getBean(beanName);}}}// Trigger post-initialization callback for all applicable beans...for (String beanName : beanNames) {Object singletonInstance = getSingleton(beanName);if (singletonInstance instanceof SmartInitializingSingleton) {StartupStep smartInitialize = this.getApplicationStartup().start("spring.beans.smart-initialize").tag("beanName", beanName);SmartInitializingSingleton smartSingleton = (SmartInitializingSingleton) singletonInstance;if (System.getSecurityManager() != null) {AccessController.doPrivileged((PrivilegedAction<Object>) () -> {smartSingleton.afterSingletonsInstantiated();return null;}, getAccessControlContext());}else {smartSingleton.afterSingletonsInstantiated();}smartInitialize.end();}}}
a的类型不是FactoryBean,走else进入getBean(beanName),源码五
protected <T> T doGetBean(String name, @Nullable Class<T> requiredType, @Nullable Object[] args, boolean typeCheckOnly)throws BeansException {String beanName = transformedBeanName(name);Object beanInstance;// Eagerly check singleton cache for manually registered singletons.Object sharedInstance = getSingleton(beanName); // 第一个getSingletonif (sharedInstance != null && args == null) {beanInstance = getObjectForBeanInstance(sharedInstance, name, beanName, null);}else {......if (!typeCheckOnly) {markBeanAsCreated(beanName);}StartupStep beanCreation = this.applicationStartup.start("spring.beans.instantiate").tag("beanName", name);try {if (requiredType != null) {beanCreation.tag("beanType", requiredType::toString);}RootBeanDefinition mbd = getMergedLocalBeanDefinition(beanName);checkMergedBeanDefinition(mbd, beanName, args);// Guarantee initialization of beans that the current bean depends on.String[] dependsOn = mbd.getDependsOn();if (dependsOn != null) {for (String dep : dependsOn) {if (isDependent(beanName, dep)) {throw new BeanCreationException(mbd.getResourceDescription(), beanName,"Circular depends-on relationship between '" + beanName + "' and '" + dep + "'");}registerDependentBean(dep, beanName);try {getBean(dep);}catch (NoSuchBeanDefinitionException ex) {throw new BeanCreationException(mbd.getResourceDescription(), beanName,"'" + beanName + "' depends on missing bean '" + dep + "'", ex);}}}// Create bean instance.if (mbd.isSingleton()) {// 第二个getSingleton,注意和第一个getSingleton不相同,是重载方法sharedInstance = getSingleton(beanName, () -> {try {return createBean(beanName, mbd, args); }catch (BeansException ex) {// Explicitly remove instance from singleton cache: It might have been put there// eagerly by the creation process, to allow for circular reference resolution.// Also remove any beans that received a temporary reference to the bean.destroySingleton(beanName);throw ex;}});beanInstance = getObjectForBeanInstance(sharedInstance, name, beanName, mbd);}.......}catch (BeansException ex) {......}finally {beanCreation.end();}}return adaptBeanInstance(name, beanInstance, requiredType);}
第一个getSingleton,源码六
@Override@Nullablepublic Object getSingleton(String beanName) {return getSingleton(beanName, true);}
继续进入getSingleton,源码七
/*** Return the (raw) singleton object registered under the given name.* <p>Checks already instantiated singletons and also allows for an early* reference to a currently created singleton (resolving a circular reference).* @param beanName the name of the bean to look for* @param allowEarlyReference whether early references should be created or not* @return the registered singleton object, or {@code null} if none found*/@Nullableprotected Object getSingleton(String beanName, boolean allowEarlyReference) {// 1级缓存// Quick check for existing instance without full singleton lockObject singletonObject = this.singletonObjects.get(beanName);// 1级缓存拿不到,则去2级缓存拿// 不要忽略isSingletonCurrentlyInCreation这个方法,得益于这个方法,我们才能终止循环,下文会详解if (singletonObject == null && isSingletonCurrentlyInCreation(beanName)) {// 2级缓存singletonObject = this.earlySingletonObjects.get(beanName);// 注意,如果allowEarlyReference是false,则不会进入if (singletonObject == null && allowEarlyReference) {synchronized (this.singletonObjects) {// Consistent creation of early reference within full singleton locksingletonObject = this.singletonObjects.get(beanName);if (singletonObject == null) {singletonObject = this.earlySingletonObjects.get(beanName);if (singletonObject == null) {// 则从3级缓存加载,最后移动到2级缓存ObjectFactory<?> singletonFactory = this.singletonFactories.get(beanName);if (singletonFactory != null) {// 调用3级缓存,getEarlyBeanReference(beanName, mbd, bean)singletonObject = singletonFactory.getObject();// 放入2级缓存this.earlySingletonObjects.put(beanName, singletonObject);// 从3级缓存移除this.singletonFactories.remove(beanName);}}}}}}return singletonObject;}
第二个getSingleton,源码八
/*** Return the (raw) singleton object registered under the given name,* creating and registering a new one if none registered yet.* @param beanName the name of the bean* @param singletonFactory the ObjectFactory to lazily create the singleton* with, if necessary* @return the registered singleton object*/public Object getSingleton(String beanName, ObjectFactory<?> singletonFactory) {Assert.notNull(beanName, "Bean name must not be null");synchronized (this.singletonObjects) {Object singletonObject = this.singletonObjects.get(beanName);if (singletonObject == null) {if (this.singletonsCurrentlyInDestruction) {throw new BeanCreationNotAllowedException(beanName,"Singleton bean creation not allowed while singletons of this factory are in destruction " +"(Do not request a bean from a BeanFactory in a destroy method implementation!)");}if (logger.isDebugEnabled()) {logger.debug("Creating shared instance of singleton bean '" + beanName + "'");}// beforeSingletonCreation设置第一个getSingleton方法中的isSingletonCurrentlyInCreation数据(4.3.2)beforeSingletonCreation(beanName);boolean newSingleton = false;boolean recordSuppressedExceptions = (this.suppressedExceptions == null);if (recordSuppressedExceptions) {this.suppressedExceptions = new LinkedHashSet<>();}try {singletonObject = singletonFactory.getObject();newSingleton = true;}catch (IllegalStateException ex) {// Has the singleton object implicitly appeared in the meantime ->// if yes, proceed with it since the exception indicates that state.singletonObject = this.singletonObjects.get(beanName);if (singletonObject == null) {throw ex;}}catch (BeanCreationException ex) {if (recordSuppressedExceptions) {for (Exception suppressedException : this.suppressedExceptions) {ex.addRelatedCause(suppressedException);}}throw ex;}finally {if (recordSuppressedExceptions) {this.suppressedExceptions = null;}// 没看懂这一步作用是什么afterSingletonCreation(beanName);}if (newSingleton) {addSingleton(beanName, singletonObject);}}return singletonObject;}}
第二个getSingleton调用createBean,在createBean中调用doCreateBean,实际创建bean,源码九
/*** Actually create the specified bean. Pre-creation processing has already happened* at this point, e.g. checking {@code postProcessBeforeInstantiation} callbacks.* <p>Differentiates between default bean instantiation, use of a* factory method, and autowiring a constructor.* @param beanName the name of the bean* @param mbd the merged bean definition for the bean* @param args explicit arguments to use for constructor or factory method invocation* @return a new instance of the bean* @throws BeanCreationException if the bean could not be created* @see #instantiateBean* @see #instantiateUsingFactoryMethod* @see #autowireConstructor*/protected Object doCreateBean(String beanName, RootBeanDefinition mbd, @Nullable Object[] args)throws BeanCreationException {......// 如果是循环引用,在为bean填充属性前,先走addSingletonFactory放入三级缓存// Eagerly cache singletons to be able to resolve circular references// even when triggered by lifecycle interfaces like BeanFactoryAware.boolean earlySingletonExposure = (mbd.isSingleton() && this.allowCircularReferences &&isSingletonCurrentlyInCreation(beanName));if (earlySingletonExposure) {if (logger.isTraceEnabled()) {logger.trace("Eagerly caching bean '" + beanName +"' to allow for resolving potential circular references");}// 放入三级缓存addSingletonFactory(beanName, () -> getEarlyBeanReference(beanName, mbd, bean));}// Initialize the bean instance.Object exposedObject = bean;try {// 填充bean的属性populateBean(beanName, mbd, instanceWrapper);exposedObject = initializeBean(beanName, exposedObject, mbd);}catch (Throwable ex) {......}if (earlySingletonExposure) {Object earlySingletonReference = getSingleton(beanName, false);if (earlySingletonReference != null) {if (exposedObject == bean) {exposedObject = earlySingletonReference;}else if (!this.allowRawInjectionDespiteWrapping && hasDependentBean(beanName)) {String[] dependentBeans = getDependentBeans(beanName);Set<String> actualDependentBeans = new LinkedHashSet<>(dependentBeans.length);for (String dependentBean : dependentBeans) {if (!removeSingletonIfCreatedForTypeCheckOnly(dependentBean)) {actualDependentBeans.add(dependentBean);}}if (!actualDependentBeans.isEmpty()) {throw new BeanCurrentlyInCreationException(beanName,"Bean with name '" + beanName + "' has been injected into other beans [" +StringUtils.collectionToCommaDelimitedString(actualDependentBeans) +"] in its raw version as part of a circular reference, but has eventually been " +"wrapped. This means that said other beans do not use the final version of the " +"bean. This is often the result of over-eager type matching - consider using " +"'getBeanNamesForType' with the 'allowEagerInit' flag turned off, for example.");}}}}// Register bean as disposable.try {registerDisposableBeanIfNecessary(beanName, bean, mbd);}catch (BeanDefinitionValidationException ex) {throw new BeanCreationException(mbd.getResourceDescription(), beanName, "Invalid destruction signature", ex);}return exposedObject;}
创建bean的时候先放入三级缓存addSingletonFactory,源码十
/*** Add the given singleton factory for building the specified singleton* if necessary.* <p>To be called for eager registration of singletons, e.g. to be able to* resolve circular references.* @param beanName the name of the bean* @param singletonFactory the factory for the singleton object*/protected void addSingletonFactory(String beanName, ObjectFactory<?> singletonFactory) {Assert.notNull(singletonFactory, "Singleton factory must not be null");synchronized (this.singletonObjects) {if (!this.singletonObjects.containsKey(beanName)) {// 放入三级缓存this.singletonFactories.put(beanName, singletonFactory);// 从二级缓存移除this.earlySingletonObjects.remove(beanName);// 放入registeredSingletons中this.registeredSingletons.add(beanName);}}}
然后填充bean的属性populateBean,源码十一
/*** Populate the bean instance in the given BeanWrapper with the property values* from the bean definition.* @param beanName the name of the bean* @param mbd the bean definition for the bean* @param bw the BeanWrapper with bean instance*/@SuppressWarnings("deprecation") // for postProcessPropertyValuesprotected void populateBean(String beanName, RootBeanDefinition mbd, @Nullable BeanWrapper bw) {......PropertyDescriptor[] filteredPds = null;if (hasInstAwareBpps) {if (pvs == null) {pvs = mbd.getPropertyValues();}for (InstantiationAwareBeanPostProcessor bp : getBeanPostProcessorCache().instantiationAware) {// 在这里会对@Autowire标记的属性进行依赖注入PropertyValues pvsToUse = bp.postProcessProperties(pvs, bw.getWrappedInstance(), beanName);if (pvsToUse == null) {if (filteredPds == null) {filteredPds = filterPropertyDescriptorsForDependencyCheck(bw, mbd.allowCaching);}// 对解析完但未设置的属性再进行处理pvsToUse = bp.postProcessPropertyValues(pvs, filteredPds, bw.getWrappedInstance(), beanName);if (pvsToUse == null) {return;}}pvs = pvsToUse;}}if (needsDepCheck) {if (filteredPds == null) {filteredPds = filterPropertyDescriptorsForDependencyCheck(bw, mbd.allowCaching);}checkDependencies(beanName, mbd, filteredPds, pvs);}if (pvs != null) {applyPropertyValues(beanName, mbd, bw, pvs);}}
postProcessPropertyValues这个方法为一个默认的钩子方法,有默认的实现。直接返回null,源码十二
@Nullabledefault PropertyValues postProcessProperties(PropertyValues pvs, Object bean, String beanName)throws BeansException {return null;}
调用AutowiredAnnotationBeanPostProcessor的postProcessProperties()方法,在方法中,首先获取类中@Autowired注解的元信息,再通过inject()方法从容器中获取对象利用反射进行注入,如果容器中不包含该Bean,则同样使用getBean()方法进行获取,源码十三
@Overridepublic PropertyValues postProcessProperties(PropertyValues pvs, Object bean, String beanName) {// 获取指定类中@Autowire相关注解的元信息InjectionMetadata metadata = findAutowiringMetadata(beanName, bean.getClass(), pvs);try {// 对bean的属性进行自动注入metadata.inject(bean, beanName, pvs);}catch (BeanCreationException ex) {throw ex;}catch (Throwable ex) {throw new BeanCreationException(beanName, "Injection of autowired dependencies failed", ex);}return pvs;}
源码八中的addSingleton也就是4.2中的图例的最后一步addSingleton,从二、三级缓存移动到一级缓存,源码十四
/*** Add the given singleton object to the singleton cache of this factory.* <p>To be called for eager registration of singletons.* @param beanName the name of the bean* @param singletonObject the singleton object*/protected void addSingleton(String beanName, Object singletonObject) {synchronized (this.singletonObjects) {// 放入一级缓存this.singletonObjects.put(beanName, singletonObject);// 从三级缓存移除this.singletonFactories.remove(beanName);// 从二级缓存移除this.earlySingletonObjects.remove(beanName);// 放入registeredSingletons中this.registeredSingletons.add(beanName);}}
4.3.2两个需要注意的点
isSingletonCurrentlyInCreation循环终止条件判断
singletonsCurrentlyInCreation是一个Set集合,存放正在创建的bean,在Bean开始创建时放入
4.3.1第一个getSingleton中的singletonsCurrentlyInCreation源码如下,如果一个bean存在于该set中,则开始调用第3级缓存中的方法,产生bean。
/*** Return whether the specified singleton bean is currently in creation* (within the entire factory).* @param beanName the name of the bean*/public boolean isSingletonCurrentlyInCreation(String beanName) {return this.singletonsCurrentlyInCreation.contains(beanName);}
singletonsCurrentlyInCreation中的数据来自于第二个getSingleton中调用的beforeSingletonCreation
/*** Callback before singleton creation.* <p>The default implementation register the singleton as currently in creation.* @param beanName the name of the singleton about to be created* @see #isSingletonCurrentlyInCreation*/protected void beforeSingletonCreation(String beanName) {// 如果inCreationCheckExclusions中不包含就添加if (!this.inCreationCheckExclusions.contains(beanName) && !this.singletonsCurrentlyInCreation.add(beanName)) {throw new BeanCurrentlyInCreationException(beanName);}}
第二个getSingleton中调用的afterSingletonCreation(beanName),如果不包含没必要remove,如果包含beanName,取反为false,后面的移除也不会走,没看懂作用是什么
/*** Callback after singleton creation.* <p>The default implementation marks the singleton as not in creation anymore.* @param beanName the name of the singleton that has been created* @see #isSingletonCurrentlyInCreation*/protected void afterSingletonCreation(String beanName) {if (!this.inCreationCheckExclusions.contains(beanName) && !this.singletonsCurrentlyInCreation.remove(beanName)) {throw new IllegalStateException("Singleton '" + beanName + "' isn't currently in creation");}}
allowEarlyReference
boolean类型的变量,
注意,根据上面的代码,只有allowEarlyReference为true,才能调用第3级缓存!
而调用完第3级缓存,马上会移动到第2级缓存!
而只有一个地方该参数是true:

而这唯一传参true的地方就在4.3.1源码六。
所以这就说明了,当递归创建bean的时候,如果发现成环了,那么就开始调用第三级缓存。
所以并不是所有的bean都会用到第3级缓存,甚至只是少数bean才会用到。
5、redis分布式锁
5.1 第一版
Redis具有极高的性能,且其命令对分布式锁支持友好,借助SET命令即可实现加锁处理。
EX seconds – Set the specified expire time, in seconds.
PX milliseconds – Set the specified expire time, in milliseconds.
NX – Only set the key if it does not already exist.
XX – Only set the key if it already exist.
在Java层面
public static final String REDIS_LOCK = "redis_lock";@Autowired
private StringRedisTemplate stringRedisTemplate;public void m(){String value = UUID.randomUUID().toString() + Thread.currentThread().getName();Boolean flag = stringRedisTemplate.opsForValue().setIfAbsent(REDIS_LOCK, value);if(!flag) {return "抢锁失败";}...//业务逻辑stringRedisTemplate.delete(REDIS_LOCK);
}
5.2 第二版
上面Java源码分布式锁问题:出现异常的话,可能无法释放锁,必须要在代码层面finally释放锁。
解决方法:try…finally…
public static final String REDIS_LOCK = "redis_lock";@Autowired
private StringRedisTemplate stringRedisTemplate;public void m(){String value = UUID.randomUUID().toString() + Thread.currentThread().getName();try{Boolean flag = stringRedisTemplate.opsForValue().setIfAbsent(REDIS_LOCK, value);if(!flag) {return "抢锁失败";}...//业务逻辑}finally{stringRedisTemplate.delete(REDIS_LOCK);   }
}
5.3 第三版
另一个问题:部署了微服务jar包的机器挂了,代码层面根本没有走到finally这块,没办法保证解锁,这个key没有被删除,需要加入一个过期时间限定key。
public static final String REDIS_LOCK = "redis_lock";@Autowired
private StringRedisTemplate stringRedisTemplate;public void m(){String value = UUID.randomUUID().toString() + Thread.currentThread().getName();try{Boolean flag = stringRedisTemplate.opsForValue()//使用另一个带有设置超时操作的方法.setIfAbsent(REDIS_LOCK, value, 10L, TimeUnit.SECONDS);//设定时间//stringRedisTemplate.expire(REDIS_LOCK, 10L, TimeUnit.SECONDS);if(!flag) {return "抢锁失败";}...//业务逻辑}finally{stringRedisTemplate.delete(REDIS_LOCK);   }
}
5.4 第四版
另一个新问题:张冠李戴,删除了别人的锁
解决方法:只能自己删除自己的,不许动别人的。
public static final String REDIS_LOCK = "redis_lock";@Autowired
private StringRedisTemplate stringRedisTemplate;public void m(){String value = UUID.randomUUID().toString() + Thread.currentThread().getName();try{Boolean flag = stringRedisTemplate.opsForValue()//使用另一个带有设置超时操作的方法.setIfAbsent(REDIS_LOCK, value, 10L, TimeUnit.SECONDS);//设定时间//stringRedisTemplate.expire(REDIS_LOCK, 10L, TimeUnit.SECONDS);if(!flag) {return "抢锁失败";}...//业务逻辑}finally{if(stringRedisTemplate.opsForValue().get(REDIS_LOCK).equals(value)) {stringRedisTemplate.delete(REDIS_LOCK);}}
}
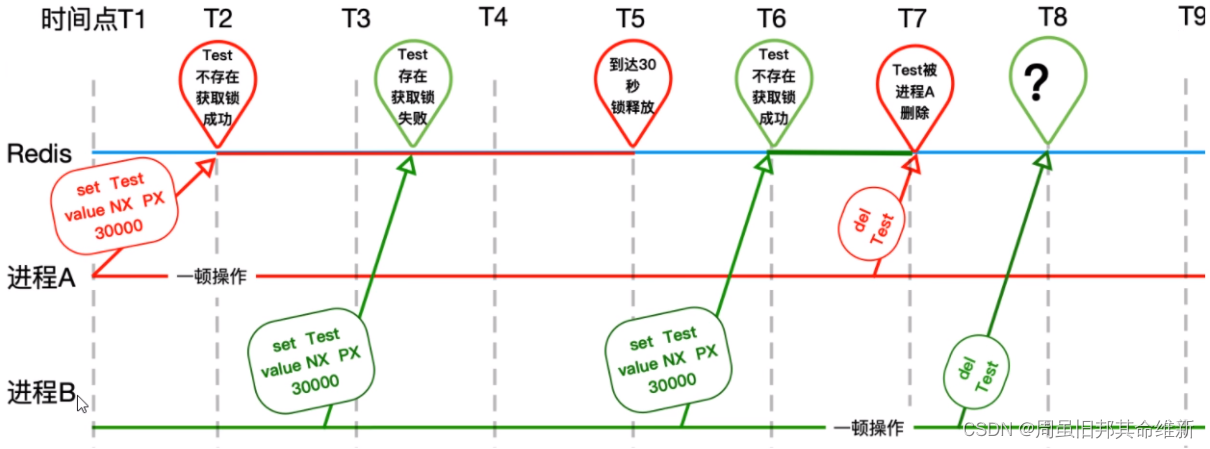
新的问题,finally块的判断 + del删除操作不是原子性的
用lua脚本或者用redis自身的事务
事务介绍可以一次执行多个命令,本质是一组命令的集合。一个事务中的所有命令都会序列化,按顺序地串行化执行而不会被其它命令插入,不许加塞。一个队列中,一次性、顺序性、排他性的执行一系列命令。
| 命令 | 描述 |
|---|---|
| DISCARD | 取消事务,放弃执行事务块内的所有命令。 |
| EXEC | 执行所有事务块内的命令。 |
| MULTI | 标记一个事务块的开始。 |
| UNWATCH | 取消 WATCH 命令对所有 key 的监视。 |
| WATCH key [key …] | 监视一个(或多个) key ,如果在事务执行之前这个(或这些) key 被其他命令所改动,那么事务将被打断。 |
官网文档http://www.redis.cn/topics/transactions.html
5.5 第五版
用redis自身的事务解决第四版的问题
public static final String REDIS_LOCK = "redis_lock";@Autowired
private StringRedisTemplate stringRedisTemplate;public void m(){String value = UUID.randomUUID().toString() + Thread.currentThread().getName();try{Boolean flag = stringRedisTemplate.opsForValue()//使用另一个带有设置超时操作的方法.setIfAbsent(REDIS_LOCK, value, 10L, TimeUnit.SECONDS);//设定时间//stringRedisTemplate.expire(REDIS_LOCK, 10L, TimeUnit.SECONDS);if(!flag) {return "抢锁失败";}...//业务逻辑}finally{while(true){stringRedisTemplate.watch(REDIS_LOCK);if(stringRedisTemplate.opsForValue().get(REDIS_LOCK).equalsIgnoreCase(value)){stringRedisTemplate.setEnableTransactionSupport(true);stringRedisTemplate.multi();stringRedisTemplate.delete(REDIS_LOCK);List<Object> list = stringRedisTemplate.exec();if (list == null) {continue;}}stringRedisTemplate.unwatch();break;} }
}
5.6 第六版
第五版任然有两个问题
1、如何确保RedisLock过期时间大于业务执行时间
2、redis集群模式下master设置锁成功会立即返回,如果在这个信息同步下发给其他slave之前,master宕机,master降级为slave,这个锁信息就会丢失。
Redis分布式锁如何续期?
集群 + CAP对比ZooKeeper 对比ZooKeeper,重点,CAP
Redis - AP -redis异步复制造成的锁丢失,比如:主节点没来的及把刚刚set进来这条数据给从节点,就挂了。
ZooKeeper - CP
CAP
C:Consistency(强一致性)
A:Availability(可用性)
P:Partition tolerance(分区容错性)
综上所述
Redis集群环境下,我们自己写的也不OK,直接上RedLock之Redisson落地实现。
public static final String REDIS_LOCK = "REDIS_LOCK";@Autowired
private Redisson redisson;@GetMapping("/doSomething")
public String doSomething(){RLock redissonLock = redisson.getLock(REDIS_LOCK);redissonLock.lock();try {//doSomething}finally {//添加后,更保险if(redissonLock.isLocked() && redissonLock.isHeldByCurrentThread()) {redissonLock.unlock();}}
}
可避免如下异常:
IllegalMonitorStateException: attempt to unlock lock,not loked by current thread by node id:da6385f-81a5-4e6c-b8c0
6、redis内存设置
redis默认内存多少可以用?
如果不设置最大内存大小或者设置最大内存大小为0,在64位操作系统下不限制内存大小,在32位操作系统下最多使用3GB内存
一般生产上你如何配置?
一般推荐Redis设置内存为最大物理内存的四分之三。
如何修改redis内存设置
修改配置文件redis.conf的maxmemory参数,如:
maxmemory 104857600
通过命令修改
config set maxmemory 1024
config get maxmemory
什么命令查看redis内存使用情况?
info memory
真要打满了会怎么样?如果Redis内存使用超出了设置的最大值会怎样?
(error) OOM command not allowed when used memory > 'maxmemory'.
如果一个键是过期的,那它到了过期时间之后是不是马上就从内存中被被删除呢?
三种不同的删除策略
- 定时删除 - 总结:对CPU不友好,用处理器性能换取存储空间(拿时间换空间)
- 惰性删除 - 总结:对memory不友好,用存储空间换取处理器性能(拿空间换时间)
- 定期删除 - 定期抽样key,判断是否过期(存在漏网之鱼)
定时删除
Redis不可能时时刻刻遍历所有被设置了生存时间的key,来检测数据是否已经到达过期时间,然后对它进行删除。
立即删除能保证内存中数据的最大新鲜度,因为它保证过期键值会在过期后马上被删除,其所占用的内存也会随之释放。但是立即删除对cpu是最不友好的。因为删除操作会占用cpu的时间,如果刚好碰上了cpu很忙的时候,比如正在做交集或排序等计算的时候,就会给cpu造成额外的压力,让CPU心累,时时需要删除,忙死。
这会产生大量的性能消耗,同时也会影响数据的读取操作。
惰性删除
数据到达过期时间,不做处理。等下次访问该数据时,
如果未过期,返回数据;
发现已过期,删除,返回不存在。
惰性删除策略的缺点是,它对内存是最不友好的。
如果一个键已经过期,而这个键又仍然保留在数据库中,那么只要这个过期键不被删除,它所占用的内存就不会释放。
在使用惰性删除策略时,如果数据库中有非常多的过期键,而这些过期键又恰好没有被访问到的话,那么它们也许永远也不会被删除(除非用户手动执行FLUSHDB),我们甚至可以将这种情况看作是一种内存泄漏 – 无用的垃圾数据占用了大量的内存,而服务器却不会自己去释放它们,这对于运行状态非常依赖于内存的Redis服务器来说,肯定不是一个好消息。
定期删除
定期删除策略是前两种策略的折中:
定期删除策略每隔一段时间执行一次删除过期键操作,并通过限制删除操作执行的时长和频率来减少删除操作对CPU时间的影响。
周期性轮询Redis库中的时效性数据,来用随机抽取的策略,利用过期数据占比的方式控制删除频度
特点1:CPU性能占用设置有峰值,检测频度可自定义设置
特点2:内存压力不是很大,长期占用内存的冷数据会被持续清理
总结:周期性抽查存储空间(随机抽查,重点抽查)
看起来使用惰性删除+定期删除会比较好,但是仍然存在问题;
定期删除时,从来没有被抽查到
惰性删除时,也从来没有被点中使用过
上述2步骤====>大量过期的key堆积在内存中,导致redis内存空间紧张或者很快耗尽
7、redis内存淘汰策略
volatile-lru:当内存不足以容纳新写入数据时,在设置了过期时间的键空间中,移除最近最少使用的key。allkeys-lru:当内存不足以容纳新写入数据时,在键空间中,移除最近最少使用的key(这个是最常用的)。volatile-lfu:当内存不足以容纳新写入数据时,在过期密集的键中,使用LFU算法进行删除key。allkeys-lfu:当内存不足以容纳新写入数据时,使用LFU算法移除所有的key。volatile-random:当内存不足以容纳新写入数据时,在设置了过期的键中,随机删除一个key。allkeys-random:当内存不足以容纳新写入数据时,随机删除一个或者多个key。volatile-ttl:当内存不足以容纳新写入数据时,在设置了过期时间的键空间中,有更早过期时间的key优先移除。noeviction:当内存不足以容纳新写入数据时,新写入操作会报错。
如何配置,修改
- 命令
- config set maxmemory-policy noeviction
- config get maxmemory
- 配置文件 - 配置文件redis.conf的maxmemory-policy参数
8、lru算法
LRU是Least Recently Used的缩写,即最近最少使用,是一种常用的页面置换算法,选择最近最久未使用的数据予以淘汰。
查找快、插入快、删除快,且还需要先后排序---------->什么样的数据结构可以满足这个问题?
你是否可以在O(1)时间复杂度内完成这两种操作?
如果一次就可以找到,你觉得什么数据结构最合适?
答案:LRU的算法核心是哈希链表
编码手写如何实现LRU
本质就是HashMap + DoubleLinkedList
时间复杂度是O(1),哈希表+双向链表的结合体
借用LinkedHashMap完成lru算法
import java.util.LinkedHashMap;
import java.util.Map;public class LRUCache {private LinkedHashMap<Integer, Integer> cache;public LRUCache(int capacity) {cache  = new LinkedHashMap<Integer, Integer>(capacity, 0.75f, true){@Overrideprotected boolean removeEldestEntry(Map.Entry eldest) {return super.size() > capacity;}};}public int get(int key) {return cache.get(key);}public void put(int key, int value) {cache.put(key, value);}@Overridepublic String toString() {return cache.toString();}public static void main(String[] args) {LRUCache lru = new LRUCache(3);lru.put(1,4);lru.put(2,4);lru.put(3,4);System.out.println(lru);lru.put(4,4);System.out.println(lru);lru.put(3,4);lru.put(3,4);lru.put(3,4);lru.put(5,4);System.out.println(lru);}
}
手写lru算法
import java.util.HashMap;
import java.util.Map;public class LRUCacheNoLinkedHashMap {class Node<K, V>{K key;V value;Node<K, V> prev;Node<K, V> next;public Node() {this.prev = this.next = null;}public Node(K key, V value) {this.key = key;this.value = value;this.prev = this.next = null;}}class DoubleLinkedList<K, V>{Node<K, V> head;Node<K, V> tail;public DoubleLinkedList() {this.head = new Node<>();this.tail = new Node<>();this.head.next = this.tail;this.tail.prev = this.head;}public void addHead(Node<K, V> node){node.next = this.head.next;node.prev = this.head;this.head.next.prev = node;this.head.next = node;}public void removeNode(Node<K, V> node){node.prev.next = node.next;node.next.prev = node.prev;node.next = null;node.prev = null;}public Node<K, V> getLast(){if (this.tail.prev == this.head){return null;}return this.tail.prev;}}private Integer cacheSize;private Map<Integer, Node<Integer, Integer>> map;private DoubleLinkedList<Integer, Integer> linkedList;public LRUCacheNoLinkedHashMap(int capacity) {this.cacheSize = capacity;map = new HashMap<>();linkedList = new DoubleLinkedList();}public int get(int key) {if (!map.containsKey(key)){return -1;}Node<Integer, Integer> node = map.get(key);linkedList.removeNode(node);linkedList.addHead(node);return node.value;}public void put(int key, int value) {if (map.containsKey(key)){Node<Integer, Integer> node = map.get(key);linkedList.removeNode(node);linkedList.addHead(node);} else {if (map.size() == cacheSize){Node<Integer, Integer> lastNode = linkedList.getLast();map.remove(lastNode.key);linkedList.removeNode(lastNode);}Node<Integer, Integer> node = new Node<>(key, value);linkedList.addHead(node);map.put(key, node);}}@Overridepublic String toString() {return map.keySet().toString();}public static void main(String[] args) {LRUCacheNoLinkedHashMap lru = new LRUCacheNoLinkedHashMap(3);lru.put(1,4);lru.put(2,4);lru.put(3,4);System.out.println(lru);lru.put(4,4);System.out.println(lru);lru.put(3,4);lru.put(3,4);lru.put(3,4);lru.put(5,4);System.out.println(lru);}
}
9、lfu算法
LFU是Least Frequently Used的缩写,即最不频繁使用
因为 LFU 算法是根据数据访问的频率来选择被淘汰数据的,所以 LFU 算法会记录每个数据的访问次数。当一个数据被再次访问时,就会增加该数据的访问次数。
不过,访问次数和访问频率还不能完全等同。访问频率是指在一定时间内的访问次数,也就是说,在计算访问频率时,我们不仅需要记录访问次数,还要记录这些访问是在多长时间内执行的。否则,如果只记录访问次数的话,就缺少了时间维度的信息,进而就无法按照频率来淘汰数据了。
我来给你举个例子,假设数据 A 在 15 分钟内访问了 15 次,数据 B 在 5 分钟内访问了 10 次。如果只是按访问次数来统计的话,数据 A 的访问次数大于数据 B,所以淘汰数据时会优先淘汰数据 B。不过,如果按照访问频率来统计的话,数据 A 的访问频率是 1 分钟访问 1 次,而数据 B 的访问频率是 1 分钟访问 2 次,所以按访问频率淘汰数据的话,数据 A 应该被淘汰掉。
所以说,当要实现 LFU 算法时,我们需要能统计到数据的访问频率,而不是简单地记录数据访问次数就行。
LFU 是在 Redis 4.0 新增的淘汰策略,它涉及的巧妙之处在于,其复用了 redisObject 结构的 lru 字段,把这个字段「一分为二」,保存最后访问时间和访问次数
key 的访问次数不能只增不减,它需要根据时间间隔来做衰减,才能达到 LFU 的目的
每次在访问一个 key 时,会「懒惰」更新这个 key 的访问次数:先衰减访问次数,再更新访问次数
衰减访问次数,会根据时间间隔计算,间隔时间越久,衰减越厉害
因为 redisObject lru 字段宽度限制,这个访问次数是有上限的(8 bit 最大值 255),所以递增访问次数时,会根据「当前」访问次数和「概率」的方式做递增,访问次数越大,递增因子越大,递增概率越低
Redis 实现的 LFU 算法也是「近似」LFU,是在性能和内存方面平衡的结果


![gcc [linux]](https://img-blog.csdnimg.cn/52da0892f61642deabd5f74704fd10d9.png)